Mgb v8 sebring project
Discussion


Hi all,
I have been busy fitting sebring valances, arches and mgc bonnet to my 79 bgt. So far the bodywork is under control so Whilst having a look at the engine options I had a bit of a spontaneous bid on a rover p6 3.5 v8 the other day and won. Turns out it's coming with a auto box from the p6.
So after a bit of reading I now plan to mate it to a lt77 5 speed manual box from an sd1. Any advice on this would be great if anyone has done this before?
I have also read that if I pop in the cam from a 3.9 and sd1 heads then I should get some more bhp. The engine is currently fitted with the classic su set up but seeing as though this will most likely stick out of my bonnet then I plan to change this to a holly carb and have a nice big air filter on show.
It'll rig up to the standard rear axle and see how many tyres I get through with the slightly off diff ratios.
So any tips on this plan? Anything I need to be aware of? Any heads up before I start would be good.
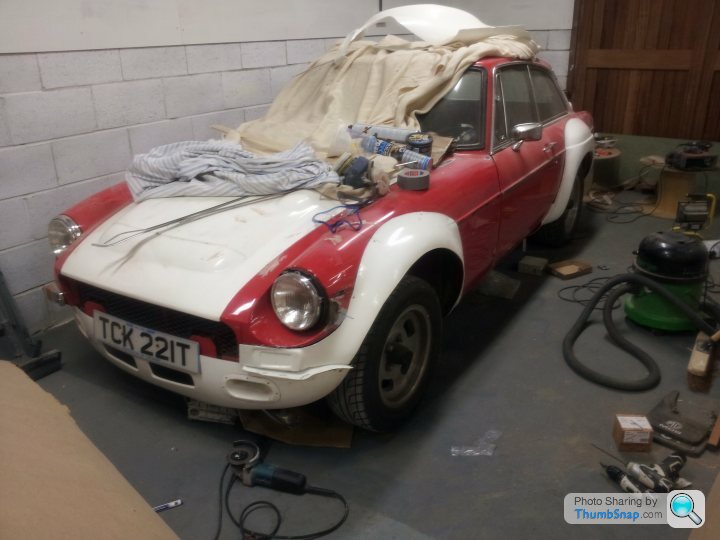
Here is the car currently just to give you an idea of what's going on.
Cheers

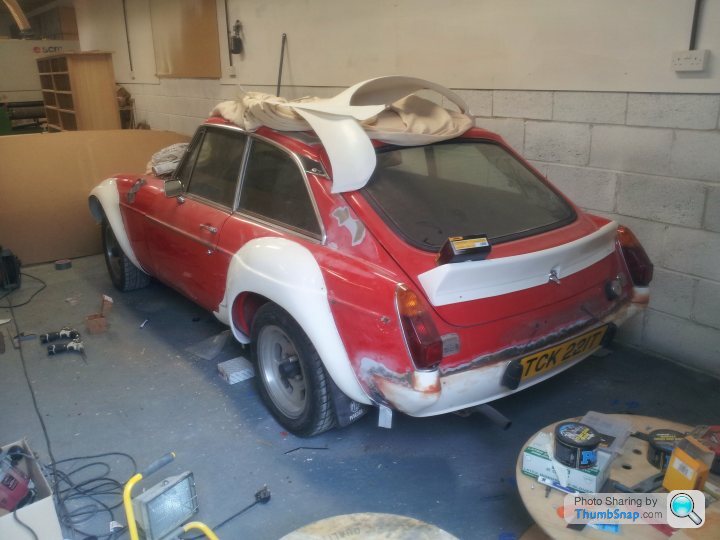
I have actually just changed the front valance to a wider one with the winged edges to match up with the arches
I have been busy fitting sebring valances, arches and mgc bonnet to my 79 bgt. So far the bodywork is under control so Whilst having a look at the engine options I had a bit of a spontaneous bid on a rover p6 3.5 v8 the other day and won. Turns out it's coming with a auto box from the p6.
So after a bit of reading I now plan to mate it to a lt77 5 speed manual box from an sd1. Any advice on this would be great if anyone has done this before?
I have also read that if I pop in the cam from a 3.9 and sd1 heads then I should get some more bhp. The engine is currently fitted with the classic su set up but seeing as though this will most likely stick out of my bonnet then I plan to change this to a holly carb and have a nice big air filter on show.
It'll rig up to the standard rear axle and see how many tyres I get through with the slightly off diff ratios.
So any tips on this plan? Anything I need to be aware of? Any heads up before I start would be good.
Here is the car currently just to give you an idea of what's going on.
Cheers
I have actually just changed the front valance to a wider one with the winged edges to match up with the arches
Simon, welcome to the V8 club [!] I'm in process of doing the same to my roadster but sans the flared arches. Re' gearbox and other mods, you'll need the following...
1. LT77 Bell Housing
2. LT77 Gearbox Remote
3. LT77 or R380 Gearbox
4. If changing rear end to IRS a new prop-shaft - a modified TVR Tuscan from GKN Driveline is the way to go.
5. Have you given any thought to the exhaust? Personally, I wouldn't go with block hugger manifolds, go with RV8's and cut outs through the inner wings. Your engine will breath so much better for it.
6. If twin exhaust, you'll need to centralize the fuel tank
9. Some extra wiring is req'd too. My engine's from a 4.0ltr TVR [same as RV8 but more power and on injection] so have bought a complete new wiring loom from Advanced Autowire in the US; these are specifically designed for the V8 engine. They are very well designed and executed kits and overcome many of the shortfalls found with the original wiring.
10. What body strengthening mods are you planning?
Now, today may be your lucky day...I have a spare LT77 'box, LT77 Bell Housing and Gearbox Remote.
PM me if interested and/or want to chew the cud that is the great V8 conversion debate.
Re-reading your engine details. If your not rebuilding the engine why not send to Peter Burgess to do his magic on your heads. He has exchange items readily available. A lot of chaps swear by the econotune set up. Also, it's worth have a target performance and budget in mind before setting off down the engine mod road. A lot of folk with your engine want to break the magical 200-215bhp figure. This is easy to do and has been done many times before...giving good around town manners + a bucketload of square torque. Torque, this is the most important thing...forget about high rev'ing engines.
If 250bhp I suggest you go with injection from the TVR/RV8/RR. You'll need to lower the plenum a little to get under the B/C bonnet and change inlet manifold. Then, once running get this tuned properly.
The v8forum.co.uk and http://forum.britishv8.org/list.php?2 sites are very helpful. Lots of good guys to help out...all of whom have completed what you're doing. Though do be careful with some suggestions as there are bodgers out there.
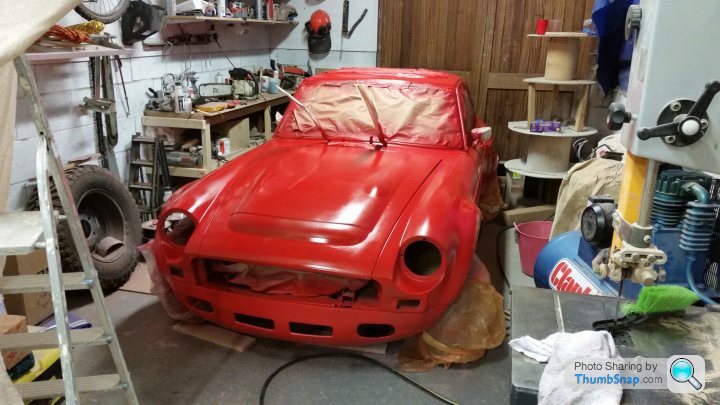
Thanks for all your help Andrew. I have been sanding and priming this weekend so here is another update picture.
I am also powering through the kindle version of how to give your mgb v8 power. It's a great read and a must for anyone attempting the conversion. My budget isn't big and so I am doing all the work myself in my spare time. The body work is getting there and I will get it back on the road with the standard 1.8 in it while I gather the various bits and strip and re build the engine.
I am hoping for somewhere close to 200hp in the end so by not going too fast I can keep the budget down. In a small light car it should be pretty quick.
Still a lot of work to do though but I'll get there. I have never done anything this major to a car before so I am learning as I go. The body has gone alright so far though, it won't be concours but it'll be pretty good.
Not added anything to this thread for a while now so thought I would add some pictures, old and new of the mgb. 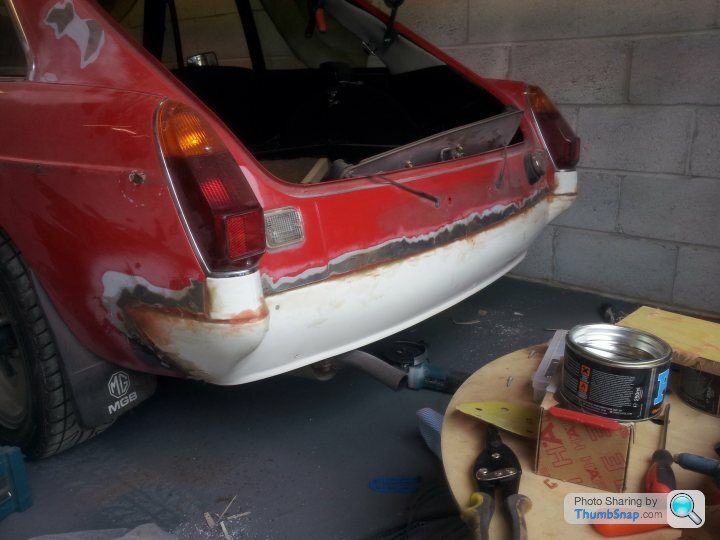
Rear bumper fitting. A long time ago now
And arch fitting, had to cut away a lot of the arch. With the rears I had to cut away both outer and inner arch and then weld in some sheet metal to extend the inner arch to meet the new outer. I stopped this half an inch short and then fibreglassed the new metal to the new fiberglass outer arch.
After this a lot of blending started
I was having a nightmare with blending the curves and so I glued together sections of hard wall insulation board and the cut and sanded profiles into them with my bandsaw. This made individually shaped sanding blocks for each task. Work speeded up a lot then.
Then I eneded up with the primed car that I posted earlier.
That then turned into this
Then I eneded up with the primed car that I posted earlier.
That then turned into this

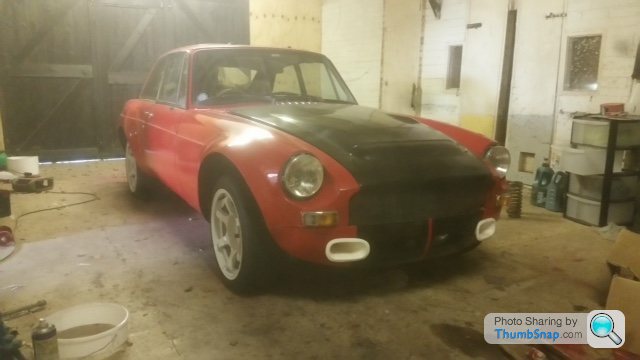
Then I had to move it out of my workshop as I got really busy with work so I've moved now, bit more space and a bit more evening painting. So it now looks like this.
I have today lowered the front but I am not sure the banded steels are big enough so I may have to stump up for some alloys soon.
The engine strip down has begun and my piper 270 cam, uprated springs, followers and push rods have arrived. Also some nice air filters and a new uprated alternator. Still got to save up for those rv8 exhust manifolds, wing strengtheners and the rest of the exhaust system. Will try to get it running on the bench first though.
Hi there,
Many years ago I ran a rally cross mgbgt v8 which used a p6 auto engine as a base. One tip which caused me some heartache is the bearin,g in the end of the crankshaft which is not needed for an auto but supports the input shaft for a manual. Make sure you remove the old auto version or else it will seize on the input shaft. As me how I know, couldn't de clutch and rammed trailer winch!
I also used a jag irs rear end which gave me a low ratio lsd and fabulous traction off the line, important 35 years ago vs. escorts and minis weighing 2/3 my weight.
Good luck
Richardracer
Some progress to report, I spent some time stripping the engine down and dropped off the bits to Barry at T&L engineering. He has acid washed all the parts, honed the bores, ground the crank, fitted the larger Pistons to the con rods. Skimmed the heads, reseated the valves and generally given it all a good going over. The finished result are these bags of goodies 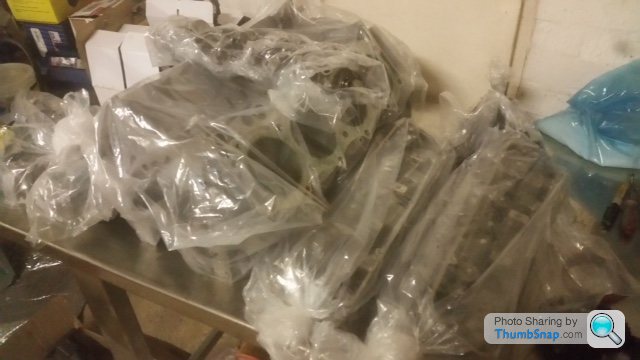
Today I unpackaged the block and mounted it back on the engine stand. Then I continued stripping the bits off the old engine to pull that out. The exhaust was a bit stubborn and after 45 minuets of struggling I took the reciprocating saw to it and cut the thing off. Very satisfying.
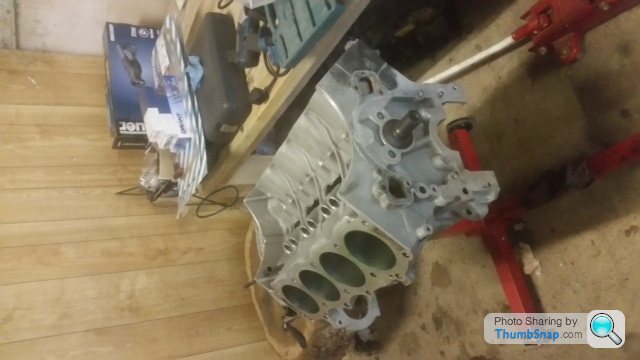
Lovely and clean.
I started this with the intention of not spending loads.... Well it's gone to pot. Engine work cost a fair bit and the shopping list is still long with brakes to buy and exhaust and I'm looking into getting an offenhauser intake and eldebrock or holly carb. Obviously rad as well. Will do a reverse scoop on the bonnet to increase airflow and the rv8 exhaust manifolds through the side of the engine bay.
The necessary addition of larger brakes has meant that I needed to consider larger wheels. Found some on eBay, bought, delivered and now they are on but I'm not sure about them. I like a wider stance with a deep dish but I'll consider that again later on after the engine parts are bought.
Anyway, tomorrow I will start the engine rebuild. Fingers crossed....
Today I unpackaged the block and mounted it back on the engine stand. Then I continued stripping the bits off the old engine to pull that out. The exhaust was a bit stubborn and after 45 minuets of struggling I took the reciprocating saw to it and cut the thing off. Very satisfying.
Lovely and clean.
I started this with the intention of not spending loads.... Well it's gone to pot. Engine work cost a fair bit and the shopping list is still long with brakes to buy and exhaust and I'm looking into getting an offenhauser intake and eldebrock or holly carb. Obviously rad as well. Will do a reverse scoop on the bonnet to increase airflow and the rv8 exhaust manifolds through the side of the engine bay.
The necessary addition of larger brakes has meant that I needed to consider larger wheels. Found some on eBay, bought, delivered and now they are on but I'm not sure about them. I like a wider stance with a deep dish but I'll consider that again later on after the engine parts are bought.
Anyway, tomorrow I will start the engine rebuild. Fingers crossed....

Thanks Andrew. Work has slowed progress massively. Interesting that I started out thinking I'll just stick a v8 in for as cheap as possible and have a bit of fun but when you start all the little bits you start to get anal about things and wanting little bits to be right before you do the next. I'm still not building something as nice as yours but it's certainly going to be a lot better, cleaner and more sorted than the original plan. Taking a while though.
Still checking your thread every now and then and am enjoying seeing the progress. It's looking great.
Still checking your thread every now and then and am enjoying seeing the progress. It's looking great.
llohcins said:
Thanks Andrew. Work has slowed progress massively. Interesting that I started out thinking I'll just stick a v8 in for as cheap as possible and have a bit of fun but when you start all the little bits you start to get anal about things and wanting little bits to be right before you do the next.
Ah yes, the OCD/getting anal bit...this really does eat in to time and definitely the wallet too. Though the good point being you'll know the job's done just how you want it. Re' throwing in a V8...there's no such thing, though those who have are just awful and verging on death traps. I'm really liking yours as it's going to look fit for purpose...and those wheels, any chance of a side-on shot as can't work out what they are.Here, am battling on with the front valence fitting. I've chosen to make a sandwiched plate that gives both rigidity and pliability with 2mm inner & outer alloy plates sandwiching 10mm closed cell neoprene foam; it's getting there...though lunchtime munchies stopped play and thought a scooby snack was in order

Lastly, what spec' are you building the engine to...?
Hi Andrew,
They are white 15'' rota grid alloys, actually pretty deep but he curve on the spokes makes them look flatter. I'm not totally sure if I will stick with them but they at least give me the space for some larger brakes when I get them.
Quick question for you if I may (or anyone reading who may have an answer) I have got the block together, crank, pistons (and rings) and cam and it is torqued up to the correct settings. The heads are not on yet and neither is the sump. It is incredibly hard to turn over by hand, was yours like this?
It was impossible to turn with a spanner on the crank nut and do we have to put some of the flywheel bolts in and turn with them using a three foot bar. Even with that its still bloody hard. It seems Far too stiff.
I might be that it is normal because it's got so many pistons but I have no experience with this and so don't want to get too far if it's not right.
All the parts have been either honed or polished and the company that did it supplied the new Pistons, rings, bearings and gaskets for the rebuild so they should all be the correct sizes etc.
I know it's a different engine but though I would ask. Is it normal or do I need to be looking into it further?
Any advice would be great, thanks
llohcins said:
It was impossible to turn with a spanner on the crank nut and do we have to put some of the flywheel bolts in and turn with them using a three foot bar. Even with that its still bloody hard. It seems Far too stiff.
I might be that it is normal because it's got so many pistons but I have no experience with this and so don't want to get too far if it's not right.
All the parts have been either honed or polished and the company that did it supplied the new Pistons, rings, bearings and gaskets for the rebuild so they should all be the correct sizes etc.
I know it's a different engine but though I would ask. Is it normal or do I need to be looking into it further?
Any advice would be great, thanks
There's something wrong. Any road engine should be able to be turned over, smoothly, on the crank bolt head with a spanner, it shouldn't be so tight that you need a 3ft bar. You need to disassemble and follow the following:I might be that it is normal because it's got so many pistons but I have no experience with this and so don't want to get too far if it's not right.
All the parts have been either honed or polished and the company that did it supplied the new Pistons, rings, bearings and gaskets for the rebuild so they should all be the correct sizes etc.
I know it's a different engine but though I would ask. Is it normal or do I need to be looking into it further?
Any advice would be great, thanks
- Disassemble and re-clean everything
- Measure bore size with internal micrometers, measuring at 3x points per depth at 4x depth points...then check against piston size
- Check piston rings are fitted right way up[!]
- Check crank main caps, shells and crank are correctly sized, complete a dry assembly without crank and internal measure; you're checking for shell/bearing crush and that there's no ovality. It must be perfect, measuring 3x internal equi-distance points of the crank shells/bearings.
- Then, lube up and torque assemble checking for smooth crank rotation. This stage is absolutely key and is often the source of many a woe + be sure the main caps are truly 'home'/main cap true to the block register edge as they can sometimes sit 'untrue' with the RV8
- If correctly sized and no bearing crush, disassemble and re-assemble with rods and pistons. Again, check each rod end for crush/any restriction before final assembly.
- Now fully assembled, but not tightened, check crank shaft endfloat...this is especially important on RV8's of all types.
- Stage tighten the big end cap bolts in correct order. First hand tighten them, check for resistance. Then increase 50% more with pre-set torque wrench..."don't confuse Nm with lb/ft, it's easily done
 "...re-check rotation, then complete final torquing only if all is well.
 - You will 'feel' some rotational resistance but not to the point of having to put masses of effort onto the bar. For reference, my V8 can be turned with spark plugs out, fully assembled, with a spanner and a reasonable amount of effort.
Hopefully the above will sort...but there are some other areas 1. if the cylinders were honed off 'true', 2. if the crank has been machined off true, the engine will be over tight. This is a rare machine shop error, but it does happen. For lube use Kent Cam Assembly and Graphogen Lube. Do not lube with engine oil, you'll run the bearings dry at start up. Complete the above and then come back.
PS do you have the book, How To Power Tune Rover V8 Engines? If not, do pick up a copy as it flags up some good points specific to the RV8 engine [by RV8 I mean all Rover/Buick V8 engines].
https://www.google.co.uk/webhp?sourceid=chrome-ins...
Good luck

Simon, forgot to mention, 1. use only ARP block + head studs, 2. when ready, use only a good quality duplex timing chain set, and 3. you're at the stage where the v8forum.co.uk is best for engine woes...there's a mass of knowledge with the guys on all RV8 engines types www.v8forum.co.uk, many have experienced the foibles of the RV8...they're a great bunch and always there to help; see you there...
Engine all sorted turns now with no problems. I didn't realise there are lobes on the con rods to signify that they are handed and also the bearings are slightly set to one side so basically we had a few of these the wrong way round which resulted in sideways friction on the crank. All sorted now thanks Andrew.
It'll be a carb system, most probably a holly 390cfm with an offenhauser inlet.
Just purchased today the rv8 style exhaust manifolds which I am very excited about. Very immaturely I will fab up some silencers and then route these out just in front of the rear wheels.... Because quite frankly I really want to.
Bit more cleaning etc to do on some other parts.
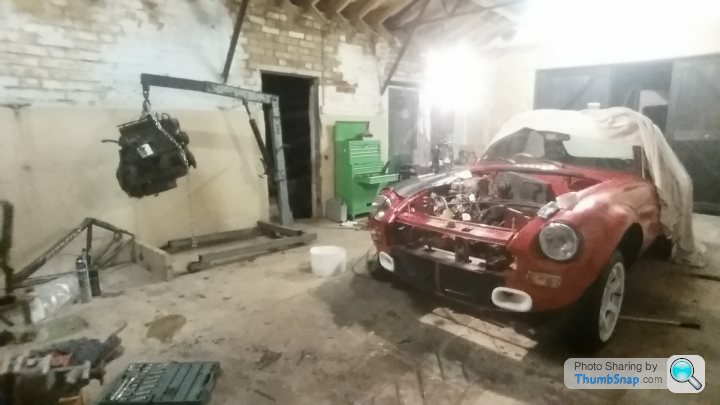
Lifted the old engine out the other night so some cleaning to do in the engine bay as well.
It'll be a carb system, most probably a holly 390cfm with an offenhauser inlet.
Just purchased today the rv8 style exhaust manifolds which I am very excited about. Very immaturely I will fab up some silencers and then route these out just in front of the rear wheels.... Because quite frankly I really want to.
Bit more cleaning etc to do on some other parts.
Lifted the old engine out the other night so some cleaning to do in the engine bay as well.
Gassing Station | MG | Top of Page | What's New | My Stuff