Griff Partial Refurb - Nearly There
Discussion


Hi,
Ive just about finished a partial rebuild of my Grif and thought I would share my experiences. hopefully it wont be too boring.
It started with me going looking for a slight tapping noise from the top of the engine and developed into a full blown engine rebuild and refurb of the chassis and bodywork forward of the wndscreen.
Started off like this:
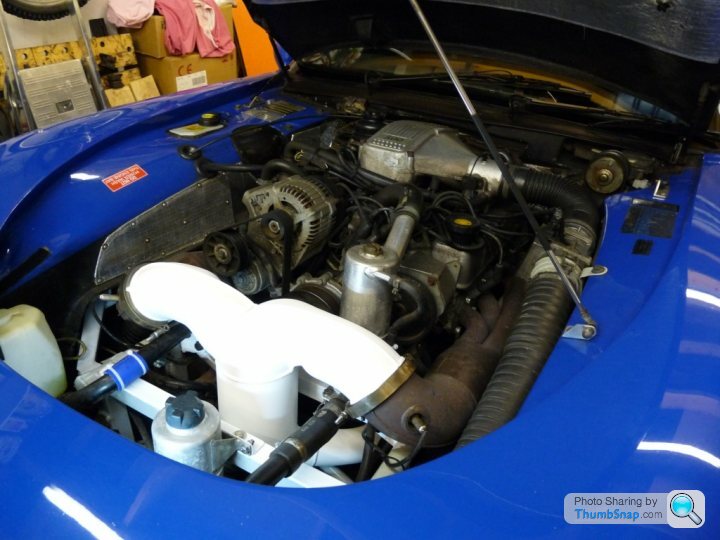
I had taken off the y-piece earlier on to clean up the crossmember that the swirl pot sits on. I had intended at some point to paint the whole exhaust system white.
Anyway, I took the rocker covers off to see if the rocker gear was worn but it seemed okay. So I decided to dig a bit deeper and have a look at the cam. The valley gasket was looking a bit crusty so I thought I would take the opportunity to swap it for a new one at the same time.
Got the plenum etc off and started to undo the valley gasket bolts. The front one came out okay, but the rear one just necked off in the block. This meant I had to take the motor out to drill out the remains of the bolt, tap the hole and helicoil it so I could fit another valley bolt. So I started taking the engine to bits and bagging and tagging everything as I went. example below:
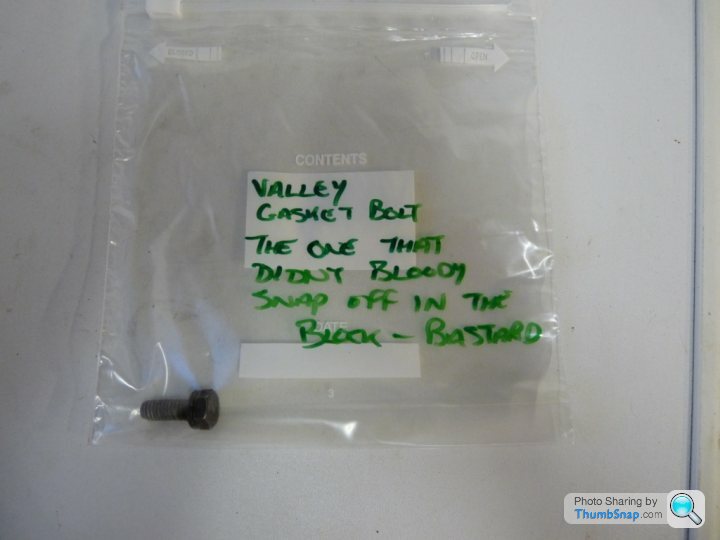
Apologies for the language, but it turned out to be an expensive bolt.
Engine out, this was what was left:
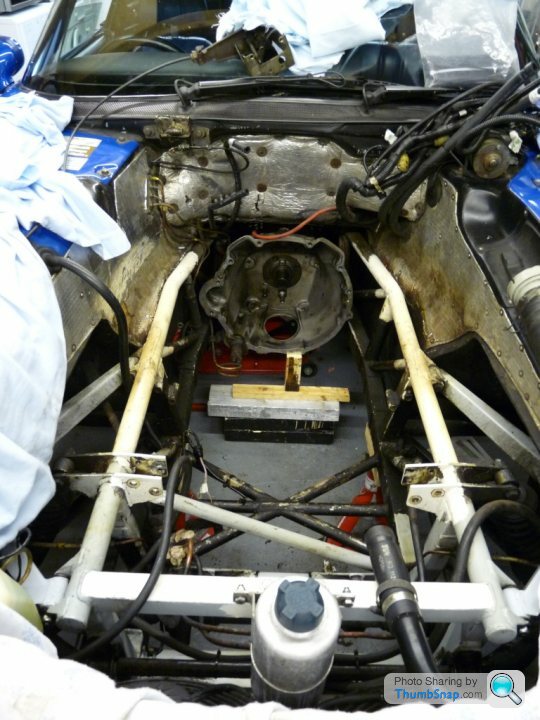
As you can see, its a bit grotty in there. there's waxoyl everywhere and the heatshielding is starting to delaminate from its backing.
Sorting out the initial problem wasnt that difficult and the helicoiling took no time at all. As the engine had been dosed with swarf from the helicoiling job, it gave me a good excuse to strip the motor and re-shell it etc etc.
A sane man would have just done the minimum and put the motor back in its proper place, however I decided to do a bit of work to the engine bay 'whilst I was in there'
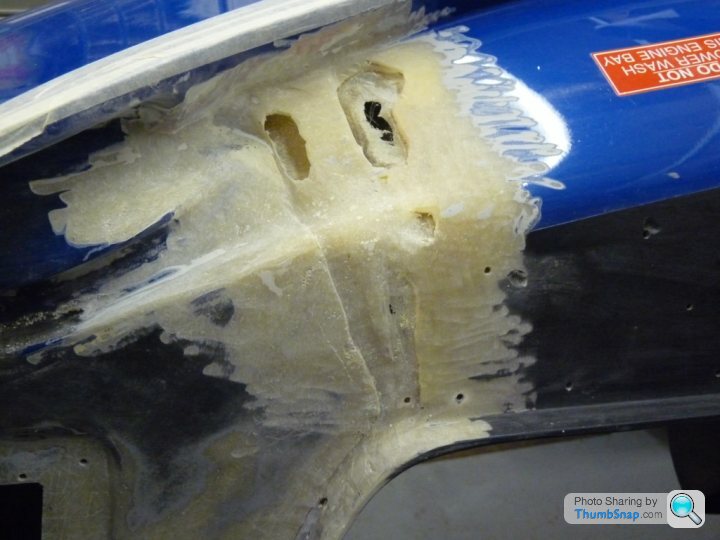
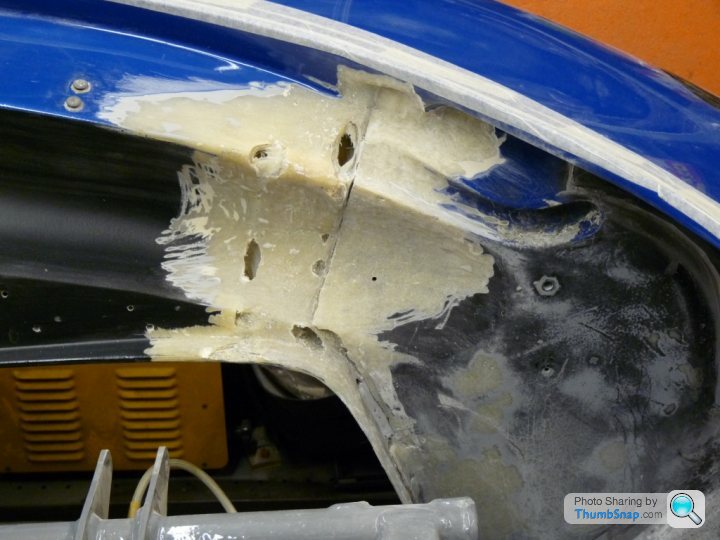
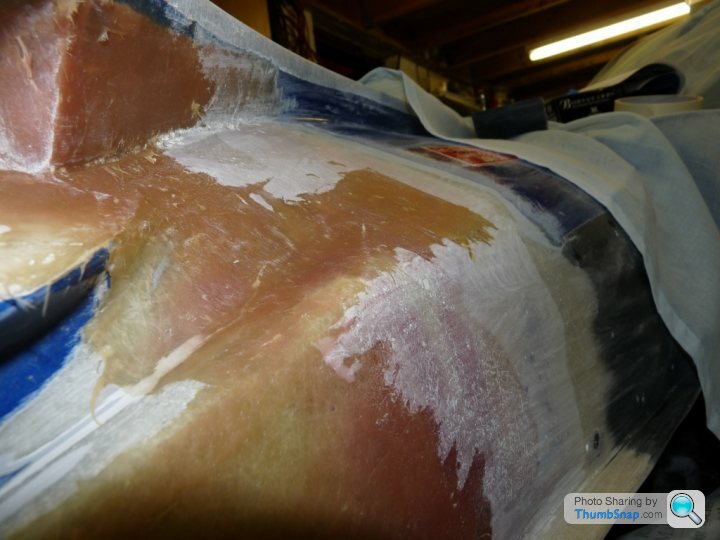
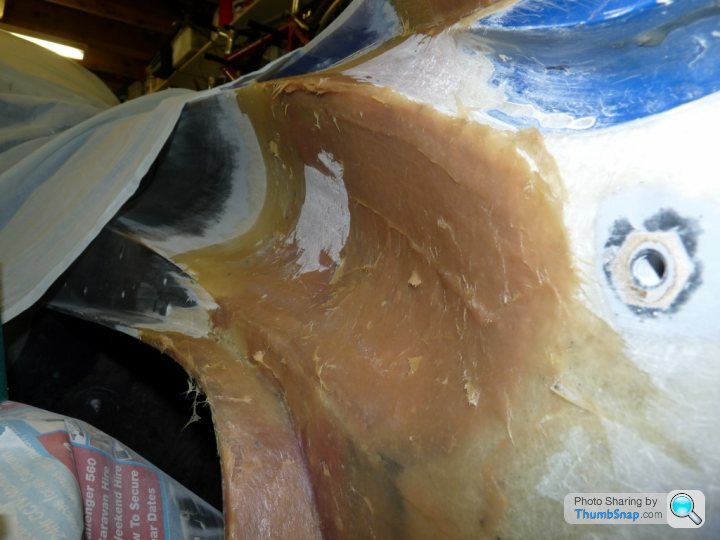
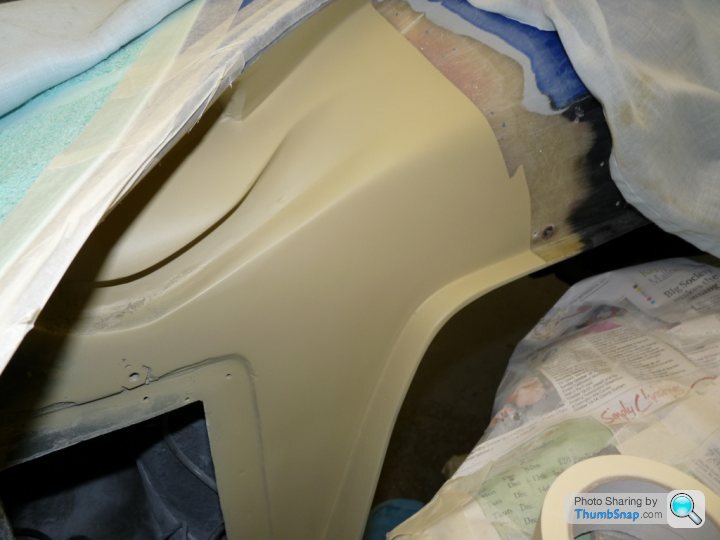
There had always been a few spider cracks on both inner wings where the nose is bonded to the body. I've never been happy with these so decided to do someting about it. Out came the powerfile and I started digging. Whats left is shown below. You can clearly see the join between the body and nose. What has been dug out was pure filler. Whats left is glassfibre.
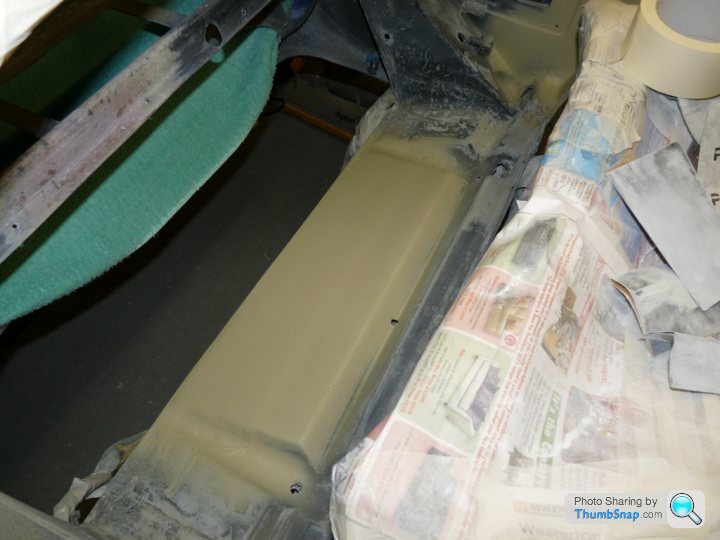
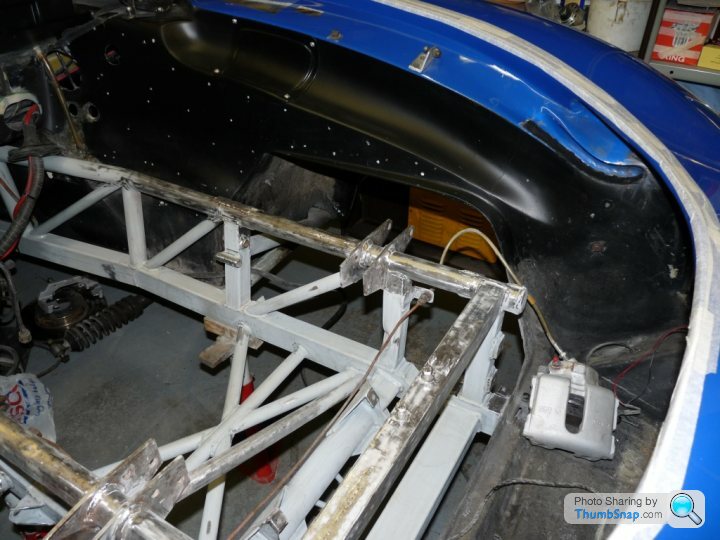
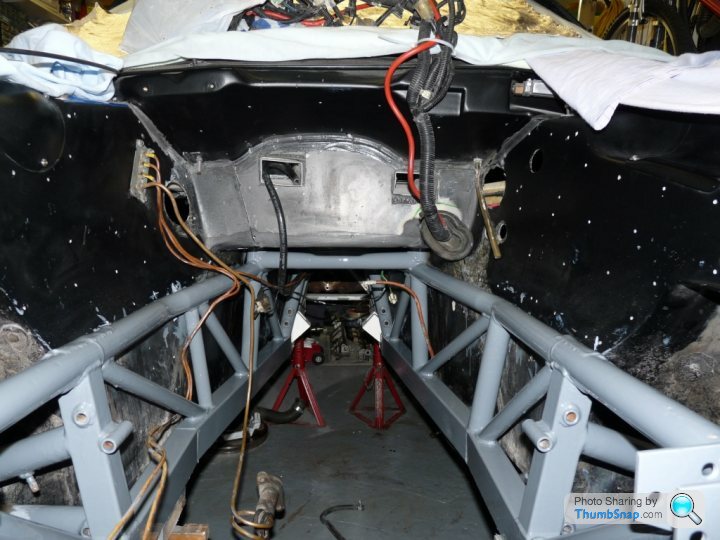
At the same time, I decided to take a close look at the chassis and found a few rust spots germinating below the plastic coating. Luckily none of these were structural, but I didnt want to leave them in-situ for them to fester further. I cleaned up the chassis of the waxoyl - took three days - and sanded it down ready for some POR15.
Chassis prep in progress:

continued....
Ive just about finished a partial rebuild of my Grif and thought I would share my experiences. hopefully it wont be too boring.
It started with me going looking for a slight tapping noise from the top of the engine and developed into a full blown engine rebuild and refurb of the chassis and bodywork forward of the wndscreen.
Started off like this:
I had taken off the y-piece earlier on to clean up the crossmember that the swirl pot sits on. I had intended at some point to paint the whole exhaust system white.
Anyway, I took the rocker covers off to see if the rocker gear was worn but it seemed okay. So I decided to dig a bit deeper and have a look at the cam. The valley gasket was looking a bit crusty so I thought I would take the opportunity to swap it for a new one at the same time.
Got the plenum etc off and started to undo the valley gasket bolts. The front one came out okay, but the rear one just necked off in the block. This meant I had to take the motor out to drill out the remains of the bolt, tap the hole and helicoil it so I could fit another valley bolt. So I started taking the engine to bits and bagging and tagging everything as I went. example below:
Apologies for the language, but it turned out to be an expensive bolt.
Engine out, this was what was left:
As you can see, its a bit grotty in there. there's waxoyl everywhere and the heatshielding is starting to delaminate from its backing.
Sorting out the initial problem wasnt that difficult and the helicoiling took no time at all. As the engine had been dosed with swarf from the helicoiling job, it gave me a good excuse to strip the motor and re-shell it etc etc.
A sane man would have just done the minimum and put the motor back in its proper place, however I decided to do a bit of work to the engine bay 'whilst I was in there'
There had always been a few spider cracks on both inner wings where the nose is bonded to the body. I've never been happy with these so decided to do someting about it. Out came the powerfile and I started digging. Whats left is shown below. You can clearly see the join between the body and nose. What has been dug out was pure filler. Whats left is glassfibre.
At the same time, I decided to take a close look at the chassis and found a few rust spots germinating below the plastic coating. Luckily none of these were structural, but I didnt want to leave them in-situ for them to fester further. I cleaned up the chassis of the waxoyl - took three days - and sanded it down ready for some POR15.
Chassis prep in progress:
continued....
Edited by Marty V8 on Tuesday 5th July 21:33
After removing all the filler from the inner wings, I then replaced it with glass fibre paste repair:
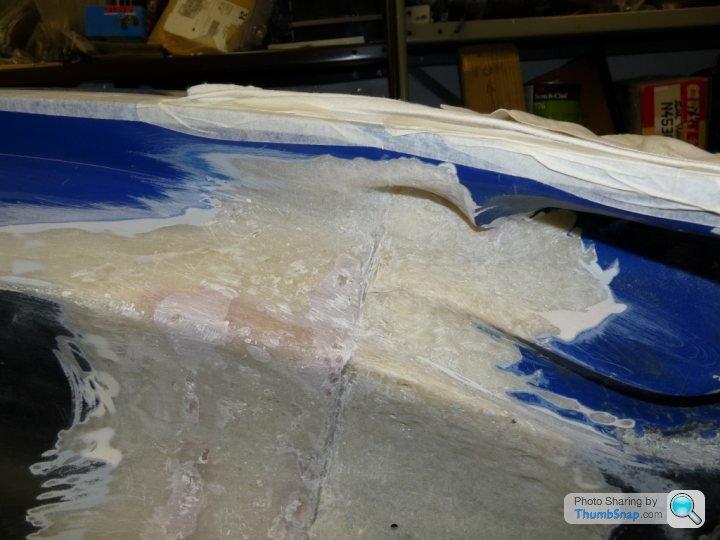
and then bridged the body/nose joint with strips of glass fibre matting, shown in progress below:
There was no matting oroginally bridging the joint on the inner wings so I hope that in doing this it will eliminate what must be a very slight movement between the two sections which has lead to the spider cracking in the first place.
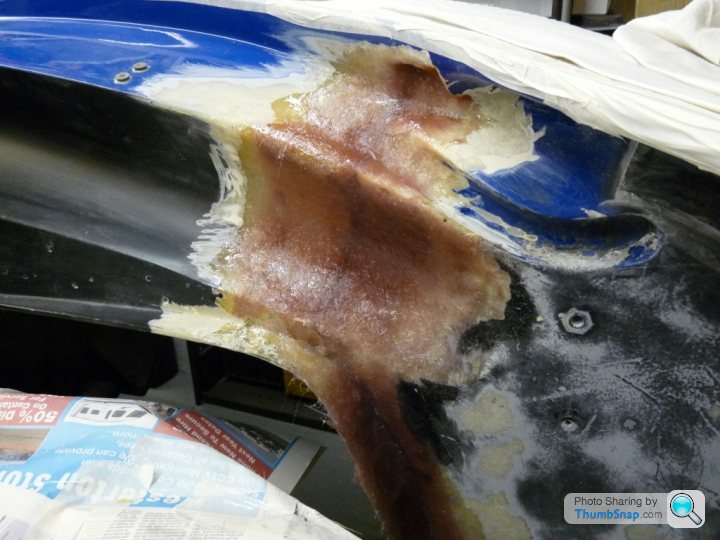
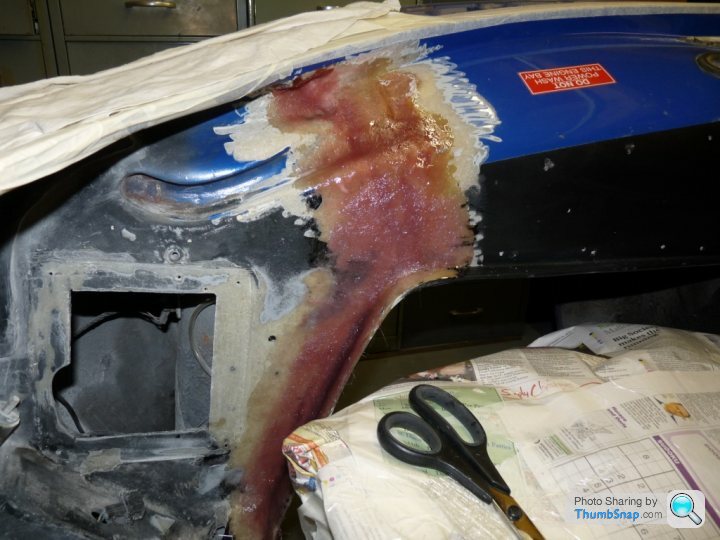
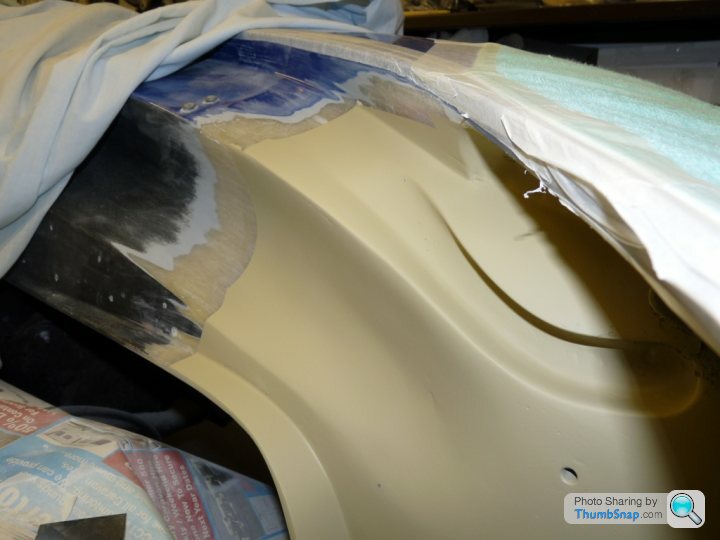
The problem now was that in bridging the joint, I had built up the inner wing surfaces, which now needed to be blended back into something approaching the original profiles. Photos below show this in progress, all done in glass fibre apart for a very small amount of finishing with filler:
whilst I was messing about with glass fibre I decided to clean up the front panel as well:
and then bridged the body/nose joint with strips of glass fibre matting, shown in progress below:
There was no matting oroginally bridging the joint on the inner wings so I hope that in doing this it will eliminate what must be a very slight movement between the two sections which has lead to the spider cracking in the first place.
The problem now was that in bridging the joint, I had built up the inner wing surfaces, which now needed to be blended back into something approaching the original profiles. Photos below show this in progress, all done in glass fibre apart for a very small amount of finishing with filler:
whilst I was messing about with glass fibre I decided to clean up the front panel as well:
After the filling and smoothing was finished both inner wings and front panel were sprayed with high build primer:
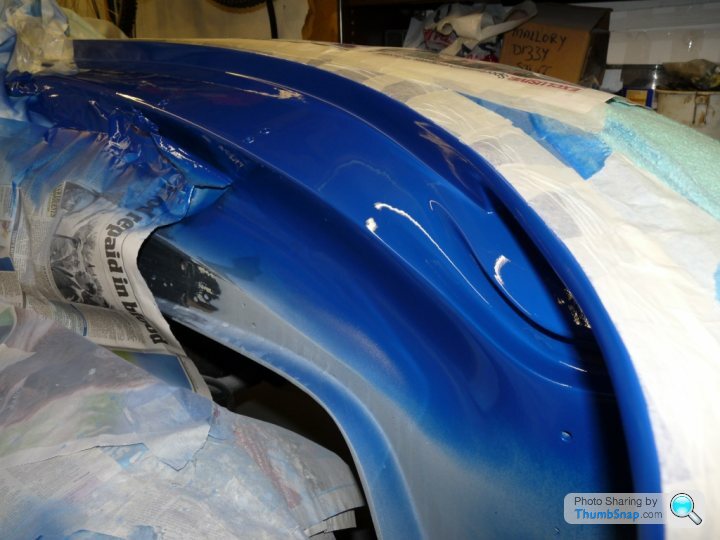
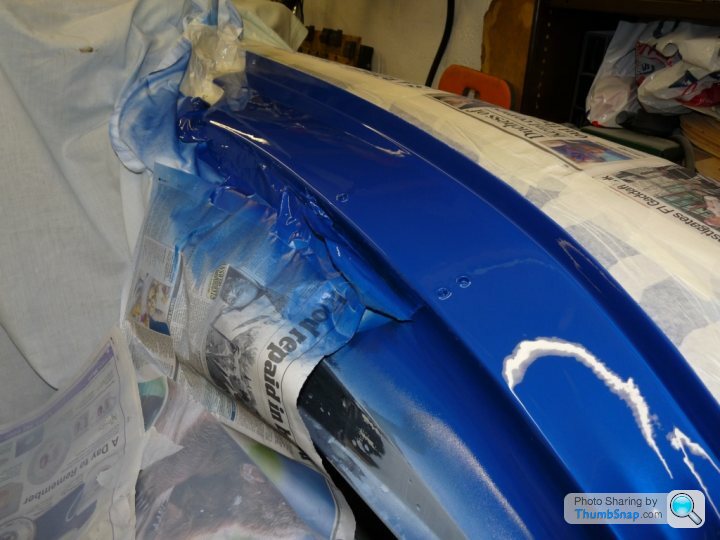
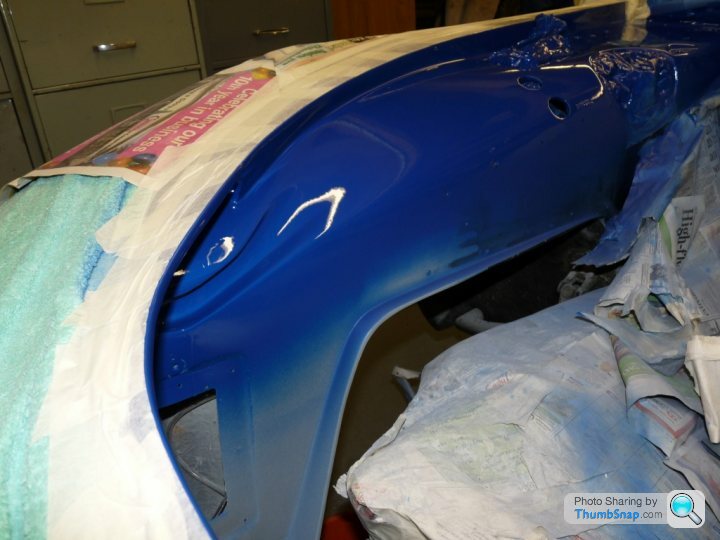
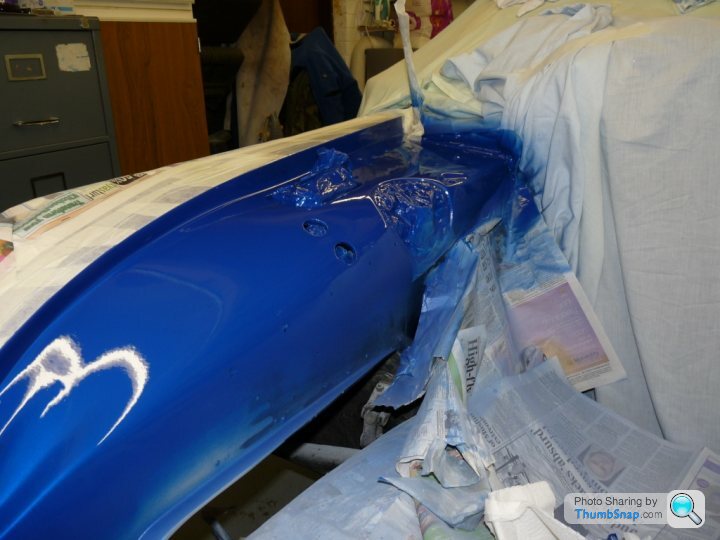
there was no way I was going to get an exact paint match to the rest of the inner wings, so I stripped them as well and repainted all the coloured surfaces with a single batch of paint. the first photo shows the prep work and the colour difference between the existing and new colours:

and these next 4 show the finished colour on the inner wings - VW Jazz Blue Pearlescent as seen on Golfs, Polo's etc. The most recent car I've seen this colour on is a 2006 reg Polo. Its a very subtle pearl and in most lights actually looks like a flat colour until you get close to it, which sort of defeats the object really, but there you go.
continued....
there was no way I was going to get an exact paint match to the rest of the inner wings, so I stripped them as well and repainted all the coloured surfaces with a single batch of paint. the first photo shows the prep work and the colour difference between the existing and new colours:
and these next 4 show the finished colour on the inner wings - VW Jazz Blue Pearlescent as seen on Golfs, Polo's etc. The most recent car I've seen this colour on is a 2006 reg Polo. Its a very subtle pearl and in most lights actually looks like a flat colour until you get close to it, which sort of defeats the object really, but there you go.
continued....
wycoller said:
good job well worth the effort
what paint you using on the exhaust
Thanks both for the comments.what paint you using on the exhaust
Paint on the exhausts is Halfords high temp paint. We'll see if its still stuck there in a couple of months. One of the manifolds is showing signs of it flaking off already and the engine has only had about 2 hrs of running on it so far.
I actually bought the paint in error as I just wanted something that looked like alumin rather than xmas tree silver. Didnt realise at the time that it was high temp paint. As I had it I just used it on the exhausts.
Edited by Marty V8 on Wednesday 6th July 21:47
Hey Marty,
Refurb looks great. Looking forward to the next instalment.
I am not sure if you have already sorted out the heat shields but fellow Tivver John Zubak offers a really nice replacement set:
http://www.pistonheads.com/sales/2712904.htm
Matthew
Refurb looks great.
Looking forward to the next instalment.I am not sure if you have already sorted out the heat shields but fellow Tivver John Zubak offers a really nice replacement set:
http://www.pistonheads.com/sales/2712904.htm
Matthew
MPoxon said:
Hey Marty,
Refurb looks great. Looking forward to the next instalment.
I am not sure if you have already sorted out the heat shields but fellow Tivver John Zubak offers a really nice replacement set:
http://www.pistonheads.com/sales/2712904.htm
Matthew
Thanks Matthew,Refurb looks great.
Looking forward to the next instalment.I am not sure if you have already sorted out the heat shields but fellow Tivver John Zubak offers a really nice replacement set:
http://www.pistonheads.com/sales/2712904.htm
Matthew
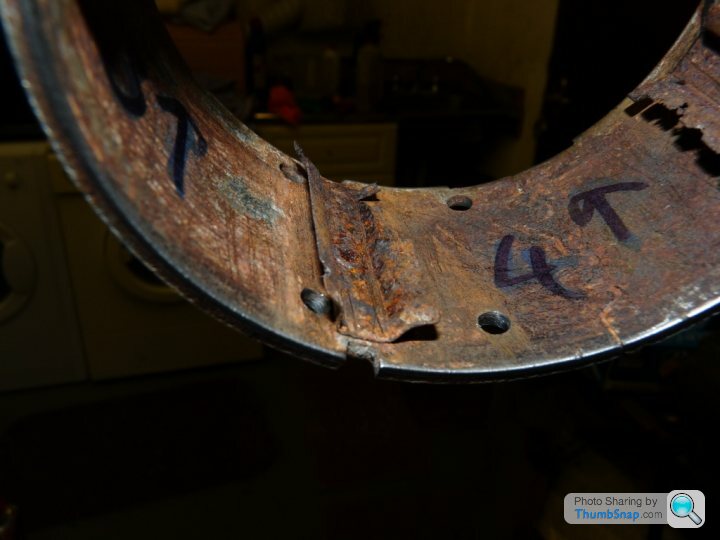
WRT heat shields. these are already done, but thanks for the reference. I got a length cut from a roll of heat matting from Racing Green as it was the same style of mat as the existing stuff, and not too expensive either. Cut each one out from the roll and edged it with metal self adhesive tape.
I'll posting some photos of it soon.
Cheers
Marty
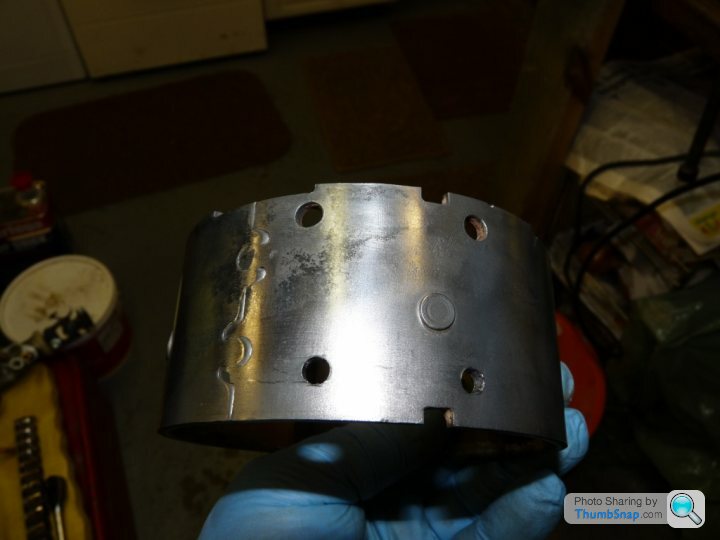
Prior to painting the inner wings and sorting the spider cracks along the nose/body joint, I had made up my own heat shields by ripping the old ones off and making up a template from them. I then modified the templates so that the heat matting extended further down (vertically) the inner wings than the existing ones to try to stop as much heat soak through into the cockpit as possible. The originals go down to about the same level as the chassis rails. The shields were also made slightly wider along the lengths of the inner wings as well for the same reasons.
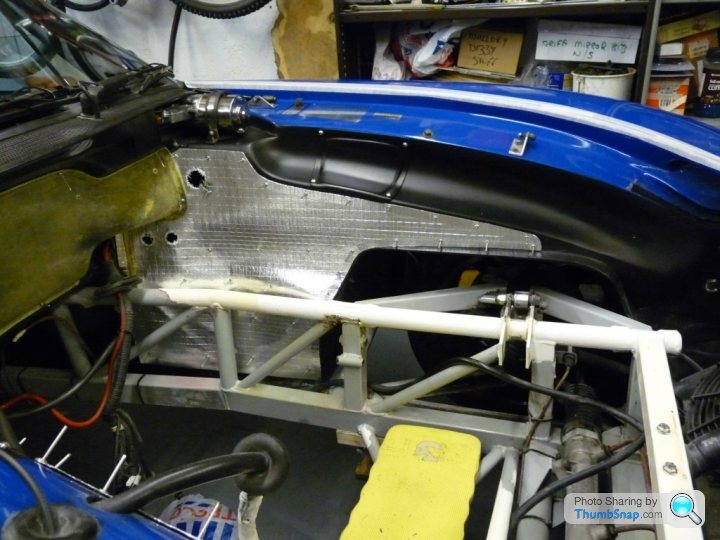
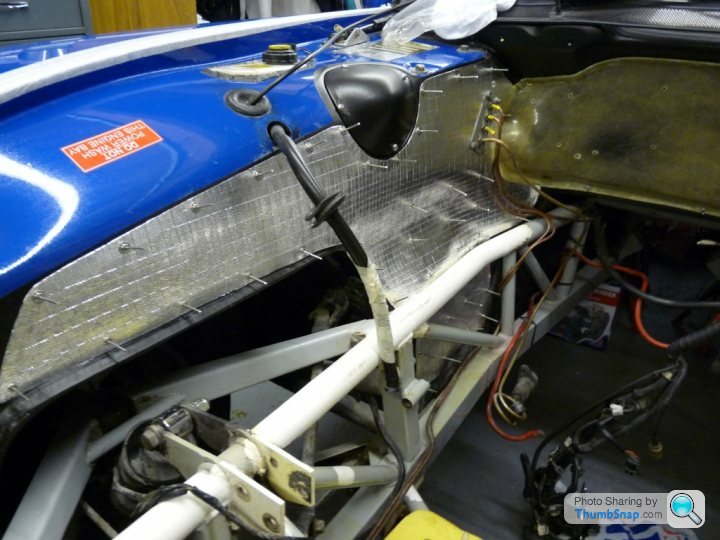
I also pulled the padded shielding off the bulkhead and removed the bulkhead panel as well. This is what it looks like behind the bulkhead panel:
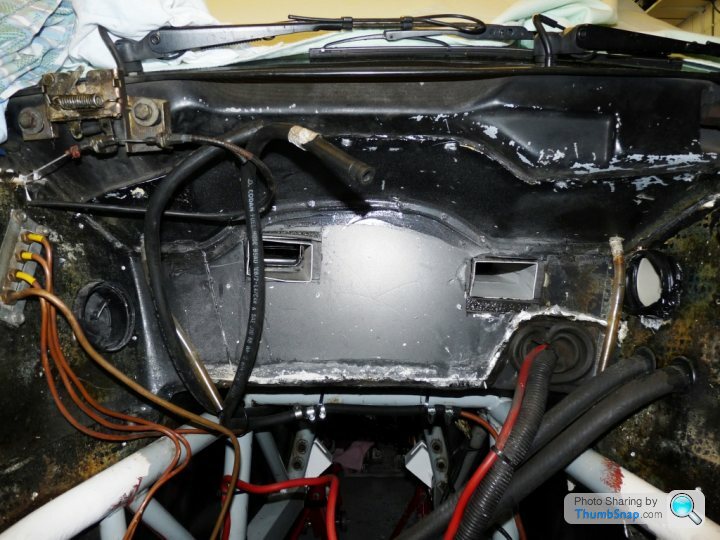
The flat panel is the back of the bulkhead and the rectangular objects sticking out of it are the dashboard vent tubes. You can just make out the plastic dash vent cover stuck in the left hand side vent tube. The hole on the right hand side is the hot/cold air feed from the blower motor, whilst the hole on the left hand side is the drivers footwell vent. The bulkhead panel covers all these as shown below:
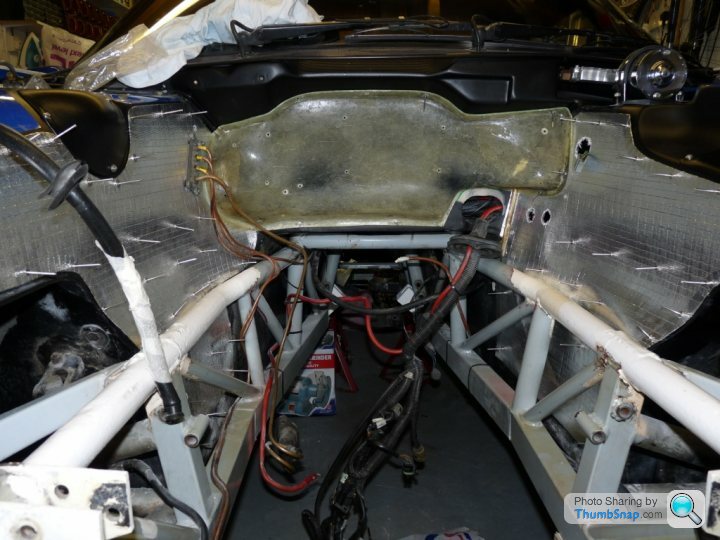
The two rubber pipes at the right hand side are water feed and return to/from the heater box.
Have to admit to putting the cart before the horse at this point as I also proceeded to paint the black sections of the inner wings, before later on having to strip some of this off when I decided to glass up the body/nose cone joint.
I also pulled the padded shielding off the bulkhead and removed the bulkhead panel as well. This is what it looks like behind the bulkhead panel:
The flat panel is the back of the bulkhead and the rectangular objects sticking out of it are the dashboard vent tubes. You can just make out the plastic dash vent cover stuck in the left hand side vent tube. The hole on the right hand side is the hot/cold air feed from the blower motor, whilst the hole on the left hand side is the drivers footwell vent. The bulkhead panel covers all these as shown below:
The two rubber pipes at the right hand side are water feed and return to/from the heater box.
Have to admit to putting the cart before the horse at this point as I also proceeded to paint the black sections of the inner wings, before later on having to strip some of this off when I decided to glass up the body/nose cone joint.
Edited by Marty V8 on Wednesday 6th July 19:17
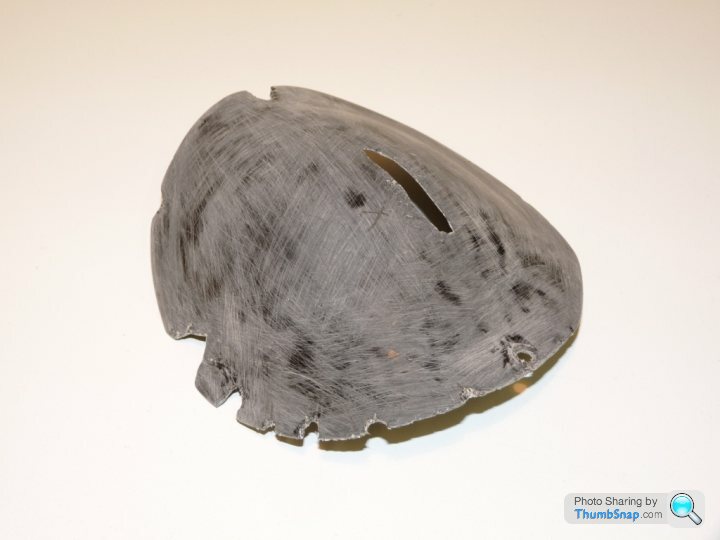
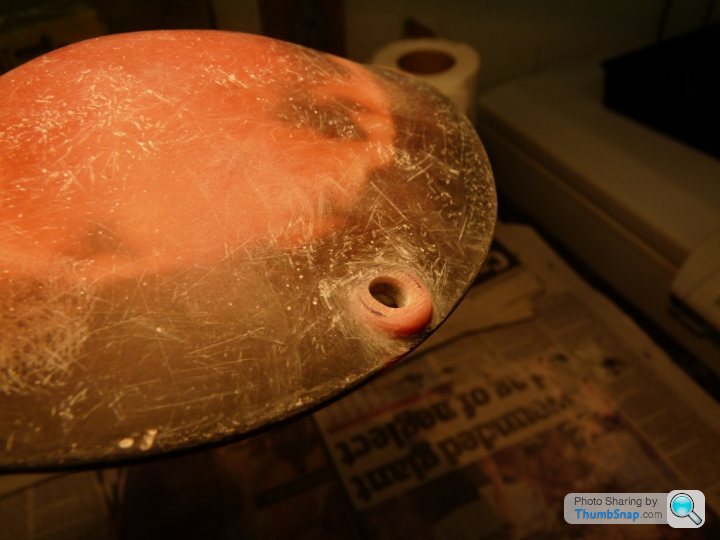
I think one of the items that can spoil a tidy Griff/Chim engine bay is the clutch master cylinder cover. The version on mine was held together with silicone sealer and had almost rubbed through against the clutch master cylinder cap.
I took it off and hacked out the grotty parts and those that had cracked or were a bit thin. What was left is shown below:
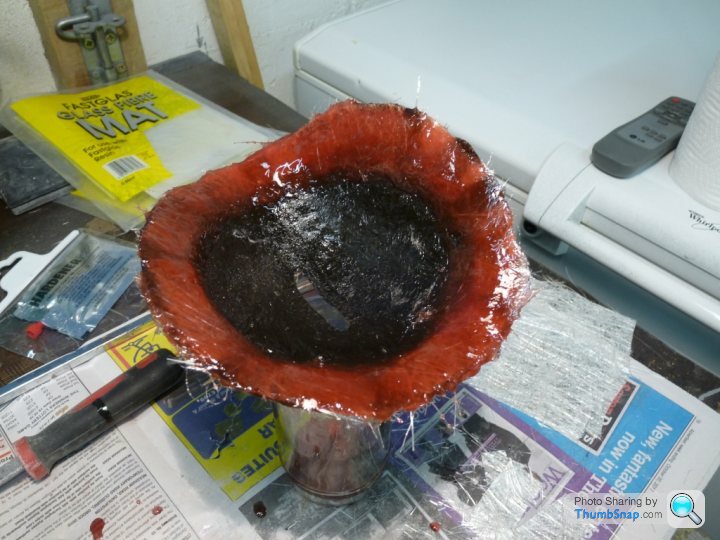
I started to glass it up and also build up the base thickness to make it sit further off the inner wing to create some clearance between the inside of the cover and the clutch master cylinder. It looks a right mess in the photo below but this was just the inital stage in building up the base.
After a couple of layers of glass had been added, out came the powerfile resulting in this:

After adding more layers and forming a small plinth for one of the retaining bolts it looked like this:
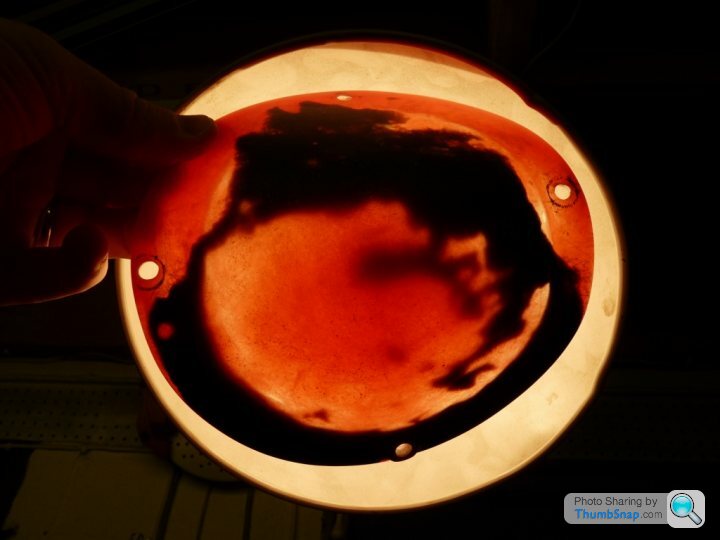
The photo below shows the cover held up against a spot lamp with the light coming through it. the black bits are all thats left of the original cover
I also used rivnuts to retain the cover, rather than self tapping screws. slapped some black paint on it and also to the cover surround on the inner wing to disguise some of the scratches present around the opening.
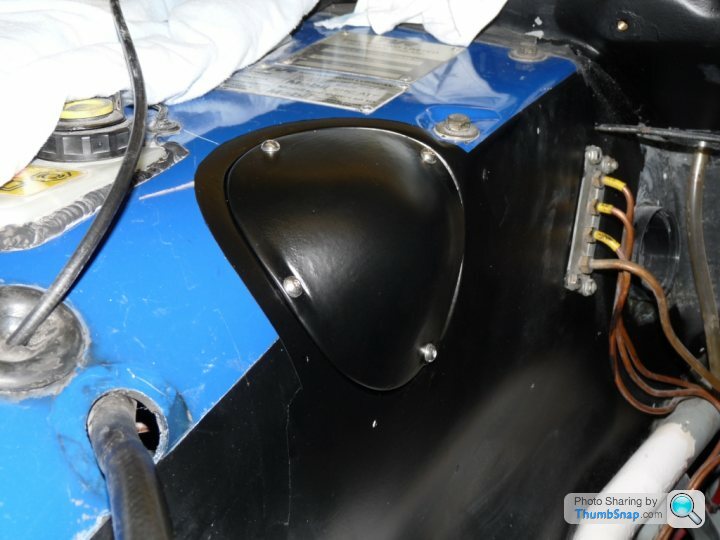
I was not really happy with this and when the inner wings were painted I changed the colour scheme to this:
Same colour as the inner wings, just needs laquer coat to finish it off.
I took it off and hacked out the grotty parts and those that had cracked or were a bit thin. What was left is shown below:
I started to glass it up and also build up the base thickness to make it sit further off the inner wing to create some clearance between the inside of the cover and the clutch master cylinder. It looks a right mess in the photo below but this was just the inital stage in building up the base.
After a couple of layers of glass had been added, out came the powerfile resulting in this:
After adding more layers and forming a small plinth for one of the retaining bolts it looked like this:
The photo below shows the cover held up against a spot lamp with the light coming through it. the black bits are all thats left of the original cover
I also used rivnuts to retain the cover, rather than self tapping screws. slapped some black paint on it and also to the cover surround on the inner wing to disguise some of the scratches present around the opening.
I was not really happy with this and when the inner wings were painted I changed the colour scheme to this:
Same colour as the inner wings, just needs laquer coat to finish it off.
WOW! that looks absolutely fantastic  cracking job! I think you may have given me the motivation to crack on with my engine bay.
I do love the colour of your Griff it looks great.
What did you do about the engine bay labels and stickers an plaques. Did you source new ones are re-use the existing ones?
cracking job! I think you may have given me the motivation to crack on with my engine bay. I do love the colour of your Griff it looks great.
What did you do about the engine bay labels and stickers an plaques. Did you source new ones are re-use the existing ones?
MPoxon said:
WOW! that looks absolutely fantastic cracking job! I think you may have given me the motivation to crack on with my engine bay.
I do love the colour of your Griff it looks great.
What did you do about the engine bay labels and stickers an plaques. Did you source new ones are re-use the existing ones?
Cheers. cracking job! I think you may have given me the motivation to crack on with my engine bay. I do love the colour of your Griff it looks great.
What did you do about the engine bay labels and stickers an plaques. Did you source new ones are re-use the existing ones?
I hope to get some from Automedon, but am awaiting news that they are in stock. Tried to peel the old ones off carefully but they just stretch and/or rip and they never look good or stick properly if re-used. Well mine cetainly wouldnt anyway.
I've kept the labels in case I cant get any more. More to show a future potential buyer that there were some than for any other reason.
Just re-read your post. You mentioned the plaques as well. I drilled the rivets out of those and have put them to one side ready for re-use.
Edited by Marty V8 on Friday 8th July 01:08
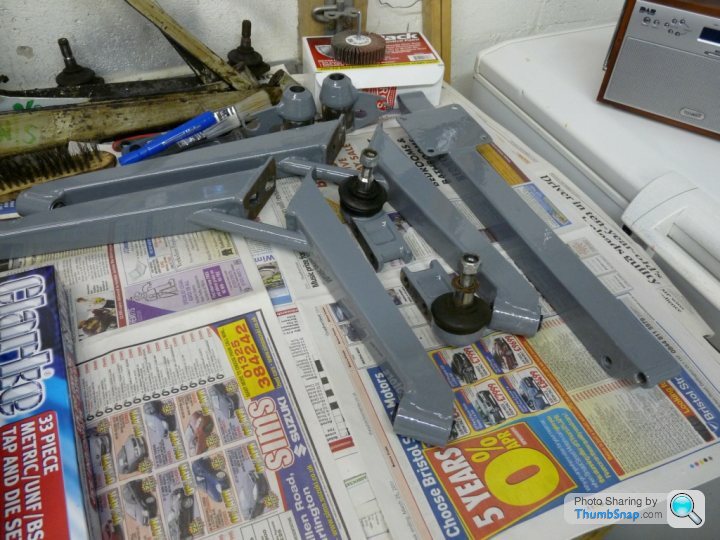
I had tried Hammerite smooth on the chassis but wasnt impressed with the way it performed if knocked. It seemed to come away from the surface very easily. I had thouroughly cleaned every thing with brake cleaner before startnig to paint as well.
In the end I used POR15 - six little pots of it from Frosts, in a grey colour. The prep of the chassis was a bit of a pain - lots of tubes, but needed doing in order to get the POR15 to adhere
and 4 coats of POR14 later...
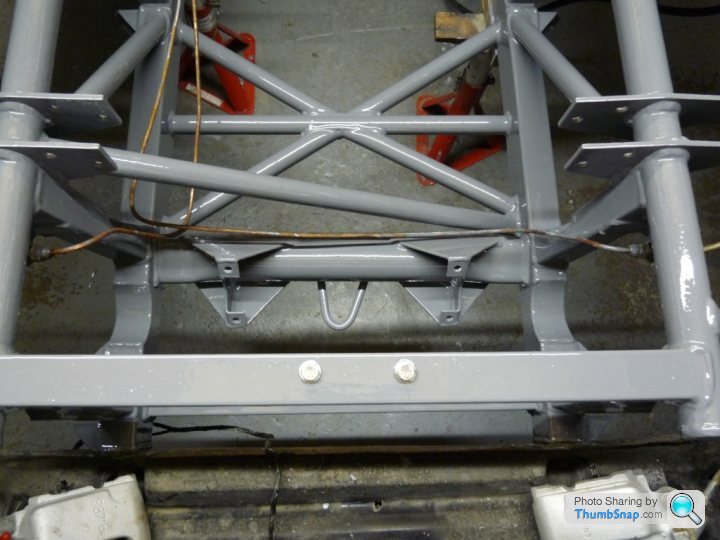
Its an 'interesting' job trying to access all areas of the chassis to paint the next coat of POR15, whilst the previous coat is still tacky, without covering yourself in the stuff.
I also used the same paint on the front suspension wishbones and hubs
In the end I used POR15 - six little pots of it from Frosts, in a grey colour. The prep of the chassis was a bit of a pain - lots of tubes, but needed doing in order to get the POR15 to adhere
and 4 coats of POR14 later...
Its an 'interesting' job trying to access all areas of the chassis to paint the next coat of POR15, whilst the previous coat is still tacky, without covering yourself in the stuff.
I also used the same paint on the front suspension wishbones and hubs
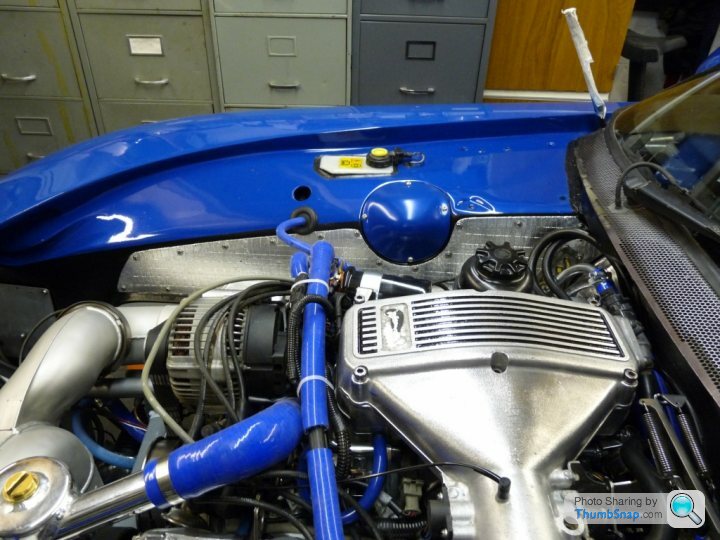
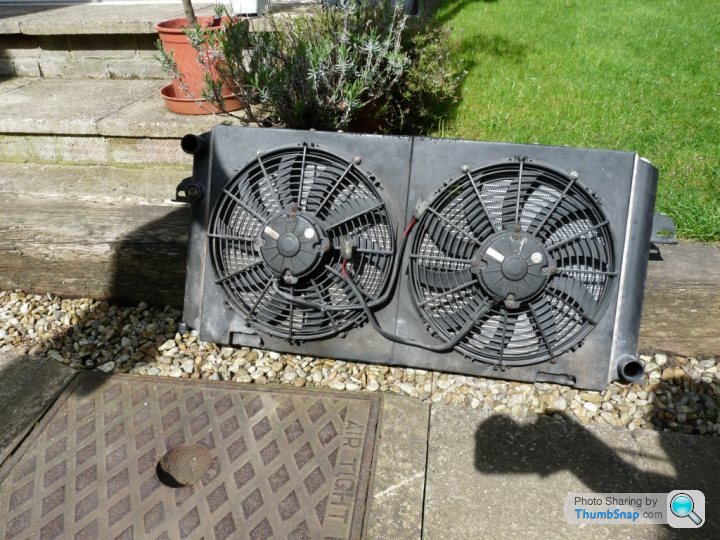
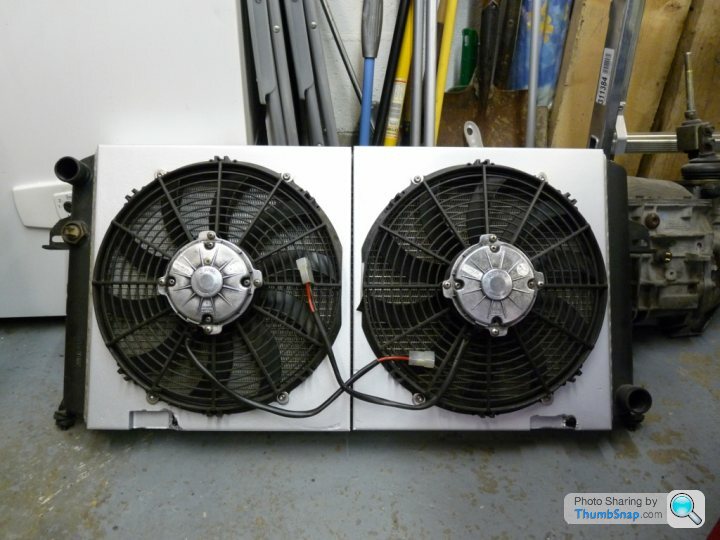
I wanted to brighten up the front of the engine as well and painting the fan shrouds looked like a simple way to do this.
Fans on radiator as existing:
and as finished:
I noticed that the fan motors each had a couple of drain holes in the bottom of their motor bodies. These holes are both situated at the same end of the body furthest away from the fan blades. Unfortunately due to the angle at which the radiator is mounted in the Grif, these drain holes are at the wrong end of the body, are not at the lowest point and therefore do not let water out. The result is this:
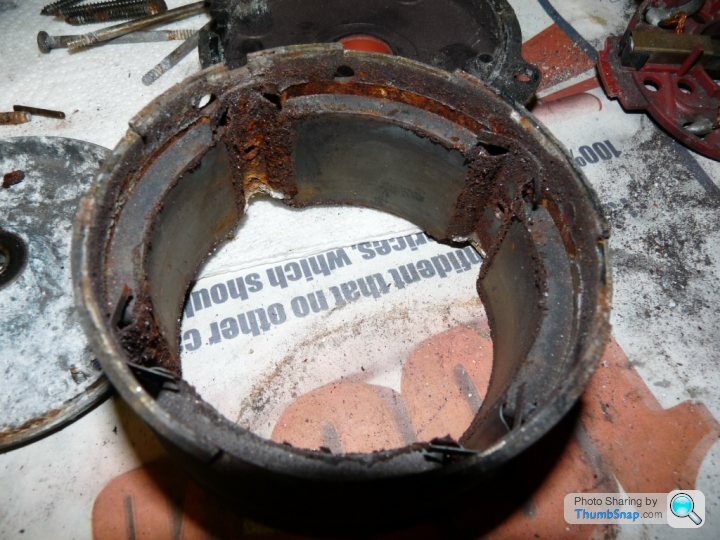
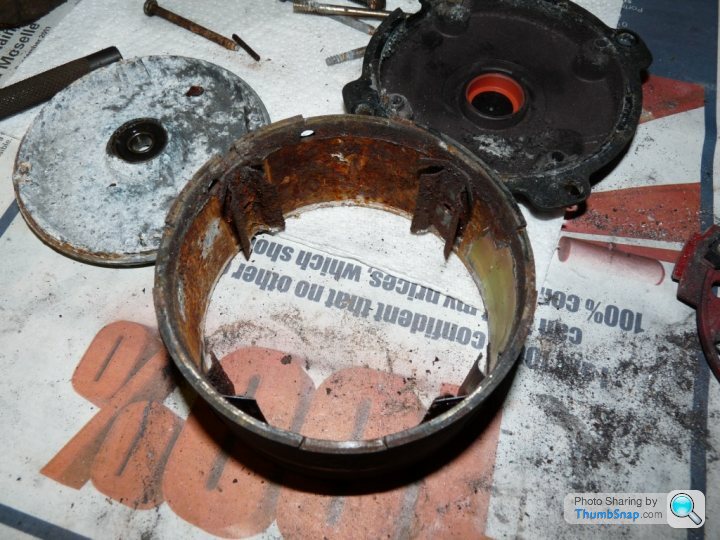
You can see the drain holes at the top of the fan motor bodies. Absolutely useless positioned where they are for the job they are meant to do. The solution was to clean up the bodies as much as possible and drill two drain holes at the other end of each fan motor body, so that any water that gets in, can get back out again. I'm surprised that the fans work at all given the state the motors were in. I gave the inside of each body a liberal coating of grease to try to limit any further corrosion.
The numbers on the inside of the body match numbers I put on the motor magnets.
So much for a simple paint job.....
Fans on radiator as existing:
and as finished:
I noticed that the fan motors each had a couple of drain holes in the bottom of their motor bodies. These holes are both situated at the same end of the body furthest away from the fan blades. Unfortunately due to the angle at which the radiator is mounted in the Grif, these drain holes are at the wrong end of the body, are not at the lowest point and therefore do not let water out. The result is this:
You can see the drain holes at the top of the fan motor bodies. Absolutely useless positioned where they are for the job they are meant to do. The solution was to clean up the bodies as much as possible and drill two drain holes at the other end of each fan motor body, so that any water that gets in, can get back out again. I'm surprised that the fans work at all given the state the motors were in. I gave the inside of each body a liberal coating of grease to try to limit any further corrosion.
The numbers on the inside of the body match numbers I put on the motor magnets.
So much for a simple paint job.....
Marty V8 said:
I wanted to brighten up the front of the engine as well and painting the fan shrouds looked like a simple way to do this.
Fans on radiator as existing:
and as finished:
I noticed that the fan motors each had a couple of drain holes in the bottom of their motor bodies. These holes are both situated at the same end of the body furthest away from the fan blades. Unfortunately due to the angle at which the radiator is mounted in the Grif, these drain holes are at the wrong end of the body, are not at the lowest point and therefore do not let water out. The result is this:
You can see the drain holes at the top of the fan motor bodies. Absolutely useless positioned where they are for the job they are meant to do. The solution was to clean up the bodies as much as possible and drill two drain holes at the other end of each fan motor body, so that any water that gets in, can get back out again. I'm surprised that the fans work at all given the state the motors were in. I gave the inside of each body a liberal coating of grease to try to limit any further corrosion.
The numbers on the inside of the body match numbers I put on the motor magnets.
So much for a simple paint job.....
good job and good posts mines a cheque book charlie but thats because i work abroad and never home Fans on radiator as existing:
and as finished:
I noticed that the fan motors each had a couple of drain holes in the bottom of their motor bodies. These holes are both situated at the same end of the body furthest away from the fan blades. Unfortunately due to the angle at which the radiator is mounted in the Grif, these drain holes are at the wrong end of the body, are not at the lowest point and therefore do not let water out. The result is this:
You can see the drain holes at the top of the fan motor bodies. Absolutely useless positioned where they are for the job they are meant to do. The solution was to clean up the bodies as much as possible and drill two drain holes at the other end of each fan motor body, so that any water that gets in, can get back out again. I'm surprised that the fans work at all given the state the motors were in. I gave the inside of each body a liberal coating of grease to try to limit any further corrosion.
The numbers on the inside of the body match numbers I put on the motor magnets.
So much for a simple paint job.....
so when youv,e finished and bored i,ll drop mine off

gammav said:
Great post and great work  ...so useful to see such detailed pics, helps those of us who have never attempted this kind of thing make sense of how everything fits together.
Thanks....so useful to see such detailed pics, helps those of us who have never attempted this kind of thing make sense of how everything fits together.Thats the beauty of digital cameras. No worries with using up film, just keep snapping away. I would be absolutely lost without referring back to all the photos Ive taken during this re-build.
If the Griff ever gets sold (not likely for a long while yet I hope), these photos can be shown to a prospective buyer so he/she can see whats been done as well.
Cheers
Marty
Gassing Station | Griffith | Top of Page | What's New | My Stuff