Discussion


7 TVR said:
Hi, would love some feedback on the power steering as it's something i might have to consider with the larger front tyres i'm running! .
It fits, works, feels great, and with the torque sensing pump setup i use gives assist at parking, but none at speed, unless you give it a huge armful of full lock (i made the same setup in one of my cobras). but i think i will hold off fitting it till after the car is back on the road, as id prefer to recondition the rack, otherwise it'll be a never ending to do list....and its sunny outside!oh, and it cost me 150 all in, so meets the "budget" spend criteria ive set myself
Edited by SteveGullick on Friday 9th March 15:37
Exhaust done......bit of metal origami around the t56, but a really nice job. This was done by craig in 2.5 SS.
went either side of the gearbox with 2 smaller tube vs one larger tube to increase ground clearance, gained an inch clearance by doing this . the 2.5 tucks in a bit, whereas the 3 inch sat too low.
I could (and still can) raise the gearbox tail by 15mm, but based on my calculations on angles of drivelines and diff inputs and the prop etc, this is where it ought be (and raising the tail means i will have to modify the handbrake mechanism, which currently clears the tail of the bearbox.....just
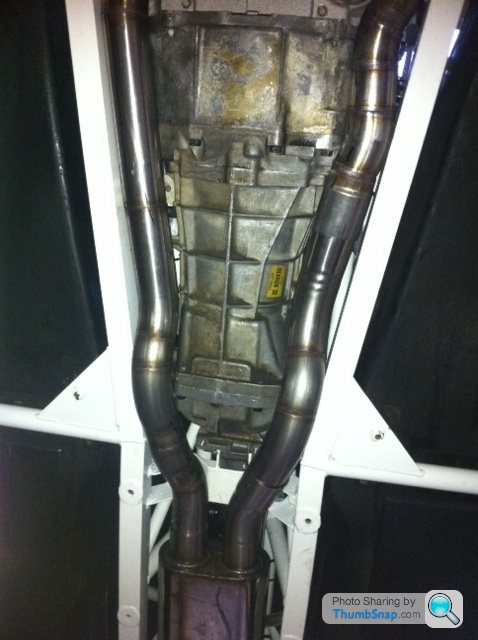
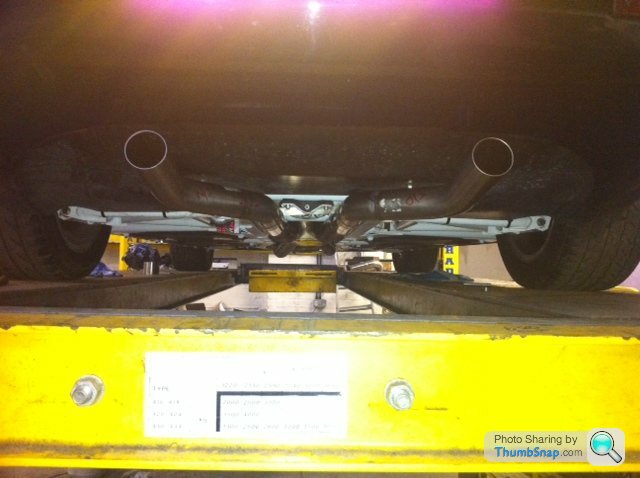
Ground clearance under the exhaust is 105mm , with the rover it was 130mm, with the chassis at the same ride height (140mm front corner, 150mm rear corner), so ive lost 25mm....... not too bad
Might raise this a little as i think it was a little on the low side anyway.
Most of the exhaust is tucked up in the chassis, so at the midpoint of the chassis, i have more clearance than before.
(glad i live in an area with no speed bumps!)
went either side of the gearbox with 2 smaller tube vs one larger tube to increase ground clearance, gained an inch clearance by doing this . the 2.5 tucks in a bit, whereas the 3 inch sat too low.
I could (and still can) raise the gearbox tail by 15mm, but based on my calculations on angles of drivelines and diff inputs and the prop etc, this is where it ought be (and raising the tail means i will have to modify the handbrake mechanism, which currently clears the tail of the bearbox.....just
Ground clearance under the exhaust is 105mm , with the rover it was 130mm, with the chassis at the same ride height (140mm front corner, 150mm rear corner), so ive lost 25mm....... not too bad
Might raise this a little as i think it was a little on the low side anyway.
Most of the exhaust is tucked up in the chassis, so at the midpoint of the chassis, i have more clearance than before.
(glad i live in an area with no speed bumps!)
Edited by SSPPGG on Wednesday 14th March 15:24
Edited by SSPPGG on Wednesday 14th March 15:30
Edited by SSPPGG on Wednesday 14th March 15:33
Craig went over the my rebuild for me, seems to pass muster, though he did point out that i have very little travel on the racing red shocks at the front, and loads at the back, and that the shock bodies therefore maybe on the wrong way round as the ones on the rear are shorter
....always useful to have a 2nd pair of eyes over the job!
....always useful to have a 2nd pair of eyes over the job!
carsy said:
Be interesting to hear how it sounds.
a "bit" louder than stock i'd guess....just a bit.if i get my coil brackets, and can find my spark plug lead crimper, i might get to fire it up this weekend, though my daughter has some french exchange students staying, so i think i'm playing host and taxi driver.......garage fun curtailed

topsparks said:
Been there done that,Suzuki GT550 3 cylinder 2 stroke,nice chrome 70's pipes,wearing shorts,trying to get it through the side door to my garage-ouch!
I dont think i ever got "bit", but saw a few, especially at le mans after a few beers, with passengers not used to sidepipes....Decided I couldn't wait any longer, so connected the battery, turned the ignition, and fired up first time.
settled down to a smooth tickover in a few seconds and have good oil pressure readings
bit "nascar" though, as i've only the headers fitted, but at least my engine wiring etc seems OK.,
now just got to sort out the wiring around the gearbox, (speedo, reverse light, rev counter and speedo.
settled down to a smooth tickover in a few seconds and have good oil pressure readings
bit "nascar" though, as i've only the headers fitted, but at least my engine wiring etc seems OK.,
now just got to sort out the wiring around the gearbox, (speedo, reverse light, rev counter and speedo.
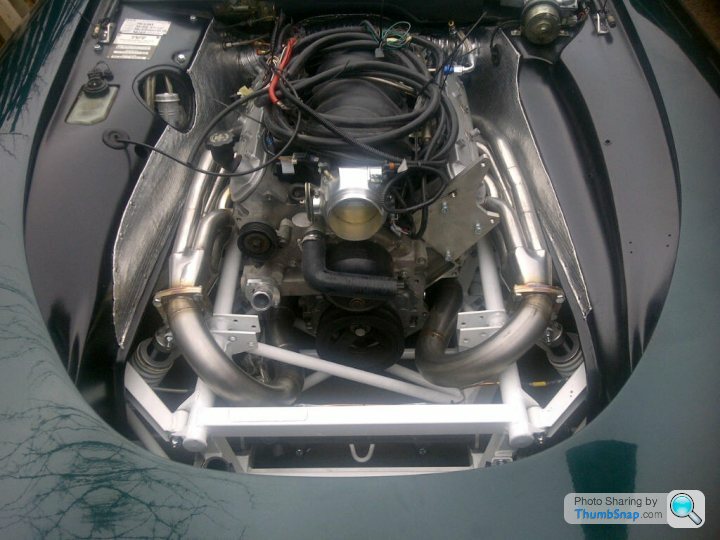
just an 5.7 ls1 with ported + polished heads, increased compression, cam and springs, ls2 injectors, ls2 intake, 90mm holley TB, so around 400 or so.
no chassis mods for this torque level, but now i know where the gearbox and exhaust sit, i might ditch the plate under the silencer, and make up something that covers more of the chassis.
no chassis mods for this torque level, but now i know where the gearbox and exhaust sit, i might ditch the plate under the silencer, and make up something that covers more of the chassis.
Edited by SSPPGG on Monday 26th March 22:22
vented bonnet fitted this weekend, but itll need fettling to fit properly when painted.
exhaust, header tank, air filter and inlet, dash fitted, and a general tidy up of the wiring, so my alternator etc now works. just the temp sender to machine to fit into a m12 hole in the LS heads.
i need to "adhere" the fibreglss bonnet catch holder onto the underside of the bonnet.
what is best ahesive to use tht wont damage the glass or resin?
Edited by SSPPGG on Monday 2nd April 15:55
early on in thew project, i moved the t56 shifter to the forward inspection plate. this meant that the reverse lock out was ditched, as it was fouling a chassis rail, and i didnt want to bend or change the chassis.
now with the shifter fitted, a missed shift from 4th to 5th could end up in reverse.......
the plan was to use the remote solenoid from the reverse lock out in a new location (the one with the electric connector), but after trial and error, it is simply too weak to prevent reverse selection inadvertently, so i got on the lathe, and using a heavy duty spring plunger (150nm) made up a sprung version. (the black bit sticking out of the end is the spring plunger, the brass but is just the housing to make it fit the existing holes in the gearbox. the silver bit holds the plunger into the brass housing from the rear .....I've still got to cut the threads, but you get the idea
this will mean that selecting reverse is much more heavily loaded (about 3 times as much force as selecting the 5/6 gate, and this will prevent an inadvertent shift.
i can change the location of the plunger by shimming inside the brass part so that the shift feel can be adjusted to suit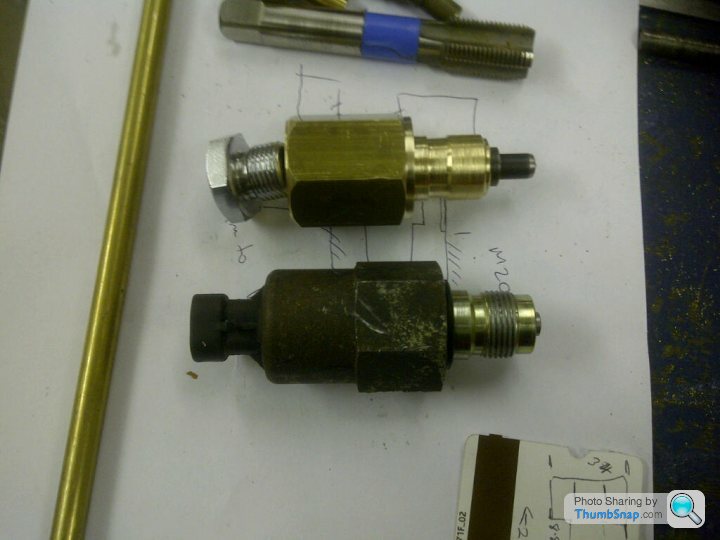
Edited by SSPPGG on Wednesday 4th April 12:04
Edited by SSPPGG on Wednesday 4th April 12:06
Edited by SSPPGG on Wednesday 4th April 12:09
the GM ECU is a pretty big affair, much larger than the rover ecu, and it wont fit where the rover one was. decided that the best location was still in the footwell, so have ditched the original battery in favour of an oddysey unit, recommended upto 6l motors, which is about half the thickness, so the ECU will sit in the battery box behind the new battery.
I used this unit in one of the cobra builds, and it was fine with the 6l ls engine
If i was doing a retrim, i might have relocated the battery to the rear or the boot, but that's a project for another winter.
the elise seats provide much more legroom than before, so the existing "short" passenger footwell is less noticeable than before
Edited by SSPPGG on Wednesday 4th April 12:16
Gassing Station | Griffith | Top of Page | What's New | My Stuff