Instructions to change fuel maps on 14CUX Griffith, Chimaera
Discussion


Following on from Colin and Dan’s huge effort to develop RoverGauge and with their guidance I’ve managed to change the fuel map on my precat Griffith. You don’t have to be a computer programmer or a Lucas/Bosch engineer, but as its not straightforward you do have to be computer savvy and meticulous with data entry.
To alter the fuel map you’ll need to buy the following hardware and a few spare EPROM chips so you can keep your original chip as a backup.
1 - TOP853 USB universal programmer, I bought mine off ebay for about £30.
2 - A few EPROM (M27C256) chips to experiment with, about £5 each on ebay.
3 - Ultra Violet (UV) light EPROM eraser on ebay for about £10.
4 - RoverGauge cable, email blitzracing (Mark), mine from him is very robust.
Optional
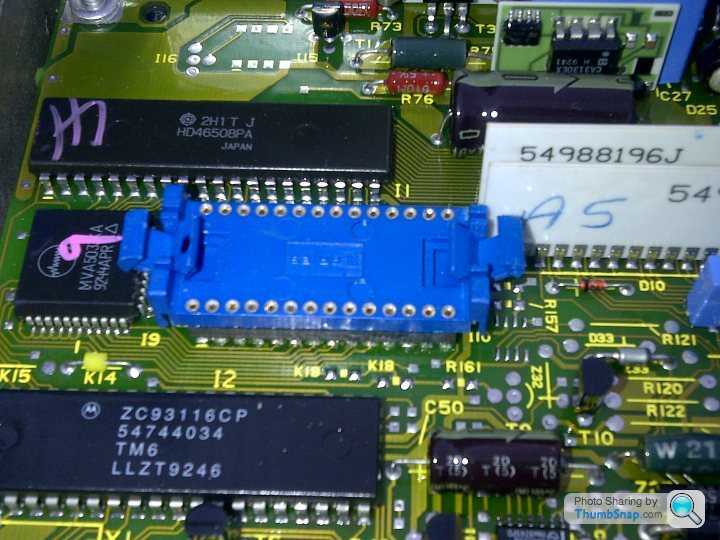
5 - Lock/Eject IC Socket with 28 pins, makes removing PROM’s safer & quicker, See picture below.
Colin and Dan have helped me come up with the following procedure, it may not suit everyone but it works for me.
1. Save PROM image via RoverGauge
In RoverGauge select ‘Save the PROM’ from the file menu, I called the file RGimage.bin.
(I save the image though RoverGauge as most EPROM chips are 32K which is large enough to hold two copies of the code & data but only have one copy in the second half, and some other chips have two copies. RoverGauge guarantees to save the correct code & data in a 16K file as required later on)
While in RoverGauge make a note of your fuel map and the fuel adjustment factor that is displayed just above the fuel map, I find it useful to save a screen shot of RoverGauge.
2. Amending the fuel Map
To amend the map I use my universal programmer software as follows, but you may have your own preferred editor.
Select chip type 27C128 EPROM & open your RGimage.bin, (Yes, I select 27C128 only while making changes to the image). Then look for your fuel map at the following offsets
For older tunes Map 1: $023F, Map 2: $0351, Map 3: $0463, Map 4: $0575, Map 5: $0687
For newer tunes: Map 1: $0267, Map 2: $0379, Map 3: $048B, Map 4: $059D, Map 5: $06AF
For Further information on the maps and the adjustment factor please see cmb (Colin) email half way down page 10 on the ‘Graphics interface for the 14CUX’ at
http://www.pistonheads.com/gassing/topic.asp?h=0&a...
It’s worth a read as Colin explains the maps, fuel adjustment factor and the location of the base idle speed.
Once you have found and changed your fuel map save your changes, I called the file mods.bin
3. Reset the checksum to 1, Stops the checksum error code
Technically you should reset the checksum to 1 every time you make a change to the chip and therefore I’m going to suggest you do. However I don’t always especially when I’m experimenting with a quick change. I’ve proved the checksum error is NOT the code of death but merely an indication that your tune chip has been altered. I would certainly reset the checksum to 1 once I’ve finished testing my alterations.
To set the checksum to 1 you need to run a program called jacksum on one copy of the code and data in a 16K file which is why I suggest saving the image at the start with RoverGauge.
a. Check mods.bin is still 16,384 bytes long.
b. Download and Install jacksum from http://www.jonelo.de/java/jacksum/
c. Run jacksum from the command line as follows “jacksum -a sum8 mods.bin”, it requires Java runtime that you’ll probably already have installed.
d. Now the trick is to change the first byte in mods.bin so jacksum returns a checksum of 1, you can use Colin’s formula or logical trial and error. If you use trial & error make notes as you guess and you’ll soon see how it works.
4. Duplicate the image
If you remember from step one the code/data is duplicated on the chip so run the following from the command line to duplicate the code/data image:-
copy /b mods.bin+mods.bin mods2.bin
5. Write changes to EPROM chip
Restart your EPROM programmer software, select chip type 27C256, open mods2.bin and select write to chip. Afterwards, it’s worth running the verify option.
6. Install the updated chip into the ECU
I’ll let you google how to physically swap the EPROM tune chips.
Conclusion
Should you have any questions or suggestions to simplify this procedure please do not hesitate to contact me and I’ll do my best, but please remember I’m not the brains behind this project, just the Monkey trying to document Colin and Dan’s instructions. I’m sorry, I can’t offer any advice on individual fuel maps so you’ll have to experiment for yourself on the rolling road or test drive while running RoverGauge data logger.
Finally please keep your original chip in a safe place as a fallback and always work on spare EPROM chips, I can’t be held responsible for any undesirable side effects.
I realise this is not straightforward but at least now ‘where there’s a will, there is a way’.
Good Luck, Steve Sprint
To alter the fuel map you’ll need to buy the following hardware and a few spare EPROM chips so you can keep your original chip as a backup.
1 - TOP853 USB universal programmer, I bought mine off ebay for about £30.
2 - A few EPROM (M27C256) chips to experiment with, about £5 each on ebay.
3 - Ultra Violet (UV) light EPROM eraser on ebay for about £10.
4 - RoverGauge cable, email blitzracing (Mark), mine from him is very robust.
Optional
5 - Lock/Eject IC Socket with 28 pins, makes removing PROM’s safer & quicker, See picture below.
Colin and Dan have helped me come up with the following procedure, it may not suit everyone but it works for me.
1. Save PROM image via RoverGauge
In RoverGauge select ‘Save the PROM’ from the file menu, I called the file RGimage.bin.
(I save the image though RoverGauge as most EPROM chips are 32K which is large enough to hold two copies of the code & data but only have one copy in the second half, and some other chips have two copies. RoverGauge guarantees to save the correct code & data in a 16K file as required later on)
While in RoverGauge make a note of your fuel map and the fuel adjustment factor that is displayed just above the fuel map, I find it useful to save a screen shot of RoverGauge.
2. Amending the fuel Map
To amend the map I use my universal programmer software as follows, but you may have your own preferred editor.
Select chip type 27C128 EPROM & open your RGimage.bin, (Yes, I select 27C128 only while making changes to the image). Then look for your fuel map at the following offsets
For older tunes Map 1: $023F, Map 2: $0351, Map 3: $0463, Map 4: $0575, Map 5: $0687
For newer tunes: Map 1: $0267, Map 2: $0379, Map 3: $048B, Map 4: $059D, Map 5: $06AF
For Further information on the maps and the adjustment factor please see cmb (Colin) email half way down page 10 on the ‘Graphics interface for the 14CUX’ at
http://www.pistonheads.com/gassing/topic.asp?h=0&a...
It’s worth a read as Colin explains the maps, fuel adjustment factor and the location of the base idle speed.
Once you have found and changed your fuel map save your changes, I called the file mods.bin
3. Reset the checksum to 1, Stops the checksum error code
Technically you should reset the checksum to 1 every time you make a change to the chip and therefore I’m going to suggest you do. However I don’t always especially when I’m experimenting with a quick change. I’ve proved the checksum error is NOT the code of death but merely an indication that your tune chip has been altered. I would certainly reset the checksum to 1 once I’ve finished testing my alterations.
To set the checksum to 1 you need to run a program called jacksum on one copy of the code and data in a 16K file which is why I suggest saving the image at the start with RoverGauge.
a. Check mods.bin is still 16,384 bytes long.
b. Download and Install jacksum from http://www.jonelo.de/java/jacksum/
c. Run jacksum from the command line as follows “jacksum -a sum8 mods.bin”, it requires Java runtime that you’ll probably already have installed.
d. Now the trick is to change the first byte in mods.bin so jacksum returns a checksum of 1, you can use Colin’s formula or logical trial and error. If you use trial & error make notes as you guess and you’ll soon see how it works.
4. Duplicate the image
If you remember from step one the code/data is duplicated on the chip so run the following from the command line to duplicate the code/data image:-
copy /b mods.bin+mods.bin mods2.bin
5. Write changes to EPROM chip
Restart your EPROM programmer software, select chip type 27C256, open mods2.bin and select write to chip. Afterwards, it’s worth running the verify option.
6. Install the updated chip into the ECU
I’ll let you google how to physically swap the EPROM tune chips.
Conclusion
Should you have any questions or suggestions to simplify this procedure please do not hesitate to contact me and I’ll do my best, but please remember I’m not the brains behind this project, just the Monkey trying to document Colin and Dan’s instructions. I’m sorry, I can’t offer any advice on individual fuel maps so you’ll have to experiment for yourself on the rolling road or test drive while running RoverGauge data logger.
Finally please keep your original chip in a safe place as a fallback and always work on spare EPROM chips, I can’t be held responsible for any undesirable side effects.
I realise this is not straightforward but at least now ‘where there’s a will, there is a way’.
Good Luck, Steve Sprint
Edited by stevesprint on Thursday 29th August 23:38
stevesprint said:
Following on from Colin and Dan’s huge effort to develop RoverGauge and with their guidance I’ve managed to change the fuel map on my precat Griffith. You don’t have to be a computer programmer or a Lucas/Bosch engineer, but as its not straightforward you do have to be computer savvy and meticulous with data entry.
To alter the fuel map you’ll need to buy the following hardware and a few spare EPROM chips so you can keep your original chip as a backup.
1 - TOP853 USB universal programmer, I bought mine off ebay for about £30.
2 - A few EPROM (M27C256) chips to experiment with, about £5 each on ebay.
3 - Ultra Violet (UV) light EPROM eraser on ebay for about £10.
4 - RoverGauge cable, email blitzracing (Mark), mine from him is very robust.
Optional
5 - Lock/Eject IC Socket with 28 pins, makes removing PROM’s safer & quicker, See picture below.
Colin and Dan have helped me come up with the following procedure, it may not suit everyone but it works for me.
1. Save PROM image via RoverGauge
In RoverGauge select ‘Save the PROM’ from the file menu, I called the file RGimage.bin.
(I save the image though RoverGauge as most EPROM chips are 32K which is large enough to hold two copies of the code & data but only have one copy in the second half, and some other chips have two copies. RoverGauge guarantees to save the correct code & data in a 16K file as required later on)
While in RoverGauge make a note of your fuel map and the fuel adjustment factor that is displayed just above the fuel map, I find it useful to save a screen shot of RoverGauge.
2. Amending the fuel Map
To amend the map I use my universal programmer software as follows, but you may have your own preferred editor.
Select chip type 27C128 EPROM & open your RGimage.bin, (Yes, I select 27C128 only while making changes to the image). Then look for your fuel map at the following offsets
For older tunes Map 1: $023F, Map 2: $0351, Map 3: $0463, Map 4: $0575, Map 5: $0687
For newer tunes: Map 1: $0267, Map 2: $0379, Map 3: $048B, Map 4: $059D, Map 5: $06AF
For Further information on the maps and the adjustment factor please see cmb (Colin) email half way down page 10 on the ‘Graphics interface for the 14CUX’ at
http://www.pistonheads.com/gassing/topic.asp?h=0&a...
It’s worth a read as Colin explains the maps, fuel adjustment factor and the location of the base idle speed.
Once you have found and changed your fuel map save your changes, I called the file mods.bin
3. Reset the checksum to 1, Stops the checksum error code
Technically you should reset the checksum to 1 every time you make a change to the chip and therefore I’m going to suggest you do. However I don’t always especially when I’m experimenting with a quick change. I’ve proved the checksum error is NOT the code of death but merely an indication that your tune chip has been altered. I would certainly reset the checksum to 1 once I’ve finished testing my alterations.
To set the checksum to 1 you need to run a program called jacksum on one copy of the code and data in a 16K file which is why I suggest saving the image at the start with RoverGauge.
a. Check mods.bin is still 16,384 bytes long.
b. Download and Install jacksum from http://www.jonelo.de/java/jacksum/
c. Run jacksum from the command line as follows “jacksum -a sum8 mods.bin”, it requires Java runtime that you’ll probably already have installed.
d. Now the trick is to change the first byte in mods.bin so jacksum returns a checksum of 1, you can use Colin’s formula or logical trial and error. If you use trial & error make notes as you guess and you’ll soon see how it works.
4. Duplicate the image
If you remember from step one the code/data is duplicated on the chip so run the following from the command line to duplicate the code/data image:-
copy /b mods.bin+mods.bin mods2.bin
5. Write changes to EPROM chip
Restart your EPROM programmer software, select chip type 27C256, open mods2.bin and select write to chip. Afterwards, it’s worth running the verify option.
6. Install the updated chip into the ECU
I’ll let you google how to physically swap the EPROM tune chips.
Conclusion
Should you have any questions or suggestions to simplify this procedure please do not hesitate to contact me and I’ll do my best, but please remember I’m not the brains behind this project, just the Monkey trying to document Colin and Dan’s instructions. I’m sorry, I can’t offer any advice on individual fuel maps so you’ll have to experiment for yourself on the rolling road or test drive while running RoverGauge data logger.
Finally please keep your original chip in a safe place as a fallback and always work on spare EPROM chips, I can’t be held responsible for any undesirable side effects.
I realise this is not straightforward but at least now ‘where there’s a will, there is a way’.
Good Luck, Steve Sprint
Hi Steve, a great resume of the process. I have been thinking of getting RoverGauge for some time now, but need to pick up a cheap laptop to use in the workshop first. Having a background in electronic engineering I would be quite confident in doing the above. Would you mind emailing me direct with your process details so as I can pull it into a document along with the RoverGauge info. If I PM you that will give an easy email reply route. Any other information you would not mind passing on would also be appreciated. Many thanks, PeteTo alter the fuel map you’ll need to buy the following hardware and a few spare EPROM chips so you can keep your original chip as a backup.
1 - TOP853 USB universal programmer, I bought mine off ebay for about £30.
2 - A few EPROM (M27C256) chips to experiment with, about £5 each on ebay.
3 - Ultra Violet (UV) light EPROM eraser on ebay for about £10.
4 - RoverGauge cable, email blitzracing (Mark), mine from him is very robust.
Optional
5 - Lock/Eject IC Socket with 28 pins, makes removing PROM’s safer & quicker, See picture below.
Colin and Dan have helped me come up with the following procedure, it may not suit everyone but it works for me.
1. Save PROM image via RoverGauge
In RoverGauge select ‘Save the PROM’ from the file menu, I called the file RGimage.bin.
(I save the image though RoverGauge as most EPROM chips are 32K which is large enough to hold two copies of the code & data but only have one copy in the second half, and some other chips have two copies. RoverGauge guarantees to save the correct code & data in a 16K file as required later on)
While in RoverGauge make a note of your fuel map and the fuel adjustment factor that is displayed just above the fuel map, I find it useful to save a screen shot of RoverGauge.
2. Amending the fuel Map
To amend the map I use my universal programmer software as follows, but you may have your own preferred editor.
Select chip type 27C128 EPROM & open your RGimage.bin, (Yes, I select 27C128 only while making changes to the image). Then look for your fuel map at the following offsets
For older tunes Map 1: $023F, Map 2: $0351, Map 3: $0463, Map 4: $0575, Map 5: $0687
For newer tunes: Map 1: $0267, Map 2: $0379, Map 3: $048B, Map 4: $059D, Map 5: $06AF
For Further information on the maps and the adjustment factor please see cmb (Colin) email half way down page 10 on the ‘Graphics interface for the 14CUX’ at
http://www.pistonheads.com/gassing/topic.asp?h=0&a...
It’s worth a read as Colin explains the maps, fuel adjustment factor and the location of the base idle speed.
Once you have found and changed your fuel map save your changes, I called the file mods.bin
3. Reset the checksum to 1, Stops the checksum error code
Technically you should reset the checksum to 1 every time you make a change to the chip and therefore I’m going to suggest you do. However I don’t always especially when I’m experimenting with a quick change. I’ve proved the checksum error is NOT the code of death but merely an indication that your tune chip has been altered. I would certainly reset the checksum to 1 once I’ve finished testing my alterations.
To set the checksum to 1 you need to run a program called jacksum on one copy of the code and data in a 16K file which is why I suggest saving the image at the start with RoverGauge.
a. Check mods.bin is still 16,384 bytes long.
b. Download and Install jacksum from http://www.jonelo.de/java/jacksum/
c. Run jacksum from the command line as follows “jacksum -a sum8 mods.bin”, it requires Java runtime that you’ll probably already have installed.
d. Now the trick is to change the first byte in mods.bin so jacksum returns a checksum of 1, you can use Colin’s formula or logical trial and error. If you use trial & error make notes as you guess and you’ll soon see how it works.
4. Duplicate the image
If you remember from step one the code/data is duplicated on the chip so run the following from the command line to duplicate the code/data image:-
copy /b mods.bin+mods.bin mods2.bin
5. Write changes to EPROM chip
Restart your EPROM programmer software, select chip type 27C256, open mods2.bin and select write to chip. Afterwards, it’s worth running the verify option.
6. Install the updated chip into the ECU
I’ll let you google how to physically swap the EPROM tune chips.
Conclusion
Should you have any questions or suggestions to simplify this procedure please do not hesitate to contact me and I’ll do my best, but please remember I’m not the brains behind this project, just the Monkey trying to document Colin and Dan’s instructions. I’m sorry, I can’t offer any advice on individual fuel maps so you’ll have to experiment for yourself on the rolling road or test drive while running RoverGauge data logger.
Finally please keep your original chip in a safe place as a fallback and always work on spare EPROM chips, I can’t be held responsible for any undesirable side effects.
I realise this is not straightforward but at least now ‘where there’s a will, there is a way’.
Good Luck, Steve Sprint
Edited by stevesprint on Thursday 29th August 23:38
TV8 said:
I dont fancy changing all the wiring and putting a new ecu in. This could be the answer?
There is already at least one person who can map these ECUs "properly", at a premium.The question is when the dust has settled and this gets cracked will the results be free for all to use or will it just end up with more people charging to do the same.
My instructions and the RoverGauge boy’s info are all free for all to use but will not suit everyone as it’s complicated.
I agree, engine tuning requires specialised knowledge, experience and a rolling road and therefore best left to the professionals, so that counts me out. The more people ending up charging to do the same job will increase competition and that’s good for the consumer.
If the home mechanic does ends up with detrimental effects, as I did when I reduced the fuelling too much, you just pop your original chip back in.
Cheers, Steve Sprint
Hoover. said:
This could also lead to some home mechanic's trying to remap themselves, with detrimental long term effects if they get it wrong or don't fully understand what they have done..... just a thought 
Is that any different to some people on here doing their own brakes?Just because the car stops when they have finished doesn't prove the job has been done properly.
Ribol said:
Hoover. said:
This could also lead to some home mechanic's trying to remap themselves, with detrimental long term effects if they get it wrong or don't fully understand what they have done..... just a thought
Is that any different to some people on here doing their own brakes?Just because the car stops when they have finished doesn't prove the job has been done properly.
I'm not here to stop people mucking about in their garages, just bit of me thinks a little knowledge can sometimes be dangerous
I wouldn’t suggest anyone, a professional or a home mechanic, change their fueling without proper testing. For example, an engine running too lean will run hotter as the fuel helps with cooling and secondly their is a higher chance of pre-ignition and that’s destructive.
I enjoy solving puzzles and the 14CUX has been more fun than a Rubixs cube.
Cheers, Steve
I enjoy solving puzzles and the 14CUX has been more fun than a Rubixs cube.
Cheers, Steve
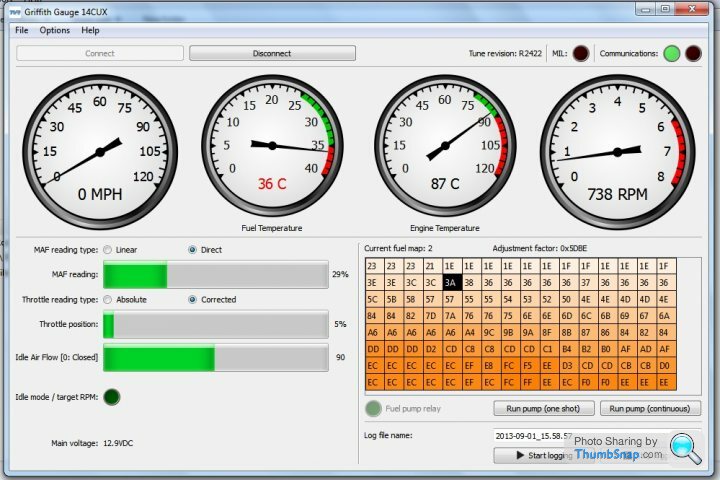
This is really interesting. I've been mucking about with the RoverGauge source code to custimise it for my Griff with silly things like the TVR icon :-)
The Rovergauge target idle doesn't seem to work for older models so I was going to hunt around for the target idle register on mine (assuming it's as easy as that). So far I've just changed the screen around a little to make it easiser to see on the fly with more appropriate ranges and dumped the lambda data indication and changed the idle control vale to map to its 180 steps directly.
A friend of mine from work has gone a huge step forwad on his Toyota and built some hardware which emulates a ROM map but it can all be adjusted on the fly. I would assume, given enough effort this is possible for the 14CUX, but I certainly don't have the time to do it.
Anyway, great info, the problem is to really know what to change anything to of course :-)
Attached is a screenshot of my modified RoverGauge I ran today whilst trying to figure out where an air leak was to allow the idle valve to operate somewhere in the middle of its range.
Cheers, Neil
Kabaman - Very cleaver and well done, I love the recalibrated dials and the icon.
The lack of target idle is a known issue with early EPROM revisions and Colin said he would look into it one day. All I know is the base idle speed is held in the same location for both revision, at $0176 and $0177 on the EPROM, which is mapped to C176 and C177 in RAM. If you knew the calculation you could temporary display the base idle speed. Maybe worth asking Colin for help on the RoverGauge thread at
http://www.pistonheads.com/gassing/topic.asp?h=0&a...
Steve
Well Colin's done all the work. I'm just playing. :-)
It's on Colin's to do list regarding idle. I'd like to get to the bottom of it as sometimes mine seems to stay at high idle if I cruise, foot off gas, other times it doesn't.
I need to start modding the app or write a script to look into this idle. If I ever make any progress I'll report back.
Cheers,
N
stevesprint said:
Kabaman - Very cleaver and well done, I love the recalibrated dials and the icon.
The lack of target idle is a known issue with early EPROM revisions and Colin said he would look into it one day. All I know is the base idle speed is held in the same location for both revision, at $0176 and $0177 on the EPROM, which is mapped to C176 and C177 in RAM. If you knew the calculation you could temporary display the base idle speed. Maybe worth asking Colin for help on the RoverGauge thread at
http://www.pistonheads.com/gassing/topic.asp?h=0&a...
Steve
It looks like the early 14CUX firmware revisions simply don't store the live target idle speed in RAM. (In fact, the location at which the target idle is stored in later versions is completely unused in the early ones.)The lack of target idle is a known issue with early EPROM revisions and Colin said he would look into it one day. All I know is the base idle speed is held in the same location for both revision, at $0176 and $0177 on the EPROM, which is mapped to C176 and C177 in RAM. If you knew the calculation you could temporary display the base idle speed. Maybe worth asking Colin for help on the RoverGauge thread at
http://www.pistonheads.com/gassing/topic.asp?h=0&a...
Steve
--Colin
vjj said:
THis is all very interesting - and time-consuming
My advice - call Mr Adams of tornado systems - 400 quid for a map and 15 minutes to fit.
Thats not "remapping", its just plugging in a pre mapped chip from previous car of the same spec'. Only any use if you have not modified the engine in any way, and its in prime condition.My advice - call Mr Adams of tornado systems - 400 quid for a map and 15 minutes to fit.

blitzracing said:
Thats not "remapping", its just plugging in a pre mapped chip from previous car of the same spec'. Only any use if you have not modified the engine in any way, and its in prime condition.
 Best guess is just that Pre Mapped and seeing as the whole point of mapping is to optimize
  pretty pointless and likely or unlikely to be better than what you got fitted already
  its like sharing a Megasquirt or whatever ECU map with someone on a similar spec
  settings may be of use but the fuel map will/can be off & possibly considerably
  Stevesprint interesting post
As I have commented earlier this is all fascinating stuff and Stevesprint's post is great along with the updates. I Like the follow on from Kaberman, nice update to the RoverGauge software. I look forward to having a dabble with this
In answer to some of the posts re amateur involvement/work like brakes etc and of course looking at the ECU mapping; if in doubt do not attempt it, that is very very important as damage or worse could result!
There are many of us though who have a backgound or a level of competence which means we enjoy working on our cars and actually end up with a better job (personal opinion), and we are not paying out collossal charges for work.
I very much appreciate there are those who cannot or are not confident in carrying out work, and that is where others can help and support or the reliable trusted specialists come into there own.

Curiosity got the better of me over the weekend so I copied my fuel map and idle speed into a 1994 Land Rover EPROM. As I don’t have a gas analyser I don’t have the full story but after a light duty 20 minute drive the noticeable good points are as follows:
1. Smoother when feathering the throttle at slow speeds
2. Holds idle up slightly while coasting and then drops down each time I stop. Is this a temporary feature while the ECU is leaning?
3. I didn’t notice the smell of fumes as much, but that might be wishful thinking as my mind was on other things.
The only bad points are I had to be careful not to stall while warming up and more serious the overrun was much much quieter and that’s unacceptable in a TVR.
I guess it’s these operating characteristics that makes Mark Adams Tornado chip really shine as he can cherry pick the best features. Maybe I’ll have to experiment with the Tuneable accelerator & the coolant temperature tables next to see if it helps.
Please don’t try this at home as Mark Adams is a professional electronics engineer who has tuned over 2000 Rover V8s and I’m just a big kid who likes to experiment and learn about my toys.
Edited by stevesprint on Wednesday 4th September 00:19
Gassing Station | Griffith | Top of Page | What's New | My Stuff