Citroen door mirror woe's
Discussion


Storm Guy said:
Very nice meeting and chatting with you earlier today Brian. Weather was perfect and a great day all round.
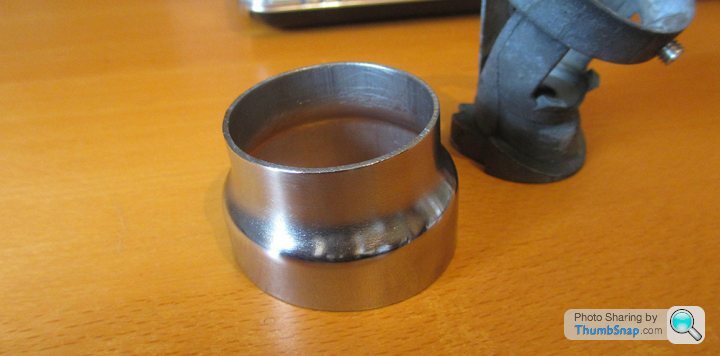
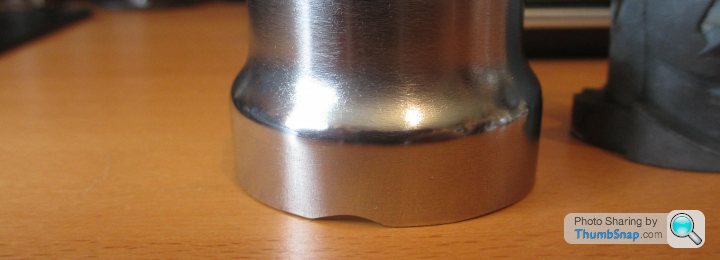
For those at Burghley who enquired about the little additional mod to the wing mirrors....these were just a simple add on to replace the plastic covers which had started to 'fray' at the edges. Shame to obviously cover the lovely boss, and thought certainly not with a cheap plastic part, hence a little something to subtley highlight the area. Just an exhaust reducer - 50.8mm to 41.27mm stainless Steel - cut to match the profile of the exitsing part - fits perfectly.
HTH
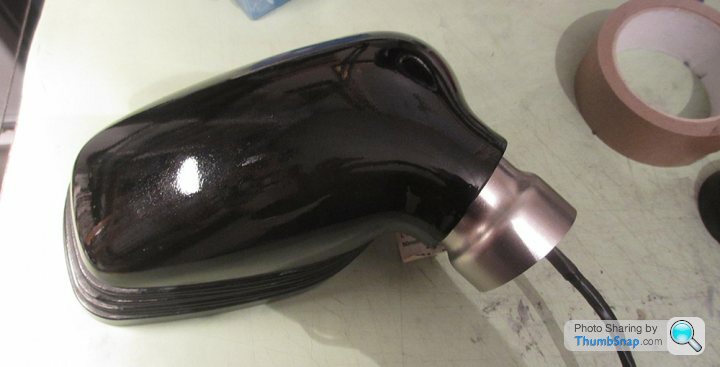

They look fantastic. Please can I have more details? What are they off and where did you get them?For those at Burghley who enquired about the little additional mod to the wing mirrors....these were just a simple add on to replace the plastic covers which had started to 'fray' at the edges. Shame to obviously cover the lovely boss, and thought certainly not with a cheap plastic part, hence a little something to subtley highlight the area. Just an exhaust reducer - 50.8mm to 41.27mm stainless Steel - cut to match the profile of the exitsing part - fits perfectly.
HTH
Oldred_V8S said:
They look fantastic. Please can I have more details? What are they off and where did you get them?
Thanks - they are just exhaust reducers, these ones off eBay but am sure available at any appropriate local exhaust specialist / pipe fabricator. Search Ebay with exhaust reducer with the above stated size and bobs your uncle.Hth


Storm Guy said:
Just an exhaust reducer - 50.8mm to 41.27mm stainless Steel - cut to match the profile of the exitsing part - fits perfectly.
Very nice Asaad, they look OEM you'd never guess its an exhaust reducer, what a brilliant idea 
How are you making the cut it looks super neat, would you consider making me a set?
I'd be happy to pay, your collars compliment Brian's excellent kit perfectly

petepetrolhead said:
Storm Guy great to chat with you on Sunday and thanks for posting details of your exhaust reducer mod - top notch!
Likewise Peter - no probs and thanks.ChimpOnGas said:
Very nice Asaad, they look OEM you'd never guess its an exhaust reducer, what a brilliant idea
How are you making the cut it looks super neat, would you consider making me a set?
I'd be happy to pay, your collars compliment Brian's excellent kit perfectly
Many thanks Dave - Cut is simply by hand with a large fine hacksaw in vice, then finished flat to required size (see below) with metal file (and edges with rat tail to de-burr). Mark up tube with dims marginally longer than the original plastic piece (Pic A), noting and taking account of the fact that the reducer has a gradual step as opposed to a sharp step of the original. This will affect how high you can pull up the part to reveal the grub screw. Obviously with the sharp step, the original can be rotated and pulled up very tight to the underside of the wing mirror to show the screw.How are you making the cut it looks super neat, would you consider making me a set?
I'd be happy to pay, your collars compliment Brian's excellent kit perfectly
Re making them, would love to but just no time and certainly more economical (and satisfying) for the end user to make. However, real reason would be the custom fit element. Am sure a generic basic cover could be made but more than likely would need to be tweaked to fit properly - particularly re access to the grub screw, and any inconsistencies in wing mirror moulding or fixing positions.
The pics below (B) show first attempt, with access to the grub screw from the long side (ie a slot at the bottom when fitted, but then having to be turned through 180 to access the grub screw, which of course is situated at the top. Not the preferred solution being a bit crude, but with careful adjusting of the length of the opposite ends of the cut tube, was able to get good access to the grub screw with simply a slight 'cut-out' - Pic C.
Upper length needs to be long enough to adequately protect the inners from weather (sliding under the wind mirror) and also short enough to allow the whole thing to slide up for access to the screw. The lower length of course needs to be short enough to give this access.
Bit long winded but hth.
Pic A
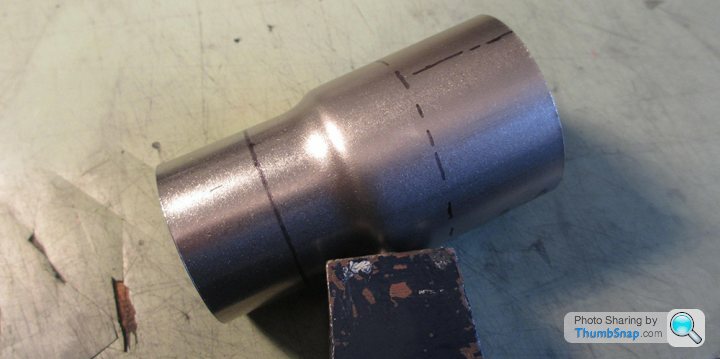
Pic B
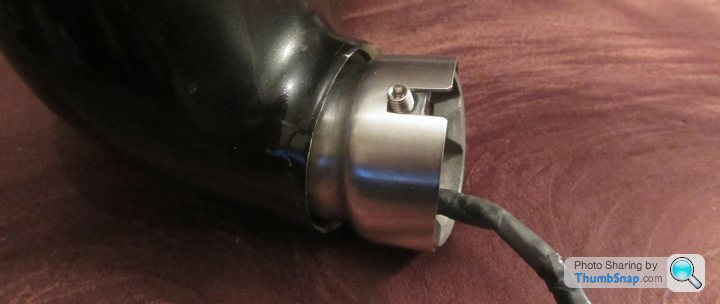
Pic C
......Back to the boss...(apologies on thread jack Brian)
Storm Guy said:
Many thanks Dave - Cut is simply by hand with a large fine hacksaw in vice, then finished flat to required size (see below) with metal file (and edges with rat tail to de-burr). Mark up tube with dims marginally longer than the original plastic piece (Pic A), noting and taking account of the fact that the reducer has a gradual step as opposed to a sharp step of the original. This will affect how high you can pull up the part to reveal the grub screw. Obviously with the sharp step, the original can be rotated and pulled up very tight to the underside of the wing mirror to show the screw.
Re making them, would love to but just no time and certainly more economical (and satisfying) for the end user to make. However, real reason would be the custom fit element. Am sure a generic basic cover could be made but more than likely would need to be tweaked to fit properly - particularly re access to the grub screw, and any inconsistencies in wing mirror moulding or fixing positions.
The pics below (B) show first attempt, with access to the grub screw from the long side (ie a slot at the bottom when fitted, but then having to be turned through 180 to access the grub screw, which of course is situated at the top. Not the preferred solution being a bit crude, but with careful adjusting of the length of the opposite ends of the cut tube, was able to get good access to the grub screw with simply a slight 'cut-out' - Pic C.
Upper length needs to be long enough to adequately protect the inners from weather (sliding under the wind mirror) and also short enough to allow the whole thing to slide up for access to the screw. The lower length of course needs to be short enough to give this access.
Bit long winded but hth.
Pic A
Pic B
Pic C
......Back to the boss...(apologies on thread jack Brian)
Superb Asaad, many thanks for the instructions Re making them, would love to but just no time and certainly more economical (and satisfying) for the end user to make. However, real reason would be the custom fit element. Am sure a generic basic cover could be made but more than likely would need to be tweaked to fit properly - particularly re access to the grub screw, and any inconsistencies in wing mirror moulding or fixing positions.
The pics below (B) show first attempt, with access to the grub screw from the long side (ie a slot at the bottom when fitted, but then having to be turned through 180 to access the grub screw, which of course is situated at the top. Not the preferred solution being a bit crude, but with careful adjusting of the length of the opposite ends of the cut tube, was able to get good access to the grub screw with simply a slight 'cut-out' - Pic C.
Upper length needs to be long enough to adequately protect the inners from weather (sliding under the wind mirror) and also short enough to allow the whole thing to slide up for access to the screw. The lower length of course needs to be short enough to give this access.
Bit long winded but hth.
Pic A
Pic B
Pic C
......Back to the boss...(apologies on thread jack Brian)

Hi all.
I realise that for some of you the words "horse and bolted" may come to mind but I have been asked to put together a "How Too" for those of you who haven't had the pleasure of tackling this job before. I would ask those of you who have fitted this kit to please add to or correct my narrative as you feel necessary.
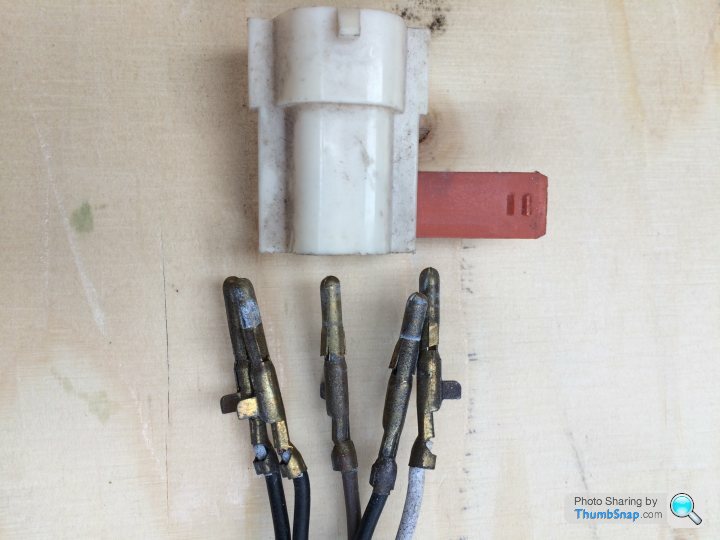
One of the first things to consider before you approach this, is the wiring. If the mirrors are still adjustable by the switch gear then the connector inside the door will need to be disconnected and either dismantled or cut off and rejoined afterwards. You should be able to get to this by removing the door speaker and finding the mirror wiring.
If you want to dismantle the five pin connector, which is how it was installed, this is done by withdrawing the red bar that slides through the side of the body of the connector.
At this point I will issue a WARNING.
Please make a drawing of the position and colour of the wires BEFORE you get carried away and dismantle it without doing so.
I would suggest that some WD40 be applied to the bar to help it on its way bearing in mind this will have been in place for fifteen years, plus.
Push the red bar through as far you can then grip the exposed end with a pair of pliers and pull it out.
The brass pins have a pair of spring out “barbs” that will need to be squashed back into the pin. You can see them in the photo. This will release the pins and allow you to withdraw them.
Since writing this piece I have repaired the loom in my drivers door and have had varying success getting some pins out.
One plug I replaced completely and they wouldn’t move
The next step is to remove the mirror from the door.
Applying some of that WD40 to the base of the mount before you start may help if it's been there for a while but I'm guessing that if you have bought or are thinking of buying one of my kits the mirrors are already suspect!!!
Please take the time to protect the door area around the mirror to prevent any damage to the paintwork. Also, if you can lift the plastic collar and see the grub screw, place a strip of masking tape alongside it and mark its position to give you a starting point when you put the mirror back.
To remove the mirror turn it in an anti-clockwise direction through the two or three indent positions till it stops then take a good grip of it and apply more pressure in the same direction till it releases and continue rotating it carefully till you can lift it free of the door.
There is an outside chance that the inner support post, part number U0649, may break, which apparently, it is designed to do in the event of an accident. Thankfully these parts are available from the usual TVR suppliers.
With the mirror on the bench you will now be able to undo the grub screw with the Allen key from the side of the support post and remove the screwed mount from the post.
At this point with the mirror out, take the time to attend to the wiring if it has been cut and prepare it ready to reconnect. It would also be good to overhaul the inner workings of the mirror by undoing the Torx bolt, removing the washer and rubber buffer. Clean the area and apply some silicone grease or Vaseline to the buffer and replace with the washer and bolt. Final adjustment comes later.
While the mirror is still on the bench you can take the opportunity to replace the old grub-screws with the new stainless steel ones, applying some copper-ease or just plain grease to them to prevent seizing.
Fitting the kit is now quite straight ( Well I think so. :-))
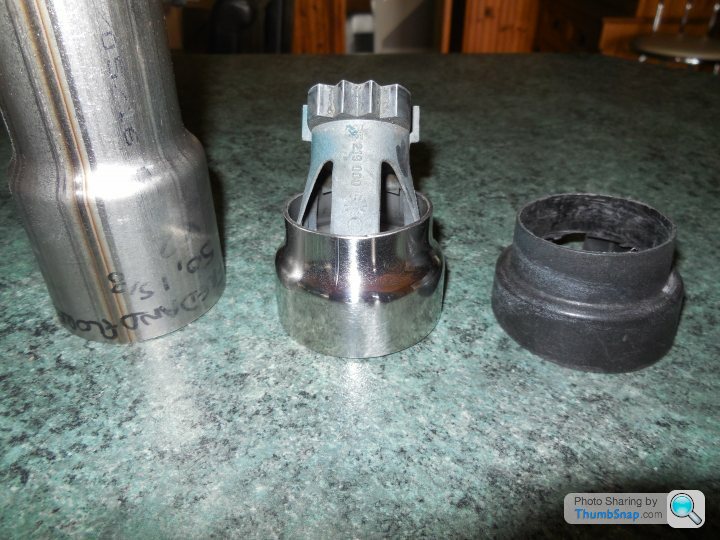
Having first cleaned the area, take the thread clearing tool and insert the plain lead-in end into the brass door insert.
Rotate it in a clockwise direction till it engages with the thread then keep on screwing into the door to clear the thread of any muck and rubbish that's living there.
Unscrew the tool and clear any remaining debris, an old toothbrush is useful.
Before fitting the post take the rubber strips and trial fit them into the door recess. As we know not all our cars are the same so I have cut them too long to allow you can trim them to suit your own car.
Once you have trimmed them to the correct length with a sharp blade you should be able to use some contact adhesive to glue the ends together and make a doughnut that slips over the post.
Time to put the new mounts into the door. Having first placed the large plastic washer, retrieved from the old mount, onto the new mount, screw it into the door by hand till it touches the base, then with the pin tool and an 8mm Allen key tighten the post firmly into the door.
Now take the rubber strips or doughnuts and insert them into the recess around the post.
Turning to the mirrors it's time to adjust the Torx bolt. If you have a bench vice to hand you can put an old mount in the vice to do this, if not, you can do this on the door.
Attach the mirror and tighten the grub screw. Now rotate the mirror body and decide if it is too loose or too tight. Undo the grub screw, remove the mirror and adjust the Torx bolt to attain a smooth but firm movement.
When you are happy with this you can fit the mirrors to the posts in the doors.
I found that the drivers mirror was best in the central of the three positions with the top of the mirror body horizontal, no I didn't use a spirit level, I was then able to adjust the mirror itself to see rearward clearly.
The passenger side needs to be on the inner position to allow the body to be horizontal.
I feel that this makes them look even or level but of course the final lines are up to you.
Reconnecting the wiring may be the last thing to do but you may find that a minor adjustment of the body is needed to get the full use of the mirrors motor travel.
I hope you find this description helpful and that you will be happy with the final result.
Cheers
Brian.G
Edited by Griffo400 on Sunday 7th May 05:58
Edited by Griffo400 on Sunday 7th May 06:02
Edited by Griffo400 on Sunday 7th May 06:06
Edited by Griffo400 on Friday 22 May 09:03
Griffo400 said:
.....Push the red bar through as far you can then grip the exposed end with a pair of pliers and pull it out.
This will release the pins and allow you to withdraw them easily.
......
The bar is actually a secondary restraint for the pins and sits behind the 'flag' you can see sticking out from the side of the pin.This will release the pins and allow you to withdraw them easily.
......The primary restraint is the pair of barbs which you can best see on the middle pin in the photo. these have to be pressed in before the pins can be removed.
Before refitting you need to bend the barbs back out with a sharp knife.
Replacement pins are available but the ones with the flag are no longer made.
The system is called Lucas RISTS if you are searching for pins.
Steve
Ordered a kit from Brian on Thursday and delivered today. Fantastic quality and a pretty straightforward job to sort out my annoying drivers mirror. Highly recommended.
Rather than replace connectors both sides as per Penelope's suggestion the better way is just to refit the 5 way plug on the wiring form the mirror as per the original. Available here
Rather than replace connectors both sides as per Penelope's suggestion the better way is just to refit the 5 way plug on the wiring form the mirror as per the original. Available here
Any thoughts on using thread-lock on this to prevent the threaded part from becoming loose again.
I'm currently carrying out he modification but after finding one of my turret covers cracked I'm now on hold awaiting delivery of some stainless steel exhaust reducers so that I can do Storm Guy's mod too
I'm currently carrying out he modification but after finding one of my turret covers cracked I'm now on hold awaiting delivery of some stainless steel exhaust reducers so that I can do Storm Guy's mod too
A couple of quick and stupid question for those of you who've fitted the kit on an unbroken set of mirrors.
When you unscrew the mirror from the door, will the body of the mirror clear the window frame? If not how much dismantling of the mirror needs to be down to allow it to unscrew?\
Where is the best pace to hold the mirror to unscrew it? I want to try and avoid snapping the mirror base if I can.
When you unscrew the mirror from the door, will the body of the mirror clear the window frame? If not how much dismantling of the mirror needs to be down to allow it to unscrew?\
Where is the best pace to hold the mirror to unscrew it? I want to try and avoid snapping the mirror base if I can.
Colin RedGriff said:
A couple of quick and stupid question for those of you who've fitted the kit on an unbroken set of mirrors.
When you unscrew the mirror from the door, will the body of the mirror clear the window frame? If not how much dismantling of the mirror needs to be down to allow it to unscrew?\
Where is the best pace to hold the mirror to unscrew it? I want to try and avoid snapping the mirror base if I can.
I tried but failed, If the turret is firmly attached to the door socket via the grub screw then you may get away with not removing the mirror covers. Mine were both slipping on the grub screw so I had to remove the front & rear covers to could get access so that I could insert a screwdriver onto one of the cut-outs on the door socket. That allowed me to use a hammer to start the unscrewing of the door socket. The front of the mirrors are held on with split washers, these I found very difficult to remove without breaking the plastic posts.When you unscrew the mirror from the door, will the body of the mirror clear the window frame? If not how much dismantling of the mirror needs to be down to allow it to unscrew?\
Where is the best pace to hold the mirror to unscrew it? I want to try and avoid snapping the mirror base if I can.
Gassing Station | Griffith | Top of Page | What's New | My Stuff