1995 Griffith 500 restoration
Discussion


RobXjcoupe said:
A bit of an update.
I visited the car recently, freshly painted body now fitted to the chassis with all the running gear.
Body looks good, chassis looks good.
Dirty engine fitted back on brand new chassis, gearbox and diff in a similar condition. Was assured these items would be cleaned and looking good. Before strip down I actually asked to take these parts away to clean ready for the new chassis, was told it was part of the price so no need to take away. Was told too many hours involved to do that. Now wondering if gearbox,diff and engine have had an oil change as was originally told. My car also had a faulty alarm when dropped off. Again was told wouldn’t be an issue. No mention if this has or is going to be repaired or replaced.
Secondly I asked for my under cover twin lights to be fitted with deleted lower front main beam lamps. The front opening to be carefully opened up into a nice oval before paint. This was forgotten. So no front grille mod. Was told this could still be done. I said I wouldn’t want blended in paint on the front after a totally new paint job. So a 7” headlight upgrade was given as a sorry.
Lastly which is really bizarre is the interior. I said I would complete a new interior save the dash and windscreen surround. So both my front seats were stripped to component level?!
As a sorry they will fit my supplied new covering for the targa roof and fold down rear.
I’m gobsmacked. More so as I thought I’d chosen a competent specialist tvr garage to do the work.
The work on the chassis and body is good but both not what I originally asked for. I actually asked for a black chassis but got a white chassis.
Now I feel I need to hold my tongue to have the last bit of work completed so I can pick the car up and trailer away.
Sounds exactly what my experience of an alleged TVR specialist did to me. I visited the car recently, freshly painted body now fitted to the chassis with all the running gear.
Body looks good, chassis looks good.
Dirty engine fitted back on brand new chassis, gearbox and diff in a similar condition. Was assured these items would be cleaned and looking good. Before strip down I actually asked to take these parts away to clean ready for the new chassis, was told it was part of the price so no need to take away. Was told too many hours involved to do that. Now wondering if gearbox,diff and engine have had an oil change as was originally told. My car also had a faulty alarm when dropped off. Again was told wouldn’t be an issue. No mention if this has or is going to be repaired or replaced.
Secondly I asked for my under cover twin lights to be fitted with deleted lower front main beam lamps. The front opening to be carefully opened up into a nice oval before paint. This was forgotten. So no front grille mod. Was told this could still be done. I said I wouldn’t want blended in paint on the front after a totally new paint job. So a 7” headlight upgrade was given as a sorry.
Lastly which is really bizarre is the interior. I said I would complete a new interior save the dash and windscreen surround. So both my front seats were stripped to component level?!
As a sorry they will fit my supplied new covering for the targa roof and fold down rear.
I’m gobsmacked. More so as I thought I’d chosen a competent specialist tvr garage to do the work.
The work on the chassis and body is good but both not what I originally asked for. I actually asked for a black chassis but got a white chassis.
Now I feel I need to hold my tongue to have the last bit of work completed so I can pick the car up and trailer away.
I spoke to them about what I wanted done to my car for weeks before my car went to them to be clear and concise about what I wanted. Many agreements and promises made.
I typed out a long 'job sheet' and left a paper copy in the car AND emailed a copy to the 'specialist' office .
When I got the car back, many things were done I didn't ask for and things I did ask for weren't done. So many things in prior conversations where stated as being 'included'. Invoice seriously contradicted that. Fortunately, I have absolute proof of I was stated as being included.
I'm not directly naming said company because it's very likely to get legal.
Mighty Flex said:
Always an interesting read when I see new posts in here.
We did have a conversation about interior work by email, but this may be useful to others:
I investigated my interior a bit better and my best estimate is that it was originally biscuit, but has been sprayed (with varied levels of attention) doeskin or magnolia. It comes off very quickly back to the original colour with cellulose thinners, so this has got me thinking about returning it and then patching what is left with more care and attention.
I have the early type seats with the flat base- would it just be straightforward forward to change to the later seat base style as part of a refurbishment? That said, I have tried a mx5 seat in place of the tvr one and it is so much better...
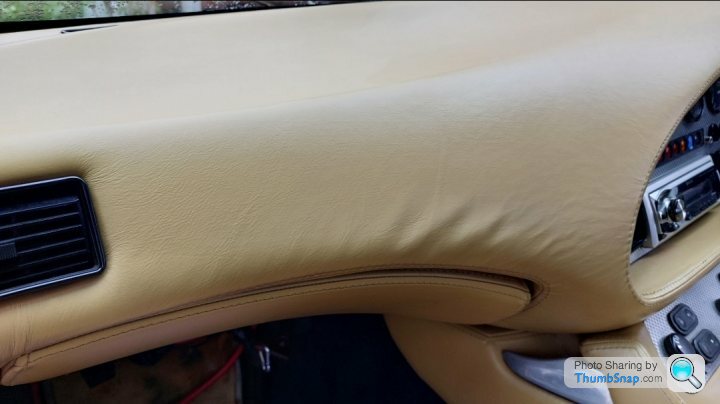
I expect I'm not alone in having a wrinkly dash: it's full leather an I expect it may have shrunk, is there a way to save it? I have wondered if it will relax with a feed?
My dials are also looking a bit battered (black rings) so it's good to see what can be done without resorting to new.
This is just my opinion to possibly remove those wrinkles on the dash. Feed won’t work as the dash has technically been painted to recolour it and thus sealing the top of the leather. Feed would only soften the leather and wouldn’t remove the wrinkles. The process below would be used in conjunction with any leather softening.We did have a conversation about interior work by email, but this may be useful to others:
I investigated my interior a bit better and my best estimate is that it was originally biscuit, but has been sprayed (with varied levels of attention) doeskin or magnolia. It comes off very quickly back to the original colour with cellulose thinners, so this has got me thinking about returning it and then patching what is left with more care and attention.
I have the early type seats with the flat base- would it just be straightforward forward to change to the later seat base style as part of a refurbishment? That said, I have tried a mx5 seat in place of the tvr one and it is so much better...
I expect I'm not alone in having a wrinkly dash: it's full leather an I expect it may have shrunk, is there a way to save it? I have wondered if it will relax with a feed?
My dials are also looking a bit battered (black rings) so it's good to see what can be done without resorting to new.
First off the dash needs to be removed from the car.
Remove the glovebox lid also. This gives access to the leather tucked behind the dash panel. Using a heat gun, you need to warm up the leather to soften the glue. This will burn the sprayed on colour if it gets too hot.
Carefully pull the tucked over edges off the dash panel adjacent to the offending wrinkled area all the way to the wrinkled leather so you can get your fingers under the wrinkles.
All the time gently warming the leather to keep the old glue soft.
Now to remove the wrinkles you need to pull the leather left to right carefully without creating any bunching which will simply move the wrinkles to another part of the dash and at the same time stretch the leather back over the dash using fresh high temp contact adhesive to glue it all back in place. The stitched line around the glove box aperture is your guide to how much leather can be pulled down around the dash. Pull too hard and you have a wonky stitch line. To fit a new cover, you start with the stitched lines so it’s all straight and remove excess from the back of the dash. It’s not an easy job.
When complete you can prep the entire dash for a fresh recolour.
As the dash is out it also allows refurbishment of your dials, bulbs, switches etc
Harvy500 said:
RobXjcoupe said:
A bit of an update.
I visited the car recently, freshly painted body now fitted to the chassis with all the running gear.
Body looks good, chassis looks good.
Dirty engine fitted back on brand new chassis, gearbox and diff in a similar condition. Was assured these items would be cleaned and looking good. Before strip down I actually asked to take these parts away to clean ready for the new chassis, was told it was part of the price so no need to take away. Was told too many hours involved to do that. Now wondering if gearbox,diff and engine have had an oil change as was originally told. My car also had a faulty alarm when dropped off. Again was told wouldn’t be an issue. No mention if this has or is going to be repaired or replaced.
Secondly I asked for my under cover twin lights to be fitted with deleted lower front main beam lamps. The front opening to be carefully opened up into a nice oval before paint. This was forgotten. So no front grille mod. Was told this could still be done. I said I wouldn’t want blended in paint on the front after a totally new paint job. So a 7” headlight upgrade was given as a sorry.
Lastly which is really bizarre is the interior. I said I would complete a new interior save the dash and windscreen surround. So both my front seats were stripped to component level?!
As a sorry they will fit my supplied new covering for the targa roof and fold down rear.
I’m gobsmacked. More so as I thought I’d chosen a competent specialist tvr garage to do the work.
The work on the chassis and body is good but both not what I originally asked for. I actually asked for a black chassis but got a white chassis.
Now I feel I need to hold my tongue to have the last bit of work completed so I can pick the car up and trailer away.
Sounds exactly what my experience of an alleged TVR specialist did to me. I visited the car recently, freshly painted body now fitted to the chassis with all the running gear.
Body looks good, chassis looks good.
Dirty engine fitted back on brand new chassis, gearbox and diff in a similar condition. Was assured these items would be cleaned and looking good. Before strip down I actually asked to take these parts away to clean ready for the new chassis, was told it was part of the price so no need to take away. Was told too many hours involved to do that. Now wondering if gearbox,diff and engine have had an oil change as was originally told. My car also had a faulty alarm when dropped off. Again was told wouldn’t be an issue. No mention if this has or is going to be repaired or replaced.
Secondly I asked for my under cover twin lights to be fitted with deleted lower front main beam lamps. The front opening to be carefully opened up into a nice oval before paint. This was forgotten. So no front grille mod. Was told this could still be done. I said I wouldn’t want blended in paint on the front after a totally new paint job. So a 7” headlight upgrade was given as a sorry.
Lastly which is really bizarre is the interior. I said I would complete a new interior save the dash and windscreen surround. So both my front seats were stripped to component level?!
As a sorry they will fit my supplied new covering for the targa roof and fold down rear.
I’m gobsmacked. More so as I thought I’d chosen a competent specialist tvr garage to do the work.
The work on the chassis and body is good but both not what I originally asked for. I actually asked for a black chassis but got a white chassis.
Now I feel I need to hold my tongue to have the last bit of work completed so I can pick the car up and trailer away.
I spoke to them about what I wanted done to my car for weeks before my car went to them to be clear and concise about what I wanted. Many agreements and promises made.
I typed out a long 'job sheet' and left a paper copy in the car AND emailed a copy to the 'specialist' office .
When I got the car back, many things were done I didn't ask for and things I did ask for weren't done. So many things in prior conversations where stated as being 'included'. Invoice seriously contradicted that. Fortunately, I have absolute proof of I was stated as being included.
I'm not directly naming said company because it's very likely to get legal.
My better experience shows the non specialist that can restore any marque is the real specialist. Restoring parts rather than replace, modifying according to customer requirements noting any issues before commencing with any work.
Happy new year!
Been a while doing anything trev wise. So finished off the wiring ie shortening the loom to the fusebox.
Plugged battery in for a test and nowt. Plugged the alarm back in and nothing. Well the remotes are not doing anything. So my question is do my remotes need syncing with the alarm module?
The alarm module was sent away and came back with a good bill of health and an upgrade. The remotes were also checked and with new batteries work.
I found a rather simple method to sync the remotes which still didn’t do anything visually with the hazard lights but the starter then cranked the engine but no fuel pump prime. I could here a relay click on pause then click again. Presumably the fuel pump relay?
If I unplug the alarm module the starter doesn’t crank the engine. Plug alarm back in, starter works but no fuel pump????
I’ve checked and double checked my wiring and visually all corresponds with my pictures before and after. I literally shortened the loom one wire at a time so no mistakes were made.
Any ideas of how to sync my foxguard alarm would be a good start. A double check so to speak
Thanks in advance for any help
Dave at HF Solutions knows the Foxguard alarm well enough to have told me how to bypass the immobilising. https://www.hf-solutions.co.uk/TVR
I had problems with the starter motor not cranking, in fact zero response at all on the starter circuit, though the fuel pump primes every time.
I chose to bypass the starter motor circuit only, then discovered the previously installed 'hot start relay kit' was incorrectly wired and falling to bits, so I've made a couple of changes to that circuit with added fuses and an uprated relay on advice of the wonderful people on here - all can be uncovered on the latter pages of this thread https://www.pistonheads.com/gassing/topic.asp?h=0&...
I mention it because you might find the immobiliser relay inside the alarm has finally given up on your fuel circuit, and it's a simple bypass to test that bit - these wires are not covered in that thread, but you can PM me to find out.
PabloGee said:
Dave at HF Solutions knows the Foxguard alarm well enough to have told me how to bypass the immobilising. https://www.hf-solutions.co.uk/TVR
I had problems with the starter motor not cranking, in fact zero response at all on the starter circuit, though the fuel pump primes every time.
I chose to bypass the starter motor circuit only, then discovered the previously installed 'hot start relay kit' was incorrectly wired and falling to bits, so I've made a couple of changes to that circuit with added fuses and an uprated relay on advice of the wonderful people on here - all can be uncovered on the latter pages of this thread https://www.pistonheads.com/gassing/topic.asp?h=0&...
I mention it because you might find the immobiliser relay inside the alarm has finally given up on your fuel circuit, and it's a simple bypass to test that bit - these wires are not covered in that thread, but you can PM me to find out.
Thank you for the info. I had problems with the starter motor not cranking, in fact zero response at all on the starter circuit, though the fuel pump primes every time.
I chose to bypass the starter motor circuit only, then discovered the previously installed 'hot start relay kit' was incorrectly wired and falling to bits, so I've made a couple of changes to that circuit with added fuses and an uprated relay on advice of the wonderful people on here - all can be uncovered on the latter pages of this thread https://www.pistonheads.com/gassing/topic.asp?h=0&...
I mention it because you might find the immobiliser relay inside the alarm has finally given up on your fuel circuit, and it's a simple bypass to test that bit - these wires are not covered in that thread, but you can PM me to find out.
I have an original wired plug instead of the hot start mod. So I know that circuit is good. I can’t actually turn the alarm on/off. The starter turns though? Unplug the alarm main unit and no turning starter. Checked the fuel pump and ecu relays and they are good. So time to pm you I think
With a bit of help from some well drawn circuit diagrams the non working alarm and no fuel pump prime checked as zero power going to both items. Seems the spare fuse position according to my original TVR driver manual isn’t actually a spare fuse position. Popped said fuse in and the alarm came to life and in turn gave power to the fuel pump. I only looked at that because the supplied circuit diagrams showed two fuses were used for the alarm.
So I’m happy, my shortened main loom to the fusebox isn’t faulty which would have been a mammoth task to check.
Currently my modified battery box has now been removed to fibreglass over moved screw positions and then a coat of satin black and a new carpet outer as it was originally.
Feels like I’m moving forward again

Not much to look at, battery box with a coat of satin black. Didn’t bother fitting carpet to the outside as it’s not seen bolted in position.
Also its a bit nippy in the garage currently and the wiring being moved around won’t do it any favours. I’ve ordered extra wiring components to run the heated seat circuits from the door switches to under the seats. Decided to use relays rather than let the switch take the current. Just thought a failed relay in the future will be easier to change than an obsolete Jaguar s-type heated seat switch
Been a while since I’ve worked on the Griff. So started to tinker again looking at the wiring mods and thinking oh yes lost the power to the fuel pump. That ole chestnut lol.
Easy fix as the offending relay tested was duff.
Strangely had a similar issue with the xj coupe which is the reason I revisited the Griff. The xj issue was a wiring missing from the inertia cutoff switch, but anyway Griff had a replacement fuel pump relay fitted and she fired up lovely.
As the weather is warming up, I can now tinker away again in the garage.
As a recap I need to finalise the modded wiring to push up the windows and complete the heated seat wiring. Dash and dials can then go back in. I have carefully stored all the new trim so will be a relief once fitted and get all that space back. It’s surprising how much flat space is needed storing trim parts.
No time line as it’s just myself doing the work against life battles, if that makes sense
So this is how the battery, ecu and bundle of cables now looks in the passenger footwell.
Ecu is secured behind the battery box in a position TVR possibly designed for it. The back of the battery box has a bracket attached which holds the important ecu and fuel pump relays. I’ve also got the much talked about hot start mod relay also securely attached. The wiring to that is also more secure.
Main fuse is sitting to the left of the battery. An improved location again for maintenance.
The positive terminal has 3 bolt on connectors. Starter motor feed, fusebox feed and a spare of which I’ll use as the power feed for the audio installation. Negative side is original TVR earth clamp. Battery is clamped in place using the red painted two bolt fitting that pushes the battery against a similar fixed bracket behind it and it all sits on a aluminium frame within the glassfibre battery box. That frame is secured through the floor via 2 m16 stainless steel bolts and large diameter stainless steel spreader washers.
So now to remove the battery it’s remove the power connectors and red painted front clamp to simply slid it off the frame within the glassfibre battery box.
This relay holder is original TVR but only held the top 2 relays. Middle two relays are the mod to the windows up circuit. The window switch up position actives the relay to switch a high current circuit rather than through the switch. Windows now go up the same speed as going down. Bottom two relays switch the current for the heated seat circuits. Left and right accordingly. So my switches I fitted in the door trims should last a long time now.
The modified wiring loom from the door to the bottom of A pillar to operate the heated seats. I fitted a pull apart connector just in case the door needs removing in the future. The blue plug with a switch fitted to test the relay kicks in and out. The switch uses an ignition on only live to operate the relay. No flat battery if seats are left on.
Below showing the 3 added fused live circuits to the fusebox. That’s another job finally finished
Above is inside the passenger door, the lower pivot for the door hinge. Mentioned before the passenger door wouldn’t shut without damaging the new paint. As a recap, this was the quality from the tvr specialist.
For adequate access to the hinge pivot the window runner needs to be removed which is the polished part above the door sealed/glued into position. I could gently lift the door with about 30mm of movement so when I actually started to wonder if the pivots were worn and needed replacing I actually found the lower and upper were hand tight. I tightened them up and luckily which is extremely rare for myself the door tightened up with no movement if gently lifted and indeed corrected the panel gap to the rear quarter.
The latch still wasn’t clicking shut. Another easy fix was to clean the latch of the dirt and grime, new grease and the door shuts lovely now.
Below is a picture looking at the floor showing how flush the door shuts after tightening the door hinge pivots.
Now I had stripped the door of the window runners I decided to clean up all the rubber and aluminium components giving everything a clean and getting rid of overspray on the side window edges which if I hadn’t removed would have been impossible to get to.
The aluminium window frame a gave a polish as it was quite stained and with a few stone chip marks. Started with 120 grit emery then wet and dry using brasso as the wet and finished with paper towel and brasso.
The passenger door has had a lot of hours of fettling. I wasn’t totally happy with the window movement up and down. The brackets holding the window guide had a lot of adjustment possibly to aid the hand built assembly when new but I still couldn’t get a good consistent movement. So I thought unbolt the front bottom frame mount and watch the way it flexes when operating the window. Well straight off when unbolted it popped off the bracket. Opening and closing the window didn’t show that much movement but it did operate more smoothly. The gap between the frame and bracket had a couple of washers added and then bolted together again. Then I noticed a bit of play in the mount to the actual bracket holding the glass to the motorised brackets. Bolts were all tight so I loosened it off and again another pop with a gap appearing so more suitable washers bolted back together and I would say as good as it can possibly be now. A bit of a powered donk when it hits the upper and lower limit of the window mechanism. No rubber buffers to adjust that. Finally a lump of shaped rubber to fit on the rear of the glass. Simply super glued by the looks of the original glue remains. Again it didn’t fit adequately. So more filing or rasping to gradually shape the rubber on the inside so the window glass slid nicely within. Cleaning off remnants of old glue and silicon sealer it was ready to reattach. A bit more superglue then carefully filling the grove around the rubber with new sealant and it looks tidy. Not perfect, as a TVR is not perfect lol.
Modified wiring loom could now be fitted within the door and through the A pillar. For those reading the wiring loom sits right at the bottom of the door to clear a lowered window mechanism with cables one side for the electric door mirrors and then the other side of the window to power the motor, speakers and now heated seat.
Then fitting of the door mirror. The connector for the mirror doesn’t fit through the hole in the door. So the pins need to be removed from the connector so as the cable can then be threaded through the hole in the door to the wiring loom within. Hindsight says use two smaller connector plugs but I persevered and removed the pins from the big connector plug. Plus for doing it the hard way is the access to polish up the pins to make a better electrical connection within the door.
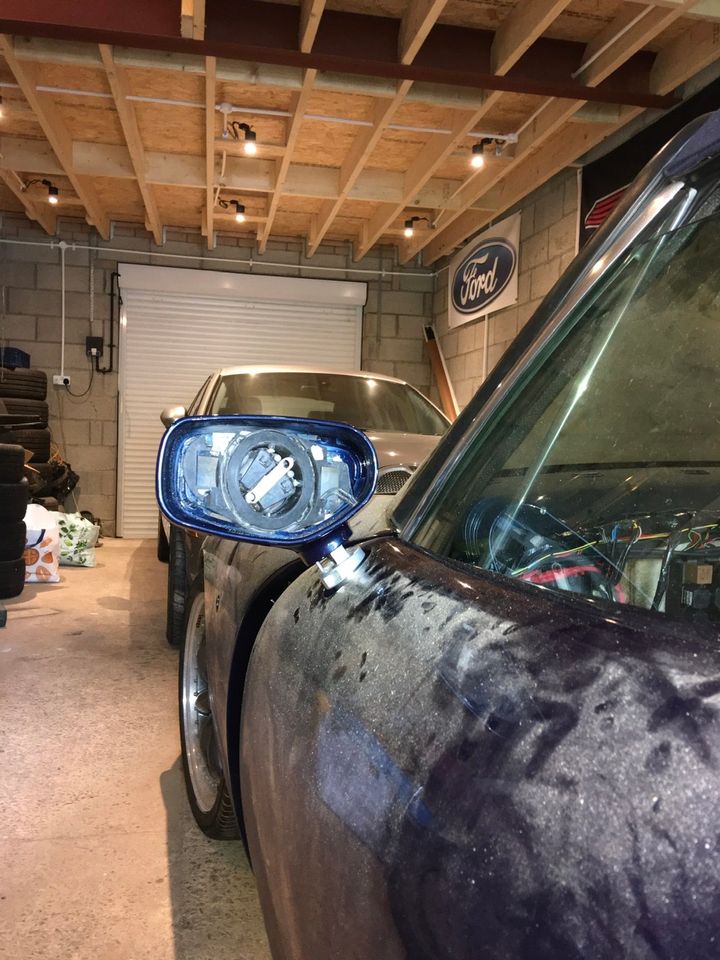
Picture above showing test fit of mirrors on modified extended mounts that fit to the door. These were bought from a fellow TVR enthusiast and gives a near perfect access to tighten up the securing grub screw on the mirror. I think the extra height of the mirror suits the shape of the door.
Hopefully my words are making sense with my work so far.
Next weekend I need to turn the car around and replicate all this work on the drivers door.
Modified wiring loom could now be fitted within the door and through the A pillar. For those reading the wiring loom sits right at the bottom of the door to clear a lowered window mechanism with cables one side for the electric door mirrors and then the other side of the window to power the motor, speakers and now heated seat.
Then fitting of the door mirror. The connector for the mirror doesn’t fit through the hole in the door. So the pins need to be removed from the connector so as the cable can then be threaded through the hole in the door to the wiring loom within. Hindsight says use two smaller connector plugs but I persevered and removed the pins from the big connector plug. Plus for doing it the hard way is the access to polish up the pins to make a better electrical connection within the door.
Picture above showing test fit of mirrors on modified extended mounts that fit to the door. These were bought from a fellow TVR enthusiast and gives a near perfect access to tighten up the securing grub screw on the mirror. I think the extra height of the mirror suits the shape of the door.
Hopefully my words are making sense with my work so far.
Next weekend I need to turn the car around and replicate all this work on the drivers door.
RichB said:
RobXjcoupe said:
<clip> test fit of mirrors on modified extended mounts...
Unless I missed it, how will you finish the extension, will you make a sleeve and spray it to match? Gassing Station | Griffith | Top of Page | What's New | My Stuff