Body lift started
Discussion


Took the plunge today and started work on lifting the body on my Griff to check/clean/paint the outriggers. Just doing the 2" raise rather than a full body off.
Whilst I have the body raised I'm also replacing all the suspension bushes with poly bushes and the shocks/springs with some Racing Reds. I'll also clean and paint the wishbones as the powder coat is starting to flake on them.
I'm using Rob's guide on The Griffith Pages to help me, which so far has been spot on, I've also had his bush removal tool made up as well to help with the suspension bushes.
So far the Griff is off the ground and all the bits are disconnected. I drained and removed the radiator outside the garage before I jacked it up. That was so I didn't have to lie on a damp garage floor. The chassis bolts in the boot are out, as are the seat belt mounting bolts. So far the bolts have come out without any real issue, the key seems to be plenty of penetrating oil and a gradual application of torque to the bolts. I'm using a 16" breaker bar with 1/2" sockets which makes it easy to apply the torque without snatching at the bolts.
Just the rest of the chassis bolts to remove and lift the body, hopefully tomorrow evening.
I'll post some pictures once the body is up and the really dirty work starts.
Once all this is done it will be time for some serious
Colin
Whilst I have the body raised I'm also replacing all the suspension bushes with poly bushes and the shocks/springs with some Racing Reds. I'll also clean and paint the wishbones as the powder coat is starting to flake on them.
I'm using Rob's guide on The Griffith Pages
to help me, which so far has been spot on, I've also had his bush removal tool made up as well to help with the suspension bushes. So far the Griff is off the ground and all the bits are disconnected. I drained and removed the radiator outside the garage before I jacked it up. That was so I didn't have to lie on a damp garage floor. The chassis bolts in the boot are out, as are the seat belt mounting bolts. So far the bolts have come out without any real issue, the key seems to be plenty of penetrating oil and a gradual application of torque to the bolts. I'm using a 16" breaker bar with 1/2" sockets which makes it easy to apply the torque without snatching at the bolts.
Just the rest of the chassis bolts to remove and lift the body, hopefully tomorrow evening.
I'll post some pictures once the body is up and the really dirty work starts.
Once all this is done it will be time for some serious
Colin
Thanks everyone - will try to post some updates as I go along.
HRG said:
Good luck, and don't forget the two bolts under the centre console when you start to lift 
I got the console out yesterday and there does not look to be much room above the bolts, so I'll have to have a closer look tonight.Colin RedGriff said:
Thanks everyone - will try to post some updates as I go along.
There is enought room to just undo them ,but leave them in place IYSWIM.HRG said:
Good luck, and don't forget the two bolts under the centre console when you start to lift
I got the console out yesterday and there does not look to be much room above the bolts, so I'll have to have a closer look tonight.AntonyJ said:
Colin RedGriff said:
Thanks everyone - will try to post some updates as I go along.
There is enought room to just undo them ,but leave them in place IYSWIM.HRG said:
Good luck, and don't forget the two bolts under the centre console when you start to lift
I got the console out yesterday and there does not look to be much room above the bolts, so I'll have to have a closer look tonight.Oh happy days

Finally got round to completing the body lift today. Last few bolts came out easily, I think letting the penetrating oil soak for a couple of days really helped.
Couldn't get the nearside bolt under the console out completely so had to lift the body a bit then undo it a bit more.
Lifting the body was realitvely easy just used some wood to spread the load and jacked it front and rear (carefully).
Outriggers don't look too bad but we'll see what we find when I start to clean them up a bit.
Started to dismantle the suspension. going to do one side at a time so I've got a reference for reassembling.
Front nearside is stripped out and the rear is nearly done but had to stop for the day. Need to find something to support the rear carrier on when I remove the wishbones. Don't really want to disconnect the driveshafts.
anyway a few pictures


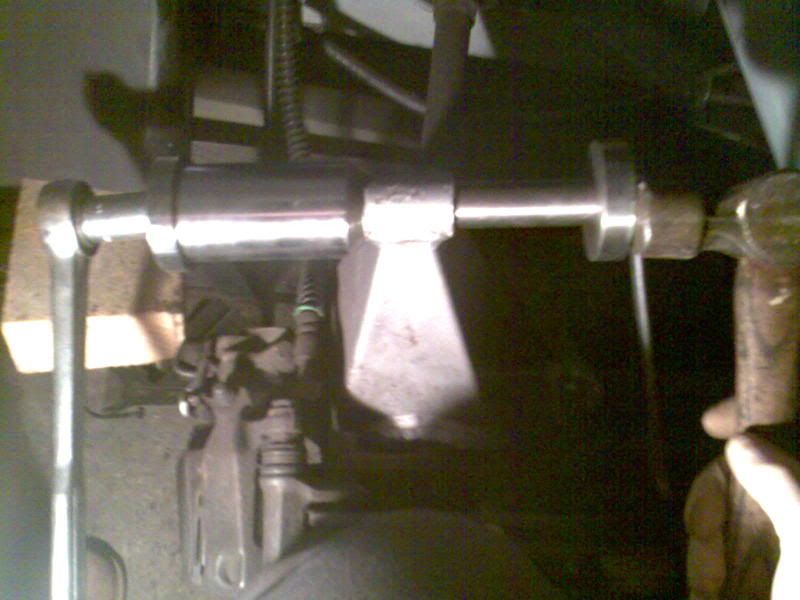
Tried out Rob's bush removal tool and it works well, just take a lot of hitting and then retightening the bolts. Might just use it for the rear carrier bushes and drop the wishbones into a garage and get them to press them out for me.
Couldn't get the nearside bolt under the console out completely so had to lift the body a bit then undo it a bit more.
Lifting the body was realitvely easy just used some wood to spread the load and jacked it front and rear (carefully).
Outriggers don't look too bad but we'll see what we find when I start to clean them up a bit.
Started to dismantle the suspension. going to do one side at a time so I've got a reference for reassembling.
Front nearside is stripped out and the rear is nearly done but had to stop for the day. Need to find something to support the rear carrier on when I remove the wishbones. Don't really want to disconnect the driveshafts.
anyway a few pictures
Tried out Rob's bush removal tool and it works well, just take a lot of hitting and then retightening the bolts. Might just use it for the rear carrier bushes and drop the wishbones into a garage and get them to press them out for me.
Edited by Colin RedGriff on Saturday 10th January 19:00
HRG said:
 For the rear carrier a wide piece of wood wedged between the disc and carrier works a treat!
And then stand the wood on the floor with the carrier on the top?
I'll give that a try - I was go to try and balance it on some bricks or similar. Did you tie it back to the chassis to take the strain off the brake hose?
Colin RedGriff said:
HRG said:
For the rear carrier a wide piece of wood wedged between the disc and carrier works a treat!And then stand the wood on the floor with the carrier on the top?
I'll give that a try - I was go to try and balance it on some bricks or similar. Did you tie it back to the chassis to take the strain off the brake hose?
The lump of wood worked a treat. The drive shaft keeps it all in place.
It was stable enough to use the bush removal tool on as well.
On the subject of the bush tool - while testing it on the rear carriers found I got a much better result with the carrier as it was held steady so clamped a wishbone in my vice and tried it that way and it works a treat. Before I was doing it in my lap and couldn't really tighten the nuts sufficiently.
In the vice I could put more pressure on with the spanner - needs a few hits with the hammer to get the bush moving and for the first bit but after that it becomes easier and tightening the nut is sufficient to keep the bush moving and so it is much quicker. Will probably do all the wishbones myself now I'm more confident with the tool.
It was stable enough to use the bush removal tool on as well.
On the subject of the bush tool - while testing it on the rear carriers found I got a much better result with the carrier as it was held steady so clamped a wishbone in my vice and tried it that way and it works a treat. Before I was doing it in my lap and couldn't really tighten the nuts sufficiently.
In the vice I could put more pressure on with the spanner - needs a few hits
with the hammer to get the bush moving and for the first bit but after that it becomes easier and tightening the nut is sufficient to keep the bush moving and so it is much quicker. Will probably do all the wishbones myself now I'm more confident with the tool. If you are leaving the rear driveshafts in place, how are you going to get at the bushes in the hub carrier? I just took the whole unit off by undoing the six hex bolts on the diff. Was a bit heavy, but made it easier to put in a vice. (I didn't even try to pull the hub)
When I did mine, the wishbones were in remarkably good fettle (98 vintage), with just a few pits that I ground out and re-painted. The two exceptions were the rear lowers, which seem to have been painted, not powderd. These I had sand blasted. The other exception was front tops, where there is a small re-inforcing plate welded inside the U profile (you'll find it). It makes a good resevoir for a bit of spare water, and needed a really good rout out.
Enjoy and good luck.
Bit of an update - haven't been spending much time in the garage recently but got out there tonight.
outrigger chassis rail

centre traingulation plates - before cleaning


Rear body mounting point - prior to cleaning

Rear triangulation plate - prior to cleaning

Nearside is now pretty much ready for painting, chassis rails in pretty good nick just some light surface rust that i've sanded/wire brushed off. Even the traingualtion plates are pretty good.
These are mostly cleaned up now just need to get into the corners to finish them off.
Wishbones will be sent off for shotblasting and powder coating.
outrigger chassis rail
centre traingulation plates - before cleaning
Rear body mounting point - prior to cleaning
Rear triangulation plate - prior to cleaning
Nearside is now pretty much ready for painting, chassis rails in pretty good nick just some light surface rust that i've sanded/wire brushed off. Even the traingualtion plates are pretty good.
These are mostly cleaned up now just need to get into the corners to finish them off.
Wishbones will be sent off for shotblasting and powder coating.
Good update Colin. You lucky boy  But I know how hard it is to clean all that mate, well done
So have your long tube outriggers got more than one seatbelt mounting point?
I'm guessing the sleeve in your pic is one and on mine the triangular section further back holds a tacked nut for the seatbelt bolt.
What are you using to paint it all?
Metal Ready, POR15 and Blackcote for me.
But I know how hard it is to clean all that mate, well done So have your long tube outriggers got more than one seatbelt mounting point?
I'm guessing the sleeve in your pic is one and on mine the triangular section further back holds a tacked nut for the seatbelt bolt.
What are you using to paint it all?
Metal Ready, POR15 and Blackcote for me.
Hi Ian
Yep I'm going the POR15 route too.
In the first picture the threaded sleeve set in the rail nearest the camera is the seatbelt fixing for the lap part of the belt. Further back on top of the chassis rail is the rear body mounting point. The seatbelt reel mounts to the rear mounting plate.
Yep I'm going the POR15 route too.
In the first picture the threaded sleeve set in the rail nearest the camera is the seatbelt fixing for the lap part of the belt. Further back on top of the chassis rail is the rear body mounting point. The seatbelt reel mounts to the rear mounting plate.
Gassing Station | Griffith | Top of Page | What's New | My Stuff