Lund's MG Metro 1275 Engine Build
Discussion


Are those adjustable tie rod arms? - I was looking at a set yesterday at Bingley Hall, but walked away as I didn't see the point in buying them and setting them to standard setting! I did however purchase myself some black bonnet pins, which look spot on - keep the black and vermillion theme going. I also bought a pair of new front seatbelts, new old-stock, unopened Kangol ones. 

 I sadly lost all motivation. I hope to be getting stuck in soon enough.
 Update:
Where do I begin...
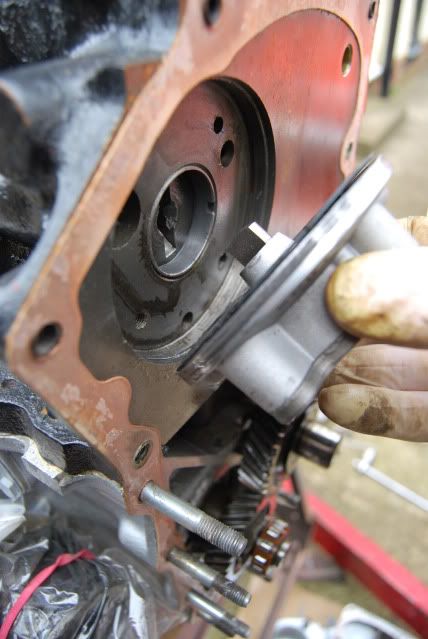
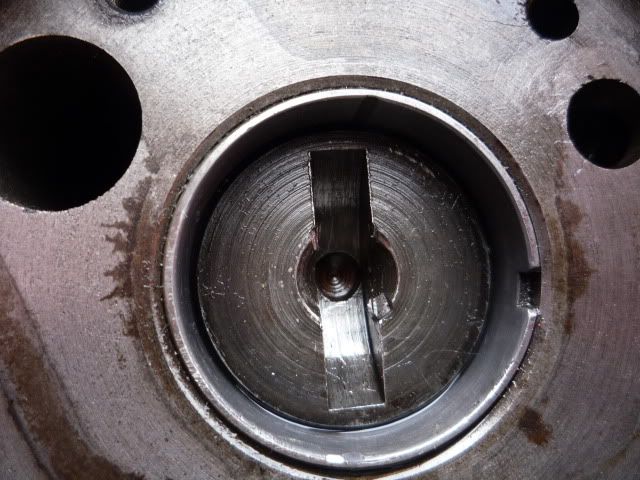
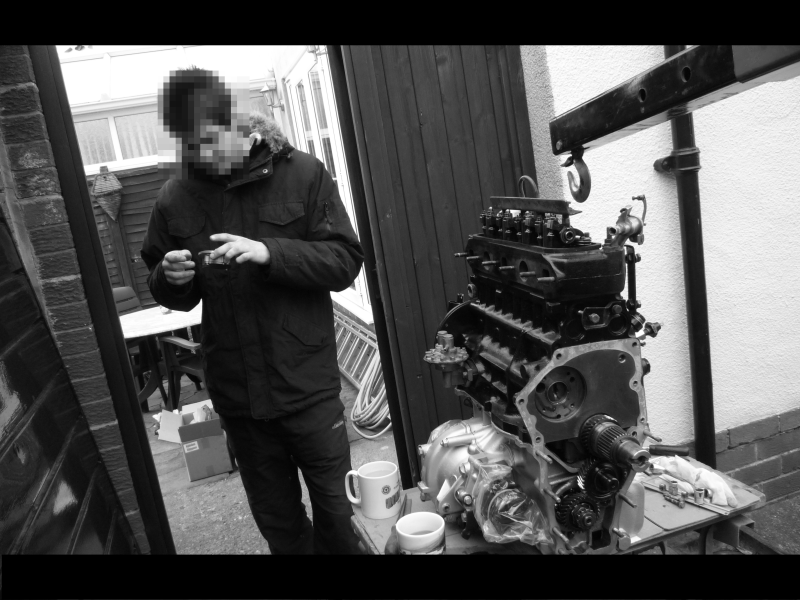
The engine is back out on the bench, flywheel and clutch pulled to get to the oil pump to which I can now confirm wasn't sitting right. Unfortunately the cam has taken the forefront of the damage, but only minor and shouldn't affect things too much.
I had the shock of my life when a drop of water came out of the gearbox sump plug! It was an anti freeze colour and thinking back, when I pulled the hose off the end of the water pump silly Lund forgot to cover the hole in the breather and a drop poured in, I believe that is the cause... (I hope!)
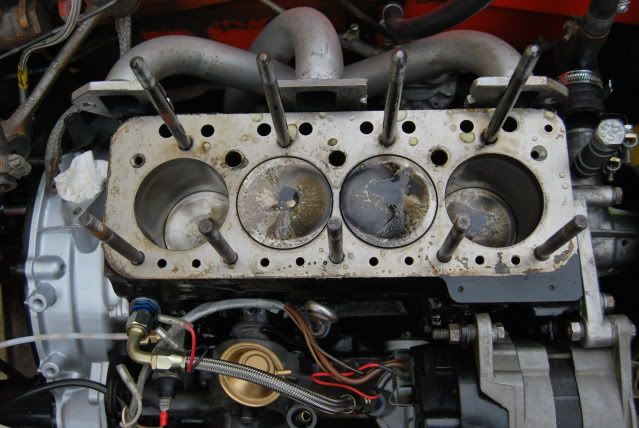
The top of the oil pump is bone dry as you can see from the pic. Yes this was removed like this!
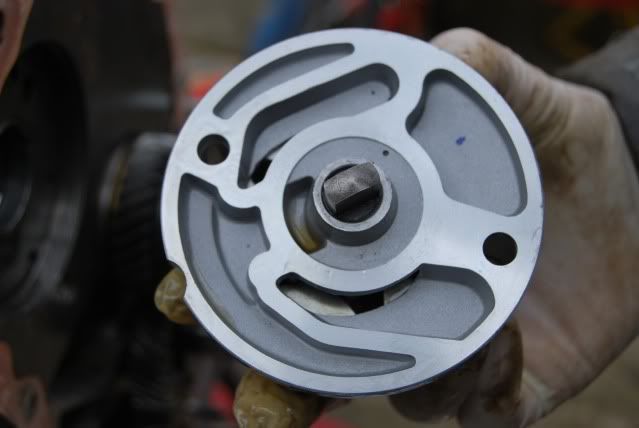
I filed the burr on the cam and washed it all out and re-tryed the oil pump, which as you can see from the image is now sitting right:
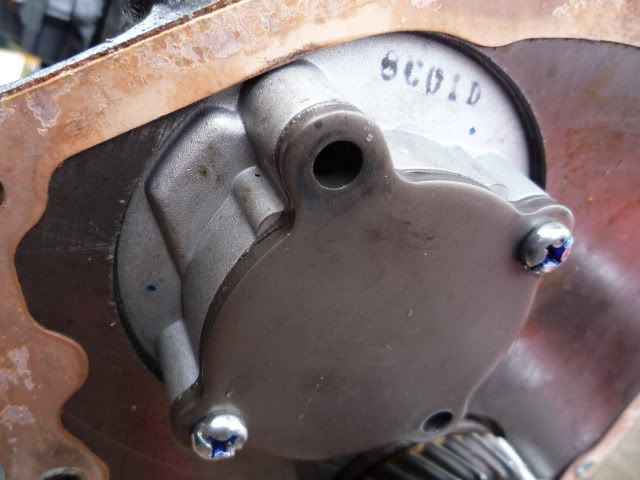
I'll clean it all up again with panel wipe, fit my new gaskets and new pump (although it probably doesnt need to be replaced), loctite and torque the bolts and refit the flywheel. The engine is looking a tad scruffy, so I'll give it a good clean before it goes back in.
Your thoughts please...
Where do I begin...
The engine is back out on the bench, flywheel and clutch pulled to get to the oil pump to which I can now confirm wasn't sitting right. Unfortunately the cam has taken the forefront of the damage, but only minor and shouldn't affect things too much.
I had the shock of my life when a drop of water came out of the gearbox sump plug!
It was an anti freeze colour and thinking back, when I pulled the hose off the end of the water pump silly Lund forgot to cover the hole in the breather and a drop poured in, I believe that is the cause... (I hope!)The top of the oil pump is bone dry as you can see from the pic. Yes this was removed like this!
I filed the burr on the cam and washed it all out and re-tryed the oil pump, which as you can see from the image is now sitting right:
I'll clean it all up again with panel wipe, fit my new gaskets and new pump (although it probably doesnt need to be replaced), loctite and torque the bolts and refit the flywheel. The engine is looking a tad scruffy, so I'll give it a good clean before it goes back in.
Your thoughts please...
Edited by Mini_Lund on Friday 2nd April 13:40
guru_1071 said:
tom
glad to see i was right!
heres an idea
once you have the motor built, put a oil guage on it and spin it over with the starter before you take it off the bench - that way you will know 100% that pressure is good and there before you fit it all back in.
it should be running by monday!
Hi Rich, glad to see i was right!
heres an idea
once you have the motor built, put a oil guage on it and spin it over with the starter before you take it off the bench - that way you will know 100% that pressure is good and there before you fit it all back in.
it should be running by monday!
Good Idea, I'll give it a go tomorrow. What amount of pressure should I be looking for (plugs out and all)? I'm still not convinced that it will get pressure, inevitably theres too much to go wrong!
It would be running and back on all four's by monday, but I could do with some swivel pin rubbers

I took the opportunity to touch up all of the bolts that had started to rust with some black enamel, certainly tidied it up abit. I might have got a little carried away
 only touched up the block mind you.
Cheers,
Tom
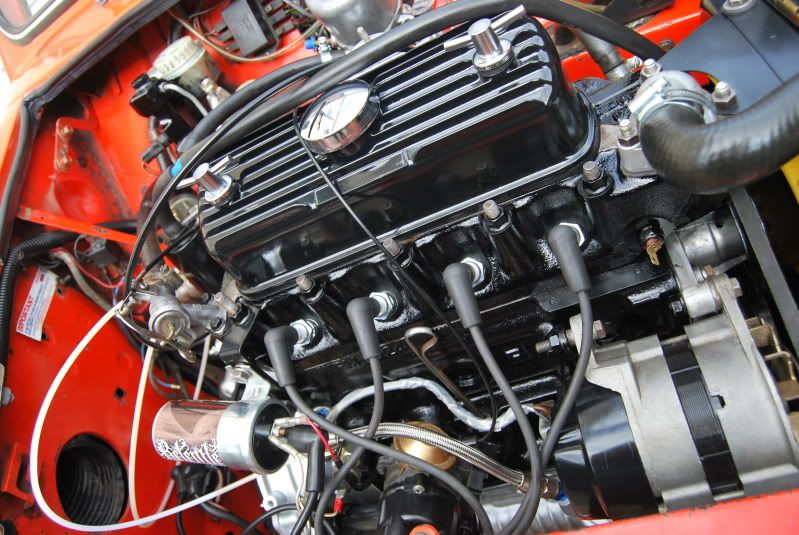
Success...Kinda!
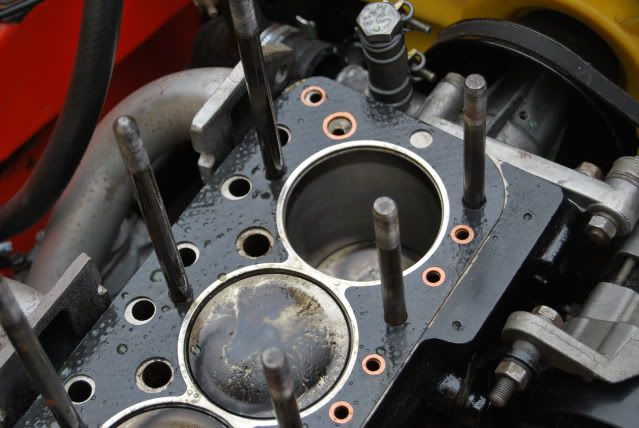
She fired up. I had the engine running for a good 10 minutes, finally set the leads and distributer up and she was idling, sounded really good However, and this is a huge however, I noticed a bubble between the cylinder head and block...b ks its a mixture of water/antifreeze & oil.
I might have had the cylinderhead gasket on the wrong way round - The holes lines up either way, except for one copper seal... (second in from top right)
I really don't know why I overlooked it previously, but I'm sending the cylinder head in for a skim etc.
You didnt think it was going to be that easy did you? Oh bks!
She fired up. I had the engine running for a good 10 minutes, finally set the leads and distributer up and she was idling, sounded really good
However, and this is a huge however, I noticed a bubble between the cylinder head and block...bks its a mixture of water/antifreeze & oil. I might have had the cylinderhead gasket on the wrong way round - The holes lines up either way, except for one copper seal... (second in from top right)
I really don't know why I overlooked it previously, but I'm sending the cylinder head in for a skim etc.
You didnt think it was going to be that easy did you? Oh b
ks!Edited by Mini_Lund on Monday 5th April 16:37
guru_1071 said:
tom
i would have just let it cool down and re torqed the head, then seen what it was like.
good to see its running though - thus ends the longest mini engine rebuild EVER!
Hi Rich, I have sent you an email to north minispares i would have just let it cool down and re torqed the head, then seen what it was like.
good to see its running though - thus ends the longest mini engine rebuild EVER!
I did try re-torque the head, but the torque settings were all correct. I'll have the head skimmed, new gasket and complete this engine build once and for all!Cheers, Tom.
Ben Magoo said:
I'm no expert and always ask questions to improve myself and my ability to look after my motors but I have always fitted copper head gaskets as I'm sure I had read/heard that they were much better in terms of longevity/reliability etc.
In fact only last week I replaced mine after 4-5 years of total reliability only because the alternator seized 4 miles from home, melting and snapping the belt - further compounded by my cavalier attitude winding the windows down to dissipate the smoke/steam for the last 2-3 miles and just letting her boil.
As it happens I had decided to change the gasket, mainly because I had one in the garage but truefully the gasket was fine and I could have just bunged on the alternator I also had kicking about with a new belt (cost me all of £4 ) oh and £6 for the new plugs as I carelessly snapped two putting the head down (MUPPET!)
Hi Ben, as you are able to tell I am no expert either! Although not afraid to ask. I am actually really concerned at the moment and fear the worst - a few people have suggested that the block could be cracked? That would explain the water coming out of the gearbox sump plug and all over the cylinder head. Sending the cylinder head to be machined and have 'the works' tomorrow..In fact only last week I replaced mine after 4-5 years of total reliability only because the alternator seized 4 miles from home, melting and snapping the belt - further compounded by my cavalier attitude winding the windows down to dissipate the smoke/steam for the last 2-3 miles and just letting her boil.
As it happens I had decided to change the gasket, mainly because I had one in the garage
but truefully the gasket was fine and I could have just bunged on the alternator I also had kicking about with a new belt (cost me all of £4 ) oh and £6 for the new plugs as I carelessly snapped two putting the head down (MUPPET!)guru_1071 said:
Mini_Lund said:
a few people have suggested that the block could be cracked
tomare these the same people who suggested that you started the car and reved it until the oil pressure appeared last time?
i have never seen a mini block crack, ever, the water will be from the head gasket or a cracked head (rare enough)
ive had blocks cold enough that the core plugs have blown out as the water froze and hot enough that the solder melted (220 degrees plus). that one got so hot it cooked the pistons, bent the cam, and left a blue heat ring in the water ways - it seized solid it was so hot.
next morning it fired up ok...... it ran raced again once it was rerung & recammed!.
You always restore the hope
These engines seem pretty much indestructable, even in the hands of a Lund!Cheers,
Tom
Cooperman said:
Hi Tom,
I'm with Richy on this. I've never seen a cracked block from water to oil in 49 years playing with Minis and other engines.
It does sound like a head gasket. Now, when and where did you get that head gasket. You may remember the head gasket issues with Payen last year when so many of us had a problem and couldn't find a gasket we could trust from anywhere in the UK. I even used a couple of gaskets from another manufacturer in place of the Payen ones I've always used. New ones are OK now, though.
The only other time I got oil/water mixing was on a Cooper 'S' engine which had been machined to take a 4-bolt later-type oil pump but was subsequently fitted with a 2-bolt pump. The additional drilling had gone through into the water jacket, but was fine until no bolt was fitted into that hole, then the 2 mm of gasket thickness between water and oil was not enough to stop 2 pints of oil getting into the water. So-called experts told me it was a 'cracked block'.
However, I doubt this is your problem, but worth considering maybe.
Hi Peter,I'm with Richy on this. I've never seen a cracked block from water to oil in 49 years playing with Minis and other engines.
It does sound like a head gasket. Now, when and where did you get that head gasket. You may remember the head gasket issues with Payen last year when so many of us had a problem and couldn't find a gasket we could trust from anywhere in the UK. I even used a couple of gaskets from another manufacturer in place of the Payen ones I've always used. New ones are OK now, though.
The only other time I got oil/water mixing was on a Cooper 'S' engine which had been machined to take a 4-bolt later-type oil pump but was subsequently fitted with a 2-bolt pump. The additional drilling had gone through into the water jacket, but was fine until no bolt was fitted into that hole, then the 2 mm of gasket thickness between water and oil was not enough to stop 2 pints of oil getting into the water. So-called experts told me it was a 'cracked block'.
However, I doubt this is your problem, but worth considering maybe.
Good to hear from you again, hows the Inno?
It sounds like its almost definately the head gasket at fault. The head gasket is from a set, produced by Payen! You're quite right, I remeber there being a few issues with the gaskets, mentioned on the forums. Richy is sorting me out with a new gasket, and the head has been skimmed so once I have everything it's full steam ahead!
I have also been working on the drivers door, which is now in primer; just needs some fillering here and there and its ready for top coat of vermillion.
Tom
Cooperman said:
Hi Tom,
I'm sure it's the head gasket and that it's one of the 'duff' ones from last year. If you get one from Richy you know that it'll be correct. A head skim will be no bad thing as well.
The Inno is almost ready for MoT, end of next week hopefully. Just a few detail bits to do like the heater trunking, horn and finding some amber bulbs for the clear front indiator lenses. I don't yet have any genuine Innocenti rear seats so I've fitted a 1966 850 interior until I can find what I need to complete it to 'original' state. It looks OK, but I know that it's wrong.
I'm all ready to get cracking now, Just need to find some time to sort it. Hopefully this time round, I'll be running without issues! I'm trying to bleed the brakes at the moment using the easybleed but not had much luck so far; cracked the joint at the calliper nothing getting through. I cracked the nut on the ingoing side but havent yet tried the outgoing. I'll crack a few more unions see what I get. If not, I'll pump the pedal hard in hope something will pass through!I'm sure it's the head gasket and that it's one of the 'duff' ones from last year. If you get one from Richy you know that it'll be correct. A head skim will be no bad thing as well.
The Inno is almost ready for MoT, end of next week hopefully. Just a few detail bits to do like the heater trunking, horn and finding some amber bulbs for the clear front indiator lenses. I don't yet have any genuine Innocenti rear seats so I've fitted a 1966 850 interior until I can find what I need to complete it to 'original' state. It looks OK, but I know that it's wrong.
Pete, good to hear the Inno is coming along, you will never be fully happy until the Inno interior is in! I hope you find what you're looking for.
PS. Might treat you to a vid of it running at some stage soon
Cheers,
Tom
guru_1071 said:
Mini_Lund said:
(15thou?)
12 thou......
phumy said:
During the initial run in period dont let it idle for too long, its possible to damage the cam lobs, you will need to give it some revs, but dont rev the nuts off of it that wont do it any good either...
Enjoy your new toy
Fair play. Cheers,Enjoy your new toy
Tom
There is slight play in the offside hub, however no play in the drivers side when torqued up with the castle nut and split pin. I did it as Peter suggested using 176Nm, then aligned the split pin.
PS. The copper washers on the brakes worked a treat
PS. The copper washers on the brakes worked a treat
Edited by Mini_Lund on Sunday 18th April 23:46
Gassing Station | Classic Minis | Top of Page | What's New | My Stuff