Contorno 75 (the bit on the side)
Discussion


Hello world.
Last year, almost exactly a year ago I bought my second Alfa Romeo with only fond memories quietly poking the logical side of my brain to one side.
Originally I bought an Alfasud which I rebuilt the engine and attempted (in vein) to restore to a semi-reliable state.
Well, the rot monster got the better of my skills and spare cash flow so we parted ways.
I figured with my more recent purchase I would stand a better chance as its almost 10years younger in design (and metal).
So me and Rich (kitchski) drove to and purchased the following:

I tidied it up a bit and it was looking nice!

Serviced it with the usualy essentials:

But wait... There was more!...
Last year, almost exactly a year ago I bought my second Alfa Romeo with only fond memories quietly poking the logical side of my brain to one side.
Originally I bought an Alfasud which I rebuilt the engine and attempted (in vein) to restore to a semi-reliable state.
Well, the rot monster got the better of my skills and spare cash flow so we parted ways.
I figured with my more recent purchase I would stand a better chance as its almost 10years younger in design (and metal).
So me and Rich (kitchski) drove to and purchased the following:
I tidied it up a bit and it was looking nice!
Serviced it with the usualy essentials:
But wait... There was more!...
Hobby Mechanic kicking in...
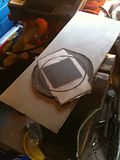
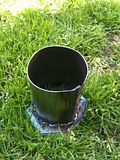
Air Filter top-hat adapter
Made a rough plan out of the back of a pizza box, marked up the bolt holes, centre bore hole size (square 50mm) and the vague outline.
Got the angle grinder out, cut the rough shape, used a metal file to soften up the edges and make the flat bits flat.
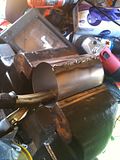
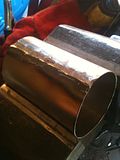
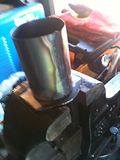
Welded the sheet to make the pipe, matched the pipe to the flange section and welded in and out. Metal primer and matt black spray, bish, bash,bosh.
Currently sat on a rag cable tied to the inner wing until I can be arsed to fabricate a fancy mount for the MAF.
photos:

Air Filter top-hat adapter
Made a rough plan out of the back of a pizza box, marked up the bolt holes, centre bore hole size (square 50mm) and the vague outline.
Got the angle grinder out, cut the rough shape, used a metal file to soften up the edges and make the flat bits flat.
Welded the sheet to make the pipe, matched the pipe to the flange section and welded in and out. Metal primer and matt black spray, bish, bash,bosh.
Currently sat on a rag cable tied to the inner wing until I can be arsed to fabricate a fancy mount for the MAF.
photos:
The second twitch:
Removed air filter, AFM and vacuum hoses.
Removed fuel rail damper and regulator from underside of plenum
Removed plenum and inlet link hoses with butterfly and idle sensor.
Heres a shot of how i left it:

A Sausage casserole later....
Realised I don't have a replacement gasket for the butterfly seal so got out my trusty craft knifes from a £ store attacked some gasket paper I had lying around.

Started cleaning up the plenum and butterfly, used degreaser for the worst of the outside.
Gulf carb cleaner and "greenie" pads followed by a few of the hundreds of baby "muslin" cloths.
cleaning of the plenum:

My new gasket fitted, awww yeah check out my thifty creative self-gratification.

And after a bit of toothbrush and carb cleaner, here is the cleaned up butterfly:

Bish bash bosh - evening #1 over and the plenum is refurbed:

Evening #2 finished the refurb up:

Removed air filter, AFM and vacuum hoses.
Removed fuel rail damper and regulator from underside of plenum
Removed plenum and inlet link hoses with butterfly and idle sensor.
Heres a shot of how i left it:
A Sausage casserole later....
Realised I don't have a replacement gasket for the butterfly seal so got out my trusty craft knifes from a £ store attacked some gasket paper I had lying around.
Started cleaning up the plenum and butterfly, used degreaser for the worst of the outside.
Gulf carb cleaner and "greenie" pads followed by a few of the hundreds of baby "muslin" cloths.
cleaning of the plenum:
My new gasket fitted, awww yeah check out my thifty creative self-gratification.
And after a bit of toothbrush and carb cleaner, here is the cleaned up butterfly:
Bish bash bosh - evening #1 over and the plenum is refurbed:
Evening #2 finished the refurb up:
INJECTORS!
Right, found some time in the morning (a little bit of tequila hangover) to attack the fuel rail and injectors.
Fuel rail removed, heres how the bay is looking with what is missing so far:

Fuel rail, surge damper and regulator:

4x Bosch Injectors
0-280-150-702
flowrate: 189.2cc/min @ 43.5psi
high impedance

Injectors ready for rebuild, filthy as sin!:

Just a quick step by step just incase someone is attempting this on some similar EV1 injectors...
1. Remove Injectors from the fuel rail, and in my case pressed into the intake manifold (wiggle them out) They were held into the fuel rail with some chunky circlip.
2. setup a clean bench to start cleaning, free of clutter and other junk
3. Clean off as much crud from the outside of the injector as possible, try and make it spotless.
4. Remove rubber seals from top and bottom (easily done with screwdriver) be careful not to damage the stainless shoulders beneath.
5. Remove the end cap and poly washer and clean all now exposed areas.
6. Remove the last chance filter from the injector inlet, this is an absolute fu**er as its a pressed brass ring at the top - A trick i used was a large wood screw in a vice, i linished the tapered end off the screw to allow more purchase on the filter and added a felt marked point to show me how deep i can go before i get to the end of the filter. Plenty of wiggling and delicate persuasion later it popped out.
7. CLEAN! apply plenty more carb cleaner and clean with a lintless rag or some sort and be very careful not to get any contaminants in the inlet.
Optional part now, as some may not be arsed and could just reassemble with replacement parts from here.
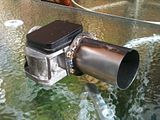
8. Create a injector holder (Jubilee clip in a vice?)
9. Insert Injector complete with a length of clean (no crap in the pipe) fuel hose about an inch or 2 spare above the injector.
10. Find a source of 12v, I've been told 9v is sufficiant to actuate the solonoid (I used a 12v adapter from an old something - xmas lights?)
11. fill the hose with carb cleaner, apply pressure to the end of the hose (deep breath and blow?)
12. tap your power source across the 2 pins of the injector, or if your really fancy wire in a switch into your circuit until your out of carb cleaner.
13. All done, reassemble the injectors
FYI a similar rig above but using clear containers and a regulated pressure source is how you would flow-rate test your injectors.
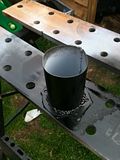
Removing the injector filter:

Striped injector:

Injector jetting rig:

Rebuilt injector:

4x rebuilt injectors, seals greased with the old parts behind.

I'm not responsible if you grind your injectors apart.
NEXT: Fuel rail cleanup and purging, order a head set and look into the next stage of stripping the top of the engine.
Right, found some time in the morning (a little bit of tequila hangover) to attack the fuel rail and injectors.
Fuel rail removed, heres how the bay is looking with what is missing so far:
Fuel rail, surge damper and regulator:
4x Bosch Injectors
0-280-150-702
flowrate: 189.2cc/min @ 43.5psi
high impedance
Injectors ready for rebuild, filthy as sin!:
Just a quick step by step just incase someone is attempting this on some similar EV1 injectors...
1. Remove Injectors from the fuel rail, and in my case pressed into the intake manifold (wiggle them out) They were held into the fuel rail with some chunky circlip.
2. setup a clean bench to start cleaning, free of clutter and other junk
3. Clean off as much crud from the outside of the injector as possible, try and make it spotless.
4. Remove rubber seals from top and bottom (easily done with screwdriver) be careful not to damage the stainless shoulders beneath.
5. Remove the end cap and poly washer and clean all now exposed areas.
6. Remove the last chance filter from the injector inlet, this is an absolute fu**er as its a pressed brass ring at the top - A trick i used was a large wood screw in a vice, i linished the tapered end off the screw to allow more purchase on the filter and added a felt marked point to show me how deep i can go before i get to the end of the filter. Plenty of wiggling and delicate persuasion later it popped out.
7. CLEAN! apply plenty more carb cleaner and clean with a lintless rag or some sort and be very careful not to get any contaminants in the inlet.
Optional part now, as some may not be arsed and could just reassemble with replacement parts from here.
8. Create a injector holder (Jubilee clip in a vice?)
9. Insert Injector complete with a length of clean (no crap in the pipe) fuel hose about an inch or 2 spare above the injector.
10. Find a source of 12v, I've been told 9v is sufficiant to actuate the solonoid (I used a 12v adapter from an old something - xmas lights?)
11. fill the hose with carb cleaner, apply pressure to the end of the hose (deep breath and blow?)
12. tap your power source across the 2 pins of the injector, or if your really fancy wire in a switch into your circuit until your out of carb cleaner.
13. All done, reassemble the injectors
FYI a similar rig above but using clear containers and a regulated pressure source is how you would flow-rate test your injectors.
Removing the injector filter:
Striped injector:
Injector jetting rig:
Rebuilt injector:
4x rebuilt injectors, seals greased with the old parts behind.
I'm not responsible if you grind your injectors apart.
NEXT: Fuel rail cleanup and purging, order a head set and look into the next stage of stripping the top of the engine.
The fuel leak:
I had a ripe smell of neat fuel around the fuel pump area on the rear O/S.
After investigation I had a leaking tank, its seen the wear and tear of its life.
After failing to find replacement 2.0 TS tanks in better condition I decided to go ALLOY!
This still needs fitting correctly in the boot floor, and will likely see a new boot floor setup minus the wheel well completely. Whilst there i'm thinking fuel swirl pot as the baffles and foam in the tank are not stopping the sway effect on roundabouts when driving enthusiastically.
Before this is resolve though, there is a bigger issue... The ROT.
The O/S sill and rear arch were welded/reconstructed last year pre-MOT, but further work is required on the N/S sill, arch and possibly suspension top mount.
Updates to follow, once I have the car insured once again under classic and back on the road!

Cheers fellas, these cars can be picked up cheap and are a great laugh to drive with 50/50 weight distribution, low unsprung weight, very low and centred centre of gravity.
Forgot to mention I had a few purchases along the way (y'know - the opportunistic kind that pop up every now and then!) ...
Found this little lot for £100 in North Yorkshire (near 'Burniston')

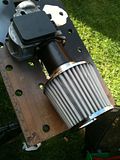
70k~ & 80k~ 2.0 TS Engines, 2.0TS gearbox transaxle (including the LSD and clutch), complete PAS system, pump, hoses, rack. A spare AFM and some other little bits.


1 of the TS engines is with me now and has had the top-end split down for refurb/mods and rebuild.
Not sure on the route with it yet, want to retain the variable inlet cam, and the twin-spark but may have to go aftermarket ecu to make use of my next purchase: A set of throttle bodies from a Suzuki GSXR750, the TB bore is almost identical to the inlet manifold diameter on the TS engine, Id obviously utilise the fuel rail and injection of the TS engine as the GSXR ports are at a stupid angle and the injection would be way too far back from the valves.
More pictures to come from this part, but first I need to sort the rot as that will kill the car if im not careful.
Forgot to mention I had a few purchases along the way (y'know - the opportunistic kind that pop up every now and then!) ...
Found this little lot for £100 in North Yorkshire (near 'Burniston')
70k~ & 80k~ 2.0 TS Engines, 2.0TS gearbox transaxle (including the LSD and clutch), complete PAS system, pump, hoses, rack. A spare AFM and some other little bits.
1 of the TS engines is with me now and has had the top-end split down for refurb/mods and rebuild.
Not sure on the route with it yet, want to retain the variable inlet cam, and the twin-spark but may have to go aftermarket ecu to make use of my next purchase: A set of throttle bodies from a Suzuki GSXR750, the TB bore is almost identical to the inlet manifold diameter on the TS engine, Id obviously utilise the fuel rail and injection of the TS engine as the GSXR ports are at a stupid angle and the injection would be way too far back from the valves.
More pictures to come from this part, but first I need to sort the rot as that will kill the car if im not careful.
Also looked into ECU maps on my exsisting Motronic ML4.1 ECU.
Done a fair amount of research into this and decided to order an EPROM programmer, a handfull of EPROMs (10xM27C256b-UV and 10x M27SF512 E)
The EPROM programmer arrived, so decided to pop me ECU out, remove the EPROM and read it to see what the current map looks like.
In doing this, I managed to snap the Vcc pin off the EPROM. (FU*K SAKE)
EPROM's arrived a week or so later, EPROM programmer would not burn new EPROMs or wipe them.
Got the multimeter out and went through an intensive testing session over several evenings.
Found the 'NEW' eprom programmer was forked.
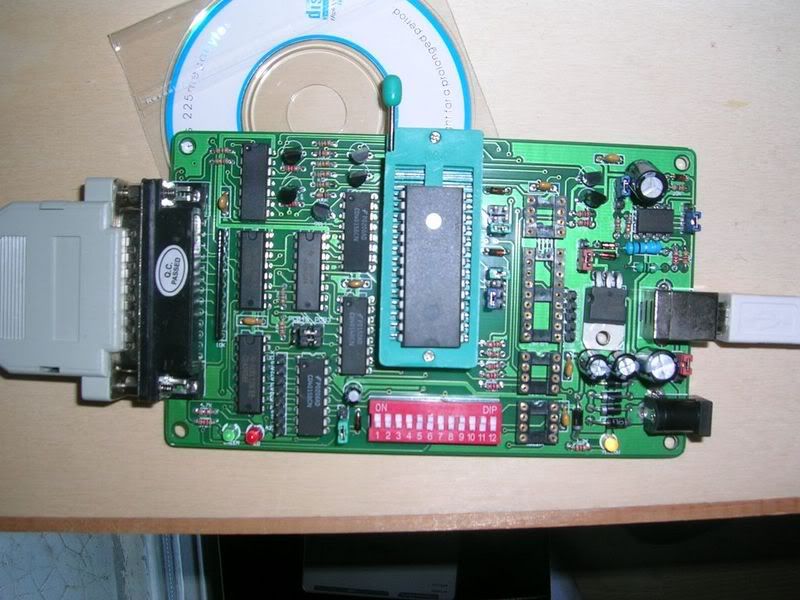
Got a second hand job for £10 from Stoke-On-Trent, worked first time and got me out for the recent 272 meet at Bowlplex, litterally programmed it Wednesday evening.
Willem 3.5 EPROM Programmer
Eprom's:

TunerPro screenshot (The application used for modifying the Binaries in a easier form than hexadecimal code)

Once I have my hands on a "live" emulator for my ECU I will start to look into modifying the ignition and fuel maps.
I experimented with rev limits, VVT pickup and Decelleration cut off maps but its all shots in the dark without a rolling road and a direct connection for logging.
Done a fair amount of research into this and decided to order an EPROM programmer, a handfull of EPROMs (10xM27C256b-UV and 10x M27SF512 E)
The EPROM programmer arrived, so decided to pop me ECU out, remove the EPROM and read it to see what the current map looks like.
In doing this, I managed to snap the Vcc pin off the EPROM. (FU*K SAKE)
EPROM's arrived a week or so later, EPROM programmer would not burn new EPROMs or wipe them.
Got the multimeter out and went through an intensive testing session over several evenings.
Found the 'NEW' eprom programmer was forked.
Got a second hand job for £10 from Stoke-On-Trent, worked first time and got me out for the recent 272 meet at Bowlplex, litterally programmed it Wednesday evening.
Willem 3.5 EPROM Programmer
Eprom's:
TunerPro screenshot (The application used for modifying the Binaries in a easier form than hexadecimal code)
Once I have my hands on a "live" emulator for my ECU I will start to look into modifying the ignition and fuel maps.
I experimented with rev limits, VVT pickup and Decelleration cut off maps but its all shots in the dark without a rolling road and a direct connection for logging.
Gassing Station | Alfa Romeo, Fiat & Lancia | Top of Page | What's New | My Stuff