Fiat Coupe 16V Turbo restoration project
Discussion


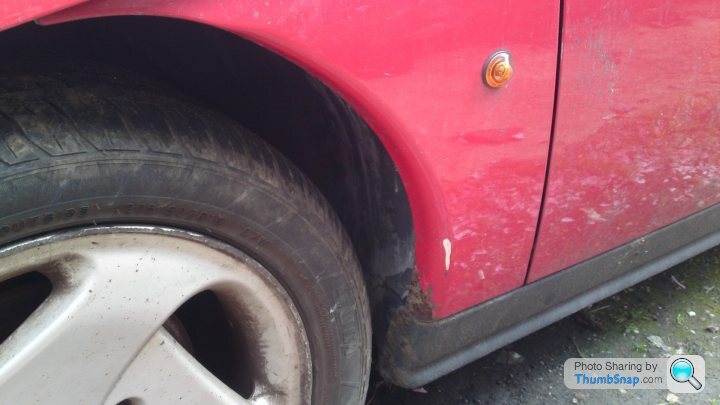
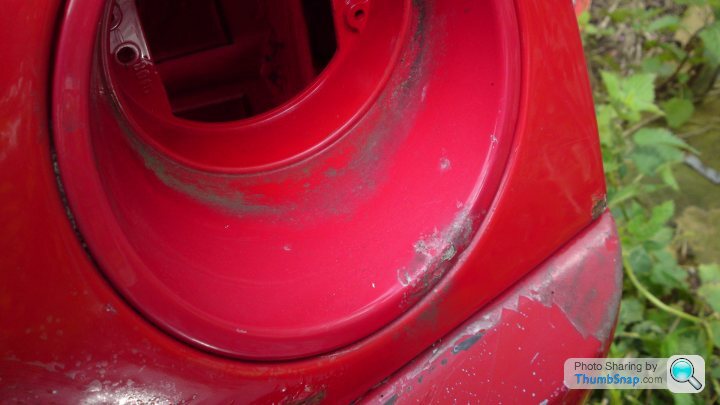
First walk around bodywork assessment.
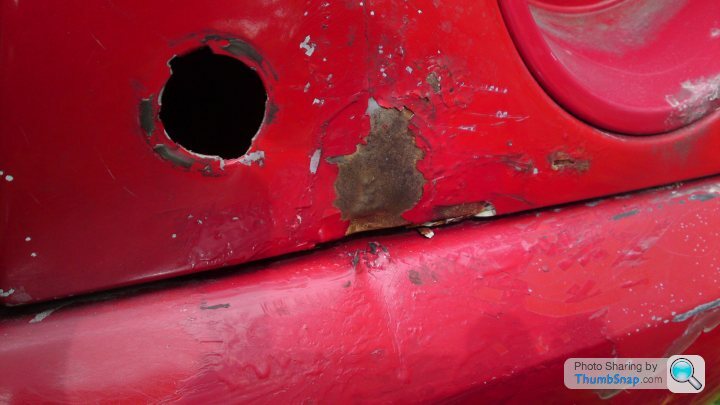
Front wings are both scabby but the passenger side is replaceable.
Driver side rear quarter needs half a day or so...
...the passenger side rear quarter needs a day or two.

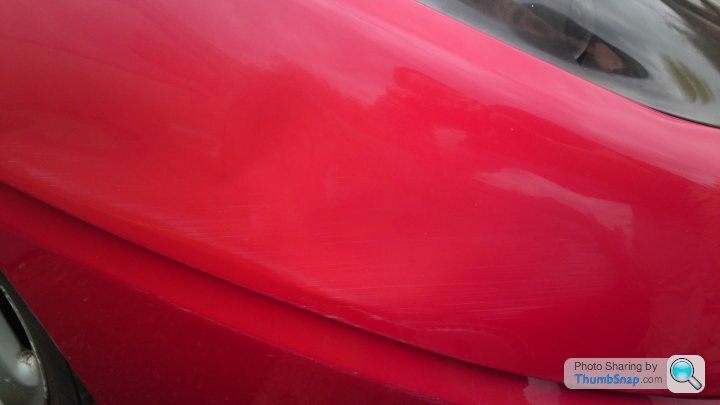
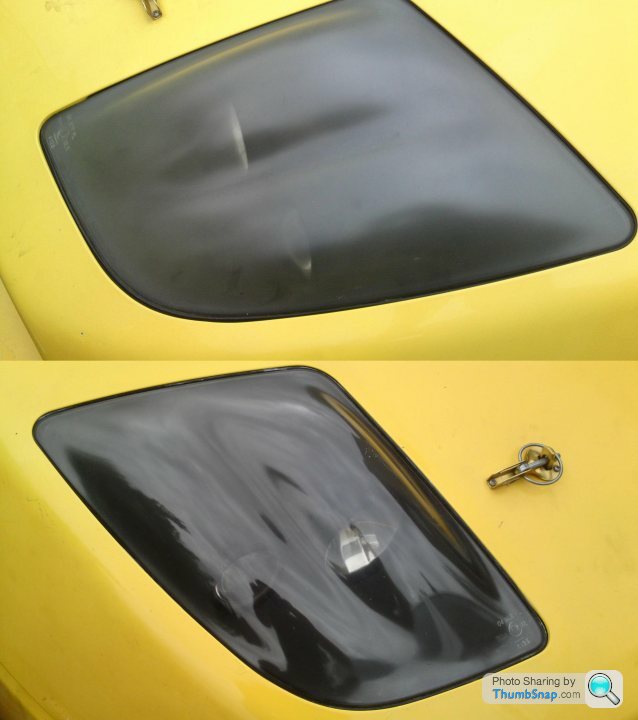
The bonnet isn't as bad as I thought and could be repairable...
...as painting a yellow bonnet red is near impossible I'll have a crack at the original one first.
For the trash pile...
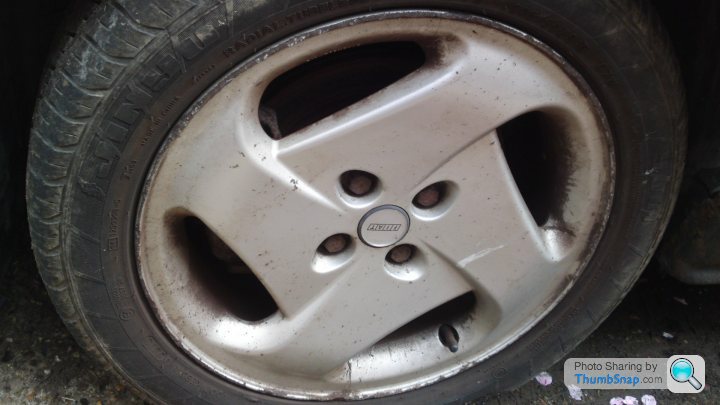
....curbed to heck passenger side front wheel...

...buckled passenger side rear wheel...
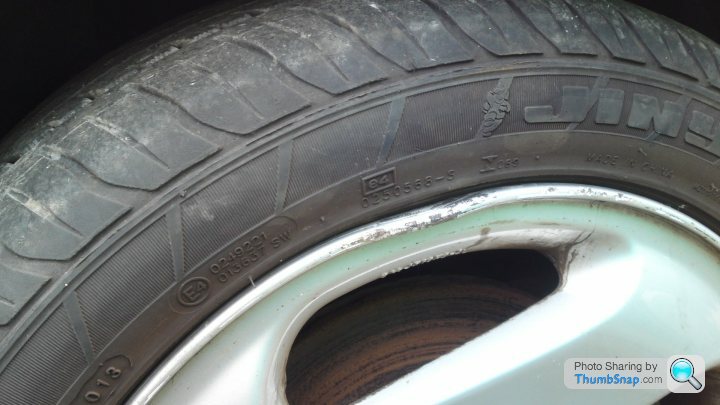
...buckled diver side front wheel. How do you buckle the passenger side rear and drivers side front?
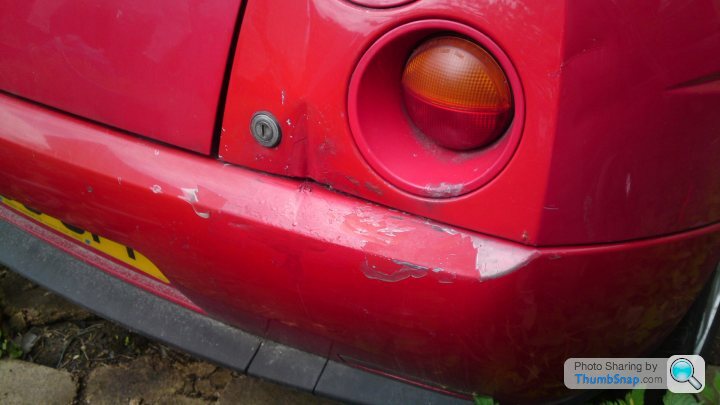
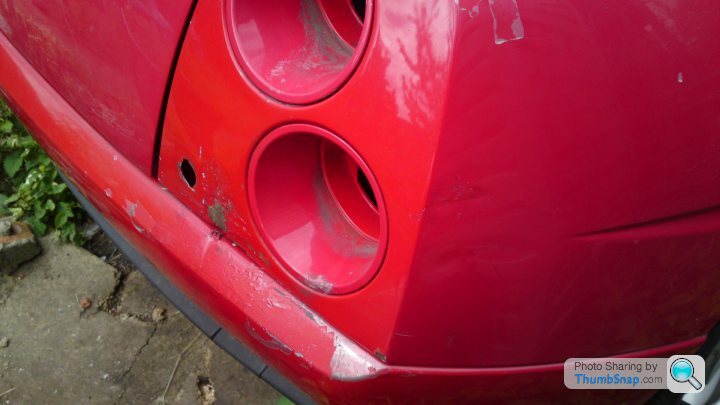
Disposable brake parts, bumpers (the front isn't bad but could be a pain in the faff to put the little wrong right), boot lid and the alarm will be more effective in a skip.
Hmmmm Trash...
https://www.youtube.com/watch?v=-PdKGDMhau4
Front wings are both scabby but the passenger side is replaceable.
Driver side rear quarter needs half a day or so...
...the passenger side rear quarter needs a day or two.
The bonnet isn't as bad as I thought and could be repairable...
...as painting a yellow bonnet red is near impossible I'll have a crack at the original one first.
For the trash pile...
....curbed to heck passenger side front wheel...
...buckled passenger side rear wheel...
...buckled diver side front wheel. How do you buckle the passenger side rear and drivers side front?
Disposable brake parts, bumpers (the front isn't bad but could be a pain in the faff to put the little wrong right), boot lid and the alarm will be more effective in a skip.
Hmmmm Trash...
https://www.youtube.com/watch?v=-PdKGDMhau4
While my breakfast was cooking I thought I would address the MOT issue that is the most concerning. I replaced the burned out light bulb.
While I was there and before I knew it...
...I had pushed out the side crease...
...most of the post dent. I can't get to the bottom pin push as it's on the lip. I may accidentally forget to put the lock back.
The bumper needs to come off so I can fill the lip fold dent so it can wait.
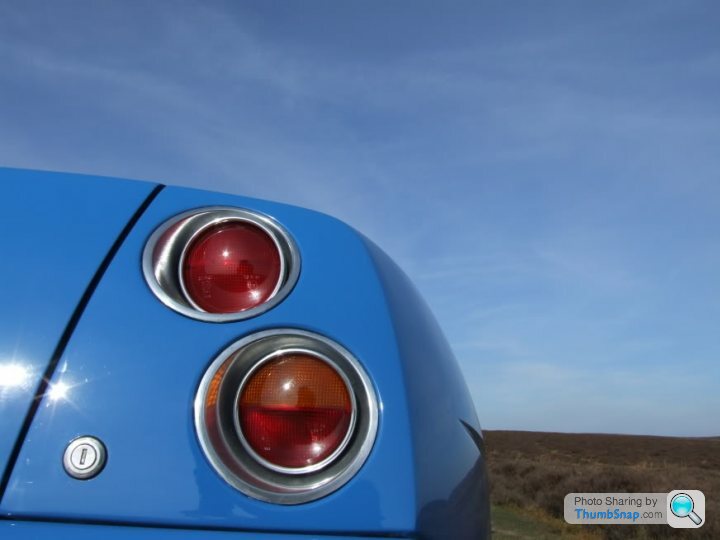
One issue is the oxidization of the aluminium light holder.
I've seen these mirror polished in the past but I'll be painting them with the rest of the car.

Chip away the stuff holding them in place so I can bench polish and/or repair or try with the holder in place? I'm tempted to fill the outer lip gaps as well to give the delocked rear a really smooth look that you'd have to know the car well to notice.
Just finished my breakfast and yes it was a little overdone.
While I was there and before I knew it...
...I had pushed out the side crease...
...most of the post dent. I can't get to the bottom pin push as it's on the lip. I may accidentally forget to put the lock back.
The bumper needs to come off so I can fill the lip fold dent so it can wait.
One issue is the oxidization of the aluminium light holder.
I've seen these mirror polished in the past but I'll be painting them with the rest of the car.
Chip away the stuff holding them in place so I can bench polish and/or repair or try with the holder in place? I'm tempted to fill the outer lip gaps as well to give the delocked rear a really smooth look that you'd have to know the car well to notice.
Just finished my breakfast and yes it was a little overdone.
Did them on the car - lots of careful masking required and many hours (by my son  ) of polishing
They look really good, but the quality of the alloy is terrible and they will start to corrode overnight if it rains. A heavy coat of wax will delay matters for a few weeks, but the only long-term solution is a clearcoat
) of polishingThey look really good, but the quality of the alloy is terrible and they will start to corrode overnight if it rains. A heavy coat of wax will delay matters for a few weeks, but the only long-term solution is a clearcoat
Got the truck and rig ready to collect the eBay 16V non-turbo tomorrow.
http://www.ebay.co.uk/itm/282017002035?_trksid=p20...
Parts for the turbo. Bootlid, maybe bonnet, seats (the drivers one has a hole), exhaust (as it looks more grown up than the chimney on the Turbo), lights, clocks (to replace the damaged odometer in the turbo mileage depending), most important of all...
N/A Inlet Camshaft!
...so I can run more boost.
Tyres for my neglected Bravo and the rest can go for spares so in theory it can pay for itself.
If I had a Pound for every time I have said "in theory" something should happen I would have a new Alfa Giulia QV.
So the N/A is a parts donor (that's a polite way of putting it).
My usual first job...
...came second this time.
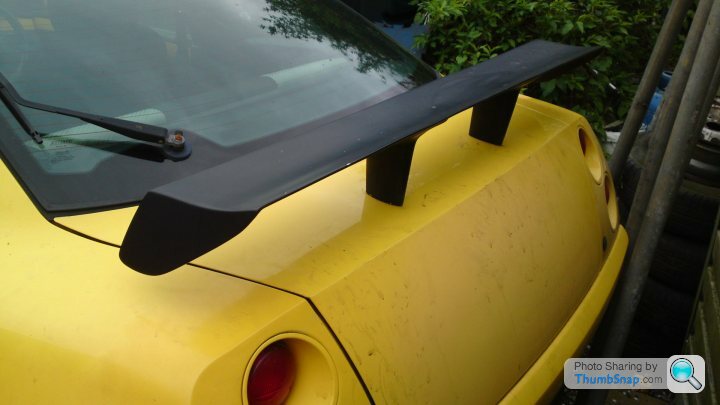
The spoiler had to go. 99p start no reserve eBay skip.
The holes in the boot lid aren't that bad but welding them could make the whole surface warp. Time to teach my nephews how do lead filling.
I'd like to keep...
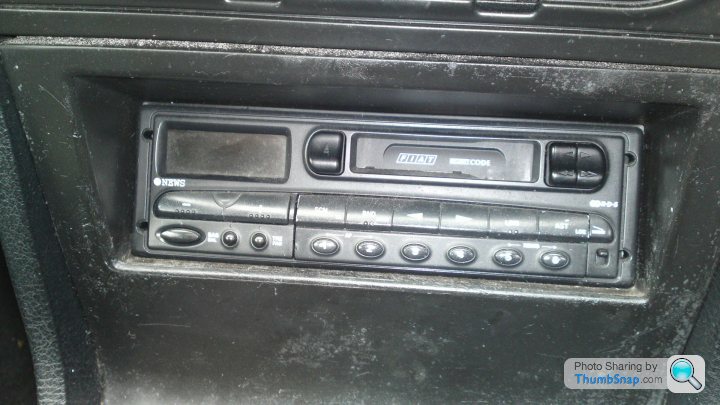
...the original stereo and...
...cam' cover but the rest can go.
My usual first job...
...came second this time.
The spoiler had to go. 99p start no reserve eBay skip.
The holes in the boot lid aren't that bad but welding them could make the whole surface warp. Time to teach my nephews how do lead filling.
I'd like to keep...
...the original stereo and...
...cam' cover but the rest can go.
What seized it do you know? It was on my manor and was tempted, but when I saw the open fuel cap, seized engine and the bloke came across as a foul mouthed d head I left it. Shame I didn't know you needed so little of it, you could have taken what you needed and sold the rest to me and left it up here!
head I left it. Shame I didn't know you needed so little of it, you could have taken what you needed and sold the rest to me and left it up here!Evoluzione said:
What seized it do you know? It was on my manor and was tempted, but when I saw the open fuel cap, seized engine and the bloke came across as a foul mouthed dhead I left it. Shame I didn't know you needed so little of it, you could have taken what you needed and sold the rest to me and left it up here!
I may be using the rear brakes to convert my Bravo HLX and other bits and bobs. Also what I don't use will do the rounds on eBay to recoup some of the outlay and buy more parts. head I left it. Shame I didn't know you needed so little of it, you could have taken what you needed and sold the rest to me and left it up here!I've all but abandoned the GRP idea as the Turbo will be done and the N/A was going to be the "project" project.


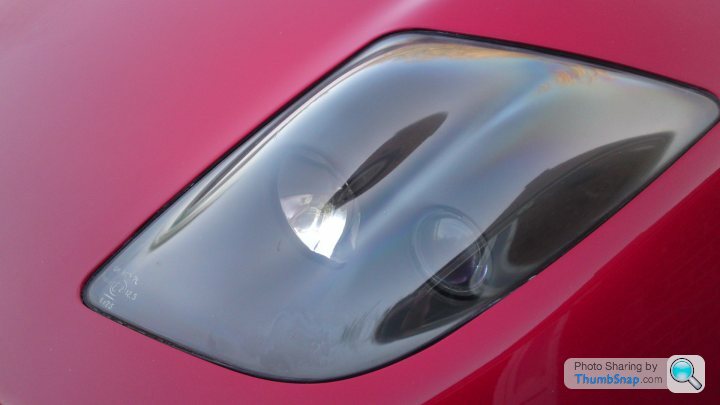
Drivers side headlight removal.
Open bonnet.
Undo the two 10mm bolts and two 10mm while supporting the unit.
When undone remove the headlight and unplug the leads.
Should take about a minute.
Passenger side headlight.
Bonnet's still open.
Undo the 10mm bolts, undo the one 10mm nut and swear because the forth lug is held on with black silicone.
Use a putty knife and a rubber hammer to knock the lamp free without breaking the lug itself.
Swear some more because the rear inner lug nearly snaps off.
Trim the excess black silicone off with a Stanley knife.
Repair the nearly broken off lug with Q-Bond.
Swear some more about the pandemic use of black silicone by idiots who don't deserve Oxygen let alone a bloody car.
Should take about an hour depending on how much you swear and if the Police are called out.
So the N/A Coupe postmortem continued to a conclusion today.
But first I had to improvise.
I had let someone borrow my M socket set, they were returned with a broken M12 and guess which one I need to undo the head bolts?
The closest to it is my T55...

...but the fins aren't wide enough and the bit wobbles.
To remedy this I used a folded sheet of kitchen roll...
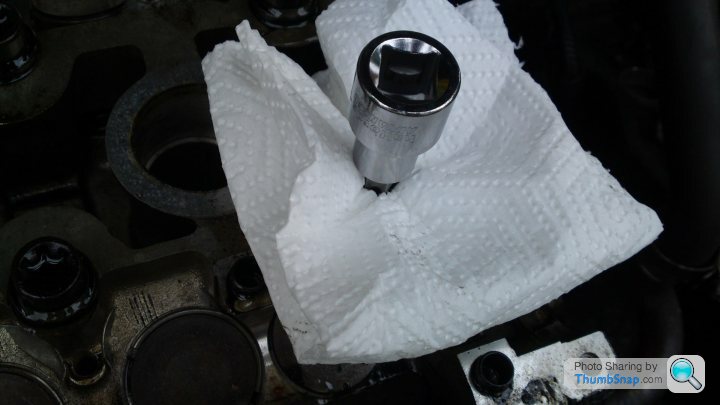
...to fill the gaps and it worked brilliantly.
So the postmortem.
Some of the head bolts weren't torqued down properly. 1, 2, 9, 10 were to spec', 5, 6, and 8 were nowhere near. 3, 4 and 7 were close enough to be okay. Water had got into cylinders two and four and where the car was sat the liners are ruined. So bad the pistons are rusted solid.
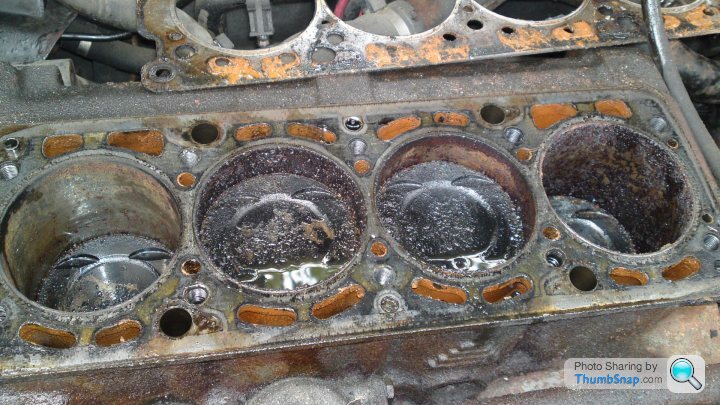
Chances are it only lost enough water to evaporate while the car was in use but filled the cylinders as she was sat. The head looks to be in fine fettle so I'll be pulling the valves out and polishing the ports before deciding what to do with it.
But first I had to improvise.
I had let someone borrow my M socket set, they were returned with a broken M12 and guess which one I need to undo the head bolts?
The closest to it is my T55...
...but the fins aren't wide enough and the bit wobbles.
To remedy this I used a folded sheet of kitchen roll...
...to fill the gaps and it worked brilliantly.
So the postmortem.
Some of the head bolts weren't torqued down properly. 1, 2, 9, 10 were to spec', 5, 6, and 8 were nowhere near. 3, 4 and 7 were close enough to be okay. Water had got into cylinders two and four and where the car was sat the liners are ruined. So bad the pistons are rusted solid.
Chances are it only lost enough water to evaporate while the car was in use but filled the cylinders as she was sat. The head looks to be in fine fettle so I'll be pulling the valves out and polishing the ports before deciding what to do with it.
Ribe M12 I'd lent it out and basically forgotten who to.
Thanks for the head tip. I'm probably just going to clean it up and mothball it in case I ever loose a belt.
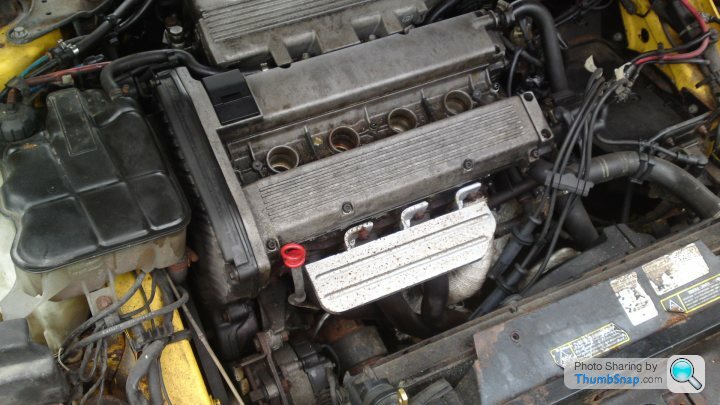
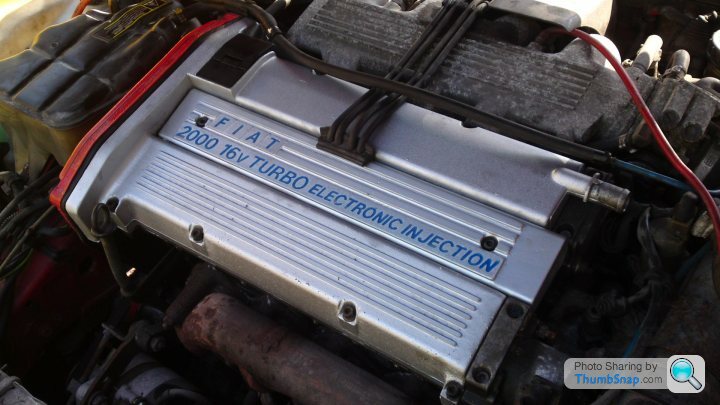
The Coupe has issues starting sometimes. I thought this down to the coilpack, crank sensor or old fuel. The old MOT gives an oil leak as an advisory for the last four tests. I had no idea these were related.
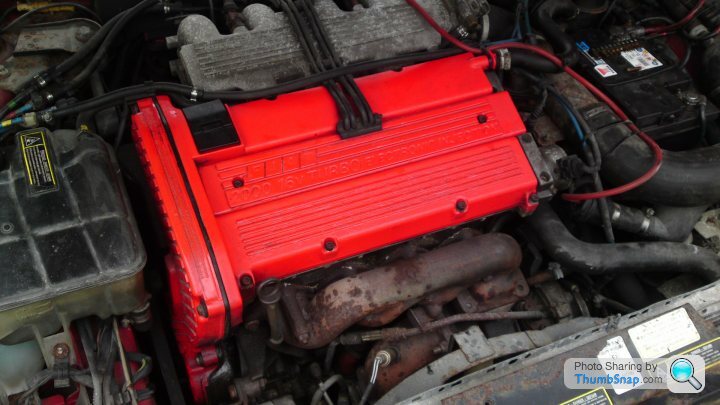
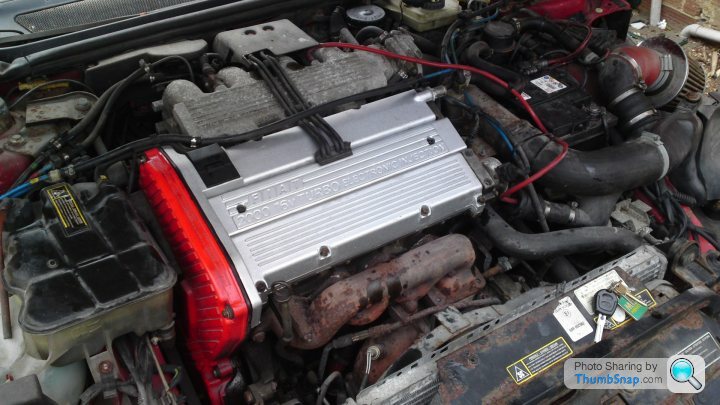
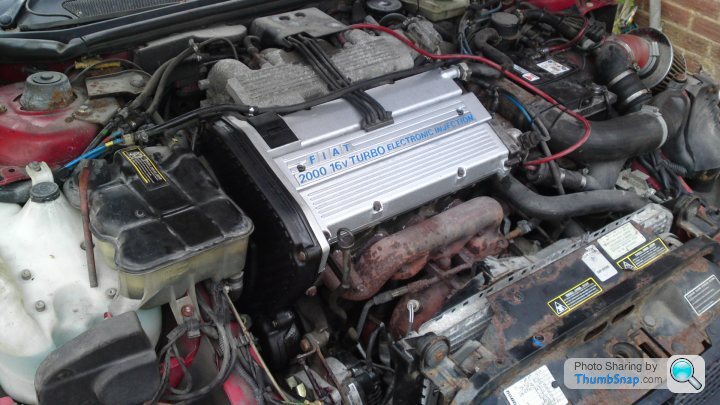
The paint job on the cam' cover is. For want of a more polite term of phrase complete and utter. As this was where the oil was leaking from and I have the original cam' cover from the N/A car it was destined for the bin from the first time I saw it.
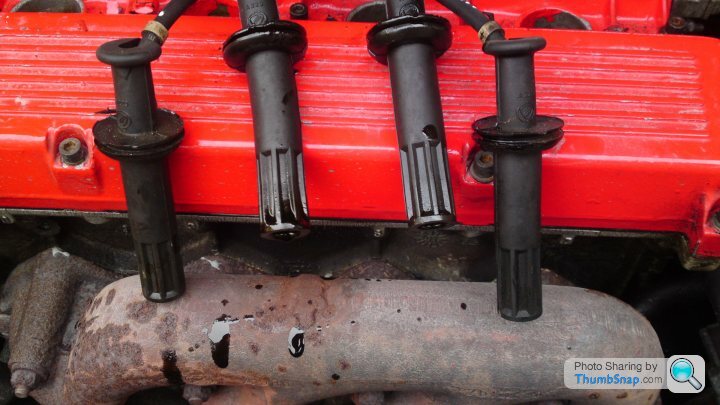
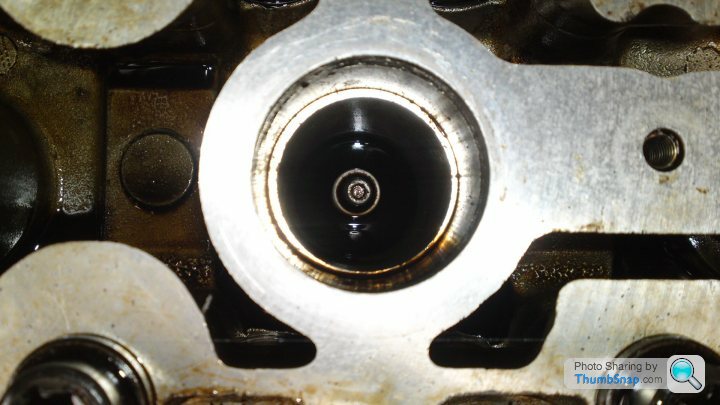
Once I took the plug cover off I noticed a few things. Some of the bolts had no washers and weren't holding the cover down properly (at all). This caused the external leak the MOT guys were advising about and the one in the middle of the cover was tight but about 5mm too long also with no washers. I pulled the spark plug caps off to discover number two and number three plug chambers were full of oil. I took the cam' cover off to see that instead of spending £20 on a cam' cover gasket set and "O" rings my old friend silicone was applied. I pulled the plugs so some of the oil dropped into the cylinder and I could mop the rest and clean the plugs before fitting the newly painted cam' cover.
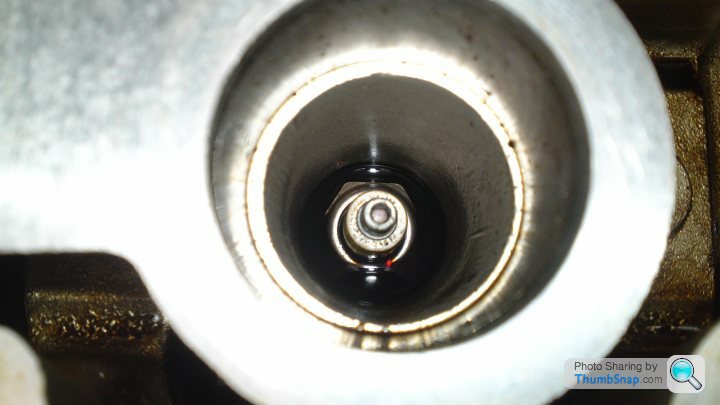
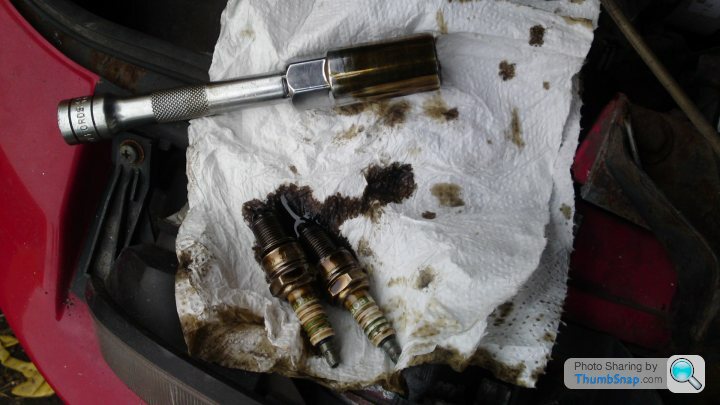
It's still the wrong colour (I had some wheel silver left in the shed) but a million times better than it was (make that a billion when I put the new belts and original cover on as well) and now it won't leak oil as I've used the right bolts and washers with a new gasket set I bought with the money from the gash spoiler (yep some mug bought it). With clean plugs she starts first turn of the key. She smoke like Molly Bindley for a while. Next I'll fix the flexi-pipe and fit the more grown up exhaust so I'll stop setting car alarms off in the next village.
Thanks for the head tip. I'm probably just going to clean it up and mothball it in case I ever loose a belt.
The Coupe has issues starting sometimes. I thought this down to the coilpack, crank sensor or old fuel. The old MOT gives an oil leak as an advisory for the last four tests. I had no idea these were related.
The paint job on the cam' cover is. For want of a more polite term of phrase complete and utter
. As this was where the oil was leaking from and I have the original cam' cover from the N/A car it was destined for the bin from the first time I saw it. Once I took the plug cover off I noticed a few things. Some of the bolts had no washers and weren't holding the cover down properly (at all). This caused the external leak the MOT guys were advising about and the one in the middle of the cover was tight but about 5mm too long also with no washers. I pulled the spark plug caps off to discover number two and number three plug chambers were full of oil. I took the cam' cover off to see that instead of spending £20 on a cam' cover gasket set and "O" rings my old friend silicone was applied. I pulled the plugs so some of the oil dropped into the cylinder and I could mop the rest and clean the plugs before fitting the newly painted cam' cover.
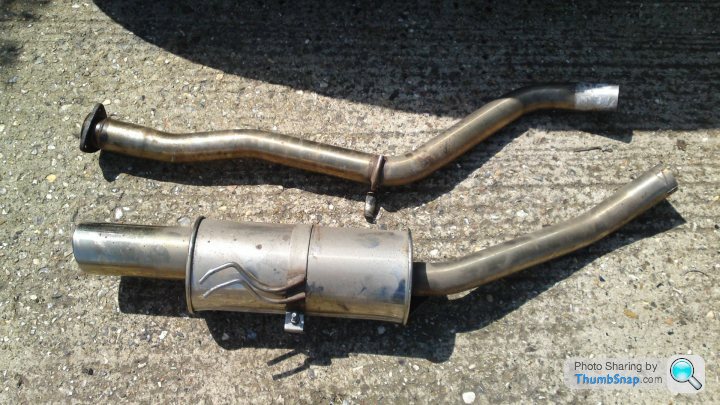
It's still the wrong colour (I had some wheel silver left in the shed) but a million times better than it was (make that a billion when I put the new belts and original cover on as well) and now it won't leak oil as I've used the right bolts and washers with a new gasket set I bought with the money from the gash spoiler (yep some mug bought it). With clean plugs she starts first turn of the key. She smoke like Molly Bindley for a while. Next I'll fix the flexi-pipe and fit the more grown up exhaust so I'll stop setting car alarms off in the next village.
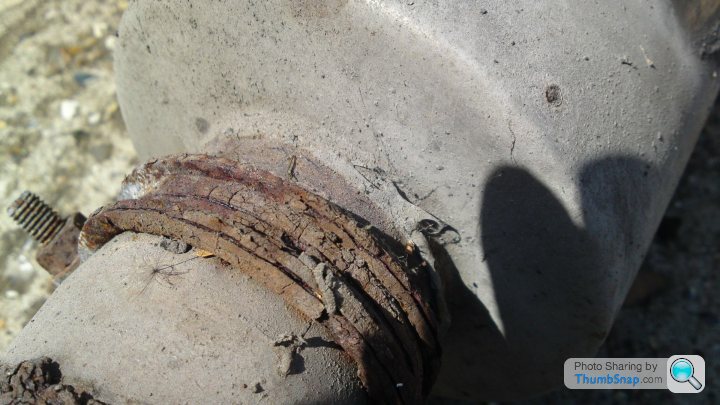
I would like to say I've taken the old exhaust off the Coupe and fitted the one from the donor car; but I would not describe what removed as an exhaust. At best I would call it a tragedy.
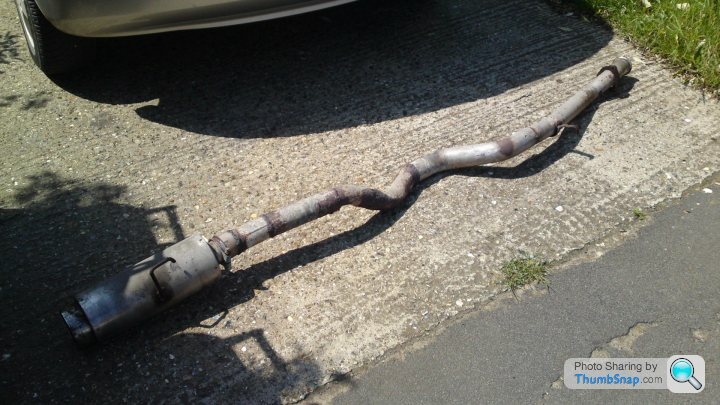
The middle box had been replaced with scrap yard bends that went under the handbrake cable instead of over it so that's why those need replacing.

Pigeon crap welding that my nephew could have done better when he was six whilst wearing a blindfold. My guess is it was done on the car by someone who thought welding was something you need a pre-nup' for.
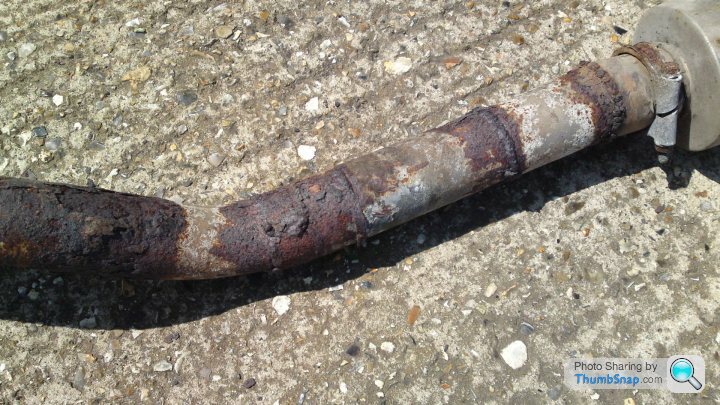
And of course the Chavesty back box was held in place with silicone before being pigeon crap welded.
It's more than fair to say the donor car paid for itself today.
Once fitted my mood was lifted so I finished the cam' cover. I filled the scripted sections with blue enamel paint yesterday and rubbed the silver from the blocks so it has a straight brushed Aluminium effect (not good enough metal to mirror polish) and where some of the silver paint has dropped into the blue it looks aged. Almost like it's supposed to be there.
While I was under the car I noticed a few holes in the floor that need addressing. Where the wiring loom has had clips drilled into the floor water has got in and between the metal and the under-seal so I have a couple of playing card sections to cut out and weld up. I'll need to take the carpet out and go from inside lap welding a slightly bigger patch and lapping from underneath as well.
Now do I bother putting the carpet back or fit bucket seats?
The middle box had been replaced with scrap yard bends that went under the handbrake cable instead of over it so that's why those need replacing.
Pigeon crap welding that my nephew could have done better when he was six whilst wearing a blindfold. My guess is it was done on the car by someone who thought welding was something you need a pre-nup' for.
And of course the Chavesty back box was held in place with silicone before being pigeon crap welded.
It's more than fair to say the donor car paid for itself today.
Once fitted my mood was lifted so I finished the cam' cover. I filled the scripted sections with blue enamel paint yesterday and rubbed the silver from the blocks so it has a straight brushed Aluminium effect (not good enough metal to mirror polish) and where some of the silver paint has dropped into the blue it looks aged. Almost like it's supposed to be there.
While I was under the car I noticed a few holes in the floor that need addressing. Where the wiring loom has had clips drilled into the floor water has got in and between the metal and the under-seal so I have a couple of playing card sections to cut out and weld up. I'll need to take the carpet out and go from inside lap welding a slightly bigger patch and lapping from underneath as well.
Now do I bother putting the carpet back or fit bucket seats?
Gassing Station | Alfa Romeo, Fiat & Lancia | Top of Page | What's New | My Stuff