Discussion


Drivetheworld, that's extremely helpful to know about the barb. I have a clear switch in my hand and can see the barb that locks the switch into the fascia, it has an internal shaping which is the babe you are describing!
The plan therefore, break the black female connector on the new glass switch (to keep the metal barrel in tact). Old black switch, break the metal case to keep the old female connector in tact. Am I right in thinking the mini circuit board for my old style switches needs transferring over to the new glass switches to keep each switch functionality? Your pictures below of an old black switch:


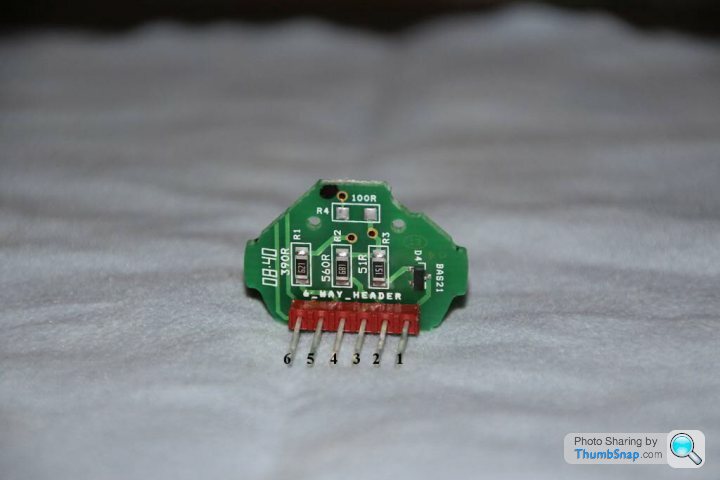
The plan therefore, break the black female connector on the new glass switch (to keep the metal barrel in tact). Old black switch, break the metal case to keep the old female connector in tact. Am I right in thinking the mini circuit board for my old style switches needs transferring over to the new glass switches to keep each switch functionality? Your pictures below of an old black switch:

W1111AM said:
Drivetheworld: next step is the button (changing the graphic)
How does the clear button element come apart?
Do I have to grind/file off the old black graphic from the back of the clear plastic?
Yes. The black switches have the graphic silk-screened on the front, whilst the glass ones have it on the back. When I was going to do this, my idea was to lightly grind away the old graphic, polish it smooth, and then make a new graphic using my vinyl cutter to adhere to the back. The vinyl would block the backlight illumination except where the graphic was cut out.How does the clear button element come apart?
Do I have to grind/file off the old black graphic from the back of the clear plastic?
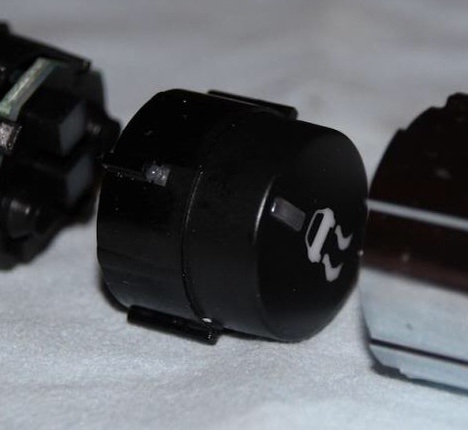
OK. In the picture, the chrome plastic part is holding the spring clips in (B). Under the spring clip is the barb that holds the switch connector in (A).
You will not be able to press in both sides of (A) without running the risk of snapping out the spring clip from the chrome housing (B). If the spring clip is broken out, the barrel is trash.

You will not be able to press in both sides of (A) without running the risk of snapping out the spring clip from the chrome housing (B). If the spring clip is broken out, the barrel is trash.
KarlFranz said:
W1111AM said:
Drivetheworld: next step is the button (changing the graphic)
How does the clear button element come apart?
Do I have to grind/file off the old black graphic from the back of the clear plastic?
Yes. The black switches have the graphic silk-screened on the front, whilst the glass ones have it on the back. When I was going to do this, my idea was to lightly grind away the old graphic, polish it smooth, and then make a new graphic using my vinyl cutter to adhere to the back. The vinyl would block the backlight illumination except where the graphic was cut out.How does the clear button element come apart?
Do I have to grind/file off the old black graphic from the back of the clear plastic?
The graphic has a hole in it to allow the LED to pull light through to the little barrel inside the clear lens (that lights up for the user). The AM graphic film is in two parts, a black film with graphic cutout, the white is a separate backing which is a solid white translucent film.
After this discovery I now have a new technical problem, the black film/graphic has to block light, the white has to be translucent to become backlit by the LED. I am not sure what material to print this in currently, could I get away with one sheet of something white then printed with black?
divetheworld said:
I am not on your wavelength quite, laser marking/cutting leaves ghost lines which will then need polishing on the graphic face of the clear button. You're talking: removing the graphic right? Or laser cutting the graphic into the back of the clear lens and then applying black?divetheworld said:
OK. In the picture, the chrome plastic part is holding the spring clips in (B). Under the spring clip is the barb that holds the switch connector in (A).
You will not be able to press in both sides of (A) without running the risk of snapping out the spring clip from the chrome housing (B). If the spring clip is broken out, the barrel is trash.
Drivetheworld, top pictures Sir thank you very much!! Great demonstration! I will be careful with the barrel mounting area for the clip to make sure the barrel does not break when releasing the clips.You will not be able to press in both sides of (A) without running the risk of snapping out the spring clip from the chrome housing (B). If the spring clip is broken out, the barrel is trash.
KF I can see you are right these are delicate, they also seems quite sharp and a classic finger cut job!
W1111AM said:
divetheworld said:
I am not on your wavelength(saw what you did there  ) quite, laser marking/cutting leaves ghost lines which will then need polishing on the graphic face of the clear button. You're talking: removing the graphic right? Or laser cutting the graphic into the back of the clear lens and then applying black?
I was searching for glass buttons but they were previously not available for older cars as mentioned in this thread, then came across this;
http://www.6speedonline.com/forums/aston-martin/35...
I'm getting all of my original buttons replaced with the glass ones while Blofeld is up at BR having his MOT.
http://www.6speedonline.com/forums/aston-martin/35...
I'm getting all of my original buttons replaced with the glass ones while Blofeld is up at BR having his MOT.
Speculatore said:
I was searching for glass buttons but they were previously not available for older cars as mentioned in this thread, then came across this;
http://www.6speedonline.com/forums/aston-martin/35...
I'm getting all of my original buttons replaced with the glass ones while Blofeld is up at BR having his MOT.
The ejector seat button sounds fun.. just need somewhere to put it, bit tricky as I don't have a gear stick http://www.6speedonline.com/forums/aston-martin/35...
I'm getting all of my original buttons replaced with the glass ones while Blofeld is up at BR having his MOT.
I know that this thread is three years old now, but I was wondering how people got on with customizing the graphics on these buttons. I have bought a set recently, including four blank ones, which need altering to replace those missing in the standard kit. I was thinking of experimenting with water-slide decals printed on my inkjet and sprayed white on the back; has anyone else come up with a solution that produces neat results?
I've got 4 glass buttons (PNRD), used, 3 of which have one of the spring clips either missing or loose. I now have 4 plastic donor buttons with good spring clips. Can anyone recommend whom I could send them to, so the glass buttons can be fixed using the plastic buttons as donors?
Edited by Philip0 on Saturday 2nd December 14:20
LiquidPT said:
I know this is an old thread, but did anyone ever swap the tilt buttons in the headrest of the sport seats? How do they come out?
Had mine replaced. You have to break the existing. I assume they pry off the plastic button then went inside with screw driver or needle nose pliers and bent the metal spring holders in to remove the outer portion with wiring attached. Plugged wires into glass switch and pushed back into seat. Old switches aren’t reusable. They gave the old ones back in pieces.
Gassing Station | Aston Martin | Top of Page | What's New | My Stuff