Papercraft... what have you started
Discussion


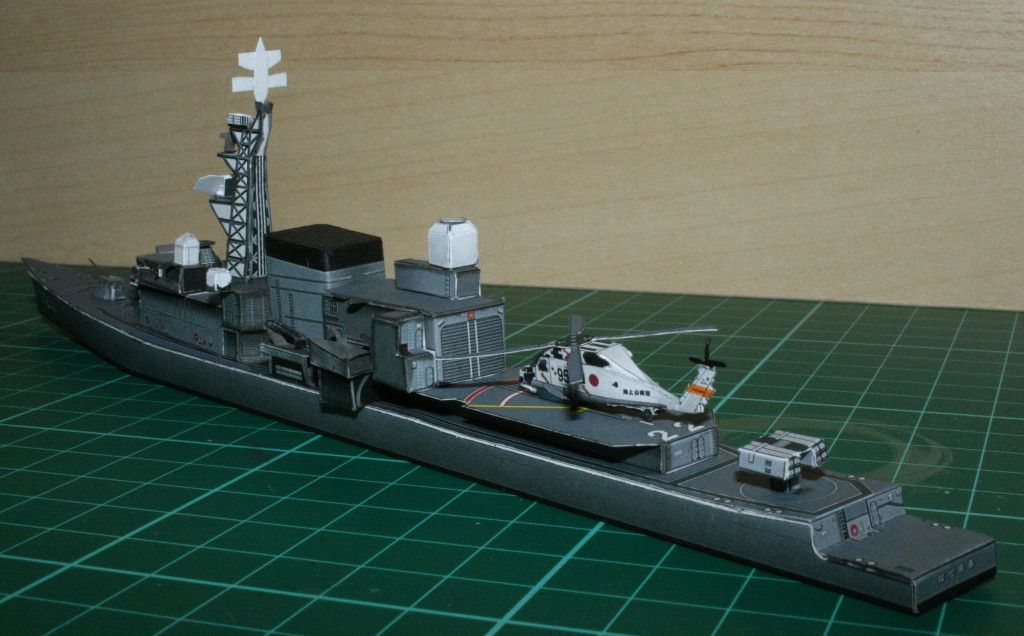
The helicopter is a little over 3cm, so yes, it was a bit fiddly!
I've just finished the ship, it's a Hatsuyuki class destroyer.
The template is from here, just printed onto one A4 sheet of 160gsm card.
I think it came out quite well, I used a marker to fill in some of the white lines but I need a felt tip to do a better job.

I've just finished the ship, it's a Hatsuyuki class destroyer.
The template is from here, just printed onto one A4 sheet of 160gsm card.
I think it came out quite well, I used a marker to fill in some of the white lines but I need a felt tip to do a better job.


blindswelledrat said:
Thank you. I labelled it Dog as artistic irony as I was aware it was so realistic as to be indistinguishable from the real thing which you often see lolloping on giant pear wood desks.
I was out for my morning run this morning... and spotted this.I couldn't resist picking it up for your wonderful canine companion.


Step 4 partially completed and step 5 started.
I completely scrapped the rear bumper assembly as I'd made a right pigs ear of it.
for reference, there is a raised lip above the bumper which is shaped like a mustache. It is 1mm tall and 1.5mm deep, and requires a radiused curve and a sharp fold - it is then slid into slits in the flat panel.. the first attempt just ended up looking like mush.
This is the second one.

There are multiple joins and folds that need to set before I can attach it to the main body assembty, so in the mean time, I started cutting and curling the bonnet and front wings. Lots of curvage, lots of tabs to cut out.

I've found a bic pen-lid tip (the bit that hooks over your shirt pocket) works well for scoring.
What is neat is the section of front wing behind the wheel-arch is clearly a thin area, so you fold it double thickness, and trim once glued.
I completely scrapped the rear bumper assembly as I'd made a right pigs ear of it.
for reference, there is a raised lip above the bumper which is shaped like a mustache. It is 1mm tall and 1.5mm deep, and requires a radiused curve and a sharp fold - it is then slid into slits in the flat panel.. the first attempt just ended up looking like mush.
This is the second one.
There are multiple joins and folds that need to set before I can attach it to the main body assembty, so in the mean time, I started cutting and curling the bonnet and front wings. Lots of curvage, lots of tabs to cut out.
I've found a bic pen-lid tip (the bit that hooks over your shirt pocket) works well for scoring.
What is neat is the section of front wing behind the wheel-arch is clearly a thin area, so you fold it double thickness, and trim once glued.
shortar53 said:
Step 4 partially completed and step 5 started.
I completely scrapped the rear bumper assembly as I'd made a right pigs ear of it.
for reference, there is a raised lip above the bumper which is shaped like a mustache. It is 1mm tall and 1.5mm deep, and requires a radiused curve and a sharp fold - it is then slid into slits in the flat panel.. the first attempt just ended up looking like mush.
This is the second one.
There are multiple joins and folds that need to set before I can attach it to the main body assembty, so in the mean time, I started cutting and curling the bonnet and front wings. Lots of curvage, lots of tabs to cut out.
I've found a bic pen-lid tip (the bit that hooks over your shirt pocket) works well for scoring.
What is neat is the section of front wing behind the wheel-arch is clearly a thin area, so you fold it double thickness, and trim once glued.
Scrap that. the rear bumper was still incorrect. I've managed to salvage the parts and rescue it.I completely scrapped the rear bumper assembly as I'd made a right pigs ear of it.
for reference, there is a raised lip above the bumper which is shaped like a mustache. It is 1mm tall and 1.5mm deep, and requires a radiused curve and a sharp fold - it is then slid into slits in the flat panel.. the first attempt just ended up looking like mush.
This is the second one.
There are multiple joins and folds that need to set before I can attach it to the main body assembty, so in the mean time, I started cutting and curling the bonnet and front wings. Lots of curvage, lots of tabs to cut out.
I've found a bic pen-lid tip (the bit that hooks over your shirt pocket) works well for scoring.
What is neat is the section of front wing behind the wheel-arch is clearly a thin area, so you fold it double thickness, and trim once glued.
These instructions are rotten. (that may be incorrect if you read japanese)
As a result, i'm only completing this model out of dogged determination. It's going to look a little rough once it's done - but the point is, I'm learning lessions each time I do a model. Hopefully I can get up to the standard of blindswelledrat with practice.
SlipStream77 said:
The helicopter is a little over 3cm, so yes, it was a bit fiddly!
I've just finished the ship, it's a Hatsuyuki class destroyer.
The template is from here, just printed onto one A4 sheet of 160gsm card.
I think it came out quite well, I used a marker to fill in some of the white lines but I need a felt tip to do a better job.
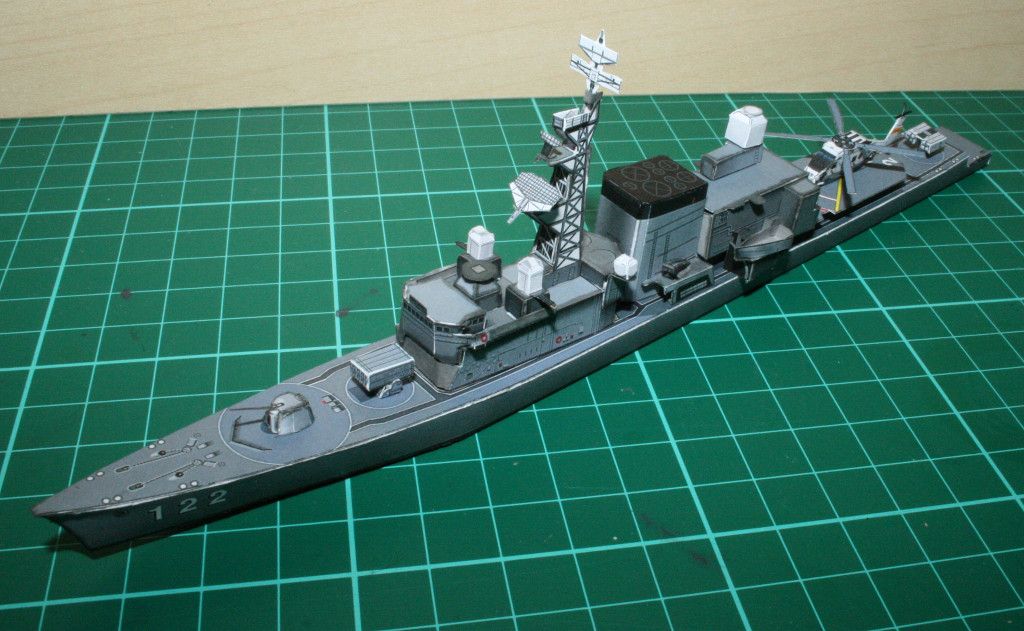
Looks pretty good - and built quick too. I've just finished the ship, it's a Hatsuyuki class destroyer.
The template is from here, just printed onto one A4 sheet of 160gsm card.
I think it came out quite well, I used a marker to fill in some of the white lines but I need a felt tip to do a better job.
I guess unless there is a laser cut set for the spaceframe masts etc, there's not much more to be done. My standard kit is exactly the same, with all the railings and stuff printed onto white paper.
shortar53 said:
shortar53 said:
Step 4 partially completed and step 5 started.
I completely scrapped the rear bumper assembly as I'd made a right pigs ear of it.
for reference, there is a raised lip above the bumper which is shaped like a mustache. It is 1mm tall and 1.5mm deep, and requires a radiused curve and a sharp fold - it is then slid into slits in the flat panel.. the first attempt just ended up looking like mush.
This is the second one.
There are multiple joins and folds that need to set before I can attach it to the main body assembty, so in the mean time, I started cutting and curling the bonnet and front wings. Lots of curvage, lots of tabs to cut out.
I've found a bic pen-lid tip (the bit that hooks over your shirt pocket) works well for scoring.
What is neat is the section of front wing behind the wheel-arch is clearly a thin area, so you fold it double thickness, and trim once glued.
Scrap that. the rear bumper was still incorrect. I've managed to salvage the parts and rescue it.I completely scrapped the rear bumper assembly as I'd made a right pigs ear of it.
for reference, there is a raised lip above the bumper which is shaped like a mustache. It is 1mm tall and 1.5mm deep, and requires a radiused curve and a sharp fold - it is then slid into slits in the flat panel.. the first attempt just ended up looking like mush.
This is the second one.
There are multiple joins and folds that need to set before I can attach it to the main body assembty, so in the mean time, I started cutting and curling the bonnet and front wings. Lots of curvage, lots of tabs to cut out.
I've found a bic pen-lid tip (the bit that hooks over your shirt pocket) works well for scoring.
What is neat is the section of front wing behind the wheel-arch is clearly a thin area, so you fold it double thickness, and trim once glued.
These instructions are rotten. (that may be incorrect if you read japanese)
As a result, i'm only completing this model out of dogged determination. It's going to look a little rough once it's done - but the point is, I'm learning lessions each time I do a model. Hopefully I can get up to the standard of blindswelledrat with practice.
There were some chaindot lines on my kit parts which weren't in the instructions. Reading your previous post I've now figured out they meant score with a blunt point. Ah well, more learning.
Assembled the front bumper/splitter and left to set overnight.
Bonnet and wings attached and start made on air intake for roof.

Once the glue has set on those wings (I'm glueing it in sections as the wings are >2mm thick at the point above the wheelarch and will bend and deform if I try and complete in one section)
It is possible to line up the body with the front section and get something resembling a car at this point.
Bonnet and wings attached and start made on air intake for roof.
Once the glue has set on those wings (I'm glueing it in sections as the wings are >2mm thick at the point above the wheelarch and will bend and deform if I try and complete in one section)
It is possible to line up the body with the front section and get something resembling a car at this point.

It's resembling a car now...
very surprised the front assembly fitted so smoothly, but it did.
air-intake to affix,
Rear wing, wing mirrors undertray and wheels left to do
I'm thinking about what to do next. I'm worried that my level of skill is still too low to attempt the detailed superbike, so I may try one of Yamaha's other motorbikes - I may just have an issue with how the creator of the NSX designed it - the transporter and car went together really easily though.
I don't know if it was the unclear instructions (it definitely was for the rear section) on this one or the way the parts went together


This does look rather nice and having seen your one I think if I were making one of these I'd probably buy some A4 photopaper to use for printing it.
It comes in packets of several sheets of smooth glossy card which would look fabulous on that car.
I've used it before to print instrument panels on my models
It comes in packets of several sheets of smooth glossy card which would look fabulous on that car.
I've used it before to print instrument panels on my models
perdu said:
This does look rather nice and having seen your one I think if I were making one of these I'd probably buy some A4 photopaper to use for printing it.
It comes in packets of several sheets of smooth glossy card which would look fabulous on that car.
I've used it before to print instrument panels on my models
Thanks for the complimentsIt comes in packets of several sheets of smooth glossy card which would look fabulous on that car.
I've used it before to print instrument panels on my models
I've thought about photo paper (decent thickness, shiny finish) but I suspect it may have it's own positives and negatives. The Epson website does appear to have used glossy card for their demo pieces
The card I used does appear to leach some of the ink out if you touch a printed area after applying glue in the proximity, and photo paper may be better for that
I also suspect the gremlin of "cracking" the ink on folds / scores (i've tried scoring the inside, and the outside of a curve with the same result) will appear on photo paper too
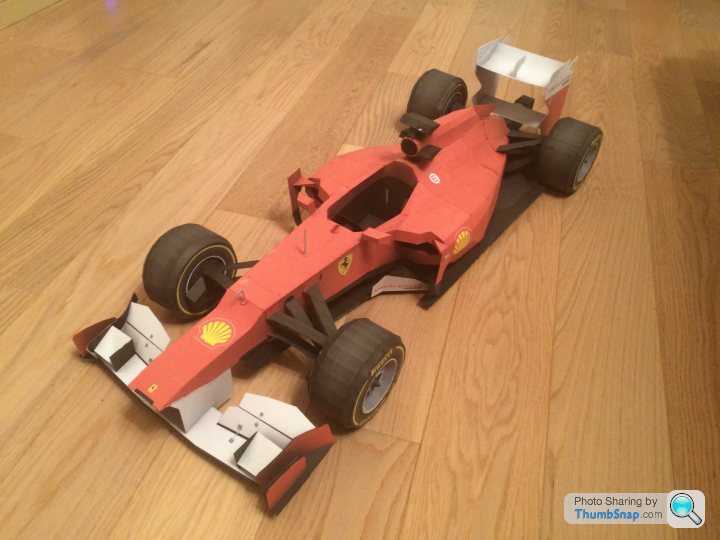
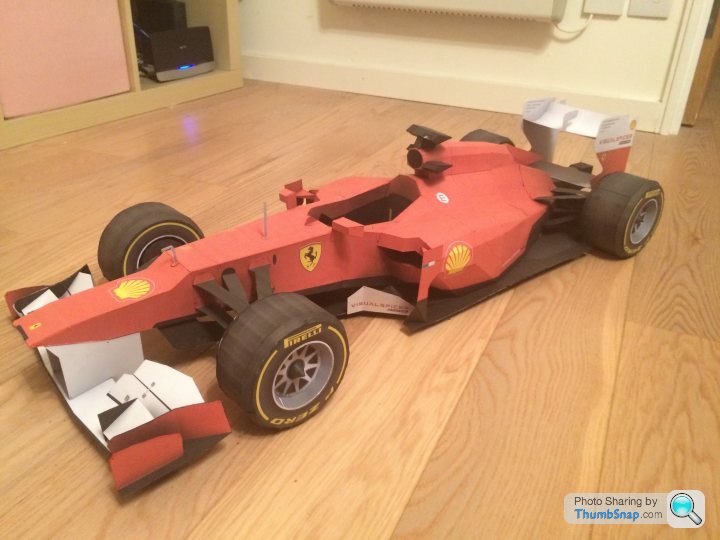
Finished.

overall, I'm happy with the process as a learning experience, and given my lack of experience in papercraft, it's come out OK.
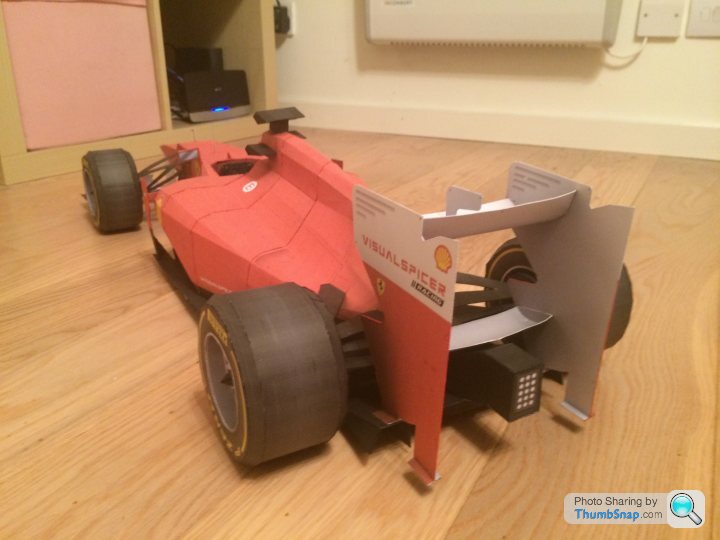
There were some bits that were more problematic than others, the instructions could have been clearer and there were some weak areas in the model - the rear bumper is not a particularly well modelled, documented or constructed section, but the front bodyshell went together nicely considering how complex the bodyshape is.

Anyway, Next on the production line (because I'm still not confident enough to try the bike at 30 sheets of card )

overall, I'm happy with the process as a learning experience, and given my lack of experience in papercraft, it's come out OK.
There were some bits that were more problematic than others, the instructions could have been clearer and there were some weak areas in the model - the rear bumper is not a particularly well modelled, documented or constructed section, but the front bodyshell went together nicely considering how complex the bodyshape is.
Anyway, Next on the production line (because I'm still not confident enough to try the bike at 30 sheets of card )
perdu said:
You've every reason to be pleased with this one
Simply smashing in the nicest of possible ways
I will be looking forwards to the next
I'm getting strangely attracted to having a dabble too

Any way, nice car!
Thanks. Simply smashing in the nicest of possible ways
I will be looking forwards to the next
I'm getting strangely attracted to having a dabble too
Any way, nice car!
Give it a go - it's strangely therapeutic.
I ended up viewing the NSX as a learning exercise from early on. The front half is way better that the back end, but I think that the front is slightly less complex to build (and you build it later)
Slowly Slowly Catchee Monkey is the way to go though. If I got any glue on the printed surface then touched it - the ink would come off on my finger. Better to stop, let the mis-applied glue set and re-do.
perdu said:
You've every reason to be pleased with this one
Simply smashing in the nicest of possible ways
I will be looking forwards to the next
I'm getting strangely attracted to having a dabble too
Any way, nice car!
+1 Simply smashing in the nicest of possible ways
I will be looking forwards to the next
I'm getting strangely attracted to having a dabble too
Any way, nice car!
It looks very good, especially considering the amount of compound curves on compound curves required.
Thanks, I think maybe I'm being a little harsh on myself
Made a start on the Formula NIPPON racer, no improvement in the instructions. Google translate fails to read the PDF as it's a page of embedded images, rather than text.
Step one

Leads to this...

Which is the inside of the wheel well for the rear of the car. My lack of Japanese doesn't help, but I think that it would benefit from a "completed" view of the part too, maybe even from a couple of angles. There is a black finish on the bottom of the part, which is somewhat counter intuitive, and part a3L faces downwards with the end section mountain-folded back on itself to present a section of black upwards - there are also 12 tabs which go through the verticals, 6 on each side.
Part a4L has a serpentine curve at the front, which is less than 2mm wide all the way along, Part a5L was less than 1mm wide at one point and needed a reinforcing shim behind it.
Step 1b and c are attaching "facings" to the white top section.
I need to create another (mirrored) one of these for the right hand side of the model - but now I've figured out how it's supposed to go together it should be easier.
Made a start on the Formula NIPPON racer, no improvement in the instructions. Google translate fails to read the PDF as it's a page of embedded images, rather than text.
Step one
Leads to this...
Which is the inside of the wheel well for the rear of the car. My lack of Japanese doesn't help, but I think that it would benefit from a "completed" view of the part too, maybe even from a couple of angles. There is a black finish on the bottom of the part, which is somewhat counter intuitive, and part a3L faces downwards with the end section mountain-folded back on itself to present a section of black upwards - there are also 12 tabs which go through the verticals, 6 on each side.
Part a4L has a serpentine curve at the front, which is less than 2mm wide all the way along, Part a5L was less than 1mm wide at one point and needed a reinforcing shim behind it.
Step 1b and c are attaching "facings" to the white top section.
I need to create another (mirrored) one of these for the right hand side of the model - but now I've figured out how it's supposed to go together it should be easier.
Gassing Station | Scale Models | Top of Page | What's New | My Stuff