Discussion


Apologies as I know it has been a subject around befoe but the new search facility just isnt as good as the old one,. Anyway, had to abort a run out to a mates 65th birthday tonight as I could se the passenge side door mirror sloopy developing the droop and that without the beer.
Now i Ive no idea how these are fixed to the door, any normal mirror would be a couple of bolts or studs but this seems different.
So what is likely to have broken, how do i get to it, how does the door panel come off (is it just push through cips like in the old days of cars or something more complicated).
This was after I hadn't sorted the dash lights (see other thread)
Been a bit of a day as the everyday Jag estate died as well ...
I find the search very good but you must remember to put 'chimaera' first. It isn't forum specific. Plenty of threads here:
https://www.google.com/search?as_q=chimaera+door+m...
https://www.google.com/search?as_q=chimaera+door+m...
HvdWeerden said:
That could be the thing, does it just unclip from the outside?mouseymousey said:
I'm pretty sure I have a mirror base at home, same as the one linked above at Clever Trevor. I bought it about 2 days before I wrote off my beloved Chimaera about 4 years ago.
You can have it for nothing if you cover the postage?
That's a very kind offer, pm me an email address and I'll pay by paypal if that is convenient or advise another method. You can have it for nothing if you cover the postage?
I'll send a postal address by return
Tony H
ianwayne said:
I find the search very good but you must remember to put 'chimaera' first. It isn't forum specific. Plenty of threads here:
https://www.google.com/search?as_q=chimaera+door+m...
Thanks Ianhttps://www.google.com/search?as_q=chimaera+door+m...
I did something similar this morning and brought up the thread below.
it was late last night and was a bit tired.
The old search ( I go back a long way) was more forum specific)
The mirrors on our cars really are rubbish, but you can solve the problem for next to no money.
My mirrors were both broken in a number of places so needed a complete rebuild, I ended up incorporating four different modification and strengthening features.
I was too cheap to buy new parts and some bits just aren't available anyway, but with my mods the whole assembly ended up far stronger than when new.
http://www.pistonheads.com/gassing/topic.asp?t=138...
I can highly recommend the centre steel bolt idea even if the tapered post hasn't fractured yet, because one day it will and the bolt solves the problem permanently.
Another top tip is to drill a dimple for the allen headed grub screw to locate to, completely eliminates the spiny spiny syndrome for ever
My mirrors are so strong now I expect them to out live the car
Hope that all helps?
Dave.
Thanks everyone, who the **** designed that?
Finally built up the courage to take a hammer and chisel to the screw in bit and with a bit of hammering out it came. Followed by the wire ..............but not the plug as it won't go through the hole!
Patience at an end, having pared down the plug and still not succeeded,it was getting dark so, I cut the wires.
Rather that than the contunual knocking of the mirror unit against the door. And no, i couldnt get the 5 terminals out of the plug either.
Mousey, you have mail
Did you remove the door speaker to try and disconnect the electrical connectors? In fact by failing to do so first, you may have twisted the looms into a bunch of b ds.
ds.
The mirrors are borrowed from the Citroen CX among others but because the grub screw can't be accessed without removing the whole assembly, it seems a poor job. Now you see why so many people go for aftermarket door mirrors.
ds. The mirrors are borrowed from the Citroen CX among others but because the grub screw can't be accessed without removing the whole assembly, it seems a poor job. Now you see why so many people go for aftermarket door mirrors.
Edited by ianwayne on Friday 12th September 20:17
Well I have a replacement tripod and the mirror is all back together but fitting it to the car is another bh all together.
Tighten the torx screw in what might be the right place (only a choice of 360 degrees to choose from) fix the tripod to the screw in base with a grub screw. Screw whole unit into door only to find either the tripod moves of more likely the mirror rotates on the torx. And it won't screw totally back into the door without using the mirror as a handle which loosens everything more.
How did they do it in the factory (and why!!!).
Gave up tonight, blanking plate a possibility.....
h all together.Tighten the torx screw in what might be the right place (only a choice of 360 degrees to choose from) fix the tripod to the screw in base with a grub screw. Screw whole unit into door only to find either the tripod moves of more likely the mirror rotates on the torx. And it won't screw totally back into the door without using the mirror as a handle which loosens everything more.
How did they do it in the factory (and why!!!).
Gave up tonight, blanking plate a possibility.....

Get everything rebuilt and tightened up first, drill through the slip ring into the tapered post for the grub screw to locate into and use my steel clamping/strengthening bolt idea.
Its critical to understand the very last adjustment is where the little grub screw bites into the post.
If you look closely the boys at TVR marked the correct position with a permanent marker, if you follow this mark you should find when the mirror is screwed tightly into the door it'll sit in the correct position.
Obviously the final fine adjustment can be made using the electric joystick adjuster.
Trial fit the whole thing first by screwing the mirror into the door, when you're confident the grub screw is in the right spot remove the mirror again and then the grub screw, drill through into the post to create a locating divot for the grub screw to bite into.
This eliminates the spinning mirror syndrome, the tapered post & grub screw system is there for fine adjustment with the mirror in situ, but this feature can't be used on the Chimaera because the way TVR fitted the mirror means you can only access the little grub screw when the mirror is off the car.
For this reason what you really need to do is lock the mirror to the tapered post permanently, but clearly you need to do so with the whole mirror assembly in exactly the right position first.
Drilling through the threaded grub screw hole to create your locating divot in the tapered post allows you to lock things up permanently, just make sure you get your divot in the right spot or the mirror will be out of alignment.
Also make sure you use the correct size drill bit or you'll cut the thread out that the grub screw winds into, I got around this by choosing a smaller than needed drill bit first to lightly mark the correct point on the post.
Then with the assembly apart you can use the correct size drill bit without fear of cutting out the thread for the grub screw, put it all back together, line up the grub screw hole with your divot, then wind the grub screw in tightly to lock up the whole assembly nice & tight.
Finally you can wind the whole mirror assembly into the door safe in the knowledge when its tight it'll be in exactly the right spot, its worth noting even a small change in the grub screw & divot point will make a large change to the mirror position.
So the trial fitting process is extremely important before you get busy with the drill, take your time and trial fit as many times as you feel necessary before you're 100% confident where to drill & commit to creating your locating divot.
Yes it's a faff, yes these mirrors are rubbish, but take your time & follow my instructions and you can make them very solid indeed and get the adjustment spot on.
I like the fact I was able to rescue my broken original mirrors and at the same time was able to make them 100% more robust than when new/fitted at the TVR factory.
Best of all it cost me nothing
Apologies for the lack of photos, I really should have taken more snaps to bring my instruction to life, but it should all make sense when you have the mirrors apart & on the bench.
ChimpOnGas said:
I can highly recommend the centre steel bolt idea even if the tapered post hasn't fractured yet, because one day it will and the bolt solves the problem permanently.
It's designed to fracture on impact, reasoning that a broken mirror base is easier and cheaper to replace than a load of nicely smoothed and painted fibreglass (or sheet metal, as the whole lot comes from a Citroën CX Phase 2. :PI simply tend to keep one of those cast tripod bases as a reserve...
900T-R said:
ChimpOnGas said:
I can highly recommend the centre steel bolt idea even if the tapered post hasn't fractured yet, because one day it will and the bolt solves the problem permanently.
It's designed to fracture on impact, reasoning that a broken mirror base is easier and cheaper to replace than a load of nicely smoothed and painted fibreglass (or sheet metal, as the whole lot comes from a Citroën CX Phase 2. :PIf the mirror gets hit the post won't save it, personally I prefer a strong mirror because what typically happens in the real world is well meaning motorists parking close to the car tend to try and close the mirrors so they can open their door further without touching the shiny TVR.
This happened to me a number of times in France, and before I solved the problem it always ended in a floppy spinning mirror and eventually a broken post a long way from home.
With my divot for the grub screw and the steel bolt through the post any well meaning citizen can now man handle my mirrors and I know nothing will break in the process.
In fact, they're now "general public proof" just like the mirrors on any other car.
Works for me
Skyedriver said:
Well I have a replacement tripod and the mirror is all back together but fitting it to the car is another bh all together.
Tighten the torx screw in what might be the right place (only a choice of 360 degrees to choose from) fix the tripod to the screw in base with a grub screw. Screw whole unit into door only to find either the tripod moves of more likely the mirror rotates on the torx. And it won't screw totally back into the door without using the mirror as a handle which loosens everything more.
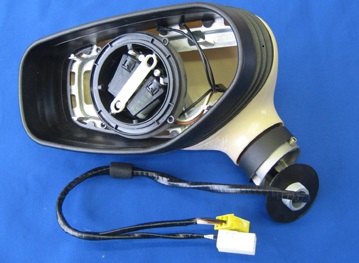
You may have the length of spring steel missing which gives the mirror it's 3 'click' positions. Chimpongas has written a good description above, but your mirror body may end up in a different position to that originally marked on assembly depending on whether you still have the large rubber washer in place or not, seen below. May still be stuck to the door anyway!h all together.Tighten the torx screw in what might be the right place (only a choice of 360 degrees to choose from) fix the tripod to the screw in base with a grub screw. Screw whole unit into door only to find either the tripod moves of more likely the mirror rotates on the torx. And it won't screw totally back into the door without using the mirror as a handle which loosens everything more.
Hi and thanks for all the tips.
Firstly the tripod on the car was dated 86 so I guess it may be the original on a 93 car.
The rubber washer between the base and the body is in place.
The base screws into the door on its own but seems tighter with the mirror attached, not cross threaded just maybe I can easily get a grip on the base but not so on the mirror without twisting it on the torx screw.
The base has a hole in it where I assume the grub screw locates, it does fit, would this indicate that it ha been off before?
There are 3 "teeth" on the post, I wondered what they locate into, am I missing something.
The rubber washer, steel washer, and torx screw at the top of the tripod are what turn first, as the tripod is locked to the base with the grub screw.
I am now thinking it is what should lock into the 3 teeth that is giving me the problem, as it is the mirror to tripod interface that moves first.
I think the three teeth on the post you're referring to are the ones that locate to the sprung steel arm.
This spring steel arm is formed with a sharp angle in it to effectively create a tooth that engages with the three teeth on the post.
It's just a simple three tooth ratchet and sprung pawl system.
The idea is this gives you three solid positions that snap & positively lock into place against the spring pressure of the pawl.
1. Fully extended (normal operation)
2. Folded in a bit (almost fully closed to the door on a Chimaera)
3. Fully folded in (in practice on a Chimaera you often never engage position 3 before the mirror hits the door)
You need to start with the mirror in position one (fully extended normal operation) or you'll get yourself in a right old muddle setting up the final adjustment using the grub screw.
Force the mirror out into it's fully extended position 1 on the sprung steel pawl and start again following the rest of my instructions.
These mirrors really are rubbish but I've never broken one or made it worse by man handling it on the bench, get a feel for how it works and dont be afraid the work that ratchet & sprung pawl system through its three positions.
The spring tension is quite strong but you can (with a bit of force) get the thing snapping into it's three different positions reasonably easily even off the car, like I say you want it in the fully out "position 1" before you attempt any other adjustment method.
Good luck with it
Gassing Station | Chimaera | Top of Page | What's New | My Stuff