Project 'radio blackout'...... done!
Discussion


 !
!


Sadly, I've just deleted some of the photos I was going to post to show progress.... sorry.
1: Remove radio.
2: Unscrew both keypad units, clock and buttons
3: Remove aircon controls by turning each knob to vertical and pulling, then unscrew from back.
4: Carefully, up clip top and bottom half of each keypad
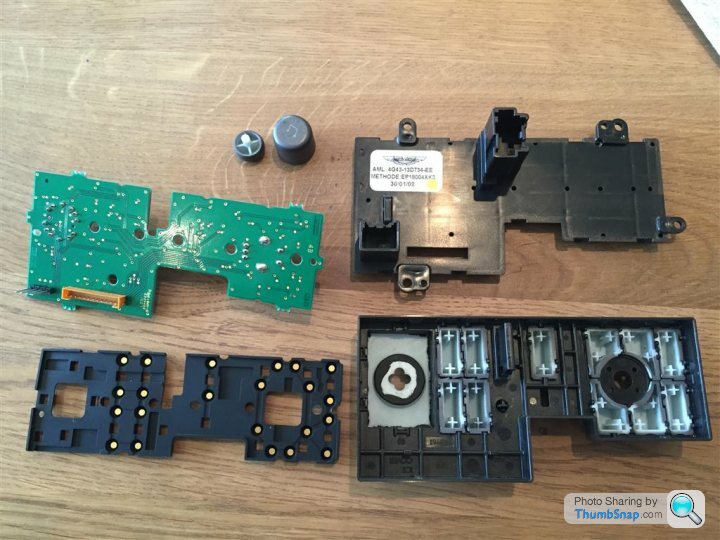
5: With p1500 wet & dry, sand each button and the area around the aircon knobs:
6: With a vinyl cutter design and cut out new icons then transfer them to the buttons & main unit.

7: Spray black
8: Peel vinyl stickers
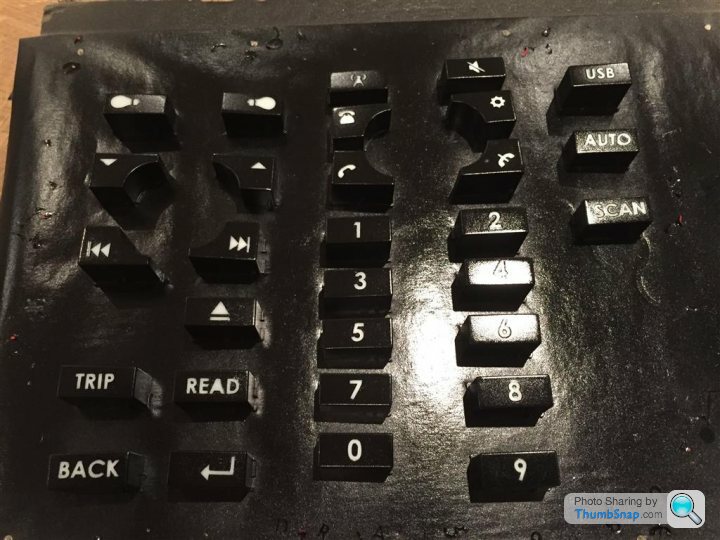
9: Spray clear lacquer
10: Re-assemble
11: Relax
1: Remove radio.
2: Unscrew both keypad units, clock and buttons
3: Remove aircon controls by turning each knob to vertical and pulling, then unscrew from back.
4: Carefully, up clip top and bottom half of each keypad
5: With p1500 wet & dry, sand each button and the area around the aircon knobs:
6: With a vinyl cutter design and cut out new icons then transfer them to the buttons & main unit.
7: Spray black
8: Peel vinyl stickers
9: Spray clear lacquer
10: Re-assemble
11: Relax
Edited by danieldenham on Saturday 4th October 18:50

ds2000 said:
You're radio on button has been stuck back on upside down 
I love the idea that having spent hours taking the buttons out, the icons designed, cut, put in exactly the right place, sprayed and finally reassembled, you might think that I would put one button on backwards!As mentioned above, it is the volume knob and so it turns!!
Thanks for posting the close-ups, great applause for your commitment and attention to detail! fonts and scale of numbers have a big impact. What font did you use?
I bet the positioning of all vinyl's was a challenge for centralising. What was the hardest part of doing the exercise for those looking at this, thinking about doing the same?
I bet the positioning of all vinyl's was a challenge for centralising. What was the hardest part of doing the exercise for those looking at this, thinking about doing the same?
W1111AM said:
What font did you use?
"Century Gothic" which is the font Aston used.W1111AM said:
I bet the positioning of all vinyl's was a challenge for centralising.
Not really as I made each icon in a box, exactly the same size as the button. Then you simply line up the button with the box, press down and peal off the backing:
For the aircon icons, I cut a circle the same size as the knob and used that to line things up:
W1111AM said:
What was the hardest part of doing the exercise for those looking at this,
Getting the vinyl cut!! I bought a vinyl cutter especially for the job and working out how to use the software, then drawing the icons took me ages!! W1111AM said:
....thinking about doing the same?
PM me if you want. I'm happy to 'print' out the icons again with the new cutter, if you are happy to contribute a little to the costs..
Edited by danieldenham on Tuesday 7th October 18:35

Gassing Station | Aston Martin | Top of Page | What's New | My Stuff