my ventures into woodworking in the home
Discussion


Nicely done Koosh, that's an impressive first piece, mine was a folding coat hanger and then a small foot stool. There's something nice about living with furniture you've made yourself and looking forward to the next piece you need
FIne woodworking magazine by Taunton press is worth picking up if you see it in W H Smiths or the like. Practical and inspirational and probably online these days.
Looking forward to the next piece.
FIne woodworking magazine by Taunton press is worth picking up if you see it in W H Smiths or the like. Practical and inspirational and probably online these days.
Looking forward to the next piece.
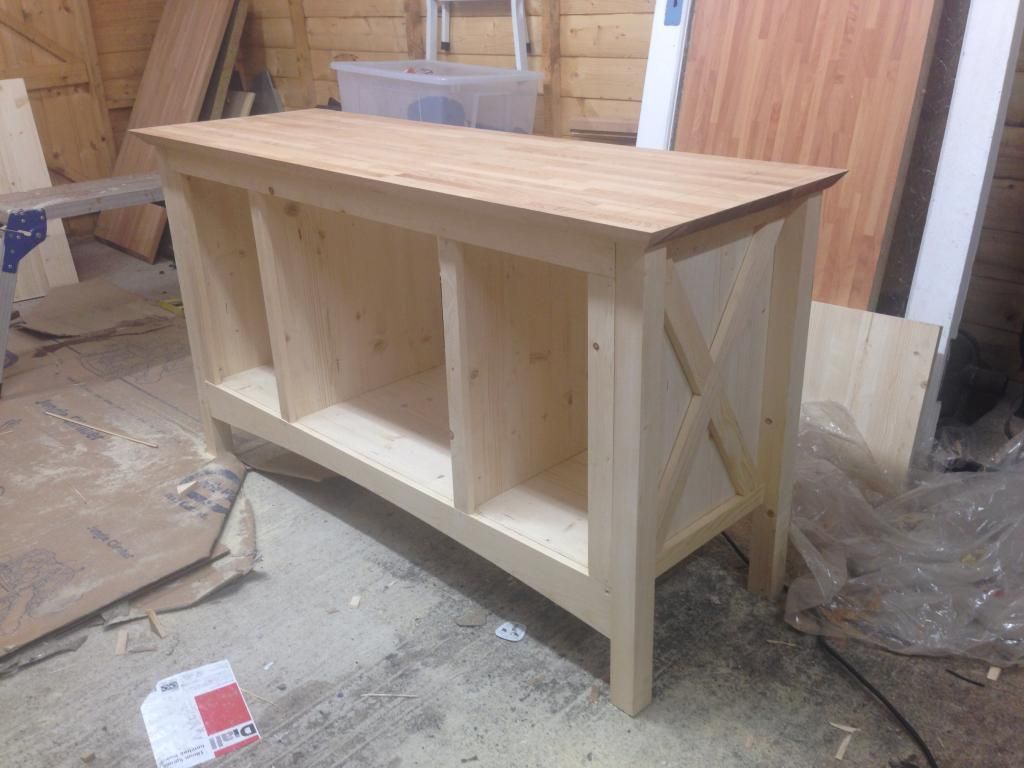
A couple of things you might want to do on it.  If you put a back on with a small hole in it, it will cover all the wires and cables running between the tv and devices and stop stuff falling out the back of the cupboards. It can also make a cabinet more rigid.
On the top, if you left a small vertical straight edge before the mitre starts, it would take away the sharp edge which can splinter,chip, be hard to finish and a bit dangerous if someone falls against it.
If you make doors the traditional way of rails and stiles instead of mitreing them,if you have to trim them to fit,you don't risk the joints looking off, ie the mitres not meeting in the corner.
Next tool to invest in should be a router, use it for making doors, rebating, grooving panels and backs, mouldings on edges and tops etc.
If you put a back on with a small hole in it, it will cover all the wires and cables running between the tv and devices and stop stuff falling out the back of the cupboards. It can also make a cabinet more rigid.On the top, if you left a small vertical straight edge before the mitre starts, it would take away the sharp edge which can splinter,chip, be hard to finish and a bit dangerous if someone falls against it.
If you make doors the traditional way of rails and stiles instead of mitreing them,if you have to trim them to fit,you don't risk the joints looking off, ie the mitres not meeting in the corner.
Next tool to invest in should be a router, use it for making doors, rebating, grooving panels and backs, mouldings on edges and tops etc.
And you might as well build yourself a router table.
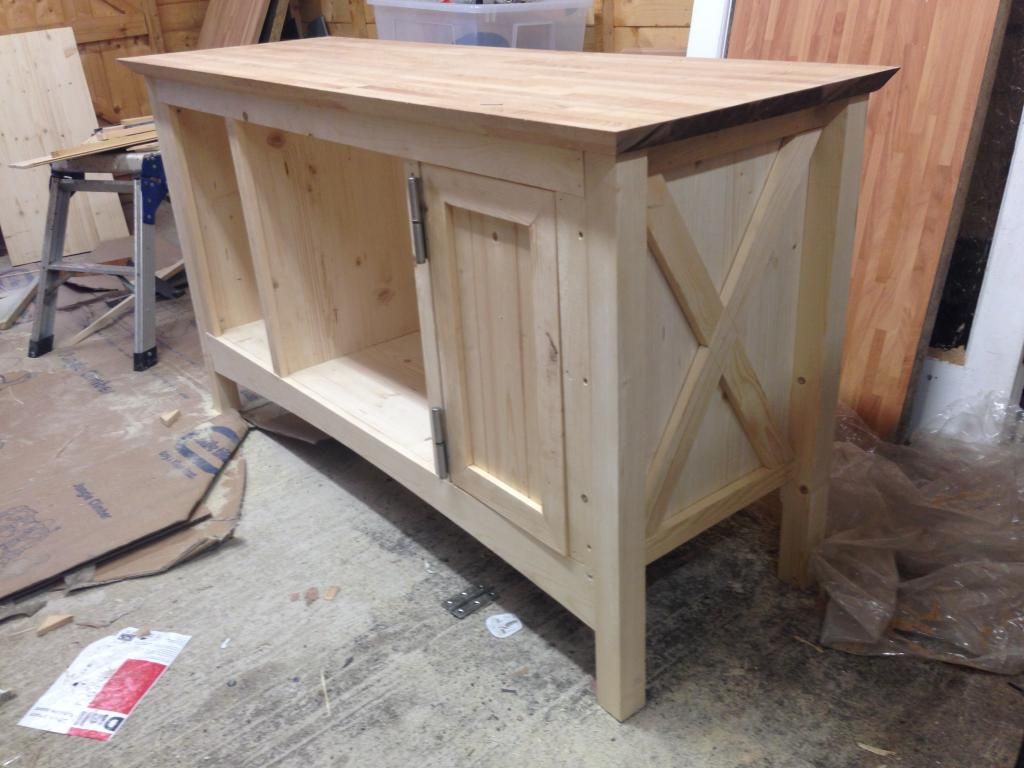
Looks good. I'm planning to make something similar at somepoint, though I'll persevere with my Tesco £8 stand until I've got some more important stuff done and I've built a router table.
What I'm intending to do is to make something quite compact that will basically house everything out of the way, but I'm going to fit a rear panel that extends up to just above the top of the TV, so the TV can be mounted directly to the unit, with the wires running behind. I'll try to recess the TV into the panel as much as possible too. The idea is to make the unit look very shallow and also to make the TV look very shallow too.
thanks for all the support and comments guys!
to point out a couple of comments i have looked into a keg jig and a router which i may go for in the future in any new pieces require such a level of workmanship!
also i have some 3mm hardboard which i used for another project that i may use for a back to hide all the wires! just need to get around to doing it.
so my next project was a "reading nook" in the girlfriends room of the house. she saw in on pintrest a couple weeks before we moved in and just wanted to show me it and silly me said something along the lines of "it wouldn't be too hard to make".... thought i'd learn the first time but obviously not...
here is the one she found on pintrest. again a not so great picture...

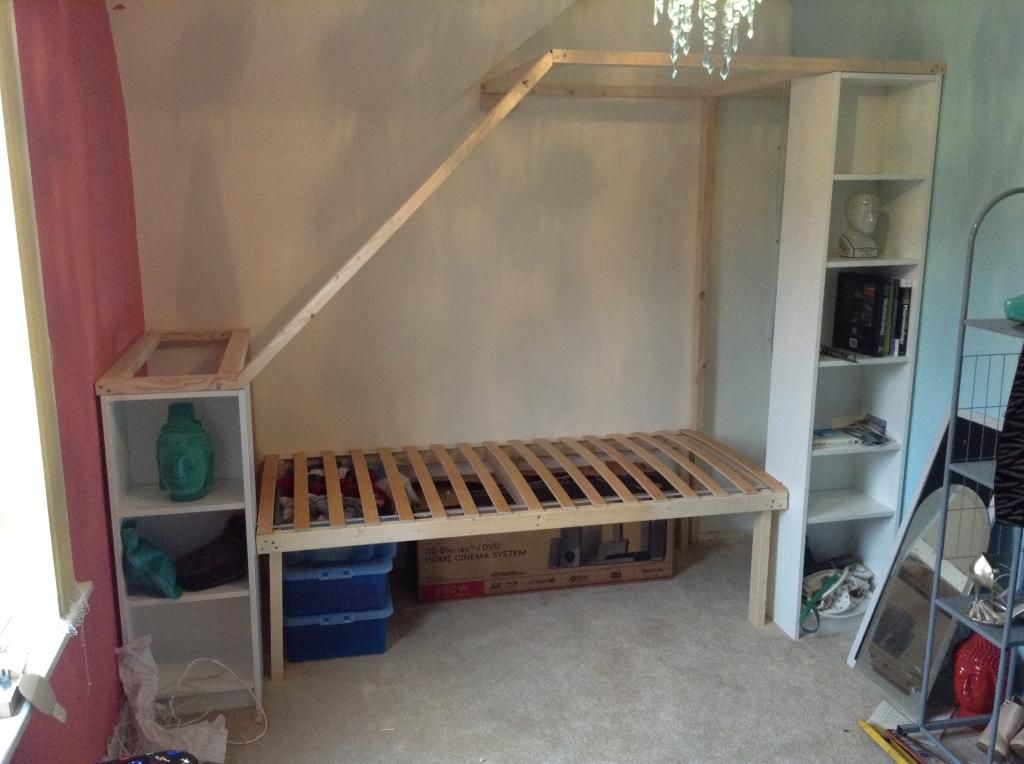
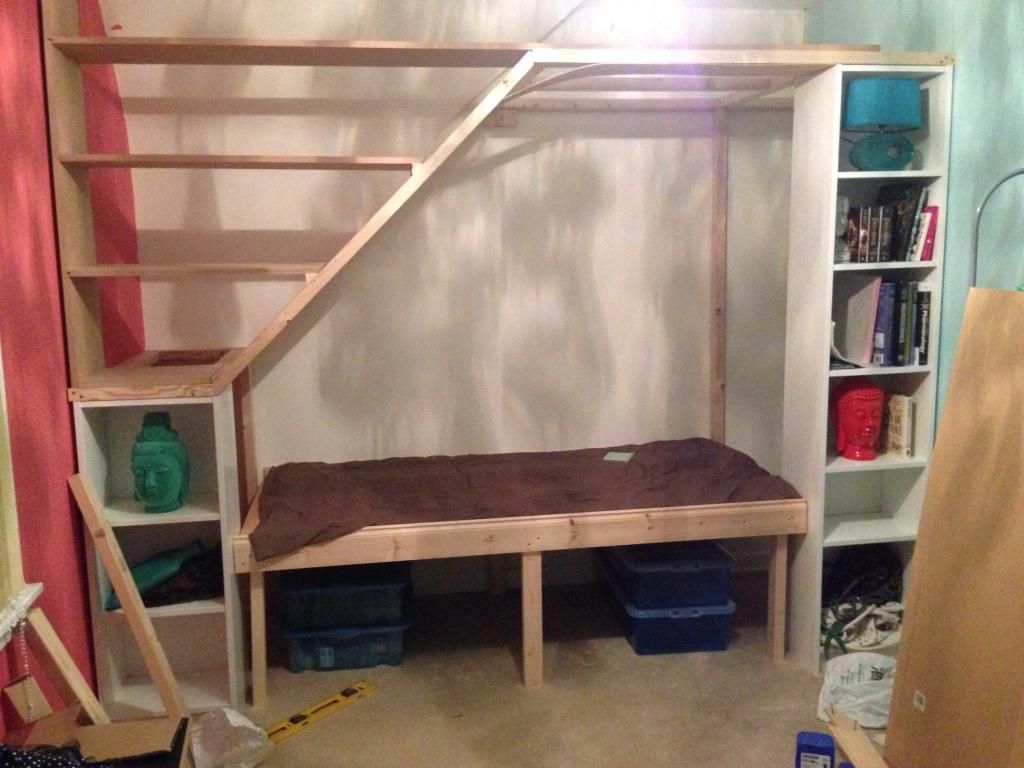
so with some planning and a rough idea how i was gonna do it i set about making a start. first up was 2 billy bookcases to give me the 2 different heights i needed at each side and they were considerably cheaper than making them from scratch! these were 400mm wide each and a standard single bed is 1900mm long and the room was 2740mm wide so this all kinda fitted in nice and perfect... so i set them just wider than a single bed width from the wall and a frame made from 3x2 was began
[img]http://i654.photobucket.com/albums/uu264/koosh-m/house/EA38078F-55BE-4F0E-BAE7-6C685F6B4C0E.jpg[/ing]
next a rough bed frame was built in the space
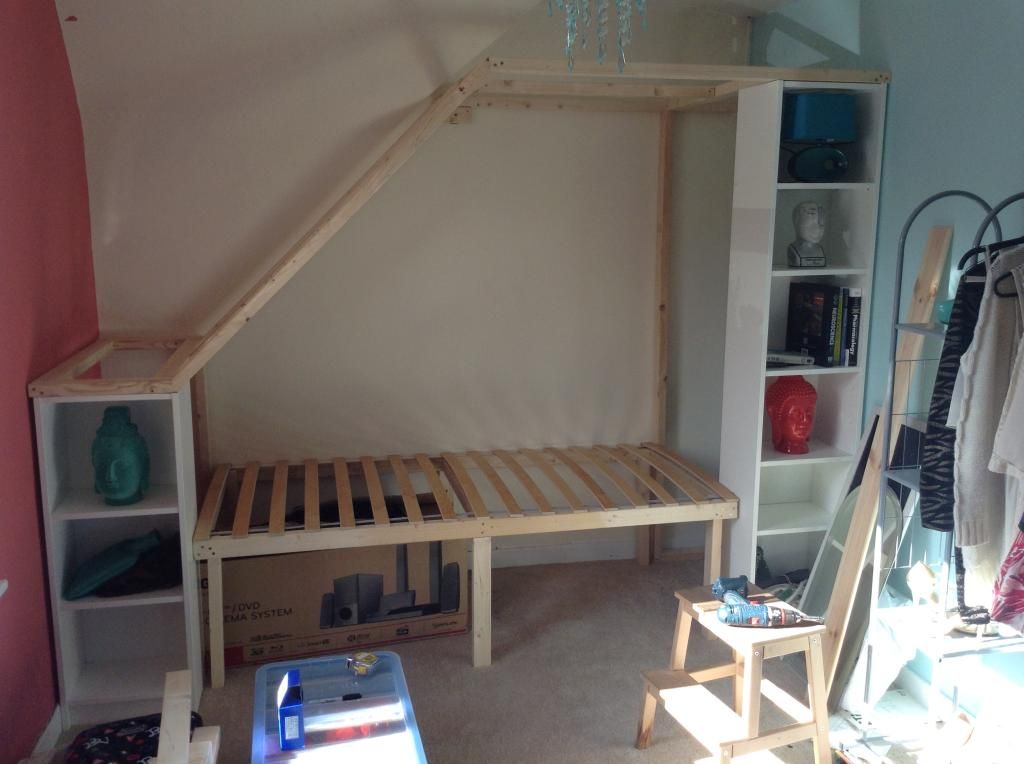
the bed edge was trimmed with a suitable "fancy" piece of wood so that the slats wouldn't slide side to side and the it would house the mattress and the whole leading face of the 3x2 frame was covered aswell. this was done so you couldn't see the shaving that was going to be put in or panelling underneath.
more pictures later! thanks!
to point out a couple of comments i have looked into a keg jig and a router which i may go for in the future in any new pieces require such a level of workmanship!
also i have some 3mm hardboard which i used for another project that i may use for a back to hide all the wires! just need to get around to doing it.
so my next project was a "reading nook" in the girlfriends room of the house. she saw in on pintrest a couple weeks before we moved in and just wanted to show me it and silly me said something along the lines of "it wouldn't be too hard to make".... thought i'd learn the first time but obviously not...
here is the one she found on pintrest. again a not so great picture...
so with some planning and a rough idea how i was gonna do it i set about making a start. first up was 2 billy bookcases to give me the 2 different heights i needed at each side and they were considerably cheaper than making them from scratch! these were 400mm wide each and a standard single bed is 1900mm long and the room was 2740mm wide so this all kinda fitted in nice and perfect... so i set them just wider than a single bed width from the wall and a frame made from 3x2 was began
[img]http://i654.photobucket.com/albums/uu264/koosh-m/house/EA38078F-55BE-4F0E-BAE7-6C685F6B4C0E.jpg[/ing]
next a rough bed frame was built in the space
the bed edge was trimmed with a suitable "fancy" piece of wood so that the slats wouldn't slide side to side and the it would house the mattress and the whole leading face of the 3x2 frame was covered aswell. this was done so you couldn't see the shaving that was going to be put in or panelling underneath.
more pictures later! thanks!
good effort !
as the guys have said, a router, a jointing jig etc will make top drawer results easier to achieve. One thing I have found useful for good strong joints is the Millerdowel system. got them from Axminster tools, no doubt there are alternatives, but it makes jointing and gluing easy and strong.
www.millerdowel.com. you can also get the dowels in different colours depending. . .
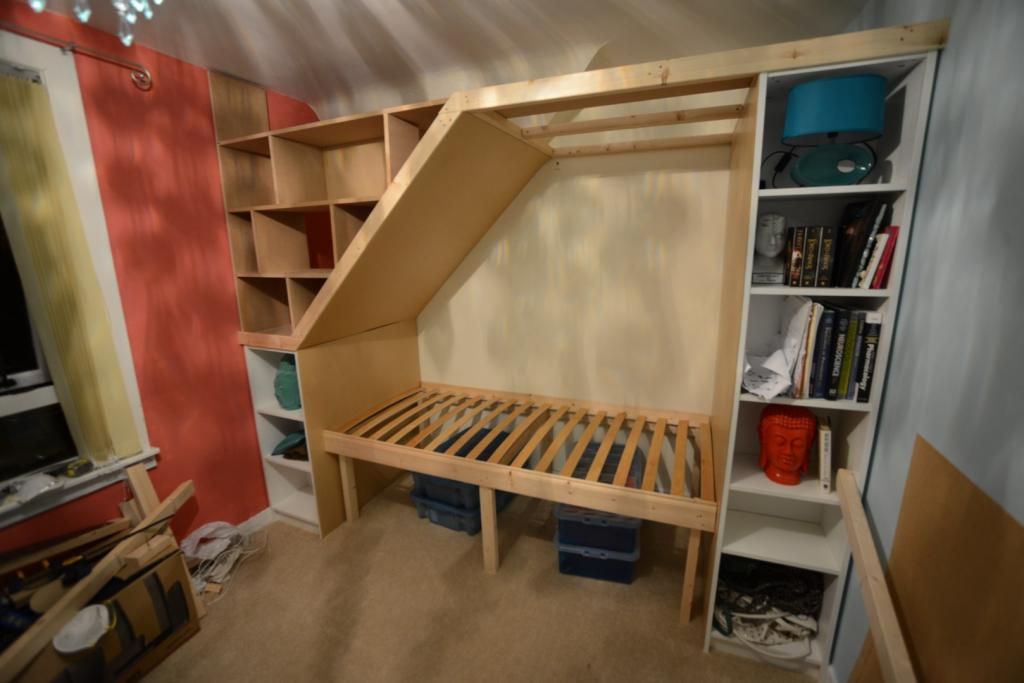
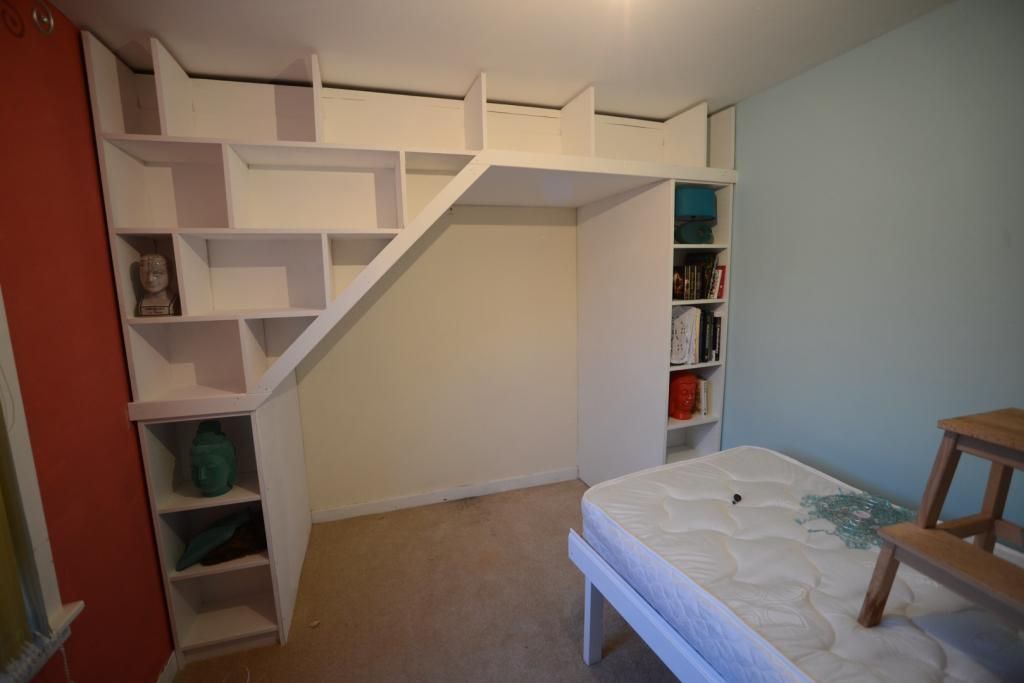
well my effort is going on the top floor of my house so i don't see much of a point putting stairs to nowhere... the bit you see sticking out on the back wall in my photos are part of the roof so i just left it there as it would be hidden by the end. and the reason i wanted the slope was to maximise the amount of shelving and just to make it look different and interesting instead of just 2 bookcases either side of a bed.
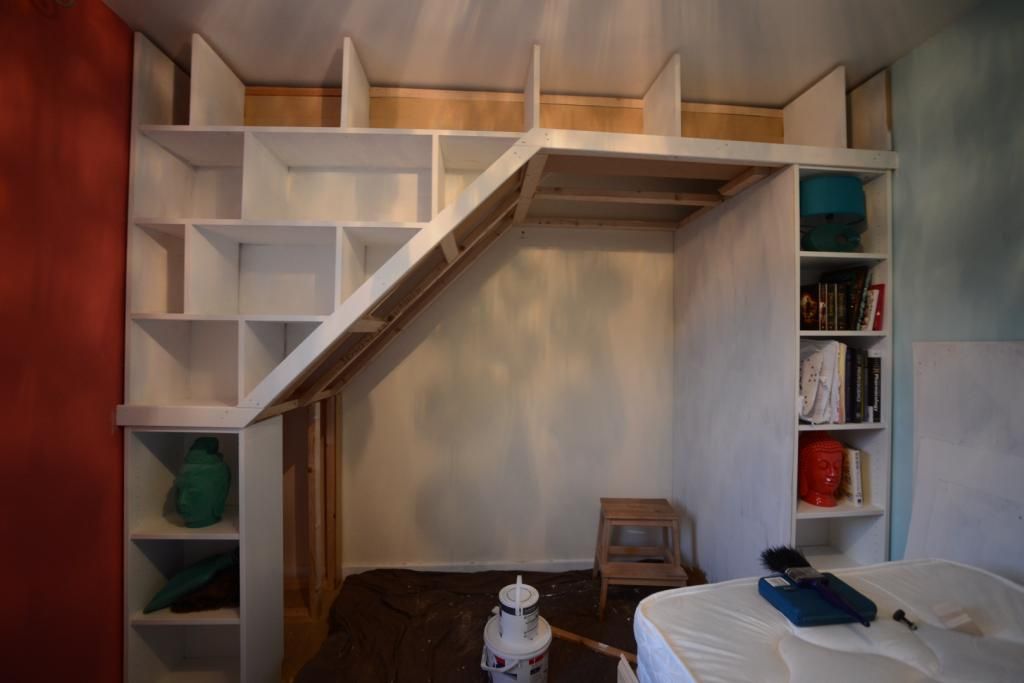
my next part to build was the shelving area that would sit on the angle. i done this on the floor and then lifted it into place. the left hand vertical edge will sit out from the wall the same distance as the bookcase.
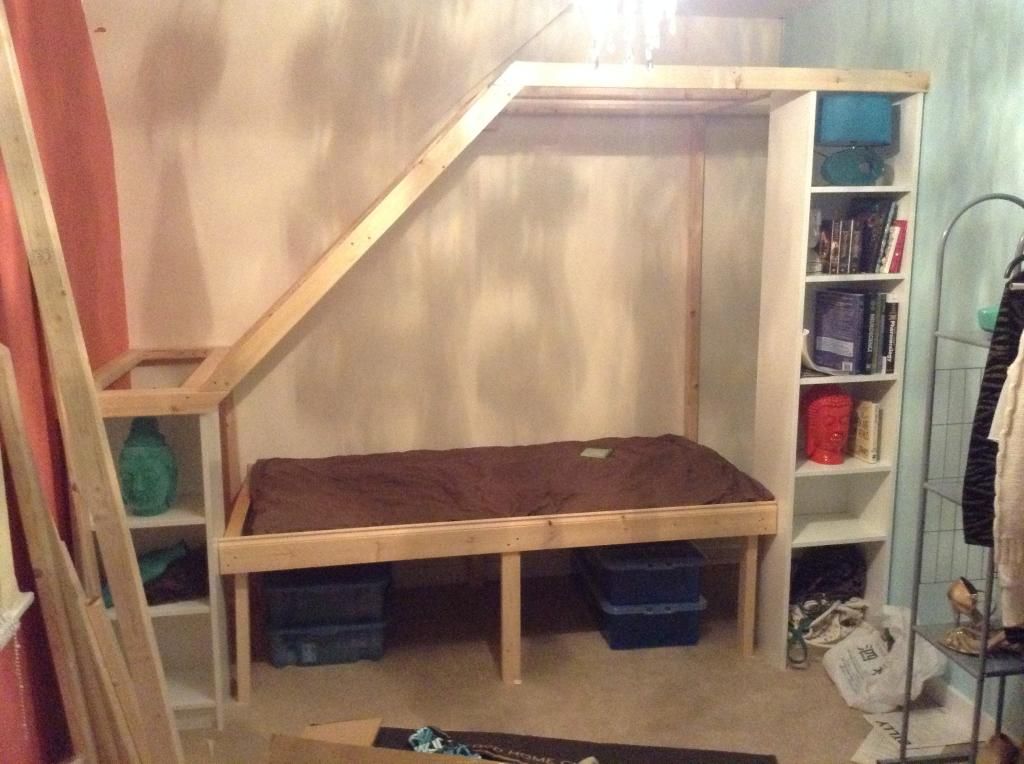
once lifted into place it all sat quite wall.
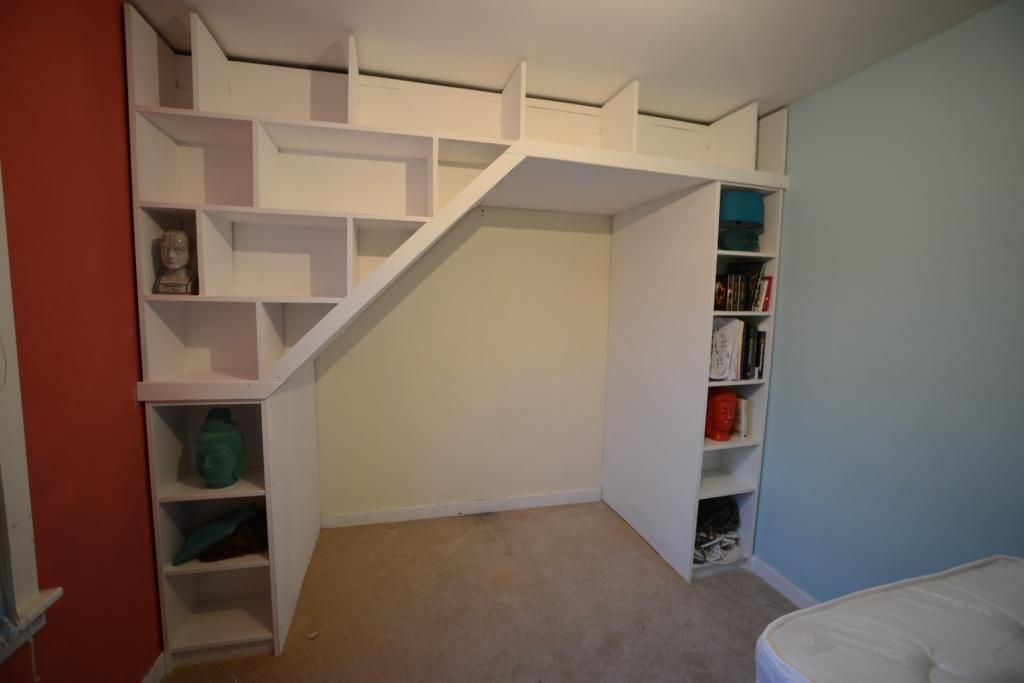
next was to install some vertical shave spacers/supports and begin panelling the inside.
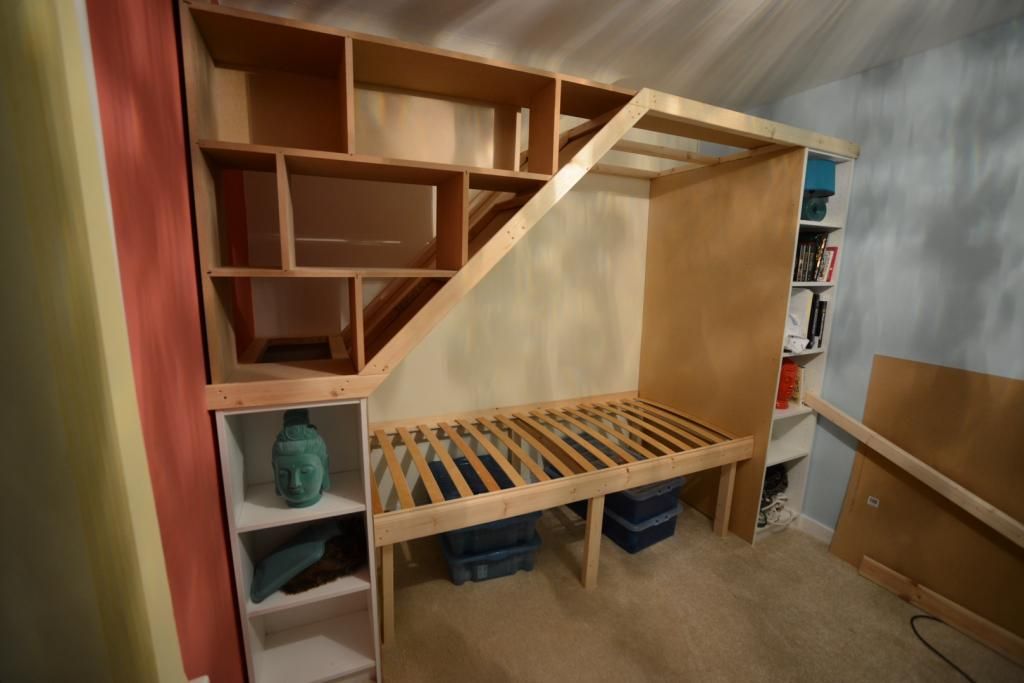

panelling kept coming in and out for minor adjustments and the top shelf vertical splits went into place

last lot of pictures coming soon!
my next part to build was the shelving area that would sit on the angle. i done this on the floor and then lifted it into place. the left hand vertical edge will sit out from the wall the same distance as the bookcase.
once lifted into place it all sat quite wall.
next was to install some vertical shave spacers/supports and begin panelling the inside.
panelling kept coming in and out for minor adjustments and the top shelf vertical splits went into place
last lot of pictures coming soon!
Simpo Two said:
Isn't the sloping top in the original photo simply there because it's built under a staircase? I see no point in the sloping roof otherwise... you can't put anything on it and you'll hit your head on it...
Agree. However if he builds in shelves to meet the slope it utilises the space and I think the slope adds to the cosiness and design aesthetic.Well done OP, inspiring stuff.
Purity14 said:
DoubleSix said:
Wozy68 said:
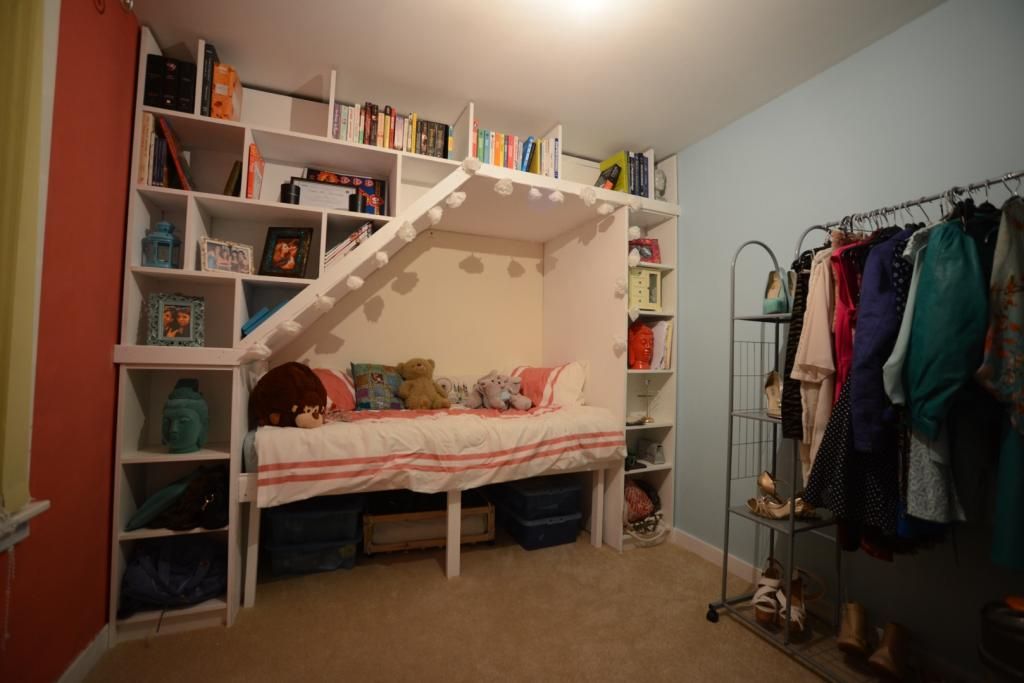
I'm liking ...... To the righthand side of the bed head where the bookcase is, the bookcase isnt full depth, I'd have made a bookcase behind it accessed from the bed head. Great for tea cups, books remotes etc
No where to lean against if you do that....See the picture he was using for inspiration, they include it.
DoubleSix said:
Simpo Two said:
Isn't the sloping top in the original photo simply there because it's built under a staircase? I see no point in the sloping roof otherwise... you can't put anything on it and you'll hit your head on it...
Agree. However if he builds in shelves to meet the slope it utilises the space and I think the slope adds to the cosiness and design aesthetic.Well done OP, inspiring stuff.
Purity14 said:
DoubleSix said:
Wozy68 said:
I'm liking ...... To the righthand side of the bed head where the bookcase is, the bookcase isnt full depth, I'd have made a bookcase behind it accessed from the bed head. Great for tea cups, books remotes etc
No where to lean against if you do that....See the picture he was using for inspiration, they include it.
DoubleSix said:
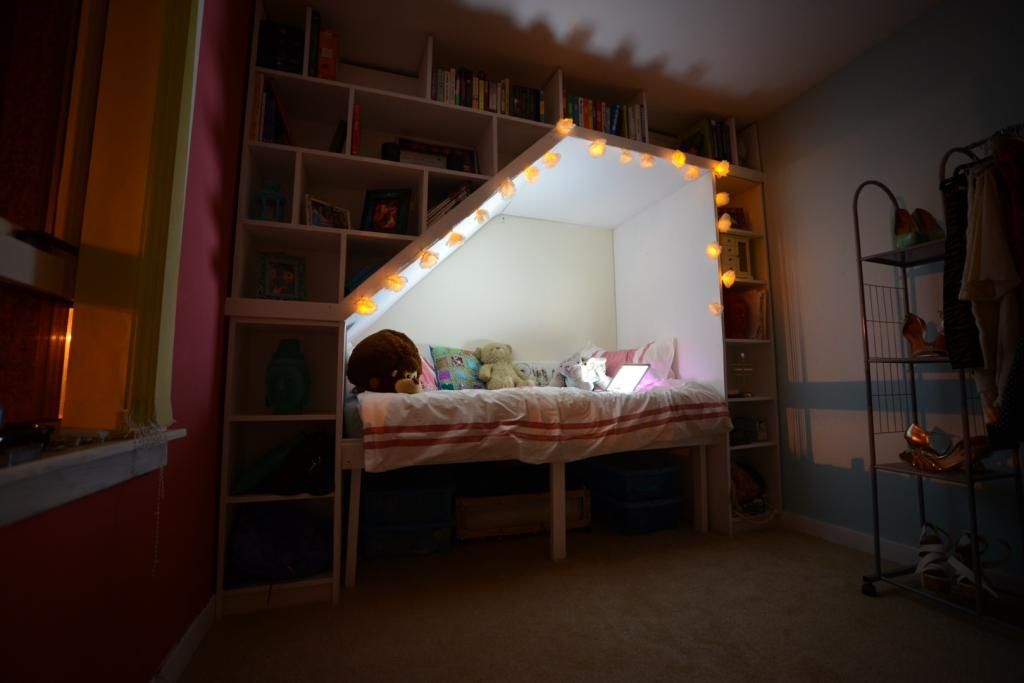
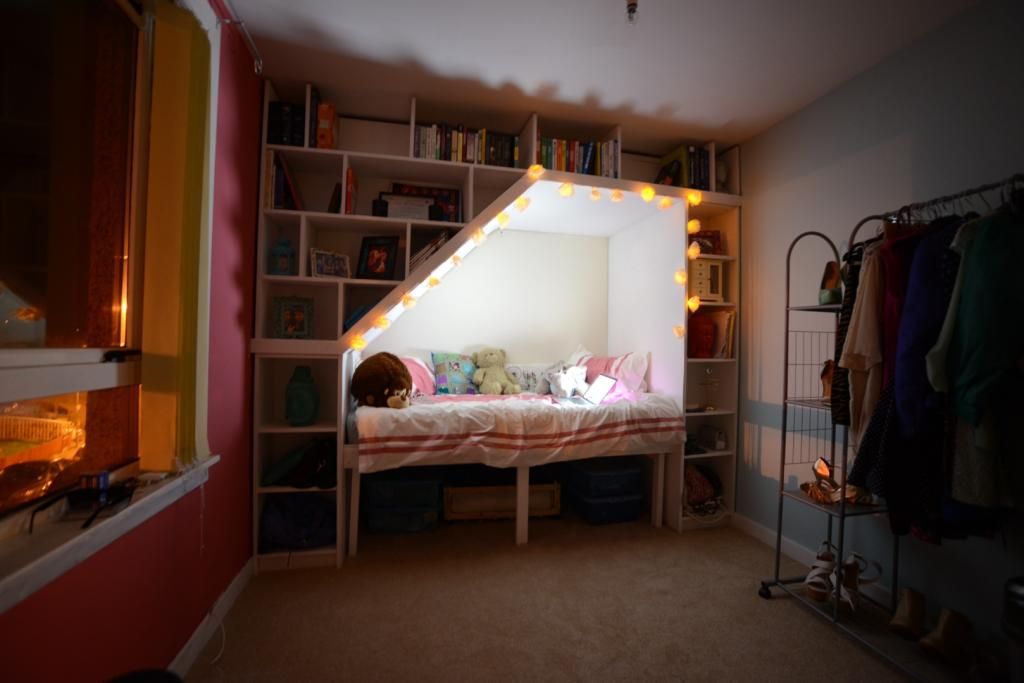
I'm hoping OP's next photo incorporates some reading lighting!
as above it was a time issue. she wanted it done sooner rather than later. at the moment there are a couple lamps providing light for reading but i have an idea for over christmas to install 3 downlighters into the panelling on the roof and the angle so all that was really left to do was begin the painting which i left to the other half
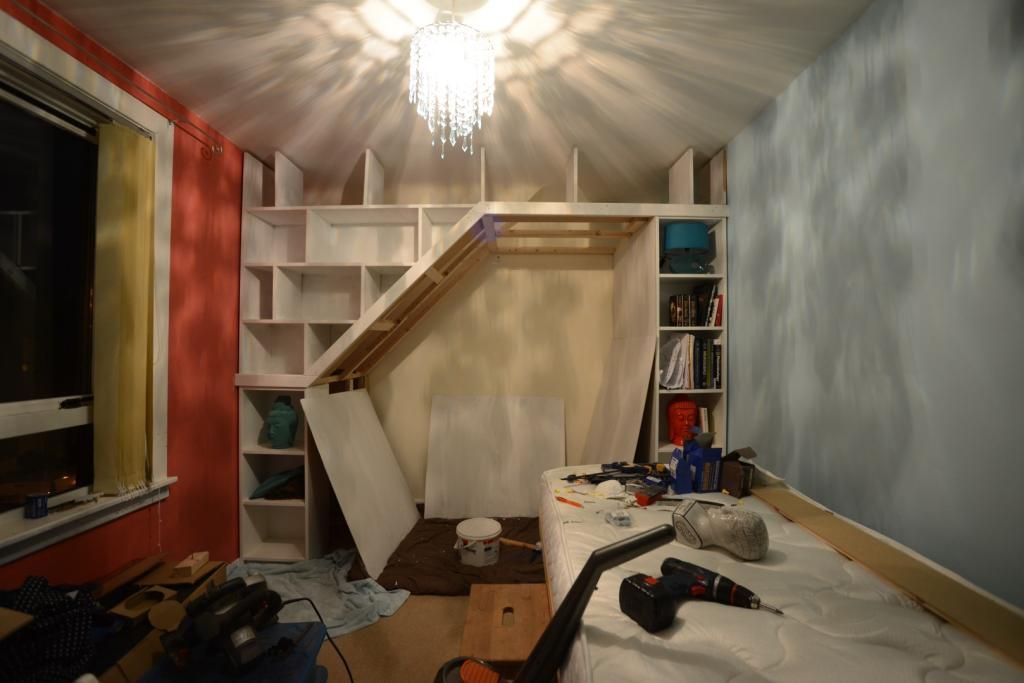
whils she done thist i put up a guard all across the back of the shelving t stop anything being pushed down the back and also a brace along the length of the top shelves to straighten them and to stop them being pushed over (only screwed up and through the bottom to begin with)
paint on the bed and some covers on to match the room
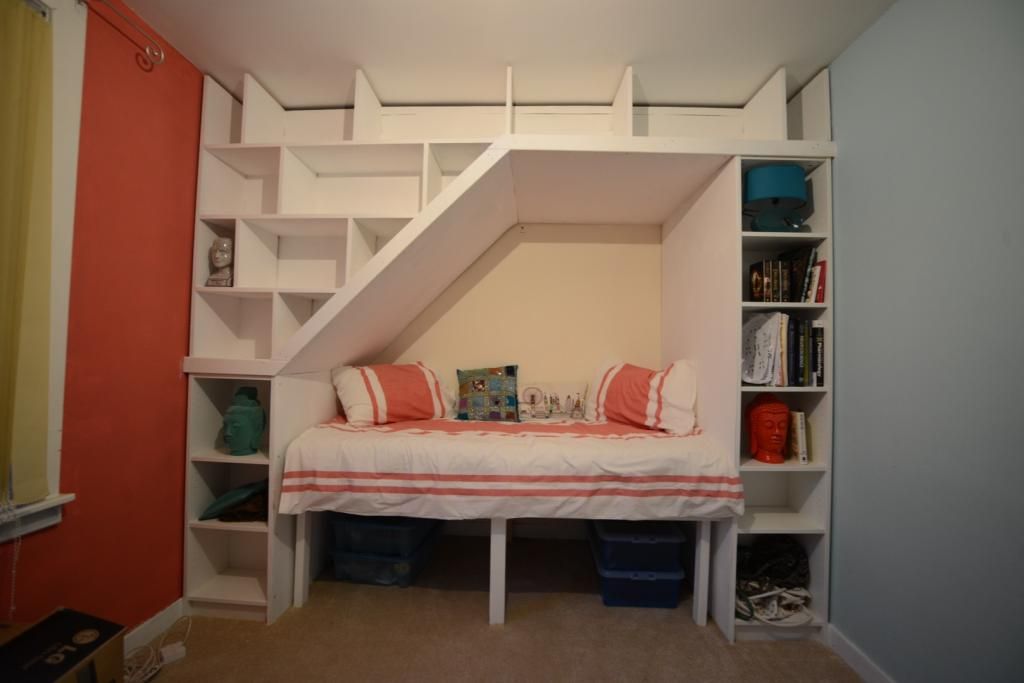
and lastly fill it with books and sentimental crap (even managed to sneak in a haynes manual or 2 in there!)
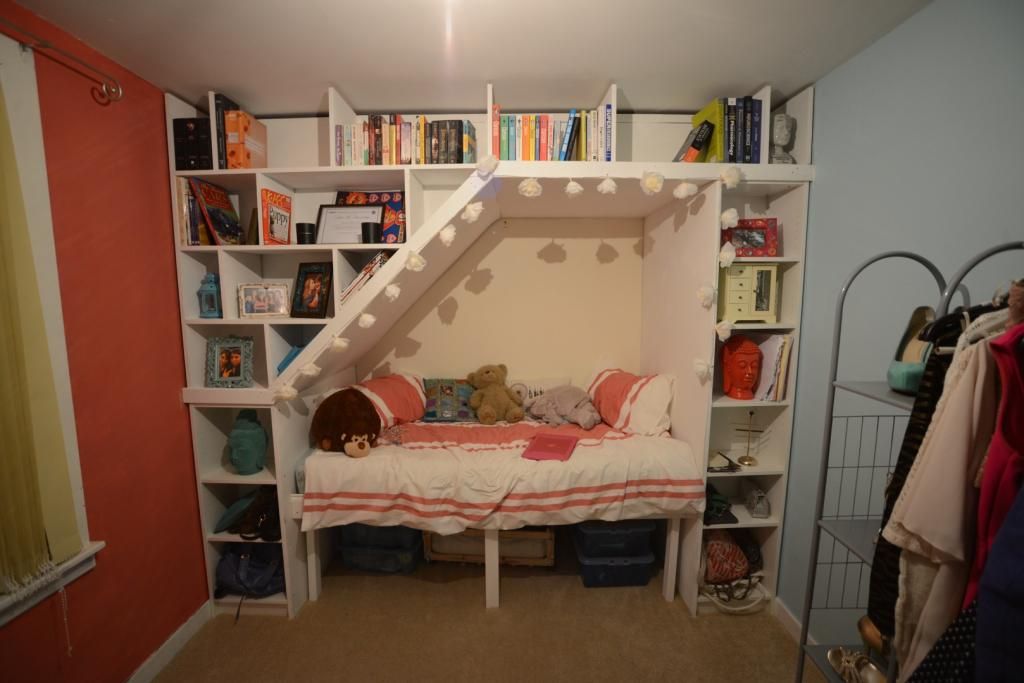
so i have found an ikea bookcase which could be utilised as a inwards facing bookcase/shelves for the head side of the bed and would only require a little cut out of the largest panel and also lighting will be installed in due course
thanks for looking!
whils she done thist i put up a guard all across the back of the shelving t stop anything being pushed down the back and also a brace along the length of the top shelves to straighten them and to stop them being pushed over (only screwed up and through the bottom to begin with)
paint on the bed and some covers on to match the room
and lastly fill it with books and sentimental crap
(even managed to sneak in a haynes manual or 2 in there!)so i have found an ikea bookcase which could be utilised as a inwards facing bookcase/shelves for the head side of the bed and would only require a little cut out of the largest panel and also lighting will be installed in due course
thanks for looking!

Gassing Station | Homes, Gardens and DIY | Top of Page | What's New | My Stuff