Jeep Grand Cherokee 2.7 CRD Injectors, the easy way!
Discussion


I recently bought a Jeep Grand Cherokee with the Mercedes 2.7 CRD engine... I quite like it so will probably keep it for a while. One of the things they suffer with is "the black death" where the injector seals start to leak and then completely gum up the top of the engine with a tar like substance.
With prevention often being better than cure, I decided to change the seals before they leaked too bad, there were slight signs of failure. The problem with the Jeep is that injector number 4 and 5 sit under the bulkhead, under the wiper cover... which means that you have to lower the engine and gearbox to get them out. the seals themselves are only pennies, and the stretch bolts (which must be changed)a £1 each.
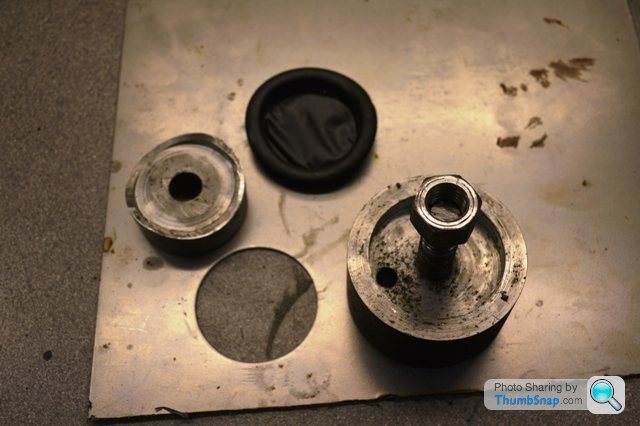
Rather than lower the engine and gearbox I decided to cut a couple of neat holes in the bulkhead. to do this I mad a 60mm hole punch out of some steel bar in the lathe. I tried it out on some 1.5mm plate and it worked a treat! I also bought a couple of 60mm rubber bungs
Next job was to cut two holes in the bulkhead using the punch, to do this I had to remove the plastic cover in front of the windowscreen, and the wiper mechanism, which is easy enough, but I did have to use a puller to remove the wiper arms from the tapered shafts.
Removal of the injectors on mine was easy, just one bolt. I did them one at a time, and made a little bung with a seal on so I could put this in the injector hole to seal it while I cleaned it out. They can be very tight however, and its best to remove them from a hot engine! I also extended a drill so I could thoroughly clean the retaining bolt hole. I cant stress the importance of this enough, as its the cause of stripped threads. I also cut a slot in one of the old bolts with the angle grinder and used that as a tap to clean the threads.
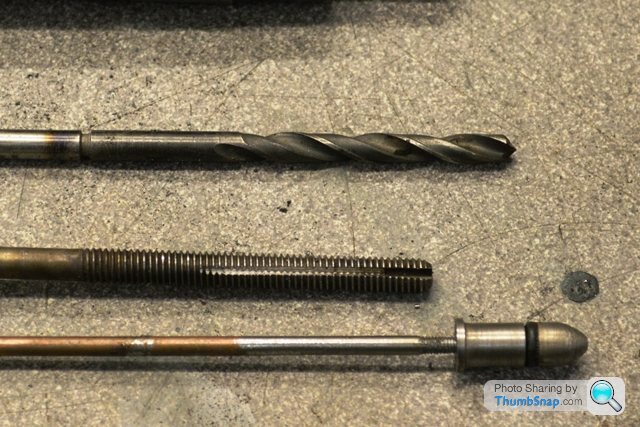
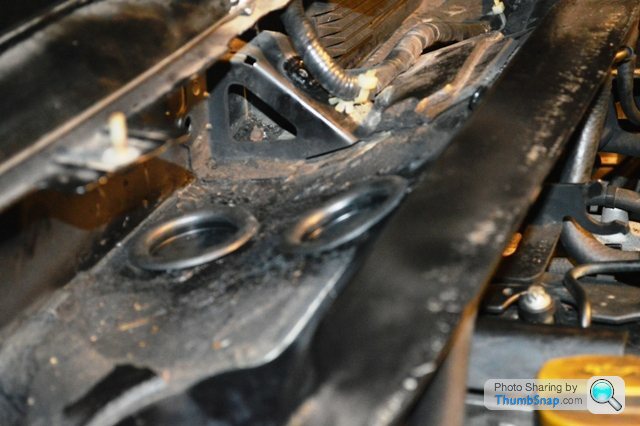
here you can see just how deep the hole is in the head for the bolt, if you look at the length of them in the picture below. If you don't thoroughly clean the holes out with a drill, followed by a bolt with a slot, you will have problems with the bolts bottoming on debris in the bolt hole. Worst case, it pushes through into the waterway, then you have real problems! as a final clean, blow them with the airline.

I also used the special Mercedes (or FEBI) ceramic grease which prevents the injectors sticking in the future

The little bung was useful to prevent debris dropping into the combustion chamber... I was able to put it in place with the threaded bar, and then screw the bar out, leaving it in place while I thoroughly cleaned the injector hole

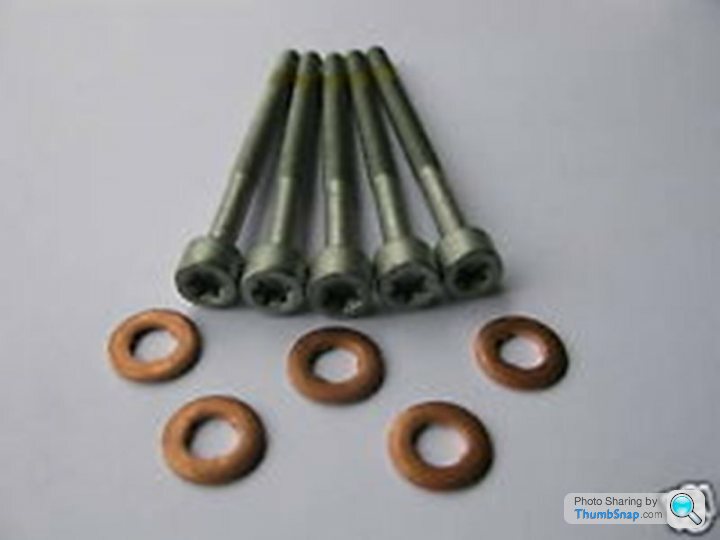
Here are the new seals and bolts
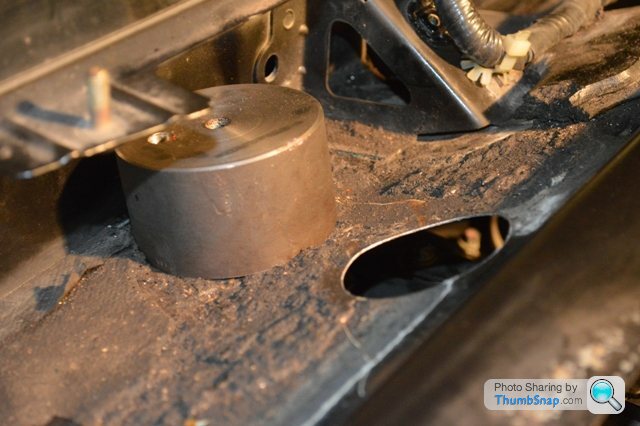
Rubber bungs in place, with a bit of rust proofing, they look like they should be there!
All in all, not too bad a job, if you do it early BEFORE you have a problem and the injectors get really stuck. ! though I would share this as it may be of interest to others.
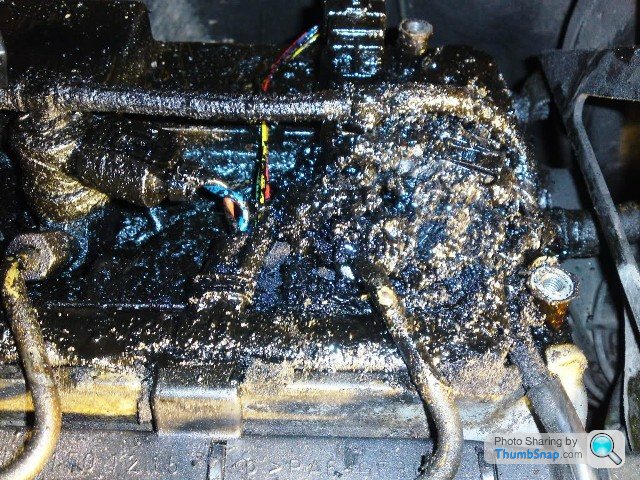
If you don't do it before it gets too bad... this is what you end up with!
With prevention often being better than cure, I decided to change the seals before they leaked too bad, there were slight signs of failure. The problem with the Jeep is that injector number 4 and 5 sit under the bulkhead, under the wiper cover... which means that you have to lower the engine and gearbox to get them out. the seals themselves are only pennies, and the stretch bolts (which must be changed)a £1 each.
Rather than lower the engine and gearbox I decided to cut a couple of neat holes in the bulkhead. to do this I mad a 60mm hole punch out of some steel bar in the lathe. I tried it out on some 1.5mm plate and it worked a treat! I also bought a couple of 60mm rubber bungs
Next job was to cut two holes in the bulkhead using the punch, to do this I had to remove the plastic cover in front of the windowscreen, and the wiper mechanism, which is easy enough, but I did have to use a puller to remove the wiper arms from the tapered shafts.
Removal of the injectors on mine was easy, just one bolt. I did them one at a time, and made a little bung with a seal on so I could put this in the injector hole to seal it while I cleaned it out. They can be very tight however, and its best to remove them from a hot engine! I also extended a drill so I could thoroughly clean the retaining bolt hole. I cant stress the importance of this enough, as its the cause of stripped threads. I also cut a slot in one of the old bolts with the angle grinder and used that as a tap to clean the threads.
here you can see just how deep the hole is in the head for the bolt, if you look at the length of them in the picture below. If you don't thoroughly clean the holes out with a drill, followed by a bolt with a slot, you will have problems with the bolts bottoming on debris in the bolt hole. Worst case, it pushes through into the waterway, then you have real problems! as a final clean, blow them with the airline.
I also used the special Mercedes (or FEBI) ceramic grease which prevents the injectors sticking in the future
The little bung was useful to prevent debris dropping into the combustion chamber... I was able to put it in place with the threaded bar, and then screw the bar out, leaving it in place while I thoroughly cleaned the injector hole
Here are the new seals and bolts
Rubber bungs in place, with a bit of rust proofing, they look like they should be there!
All in all, not too bad a job, if you do it early BEFORE you have a problem and the injectors get really stuck. ! though I would share this as it may be of interest to others.
If you don't do it before it gets too bad... this is what you end up with!
Edited by buzzer on Tuesday 4th November 21:33
Interesting.
I have a 208CDi Sprinter van.
The seal failed on No4 - which is of course the one at the back & least accessible.
Removed it, cleaned everything & refitted using genuine Mercedes seal & bolt. These are stretch bolts, have a sealant of some sort on them and must not be reused - if it snaps you'll be taking the head off.
Same symptoms within a couple of weeks.
Removed it, cleaned it all very very thoroughly.
Refitted with genuine Mercedes seal & bolt - fortunately these weren't expensive (Mertrux, Leicester)
Lasted around a month before diesel started bubbling up again.
Bit of searching on the net brought up the advice to leave the genuine ones as they are very hard & use the ones as on the Honda 2.2 diesel.
Bought a couple from the local Honda dealer (IIRC quite a bit more than the MB ones) & followed the instructions in the link exactly.
Fitted & a year on no further issues. They're softer & thicker.
http://www.mercedes.gen.in/mercedes-diesel-injecto... and the link mentioned in the first link:
http://www.mercedes.gen.in/mercedes-cdi-injector-l...
Edited by paintman on Tuesday 12th June 18:40
toolhead said:
Great post, couple of questions, you replaced the bolts?
out of interest where did you source your bolts and injectors from?
Yes, as paint man says they are stretch bolts, I got them off the dealer, quite cheap. Lots on Ebay as well. I have heard of people using the Honda seals, but I used the genuine ones... the trick is to anneal them before fitment. to do this heat them up to cherry red (hang them on a piece of wire) and immediately quench them in water. do it a couple of times. this makes them soft and seat much better. try it on an old seal and see the difference before and after by trying to bend it!out of interest where did you source your bolts and injectors from?
one important thing is make sure the bolt holes are really clean, with no debris in the bottom... use a drill bit to get right to the bottom... if not, the bolts snap, or the injector does not seal.
For injectors I use RN Diesel, Unit 2 Cable Street, Central Industrial Estate, Wolverhampton WV2 2HX
Phone: 01902 450912. he is a fantastic guy and always does a good job on reconditioning your injectors.
he recently did one of mine that was clearly faulty after a leak off test...
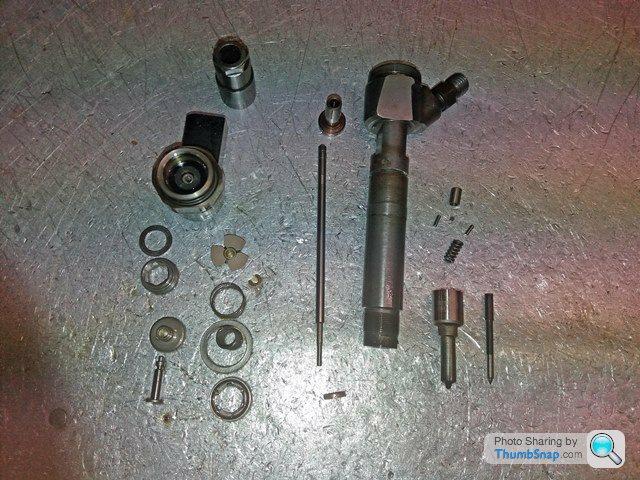
here is what caused the problem... a split seal...
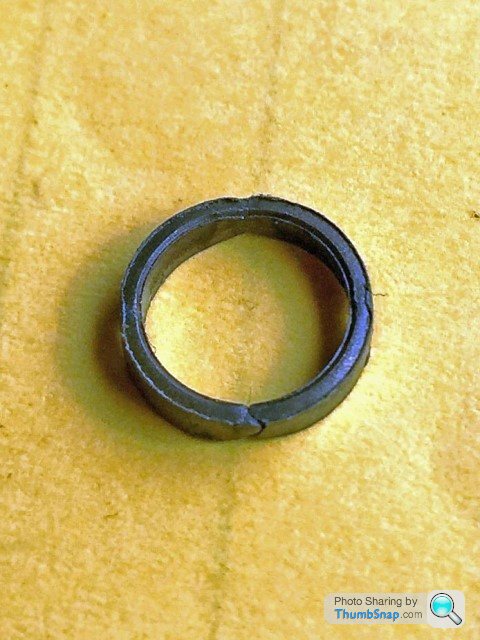
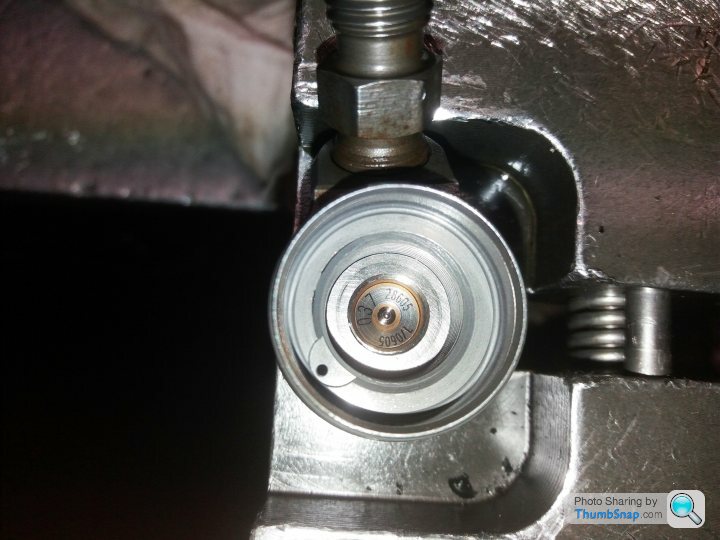
here it is on test afterwards... He checked the other four injectors but the were all OK...

Ready to go back in... remember one bad injector means hard, or in my case no start...

Big thanks for posting this info, Ive book marked it !
Ive got a 2004 WJ with 105K on it now. About 2 years ago I changed the seals on the low pressure fuel lines around the engine as it was hard to start, with air bubbles visible in the clear plastic fuel line under the high pressure pump. Lucky easy fix that time.
Every service I inspect the injectors and lucky no sign of the black death, but I guess its only a matter of time.
Two questions if you can help, can the home spanner man diagnose if he has a bad injector or is that a garage job ? Ive had a couple of bad starts the past few weeks on mine
Also I think I need to replace the glow plugs as it was difficult to start in the cold weather back in March, I had to start using a can of Easy-start on the cold mornings ! Have you done that one yet ?
Cheers
pcn1 said:
Big thanks for posting this info, Ive book marked it !
Ive got a 2004 WJ with 105K on it now. About 2 years ago I changed the seals on the low pressure fuel lines around the engine as it was hard to start, with air bubbles visible in the clear plastic fuel line under the high pressure pump. Lucky easy fix that time.
Every service I inspect the injectors and lucky no sign of the black death, but I guess its only a matter of time.
Two questions if you can help, can the home spanner man diagnose if he has a bad injector or is that a garage job ? Ive had a couple of bad starts the past few weeks on mine
Also I think I need to replace the glow plugs as it was difficult to start in the cold weather back in March, I had to start using a can of Easy-start on the cold mornings ! Have you done that one yet ?
Cheers
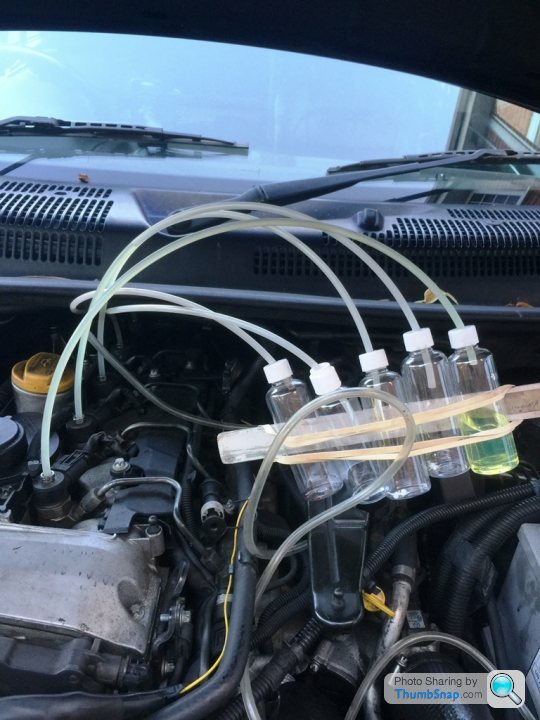
to diagnose if you have a bad injector is really easy, and worth doing as they give all sorts of problems... get some plastic bottle from Poundland... tape them together. get some hard plastic air pipe from Ebay, very cheap but I cant remember if its 5 or 6mm, (check the hole size in the top of the injector)Ive got a 2004 WJ with 105K on it now. About 2 years ago I changed the seals on the low pressure fuel lines around the engine as it was hard to start, with air bubbles visible in the clear plastic fuel line under the high pressure pump. Lucky easy fix that time.
Every service I inspect the injectors and lucky no sign of the black death, but I guess its only a matter of time.
Two questions if you can help, can the home spanner man diagnose if he has a bad injector or is that a garage job ? Ive had a couple of bad starts the past few weeks on mine
Also I think I need to replace the glow plugs as it was difficult to start in the cold weather back in March, I had to start using a can of Easy-start on the cold mornings ! Have you done that one yet ?
Cheers
take off the top leak off pipe across the injectors and push the tube into each injector, and into a separate bottle.
Start her up and watch how much leaks off into each bottle. there is always some leak off, but often one or two are much worse, and these are often faulty... if they are all the same amount, they are usually OK... as you can see above, one of mine was clearly defective!
If you have a WJ Jeep I would also recommend doing an EGR cheat on it... only costs a few £ and made a big difference to how mine ran, and improved the MPG.


AS many people know, the EGR valves and solenoids can give problems on Diesel engines. I seemed to have an intermittent fault with the EGR solenoid on my Jeep so I decided to see if I could delete the solenoid and stop the EGR valve operating which gives a much cleaner engine intake.
At first I tried just disconnecting the wires to the EGR solenoid, but this caused the MIL to come on and a fault code to appear. Seems the ECU monitors the EGR function… The following modification fools the ECU into thinking the EGR valve is working!
I could find references to this modification being done on the Mercedes engine, there are a few guides on the internet, but not specific to the Jeep. After a bit of digging and using the information provided on the Mercedes forum, I did the following modification to my Jeep. its been working for two years now...
Here is what I did:-
First I obtained the parts from Maplins, total cost £3.64 (maplins have gone now, so Ebay or RS components)
1 x 470 Ohm resistor part #D470R
1 x 1N4004 diode part # QL76
1 x 1K Ohm resistor part #M1K
1 x small circuit box part #N78BQ
Remove the plug off the EGR solenoid and strip back the outer insulation on the wires. (Grey/yellow and red / green) This is a little awkward as space is restricted. Then remove a little insulation from each to expose the copper wire and solder on a couple of wires of a similar colour. Stagger the removal of the insulation so as to make insulating it again after soldering the wires on easier. Tape them up. DO not reconnect the plug!
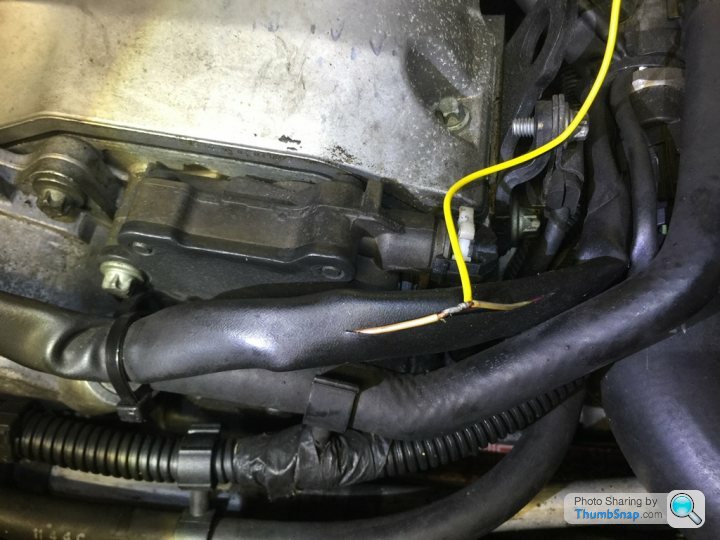
Cut a slit in the insulation of the loom at the front of the engine (see picture) and find the yellow/white wire which runs from the MAF sensor to the ECU. Bare the insulation on this to expose the copper and solder a similar colour wire to it. Tape the joint up and make good the slit in the loom insulation
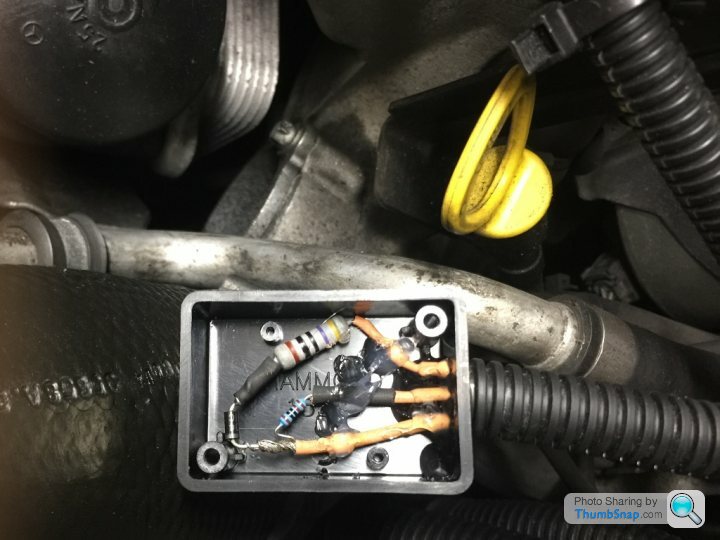
Bring all three wires up to the circuit box and connect them as per the schematic above. Note the resistors can go either way around but the diode is directional and MUST be the right way around. Add a little glue with a Glue gun to keep everything in the box stable. Cable tie the box up to a suitable location and tidy the wiring. I use the corrugated split sleeving which makes a neat job.
Remove the vacuum pipe off the EGR valve and block the pipe. I also added a bit of tape on the open EGR valve pipe.
Edited by buzzer on Wednesday 13th June 18:34

Another wj owner here. Mine also has an odd starting fault I'm slowly working towards trying to sort. Great old trucks though is yours the overland too seems a lot of these 2.7s are? If so have you been off road yet? Eye opening how capable they are.
The most frustrating thing I've found so far is the reliability of the Mercedes bits in the car, literally the only issues I've had have been related to the engine and box, the "poor quality American" bits around them have been faultless.
Bit of advice for anyone with a 2.7 check your gearbox oil, mine was black (and is a pain to change) and check the water hoses running across the top of the turbo under the silver heat protective sleeves, they trap oil and cause the hoses under the sleeve to swell and eventually leak but it's a nightmare to track down. I very nearly pulled the engine thinking it was a core plug issue as it only leaked when cold.
Gassing Station | Home Mechanics | Top of Page | What's New | My Stuff