roof locking mechanism
Discussion


Hey guys,
So, went to take the roof off tonight and the passenger side roof pin was stuck in. I managed to get a screwdriver in and gently work it back so I could get the roof out but its not responding to the lever bar.
Has anyone taken this apart/know any common issues with these before I start pulling it to bits?
Cheers!

I had a similar thing but the cause was the lever in the boot coming apart. It consists of two arms connected together by a pin through them, then that is held in place by an 'R' type split pin through it. On mine the split pin and fallen out and the two arms separated. That leaves the handle part free to move as it always does but not actually pulling on anything.
OK...the cable is snapped 
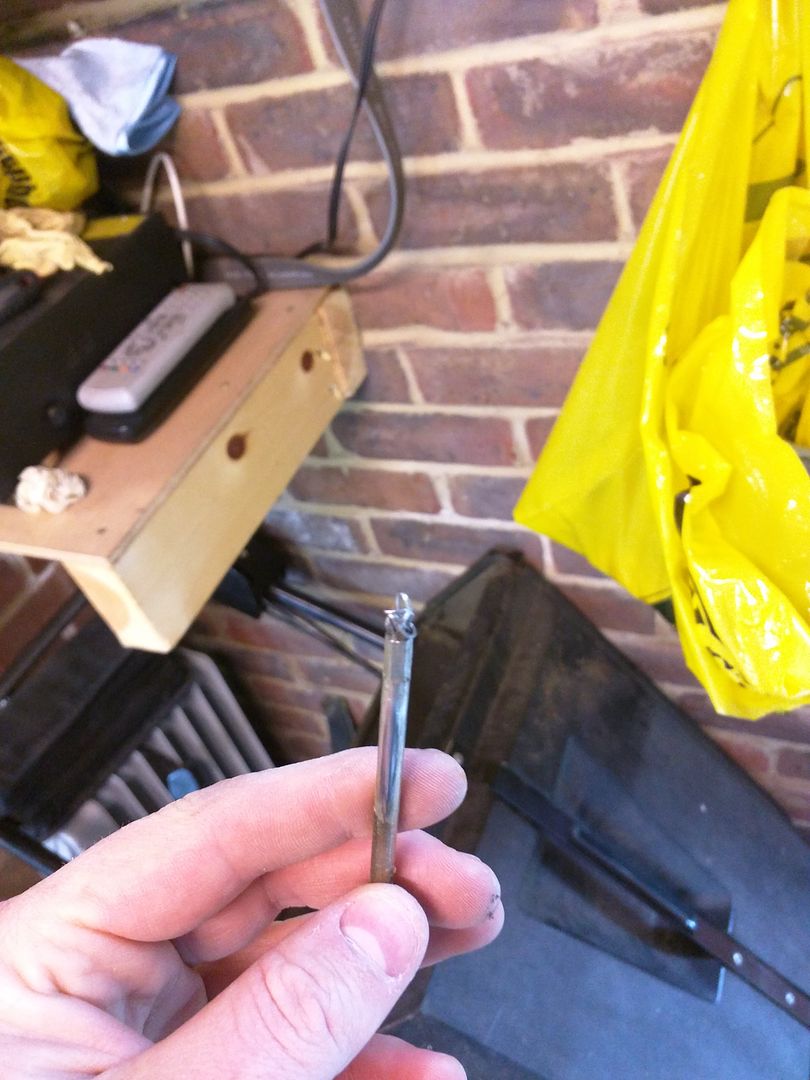 Its is snapped right at the connection in the boot which is two inches up the cable. Bu££er.
So, anyone know how to get to the trim off at the top /side covering it?
I've taken the indicator off, rubber seal off, side panel out, seatbelt mount off and still can't see how to get access.
Any ideas chaps?
Right, all sorted. I managed to get a replacement cable from racetech direct (first time I've used them and very impressed with service).
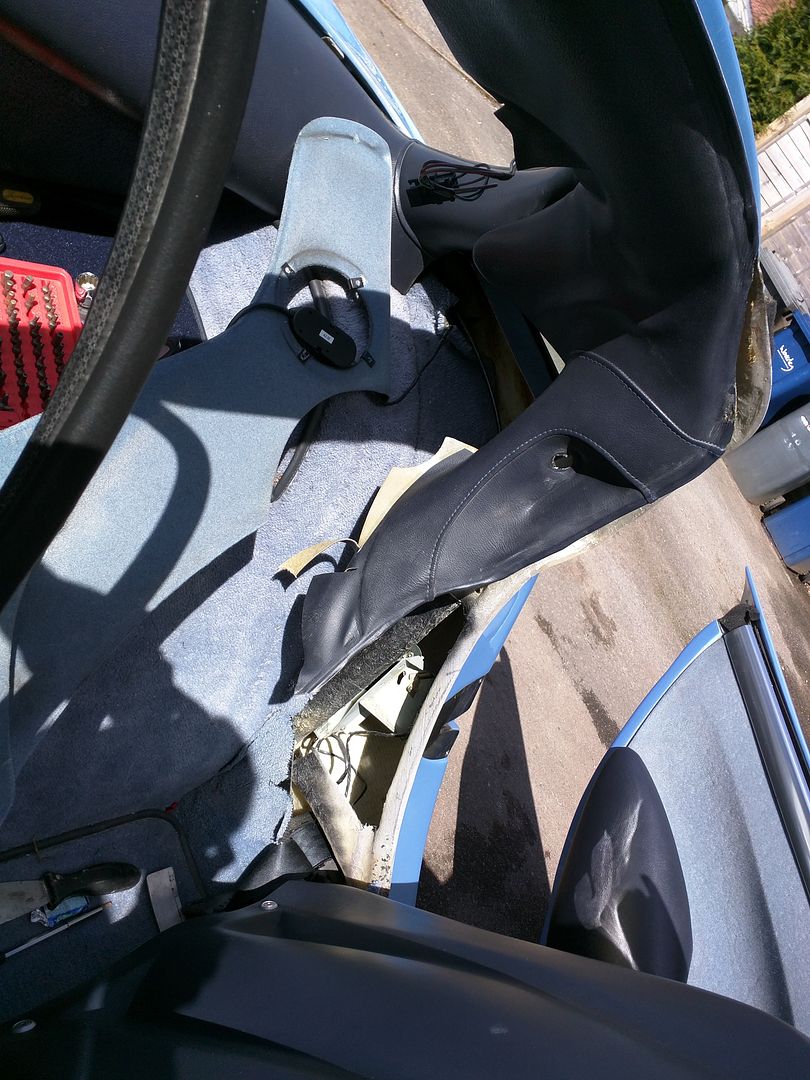
I got all the required trim out of the way, but what a nasty little job that was.
To get access, the indicator was removed, screw taken out under indicator (goes into roll bar), rubber trim seal removed, vinyl glue parted from bodywork, side panel removed covering seatbelt and then seatbelt top removed. Looks like this
The cable is right tucked in behind the roll bar...
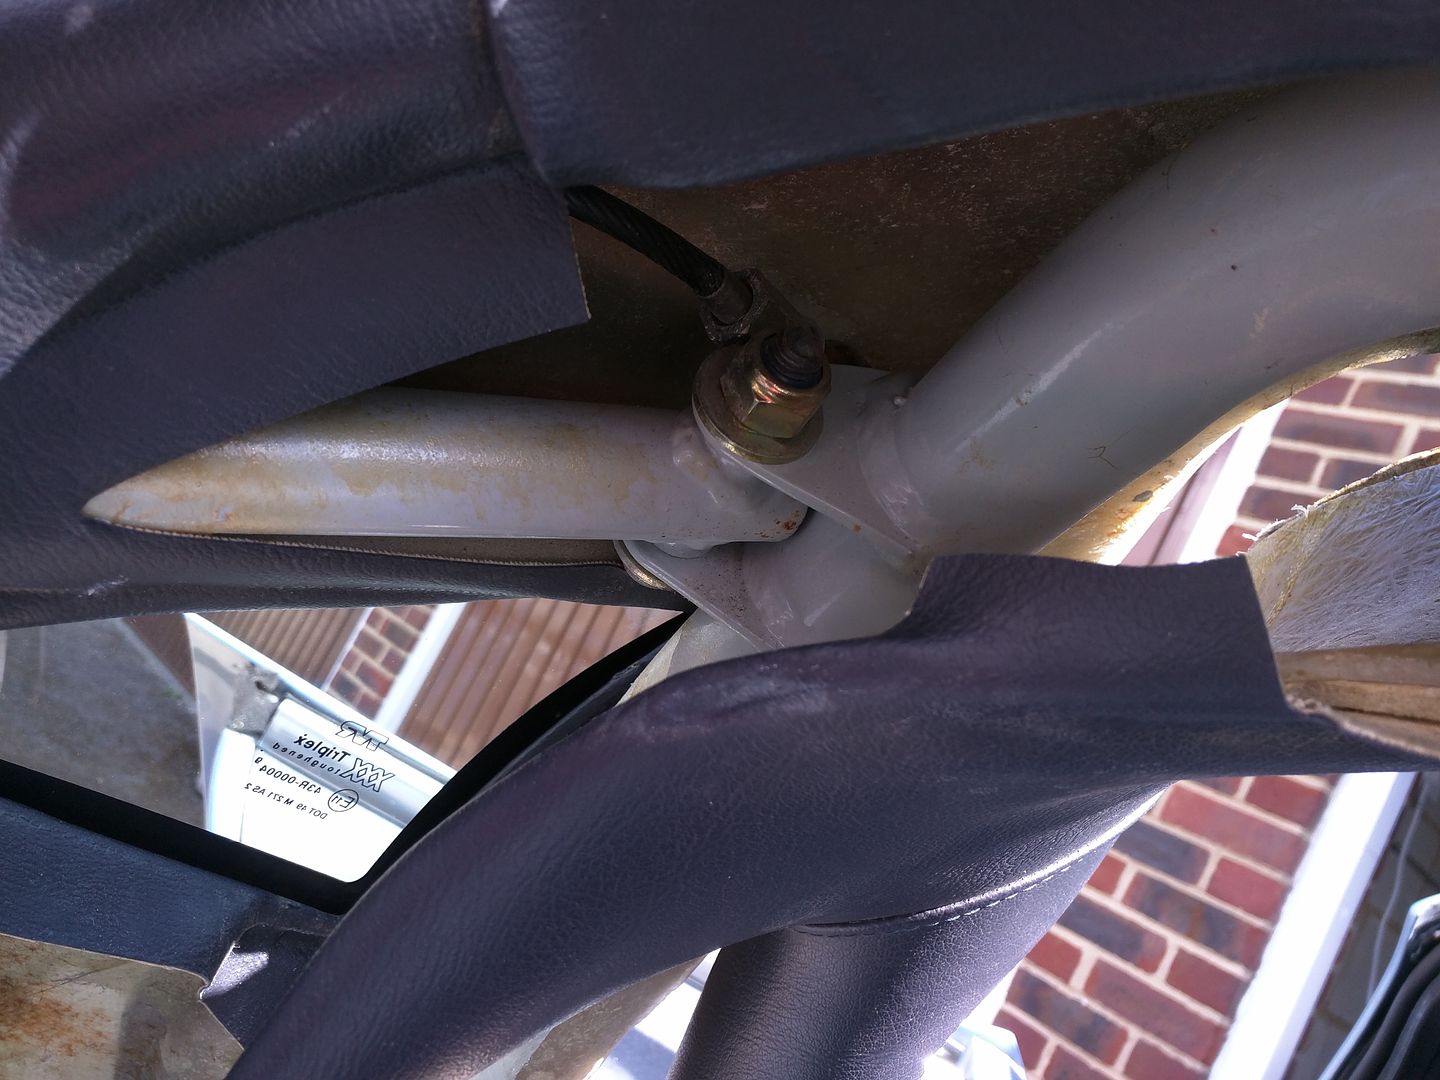
The access to the mechanism in the boot was quite awkward too but due to the bend radius this is where it failed and is an obvious weak spot
Anyhow, all done now
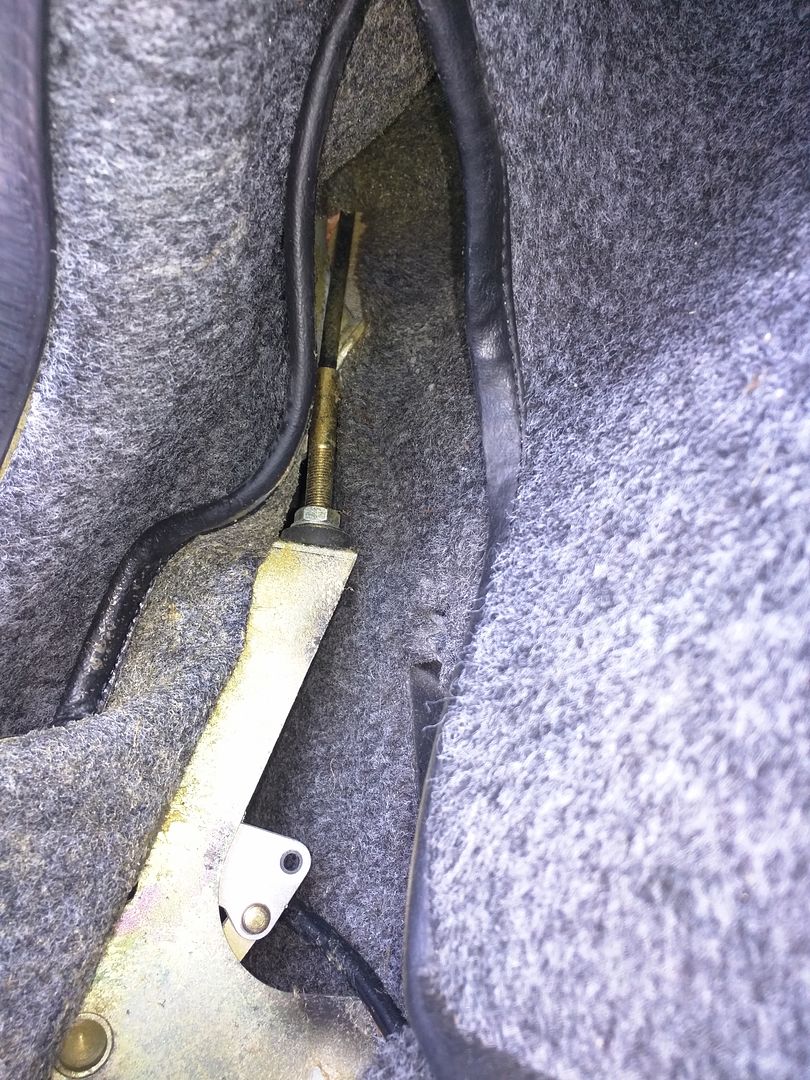
The pin and cable were very dry, the grease had gone hard. I would recommend spraying WD in the top pin gap and working it in as its not a fun job fixing it...not hard but not a fun one
I got all the required trim out of the way, but what a nasty little job that was.
To get access, the indicator was removed, screw taken out under indicator (goes into roll bar), rubber trim seal removed, vinyl glue parted from bodywork, side panel removed covering seatbelt and then seatbelt top removed. Looks like this

The cable is right tucked in behind the roll bar...

The access to the mechanism in the boot was quite awkward too but due to the bend radius this is where it failed and is an obvious weak spot

Anyhow, all done now
The pin and cable were very dry, the grease had gone hard. I would recommend spraying WD in the top pin gap and working it in as its not a fun job fixing it...not hard but not a fun one

Mine is exactly the same as yours! The doors are so easy to take off (when you do it the right way!)
The hinges have spacers behind which I have removed a couple on the driver's door to assist with the gap. Still not ideal but better! I would leave it alone if I were you as otherwise you will get super picky like me once you try and fix everything!!
The hinges have spacers behind which I have removed a couple on the driver's door to assist with the gap. Still not ideal but better! I would leave it alone if I were you as otherwise you will get super picky like me once you try and fix everything!!
matt-man said:
Mine is exactly the same as yours! The doors are so easy to take off (when you do it the right way!)
The hinges have spacers behind which I have removed a couple on the driver's door to assist with the gap. Still not ideal but better! I would leave it alone if I were you as otherwise you will get super picky like me once you try and fix everything!!
Dave, I'd agree with Matt - - leave well alone!!!The hinges have spacers behind which I have removed a couple on the driver's door to assist with the gap. Still not ideal but better! I would leave it alone if I were you as otherwise you will get super picky like me once you try and fix everything!!
I had a whole world of pain when I noticed some dampness on the driver's side floor last August in Nurburg after a thunder shower overnight.
Yes, there are shims/spacers underneath the hinges at the A pillar fixing. I had them in - out, 2 shims in....now I have none, renewed the complete seal (from Racetech) and at last I have a dry car. I also faffed around with the mushroom striker innumerable times....certainly after each 'shim' configuration.
I have read that back in the day of Bristol Avenue, the door hanging operation was often 2 days to complete!!
If your carpets are dry, then I wouldn't disturb the hinges - you might get a bit 'tighter' shut by altering the striker.
Nick
And... I'm stuck 
Seatbelt off, found a small screw holding the fibreglass moulding to the roll cage but can't seem to separate the moulding from the roll hoop.
How does the curve section to the left off the picture separate from the roll hoop bit?

Edit: stupid iPhone won't put picture the right way up. Curved but is to the bottom of the pic
Seatbelt off, found a small screw holding the fibreglass moulding to the roll cage but can't seem to separate the moulding from the roll hoop.
How does the curve section to the left off the picture separate from the roll hoop bit?
Edit: stupid iPhone won't put picture the right way up. Curved but is to the bottom of the pic
Edited by MrChips on Saturday 27th February 17:43
MrChips said:
Also... now looking for where to source the high level brake light cover from (even if i need to buy a whole new light)?
Not my pic but it's the same as this one:

I don't think they were ever made available for aftermarket installation. I suspect they were bespoke to TVR on a limited production run in-house so unless you can find something similar from another manufacturer your only hope would be a scrapper. I do recall seeing a thread on PH over a year ago by a chap that had converted the inner segments of the indicators to red LED's to perform that function. I think the thread was about changing a whole bunch of lighting over to LED on his Tuscan.Not my pic but it's the same as this one:
MrChips said:
And... I'm stuck
Seatbelt off, found a small screw holding the fibreglass moulding to the roll cage but can't seem to separate the moulding from the roll hoop.
How does the curve section to the left off the picture separate from the roll hoop bit?
Edit: stupid iPhone won't put picture the right way up. Curved but is to the bottom of the pic
Trying to remember however I recall that I had to bend it around the bar, it didn't feel right as such but the only way I could see.Seatbelt off, found a small screw holding the fibreglass moulding to the roll cage but can't seem to separate the moulding from the roll hoop.
How does the curve section to the left off the picture separate from the roll hoop bit?
Edit: stupid iPhone won't put picture the right way up. Curved but is to the bottom of the pic
Edited by MrChips on Saturday 27th February 17:43
If you pull the trim away from the rear glass to pull around the cage where the belts bolt on, then try and pull forward. I didn't remove the whole thing, just enough to get access.
Hope that helps
It feels rock solid so I suspect that they have screwed the moulding to the rollbar in a similar position to where the indicator pods are on the mk1 (you mentioned behind the pod it was screwed to the rollhoop)
Dave the Trimmer has kindly emailed to say he's sure there are 2 screws as well so I need to peel back the leather to find them
It's gonna be fun! Any recommendations on glue to stick the leather back down?
Dave the Trimmer has kindly emailed to say he's sure there are 2 screws as well so I need to peel back the leather to find them
It's gonna be fun! Any recommendations on glue to stick the leather back down?


3hrs with 2 people... and i now have a shiny new cable installed and working. Oddly there's not a lot of adjustment left in the boot mounting now we've got the roof pin sufficiently recessed into the body. Will play around now with the receiver on the targa panel to get it all fitted properly.
I've got some leather glue, but not sure if this is the right stuff to stick the leather back down to the foam padding. It was quite easy to pull off and i'm worried about the glue melting the foam. Any recommendations?
I've got some leather glue, but not sure if this is the right stuff to stick the leather back down to the foam padding. It was quite easy to pull off and i'm worried about the glue melting the foam. Any recommendations?
Gassing Station | Tuscan | Top of Page | What's New | My Stuff