Christmas Tree Train Project
Discussion


Last year I decided we really needed a little train running around the Christmas tree. It was a good idea and I.. err.. the kids loved it!
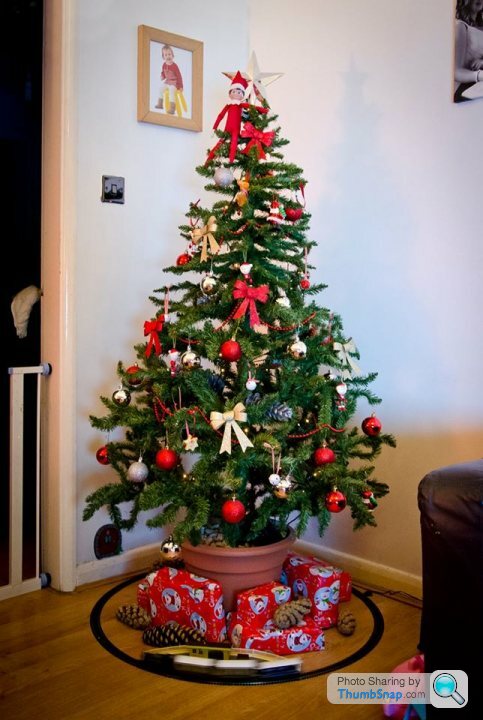
A simple set up as you can see. I purchased a Hornby Cornish Belle set from ebay and used the 2nd radius track and controller from the set to make the simple circle loop. Job done.
Well a year later, my interest in model railways has flourished and I've decided to step it up a gear! No longer will the Cornish Belle run around on bare floor. I'm building a mini layout!
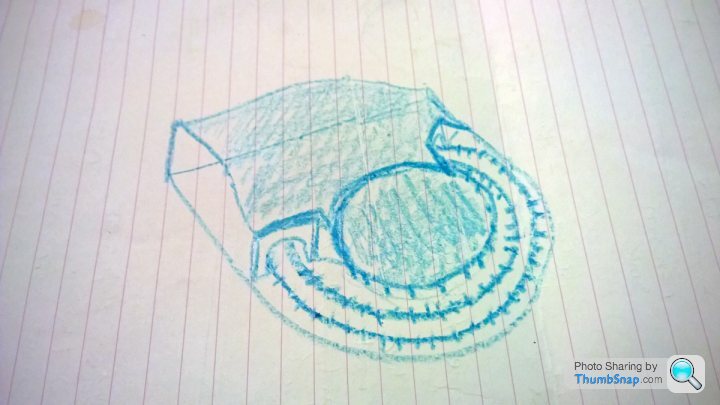
Excuse my crude drawing but basically what you should hopefully be able to make out is a double track loop which will circle the base of the christmas tree with a hillside around the back of the tree. The idea was that the layout was to be no bigger than the circle of track from last year I'm building the layout on a 1m x 1m mdf board. The outer loop of track will be 2nd radius and inner loop 1st radius. Very tight curves and such a short length of track limits the layout to smaller 0-4-0 and 0-6-0 locos and shorter rakes.
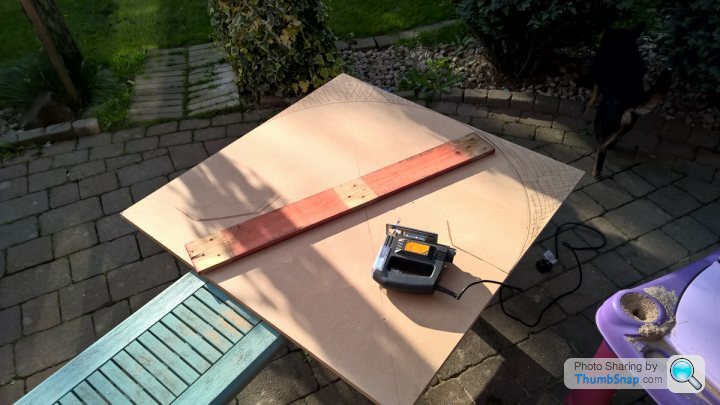
I've had this in my head for a few months now but just never really got around to getting it started. A quiet afternoon on Saturday finished with me walking out of B&Q with a large board of 18mm MDF cut into 1m x 1m sections. First thing I had to do was get some track on it...
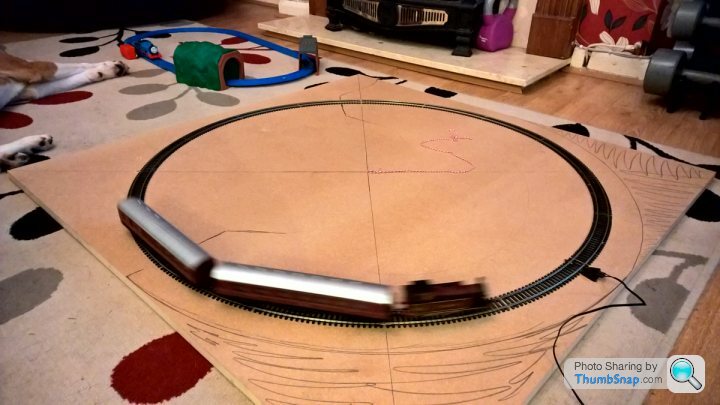
And a train...
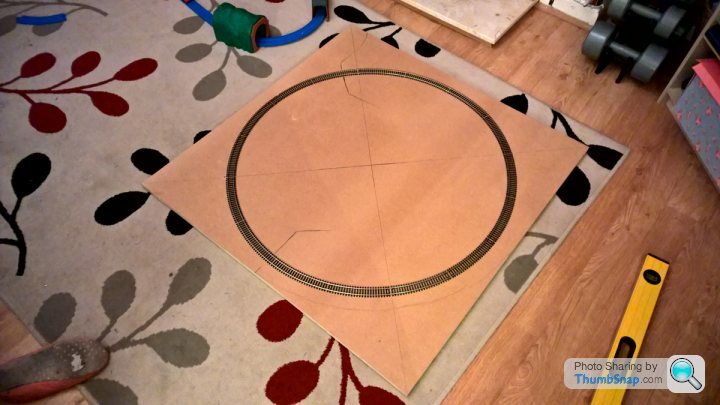
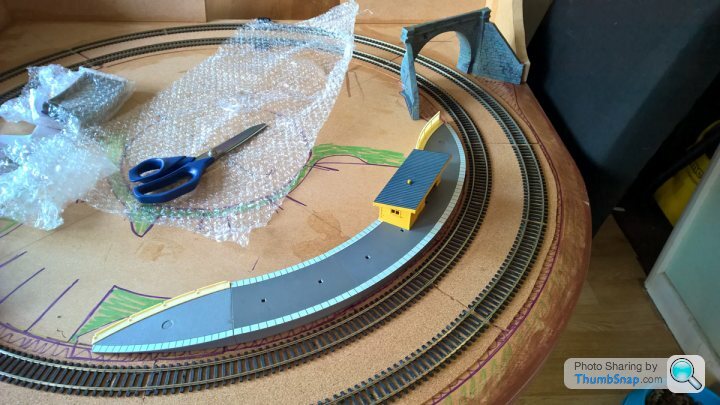
As you can see, I started crudely marking out where to cut and where various bits of the layout would be located. This is the outer loop of 2nd radius track pictured.
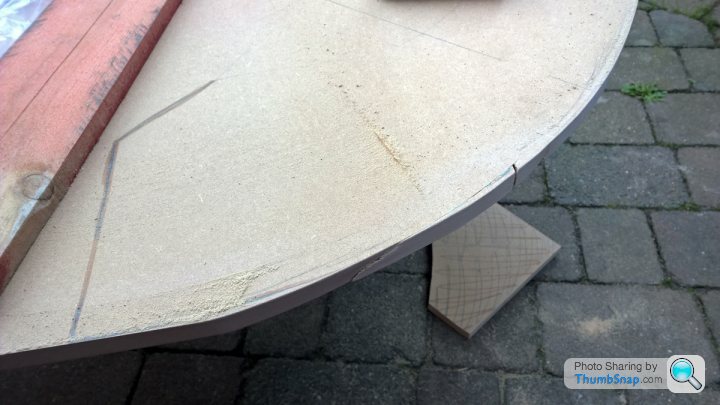
Time to get cutting, so I got the jigsaw out and made an arm to guide my cutting for a perfect circle...

Oh dear. Well it didn't occur to me that the blade of the jigsaw would need to be exactly central at the end of the arm. Sadly it wasnt and so the blade bent and went off course... I finished the rest of the cutting by hand.
Not wanting to feel too downhearted, I did what any master bodger would do.. I bodged!
Bit of glue here...
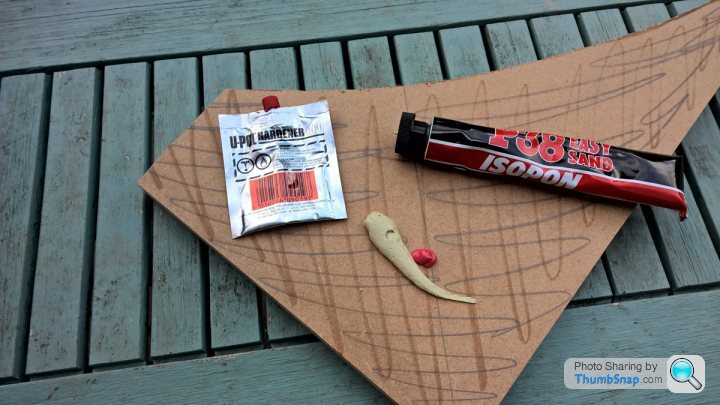

Bit of body filler there...
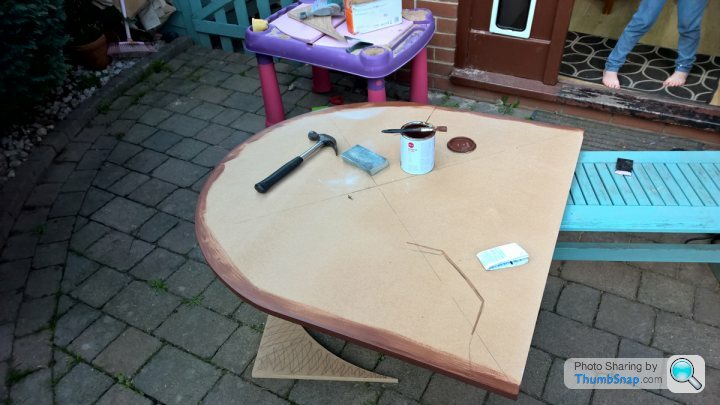
Sand it all down, slap some paint on and BOSH!
That's pretty much as far as I've got so far. Currently waiting on some ebay orders to arrive so I can crack on a bit further. Currently on order is the inner 1st radius loop, cork underlay for the track and I picked up a pair of tunnel portals for a bargain price. Next step will likely be laying the track and constructing the back/sideboards and inside of the tunnel. Will keep this updated as I go along!
A simple set up as you can see. I purchased a Hornby Cornish Belle set from ebay and used the 2nd radius track and controller from the set to make the simple circle loop. Job done.
Well a year later, my interest in model railways has flourished and I've decided to step it up a gear! No longer will the Cornish Belle run around on bare floor. I'm building a mini layout!
Excuse my crude drawing but basically what you should hopefully be able to make out is a double track loop which will circle the base of the christmas tree with a hillside around the back of the tree. The idea was that the layout was to be no bigger than the circle of track from last year I'm building the layout on a 1m x 1m mdf board. The outer loop of track will be 2nd radius and inner loop 1st radius. Very tight curves and such a short length of track limits the layout to smaller 0-4-0 and 0-6-0 locos and shorter rakes.
I've had this in my head for a few months now but just never really got around to getting it started. A quiet afternoon on Saturday finished with me walking out of B&Q with a large board of 18mm MDF cut into 1m x 1m sections. First thing I had to do was get some track on it...
And a train...
As you can see, I started crudely marking out where to cut and where various bits of the layout would be located. This is the outer loop of 2nd radius track pictured.
Time to get cutting, so I got the jigsaw out and made an arm to guide my cutting for a perfect circle...
Oh dear. Well it didn't occur to me that the blade of the jigsaw would need to be exactly central at the end of the arm. Sadly it wasnt and so the blade bent and went off course... I finished the rest of the cutting by hand.
Not wanting to feel too downhearted, I did what any master bodger would do.. I bodged!
Bit of glue here...
Bit of body filler there...
Sand it all down, slap some paint on and BOSH!
That's pretty much as far as I've got so far. Currently waiting on some ebay orders to arrive so I can crack on a bit further. Currently on order is the inner 1st radius loop, cork underlay for the track and I picked up a pair of tunnel portals for a bargain price. Next step will likely be laying the track and constructing the back/sideboards and inside of the tunnel. Will keep this updated as I go along!
Little bit of an update for today.. Some bits arrived!..
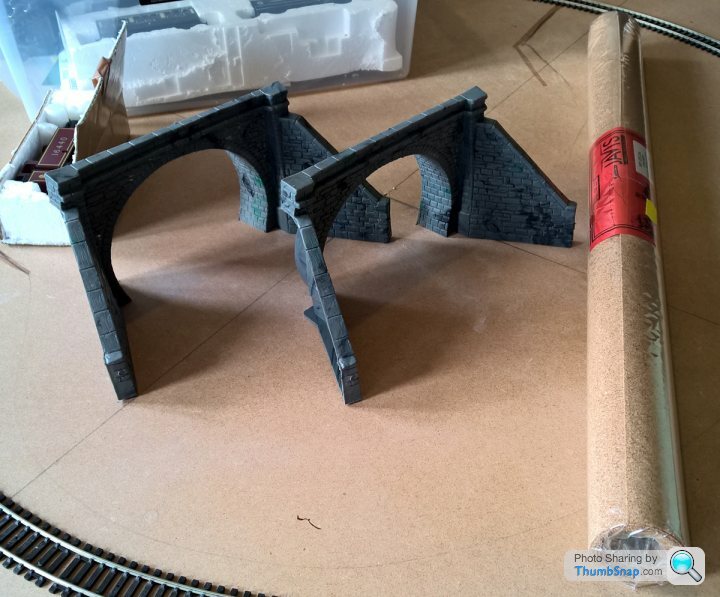
Tunnel portals and cork underlay. Not much I can do with them just yet as I'm still waiting on the inner loop of track to arrive. Once I've got all of the track, I can mark out it's final location on the board and get the tunnel portals in the correct place. Then I can get the jigsaw out again and start building the hillside and tunnel!

Tunnel portals in their approx locations with the outerloop of track in place.

Trying some coaches out for size. Perfect fit!
Tunnel portals and cork underlay. Not much I can do with them just yet as I'm still waiting on the inner loop of track to arrive. Once I've got all of the track, I can mark out it's final location on the board and get the tunnel portals in the correct place. Then I can get the jigsaw out again and start building the hillside and tunnel!
Tunnel portals in their approx locations with the outerloop of track in place.
Trying some coaches out for size. Perfect fit!
RacingPete said:
Nice little project... Interested to see how it develops.
Also interested to see how you do the tunnel portals and the hillside around it, as I am putting off that challenge myself at the moment.
I'm split between 3 methods I've seen to make the hillside and tunnel. I want to keep the whole process as cheap as possible really. Also interested to see how you do the tunnel portals and the hillside around it, as I am putting off that challenge myself at the moment.
I've watched a number of videos and done some googling and found one method which seems very cheap. The idea was to use scrunched up newspaper as fill to build up the hillside to the height and shape required. Then lay plaster soaked cloths over the top to make a smooth surface. I would need to box in the tunnel with MDF to stop newspaper getting where it shouldn't but could be a cheap and easy way to do it.
I've looked at using styrofoam boards or polystyrene but after a bit of ebaying and googling, it seems really expensive for the quantity you get and what I'll need. Could well be looking at £60+ just for the foam required. Anyone able to suggest a cheap supplier?
I've also looked at fibreglass. I've worked with it in the past building speaker boxes for cars so confident I would have no issue and it would be very strong. The problem is cost.
Also one question to ask for those in the know. Soldering track. I want to solder the joins together to ensure good electricity flow. I've seen people soldering over the fishplates etc. I've also seen people leaving gaps in the track to allow to for expansion in the rails. What I don't understand, is that if I leave small gaps in the track, and then solder the joins, surely the solder will stop the free movement of the rails and if they do expand/contract, will still buckle? How can I solder the joins but still allow for expansion?
I would not solder track ine as you will need expansion joints, using new or relatively new track joiners will be fine. plus a hot living room will cause more expansion than a cold loft. as for scenic board, i use insulation board from the builders merchants a 4' by 2' board is less than a tenner
MysteryLemon said:
I've looked at using styrofoam boards or polystyrene but after a bit of ebaying and googling, it seems really expensive for the quantity you get and what I'll need. Could well be looking at £60+ just for the foam required. Anyone able to suggest a cheap supplier?
I have been using Celotex in my build thread, http://www.wickes.co.uk/Celotex-50mm-High-Performa... which I have used about three sheets (£15 worth)... It is easy to cut with a kitchen knife and have glued together using just standard PVA without it causing issue (though recently I have moved to using Woodland Scenics foam glue as it sticks faster). Thus I can cut out the curved tunnel cavity easily and it sands down well to create good contours...As I have one straight tunnel, doing the curved walls of the tunnel were easy, but haven't tackled the curved section, so looking at DIY stores for something bendable and suitable.... interesting to see what you find.
MysteryLemon said:
Also one question to ask for those in the know. Soldering track. I want to solder the joins together to ensure good electricity flow. I've seen people soldering over the fishplates etc. I've also seen people leaving gaps in the track to allow to for expansion in the rails. What I don't understand, is that if I leave small gaps in the track, and then solder the joins, surely the solder will stop the free movement of the rails and if they do expand/contract, will still buckle? How can I solder the joins but still allow for expansion?
I haven't soldered the track to the fish plates, and instead have left them with space in to expand and contract... instead I soldered the wire to the track, and have connected it to each other (so each section of track is linked to each other - this also allows me to isolate track as I am running DC and don't have ability to control trains individually - but that is a bit overkill for what you are doing).Some solder the wires to the fishplates and use that as the connection.
Thanks for the info guys.
With regards to the track and soldering, I'm maybe thinking now to just not bother at all.. Just rely on the fishplates and deal with any connection issues as they arise in the future. Such a simple layout probably won't have any issues, but I'm reluctant to run any wiring through and under the board as it sits flat on the floor. I would need to router trenches in the board to run wires.
Those foam boards are a lot cheaper than what I was seeing on google and ebay. Thanks for the link Pete! I might pop into Wickes and have a look at some point. I did see something similar in B&Q a while back. Something thicker than 50mm would be nice too. The hillside covering the tunnel is likely to top out at around 200-250mm.
I do have an idea for the inner walls of the tunnel. I need to experiment but I'm thinking of printing some brick wall texture onto some thick 300gsm card. I can then curl it over to form the rounded shape of the tunnel portal. It will then have to be cut into triangular shapes to follow round the curve of the track. The tunner interior will only need to extend into the hill until out of sight though. I plan for there for be a big cavern inside the hill, out of sight, where I can put the controllers and wiring. The back board of the layout will likely be open, or at least have some kind of door for access.


For Styrofoam just look in builders skips, you will be surprised how much they throw away.
I got four, four foot by two foot, four inch sheets from one. I did ask the builder beforehand.
When you have finished, clean your track top, then rub with a 2B pencil, this will help stop ypur track getting dirty and helps with pick up because graphite is a conductor. Not so good if you run long trains round tight curves because it is also a lubricant.
I have a layout I exhibit and never have to clean the track throughout a weekend show.
Martin
Cheers for the tips GreengiantPH!
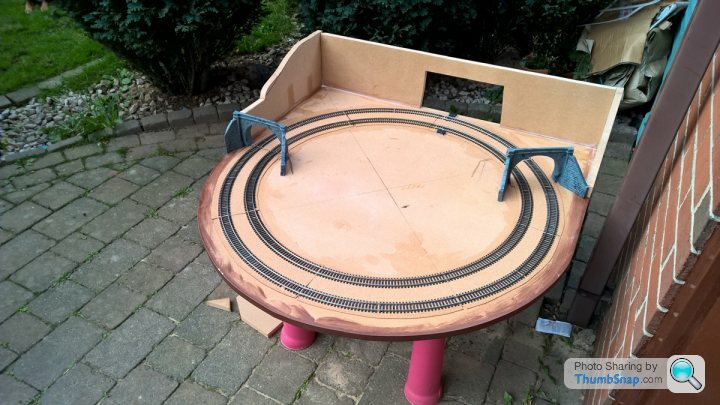
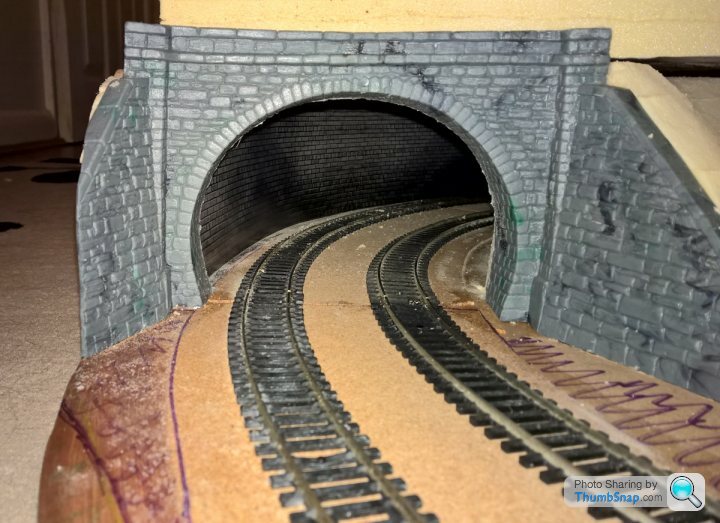
The inner loop of track I was waiting on arrived last night so I got stuck in...

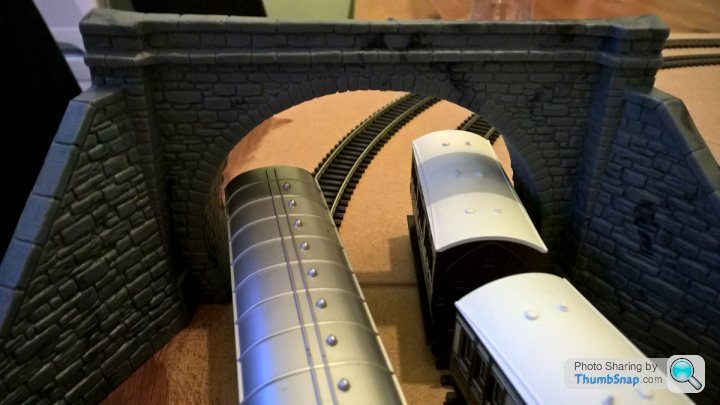
Testing the tunnels and they're very tight on 1st and 2nd radius curves but just about fit. I did have the pull the tracks together slightly where the tunnel portals are to be placed though. The little 4 wheel coaches are no issue, but the LSM composites are almost the length of BR MK1 coaches so when on 2nd radius curves, do need quite a bit of space around the track.

First I marked out where the track sits on the board...

Then traced quarter sections of the circle onto paper to make a template out of cork...


All of the quarter sections layed out in position.
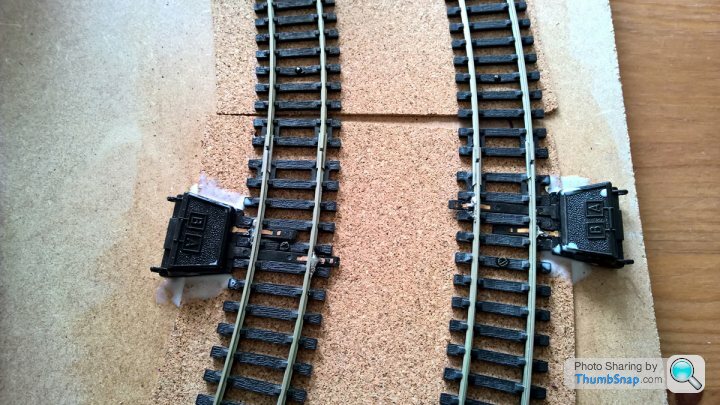
Now, I did intend to glue all of the cork down before laying the track on top. I made a start and realised that it just wasn't going to work. As soon as I would lay the cork onto the pva, the edges would lift and it just wouldn't stick flat. I dug out all sorts of weights (food tins, old lima track, kids toys etc) to hold it down in place but even after 15 mins or so, the cork would still lift at the edges with no weight applied.
Whilst waiting for the PVA to dry in the above attempt, I did some youtubing and found a video tutorial and the guy just pinned track over the cork with no glue, so I gave up on the glue idea and just layed the track over the cork and pinned it down. Seems to have worked fine, and I did go round the edges of the cork with PVA afterwards just to make sure it was all sealed down, although I suppose it wont matter once there's ballast on top and a thick coating of PVA anyway.

I got a little video of the intended trains running on the track...
https://youtu.be/8h3J8vwPanQ
Very pleased indeed. I've got a few more ideas for the layout now so the initial plan may change. I'm thinking it needs a little halt around the front just before the tunnel on the right that the inner train can stop at. Will have to have a think.
The inner loop of track I was waiting on arrived last night so I got stuck in...
Testing the tunnels and they're very tight on 1st and 2nd radius curves but just about fit. I did have the pull the tracks together slightly where the tunnel portals are to be placed though. The little 4 wheel coaches are no issue, but the LSM composites are almost the length of BR MK1 coaches so when on 2nd radius curves, do need quite a bit of space around the track.
First I marked out where the track sits on the board...
Then traced quarter sections of the circle onto paper to make a template out of cork...
All of the quarter sections layed out in position.
Now, I did intend to glue all of the cork down before laying the track on top. I made a start and realised that it just wasn't going to work. As soon as I would lay the cork onto the pva, the edges would lift and it just wouldn't stick flat. I dug out all sorts of weights (food tins, old lima track, kids toys etc) to hold it down in place but even after 15 mins or so, the cork would still lift at the edges with no weight applied.
Whilst waiting for the PVA to dry in the above attempt, I did some youtubing and found a video tutorial and the guy just pinned track over the cork with no glue, so I gave up on the glue idea and just layed the track over the cork and pinned it down. Seems to have worked fine, and I did go round the edges of the cork with PVA afterwards just to make sure it was all sealed down, although I suppose it wont matter once there's ballast on top and a thick coating of PVA anyway.
I got a little video of the intended trains running on the track...
https://youtu.be/8h3J8vwPanQ
Very pleased indeed. I've got a few more ideas for the layout now so the initial plan may change. I'm thinking it needs a little halt around the front just before the tunnel on the right that the inner train can stop at. Will have to have a think.
Been busy the last couple of days and been making a start building up the tunnels and hills.
Soldered the connectors to the track at the back of the layout (inside the tunnel). I know it will be suggested I should have just soldered the wires to the track but I didn't really want to butcher the cables on my controllers. This seemed to be the next best option.

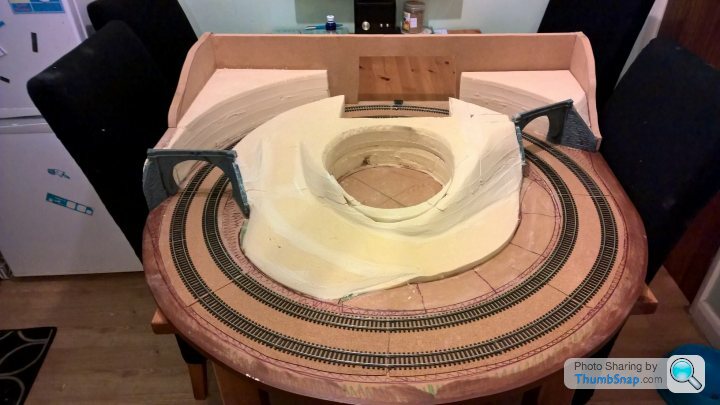
Cut and attached the MDF walls for the shape of the hillside. Stuck with PVA and screwed through from underneath.
Bought a station! As above I suggested I thought it needed a small halt so I bought a few 1st radius curved sections to fit inside the layout nicely. I already had a small straight section of station so the end pieces and waiting building came from that.


Started building up and making the tunnel walls and hillside. Decided to use insulation foam in the end as suggested above. I went to wickes for a look and seemed a good option and it is indeed nice to work with. Just don't breathe in the dust when sanding it!
I'm not happy with the section on the inside of the track. I'm going to cut most of it out and start again on that, but the outer tunnel walls are fine.
I'll eventually coat the foam with a layer of plaster cloth when I've finished shaping it. It will help smooth out edges and fill in gaps where the foam doesn't quite fit right etc.
All good fun!
Soldered the connectors to the track at the back of the layout (inside the tunnel). I know it will be suggested I should have just soldered the wires to the track but I didn't really want to butcher the cables on my controllers. This seemed to be the next best option.
Cut and attached the MDF walls for the shape of the hillside. Stuck with PVA and screwed through from underneath.
Bought a station! As above I suggested I thought it needed a small halt so I bought a few 1st radius curved sections to fit inside the layout nicely. I already had a small straight section of station so the end pieces and waiting building came from that.
Started building up and making the tunnel walls and hillside. Decided to use insulation foam in the end as suggested above. I went to wickes for a look and seemed a good option and it is indeed nice to work with. Just don't breathe in the dust when sanding it!
I'm not happy with the section on the inside of the track. I'm going to cut most of it out and start again on that, but the outer tunnel walls are fine.
I'll eventually coat the foam with a layer of plaster cloth when I've finished shaping it. It will help smooth out edges and fill in gaps where the foam doesn't quite fit right etc.
All good fun!
RacingPete said:
Looking good...
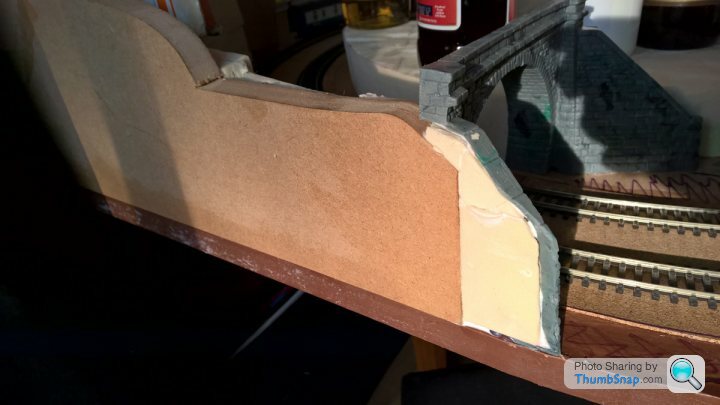
In this photo
Have you just cut the insulating foam to shape for the edge of the tunnel by the wing walls, or used any filler?
Cut and glued the foam but will be putting some filler over it at some point.In this photo
Have you just cut the insulating foam to shape for the edge of the tunnel by the wing walls, or used any filler?
In hindsight, I would have positioned and glued the tunnels after cutting the mdf walls so I could have lined them up better. Should be fine though I coated the foam in PVA and its set very hard.
Spent a bit more time cutting and sanding foam the last couple of nights. Actually removed and redid the whole center section as I wasn't happy with my first go. Much happier now.
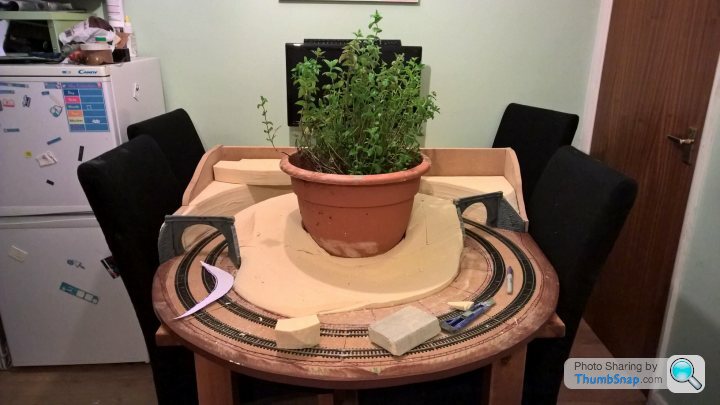
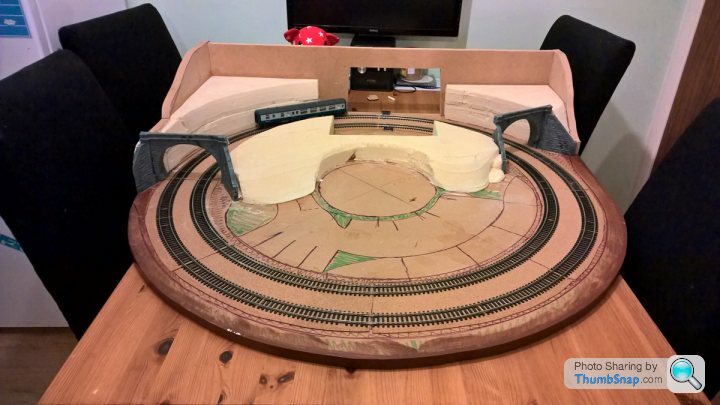
The layout as it currently stands now. Quick test of the pot we use for the xmas tree. Currently with a lovely mint plant
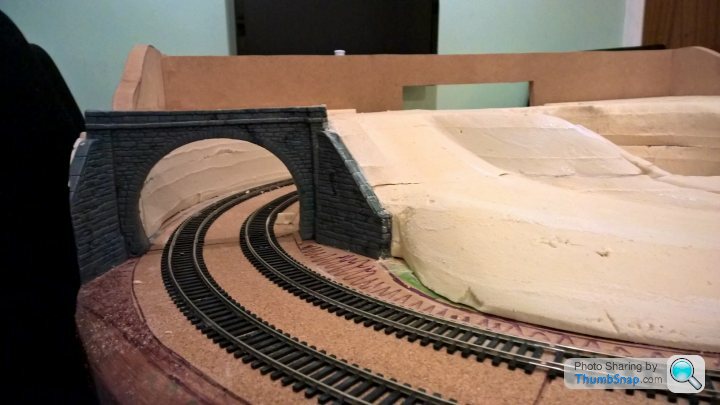

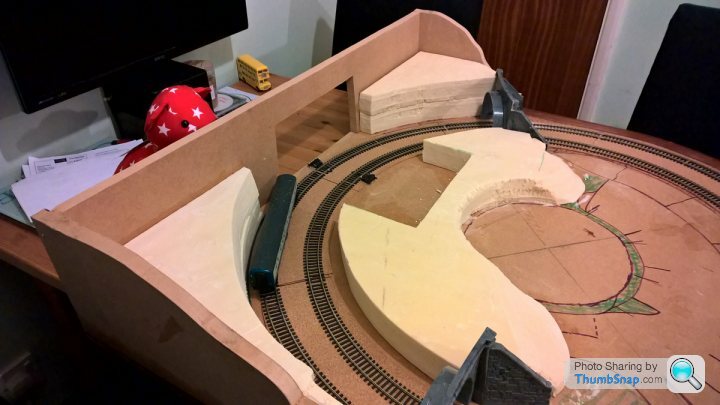
Few closer shots of the tunnel portals and hills.

Testing out the little halt whilst shaping the foam around it.
Pretty pleased overall. It's really starting to develop into something. Next job before I can continue the hills is to finish the insides of the tunnel. This includes all of the wiring as the controllers will be housed in the hillside cut out. I will also need to ballast the insides of the tunnel and finish the walls. Once that's done, the lid can go on.
The layout as it currently stands now. Quick test of the pot we use for the xmas tree. Currently with a lovely mint plant
Few closer shots of the tunnel portals and hills.
Testing out the little halt whilst shaping the foam around it.
Pretty pleased overall. It's really starting to develop into something. Next job before I can continue the hills is to finish the insides of the tunnel. This includes all of the wiring as the controllers will be housed in the hillside cut out. I will also need to ballast the insides of the tunnel and finish the walls. Once that's done, the lid can go on.
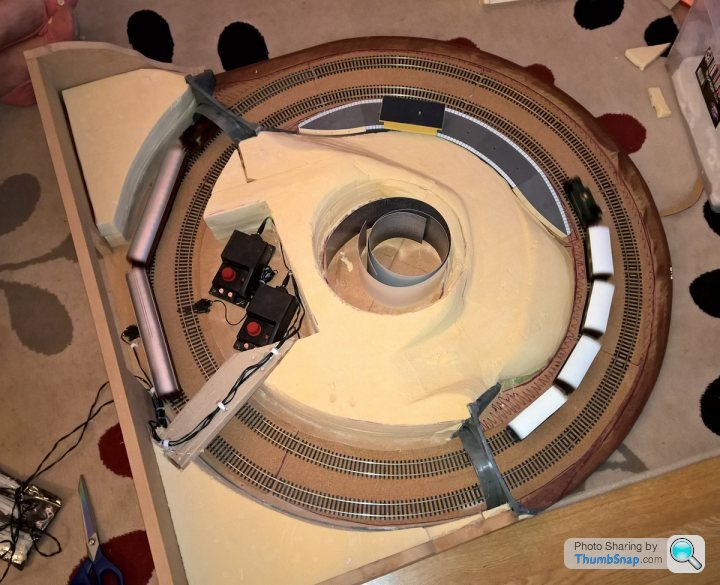
Wanted to look at sorting the controllers and wiring this evening so out came the layout again...

This is what I ended up with. A very simple set up but does the job nicely. Plenty of access space via the hole at the rear to set the controllers should they need adjusting at any time.
Had to run the trains a bit too of course. Two issues I have noticed though. The little 0-4-0, having been geared to reach speeds it is capable of taking off at, is quite a rough runner at slower speeds, however, it runs much smoother with one of the controllers than the other. I imagine the mechanism for adjusting the voltage is a little worn and not as smooth as it once was. It affects the 0-4-0 much more than the 0-6-0. Annoying I've wired the "rough" controller to the inner track which is 0-4-0 is intended to run on ... That said, I've always thought this 0-4-0 was quite a rough runner anyway. I have wanted to change it for a while, likely for a little LMS maroon tank but I'm possibly thinking of another 0-6-0. Tempted to get a hornby Class 4f for the outer track and use the 0-6-0 on the inner track.
Second issue is track cleaning. I did think that there would be enough access through the hole at the rear to clean inside the tunnel but playing around placing some foam on top, there really isn't much room to get at all of the track... I'm possibly now thinking making the top section of the hill removable, or at least a section of it. I'll need to start planning scenery and a way I can blend the joins if I do go for a removable top.
Working in Burton-Upon-Trent tomorrow so I'm going to make a visit to The Model Shop in the Octagon Centre. Want some ballast to scene the inside of the tunnel!
Speaking of the tunnel, I made these up at work the other day...

Works well I think!
This is what I ended up with. A very simple set up but does the job nicely. Plenty of access space via the hole at the rear to set the controllers should they need adjusting at any time.
Had to run the trains a bit too of course. Two issues I have noticed though. The little 0-4-0, having been geared to reach speeds it is capable of taking off at, is quite a rough runner at slower speeds, however, it runs much smoother with one of the controllers than the other. I imagine the mechanism for adjusting the voltage is a little worn and not as smooth as it once was. It affects the 0-4-0 much more than the 0-6-0. Annoying I've wired the "rough" controller to the inner track which is 0-4-0 is intended to run on
... That said, I've always thought this 0-4-0 was quite a rough runner anyway. I have wanted to change it for a while, likely for a little LMS maroon tank but I'm possibly thinking of another 0-6-0. Tempted to get a hornby Class 4f for the outer track and use the 0-6-0 on the inner track.Second issue is track cleaning. I did think that there would be enough access through the hole at the rear to clean inside the tunnel but playing around placing some foam on top, there really isn't much room to get at all of the track... I'm possibly now thinking making the top section of the hill removable, or at least a section of it. I'll need to start planning scenery and a way I can blend the joins if I do go for a removable top.
Working in Burton-Upon-Trent tomorrow so I'm going to make a visit to The Model Shop in the Octagon Centre. Want some ballast to scene the inside of the tunnel!
Speaking of the tunnel, I made these up at work the other day...
Works well I think!
Can you not run this for track cleaning? http://www.hornby.com/uk-en/track-cleaning-coach.h...
ecsrobin said:
Can you not run this for track cleaning? http://www.hornby.com/uk-en/track-cleaning-coach.h...
Ohh yeah I never really thought about those. How good actually are they? For whatever reason I often find blank deposits on the rails and wheels which are quite hard to shift (I've taken to using white spirit recently as it dissolves it instantly and trains run fantastic), will one of these coaches manage that? Will look at 2nd hand options, £22 on a little coach is a bit excessive for my budget Gassing Station | Scale Models | Top of Page | What's New | My Stuff