HOW TO - fit parking sensors
Discussion


First off, big thanks to those who pointed me in the direction of the Meta SR2 parking sensor system. Initially I was a bit sceptical as it only has two sensors and I assumed that this was not adequate enough coverage. But, it is. So, for £100 I doubt you could do much better given the ease of installation and overall “neatness”.
You can pick them up off eBay pretty cheap, I ended up getting mine from Halfords on a Sunday morning and was pushed for time to get it installed before heading to the pub for lunch. £99 for the unit which is similar to anywhere else online (other than eBay).
For the install you will need...
Tools
3-4mm Drill
10mm Drill
Countersink (not essential)
4 “Y” snap electrical connectors
Insulating tape
20-30 small cable ties
Bit of stiff 2-3mm wire
Posi-drive screwdriver
Drop of washing up liquid (or favourite car shampoo)
Heavy duty double sided tape
1m (3-4 feet) of bell wire/thin speaker cable or similar
Time: 2 hours. This allows for a couple of beers and time to admire your work. More than this and you’re a numpty, less and your trying too hard!
Step 1 – Remove existing number plate
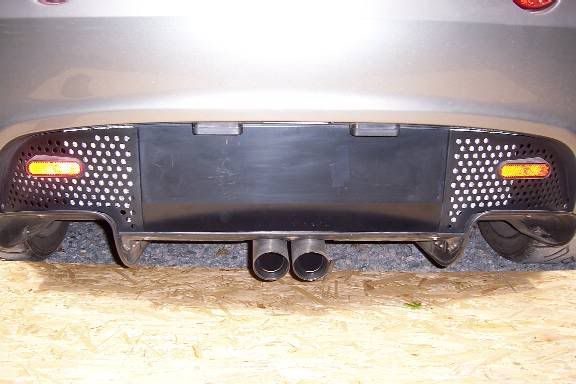
Remove any existing tape/sticky pads etc being careful not to scratch the panel (as I did, hence some insulating tape in a vain attempt to protect it from rust. I then cleaned the panel down with lighter fluid which was to hand. Meths is also good for cleaning remaining glue off.
Step 2 – Drilling a big hole in P & J

Open the boot, whip back the carpet and drill a 10 mm hole in your P&J! Okay, maybe not quite that simple…
Might be work drilling a pilot hole first either to the left opr right of the central bolt under the carpet. Use the 3-4mm drill needed later. Make sure you’re a good inch (25mm) to the side of the bolt head as there is a sprung steel clip on the other side you don’t want to catch (have a look!) There is a steel plate underneath but this is easily drilled.
Enlarge the pilot hole to about 11mm by wiggling the 10mm drill a bit. I also used a countersink from the top and bottom to chamfer the edges slightly.
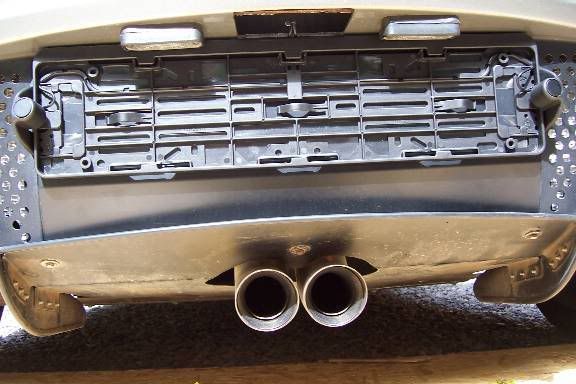
Step 3 – Preparing the plate holder

After a bit of fiddling a looking at it I was happier with the number plate frame “upside down”, i.e. not the way up shown in the instructions. They show it with the wider plastic frame at the bottom which to me is “aesthetically unpleasing”. So, based on the assumption the plate was going the “wrong way up” I reversed the sensors A and B. This is completely up to you. My logic was that the top of the plate frame was going to be tucked behind the number plate lights so it would hide the heavy frame. Maybe it’s just me but everything still works fine doing it this way.
I used double sided tape, largely because I had some to hand and I didn’t fancy trying to find 4 x ½” stainless self tappers with matching washers at 11am on a Sunday. Choice is yours.
Whatever you do mark the plug end of sensor “A” in some way. I wrapped a bit of tape around it. Later on you need to be able to identify the sensor leads once threaded through the car!
Step 4 – Fit the plate holder and feed the wires
This is the bit where it starts to look like you’re getting somewhere. Either stick or screw the plate holder in place making sure its central and level. I tucked the top edge behind the lights and against the bodywork. Then feed the two sensor leads through the big hole in the clam (now I know what its for!) and through the smaller hole you drilled into the boot.
Step 5 – Fiddle
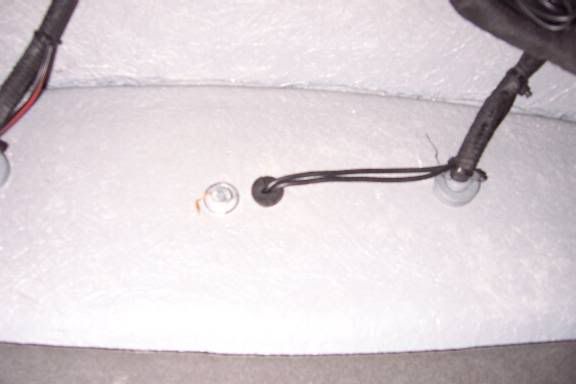
Using the rubber “plug” (no jokes!) supplied in the kit you can encase the wires and seal the hole. No need for the grommet. It should be a tight fit eased with the washing up liquid or Autoglym shampoo as it was in my case. If it doesn’t go just pull the wires back through and use a countersink to enlarge the hole slightly from both sides (watch the drill chuck rubbing in the body work!)
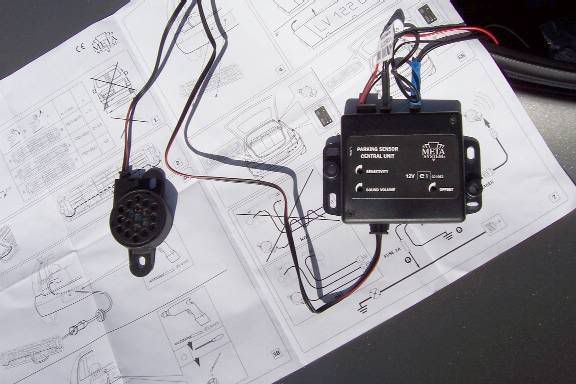
Step 6 – Electrics

The instructions say to put the supplied 1amp fuse in-line on the +’ve feed. I didn’t. Two reasons, first they didn’t supply spade connectors to connect the fuse with and secondly I wanted to get to the pub by lunchtime and another trip to Halfords was not an option. I might be wrong and die in a ball of flames but 1 Amp… I’ve risked more! If an am wrong then let me know and I can always retro-fit and amend this “how-to”.
I used a couple of snap “Y” connectors to splice into the reversing lamp wires, black to black, red to brown. Pretty simple really!
Step 7 – Try it!
Connect it all up as per the instructions. You can’t get it wrong as long as you marked sensor A! With luck it should work first time. Now is a good opportunity to adjust the sensitivity etc. On mine all I did was turn the sensitivity to maximum. Everything else was fine from factory. Play around until you are happy.
It's also a good time for a beer and involve your girlfriend, boyfriend, wife, husband, kids, pets, mates, passers by, anyone who will listen (delete as applicable) so you can demonstrate your skill and superiority to all others.
Step 8 – Drill another hole in you P & J
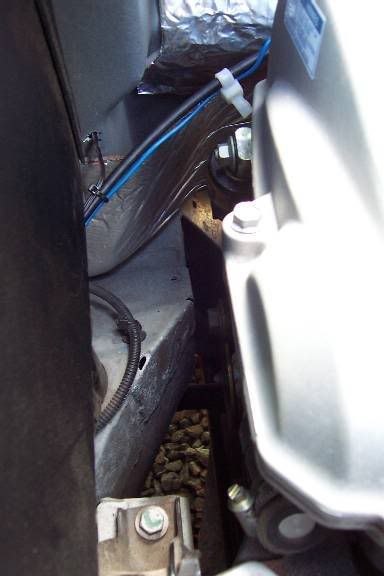
This takes a bit of thought. In the picture there is a blue wire (untidily) tied to the boot release cable. Find the boot release cable first and trace it around. The picture was taken with the camera facing towards the rear of the car so you are looking backwards towards the boot along the side of the engine.
The black and red wire is the “beeper” wire from the parking sensor. I drilled a 3-4mm whole through the corner of the body so it came out in the bit of boot tucked around the corner of the boot beneath the tyre inflator. In other words as far out of the way as was practicable.
Drilling from the engine bay side, as soon as the drill is through the fibreglass stop and push the drill until you can feel it hitting the carpet on the inside of the boot. You need to (carefully!!) press against this as you drill to make a hole for the wire (don’t drill a hole in your fingers!!) As soon as the hole is made feed the bit of wire through so you can find it again later.
The wire of the beeper is not long enough, plus the connectors are too big to pass through the holes in the body that you drill (unless you want 8mm holes for a 3mm wire!)
I cut the wires about 10” (25cm) from the beeper itself and fed the wire from the sensor box under the boot carpet, up and through the newly drilled hole using the wire as a guide.
Once into the engine back I followed the line of the boot release cable but tucked it behind the “thing” closest to the bodywork and it came out the other side.
At this point I lengthened the cables with some thin speaker cable that was to hand, again using the “Y” connectors to join them. These were wrapped in copious amounts of insulating tape and tucked behind the engine bay lining.
Step 9 – Drilling into the cabin

I already had this hole from the previous weekends installation of some shift lights. The hole is just below the rear window on an Exige, a similarly suitable point can no doubt be found on an Elise.
It might be worth removing the rear panel behind the drivers seat to have a look before drilling.
i. Slide the drivers seat as far forwards as possible.
ii. Remove the cap on the seat belt fixing point (just push it upwards).
iii. Undo the first 3 posi-head screws and clips behind the screws (starting on the drivers side)
iv. “Ease” the bottom part of the panel out.
v. “Ease” the top part of the panel out (turn the seat belt pivot as you go!)

Feed through the hole and the wire down behind the boot release mechanism. Be very wary of the seatbelt mechanism. You don’t want to trap the belt or cut the wires. I went behind the belt and checked carefully that it was not trapping anything or being trapped!
Now reverse the fitting of the trim panel. Simple wasn’t it!
Step 10 – Connecting the beeper

Finally reconnect the beeper to the wires. I used a couple of the “Y” connectors again for simplicity. I pulled the carpet up behind the seat and fed the wires through using the Velcro in the kit to hold the beeper loosely behind the drivers seat.
Step 11 – Test and more beer, try reversing towards a range of cuddly toys on your drive. Neighbours will think you’ve gone mad!
Step 12 - Tidy up cables
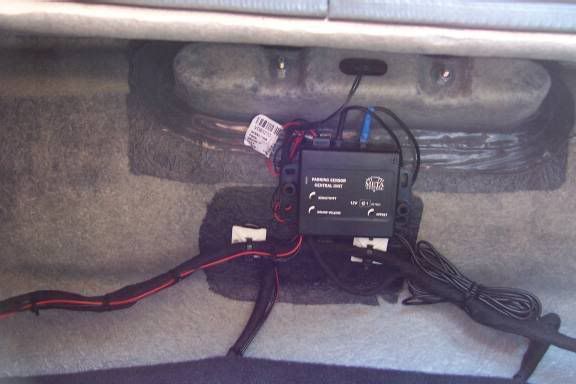
Using numerous cable ties and the self adhesive pads supplied in the kit tidy up the install in the boot so your shopping doesn't trash all your efforts!
END - Go to pub.
You can pick them up off eBay pretty cheap, I ended up getting mine from Halfords on a Sunday morning and was pushed for time to get it installed before heading to the pub for lunch. £99 for the unit which is similar to anywhere else online (other than eBay).
For the install you will need...
Tools
3-4mm Drill
10mm Drill
Countersink (not essential)
4 “Y” snap electrical connectors
Insulating tape
20-30 small cable ties
Bit of stiff 2-3mm wire
Posi-drive screwdriver
Drop of washing up liquid (or favourite car shampoo)
Heavy duty double sided tape
1m (3-4 feet) of bell wire/thin speaker cable or similar
Time: 2 hours. This allows for a couple of beers and time to admire your work. More than this and you’re a numpty, less and your trying too hard!
Step 1 – Remove existing number plate
Remove any existing tape/sticky pads etc being careful not to scratch the panel (as I did, hence some insulating tape in a vain attempt to protect it from rust. I then cleaned the panel down with lighter fluid which was to hand. Meths is also good for cleaning remaining glue off.
Step 2 – Drilling a big hole in P & J
Open the boot, whip back the carpet and drill a 10 mm hole in your P&J! Okay, maybe not quite that simple…
Might be work drilling a pilot hole first either to the left opr right of the central bolt under the carpet. Use the 3-4mm drill needed later. Make sure you’re a good inch (25mm) to the side of the bolt head as there is a sprung steel clip on the other side you don’t want to catch (have a look!) There is a steel plate underneath but this is easily drilled.
Enlarge the pilot hole to about 11mm by wiggling the 10mm drill a bit. I also used a countersink from the top and bottom to chamfer the edges slightly.
Step 3 – Preparing the plate holder
After a bit of fiddling a looking at it I was happier with the number plate frame “upside down”, i.e. not the way up shown in the instructions. They show it with the wider plastic frame at the bottom which to me is “aesthetically unpleasing”. So, based on the assumption the plate was going the “wrong way up” I reversed the sensors A and B. This is completely up to you. My logic was that the top of the plate frame was going to be tucked behind the number plate lights so it would hide the heavy frame. Maybe it’s just me but everything still works fine doing it this way.
I used double sided tape, largely because I had some to hand and I didn’t fancy trying to find 4 x ½” stainless self tappers with matching washers at 11am on a Sunday. Choice is yours.
Whatever you do mark the plug end of sensor “A” in some way. I wrapped a bit of tape around it. Later on you need to be able to identify the sensor leads once threaded through the car!
Step 4 – Fit the plate holder and feed the wires
This is the bit where it starts to look like you’re getting somewhere. Either stick or screw the plate holder in place making sure its central and level. I tucked the top edge behind the lights and against the bodywork. Then feed the two sensor leads through the big hole in the clam (now I know what its for!) and through the smaller hole you drilled into the boot.
Step 5 – Fiddle
Using the rubber “plug” (no jokes!) supplied in the kit you can encase the wires and seal the hole. No need for the grommet. It should be a tight fit eased with the washing up liquid or Autoglym shampoo as it was in my case. If it doesn’t go just pull the wires back through and use a countersink to enlarge the hole slightly from both sides (watch the drill chuck rubbing in the body work!)
Step 6 – Electrics
The instructions say to put the supplied 1amp fuse in-line on the +’ve feed. I didn’t. Two reasons, first they didn’t supply spade connectors to connect the fuse with and secondly I wanted to get to the pub by lunchtime and another trip to Halfords was not an option. I might be wrong and die in a ball of flames but 1 Amp… I’ve risked more! If an am wrong then let me know and I can always retro-fit and amend this “how-to”.
I used a couple of snap “Y” connectors to splice into the reversing lamp wires, black to black, red to brown. Pretty simple really!
Step 7 – Try it!
Connect it all up as per the instructions. You can’t get it wrong as long as you marked sensor A! With luck it should work first time. Now is a good opportunity to adjust the sensitivity etc. On mine all I did was turn the sensitivity to maximum. Everything else was fine from factory. Play around until you are happy.
It's also a good time for a beer and involve your girlfriend, boyfriend, wife, husband, kids, pets, mates, passers by, anyone who will listen (delete as applicable) so you can demonstrate your skill and superiority to all others.
Step 8 – Drill another hole in you P & J
This takes a bit of thought. In the picture there is a blue wire (untidily) tied to the boot release cable. Find the boot release cable first and trace it around. The picture was taken with the camera facing towards the rear of the car so you are looking backwards towards the boot along the side of the engine.
The black and red wire is the “beeper” wire from the parking sensor. I drilled a 3-4mm whole through the corner of the body so it came out in the bit of boot tucked around the corner of the boot beneath the tyre inflator. In other words as far out of the way as was practicable.
Drilling from the engine bay side, as soon as the drill is through the fibreglass stop and push the drill until you can feel it hitting the carpet on the inside of the boot. You need to (carefully!!) press against this as you drill to make a hole for the wire (don’t drill a hole in your fingers!!) As soon as the hole is made feed the bit of wire through so you can find it again later.
The wire of the beeper is not long enough, plus the connectors are too big to pass through the holes in the body that you drill (unless you want 8mm holes for a 3mm wire!)
I cut the wires about 10” (25cm) from the beeper itself and fed the wire from the sensor box under the boot carpet, up and through the newly drilled hole using the wire as a guide.
Once into the engine back I followed the line of the boot release cable but tucked it behind the “thing” closest to the bodywork and it came out the other side.
At this point I lengthened the cables with some thin speaker cable that was to hand, again using the “Y” connectors to join them. These were wrapped in copious amounts of insulating tape and tucked behind the engine bay lining.
Step 9 – Drilling into the cabin
I already had this hole from the previous weekends installation of some shift lights. The hole is just below the rear window on an Exige, a similarly suitable point can no doubt be found on an Elise.
It might be worth removing the rear panel behind the drivers seat to have a look before drilling.
i. Slide the drivers seat as far forwards as possible.
ii. Remove the cap on the seat belt fixing point (just push it upwards).
iii. Undo the first 3 posi-head screws and clips behind the screws (starting on the drivers side)
iv. “Ease” the bottom part of the panel out.
v. “Ease” the top part of the panel out (turn the seat belt pivot as you go!)
Feed through the hole and the wire down behind the boot release mechanism. Be very wary of the seatbelt mechanism. You don’t want to trap the belt or cut the wires. I went behind the belt and checked carefully that it was not trapping anything or being trapped!
Now reverse the fitting of the trim panel. Simple wasn’t it!
Step 10 – Connecting the beeper
Finally reconnect the beeper to the wires. I used a couple of the “Y” connectors again for simplicity. I pulled the carpet up behind the seat and fed the wires through using the Velcro in the kit to hold the beeper loosely behind the drivers seat.
Step 11 – Test and more beer, try reversing towards a range of cuddly toys on your drive. Neighbours will think you’ve gone mad!
Step 12 - Tidy up cables
Using numerous cable ties and the self adhesive pads supplied in the kit tidy up the install in the boot so your shopping doesn't trash all your efforts!
END - Go to pub.
Edited by 21TonyK on Sunday 20th May 20:37

jb111s said:
Looks good! Presumably it's not linked to the reverse gear so does it go haywire & start beeping when someone pulls up behind you ?
Thanks for the instructions, one of these could of saved me 600 quids worth of damage last month I shall be paying halfords a visit n weekend.
Thanks for the instructions, one of these could of saved me 600 quids worth of damage last month
I shall be paying halfords a visit n weekend.It draws power from the reverse light so only activates when reverse gear selected. Could always wire differently though such as for forward facing (?)
vetteheadracer said:
I assume this is for track use so you can tell when you are about to be overtaken?
Says the man with power steering, traction control, power adjusted seats (FFS!) and...
--->> cruise control <<--- LOL!!!
Wait till you've got an Exige and try reversing in a car park full of shopping trolleys and old dears in micras!
Then we'll see who's laughing

tanman said:
21TonyK said:
vetteheadracer said:
I assume this is for track use so you can tell when you are about to be overtaken?
Says the man with power steering, traction control, power adjusted seats (FFS!) and...
--->> cruise control <<--- LOL!!!

Wise words mate, not 'arf
Was passing your "place of work" at kicking out time the other day. The lollipop man went mental waving at me as did half the kids.
Nothing like being famous
21TonyK said:
tanman said:
21TonyK said:
vetteheadracer said:
I assume this is for track use so you can tell when you are about to be overtaken?
Says the man with power steering, traction control, power adjusted seats (FFS!) and...
--->> cruise control <<--- LOL!!!
Wise words mate, not 'arf
Was passing your "place of work" at kicking out time the other day. The lollipop man went mental waving at me as did half the kids.
Nothing like being famous
Did they egg you? thats the kind of response i get
 .
. Leaving in July to go to wastelands (westlands) up at plainmore next to that great side Torquay United

tanman said:
21TonyK said:
tanman said:
21TonyK said:
vetteheadracer said:
I assume this is for track use so you can tell when you are about to be overtaken?
Says the man with power steering, traction control, power adjusted seats (FFS!) and...
--->> cruise control <<--- LOL!!!
Wise words mate, not 'arf
Was passing your "place of work" at kicking out time the other day. The lollipop man went mental waving at me as did half the kids.
Nothing like being famous
Did they egg you? thats the kind of response i get
. Leaving in July to go to wastelands (westlands) up at plainmore next to that great side Torquay United
Nope, but I did think about flicking the lollipop man the finger just to get you into trouble!
You're going to park in Plainmore in an Exige... Jesus... get a £500 hack for work!
You know it is actually possible to fit this without any drilling. Here are the destructions i wrote elsewhere:
1. Remove oe license plate, mine was proper stuck on and required a hefty tug.
2. Pull back carpet in boot and at the rear of the boot (closest the back) you will find two grommets. These are for the lights that light up the no. plate. Remove one.
3. Just above where the plate mounts if you sit on the floor and look up is a rectangle hole. Feed the wires from the new plate surround through this and the hole for the grommet you previously removed. You could try to push the wires through the existing grommet, install a new one or put insulation tape around the hole to stop the wires chaffing.
4. Make sure you have the immobiliser code, disarmed the alarm and a window open. I didnt have to remove the battery, i just pulled back the carpet to reveal the battery holder thing to move it out the way.
5. I placed the speaker just behind the drivers head in the engine compartment on the plastic 'shelf' above the window.
6. Feed the speaker wire under the black plastic trim that runs along the back of the engine compartment and behind the black plastic cover that seperates the engine from the air filter. You can cable tie the wire to the rollcage.
7. Push the trunking for the power lead from the battery into the car as far as it'l go and push the speaker wire inside, then push it back and it should end up in the car.
8. Use scotchblock connectors to get power from the reverse light.
9. Connect wiring as supplied instructions.
Hints:
If you want to mount the controller anywhere but behind the battery out the way you will need to extend the speaker wire.
If you dont, do a trial run to get the setting right before you lay the speaker cable as the box is hard to get to otherwise.
Also i'd keep an eye on that double sided tape. I stuck mine on with some a couple times and my plate half fell off (couldnt go far as it dangled on the wires into the boot). I ended up drilling some pilot holes and self tapping the holder on.
Nice work Tony. BoLOCs to the 'buy a beemer' and 'why?' comments - each to their own. If it works for you, which I think it clearly does, then top work fella 
Good piccys and write up (Approved!) and well done to the other fellas who've chipped in with something constructive to add too
Good piccys and write up (Approved!) and well done to the other fellas who've chipped in with something constructive to add too
21TonyK said:
vetteheadracer said:
I assume this is for track use so you can tell when you are about to be overtaken?
Says the man with power steering, traction control, power adjusted seats (FFS!) and...
--->> cruise control <<--- LOL!!!
Wait till you've got an Exige and try reversing in a car park full of shopping trolleys and old dears in micras!
Then we'll see who's laughing
No longer my friend....as of today the daily driver Z06 is sold so I now have the required cash to purchase an Exige S2 Chrome Orange Performance Pack

I witnessed an S1 Exige owner trying to reverse on a recent South Wales hoon and know exactly what you mean if I hadn't intervened he would have punted an old Rover off the side of a mountain......hang on a minute!
Gassing Station | Elise/Exige/Europa/340R | Top of Page | What's New | My Stuff