please feel free to add commonly asked questions to this Wiki - it's here for the purposes of sharing info. Please add away...
M12 Dimensions
- Length 4089mm
- Width (inc.mirrors) 1885mm
- Height 1143mm
- Wheelbase 2438mm
- Max/min legroom 1120/980mm
- Headroom 930mm
- Interior width 11360mm
- Kerbweight 1050kgs
Air Filters - (for 2.5l) are K&N R-1380 - see http://www.filterpower.co.uk and https://secure3.easyspace.com/www.filterpower.co.u...
Headlamps - GTO / GTO3 5 3/4" Headlamp, main/dip/side. Cibie p/n:8482371. See: http://www.larkspeed.com/index.pl?p=8482371&a=...
Indicator relay for led indicators (2.5 3 pin relay with pinouts 31, 49 and 49a) - CF13 GL-02
Oil- Factory recommends Shell Helix Ultra 5W/40 Fully synthetic. Also Mobil 1 recommended by some tuners/racers.
Oil Filter- (Ford) Part no. 4628534 (Ford: 120FO0130 & Mann: W920/45) (Ford new part no. 5191626)
Oil Pressure Switch (3 Litre) - 1U5T9278BA sometimes listed under 51162
Sump Plug with washer (2002 M12 GTO)- (Ford) Part no 3051079 (12mm) 4.44 incl VAT. (Ford: 116FO0040)
Spark Plugs - Motorcraft AGSF32WM/4 527 158 - 40thou gap
NGK BR7EFS as recommended by Yellowshed gapped to 0.025" or 0.65mm
Fuel Filter - Sytec Motorsport Bullet (15mm in/out) - http://www.fuelsystem.co.uk/filters.pdf
Fuel Pump M400 - Bosch 0 580 254 979
Lambda sensors
Part numbers
1001702, 96BB-9F472-BA - Ford Cougar V6 Lambda, SENSOR ASSY C85432, D4 (WP), Ford Cougar V6 Lambda
Available from Ford.
NGK LAMBDA SENSOR OZA216-D2 0190 - replacement for Ford 1001702
Coolant Fan Switch- Intermotor - part number 50173
Battery - type 075
Rear Hub nuts -Improvement over standard part (which can become loose) - P999.084.641.01 LOCK NUT (Porsche Boxter part)
Wheel Nuts - M12x1.5mm pitch with a 60 degree seat and a 19mm A/F hex
ECU
M400 - MBE 975D
Others .... please add
One way valve in the overflow petrol tank pipe - part no is89f8-9a 153-ab 8z02a,it does not show on the parts computer but is listed under ford escort zetec 150 ps
3R Headlight units
all items are hella
main beam/sidelight unit
1KO 008 191-00
HR-2 12,5 04 HR
main driving lamp (projector)
1BL 008 193-00
HC-6 04 HC
Alternator belt
According to Noble Parts, the [b]Gates 6PK 1708 belt is the correct one[/b]
6PK 1705 (6 ribs 1705 long)
6PK 1700 (also fits fine and cured squeak on M400)
6PK 1238 for cars with air-con removed AND Daddysumo's smaller crank pulley fitted.
available from any motor factors
Alternator
Ford Cougar 2.5 (2002) - Euro car parts - P/N: 401591231 or 401591230 or 401591232
Crank pulley bolt is torqued to yield and should be replaced. Part number Ford 3675106. Tighten in 4 stages - 120Nm, release 360 degrees, 50Nm, tighten 90 degrees.
If your are in the USA the Alternator / AC belt Tensioner is Ford Part F8RZ6B209AA and the idler pulley is Ford #98BZ8678AC
Water Pump Belt
Motorcraft 5L8E-8K543-AA
Finis Code 59X28DO5 Part No 4513849
Reversing light switch
3R 6 Speed gearbox - Ford part No. 1444282 Switch Assembly, Mondeo ST220 from about Mar 2003 onwards.
Also for the 6 speed- Ford part no. 1805255 Switch Assy- Reversing Lamp
Water pump tensioner – FORD FINIS Number 4173397
Water pump tensioner bolt –FORD FINIS Number 7106178
2.5L Idler Pulley- Gates Drive/Align Part Number T36199 (7803-21299)
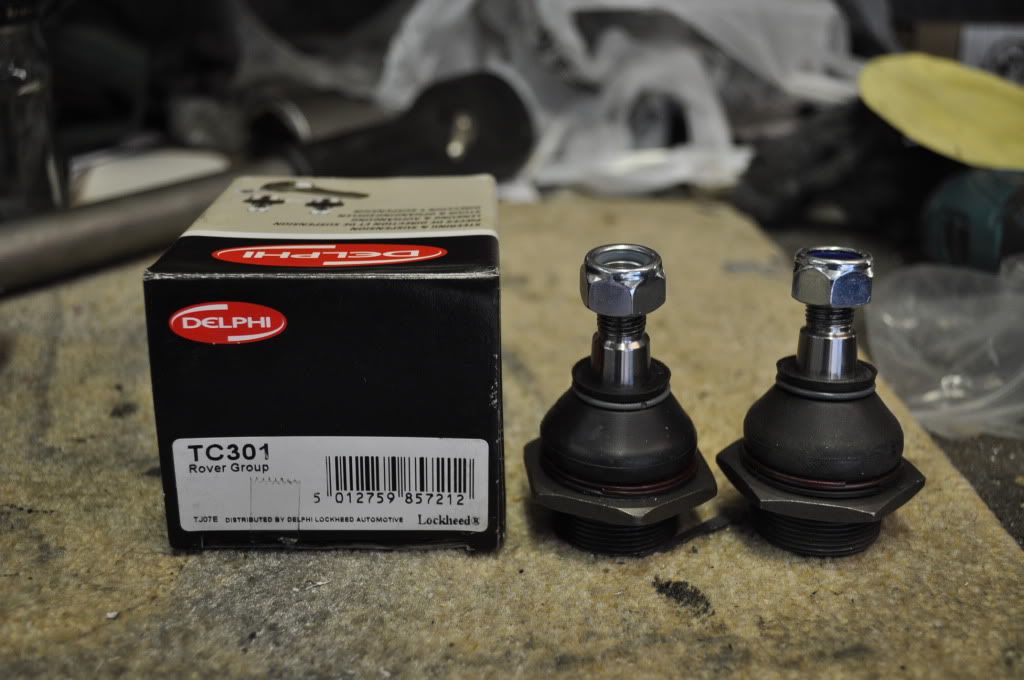
M12 GTO3R Rear Ball Joints
From PEUGEOT 406 - Part Number - 3640.34
DELPHI - Part Number - TC368
QH - Part Number - QSJ1184S
M12 GTO Dip stick
Original part number F53E-6750-CA. This was replaced by F53E-6750-CB Mondeo
Front Brake Pads- Ferodo DS2500. Part number FRP3083H from Camskill £107 for fronts
Rear Brake Pads- Ferodo DS2500. Part number FRP3083HS (bit machined off) from Camskill £129 for Rears.
TDS gasket for machined groove- FORD FINIS Number 4802294
TDS gasket for flat face (no groove- FORD FINIS Number 4763355
Suspension Torque Settings
FRONT SUSPENSION Torque setting
Upper & lower A - Arm inner bushes 140 Nm 103 lbft
Upper A-arm outer ball joint mounting block to upright (Loctite 243) 60 Nm 44 lbft
Upper A - Arm outer ball joint 60 Nm 44 lbft
Lower A - Arm outer ball joint 60 Nm 44 lbft
Wheel bearing bolt - end nyloc nut 220 Nm 162 lbft
Shock mountings, upper & lower 100 Nm 74 lbft
Tie rod ends to upright 60 Nm 44 lbft
REAR SUSPENSION Torque setting
Upper A - Arm inner bushes 140 Nm 103 lbft
Upper A - Arm outer ball joint 60 Nm 44 lbft
Lower A - Arm inner front bush 140 Nm 103 lbft
Lower A - Arm inner rear bush & inner track rod joint 140 Nm 103 lbft
Lower A - Arm outer bush & outer track rod joint 140 Nm 103 lbft
Shock mountings, upper & lower 100 Nm 74 lbft
BRAKES Torque setting
Front & rear caliper mtg bolts + Loctite 243 60Nm 44 lbft
Front disk-bell, retaining bolts (use AP Mtg.kit) 14Nm 10lbft
DIFFERENTIAL & GEARBOX
Standard 5-speed box: MTX-75
Ford MTX75 Part Number 1206944.This Box was only fitted on the very first of the MK3 Mondeo Up to 15-10-2000
Apparently this is now obsolete and the replacement is P/No 1232410. fitted to the Mondeo From: 15-08-2000> With a 3.82
Quaife ATB LSD for standard 5-speed: QDF20Z
Standard 6 speed gearbox MMT6 Getrag unit (derived from ST220 only for correct ratios)
Quaife ATB LSD 6 speed part No:QDF41Z
Tel: 0845 1307400, http://www.quaife.co.uk/Ford-Contour-USA-MTX75-Qua...
Fidanza Aluminium Flywheel for 5 Speed MTX-75 box - Part Number - 186251
Fidanza Aluminium Flywheel for 6 Speed MMT6 Box - Part Number - 186251
[ Supplier - www.ultrarev.com ]
OR TTV Noble Flywheel (4.2 kg, the same weight as the Fidanza flywheel) - http://ttvracing.com/product/noble-ford-3-0-v6-tur...
TTV never sell directly to the public but it might be worth a try. Otherwise they can be purchased from Jetstream - www.jetstream.co.uk
Original Noble Flywheel - Same as an Mondeo ST200 - Buy from Ford
CLUTCH PARTS
Clutch Slave Cylinder - Modified AP Racing Part - Noble Part Number - M12CLU03 (AP Racing Part Number - CP3859-10 [Soon to be superceded by CP6859 - Double Check before purchasing]
Clutch Plate & Cover - Buy together as a unit, or buy the cover separately and then buy the sprung plate clutch (ok up to 400lb ft torque) or the paddle clutch (will handle up to 650lb ft and beyond...)
Buy from the usual Noble dealers and garages.
MMT6 (6 SPEED) GEARBOX PARTS:-
MMT6 Gearbox Selector Forks (Pretty sure they're all metal forks now (2015), but DOUBLE CHECK to be sure)
1st & 2nd Gear - Ford Part Number - 1374959
2nd & 3rd Gear - Ford Part Number - 1374958
5th & 6th Gear - Ford Part Number - 1371699
Reverse Gear - Ford Part Number - 1371700
The metal ones look like this (see pic below). Note the nylon tips. Sometimes if you have gear selection problems, worn tips are the cause of it. You can't buy the tips, so the whole selector fork has to be replaced.

Driveshaft Seals (2 needed) - Ford Part Number - 1543933
Bell Housing Seal - Ford Part Number - 1807604
Hex Bolts (10 needed)- Ford Part Number - 1663348
SYNCRO RINGS
1st, 2nd 3rd & 4th Gear Syncro Rings (same part number for all 4) - Ford Part Number - 1712553 [Number 4 on Diag 1 below]
5th & 6th Gear Syncro Rings (same part number for both) - Ford Part Number - 1474007 - [Number 4 on Diag 2 below]
Reverse Gear Syncro Ring - Ford Part Number - 1474849 [Number 21 on Diag 2 below]
ROLLER BEARINGS - (Not always necessary to replace but recommended by my gearbox guy to help with gear selection issues)
1st Gear Needle Roller Bearing - Ford Part Number - 1227471 [number 3 on Diag 1 below]
2nd Gear Needle Roller Bearing - Ford Part Number - 1227473 [number 8 on Diag 1 below]
3rd Gear Needle Roller Bearing - Ford Part Number - 1227475 [number 12 on Diag 1 below]
4th Gear Needle Roller Bearing - Ford Part Number - 1227482 [number 16 on Diag 1 below]
5th Gear Needle Roller Bearing - Ford Part Number - 1227479 [number 9 on Diag 2 below]
6th Gear Needle Roller Bearing - Ford Part Number - 1227482 [number 13 on Diag 2 below]
Reverse Gear Needle Roller Bearing - Ford Part Number - 1227479 [number 3 on Diag 2 below]
DIAGRAM 1 - GEARS 1 TO 4

imag
DIAGRAM 2 - GEARS 5, 6 & REVERSE

upload a gif
GEARBOX OIL
Ford 75W/90 1 Litre Bottle - WSD-M2C200-C WSS-M2C200-D2 - Ford Part Number - 1790199
[NB - You need to buy 2 litres as MMT6 Gearbox Capacity is 1.75 Litres]
OR Royal Purple Synchromax Manual transmission fluid - 1 QT. bottle (0.946 litre) (Many US Noble Owners swear by this compared to the OEM Ford Oil)
[Again, remember to buy 2 bottles]
Buy from here in the UK - http://www.monkfishperformance.co.uk/royal-purple-...
Or try eBay UK or Amazon UK as they sometimes stock it.
[BOTH ARE FINE TO USE WITH AN LSD - SPOKE TO QUAIFE AND THEY SAID THE STANDARD FORD OIL IS FINE WITH THEIR DIFFS]
BALL JOINTS:-
Ball joint front lower opel made by firstline part no FBJ5030
top ball joints front and rear GT03 32mm dia hole in alloy block
replacement stub axles and bearings to replace Noble parts
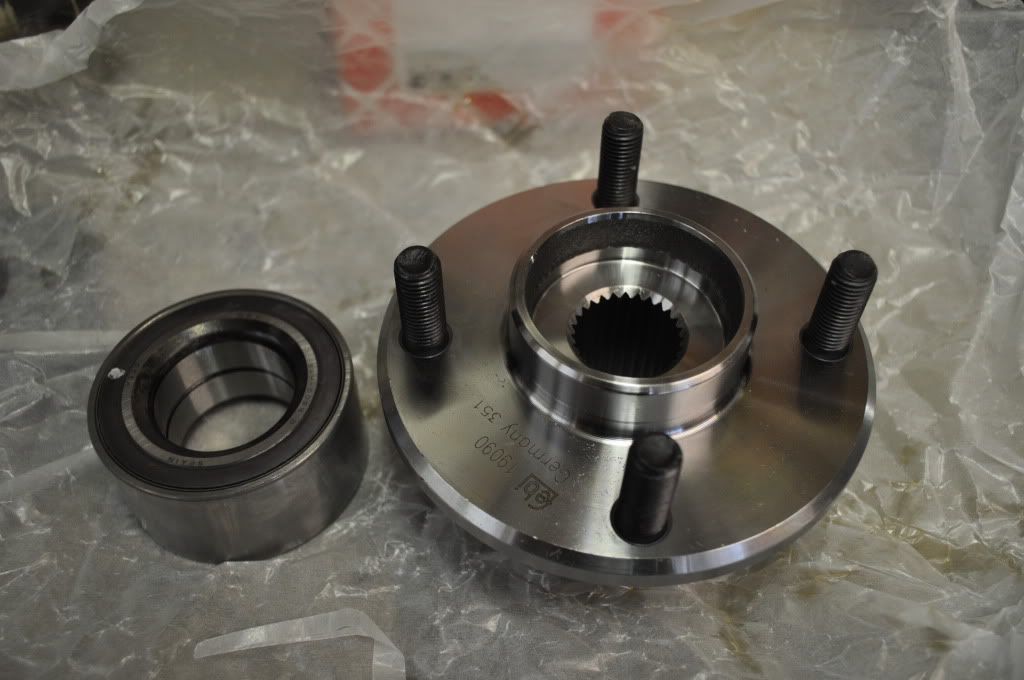
part no wheel hub febi/bilstein 19090 ford pkw
bearing SKF VKBA3575 (Febi/Bilstein 19265 ford)
All parts purchased from Andrew Page ltd .01733 340177 speak tp Paul Kendle
(Additional info on Hub/Bearing: OEM number for bearing is 5 027 620, Hub is 7 346 525
The 19090 or (7 346 525 as 19090 is specific to Febi) is an uprated stronger hub and uses a 40mm bearing as apposed to the std noble hub that I believe is a 42mm bearing. So if a new hub is required then use the two OEM cross ref numbers and do both sides as they are stronger. If you need just a bearing then make sure you get the right size for type of hub.
(updated 20/2/17)
Nissan gasket details
manifold to turbo 1441517-m00 cost £10.50 + vat
turbo to down pipe 1444579-e00 cost £19.78 + vat
Paint Codes
Azure blue- CHRSBE - Chrysler paint .PPG paint system.
Formula is
D763 828 grams
D776 1352 grams
D754 1610 grams
D755 1808 grams
D753 1875.2 grams
D752 1934.6 grams
This will make 2 litres
Mallory Green- PPG paint system
Formula is
D797 1157.6
D740 1376.0
D754 1569.6
D770 1722.8
D742 1853.4
D759 1909.8
This will make 2 litres
Air-con - What's the recharge weight of refrigerant needed?
Noble state 1KG but 950g has been suggested by a few people. Lubricant is PAG oil ISO 100
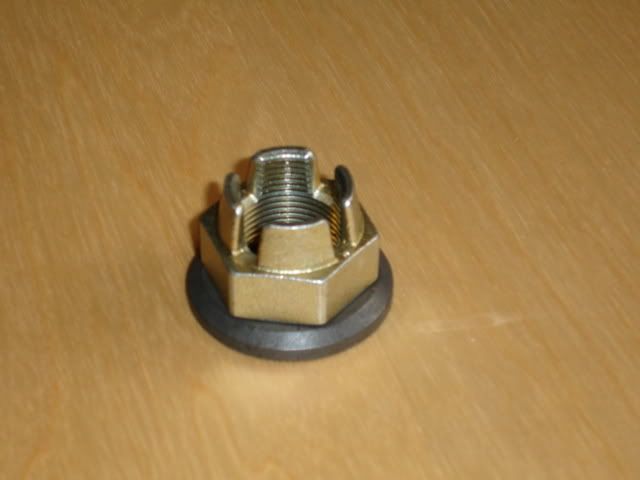
Hub nuts. What's the Porsche part number?
P999.084.641.02 (or .01) LOCK NUT. It's a Boxter part and costs under 3+vat. You do not need to drill the hub, it will be fine as is. Hub nuts only needed for the rear of the car, the front nuts are a different size and do not work loose anyway.
Tyre Pressures - what are the recommended pressures for M12 and M400?
M12 - Front: 18psi Rear: 27psi
M400 - Front: 20psi Rear: 30psi
Torque settings
Wheel bearing: 270Nm
Wheel nut: 130Nm 95 ft/lb
BUT FOR THE WHEEL NUT TORQUES...
--- Noble Automotive states: 120Nm - 88 ft/lb
--- Bespoke Performance states: 102Nm - 75 ft/lb
Note entered 240517 (AMG Merc)
Manifold Torque Settings

Battery - What type and where is it?
It's a type 075 and it's on the floor of the engine bay just behind the driver. To change it, lift the car and undo the floor plate for access. You cannot remove it from above.
Who produces performance parts?
What does the Roush exhaust look like?
On the car:-
Power curves :-
What are they for?
The intercooler reduces the intake air temperature, thus providing denser air available for more fuel to be added and thus more power. The cooler the air the better, turbo's heat up the air during pressurisation, the intercooler is there to bring the temp back down again.
Third party Intercoolers:-
An improved performing IC was produced by Faulks Performance (manufactured by Pace Products). This improved flow and reduced the time to heat soak providing more power and better throttle response.
Other enhanced ICs are available from Pro Alloy and Noblemods. These ICs have not been back-to-back performance tested.
The Pro Alloy version is used in at least one Noble racecar and compared with the FP version provides better flow, releases more hp and has more resistance to heat soak. Further track testing on the PA version will continue during 2007.
Brake Disks
Standard disks are drilled.
Slotted or groved disks provide a better "feel" and are generally easy to modulate. They also cope with heat better than drilled version and are more resistant to cracking.
Slotted AP discs are available from Plans Motorsport and main dealers. The rear disks are also now available for the M400/3R/3. Slotted/grooved discs are available for the rears on 2.5L cars.
AP330 Front Grooved Disc LH
AP330 Front Grooved Disc RH
These are genuine AP discs AP Part Number CP3580-1131/0-CR8 - usual retail price 253.28 inc VAT plus shipping each.
CP2494-18 Bell fitting kit
These discs are a straight swap for the standard discs and are an easy DIY fit.
Front discs (grooved AP Racing) come as rotors only, and you need to get fitting kit to attach them to the bell (12 nuts/bold for each side).
Removal of old nuts/bolts may be problematic as they tend to weld together with the heat.
Note that you need 3/16AF Allen key for the bolts (Latest ones use torx heads so you need a female torx socket).
The torque for the bolts is 11 lbs/ft or 14 Nm
Bedding-in procedure for new discs (note - use old pads) from AP Racing site below
http://www.apracing.com/info/info.asp?section=Disc...
Brake Pads
Standard pads are ???
Optional pads in order of hardness are
Ferodo DS2500
Ferodo DS3000
Pagid RS19
Pagid RS29
One Owner Comments:-
"I've tested the stock pads, DS2500's, DS3000's and Pagids. I believe that the best combination of the ones that I've tested are the Pagid's* and the AP grooved front disks.
DS3000's will stop you quicker than DS2500's but overheat the disks under hard track/race use and cause the brake fluid to boil . They are also more snatchy (lockable) than the 2500's although you can cure this by adjusting the dampers.
With the Pagids you'll get better brake modulation (feel) and they don't require warming up to function which is important for road use. They do squeal at low speeds.
Note that I don't use extra ducting for brake cooling. The DS3000's actually roasted the rear disks as well as the fronts and I doubt that we could have done much about their temperatures with extra brake cooling hoses. What did make the difference were simply better pads."
D_G reports - My handbrake has always been pretty bad and after trying a quick adjustment which didn't feel right took the disc off and found one of the shoe linings laying in the bottom of the drum. I've also had an intermittent scraping noise from that side recently which now adds up. Looks like a previous service dealer has got a bit overexcited with the adjustment as the other side is still OK.
Ordered some new shoes from the factory today but would recommend anyone with a dodgy handbrake to have the shoes looked at and not just adjusted through the discs.
Found the driver's side footwell full of water a couple of weeks ago after leaving it in the heavy rain and found that the floor of the car under the front clam on the driver's side had a small pool just sitting there (presumably flowing down off the windscreen and then seeping slowly into the cabin). Wondered why this had never happened before and found that the floor has small holes drilled in (I guess to drain any water flowing in) but they were full of stones/grit that had collected over time and were acting as plugs.
Fuel Smell
Fuel smells in the cabin and around the car are most likely to be from the breather pipe.
The pipe runs from the filler neck between the cap and tank. Its purpose is to vent the tank as it gets hot and to allow air in as the fuel level goes down. It also acts as an overflow of you overfill the tank.
The pipe runs into the compartment behind the panel in front of the rear NS wheel. It should poke out of the panel to atmosphere. Often the end of the pipe perishes and it pulls back into the compartment. This means the tank vents into the sill and compartment area and can trap the smell. It also means that any overflow can run straight into the compartment.
The most common modification is to use a P-clip to trap the pipe using one of the bottom screw holes holding the panel in.
In some cases, the smell can be from a fuel leak. This is most likely to be from a connection inside the pump/filter compartment. The seal may also have failed in the filter causing a drip where the two halves connect. obes.
Fuel line Removal from fuel rail
There's a special tool that releases the fitting - it slides in from the rail side, and moves a spring out of the way so that the connector can come off. Tool is pretty cheap - you can get a plastic one for a few bucks. Or, you can get a little piece of metal tubing (something that fits around the tube coming off the fuel rail, around .063" wall thickness), split it in half lengthwise, put it around the tube coming off the fuel rail, and push it into the connector, then pull off the connector. Or, use something like a thin, flexible piece of plastic, like a piece of a juice container, beverage bottle, or oil container. Cut a piece, wrap it around the tube, and slide it into the fitting until it bottoms out, then pull the fitting off the rail.
Picture of the fuel line connected the fuel rail
Picture of the fuel line out of the fuel rail

Picture of empty fuel rail connector

Picture of Standard Noble fuel line from pump to fuel rail, including fuel regulator

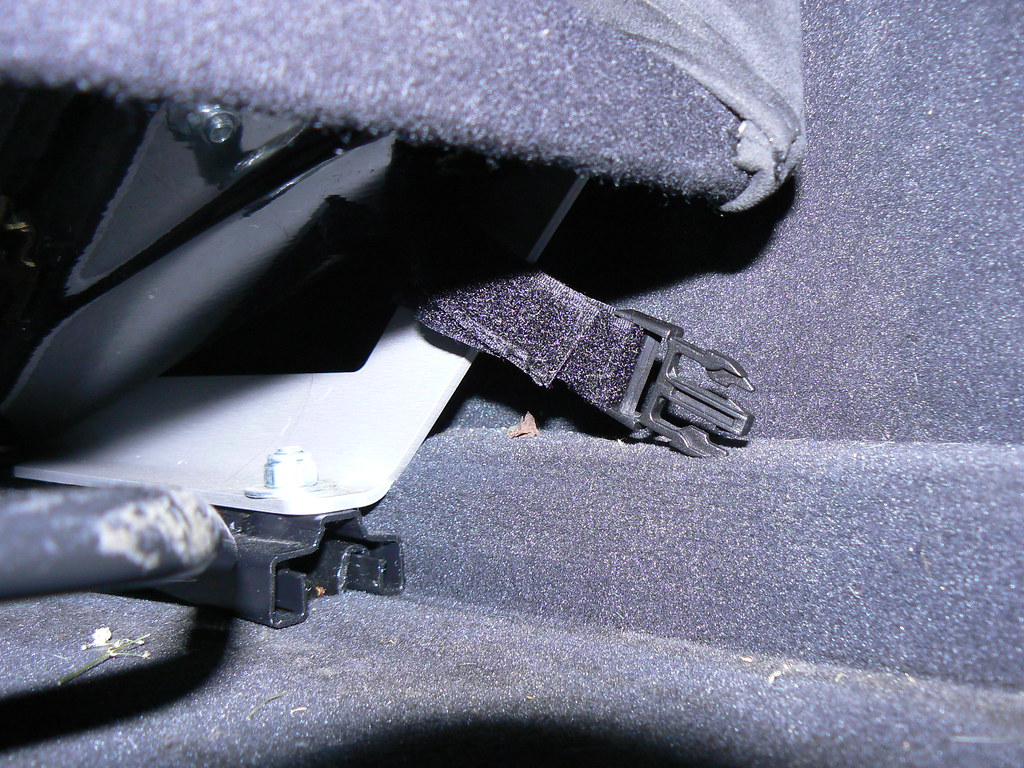
Noble Luggage Set - Fitting the Securing Clips
For anyone buying a luggage set, fitting the fasteners to the car which the bags clip into is a simple 15 minute process.
The luggage set comprises 6 bags:
2 large bags which sit behind the seats and are not clipped in.
2 bags which sit on the floor just infront of the seats - these are clipped to the seats.
2 bags which sit on the rear parcel shelf behind one's head - these are also clipped in.
All the fasteners are left fitted in the car, and the bags just clip in and out of them.
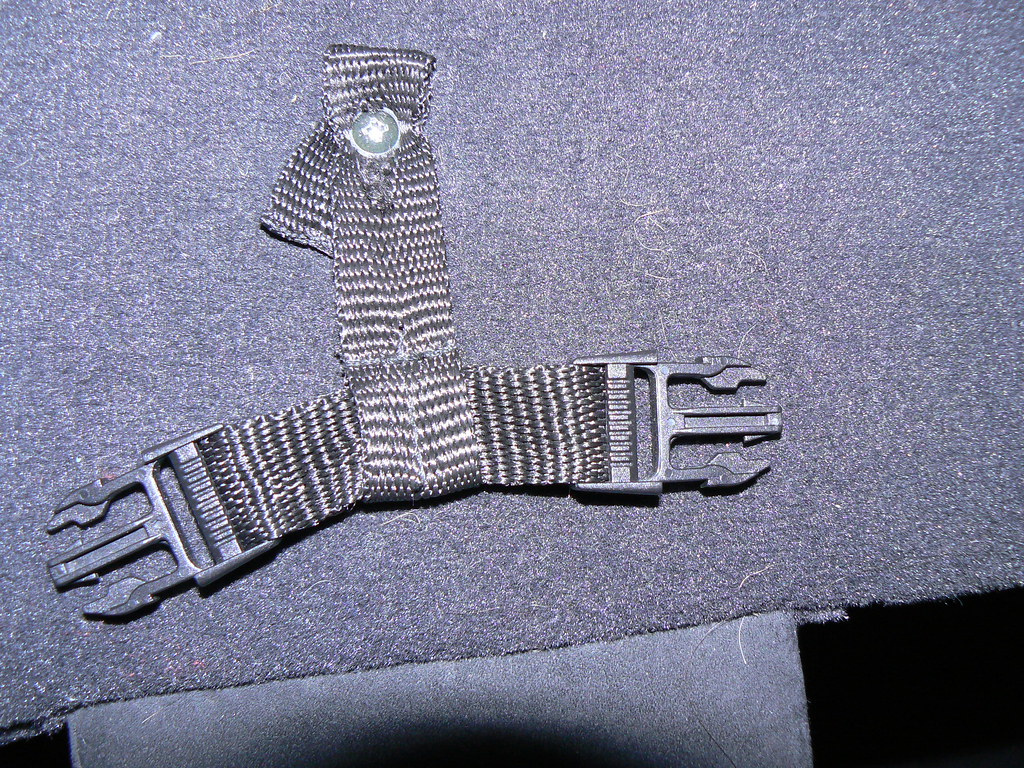
There are 7 fasteners:
4 velcro ones - these attach to the supports at the front of the front seats near the floor.
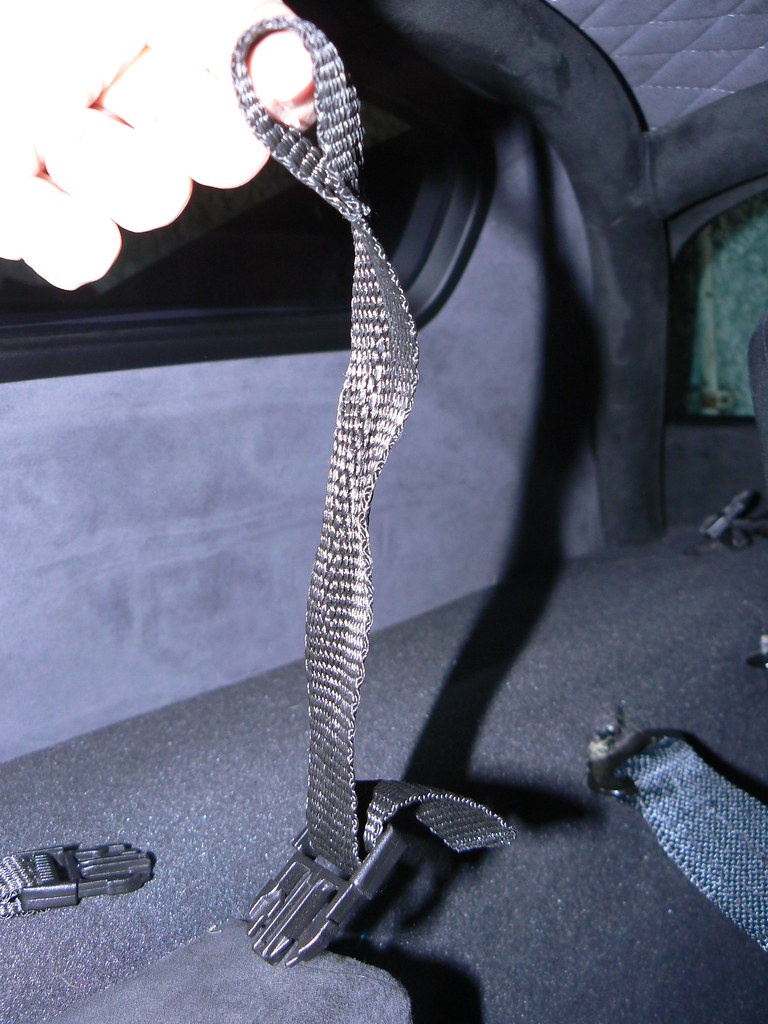
2 longish non-velcro ones with a loop on the end - these attach round the "seatbelt guides" on the rear parcel shelf next to the window.
1 "T" shaped one - this attaches to the middle of the rear parcel shelf with a self-tapping screw.
Fitting
The velcro ones simply wrap around the front seat supports and fasten to themselves:
The non velcro loop ones go round the seatbelt mounting point on the rear parcel shelf. Just pass the loop round the mount point, and thread the other end with the clip through the loop and pull to tighten it:
Finally, the T piece goes in the middle of the rear parcel shelf. A short self-tapping screw (1/2 inch or so) goes through the piece of webbing with no clip on it and simply screws into the parcel shelf, leaving the 2 clips laying at the front of the parcel shelf just above the rear courtesy light. You will find that a short handled screwdriver comes in handy here, as a long one will catch the roll bar and roof and make things awkward. It may help to create a small pilot hole first with a "sharp pointy thing" (a bradawl?). It also can take a bit before the screw engages in the parcel shelf as the carpet is quite thick, but once it's engaged, it should hold very well when tightened.
More photos and larger versions of the ones above are available here:
http://www.flickr.com/photos/conradsphotos/sets/72...
Removing dash air vents
The outer, fixed ring of the vents is held in place with 3 small screws that are hidden by the inner, movable piece. Use a small dental pick to pry down the latch of the inner piece, then it will pop right out, exposing the 3 screws.
Conrad (C&C)
Wind tunnel Data (added 8/02/17)

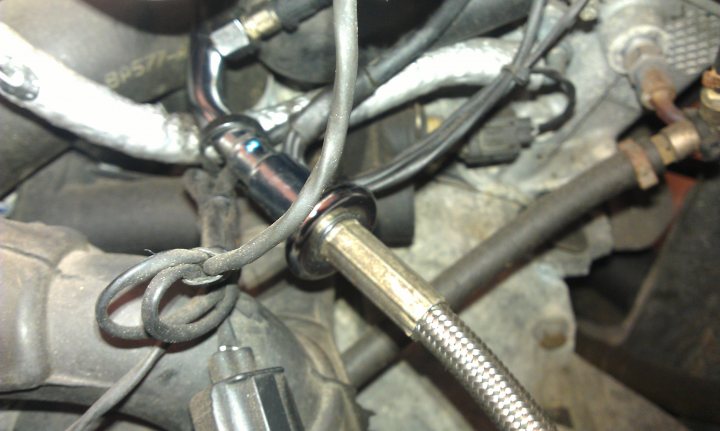
Flickering Battery Light at idle
Rewire the three wire plug on the alternator as per the picture.
Cut the top wire, which is black on UK cars, place a eyelet crimp on the end (6mm hole diameter), and attach it to the alternator main power cable stud.
Insulate the cut off wire in the loom.
Cable colours different as this picture is from an American car, but the desired wiring is the same.

==============================
M12 Dimensions
- Length 4089mm
- Width (inc.mirrors) 1885mm
- Height 1143mm
- Wheelbase 2438mm
- Max/min legroom 1120/980mm
- Headroom 930mm
- Interior width 11360mm
- Kerbweight 1050kgs
Parts and Part Numbers
Air Filters - (for 2.5l) are K&N R-1380 - see http://www.filterpower.co.uk and https://secure3.easyspace.com/www.filterpower.co.u...
Headlamps - GTO / GTO3 5 3/4" Headlamp, main/dip/side. Cibie p/n:8482371. See: http://www.larkspeed.com/index.pl?p=8482371&a=...
Indicator relay for led indicators (2.5 3 pin relay with pinouts 31, 49 and 49a) - CF13 GL-02
Oil- Factory recommends Shell Helix Ultra 5W/40 Fully synthetic. Also Mobil 1 recommended by some tuners/racers.
Oil Filter- (Ford) Part no. 4628534 (Ford: 120FO0130 & Mann: W920/45) (Ford new part no. 5191626)
Oil Pressure Switch (3 Litre) - 1U5T9278BA sometimes listed under 51162
Sump Plug with washer (2002 M12 GTO)- (Ford) Part no 3051079 (12mm) 4.44 incl VAT. (Ford: 116FO0040)
Spark Plugs - Motorcraft AGSF32WM/4 527 158 - 40thou gap
NGK BR7EFS as recommended by Yellowshed gapped to 0.025" or 0.65mm
Fuel Filter - Sytec Motorsport Bullet (15mm in/out) - http://www.fuelsystem.co.uk/filters.pdf
Fuel Pump M400 - Bosch 0 580 254 979
Lambda sensors
Part numbers
1001702, 96BB-9F472-BA - Ford Cougar V6 Lambda, SENSOR ASSY C85432, D4 (WP), Ford Cougar V6 Lambda
Available from Ford.
NGK LAMBDA SENSOR OZA216-D2 0190 - replacement for Ford 1001702
Coolant Fan Switch- Intermotor - part number 50173
Battery - type 075
Rear Hub nuts -Improvement over standard part (which can become loose) - P999.084.641.01 LOCK NUT (Porsche Boxter part)
Wheel Nuts - M12x1.5mm pitch with a 60 degree seat and a 19mm A/F hex
ECU
M400 - MBE 975D
Others .... please add
One way valve in the overflow petrol tank pipe - part no is89f8-9a 153-ab 8z02a,it does not show on the parts computer but is listed under ford escort zetec 150 ps
3R Headlight units
all items are hella
main beam/sidelight unit
1KO 008 191-00
HR-2 12,5 04 HR
main driving lamp (projector)
1BL 008 193-00
HC-6 04 HC
Alternator belt
According to Noble Parts, the [b]Gates 6PK 1708 belt is the correct one[/b]
6PK 1705 (6 ribs 1705 long)
6PK 1700 (also fits fine and cured squeak on M400)
6PK 1238 for cars with air-con removed AND Daddysumo's smaller crank pulley fitted.
available from any motor factors
Alternator
Ford Cougar 2.5 (2002) - Euro car parts - P/N: 401591231 or 401591230 or 401591232
Crank pulley bolt is torqued to yield and should be replaced. Part number Ford 3675106. Tighten in 4 stages - 120Nm, release 360 degrees, 50Nm, tighten 90 degrees.
If your are in the USA the Alternator / AC belt Tensioner is Ford Part F8RZ6B209AA and the idler pulley is Ford #98BZ8678AC
Water Pump Belt
Motorcraft 5L8E-8K543-AA
Finis Code 59X28DO5 Part No 4513849
Reversing light switch
3R 6 Speed gearbox - Ford part No. 1444282 Switch Assembly, Mondeo ST220 from about Mar 2003 onwards.
Also for the 6 speed- Ford part no. 1805255 Switch Assy- Reversing Lamp
Water pump tensioner – FORD FINIS Number 4173397
Water pump tensioner bolt –FORD FINIS Number 7106178
2.5L Idler Pulley- Gates Drive/Align Part Number T36199 (7803-21299)
M12 GTO3R Rear Ball Joints
From PEUGEOT 406 - Part Number - 3640.34
DELPHI - Part Number - TC368
QH - Part Number - QSJ1184S
M12 GTO Dip stick
Original part number F53E-6750-CA. This was replaced by F53E-6750-CB Mondeo
Front Brake Pads- Ferodo DS2500. Part number FRP3083H from Camskill £107 for fronts
Rear Brake Pads- Ferodo DS2500. Part number FRP3083HS (bit machined off) from Camskill £129 for Rears.
TDS gasket for machined groove- FORD FINIS Number 4802294
TDS gasket for flat face (no groove- FORD FINIS Number 4763355
Suspension Torque Settings
FRONT SUSPENSION Torque setting
Upper & lower A - Arm inner bushes 140 Nm 103 lbft
Upper A-arm outer ball joint mounting block to upright (Loctite 243) 60 Nm 44 lbft
Upper A - Arm outer ball joint 60 Nm 44 lbft
Lower A - Arm outer ball joint 60 Nm 44 lbft
Wheel bearing bolt - end nyloc nut 220 Nm 162 lbft
Shock mountings, upper & lower 100 Nm 74 lbft
Tie rod ends to upright 60 Nm 44 lbft
REAR SUSPENSION Torque setting
Upper A - Arm inner bushes 140 Nm 103 lbft
Upper A - Arm outer ball joint 60 Nm 44 lbft
Lower A - Arm inner front bush 140 Nm 103 lbft
Lower A - Arm inner rear bush & inner track rod joint 140 Nm 103 lbft
Lower A - Arm outer bush & outer track rod joint 140 Nm 103 lbft
Shock mountings, upper & lower 100 Nm 74 lbft
BRAKES Torque setting
Front & rear caliper mtg bolts + Loctite 243 60Nm 44 lbft
Front disk-bell, retaining bolts (use AP Mtg.kit) 14Nm 10lbft
DIFFERENTIAL & GEARBOX
Standard 5-speed box: MTX-75
Ford MTX75 Part Number 1206944.This Box was only fitted on the very first of the MK3 Mondeo Up to 15-10-2000
Apparently this is now obsolete and the replacement is P/No 1232410. fitted to the Mondeo From: 15-08-2000> With a 3.82
Quaife ATB LSD for standard 5-speed: QDF20Z
Standard 6 speed gearbox MMT6 Getrag unit (derived from ST220 only for correct ratios)
Quaife ATB LSD 6 speed part No:QDF41Z
Tel: 0845 1307400, http://www.quaife.co.uk/Ford-Contour-USA-MTX75-Qua...
Fidanza Aluminium Flywheel for 5 Speed MTX-75 box - Part Number - 186251
Fidanza Aluminium Flywheel for 6 Speed MMT6 Box - Part Number - 186251
[ Supplier - www.ultrarev.com ]
OR TTV Noble Flywheel (4.2 kg, the same weight as the Fidanza flywheel) - http://ttvracing.com/product/noble-ford-3-0-v6-tur...
TTV never sell directly to the public but it might be worth a try. Otherwise they can be purchased from Jetstream - www.jetstream.co.uk
Original Noble Flywheel - Same as an Mondeo ST200 - Buy from Ford
===========
CLUTCH PARTS
===========
Clutch Slave Cylinder - Modified AP Racing Part - Noble Part Number - M12CLU03 (AP Racing Part Number - CP3859-10 [Soon to be superceded by CP6859 - Double Check before purchasing]
Clutch Plate & Cover - Buy together as a unit, or buy the cover separately and then buy the sprung plate clutch (ok up to 400lb ft torque) or the paddle clutch (will handle up to 650lb ft and beyond...)
Buy from the usual Noble dealers and garages.
===========================
MMT6 (6 SPEED) GEARBOX PARTS:-
===========================
========================
MMT6 Gearbox Selector Forks (Pretty sure they're all metal forks now (2015), but DOUBLE CHECK to be sure)
========================
1st & 2nd Gear - Ford Part Number - 1374959
2nd & 3rd Gear - Ford Part Number - 1374958
5th & 6th Gear - Ford Part Number - 1371699
Reverse Gear - Ford Part Number - 1371700
The metal ones look like this (see pic below). Note the nylon tips. Sometimes if you have gear selection problems, worn tips are the cause of it. You can't buy the tips, so the whole selector fork has to be replaced.
Driveshaft Seals (2 needed) - Ford Part Number - 1543933
Bell Housing Seal - Ford Part Number - 1807604
Hex Bolts (10 needed)- Ford Part Number - 1663348
=======
SYNCRO RINGS
=======
1st, 2nd 3rd & 4th Gear Syncro Rings (same part number for all 4) - Ford Part Number - 1712553 [Number 4 on Diag 1 below]
5th & 6th Gear Syncro Rings (same part number for both) - Ford Part Number - 1474007 - [Number 4 on Diag 2 below]
Reverse Gear Syncro Ring - Ford Part Number - 1474849 [Number 21 on Diag 2 below]
==========
ROLLER BEARINGS - (Not always necessary to replace but recommended by my gearbox guy to help with gear selection issues)
==========
1st Gear Needle Roller Bearing - Ford Part Number - 1227471 [number 3 on Diag 1 below]
2nd Gear Needle Roller Bearing - Ford Part Number - 1227473 [number 8 on Diag 1 below]
3rd Gear Needle Roller Bearing - Ford Part Number - 1227475 [number 12 on Diag 1 below]
4th Gear Needle Roller Bearing - Ford Part Number - 1227482 [number 16 on Diag 1 below]
5th Gear Needle Roller Bearing - Ford Part Number - 1227479 [number 9 on Diag 2 below]
6th Gear Needle Roller Bearing - Ford Part Number - 1227482 [number 13 on Diag 2 below]
Reverse Gear Needle Roller Bearing - Ford Part Number - 1227479 [number 3 on Diag 2 below]
==================
DIAGRAM 1 - GEARS 1 TO 4
==================
imag
==========================
DIAGRAM 2 - GEARS 5, 6 & REVERSE
==========================
upload a gif
=========
GEARBOX OIL
=========
Ford 75W/90 1 Litre Bottle - WSD-M2C200-C WSS-M2C200-D2 - Ford Part Number - 1790199
[NB - You need to buy 2 litres as MMT6 Gearbox Capacity is 1.75 Litres]
OR Royal Purple Synchromax Manual transmission fluid - 1 QT. bottle (0.946 litre) (Many US Noble Owners swear by this compared to the OEM Ford Oil)
[Again, remember to buy 2 bottles]
Buy from here in the UK - http://www.monkfishperformance.co.uk/royal-purple-...
Or try eBay UK or Amazon UK as they sometimes stock it.
[BOTH ARE FINE TO USE WITH AN LSD - SPOKE TO QUAIFE AND THEY SAID THE STANDARD FORD OIL IS FINE WITH THEIR DIFFS]
========================
BALL JOINTS:-
Ball joint front lower opel made by firstline part no FBJ5030
top ball joints front and rear GT03 32mm dia hole in alloy block
replacement stub axles and bearings to replace Noble parts
part no wheel hub febi/bilstein 19090 ford pkw
bearing SKF VKBA3575 (Febi/Bilstein 19265 ford)
All parts purchased from Andrew Page ltd .01733 340177 speak tp Paul Kendle
(Additional info on Hub/Bearing: OEM number for bearing is 5 027 620, Hub is 7 346 525
The 19090 or (7 346 525 as 19090 is specific to Febi) is an uprated stronger hub and uses a 40mm bearing as apposed to the std noble hub that I believe is a 42mm bearing. So if a new hub is required then use the two OEM cross ref numbers and do both sides as they are stronger. If you need just a bearing then make sure you get the right size for type of hub.
(updated 20/2/17)
Nissan gasket details
manifold to turbo 1441517-m00 cost £10.50 + vat
turbo to down pipe 1444579-e00 cost £19.78 + vat
Paint Codes
Azure blue- CHRSBE - Chrysler paint .PPG paint system.
Formula is
D763 828 grams
D776 1352 grams
D754 1610 grams
D755 1808 grams
D753 1875.2 grams
D752 1934.6 grams
This will make 2 litres
Mallory Green- PPG paint system
Formula is
D797 1157.6
D740 1376.0
D754 1569.6
D770 1722.8
D742 1853.4
D759 1909.8
This will make 2 litres
Technical questions
Air-con - What's the recharge weight of refrigerant needed?
Noble state 1KG but 950g has been suggested by a few people. Lubricant is PAG oil ISO 100
Hub nuts. What's the Porsche part number?
P999.084.641.02 (or .01) LOCK NUT. It's a Boxter part and costs under 3+vat. You do not need to drill the hub, it will be fine as is. Hub nuts only needed for the rear of the car, the front nuts are a different size and do not work loose anyway.
Tyre Pressures - what are the recommended pressures for M12 and M400?
M12 - Front: 18psi Rear: 27psi
M400 - Front: 20psi Rear: 30psi
Torque settings
Wheel bearing: 270Nm
Wheel nut: 130Nm 95 ft/lb
BUT FOR THE WHEEL NUT TORQUES...
--- Noble Automotive states: 120Nm - 88 ft/lb
--- Bespoke Performance states: 102Nm - 75 ft/lb
Note entered 240517 (AMG Merc)
Manifold Torque Settings
Battery - What type and where is it?
It's a type 075 and it's on the floor of the engine bay just behind the driver. To change it, lift the car and undo the floor plate for access. You cannot remove it from above.
Upgrades
Who produces performance parts?
What does the Roush exhaust look like?
 |
 |
 |
 |
 |
 |
 |
 |
 |
On the car:-
 |
 |
 |
 |
Power curves :-
- Power Developed - Baseline V Cats
- Power Developed - Baseline
- Power Developed - Cats
- Power Developed - No Cats
What are they for?
The intercooler reduces the intake air temperature, thus providing denser air available for more fuel to be added and thus more power. The cooler the air the better, turbo's heat up the air during pressurisation, the intercooler is there to bring the temp back down again.
Third party Intercoolers:-
An improved performing IC was produced by Faulks Performance (manufactured by Pace Products). This improved flow and reduced the time to heat soak providing more power and better throttle response.
Other enhanced ICs are available from Pro Alloy and Noblemods. These ICs have not been back-to-back performance tested.
The Pro Alloy version is used in at least one Noble racecar and compared with the FP version provides better flow, releases more hp and has more resistance to heat soak. Further track testing on the PA version will continue during 2007.
Brake Disks
Standard disks are drilled.
Slotted or groved disks provide a better "feel" and are generally easy to modulate. They also cope with heat better than drilled version and are more resistant to cracking.
Slotted AP discs are available from Plans Motorsport and main dealers. The rear disks are also now available for the M400/3R/3. Slotted/grooved discs are available for the rears on 2.5L cars.
AP330 Front Grooved Disc LH
AP330 Front Grooved Disc RH
These are genuine AP discs AP Part Number CP3580-1131/0-CR8 - usual retail price 253.28 inc VAT plus shipping each.
CP2494-18 Bell fitting kit
These discs are a straight swap for the standard discs and are an easy DIY fit.
Front discs (grooved AP Racing) come as rotors only, and you need to get fitting kit to attach them to the bell (12 nuts/bold for each side).
Removal of old nuts/bolts may be problematic as they tend to weld together with the heat.
Note that you need 3/16AF Allen key for the bolts (Latest ones use torx heads so you need a female torx socket).
The torque for the bolts is 11 lbs/ft or 14 Nm
Bedding-in procedure for new discs (note - use old pads) from AP Racing site below
http://www.apracing.com/info/info.asp?section=Disc...
Brake Pads
Standard pads are ???
Optional pads in order of hardness are
Ferodo DS2500
Ferodo DS3000
Pagid RS19
Pagid RS29
One Owner Comments:-
"I've tested the stock pads, DS2500's, DS3000's and Pagids. I believe that the best combination of the ones that I've tested are the Pagid's* and the AP grooved front disks.
DS3000's will stop you quicker than DS2500's but overheat the disks under hard track/race use and cause the brake fluid to boil . They are also more snatchy (lockable) than the 2500's although you can cure this by adjusting the dampers.
With the Pagids you'll get better brake modulation (feel) and they don't require warming up to function which is important for road use. They do squeal at low speeds.
Note that I don't use extra ducting for brake cooling. The DS3000's actually roasted the rear disks as well as the fronts and I doubt that we could have done much about their temperatures with extra brake cooling hoses. What did make the difference were simply better pads."
Tips
D_G reports - My handbrake has always been pretty bad and after trying a quick adjustment which didn't feel right took the disc off and found one of the shoe linings laying in the bottom of the drum. I've also had an intermittent scraping noise from that side recently which now adds up. Looks like a previous service dealer has got a bit overexcited with the adjustment as the other side is still OK.
Ordered some new shoes from the factory today but would recommend anyone with a dodgy handbrake to have the shoes looked at and not just adjusted through the discs.
Found the driver's side footwell full of water a couple of weeks ago after leaving it in the heavy rain and found that the floor of the car under the front clam on the driver's side had a small pool just sitting there (presumably flowing down off the windscreen and then seeping slowly into the cabin). Wondered why this had never happened before and found that the floor has small holes drilled in (I guess to drain any water flowing in) but they were full of stones/grit that had collected over time and were acting as plugs.
Fuel Smell
Fuel smells in the cabin and around the car are most likely to be from the breather pipe.
The pipe runs from the filler neck between the cap and tank. Its purpose is to vent the tank as it gets hot and to allow air in as the fuel level goes down. It also acts as an overflow of you overfill the tank.
The pipe runs into the compartment behind the panel in front of the rear NS wheel. It should poke out of the panel to atmosphere. Often the end of the pipe perishes and it pulls back into the compartment. This means the tank vents into the sill and compartment area and can trap the smell. It also means that any overflow can run straight into the compartment.
The most common modification is to use a P-clip to trap the pipe using one of the bottom screw holes holding the panel in.
In some cases, the smell can be from a fuel leak. This is most likely to be from a connection inside the pump/filter compartment. The seal may also have failed in the filter causing a drip where the two halves connect. obes.
Fuel line Removal from fuel rail
There's a special tool that releases the fitting - it slides in from the rail side, and moves a spring out of the way so that the connector can come off. Tool is pretty cheap - you can get a plastic one for a few bucks. Or, you can get a little piece of metal tubing (something that fits around the tube coming off the fuel rail, around .063" wall thickness), split it in half lengthwise, put it around the tube coming off the fuel rail, and push it into the connector, then pull off the connector. Or, use something like a thin, flexible piece of plastic, like a piece of a juice container, beverage bottle, or oil container. Cut a piece, wrap it around the tube, and slide it into the fitting until it bottoms out, then pull the fitting off the rail.
Picture of the fuel line connected the fuel rail
Picture of the fuel line out of the fuel rail
Picture of empty fuel rail connector
Picture of Standard Noble fuel line from pump to fuel rail, including fuel regulator
Noble Luggage Set - Fitting the Securing Clips
For anyone buying a luggage set, fitting the fasteners to the car which the bags clip into is a simple 15 minute process.
The luggage set comprises 6 bags:
2 large bags which sit behind the seats and are not clipped in.
2 bags which sit on the floor just infront of the seats - these are clipped to the seats.
2 bags which sit on the rear parcel shelf behind one's head - these are also clipped in.
All the fasteners are left fitted in the car, and the bags just clip in and out of them.
There are 7 fasteners:
4 velcro ones - these attach to the supports at the front of the front seats near the floor.
2 longish non-velcro ones with a loop on the end - these attach round the "seatbelt guides" on the rear parcel shelf next to the window.
1 "T" shaped one - this attaches to the middle of the rear parcel shelf with a self-tapping screw.
Fitting
The velcro ones simply wrap around the front seat supports and fasten to themselves:
 |
 |
The non velcro loop ones go round the seatbelt mounting point on the rear parcel shelf. Just pass the loop round the mount point, and thread the other end with the clip through the loop and pull to tighten it:
 |
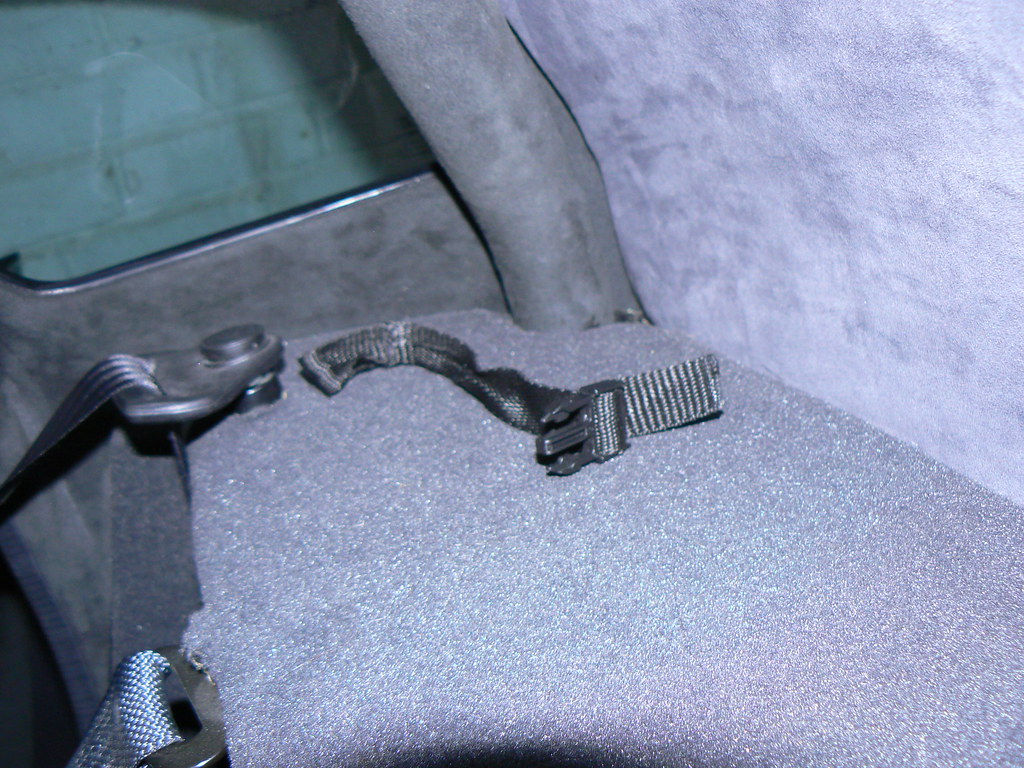 |
 |
Finally, the T piece goes in the middle of the rear parcel shelf. A short self-tapping screw (1/2 inch or so) goes through the piece of webbing with no clip on it and simply screws into the parcel shelf, leaving the 2 clips laying at the front of the parcel shelf just above the rear courtesy light. You will find that a short handled screwdriver comes in handy here, as a long one will catch the roll bar and roof and make things awkward. It may help to create a small pilot hole first with a "sharp pointy thing" (a bradawl?). It also can take a bit before the screw engages in the parcel shelf as the carpet is quite thick, but once it's engaged, it should hold very well when tightened.
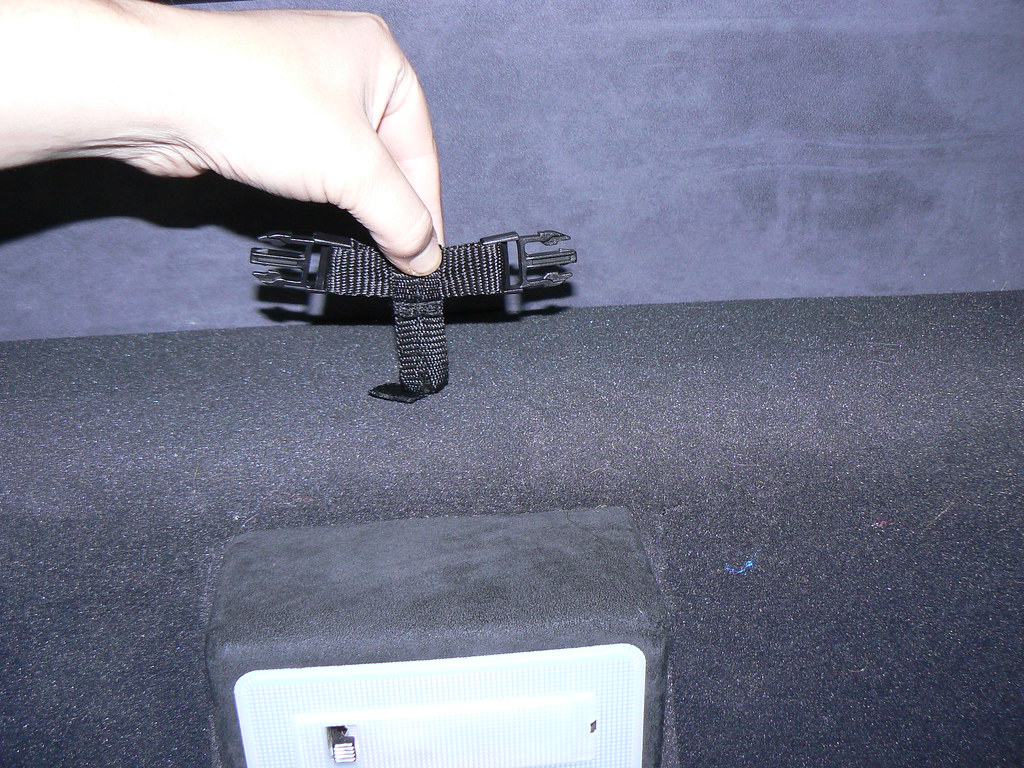 |
 |
More photos and larger versions of the ones above are available here:
http://www.flickr.com/photos/conradsphotos/sets/72...
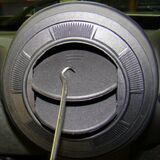
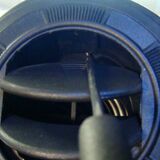
Removing dash air vents
The outer, fixed ring of the vents is held in place with 3 small screws that are hidden by the inner, movable piece. Use a small dental pick to pry down the latch of the inner piece, then it will pop right out, exposing the 3 screws.
======================
Conrad (C&C)
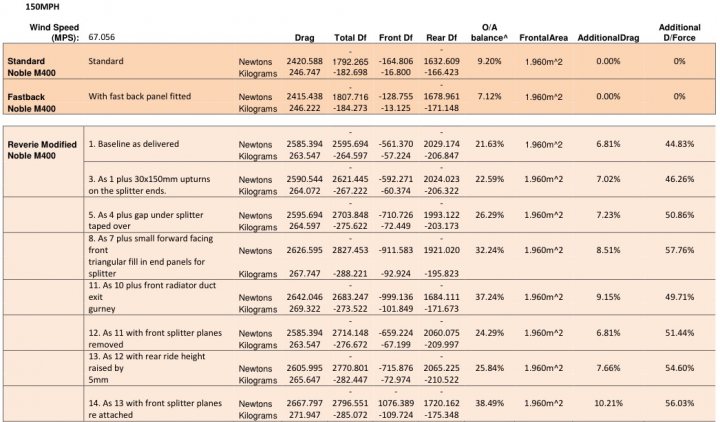
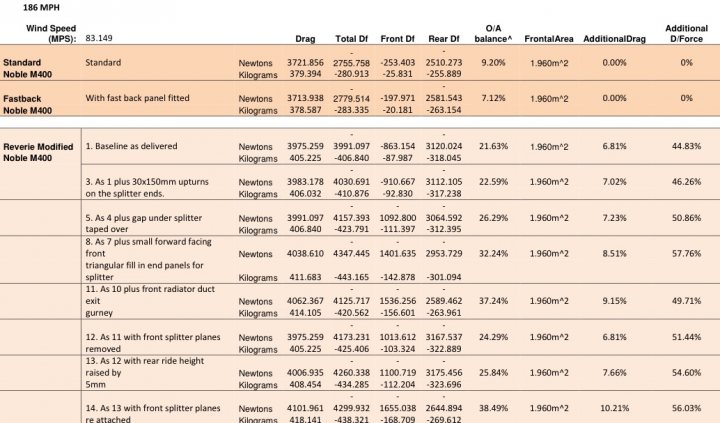
Wind tunnel Data (added 8/02/17)
Flickering Battery Light at idle
Rewire the three wire plug on the alternator as per the picture.
Cut the top wire, which is black on UK cars, place a eyelet crimp on the end (6mm hole diameter), and attach it to the alternator main power cable stud.
Insulate the cut off wire in the loom.
Cable colours different as this picture is from an American car, but the desired wiring is the same.