Reg Local's Performance Driving Articles Part 2
Contents
Reg puts his money where his mouth is - overtaking demo
Cornering basics 1 - assessing the bend (limit point)
Cornering basics 2 Assessing a bend without the limit point
Cornering basics 3 - linking corners
PART 1
PART 3
Reg puts his money where his mouth is - overtaking demo
It's all well and good writing my ramblings on here, but sometimes things need to actually be demonstrated before they make complete sense.
I had a run out with my two lads today to watch a rally, and there was a bit of charge left in the video camera battery once the stage had finished. Rather than waste it, I got my eldest to video part of the drive home. I've edited the footage down to show a small assortment of overtakes. I haven't commentated on the video for various reasons, but I've listed a few notes on the overtakes below.
There are several things to bear in mind when watching this. Firstly, the quality is quite poor. That's down to a combination of a quite bumpy road, an inexperienced cameraman and quality loss through uploading. I take no responsibility if you get travel sick watching it. Secondly, a video such as this is very restricted in view, so on a couple of occasions, I'm going out on an overtake in areas where it seems the view is restricted. I can assure you that the view wasn't restricted for me, as it seems on the video. Thirdly, watching the video back, my following position looks quite close. This is down to the limited depth of view from the video camera, and out on the road, my following position was mostly fine. Finally, all the overtakes took place on national speed limit single carriageway roads.
Oh, and this isn't a willy-waving excersise, it's just a practical demonstration of some of the stuff I've been going on about.
Overtake 1 - silver Skoda.
Whilst in the following position, you'll see me move my car nearside and offside to obtain a view ahead. The overtake itself takes place on a left hand bend, and it appears that I have a limited view. This isn't the case - the nearside of the road was lined with well-spaced trees, and I had a good view up the nearside of the Skoda before moving out.
Overtake 2 - Transit pick-up.
This was a relatively slow-moving vehicle which I followed for a short while, and overtook on a straight after a left-hand bend. I moved sideways, but delayed the acceleration slightly to make sure that nothing was emerging from the building on the right.
Overtake 3 - Silver 4X4.
This was a classic overtake off a right-hand bend. I closed my following position up to less than 2 seconds and positioned nearside. Although the two on-coming cars prevented me going immediately, they passed very quickly and the overtake was clearly on straight after they had passed, so I didn't drop back to 2 seconds.
Overtake 4 - Ford Mondeo.
Lots of interesting stuff going on here! I took my time getting into the following position, as the road was, initially, quite tight and governed by double white lines. I had to hold back for two on-coming cars, and at the point I went, I was conscious of a crossroads junction ahead - you can actually see a silver car approaching the junction and turning left towards me. In spite of this, the Mondeo was travelling fairly slowly, and I knew I could easily pass it well before the junction. After the overtake, you'll see the silver car emerge, which is a good example of why you should avoid overtaking with a junction to the right.
Overtake 5 - BMW 7 series.
A nice one, off a left-hand bend. On the approach to the bend, I initially moved left for the view, and then moved right to keep the nearside view. As we rounded the corner, I saw that the overtake was on by keeping that nearside view, and then confirmed it with an offside move prior to accelerating. It may look like there was a blind farm entrance to the right as I accelerated, but in reality, I had a nice clear view into it.
Overtake 6 - VW Golf.
This was more of a rolling overtake really. I had plus speed on the Golf, and it the overtake was clearly on from some distance back. One slight error though - I moved nearside after the pass, and then back offside for the left-hander. Staying offside after the pass would have been better.
Anyway, enough waffle - here's the video...
http://www.youtube.com/watch?v=V4OZwy6Piao
Enjoy.
Thread
Cornering basics 1 - assessing the bend (limit point)
This is the first in a series of articles on cornering, and to make it easier to understand, I've been out and taken some photographs. I only hope that I manage to post them properly, otherwise this will make as much sense as quantum mechanics if the pictures don't come out.
Anyway, for the first couple of parts in this series, I've decided to look at something else that is considered a bit of a "black art" - assessing the severity of bends. There's not really any secret to it, but I've heard some ruddy complicated explanations in the past, so it's not surprising that some people think it involves voodoo. I'll try to stick to my mantra of KISS - Keep It Simple, Stupid - and you'll probably find that, actually, it's quite straightforward and that you probably use a lot of these skills already.
THE LIMIT POINT
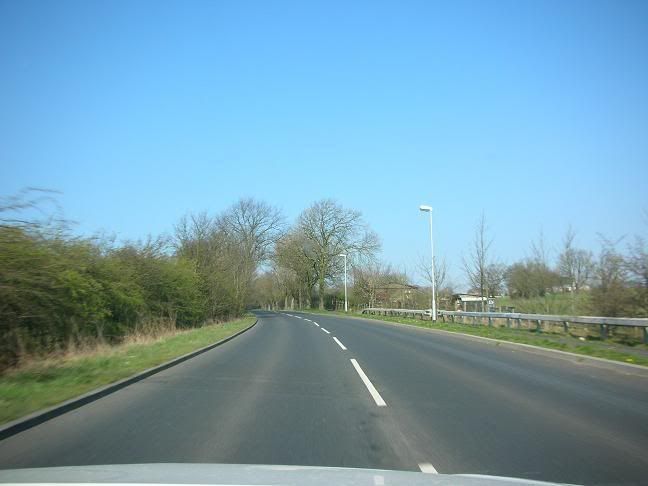
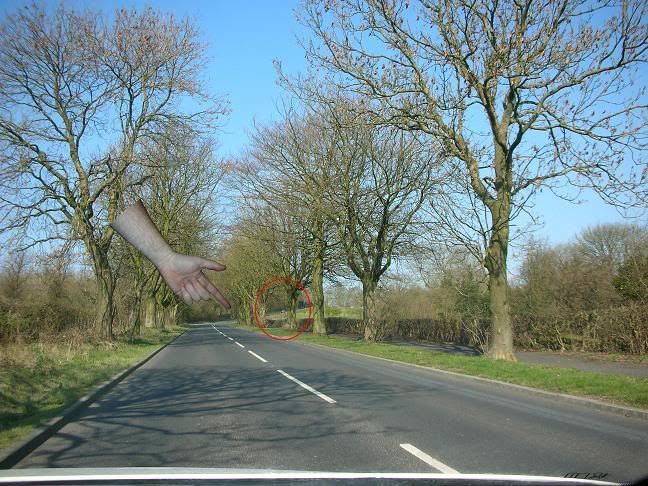
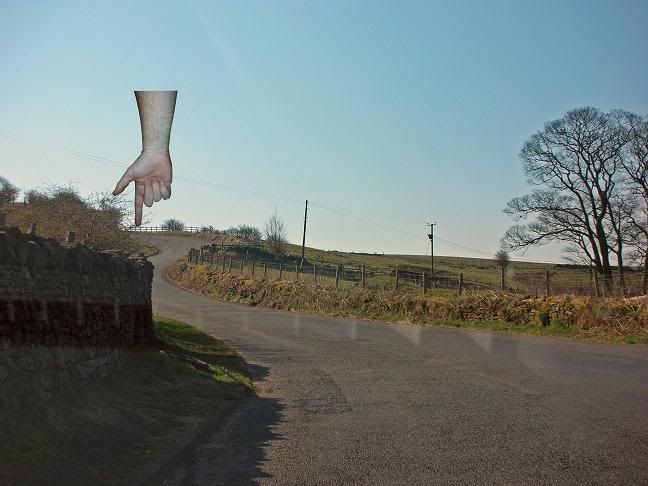
Let's deal with this little chestnut to start with, as it's the one that most people struggle to get their heads round. Have a look at this picture of a section of road - you can see a straight piece of road over a motorway bridge, followed by a left-hand bend in the distance...
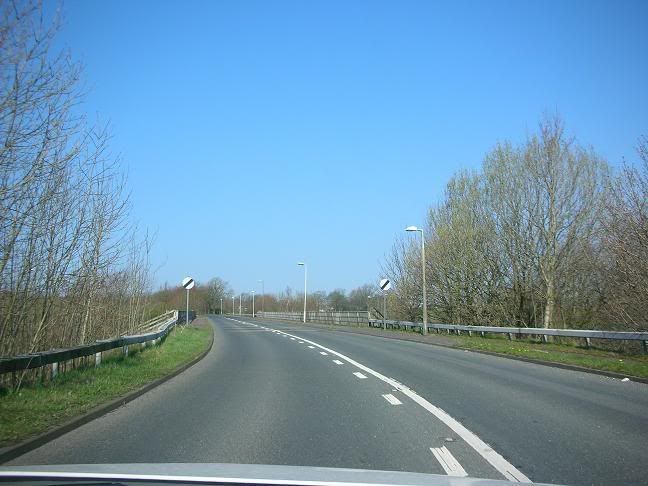
Now, there's plenty to look at - it's obvious we're coming off a left-hand bend with double white lines, there are some NSL signs, the road goes over a bridge, there are some street lights on the offside, some rumble-strips which are, presumably for traffic travelling towards us, a change from double white to hazard lines, and, right in the distance, you can see the limit point for the left-hand bend.
What? Oh, sorry - I didn't explain - the limit point has been described to me as "the furthest point at which you have an uninterrupted view of the road surface", which sounds a little pompous, and "The point at which the nearside and offside verges seem to meet", which is a bit better, but the opposite verges of a road don't actually meet, do they? That'd be silly. A better description would be "The furthest point you can see the road surface" - less pompous I think, and straight to the point. Straight to the limit point, in fact.
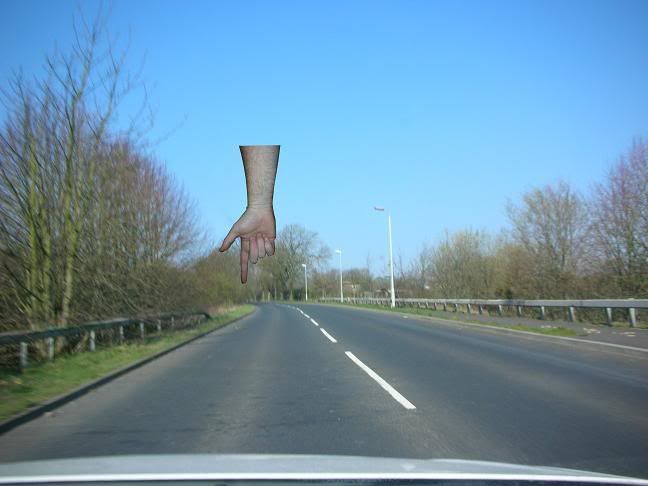
For the next few pictures, however, I've recruited an assistant in the form of the hand of God, who will point out the limit point for you (Obviously, in these politically correct days, it doesn't have to be the hand of God - insert "Allah", "Brahman", "Ishvara", "Vahiguru", "Senna" or whatever else takes your fancy).
Anyway, here's the same picture again, with the limit point indicated...
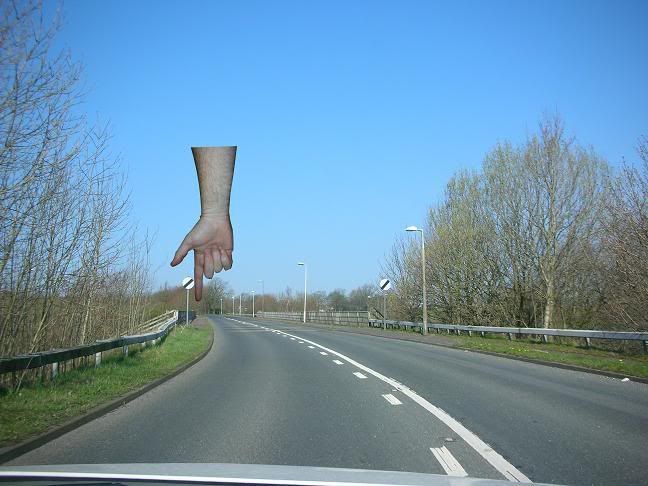
As you can see, the limit point is waaay in the distance, but although the driver may be performing other actions at this point on the road, such as changing to a flexible gear, checking the mirror and preparing to accelerate, they'll be paying some attention to that limit point, as it will help them to determine the severity of the next bend, and assist them in mentally preparing a plan as to how to drive through the corner.
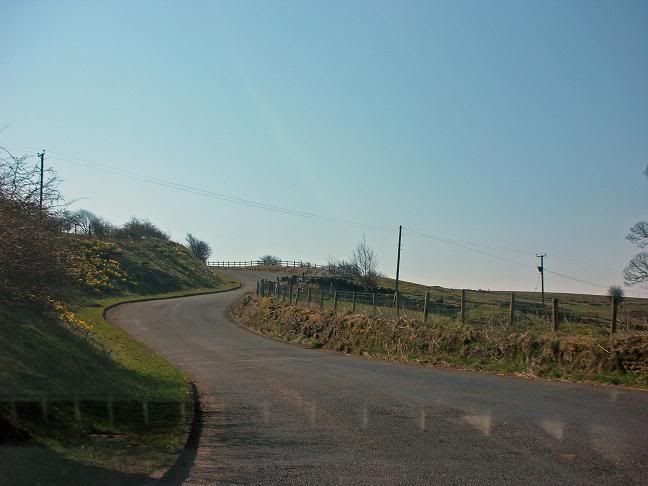
The thing to look for with a limit point is it's relative position to you as you approach. If you seem to be getting closer to it as you approach the bend, then the bend will be quite tight. If it seems to be remaining a constant distance from you, as, for instance, a rainbow does as you move towards it, then the bend isn't getting any tighter. If the limit point seems to be going further away, then the bend is opening up and the road is straightening.
Lets recruit Gods help again, and look at where the limit point is after we've moved a short distance up the road...
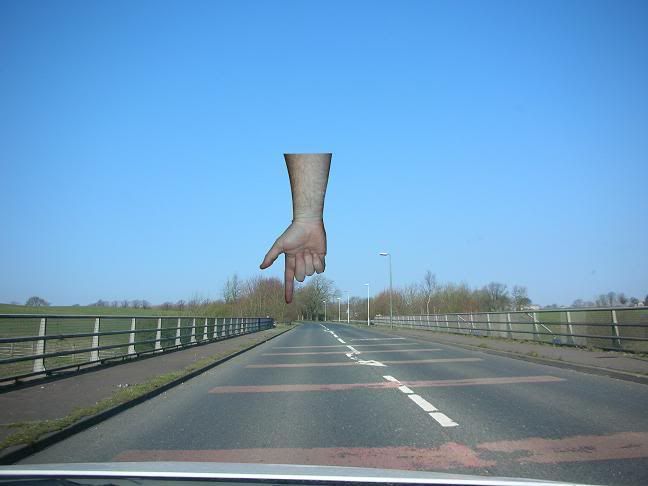
Right - we've moved forwards onto the bridge now, the driver will be accelerating at this point, and their focus will be towards the corner. Look left from the bend, across the adjacent fields, to see if there is a view of the road, as this can assist in assessing how tight it is. In this case, there isn't a view to the left, so we're relying on the limit point to show how tight it is. With help from the hand of God, you can see that we appear to be getting closer to it.
Let's move a bit further forward...
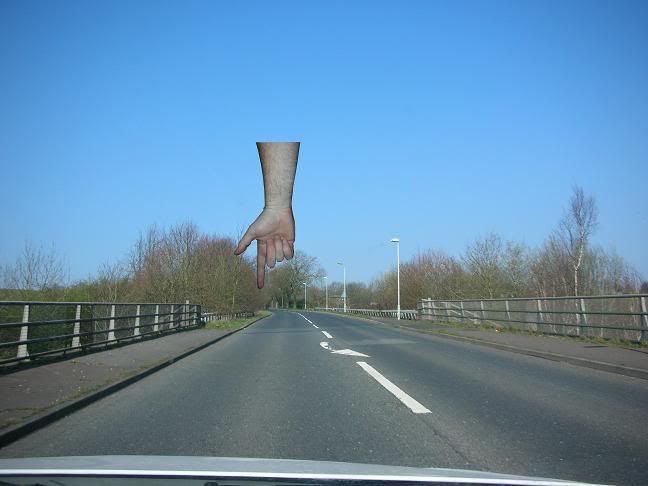
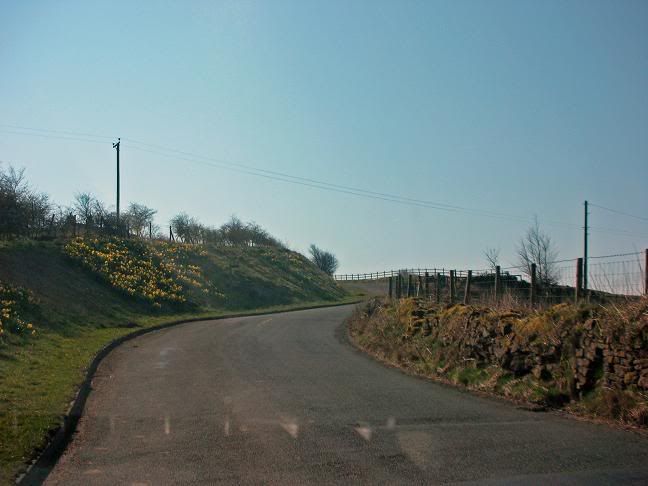
We're halfway across the bridge now and we're still getting closer to the limit point. There are some other clues as to how tight the bend is though, and they're in the form of what you can't see, more than what you can see.
You can't see a triangle warning sign for the bend, you can't see a chevron board to the left, you can't see a change back to double white lines and you can't see a "SLOW" painted on the road. The fact that you can't see these things is an indicator that the bend won't be particularly tight.
One other thing - take notice how many lamp-posts you can see to the right in this picture, as it'll give you a guide to how far forward I'm moving, and what the limit point is doing. In the above picture, you can see four lamp-posts.
Let's move on again - God, it's over to you...
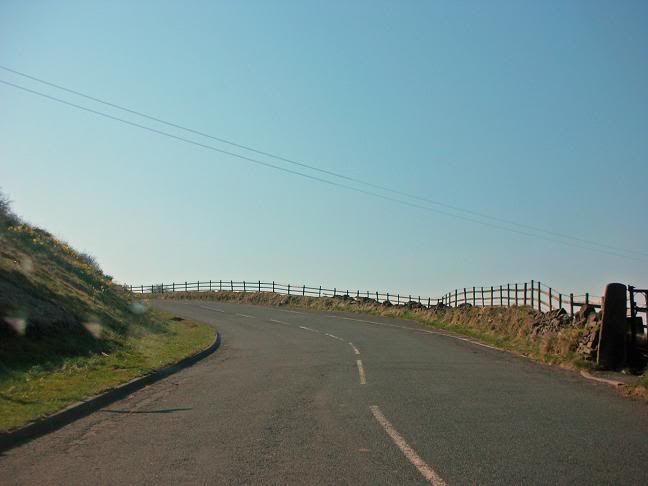
From this one, you can see that I've moved forward by one lamp-post, and now the limit point has started moving forwards too. This is a critical point, as, when you're driving through this bend, the limit point is now acting like a rainbow, and moving away at the same rate as we're driving towards it. As we're still a distance away from the bend, this means that it's going to be a quite open corner, so we're unlikely to have to lose much, if any speed to negotiate it.
On to the next one...
Well, we've only moved forward another lamp-post, but things have changed quite dramatically on the limit-point front. So dramatically, in fact, that in that short distance, the limit point has shot off away from us, and no longer exists, so we've nothing for the hand of God to point at any more. Look at where we are on the road - we're only just entering the bend, and yet the limit point has gone completely, and we can quite happily accelerate through the corner.
Obviously, it's very easy from that position to see that the corner is nice and open, but if you've paid attention to the limit point from when it first becomes visible, then you can work out how open or tight the bend is from much further back, which obviously helps you to make your all-important driving plans.
There are many more ways of assessing the severity of corners, and I'll look at them next time.
Thread
Cornering basics 2 Assessing a bend without the limit point
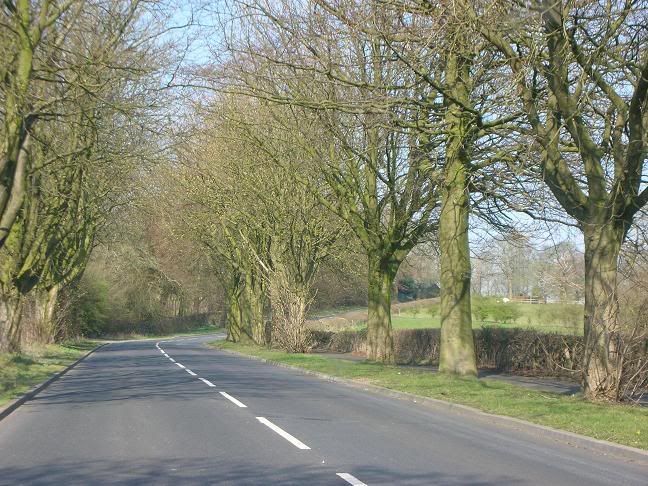
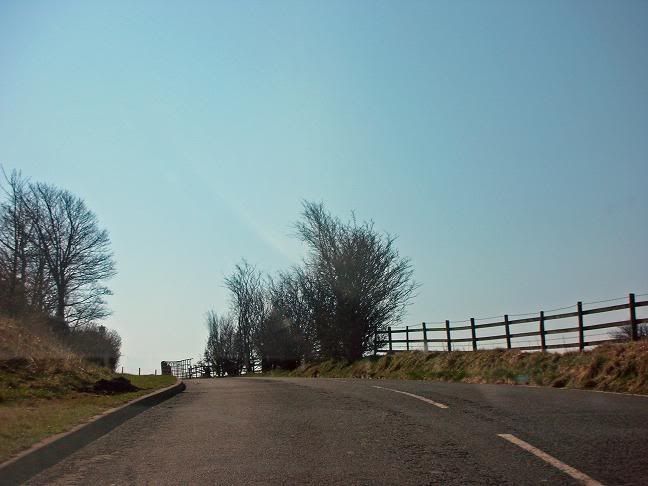
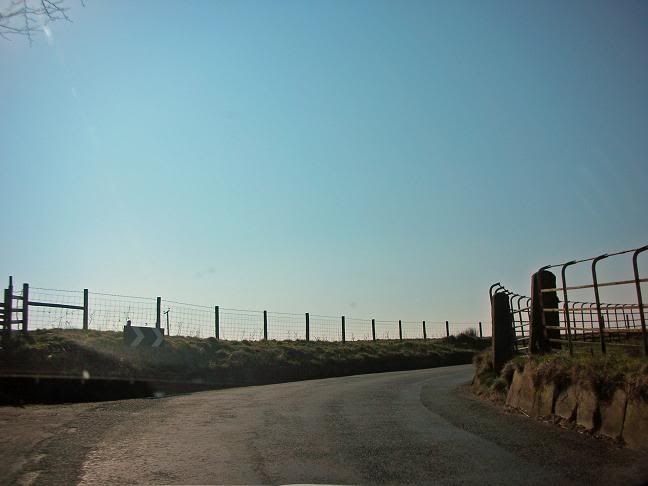
There was considerable debate following my last post as to where the road went next. Debate no more, for all is revealed - a short straight, followed by a right hander...
Now, let's consider this next bend - as with the last one, it'd be fairly easy to assess using the limit point - I've got the hand of God to point it out again...
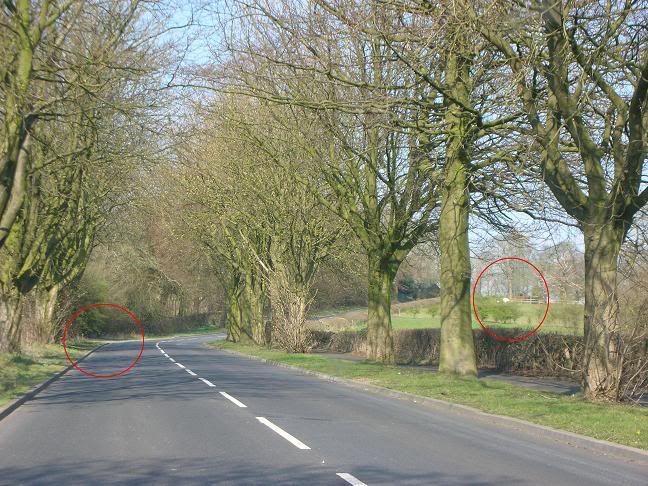
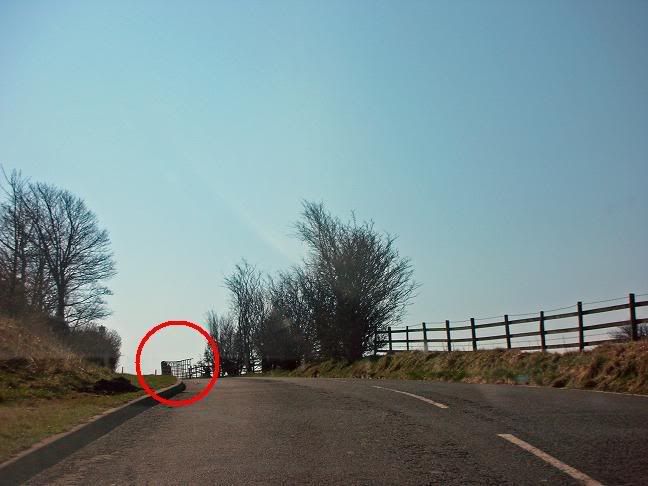
In this case, however, if you extend your observations a little bit - "look outside the box" a little, you'll pick up enough clues to allow you to assess this bend properly without having to use the limit point at all. The next picture is the same as above, but with the essential area circled...
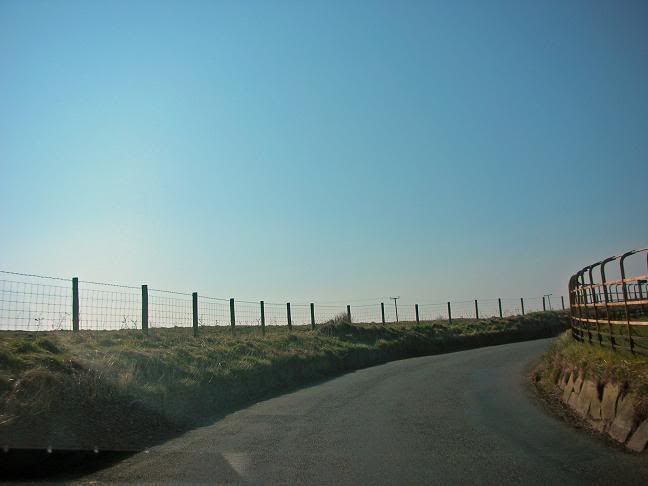
In the circle, you'll see the road continuing uphill to the right, and you can also see a car travelling towards us. This shows you, almost immediately, the angle of the upcoming corner. It allows you to plan your position on approach, to get your speed and gear correct for the corner, and to plan the line you'll take as you drive around it. Let's move a bit closer to the bend...
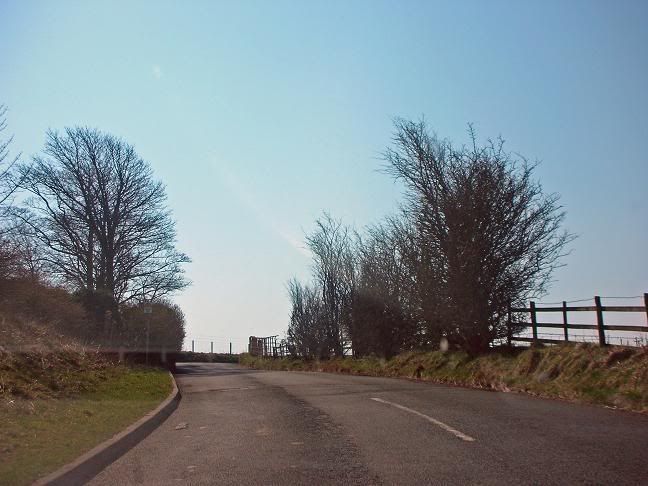
Now, we're getting to a point where you'll be getting your speed and gear correct for the bend, and planning your line through it. Two potential hazards have come into view though - can you see them?...
There is an entrance to the left, right on the corner itself, which has a very limited view into it, and further up the road, there is a line of fencing which indicates a possible road off to the right. The presence of this road is confirmed by the small white car which is driving along it, towards our road.
Let's consider the entrance on the left first. Even without that entrance, if there are no on-coming vehicles, my plan would be to go offside through this corner - it gives you the benefit of making the radius of the turn as large as possible, so your car will remain as stable as possible through the corner. Another advantage of going offside through the corner is that this road appears to have been built with crown camber (raised in the middle and lower towards the edges to aid drainage). Now, crown camber can be a disadvantage when negotiating right-hand bends, as the slope to the nearside can destabilise a car, forcing it out towards the nearside. If you take an offside position, however, the crown camber actually helps you through the bend, keeping the car more stable.
There would be a third major advantage from taking an offside position through this bend. Remembering that we should always keep a zone of relative safety around us when we're driving, a move offside would keep you away from the entrance, and away from any vehicles which could potentially emerge.
Clearly, the plan would be different with on-coming vehicles present, and in that case, you'd have to lose more speed for the corner to allow you to remain safely on the nearside of the road, albeit towards the centre-line, away from the entrance on the left.
As for the junction to the right further up the road - it shouldn't alter our plan for this corner - if the white car emerged and turned left towards us, it wouldn't be anywhere near the bend when we negotiate it, but it could have some implications. Approaching it after the bend, you should be wary of other vehicles emerging or turning into th junction, and you could end up coming up behind the white car if it's turned right, so an overtake might now form part of your future plans.
As far as this single corner goes, however, it's not really too relevant, but it does show the benefit of an extended view.
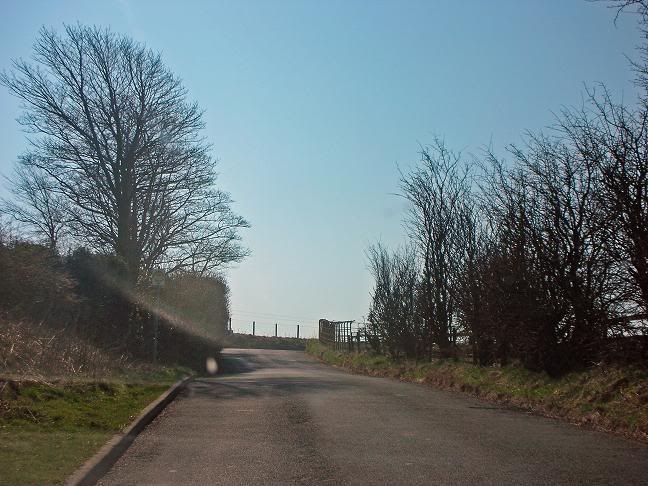
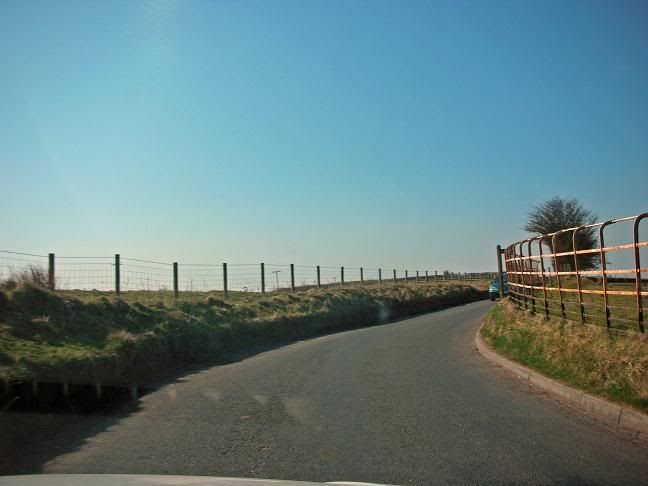
As we get to the bend itself, it all becomes clear and the plan should fit into place nicely...
The muddy tyre marks coming out of the entrance on the left confirm that it's used regularly, so we're absolutely correct to move away from it. In the distance, you can just make out the white car which has turned left towards us, so we've got a nice clear run through the bend, and plenty of time to return to the nearside, from where we'll consider the next hazard...
Thread
Cornering basics 3 - linking corners
As I hope I've shown in my last couple of articles, assessing the severity of bends is reasonably straightforward, but does take some practise, particularly if you're relying on the limit point. Over time, however, you should be able to get to a stage where you can consistently assess corners for severity, which obviously greatly assists in your ability to formulate driving plans.
It couldn't just be that simple though, could it Reg? A good driver should be like a good snooker player - whilst they're playing one shot, they're planning the next one, and thinking two or even three shots in front of that one. So if you've reached the stage where you can consistently assess individual corners, the next stage on the road to driving greatness (it's a very long and very winding road, trust me), is to start thinking beyond the corner that you're currently dealing with, and start thinking about the next one, and the one after that.
You see, getting one corner correct is all well and good, but if you're on a road with a series of corners, which would be pretty much every single carriageway road in the UK, then your position as you exit one corner greatly influences your position into the next one, and as you're probably aware, your position on the approach to a corner is vitally important in terms of improving your view, maximising the radius of the turn, and keeping the car stable and well-balanced.
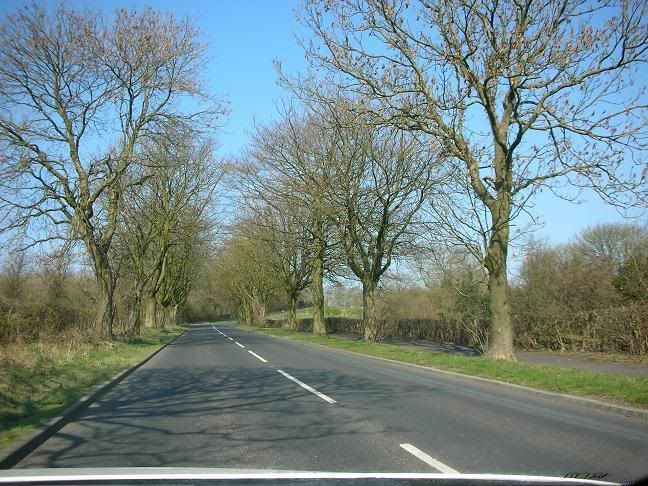
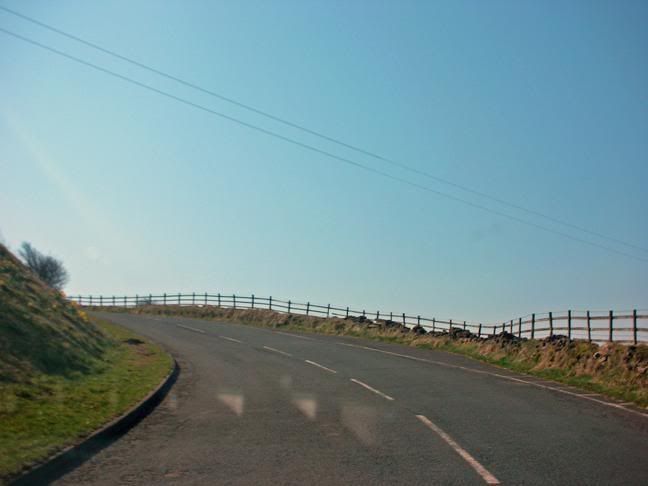
I'm again going to use a series of photographs - quite a long series this time - to demonstrate what I'm on about. It's not a particularly fast set of bends, but they are varied, and I'd use different methods to asses each corner. It's not so much how we'd take these corners that I want to look at - I'll cover that later - it's more about where you should be looking as you're driving along, and what your thought process should be as the view of the road changes with our progress.
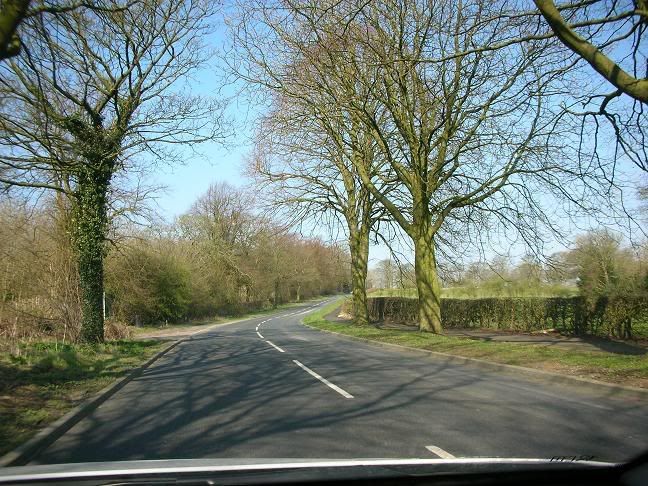
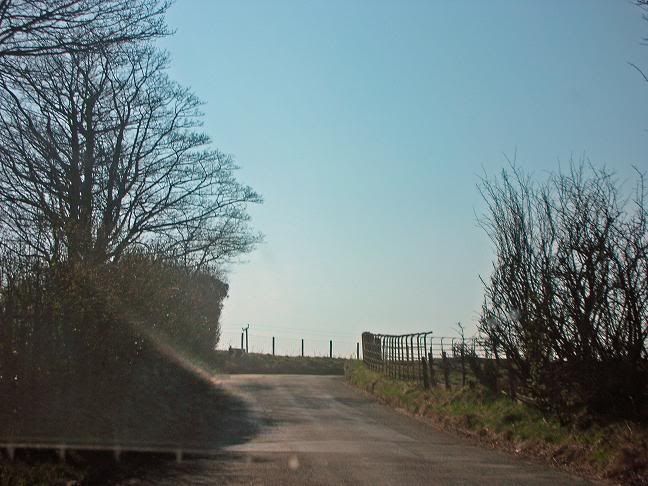
Here's the first view...

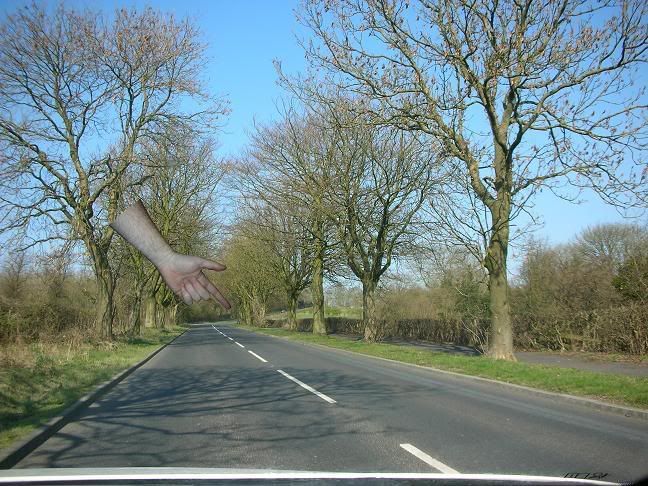
As far as assessing the first couple of bends, our work is pretty much done for us - we've got a very good view of the left and right handers, with just one small zone of invisibility to the nearside which we could easily deal with by moving offside slightly. But we're moving on a bit from just looking at the next bend, and so our attention should, in this case, be on the third corner - the left-hander which goes out of sight at the top of the rise. Just to help out, I've used the hand of God again, just this once, to point out the limit point for that corner...
I'll not use God again, as I'm assuming you've already read and understood my post on limit points, and you'll know what I mean when I refer to it.
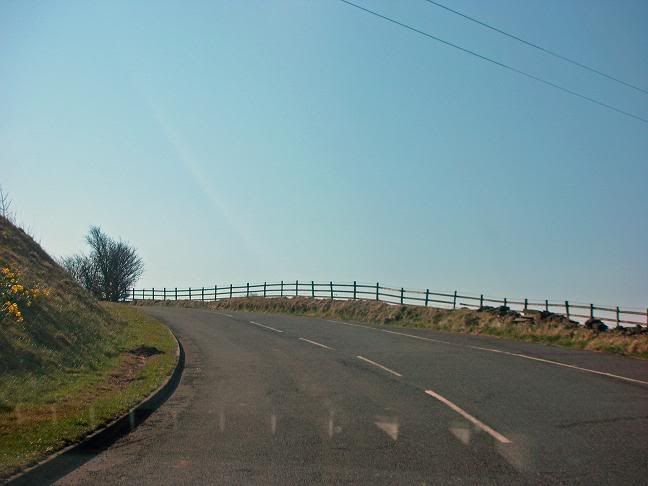
So, in this case, we'd move offside a little to improve the view to the nearside, but our attention is already on the limit point for the left-hander and what it's position is in relation to us as we approach it. Let's move forward a bit...
So, the view has opened up nicely, we can easily plan for the left and right handers (I'd be looking to move offside to straighten the bends, but with a cautious eye out for on-coming vehicles), and our attention is mainly focused on the next left-hander. As you can see, despite moving forwards, the limit point hasn't moved, so we should already be thinking that it's a tighter corner than the other two.
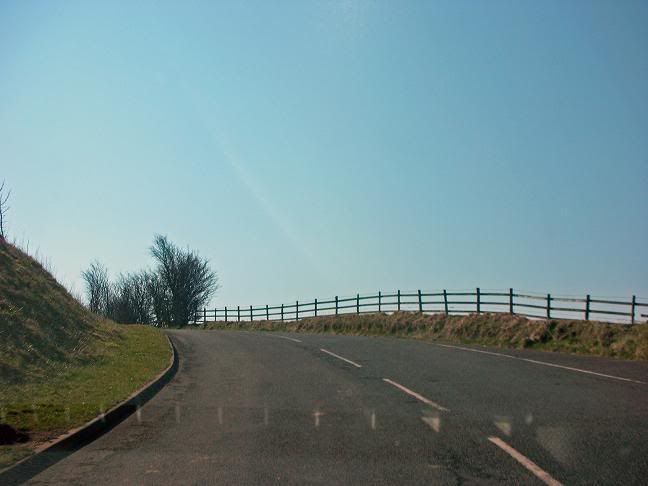
As we move further forward, you can see that we've actually lost some of the view we had, behind the banking on the right. It's not really a problem, as we've already looked there, but if you go back to our limit point, it's still not moving. One little thing to note - there's a finger-post sign indicating an entrance or footpath off to the right. It's difficult to see from here, but it's indicating an area which has now gone out of view, so it's something I'd keep half an eye on. It'll become clearer in the next picture...

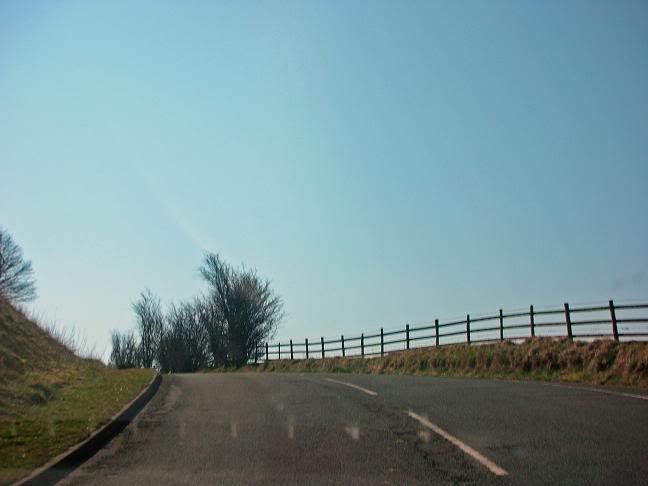
There's the finger-post, and we still can't quite see what it's pointing at (although the view would obviously be better in real life). The limit point for the left hander still hasn't moved though, has it?...
At this point, however, the limit point has started to move away from us, so we've potentially reached the point where we know roughly how tight the bend is. We'll keep an eye on the limit point as we turn in to the bend, but let's keep our observations in the distance too - remember to look outside the box a bit, and not just concentrate on the limit point. Oh, and we can now see the little entrance to the right, and give it a quick visual check. Back to the left hander though...
Yes - I'm happier with this one now - as we enter the bend, the limit point is going away from us at a consistent rate, so we've assessed it correctly. Keep looking elsewhere though - I want to know what's next, and there's no clues yet...
Still no clues as to what's next, but that limit point is getting further away now, so the bend is opening up...
Yup - still opening up, but look at the hedge - it's on the offside of the road, so the corner continues for a bit further yet...
Still in the corner, but a hint of straightening from the hedge-line. Still no idea what's next though. Remember the safe stopping rule? It's vitally important here.
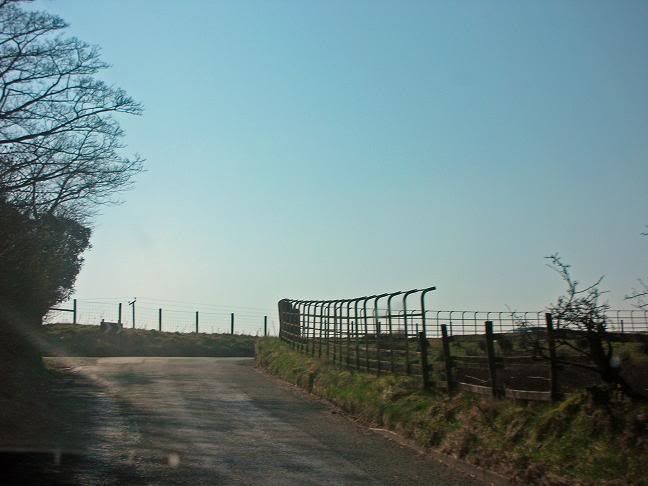
Right - this is where we can start planning again. We're still negotiating the left-hander, but in the distance we can see some easy-view railings, which you'll only ever see next to a corner or a junction. They're a little rusty here (they should be painted white), but they've a distinctive shape, and their name is a clue to their function - they allow a good view through them of on-coming vehicles. If you're in any doubt, here's the same picture, with the railings highlighted...
So, we now know that, up ahead, is either a junction or a right-hander, but which one? It's impossible to tell from here, so let's move on a bit more...
Well, we can see that the road tightens considerably, and that the junction/corner is fairly tight, so we'd be slowing quite a bit going into here. No other clues yet as to what's coming up though. Having said that, it would appear to be a neighbourhood watch area. Which is nice.
Right, now we've got it - the vital clue as to whether it's a junction or a right-hander. You have seen it, haven't you? Haven't you? Go on then - I'll show you...

Not easy to see, granted, but it's there nonetheless - a chevron board showing a bend to the right. I'd still be cautious about the hidden area behind the hedge on the left, mind, but we know that the road's going to the right...
Moving closer to the bend opens the view up to the right, so, as you should with any corner - if the road goes right, look right...
Looking off to the right will give you a nice early view of any on-coming vehicles or other hazards, and may give you a view of where the road is going next. We can, of course, use the limit point at this stage, to assess the angle of the bend, but the railings are doing that job for us. Although we can't see the road itself, they're giving us a very good idea of how sharp the bend is, which in effect, renders the limit point useless.
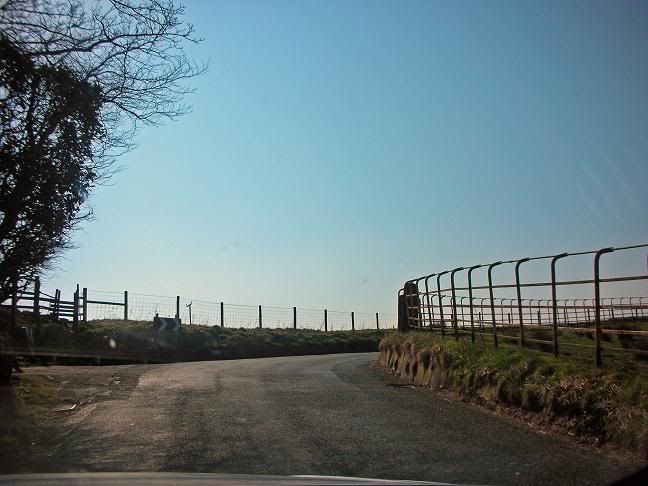
We'd have gone nearside by now, as that's the best position on approach to a right-hander, but we should also be conscious of the little entrance on the left that's just popped into view. It's not caught us by surprise - we identified the possibility some distance back, but it's existence has now been confirmed, and our move nearside should incorporate a zone of relative safety to deal with anything which may emerge from the left.
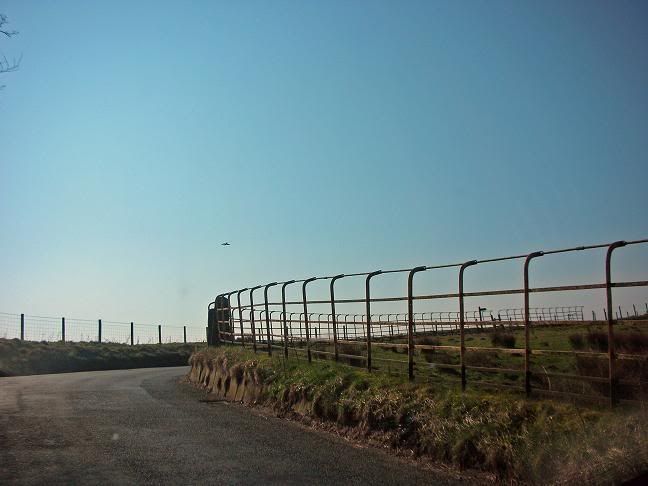
Looking right again at this point confirms the severity of the bend, and gives us a couple of other visual clues. There's another finger-post, which will be opposite another entrance or footpath, and we can see the end of the railings, which would indicate the end of that particular corner. We can see a continuation of the fence-line, showing that the road goes straight, at least for as far as we can see form here.
We're just entering the bend at this point, and it's a good example of how an extended view can improve your ability to plan. From this point, we've a very limited view, and a driver who only looks in front of themselves would have absolutely no idea of how tight the bend is, or what's coming next. Because we have looked outside the box though, we know exactly what's coming up, and we'd be driving into this corner with a little confidence about what's next.
Thinking in terms of the limit point, you'll see that it's now a consistent distance away from us, so we've "found" the tightness of the bend. It's irrelevant to a certain degree though, as we've already assessed the bend using other means.
Right, things are getting interesting again now. OK, we've got an on-coming car (it wasn't possible to show it before this, as I was stationary when I took the pics - you wouldn't want me to take pictures when I'm driving, would you?
 ) which, in reality, we'd have seen some time back, but look beyond it. There is a hedge line going off to the left which, to me, would be a very strong indicator as to where the road goes next.
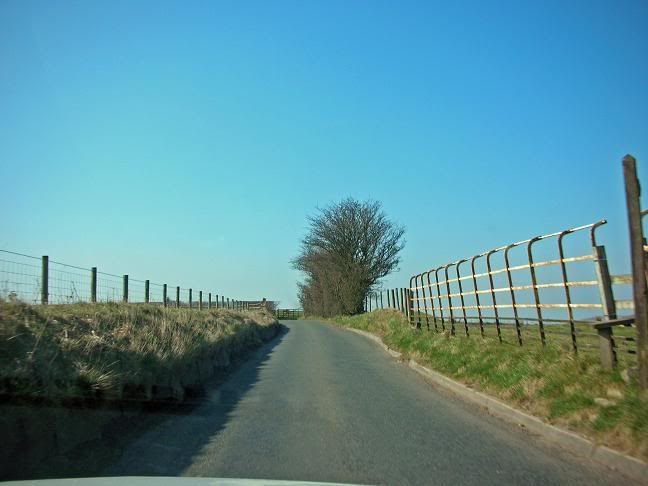
And, as if by magic, all our predictions come true at this point. We've got the road bending to the left, the short straight, and even the footpath off to the right. This is a really good example of how forward observations and planning works. We've spotted several visual clues, worked out what they mean, and decided what the road is going to do before we get there. It's a huge part of advanced driving, and something that gives me just as much pleasure as driving at speed. Having your predictions come true can be hugely satisfying, and can turn even the most dreary drive into an interesting one.
Thread
How to make better use of your semi...
...Automatic gearbox.
What?
Well, what else were you expecting the title to be? *Tuts*
This is something you won't find in Roadcraft - a guide to using semi-automatic gearboxes. I've never read a proper guide to using them, so the advice I'm giving is based solely on my own experiences. Obviously, every manufacturer's systems are slightly different, and have their own idiosyncrasies, so if you're an owner of a car with one of these gearboxes, please feel free to share your experiences on here.
Let's set the guidelines for the article first. I'm not going to be writing about switchable automatic gearboxes. A traditional fully automatic gearbox works via a torque converter, and there is plenty of information knocking about on how to use those correctly. What I am writing about are the more modern style of semi-autos, which incorporate a mechanical clutch and a traditional gearbox which has automatic (usually hydraulic) operation of the gearchange and clutch. They're two-pedal cars in which the gearchange is operated with either a gear-lever style switch on the centre console, or "paddles" behind the steering wheel, or a combination of the two. The gearchange is generally sequential (i.e. you have to go through each individual gear on the way up and down the 'box), but there are ways to effectively "miss" gears out, which I'll cover.
Now, my experience of these gearboxes isn't vast, but I own an M3 with the SMG1 gearbox, and I've had a reasonable amount of time behind the wheel of a DSG equipped Golf GTI, so I think I'm experienced enough to comment, but if anyone wants to let me have a go in an F1 equipped Ferrari (for comparison reasons only, of course), then I'd be happy to do so.
Setting off
The first thing to remember with gearboxes of this type is that they are not automatics. They have a mechanical clutch, and you should drive them with as much mechanical sympathy as you would a manual car. In a traditional automatic, the car is happy to sit on a hill with a small amount of power applied, keeping it stationary or just moving forward slightly - that's because the drive is being transmitted through a fluid coupling, and it creates no wear whatsoever if you drive it in that manner. Try that in a semi-auto, however, and you're effectively slipping the clutch. Drive like that all the time in traffic and you'll need a new clutch much sooner than you'd like.
Semi-autos don't "creep" either. Put a traditional automatic in drive, and it's tendency to creep allows you to carry out almost all your low speed manoeuvring by just releasing and pressing the brake pedal. If you put a SA car in gear and release the brake, nothing will happen. That's because the car has, in effect, pressed the clutch, put the car into gear, and is waiting, clutch down, for your next input. The car requires you to actually press the accelerator and apply some revs before it will release the clutch and start to move.
This is another area where you need to demonstrate some mechanical sympathy, and not quite in the way you might think. If you apply a small amount of throttle, the clutch will be released gradually and the car will slip the clutch for you. This is fine on the odd occasion that you're doing some parking or manoeuvring, but if you set off from stationary like that every time, again, you'll quickly wear out the friction plates of your clutch and face a large bill. I find that it's actually more mechanically sympathetic to set off with a little more throttle, so that the car almost immediately fully engages the clutch, rather than slipping it. I'm not saying you should set off with full-bore acceleration every time, but rather with a positive press of the accelerator, as opposed to feathering the pedal.
Most SA cars have some form of "launch control" system built into their software. In the M3, I think it's called "race start" or something similar. It requires the driver to push and hold the gear lever forward, which holds the clutch down, and then apply 4,000 to 5,000 revs with their right foot. Releasing the gearlever effectively "sidesteps" the clutch and the car takes off like a rocket. Now, don't get me wrong - it's an effective system, and it's great for impressing/frightening passengers, but it feels very rough on the whole transmission and in an RWD car, it can kick the rear-end sideways on all but the driest, best-quality tarmac. Other than trying it out a few times, I don't use it on the road, and I don't recommend it for anywhere other than the track.
So the best advice I can give you when setting off in a SA car is to remember that it's a manual gearbox with a proper clutch, and to drive it like that.
Changing up
I've discussed the merits of smooth gearchanges in another thread, so I won't flog that dead horse any more, but new users of SA gearboxes (myself included), find that the quality of gearchange is a little poor. I suspect (as was the case with me) that that's because they don't drive it like a manual, and expect the cars elastictrickery to sort it all out for them.
I'll refer you back to the advice I gave before - drive it like a manual. If you don't adjust your throttle position during an up-change, then the engine speed won't match the road speed for the next gear, and there will be an inevitable jerk when the clutch is released and the engine speed is brought back down through the transmission. So, the trick for up-changes is to release the throttle a bit during the gearchange. It doesn't have to be much, but allowing the revs to drop slightly during the up-change nicely matches engine speed to road speed, and eliminates almost all the jerkiness from the change.
This is obviously easier with slower gear-changes than it is with quicker ones. My SMG 'box is an early one which only has one speed of gearchange, which is quite slow. It suits my driving style, and allows me to change nice and smoothly - almost seamlessly. Newer SMG set-ups, together with other manufacturer's systems allow the driver to choose the gearchange speed. In those cars, I'd recommend perfecting your changes in a lower-speed setting, before turning the gearchange speed up. In the fastest settings, I think you'll always lose some smoothness, and these are best suited for track use, or spirited drives on your own.
Downchanges
Downchanges in SA cars are much easier to perfect, as the car's software usually incorporates a system which raises engine revs - "blips the throttle" on downchange. The SMG system is very good, and I've heard open-exhausted 360 CSs running at Fiorano, and they sound like they match the revs on downchange seamlessly.
One aspect which will be alien to the more traditional advanced drivers is that SA cars - particularly those with paddle gearchanges - allow gearchanges to occurr much easier whilst the driver is braking. One of the main reasons that Roadcraft recommends separation of braking and gearchanging is that it allows the driver to keep both hands on the wheel whilst braking. Paddle-shift setups obviously allow the gearchanges without removing the hands from the wheel. Despite that, though, I still drive mine almost to the system in that I leave my gearchanges to the end of the braking period, as I'm still a big believer in separation.
The only car I've driven so far in which I would overlap more was the DSG Golf. This gearbox is a marvellous piece of kit, and the gearchanges are almost perfect - on upchanges, there is no perceptible drop in acceleration and the downchanges are virtually seamless. I'd feel confident changing down through the box with a DSG setup, as the software doesn't allow selection of too low a gear.
Automatic Mode
Apparently these cars have a fully automatic mode.
I've never tried it.
Thread
A few lines on steering
Steering is one of those skills that we don't really think about. Turn the wheel a certain amount and the car points in the direction you want it to go - simple.
Isn't it?
Not if you read advanced driving manuals it's not - rotational steering is a no-no, push pull is best - or is it pull-push? But rotational steering is actually ok sometimes. What about an emergency though? What's the fastest way to put lock on if things go wrong? Isn't shuffling the wheel the preserve of driving schools and people who smoke pipes?
Questions, questions.
Allow me to simplify things for you. I don't actually care how you hold or turn the wheel, as long as you operate it in the correct manner.
I do care if you're trying to pass a Police course or one of the civilian advanced courses which require pull-push of course. In those circumstances, if you don't demonstrate an ability to use the prescribed technique, then you won't pass the course.
But in every day driving, trust me, I don't care one iota how you turn the wheel, as long as you turn it in the correct way.
But what is the correct way Reg?
I've talked about vehicle balance before - I wrote a whole article on the subject - and the basic principles for steering are exactly the same as for any other driver input. If you're rough with the steering, you'll catch the car unawares, which is something cars don't like - roughness moves the vehicle's weight around quickly and results in the car feeling unsettled, and in extreme cases, can result in a loss of directional stability. Modern vehicles - even the more mundane family cars - have quite high grip levels these days, but you can easily use up all of a cars lateral grip very quickly just by being rough with the wheel.
The way to apply steering lock is to turn the wheel slowly at first, build up the speed of the lock application until you're close to having the right amount of lock applied, and then slow down the application again until the wheel is stationary. Starting with a slow, gradual turn of the wheel starts to gently settle the car onto it's springs rather than suddenly chucking lock on and expecting the car to go immediately from travelling in a straight line, to turning.
I don't mean that you should be excruciatingly slow with the wheel - this technique can be used even at very high speeds and on the track. I just mean that at the point you start to turn the wheel, the speed of lock application should build up and then slow down again, rather than just being done at a constant speed.
Imagine a pendulum swinging from left to right. At the very far reach of it's swing, it's momentarily stationary until gravity starts to swing it the other way. It then starts to accelerate - slowly at first - until it's travelling at a constant speed. As it swings through it's arc, gravity starts to slow it down again until it becomes stationary at the other far reach of it's swing.
Keep that swinging pendulum in mind, and now attach a steering wheel at it's fulcrum (is that the right word? It's been a long time since I did secondary school physics). The pendulum can swing faster or slower, depending on the weight and it's length, but the manner in which it turns is still the same - slow at first, speeding up, and then slowing down again.
It's just as important to use that same technique when taking lock off as well. As you're taking lock off when you're coming out of a corner, the steering action should be accompanied by a degree of acceleration, so to keep the car balanced under that acceleration, the lock should come off slowly at first, then quicker, and finally slowing down until you're pointing straight ahead again.
Of course, this sounds simple enough when applied to a single corner, and in reality, when negotiating a series of corners of varying degrees of sharpness, it's more difficult to apply correctly, but all you're effectively doing is shortening or lengthening the imaginary pendulum to suit each corner.
There are techniques which make this type of steering easier to maintain. If you try pulling the wheel down at the start of a turn you'll usually naturally apply a pendulum effect, which is why the Police, IAM etc, recommend pull-push. You can steer correctly with rotational steering, but it requires a little more concentration and practise, particularly if you like to sit with a straight-arm posture. Straight-arm driving requires the steering input to come more from the shoulder, whereas sitting with arms bent means the steering input comes more from the wrists. If you steer from the shoulder, it's less sensitive, and can be rougher.
So, next time you're out for a drive, just pay a little attention to how you operate the wheel, and have a go at imagining the pendulum effect. If you apply it correctly, you should notice an improvement in the smoothness of your drive, and in the stability of your car through corners.
Thread
Familiarity breeds complacency
There is a road I drive along when I go to pick my children up from school. It's not particularly long - a couple of miles at most, and it's not a particularly fast road. It's single carriageway NSL, but it twists and turns with a whole variety of different corners. It has varying degrees of negative and positive camber, uneven patches of tarmac, areas where it's less grippy than others and is interspersed with double white line systems.
Now, I've been driving along this road, on average, three or four times a week for at least the last ten years - possibly longer. I know the road intimately - I know where it stays wet after a rainstorm and where it dries more quickly. I know where patches of frost tend to linger into the afternoon, and where it thaws out. I know which farm entrances are likely to have mud near to them, and which ones a herd of cattle is prone to emerge from occasionally. I know which junctions are blind and difficult to emerge from, and which ones I've got a good, early view into. I know exactly where I can overtake (two areas in one direction and, helped by a downhill stretch if I'm behind something slow), three in the other direction.
With all this detailed local knowledge, you'd think that it would be one of the safest roads I could possibly drive along, wouldn't you?
Well, I've been giving this some thought today and I've decided that it's actually quite the opposite - it's probably the most dangerous road that I use.
The problem with familiarity with a road is that there is an inevitable "autopilot" mode that kicks in, whether you want it to or not. Now, I'm not saying that I blindly drive along this road without thinking, but I monitored myself as I drove along it today, and I realised that, because I knew it so well, I was automatically looking in the same places for a view, I wasn't assessing bends, because I knew how tight they were, my attention was placed in well-rehearsed areas along the length of the road, and my thought patterns, generally, seemed to be pre-determined, rather than free-thinking.
If I drive an unfamiliar piece of road, I have to assess bends for their severity, look for areas of visibility and invisibility, spot actual and potential hazards, work out driving plans and alternative plans, etc, etc. On the familiar road, I've pretty much got one single driving plan for the whole road. Of course, circumstances change every time I drive the road, but It's very easy to think that you've seen everything before and you've already got a plan for it happening. I know where the stables are, for instance and I've seen enough horses on that road to know exactly what I'm going to do if I come across one. I know where to deal with cyclists, and not just where to overtake other vehicles, but what gear I need to be in and how to carry out the overtakes.
The problem is - and this is what was bugging me today - because I'm not approaching the road with a fresh, open mind, I could end up in deep trouble if something genuinely unexpected happened. We all know about the safe stopping rule, but I know for a fact that I'll carry more speed into a corner if I know it well, than I will if it's unfamiliar. Would I still be able to stop on my own side of the road if something unexpected happened? I asked myself that very question whilst driving today. The answer was yes - I could, but it'd be a close thing. Closer than I'd like it to be anyway.
You see, although I've encountered pretty much everything that I'm likely to on that road, there are still many situations that I haven't, and which are a real possibility. I've never encountered a fallen tree, for instance, or a cyclist who's had a fall, or a recent accident. The fact that I'm probably giving these possibilities less credence than I would if I didn't know the road is what's been bothering me.
On the way back home, I approached the road with a different mindset. I pretended that I didn't know it. The difference was surprising. Although my lines through corners didn't change, the way in which I assessed them certainly did, and my entry speeds were slower as a result. I found myself looking in places that I haven't looked for ages - probably years - and assessing possibilities that hadn't really come up before.
I've decided that this is something that I'm going to do on all the routes I use regularly, starting with my route to work, as that's probably the route I drive most often, so it's almost certainly the route I've become most complacent with.
Have a go yourself - you'll probably be quite surprised at how many possibilities you haven't considered on roads that you know well.
Thread