Bush removal - Credit to Rob Brookbank
Discussion


For the avoidance of doubt, thanks go to Rob Brookbank for his time to design, test, draw and publish his suspension bush puller/pusher . . . Here's how I got on with it . . it is not my design.
This is always a topic which creates enivetable debate as many people have varying ways of removing old suspension bushes. I've drilled and sawed out many a suspension bush on both my S, this Griffith and others TVR's. Ultimately finding that the best way was to use 2 suitably sized sockets, a good sized vice and a hammer, levering the bush free by rotating the wishbone to free it and then push it through.
Ultimately a press has been my preferred option but since a move of location and other factors I decided to have another look into what I could come up with.
I've never burnt them out, which is another way to do it, however the whole idea doesn't sit comfortably with me anyway, personal opinion as I know it's a well used method.
Also I always hate paying anybody to do something I am perfectly capable of doing myself and then I know it has been done properly and to my standard's.
Flicking through The Griffith Pages I noted an article by Rob Brookbank, who'd gone a step further than thinking about it and had drawn up and had made a suspension bush puller. Not revolutionary in terms of concept, they've been around for years. But none I've seen have been useable on the TVR.
On Saturday Pop's and I stripped the whole rear end of the Griffith, removing all wishbones and the diff. So today was suspension bush removal . . . Diff bushes I will cover later as the puller being used here will not work in it's current design to accomplish the same result. Did them yesterday, straight forward enough, even the dreaded top one (a new design has been hatched)
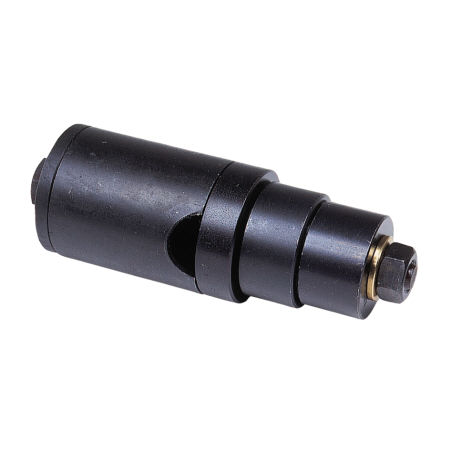
The design of the puller has been created specifically to suit the Griffith/Chimaera chassis and with such a good drawing I decided to have one made up at my local friendly machine shop. I had mine made in 16T Steel, which is pretty hard stuff and they did it for me for £50.

Ultimately the tools you require are shown below. Grease, high tensile M10 stud and plenty of M10 nuts and washers make up the rest of the necessary items. A vice is very useful as well as an impact implementation device. High tensile threaded stud is essential as with all pullers using a threaded bar of some sort it's the thread/nuts that take the absolute pounding. Normal threaded bar will give up on you far too quickly.

I'm not going to go through the whole process as Rob has written it up very well in the The Griffith Pages article I will however reiterate a couple of absolute key points that make the job easier.
1 - Grease the threads to help eleviate as much friction as possible to preserve the threaded bar for as long as possible.

2 - Make sure the pusher part of the set up is absolutely square onto the outer metal sleeve being forced through and that the puller is also squarely located to allow the metal sleeve and all contents to easily push into the puller on the other side.

3 - Make sure that after you have loaded as much torque onto the puller and made sure you've got everything square that you place the whole assembly either in a vice as shown or I found holding the wishbone with the puller onto the edge of the bench another good way before you use the impact implementation device. Either way, it needs to be onto something solid or you're just wasting energy.
What you learn quickly is that is when you get it properly square to the outer metal sleeve and the wishbone, loaded a lot of torque via the bolts either end that you only need a couple of good (and I do mean bloody hard) blows with a suitably significant impact implementation device or 'big hammer' for short. This saves more hits than necessary and less damage to the puller itself.

4 - The set up is different when doing the hub upright lower twin bushes as can be shown here, but all the advice above still applies. You can note in shot below the bush being pulled/pushed out on the right hand side.

5 - The mushroom part of the pusher side of the puller does take an real pounding, so you really need to get it made of something that will take the abuse. Going for 3b steel will mean you'll just knacker it very quickly and I had 14 suspension bushes to get out. That's before we do Dad's Chimaera. Fronts are done on both our cars using the vice method previously described.

Overall today in 3hrs, having only tried it once yesterday- successfully, I took out 13 suspension bushes with ease in under 3hrs. So between rowing with Sky about my install, hack sawing lengths of HT threaded bar to size etc etc it's less than 10mins for each one. You'll note from the shot below how chuffed I was and how cleanly each suspension bush came out. No drilling, hack sawing or generally ferking about required.

The only suspension bush that you have to be a little more careful with is the top wishone short one. As the diameter of the outer metal sleeve is very slightly larger than the others, you do employ the same method but I found you can't get squarely onto the whole edge, rather having to commit to one side, then load and smack it, then unload, commit to the other side of the sleeve and repeat otherwise the pusher will work it's way inside the sleeve. It stills work's but can go out of square and proved more successful using the slightly longer process as described.
Important to highlight (sorry no pictures yet) that the internal bores of the wishbones are completely umarked by the process, only showing where the old suspension bush was pulled through. No hacksaw over cuts or marks in any way at all which is very important for the fitment of the replacement poly bushes going in as after some wet and dry there are no rough edges to attack them in operation.
As for the diff bushes . . . . . These 3 took a little over an hour to get out and I wasn't taking photo's, so you'll have to read . .
The front 2 diff bushes are mounted in 2 brackets bolted to the diff itself and then the bushes are the support for bolts retaining the diff to the chassis. You remove these brackets before you can remove the diff and once on the bench you will find these are big enough to be able to use a 6-7-8mm drill to remove the rubber sleevee, then nick the outer sleeve with a hacksaw or small cold chisel (very carefully), curl the edges and tap through. Took 5-10mins for each.
The absolute knacker is the top mounting bush as this is fixed to the chassis and is not easily accessible. You can't get a swing at it, or a drill to it. A bit of lateral thinking and with a right angle adaptor on the drill I was able to remove enough of the rubber sleeving to then used a tile saw (wire saw). You pass the tile saw through the drill hole to then cut through enough of the remaining ribber sleeve before finding a suitable long enough punch that you can re-use you impact implementation device to knock it through.
You're then left with the outer sleeve in place. Sawing this is practically impossible, so after trialling the process on one of the bracket mounted bushes I used a 4mm cold chisel. I was lucky as there was another pair of hands to hold the chisel so that I could re-use the long punch we had (old drive shaft) to distort the outer sleeve at 9 o'clock and 3 o'clock positions. Then just use the long punch to knock it through the rest of the way. If I had been on my own, then I would have drilled the end of the drive shaft or other long punch to hold the chisel to effect the same process.
You have to be very careful not to damage the fixed mount or sleeve and with a small chisel in the right place we didn't mark it at all, but be careful, it's not something you want to damage given it's location and the fact the car is not immobile. Many will warn against this method I'm sure, but we executed it yesterday with no ill effects and we knew that to ferk it up would be a real problem.
The hardest part was using the tile saw with such a limited space. 45mins in total to remove that one remaining bush.
You'll also note that the drive shafts and CV's are still in place and I'm sure someone will moan the wishbones look filthy. Let me assure you, I want to get the car back on the road ASAP so no need to undo hub nuts and upset bearing that are perfectly alright, so leave em in place. The muck on the wishbones will stay there, and when they go back I'll make sure they're good and oily as well as it protects them better than stripping it all off and painting them. They're immaculate underneath the greay oily crud, so that's how they stay.
I'm not trying to convince anyone to do the work my way, just that it is a way that works. There's always someone asking and maybe they'll read the article on the The Griffith Pages and here and it'll help them to choose how they go for it.
One last thing, as there seems to be no article I could find on diff removal. Once it's loose from all 3 mounting bushed it needs to move forward, slightly upwards and then be turned in the same plane as the prop shaft through approximately 30 degrees before it will come out of the chassis aperture. It's heavy but one person can handle it alone, whilst leaving enough space to make sure you're not under it, or any of you limbs/digits etc are under it should you get it wrong. Trying to do it balancing on a trolley jack was more dangerous for us than just muscling it, but again, be very careful.
Again, credit to Rob. I do have a design in my mind for another puller that works exactly the same as Rob's but is designed differently to work with the diff bushes and especially the top one which is such a pain to get too. The design accounts for the triangulated chassis members etc that seemingly get in the way of such a puller. I'll try and get it drawn up.
This is always a topic which creates enivetable debate as many people have varying ways of removing old suspension bushes. I've drilled and sawed out many a suspension bush on both my S, this Griffith and others TVR's. Ultimately finding that the best way was to use 2 suitably sized sockets, a good sized vice and a hammer, levering the bush free by rotating the wishbone to free it and then push it through.
Ultimately a press has been my preferred option but since a move of location and other factors I decided to have another look into what I could come up with.
I've never burnt them out, which is another way to do it, however the whole idea doesn't sit comfortably with me anyway, personal opinion as I know it's a well used method.
Also I always hate paying anybody to do something I am perfectly capable of doing myself and then I know it has been done properly and to my standard's.
Flicking through The Griffith Pages I noted an article by Rob Brookbank, who'd gone a step further than thinking about it and had drawn up and had made a suspension bush puller. Not revolutionary in terms of concept, they've been around for years. But none I've seen have been useable on the TVR.
On Saturday Pop's and I stripped the whole rear end of the Griffith, removing all wishbones and the diff. So today was suspension bush removal . . . Diff bushes I will cover later as the puller being used here will not work in it's current design to accomplish the same result. Did them yesterday, straight forward enough, even the dreaded top one (a new design has been hatched)
The design of the puller has been created specifically to suit the Griffith/Chimaera chassis and with such a good drawing I decided to have one made up at my local friendly machine shop. I had mine made in 16T Steel, which is pretty hard stuff and they did it for me for £50.
Ultimately the tools you require are shown below. Grease, high tensile M10 stud and plenty of M10 nuts and washers make up the rest of the necessary items. A vice is very useful as well as an impact implementation device. High tensile threaded stud is essential as with all pullers using a threaded bar of some sort it's the thread/nuts that take the absolute pounding. Normal threaded bar will give up on you far too quickly.
I'm not going to go through the whole process as Rob has written it up very well in the The Griffith Pages article I will however reiterate a couple of absolute key points that make the job easier.
1 - Grease the threads to help eleviate as much friction as possible to preserve the threaded bar for as long as possible.
2 - Make sure the pusher part of the set up is absolutely square onto the outer metal sleeve being forced through and that the puller is also squarely located to allow the metal sleeve and all contents to easily push into the puller on the other side.
3 - Make sure that after you have loaded as much torque onto the puller and made sure you've got everything square that you place the whole assembly either in a vice as shown or I found holding the wishbone with the puller onto the edge of the bench another good way before you use the impact implementation device. Either way, it needs to be onto something solid or you're just wasting energy.
What you learn quickly is that is when you get it properly square to the outer metal sleeve and the wishbone, loaded a lot of torque via the bolts either end that you only need a couple of good (and I do mean bloody hard) blows with a suitably significant impact implementation device or 'big hammer' for short. This saves more hits than necessary and less damage to the puller itself.
4 - The set up is different when doing the hub upright lower twin bushes as can be shown here, but all the advice above still applies. You can note in shot below the bush being pulled/pushed out on the right hand side.
5 - The mushroom part of the pusher side of the puller does take an real pounding, so you really need to get it made of something that will take the abuse. Going for 3b steel will mean you'll just knacker it very quickly and I had 14 suspension bushes to get out. That's before we do Dad's Chimaera. Fronts are done on both our cars using the vice method previously described.
Overall today in 3hrs, having only tried it once yesterday- successfully, I took out 13 suspension bushes with ease in under 3hrs. So between rowing with Sky about my install, hack sawing lengths of HT threaded bar to size etc etc it's less than 10mins for each one. You'll note from the shot below how chuffed I was and how cleanly each suspension bush came out. No drilling, hack sawing or generally ferking about required.
The only suspension bush that you have to be a little more careful with is the top wishone short one. As the diameter of the outer metal sleeve is very slightly larger than the others, you do employ the same method but I found you can't get squarely onto the whole edge, rather having to commit to one side, then load and smack it, then unload, commit to the other side of the sleeve and repeat otherwise the pusher will work it's way inside the sleeve. It stills work's but can go out of square and proved more successful using the slightly longer process as described.
Important to highlight (sorry no pictures yet) that the internal bores of the wishbones are completely umarked by the process, only showing where the old suspension bush was pulled through. No hacksaw over cuts or marks in any way at all which is very important for the fitment of the replacement poly bushes going in as after some wet and dry there are no rough edges to attack them in operation.
As for the diff bushes . . . . . These 3 took a little over an hour to get out and I wasn't taking photo's, so you'll have to read . .
The front 2 diff bushes are mounted in 2 brackets bolted to the diff itself and then the bushes are the support for bolts retaining the diff to the chassis. You remove these brackets before you can remove the diff and once on the bench you will find these are big enough to be able to use a 6-7-8mm drill to remove the rubber sleevee, then nick the outer sleeve with a hacksaw or small cold chisel (very carefully), curl the edges and tap through. Took 5-10mins for each.
The absolute knacker is the top mounting bush as this is fixed to the chassis and is not easily accessible. You can't get a swing at it, or a drill to it. A bit of lateral thinking and with a right angle adaptor on the drill I was able to remove enough of the rubber sleeving to then used a tile saw (wire saw). You pass the tile saw through the drill hole to then cut through enough of the remaining ribber sleeve before finding a suitable long enough punch that you can re-use you impact implementation device to knock it through.
You're then left with the outer sleeve in place. Sawing this is practically impossible, so after trialling the process on one of the bracket mounted bushes I used a 4mm cold chisel. I was lucky as there was another pair of hands to hold the chisel so that I could re-use the long punch we had (old drive shaft) to distort the outer sleeve at 9 o'clock and 3 o'clock positions. Then just use the long punch to knock it through the rest of the way. If I had been on my own, then I would have drilled the end of the drive shaft or other long punch to hold the chisel to effect the same process.
You have to be very careful not to damage the fixed mount or sleeve and with a small chisel in the right place we didn't mark it at all, but be careful, it's not something you want to damage given it's location and the fact the car is not immobile. Many will warn against this method I'm sure, but we executed it yesterday with no ill effects and we knew that to ferk it up would be a real problem.
The hardest part was using the tile saw with such a limited space. 45mins in total to remove that one remaining bush.
You'll also note that the drive shafts and CV's are still in place and I'm sure someone will moan the wishbones look filthy. Let me assure you, I want to get the car back on the road ASAP so no need to undo hub nuts and upset bearing that are perfectly alright, so leave em in place. The muck on the wishbones will stay there, and when they go back I'll make sure they're good and oily as well as it protects them better than stripping it all off and painting them. They're immaculate underneath the greay oily crud, so that's how they stay.
I'm not trying to convince anyone to do the work my way, just that it is a way that works. There's always someone asking and maybe they'll read the article on the The Griffith Pages and here and it'll help them to choose how they go for it.
One last thing, as there seems to be no article I could find on diff removal. Once it's loose from all 3 mounting bushed it needs to move forward, slightly upwards and then be turned in the same plane as the prop shaft through approximately 30 degrees before it will come out of the chassis aperture. It's heavy but one person can handle it alone, whilst leaving enough space to make sure you're not under it, or any of you limbs/digits etc are under it should you get it wrong. Trying to do it balancing on a trolley jack was more dangerous for us than just muscling it, but again, be very careful.
Again, credit to Rob. I do have a design in my mind for another puller that works exactly the same as Rob's but is designed differently to work with the diff bushes and especially the top one which is such a pain to get too. The design accounts for the triangulated chassis members etc that seemingly get in the way of such a puller. I'll try and get it drawn up.
I had the same thought whilst doing the work. If you had a further sleeve made up recessed for the M10 washer and nut which fitted over the top then you would avoid whacking the nut and threaded bar.
The problem comes when you've got a longer length of threaded bar through the nut, any additional sleeve would have to accomodate that. Also, you would want it fixed in place as the force you're exerting on it would cause it to fly off and it ain't gonna be light.
Excuse me nurse, please remove this lump of 16T steel from my forehead please.
Overall therefore I felt it was better that everything is held together as I didn't want to have to hold anything and hit it that hard. You alos get more accurate with practice and keeping a file to hand to just nip off any bur from a mis-directed blow takes seconds and I only needed to do it a couple of times. Easier to hammer the spanner onto the nut in fact as they're relatively soft compared to decent spanners.
No need for a tool to be drawn up then, got a picture for anyone who needs it of that puller ?
I'm replacing mine with poly bushes and will wind it in using the M10 threaded bar after heating it up in boiling water and adding some grease. Easy to do compared to getting the bugger out.
I'm replacing mine with poly bushes and will wind it in using the M10 threaded bar after heating it up in boiling water and adding some grease. Easy to do compared to getting the bugger out.
Torque Matters said:
Nice write up. I did all mine recently and found a Ford Cortina Void Bush remover will get the top diff bush out and new one back in if you use a metelastic replacement.

Johno said:
No need for a tool to be drawn up then, got a picture for anyone who needs it of that puller ?
Sykes pickavant... I think Rob has the details on that as well 
I'll see if i can dig out what i sent him
ETA picture
shamlessly stolen from this thread (but i did input some of it
 )
)Edited by Del 203 on Sunday 25th January 23:33
Del 203 said:
Torque Matters said:
Nice write up. I did all mine recently and found a Ford Cortina Void Bush remover will get the top diff bush out and new one back in if you use a metelastic replacement.
Johno said:
No need for a tool to be drawn up then, got a picture for anyone who needs it of that puller ?
Sykes pickavant... I think Rob has the details on that as well I'll see if i can dig out what i sent him
ETA picture
shamlessly stolen from this thread (but i did input some of it
)Edited by Del 203 on Sunday 25th January 23:33


Thanks for the credit Johno
 One other thing is that it works just as well in situ. The reason I designed it was that I wanted to change bushes without removing the rear hub etc.
It certainly pops them out quick once you get the knack of using it
I'll ignore the missing s from the end of my surname as I'm dead chuffed to get a namecheck.


Just did mine on the chim the other week. i made up a similer tool but my problem was it was just pulling out the rubber centre and damaging the screwed stainless bar threads i was using. ended up geting O/A burner out then made up a drift sat them on the anvil and had all 14 rear ones out and pollyed up within the hour. just cleaned it up with some emmery paper and used the vice to press them easy job.
Edited by scotty_d on Monday 26th January 16:13
Edited by scotty_d on Monday 26th January 16:33
Access to o/a isn't common hence the reasoning behind the experiment.
14 in an hour in is 4min and 20secs a bush which is half the time I reckon it took me to do mine. . . Although your time also includes tidying the w/b and and fitting the next bush
Mightily impressive, perhaps we should have an annual competition on the swiftness of suspension bush removal. Winner get naff all of course
Colin RedGriff said:
Have to say a thank you to Rob as well. I have used the puller successfully on my bushes as well.
Found the same thing with the top rear wishbone and have managed to knacker the wishbone in the process of trying to get the bush out (my own stupidity) .
.
The other thing I noticed is you have to be carfeul of the angle of impact and how you hold the top wishbone as it is totally unbraced and can easily be bent a little here and there etc . . Found the same thing with the top rear wishbone and have managed to knacker the wishbone in the process of trying to get the bush out (my own stupidity)
.Also the need to be careful not to upset the toe adjusters by not supporting it correctly etc etc . .
Johno said:
Access to o/a isn't common hence the reasoning behind the experiment.
14 in an hour in is 4min and 20secs a bush which is half the time I reckon it took me to do mine. . . Although your time also includes tidying the w/b and and fitting the next bush
Mightily impressive, perhaps we should have an annual competition on the swiftness of suspension bush removal. Winner get naff all of course
Sorry should i say my father did most of the work i just stood near the heater 14 in an hour in is 4min and 20secs a bush which is half the time I reckon it took me to do mine. . . Although your time also includes tidying the w/b and and fitting the next bush
Mightily impressive, perhaps we should have an annual competition on the swiftness of suspension bush removal. Winner get naff all of course
scotty_d said:
Johno said:
Access to o/a isn't common hence the reasoning behind the experiment.
14 in an hour in is 4min and 20secs a bush which is half the time I reckon it took me to do mine. . . Although your time also includes tidying the w/b and and fitting the next bush
Mightily impressive, perhaps we should have an annual competition on the swiftness of suspension bush removal. Winner get naff all of course
Sorry should i say my father did most of the work i just stood near the heater 14 in an hour in is 4min and 20secs a bush which is half the time I reckon it took me to do mine. . . Although your time also includes tidying the w/b and and fitting the next bush
Mightily impressive, perhaps we should have an annual competition on the swiftness of suspension bush removal. Winner get naff all of course

 Classic
 Gassing Station | Griffith | Top of Page | What's New | My Stuff