R400D to R500D Anyone done it?
Discussion


As title really. I know the rods and pistons need changed but I'm trying to work out if it would be better to start afresh with a new engine or whether a 10,000 mile R400 would be the best starting point. Also does anyone know what Cams the R500 Duratec uses? I had it in my head that they were Cosworth but the Caterham site suggests they might be the Kent KCDTEC50.
Any Advice would be much apreciated
Any Advice would be much apreciated
Jason, it ran about 5000 miles on the plenum and then was refreshed and upgraded to roller barrels and dry sump. It's making about 220+BHP at the moment which was more than was anticipated but it must have been one of the first high port heads as it's an early 2008 car. I'm looking for about 8500 RPM and 260 BHP so your suggested spec sounds about right - interesting what you say about compression ratios. Wondering if the big valves are necessary though. Still need to learn more about cam options, although maybe not as critical as I first thought.
I've spoken to Simon and he has recommended what Jason suggested. Basically a CNC phase 2 with the 12.5:1 Supertech pistons, Carrillo rods, and fitted with his milder cam will give a potential of 270+ BHP. Using the Caterham (Cosworth) 45mm roller barrels and 4:1 exhaust will limit power back to about 260 BHP.
Looks like I may be going down this route so I'll post progress as it happens.
Looks like I may be going down this route so I'll post progress as it happens.
Edited by DCL on Tuesday 22 October 15:47
From looking at other companies, his prices were very reasonable. I suppose it is all relative and the cost, although considered, was not my primary concern. I was really looking for a no nonsense quote and proven track record - and Simon has that by the bucket load. £3-4K is probably your 'essentials' starting point and you could double that without much trouble depending on what you've got, how much you want to do yourself, and what figures you want to achieve.


tomwoodis said:
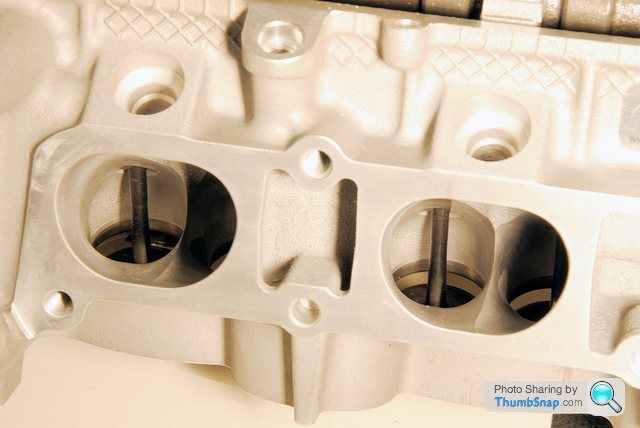
Ohh, that looks nice.
Forgive me if this is a silly question but ill ask it anyway. With a head like this, do you still get benefit from porting/polishing the head or is that process rather wasted effort once you've gone to the extent of buying a CNC machined head?
Tom
That's a very good question! I think the general opinion is that the shape is more important. Reading older text books you find theories that a polished surface can cause more pooling of fuel, whereas a rough surface helps mix and vaporous the fuel better. But on a modern fuel injected engine, it is probably the position of the injector that's more important. I think, basically, it's not significant enough to be worth the effort.Forgive me if this is a silly question but ill ask it anyway. With a head like this, do you still get benefit from porting/polishing the head or is that process rather wasted effort once you've gone to the extent of buying a CNC machined head?
Tom
I plan to use Ultimate's own 12.5/12mm cams - which I think are very similar to the R500. The CNC phase two head has +1mm oversize values. To keep costs under control, I am using the Caterham roller barrels and exhaust which are a bit small for this head so I'll be lucky to see more than 250 bhp. But really looking for some more rpm as much as anything.
Yeah, Central Scotland. I've just bought a Titan diff and got R&R to fit it to a 3.92 diff. Before anyone says 3.92 and Duratec is mad, it is for the Superlap Scotland Championship at KH and I've kind of worked out that, if I can get 8500 RPM, it will minimise gear changes with the six speed box. Unfortunately a sequential is beyond my budget this year.
nicemd said:
A simple but good lap time simulation software is Optimum Lap: http://www.optimumg.com/software/optimumlap/
It can give you a hint of how much you'll gain in terms of lap time and accelleration. It is also free!
Had a look at this this morning. looks like a great bit of software to have some fun with. Unfortunately no Knockhill in the archive, so quite a bit of work to get that made. I'll give it a go one evening It can give you a hint of how much you'll gain in terms of lap time and accelleration. It is also free!
Time for a quick update . . .
Having thought about the risks involved with upgrading my existing engine, I decided there was a high possibility that I was going to end up with a non serviceable car for some time and putting myself under pressure to complete it prior to the start of the season. So, while the Duratecs are still cheap and available, I decided to buy a new engine and go for an all new build. The bonus of course is that I'll have a spare engine, should I ever need it.
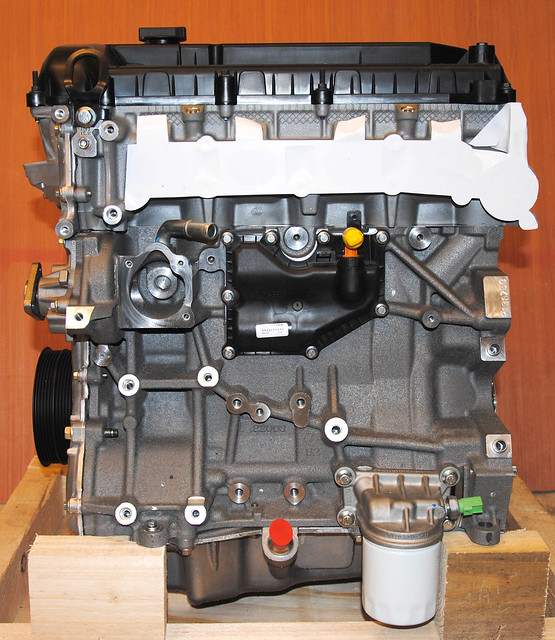
So a nice shinny engine is sitting on my garage floor completely unaware of its fate.
For those that are interested here's a FB page covering the build https://www.facebook.com/Duratec.in.detail
Having thought about the risks involved with upgrading my existing engine, I decided there was a high possibility that I was going to end up with a non serviceable car for some time and putting myself under pressure to complete it prior to the start of the season. So, while the Duratecs are still cheap and available, I decided to buy a new engine and go for an all new build. The bonus of course is that I'll have a spare engine, should I ever need it.
So a nice shinny engine is sitting on my garage floor completely unaware of its fate.
For those that are interested here's a FB page covering the build https://www.facebook.com/Duratec.in.detail
Edited by DCL on Thursday 12th December 14:12
An update . . .
The pulley bolt first - this proved to be exceptionally tight. I've done a few now, but this one was the tightest I've come across. But the holding tool fabricated on my last rebuild and the 3/4'' socket with the 3 foot breaker bar wasn't going to be defeated.

I've never worked on a zero hour engine before so when I opened it up I was surprised to find it bone dry - no assembly lubricant to be seen anywhere! Even a hint of corrosion on the lifters. Those first few seconds on a new engine must be a tough time.

Another good hour this afternoon saw the strip down completed. It has clearly been built by a different operator from the head as it was swimming in oil Bores where honed to a higher finish than I expected and I am delighted with the quality of the bits that will be the basis of the new engine. More photos and details tomorrow.
Duratec Strip
http://www.youtube.com/watch?v=He76ogDVqDw
With the engine stripped down, I could compare the bits that need replaced. Supertech pistons and Carillo rods (right) will replace the cast Ford items (left), both are forged items and apart from being stronger and better quality, they are 100 grams lighter.

An interesting feature on the Ford rods are the sheared bearing caps. The rods are cast in one piece and then 'broken'. I guess it makes them cheaper to manufacture and provides a nice 'keyed' joint

Heat management in pistons is something that you don't necessarily think about but there are some interesting books on the subject. Here the Supertec piston uses the traditional method of oil hole position to help create a thermal break to the skirt, while Ford seem to have inlaid a different material, the oil drains being notches at the side - presumably to keep the strength of the weaker cast piston.
The ring height appears to be slightly lower on the Carillo piston - I guess to allow it to run in a worn bore. Something that had worried me and one of the reasons I went for a new engine. You live and learn!

The standard shells come in three grades (sizes) red, blue and green. They mix and match the grades to get the optimum clearance to compensate for manufacturing tolerances - this big end uses one blue and one red. All the others where fitted with blue which is the nominal size. The up-rated VP2 bearings that I will use come in just the nominal size. The increased tolerances appear to be acceptable on a rebuilt performance engine.

The grading system is not just confined to bearings shells. The pistons are also made in three grades 1, 2, & 3 to give optimum fit to the bore. All four piston on this engine seem to be grade 2. The Supertech is a 12.5:1 CR so has a proud crown and pockets for the value as both the lift and timing would otherwise cause contact. Again the replacement Supertech Pistons all come in the nominal size.

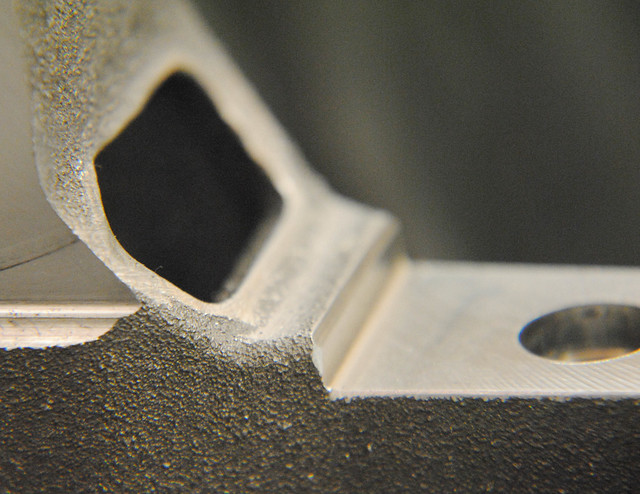
One thing I noted on the casting was a number of flakes and decided to de-burred the block casting. This photo shows the finish - clearly Ford think it is acceptable. It probably is in most cases, but bits could break away and this 'bit' would not do the oil pump much good.

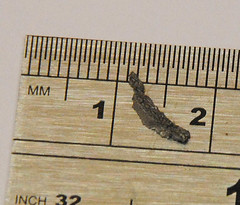
I spent an hour or so de-burring the casting - and I'm glad I did. Lots of pieces were found loosely attached, the biggest bit being pictured below. Because of the number of bits coming off, I decided to extend the de-burring to all areas that I could see. The oil galleries seemed particularly bad. I remember when my R400 was new I found bits in the gauze filter and oil filter (which I cut open to check). I now know where they most likely came from. Their size probably doesn't present any risk to the engine as they are likely to be caught in the filters. But oil can bypass the filter when cold so I'd rather not find out.
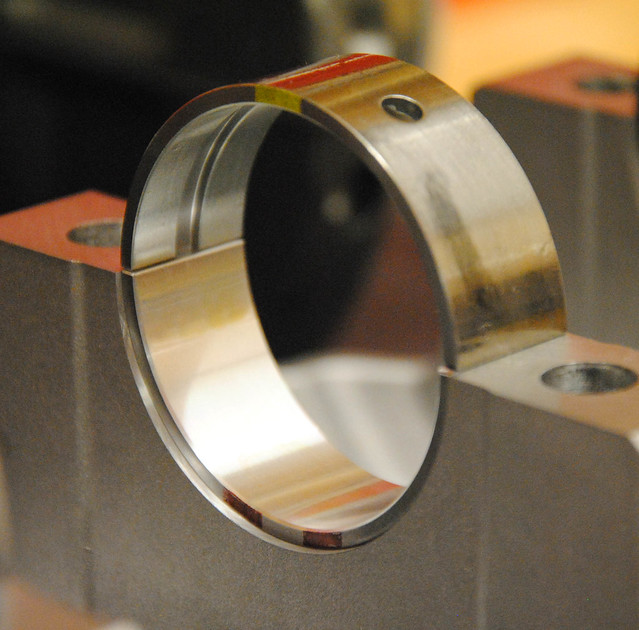
The main bearings are graded in the same way as the big end shells but this time their are 13 combined sizes This is a yellow top and brown + brown bottom which represents one grade each side of the nominal size - all the shells where similar sizes. The top bearings are groved and the bottom is plain. I will reuse these bearings as they are new and VP2 upgraded bearings are not available.
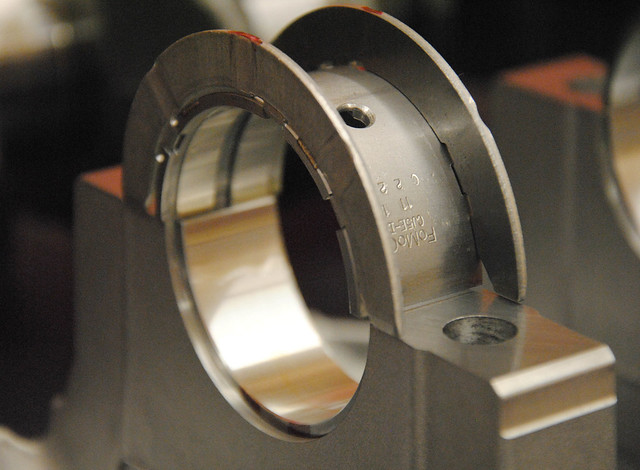
The thrust bearing is the middle bearing of the five. The thrust sections are welded to the main bearing and are a snug fit to the crank case bearing web. They are not a precision bearing by any means and have a healthy clearance to the crank. I shall check the spec on assembly. The photo shows them sitting on the cradle with its opposite number - one is a brown + brown, and the other brown.
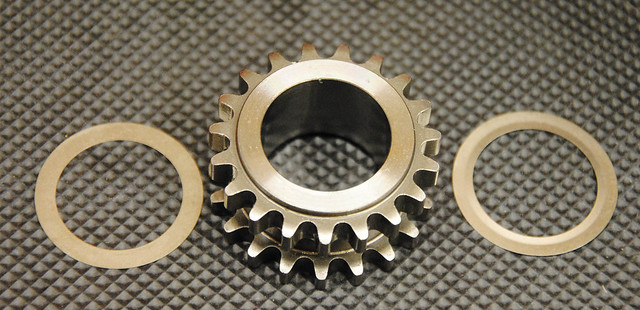
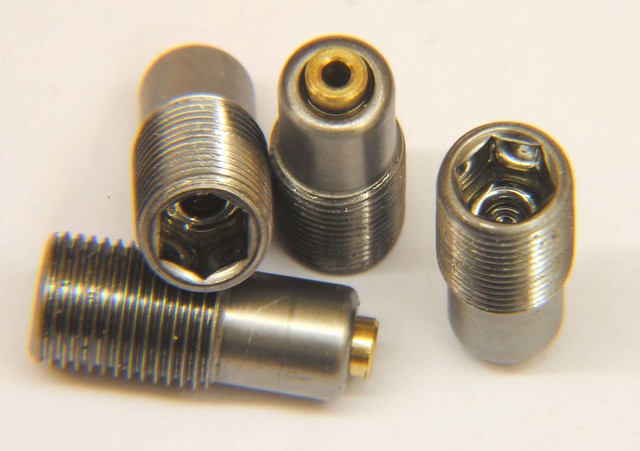
On of the first jobs will be to send off the crank to have a key cut in the crank. The standard friction washers are OK to 8000 rpm, but once above that, the risk of it slipping is real. That would undoubtedly be a dramatic and costly end to the engine.
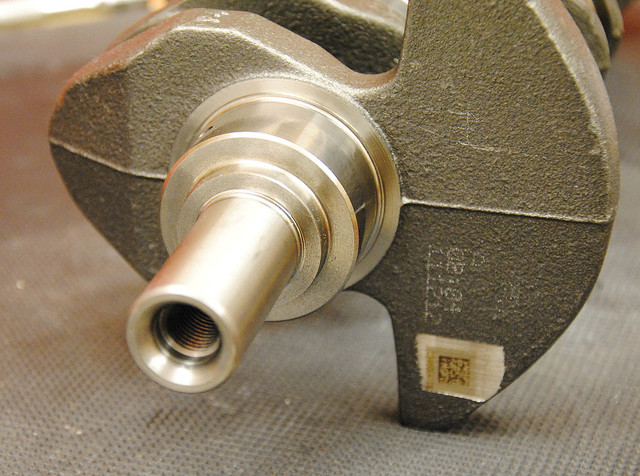
This is a slightly exploded view of the crank pulley. On the standard engine they all get clamped up with two 'friction' washers which can be seen both sides of the sprocket.
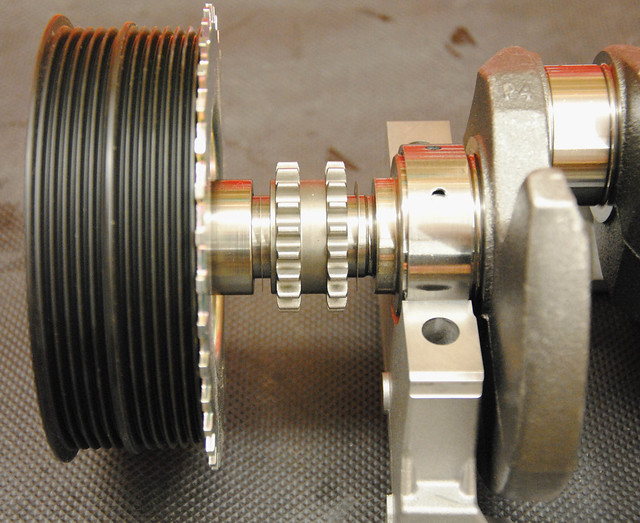
The crank shaft sprocket drives the camshafts from outer teeth, and the oil pump from the inner teeth. The chains are of different sizes.
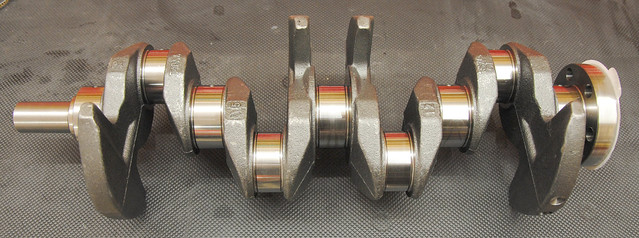
I suppose the crank is pretty ordinary and safe to 9000 rpm I’ve been told when keyed. I'm confident a that a steel crank would not add anything, and would not be worth the money.
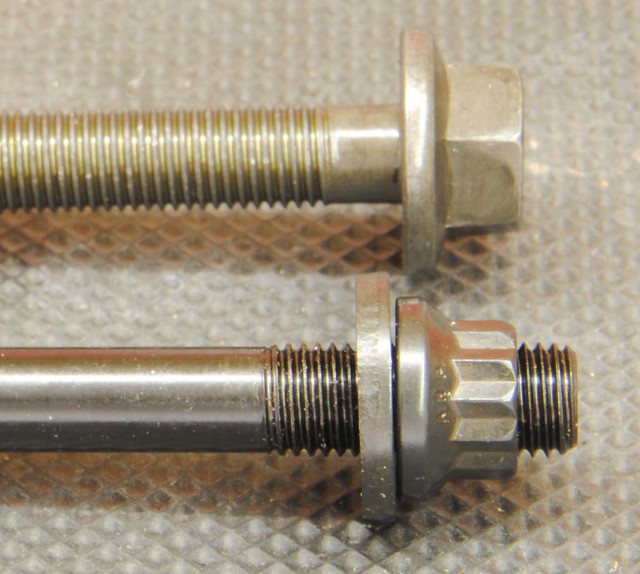
Comparing the camshafts: on the right is the standard (145BHP) camshaft and on the left is the UL39 (the bar through the center is just to align the two). The standard is just clamped to its sprocket with a bolt, although a friction washer can be added to 'upgrade' this arrangement. The UL39 is located with a pin (not shown) and has a vernier type sprocket to allow for adjustment.

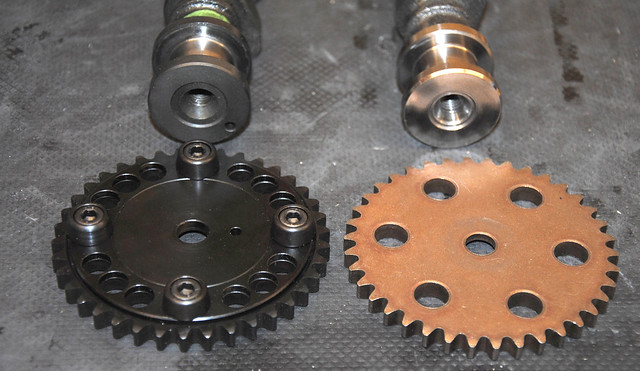
Superimposing the standard inlet cam over the UL39 inlet shows the different profile. The UL39 has a 12.5 mm lift (9 mm std) and is clearly opening earlier and longer.
The pulley bolt first - this proved to be exceptionally tight. I've done a few now, but this one was the tightest I've come across. But the holding tool fabricated on my last rebuild and the 3/4'' socket with the 3 foot breaker bar wasn't going to be defeated.
I've never worked on a zero hour engine before so when I opened it up I was surprised to find it bone dry - no assembly lubricant to be seen anywhere! Even a hint of corrosion on the lifters. Those first few seconds on a new engine must be a tough time.
Another good hour this afternoon saw the strip down completed. It has clearly been built by a different operator from the head as it was swimming in oil
Bores where honed to a higher finish than I expected and I am delighted with the quality of the bits that will be the basis of the new engine. More photos and details tomorrow.Duratec Strip
http://www.youtube.com/watch?v=He76ogDVqDw
With the engine stripped down, I could compare the bits that need replaced. Supertech pistons and Carillo rods (right) will replace the cast Ford items (left), both are forged items and apart from being stronger and better quality, they are 100 grams lighter.
An interesting feature on the Ford rods are the sheared bearing caps. The rods are cast in one piece and then 'broken'. I guess it makes them cheaper to manufacture and provides a nice 'keyed' joint
Heat management in pistons is something that you don't necessarily think about but there are some interesting books on the subject. Here the Supertec piston uses the traditional method of oil hole position to help create a thermal break to the skirt, while Ford seem to have inlaid a different material, the oil drains being notches at the side - presumably to keep the strength of the weaker cast piston.
The ring height appears to be slightly lower on the Carillo piston - I guess to allow it to run in a worn bore. Something that had worried me and one of the reasons I went for a new engine. You live and learn!
The standard shells come in three grades (sizes) red, blue and green. They mix and match the grades to get the optimum clearance to compensate for manufacturing tolerances - this big end uses one blue and one red. All the others where fitted with blue which is the nominal size. The up-rated VP2 bearings that I will use come in just the nominal size. The increased tolerances appear to be acceptable on a rebuilt performance engine.
The grading system is not just confined to bearings shells. The pistons are also made in three grades 1, 2, & 3 to give optimum fit to the bore. All four piston on this engine seem to be grade 2. The Supertech is a 12.5:1 CR so has a proud crown and pockets for the value as both the lift and timing would otherwise cause contact. Again the replacement Supertech Pistons all come in the nominal size.
One thing I noted on the casting was a number of flakes and decided to de-burred the block casting. This photo shows the finish - clearly Ford think it is acceptable. It probably is in most cases, but bits could break away and this 'bit' would not do the oil pump much good.
I spent an hour or so de-burring the casting - and I'm glad I did. Lots of pieces were found loosely attached, the biggest bit being pictured below. Because of the number of bits coming off, I decided to extend the de-burring to all areas that I could see. The oil galleries seemed particularly bad. I remember when my R400 was new I found bits in the gauze filter and oil filter (which I cut open to check). I now know where they most likely came from. Their size probably doesn't present any risk to the engine as they are likely to be caught in the filters. But oil can bypass the filter when cold so I'd rather not find out.
The main bearings are graded in the same way as the big end shells but this time their are 13 combined sizes This is a yellow top and brown + brown bottom which represents one grade each side of the nominal size - all the shells where similar sizes. The top bearings are groved and the bottom is plain. I will reuse these bearings as they are new and VP2 upgraded bearings are not available.
The thrust bearing is the middle bearing of the five. The thrust sections are welded to the main bearing and are a snug fit to the crank case bearing web. They are not a precision bearing by any means and have a healthy clearance to the crank. I shall check the spec on assembly. The photo shows them sitting on the cradle with its opposite number - one is a brown + brown, and the other brown.
On of the first jobs will be to send off the crank to have a key cut in the crank. The standard friction washers are OK to 8000 rpm, but once above that, the risk of it slipping is real. That would undoubtedly be a dramatic and costly end to the engine.
This is a slightly exploded view of the crank pulley. On the standard engine they all get clamped up with two 'friction' washers which can be seen both sides of the sprocket.
The crank shaft sprocket drives the camshafts from outer teeth, and the oil pump from the inner teeth. The chains are of different sizes.
I suppose the crank is pretty ordinary and safe to 9000 rpm I’ve been told when keyed. I'm confident a that a steel crank would not add anything, and would not be worth the money.
Comparing the camshafts: on the right is the standard (145BHP) camshaft and on the left is the UL39 (the bar through the center is just to align the two). The standard is just clamped to its sprocket with a bolt, although a friction washer can be added to 'upgrade' this arrangement. The UL39 is located with a pin (not shown) and has a vernier type sprocket to allow for adjustment.
Superimposing the standard inlet cam over the UL39 inlet shows the different profile. The UL39 has a 12.5 mm lift (9 mm std) and is clearly opening earlier and longer.
Edited by DCL on Friday 20th December 19:48

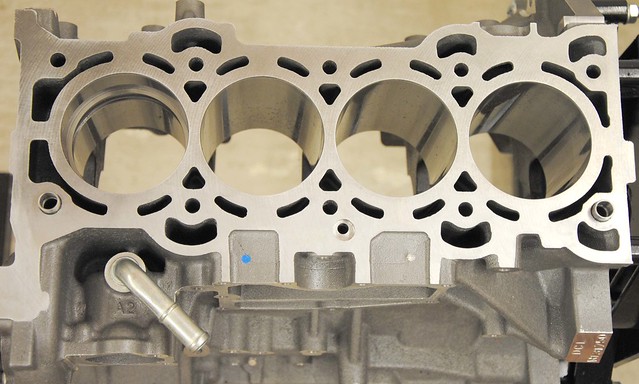
With the crank sent off to be keyed and a load of parts on order, I spent some time looking at the block in more detail. These little ‘squirters’ hide on top of the main bearing journals and spray oil onto the pistons and bores when the oil pressure is high enough. They have spring loaded ball bearing valves in them.

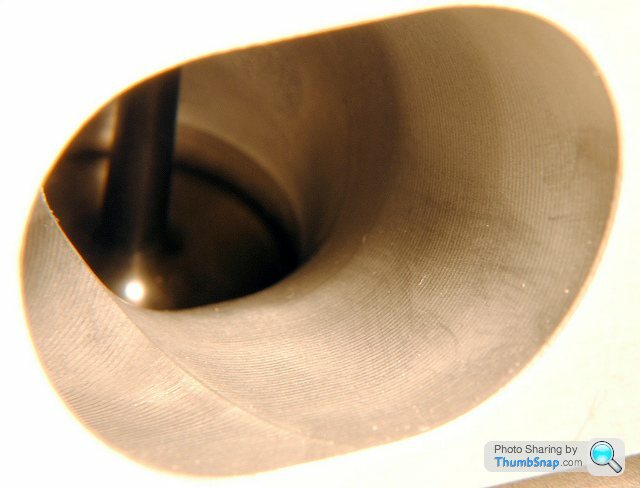
Duratec is a very straightforward 'back to basics' type engine. But look how they put the 'basics together! The complexity in the block casting, particularly in the voids, is outstanding - Just look how the liners meet the head surface to provide a trouble free gasket surface.

As I mentioned in a previous post, uprated main bearings are not readily available for the Duratec. The preferred option is to use the Ford graded bearing. This picture offers a clue as to why this may be - the bearing material is VERY thin. No doubt the this adds significantly to the structural strength of the bearing, but does show the importance of those 13 possible grade options to get the tolerances correct.
One disappointment when examining the bearings was to see that some had suffered minor hammer marks and scuffing. I'm 100% confident this damage happened during or before the original assembly, and my experience suggest it's irrelevant, but when you aiming for a perfect build it is unwelcome
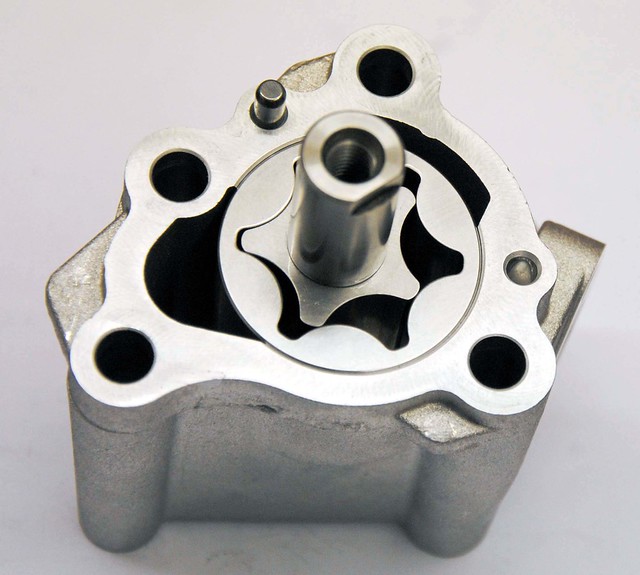
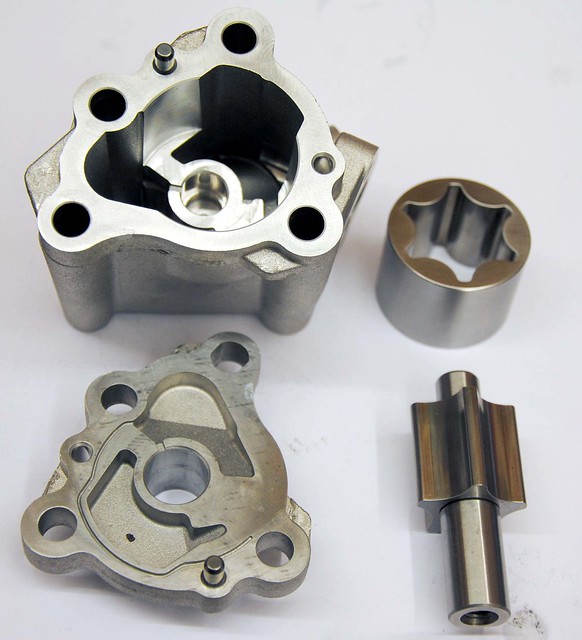
The oil pump is a fairly standard rota type. As I am using a Cosworth dry sump I’ll be using the internal oil pump. The jury is still out on whether I upgrade to a high volume version.
Anyone who has pushed a Duratec for a long track session will have seen that oil pressure can take a dive - but it usually recovers quickly. One theory is that the block expands and allowing more oil to escape from the mains. The more I look at the overall oil system, the more I realise that the main bearings (and their tight tolerances) are key to this engine’s success.
While on the subject of oil pressure, it is worth saying that the main studs will be replaced with ARP versions. Their increased strength over the standard bolt help to hold the bearing together and play their part in maintaining tolerance and the oil pressure. At £16 a bolt, they're expensive but probably worth every penny.
In the next post, I hope to start assembly - you can follow day to day stuff on https://www.facebook.com/Duratec.in.detail
Duratec is a very straightforward 'back to basics' type engine. But look how they put the 'basics together! The complexity in the block casting, particularly in the voids, is outstanding - Just look how the liners meet the head surface to provide a trouble free gasket surface.
As I mentioned in a previous post, uprated main bearings are not readily available for the Duratec. The preferred option is to use the Ford graded bearing. This picture offers a clue as to why this may be - the bearing material is VERY thin. No doubt the this adds significantly to the structural strength of the bearing, but does show the importance of those 13 possible grade options to get the tolerances correct.
One disappointment when examining the bearings was to see that some had suffered minor hammer marks and scuffing. I'm 100% confident this damage happened during or before the original assembly, and my experience suggest it's irrelevant, but when you aiming for a perfect build it is unwelcome
The oil pump is a fairly standard rota type. As I am using a Cosworth dry sump I’ll be using the internal oil pump. The jury is still out on whether I upgrade to a high volume version.
Anyone who has pushed a Duratec for a long track session will have seen that oil pressure can take a dive - but it usually recovers quickly. One theory is that the block expands and allowing more oil to escape from the mains. The more I look at the overall oil system, the more I realise that the main bearings (and their tight tolerances) are key to this engine’s success.
While on the subject of oil pressure, it is worth saying that the main studs will be replaced with ARP versions. Their increased strength over the standard bolt help to hold the bearing together and play their part in maintaining tolerance and the oil pressure. At £16 a bolt, they're expensive but probably worth every penny.
In the next post, I hope to start assembly - you can follow day to day stuff on https://www.facebook.com/Duratec.in.detail
I'm still waiting for the crank to be returned and a load of bits, but here's an up date of some of the learning process I am going through with the Duratec . . .
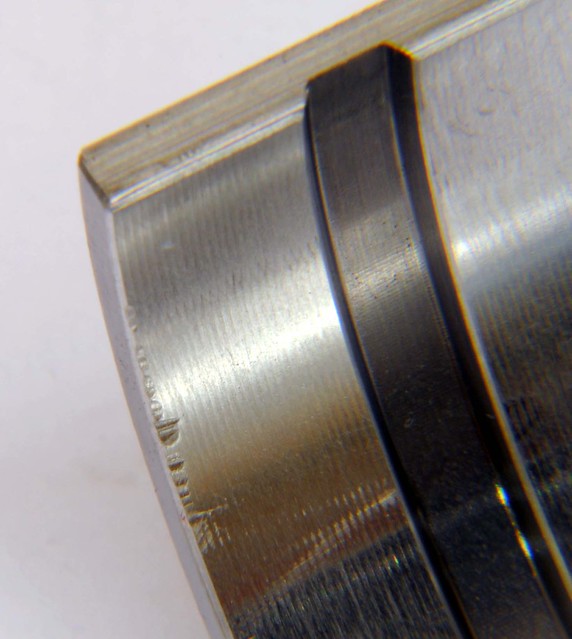
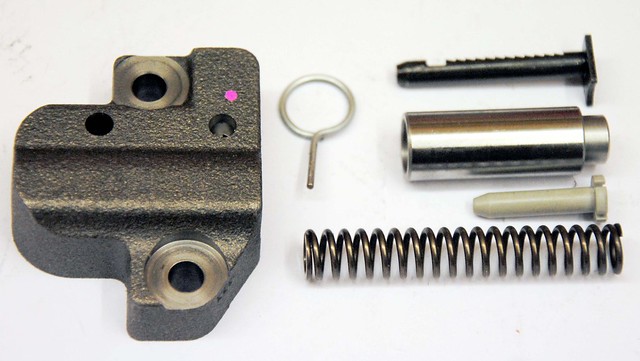
It was fashionable for DOHC engines to have cam belts as they provided a easy solution to the longer runs and high RPM. But with higher production costs to keep the belt clear of oil, it was only a matter of time before the chains made a comeback. The Duratec uses an eight segment design, and, unlike a conventional chains, the segments engage directly with the sprocket. Typical of this engine, it is a clever low cost solution.

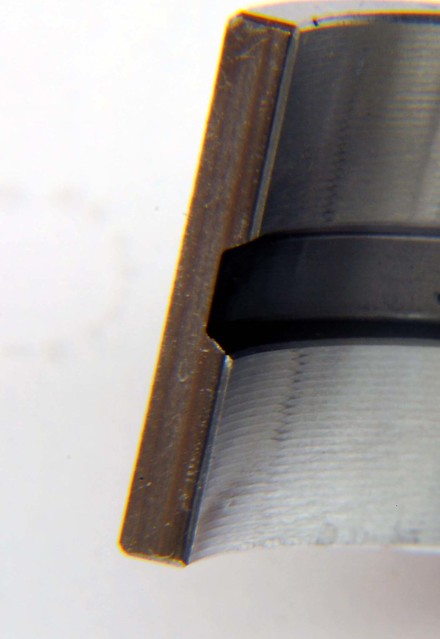
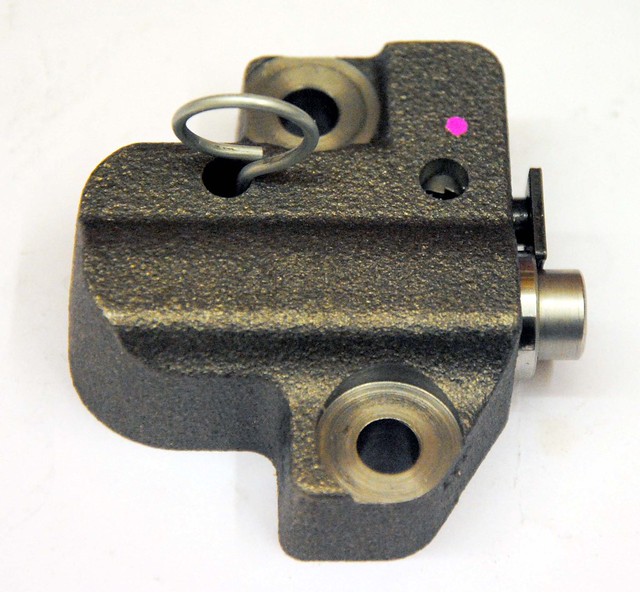
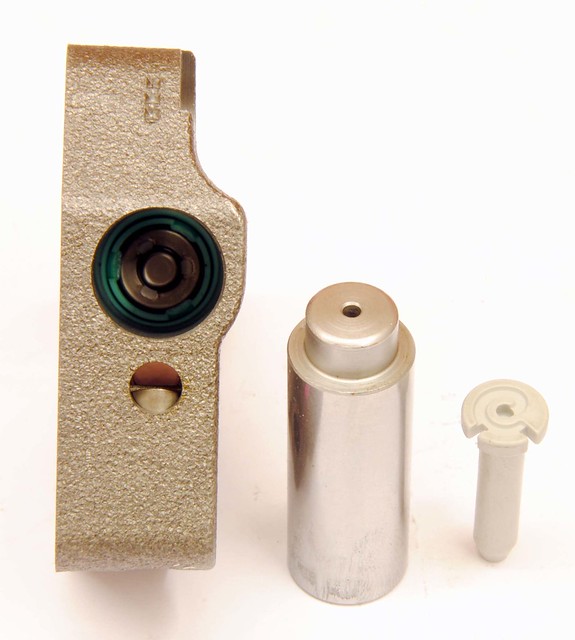
Following on from the chain, the standard tensioner (bottom in the picture) is spring loaded device that also utilises oil pressure. There is a spring ratchet mechanism that takes up the slack when the engine is not running and a small hole in the nose that squirts oil onto the chain (through a hole in the guide).
Before I had the dry sump, I lost oil pressure on my R400 and there was a terrifying noise - not a knock like you might expect from bearings, but more like a 'bag of spanners'. I suspect the ratchet mechanism was defeated and the chain lost tension. I got away with it on the ‘standard’ engine but that might not be the case with hotter cams and higher CR piston.
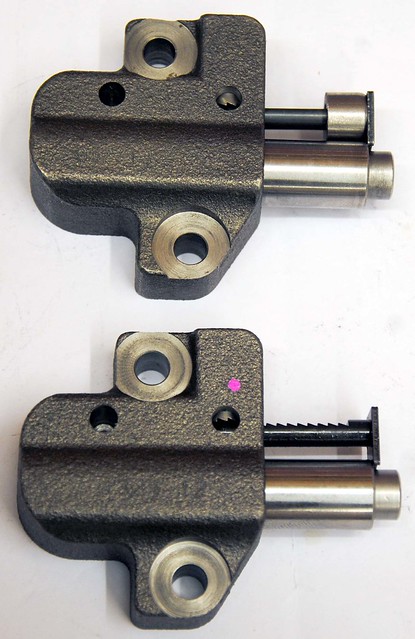
The solution is a modified tensioner (top picture) - there are variations on the theme, but basically a mechanical stop is added to limit how slack the chain can get. This one also has the ratchet machined off completely.
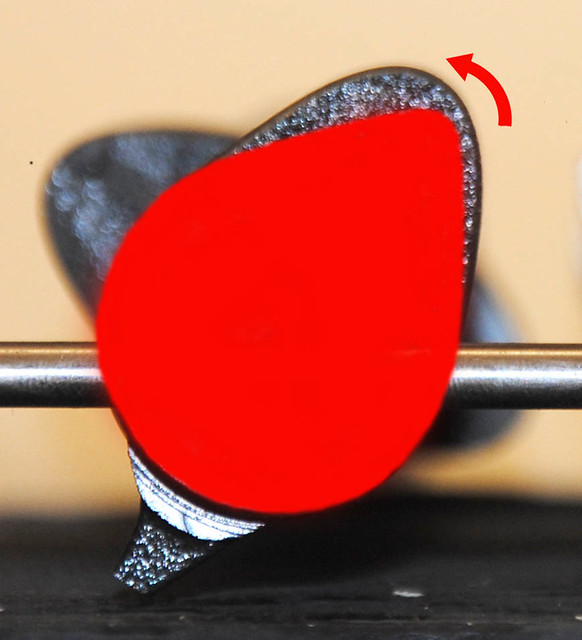
Here's a picture of the tensioner showing the internal valve. The valve inside appears to be 'on-way' and, using the spring, regulates oil flow when pressure is low. Because the spring acts to both tension the chain and regulate the oil pressure, the spring tension will be replaced (and not added to) when oil pressure is sufficient. Also, as the piston would be full of oil with the only exit via the small hole in the tip (non-return valve the other end), it will act as a damper and help keeps the tension guide in contact with the chain.
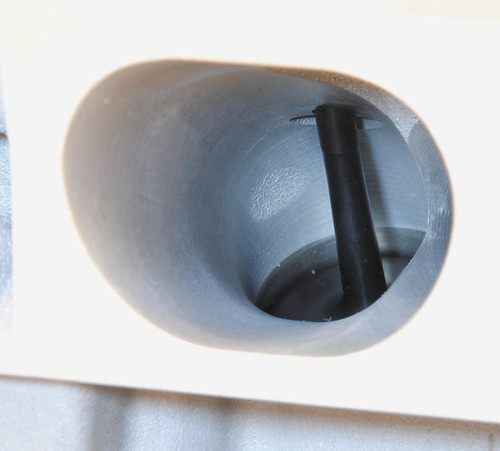
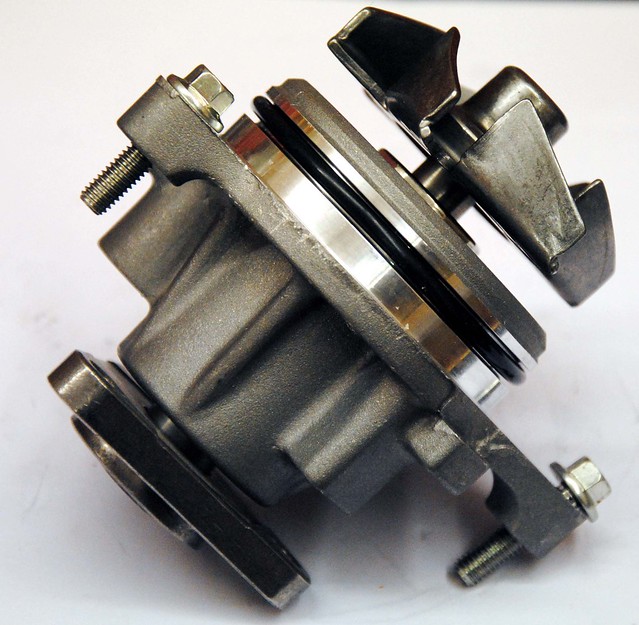
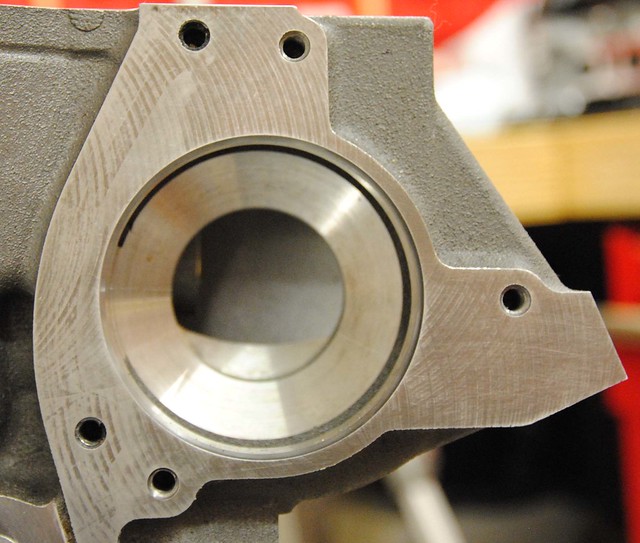
The water pump is a conventional set-up. The cone shape impeller fits in a cone shape that has been machined in the block - coolant being sucked into the centre and thrown out to a ring in the housing - not unlike a turbo charger in appearance. The coolant exiting from the pump is split in two - one flow being directed to each side of the block for even cooling. On a high RPM engine it will cavitate, so steps need to be taken to slow it down and this can be done with either with a larger pulley on the pump or a smaller one on the crank.
The thermostat is 'conventional' (that's a word that I'm using a lot on this engine) but, as is often the case with the Duratec, there's usually a twist to the design. . .
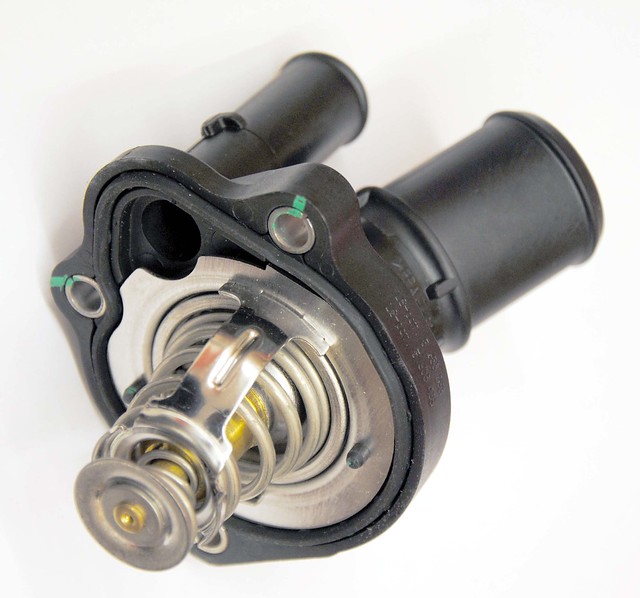
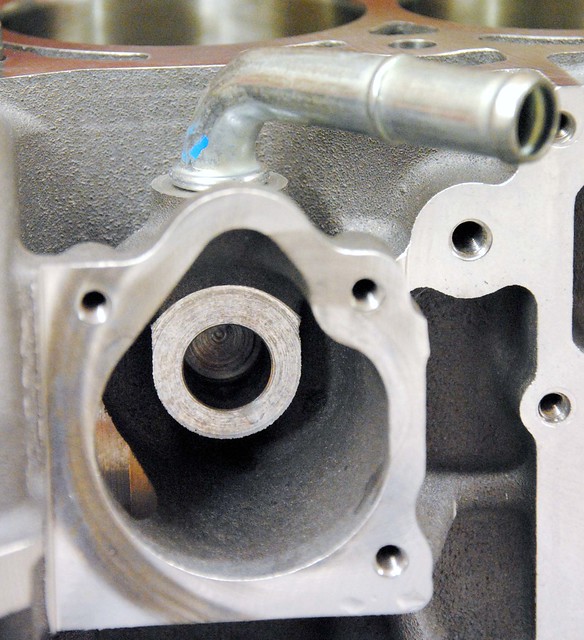
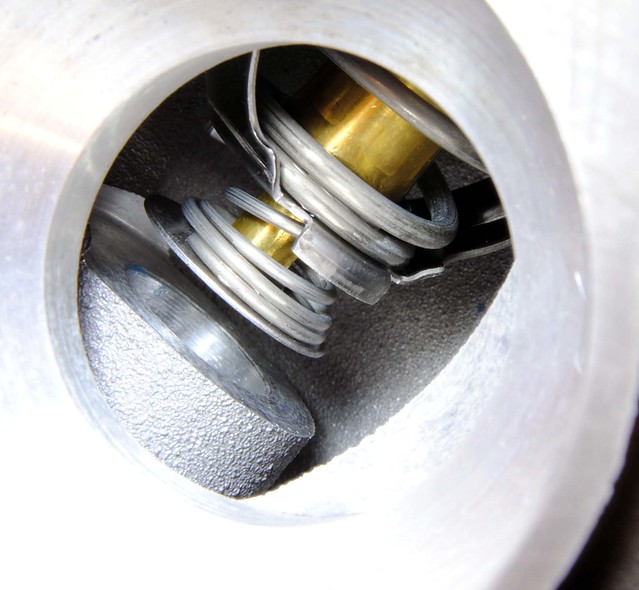
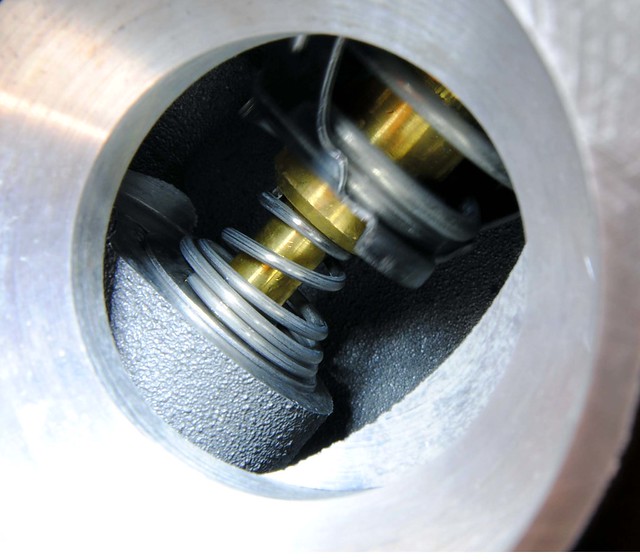
The thermostat housing has a re-circulation pipe that allows for coolant to circulate around the block when the thermostat is closed. The thermostat is, in fact, a two-way valve and blocks off the re-circulation pipe when it opens. The bottom picture shows the thermostat after being heated up in boiling water. This engine will use a 82 degree thermostat.
It was fashionable for DOHC engines to have cam belts as they provided a easy solution to the longer runs and high RPM. But with higher production costs to keep the belt clear of oil, it was only a matter of time before the chains made a comeback. The Duratec uses an eight segment design, and, unlike a conventional chains, the segments engage directly with the sprocket. Typical of this engine, it is a clever low cost solution.
Following on from the chain, the standard tensioner (bottom in the picture) is spring loaded device that also utilises oil pressure. There is a spring ratchet mechanism that takes up the slack when the engine is not running and a small hole in the nose that squirts oil onto the chain (through a hole in the guide).
Before I had the dry sump, I lost oil pressure on my R400 and there was a terrifying noise - not a knock like you might expect from bearings, but more like a 'bag of spanners'. I suspect the ratchet mechanism was defeated and the chain lost tension. I got away with it on the ‘standard’ engine but that might not be the case with hotter cams and higher CR piston.
The solution is a modified tensioner (top picture) - there are variations on the theme, but basically a mechanical stop is added to limit how slack the chain can get. This one also has the ratchet machined off completely.
Here's a picture of the tensioner showing the internal valve. The valve inside appears to be 'on-way' and, using the spring, regulates oil flow when pressure is low. Because the spring acts to both tension the chain and regulate the oil pressure, the spring tension will be replaced (and not added to) when oil pressure is sufficient. Also, as the piston would be full of oil with the only exit via the small hole in the tip (non-return valve the other end), it will act as a damper and help keeps the tension guide in contact with the chain.
The water pump is a conventional set-up. The cone shape impeller fits in a cone shape that has been machined in the block - coolant being sucked into the centre and thrown out to a ring in the housing - not unlike a turbo charger in appearance. The coolant exiting from the pump is split in two - one flow being directed to each side of the block for even cooling. On a high RPM engine it will cavitate, so steps need to be taken to slow it down and this can be done with either with a larger pulley on the pump or a smaller one on the crank.
The thermostat is 'conventional' (that's a word that I'm using a lot on this engine) but, as is often the case with the Duratec, there's usually a twist to the design. . .
The thermostat housing has a re-circulation pipe that allows for coolant to circulate around the block when the thermostat is closed. The thermostat is, in fact, a two-way valve and blocks off the re-circulation pipe when it opens. The bottom picture shows the thermostat after being heated up in boiling water. This engine will use a 82 degree thermostat.
mic said:
Its worth checking that there is enough clearance between the ARP mains bolts and the windage plate. For what its worth the standard bolts will give no trouble at all.
Thanks for the tip! I've just checked them and they are about 1cm longer. It is a Cosworth dry sump and as the studs are also Cosworth (but made by ARP). I would like to think they have taken this into account! (famous last words ) That looks like a neat solution. I've not decided how I will do mine yet, but have looked at a few options. I've COPs but the issues for me is that I am using a Modine oil cooler and that needs a good supply of coolant. So with that and the by-pass pipe, I need two outlets on the inlet side and none of the water rails I've looked seem to do that very well. The set up I've got at the moment (Silicon pipe on inlet side) works well so may just stick with that until I find something better.
I'm using SPA guage for the oil (sensor in the dry sump tank), and Stack dial gauges for the pressures. Both work well. I particuarly like the SPA as I can set mins and max temps to a warning light.
I'm using SPA guage for the oil (sensor in the dry sump tank), and Stack dial gauges for the pressures. Both work well. I particuarly like the SPA as I can set mins and max temps to a warning light.
I suppose it depend on your state of tune, how you drive, and ambient temperature, but I personally have never seem high oil temperature on my Duratec. Funny what you say about the alternator position - mine has allways been on the inlet side, but I was thinking of moving it to the exhaust side as the small SBD crank pulley I plan to use makes the belt to belt clearance a bit small 
Gassing Station | Caterham | Top of Page | What's New | My Stuff