Caterham 6 to Sadev Anyone done it?
Discussion


This time last year I was pondering the possibility of upgrading my engine and a year later I have a 270BHP screamer. All covered here
Well it's time to move on and I've decided to go sequential and a nice new Sadev box arrived this week.
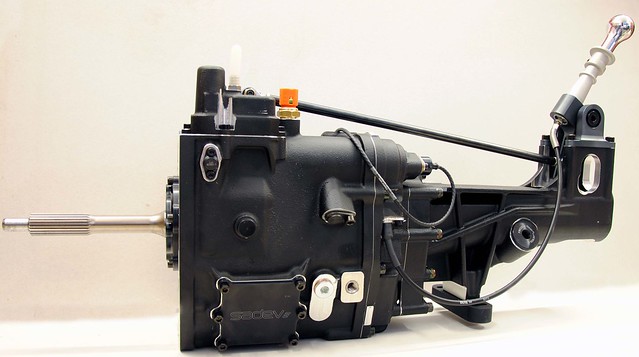
The plan is to get it installed and working and then working with a Geartronics flatshift. Longer term, (and really just for the technical challenge) look at a paddle shift with throttle blipper.
Anyway before I get too carried away, is there anyone who's installed one and knows the pitfalls. In particular I'm interested if the standard prop-shaft is up to the job?
Well it's time to move on and I've decided to go sequential and a nice new Sadev box arrived this week.
The plan is to get it installed and working and then working with a Geartronics flatshift. Longer term, (and really just for the technical challenge) look at a paddle shift with throttle blipper.
Anyway before I get too carried away, is there anyone who's installed one and knows the pitfalls. In particular I'm interested if the standard prop-shaft is up to the job?
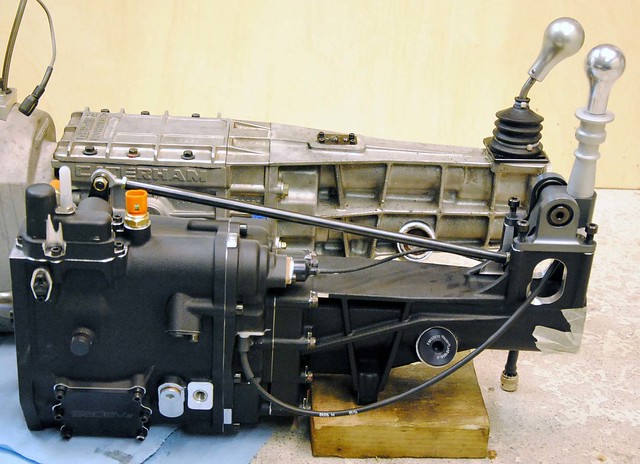
I'd love to pick your brains on your experience with the Westie - maybe up at KH on day. I'm really still researching, but have bought the box and the Geartronics ECU. The Sadev is purpose built straight cut box with proper dog engagement and is really only intended for racing. It has a reverse gear below 1st (the cable from the stick is used to unlock it).
Sadev boxes have a hall effect gear position sensor with a change switch. The Geartronics ECU pugs straight in and provides closed loop flatshift using torque reduction, if your engine ECU supports it. Down shifts are more difficult as the larger engines need to overcome the inertia as quickly as possible. That usually means physically opening the throttle with an actuator (pneumatic). I've built the engine with this in mind, so it does have lightweight pulley, flywheel, and a small twin-plate clutch. But there are still significant challenges in engineering it.
Sadev boxes have a hall effect gear position sensor with a change switch. The Geartronics ECU pugs straight in and provides closed loop flatshift using torque reduction, if your engine ECU supports it. Down shifts are more difficult as the larger engines need to overcome the inertia as quickly as possible. That usually means physically opening the throttle with an actuator (pneumatic). I've built the engine with this in mind, so it does have lightweight pulley, flywheel, and a small twin-plate clutch. But there are still significant challenges in engineering it.
Edited by DCL on Saturday 12th July 22:14
Thanks James and IBDAET for your input. The gearbox has been purchased from SWR and is (I'm told) modified to latest Caterham spec, but I've been doing this sort of thing long enough to know there are no certainties in this world. Certainly the rear mount looks like it will need modified or a different rubber mount fitted.
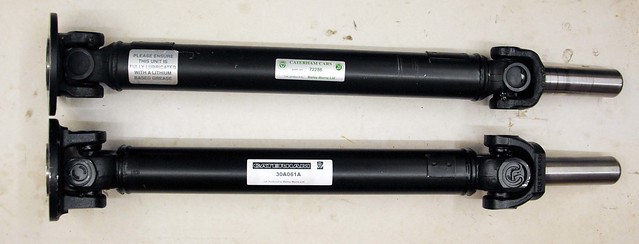
Talking to others, including Caterham, it seems there are two options for prop-shafts. Get one made, or use the R300 race item, but (according to Caterham parts) the R300 race item has been discontinued but is replaced with the R600 shaft. My understanding is the R600(not to be confused with the 620R)used the Ford diff, but it's all getting a bit confusing - can anyone confirm?.
Talking to others, including Caterham, it seems there are two options for prop-shafts. Get one made, or use the R300 race item, but (according to Caterham parts) the R300 race item has been discontinued but is replaced with the R600 shaft. My understanding is the R600(not to be confused with the 620R)used the Ford diff, but it's all getting a bit confusing - can anyone confirm?.
Edited by DCL on Tuesday 15th July 09:28
I've just received what Caterham are using on their 2014> sequential cars. It appears to be a a heavier gauge tube (but still 2 inch) with significantly bigger yokes. The flange is to the Ford pattern and the length is the same as the earlier Duratec/Ford diff cars. Not sure if the 620 uses the Ford diff, or just the Ford flange? Anyway, the paper work suggest it fits the 620 too.


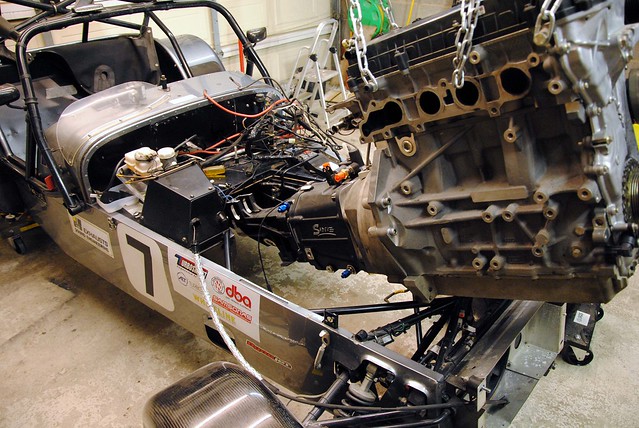
After a frustrating few months where domestic commitments stopped progress on Sadev upgrade, I've finally managed to start and took the engine out this week.
Thanks to everyone who has contacted me and offered valued advice - an amalgam of knowledge is beginning to form
Dimensionally the two boxes are the same so it should fit but there are differences - namely the fixing bolts are M12 and screw into the gearbox, whereas the caterham six used M10 that screw into the bell housing (possibly only relevant to early factory Duratecs). The gear position is also said to be poor, so some mods are needed there, but I might test fit it to make my own mind up about that first.
This means drilling out the bell housing M10 threads to a M12 clearance hole.
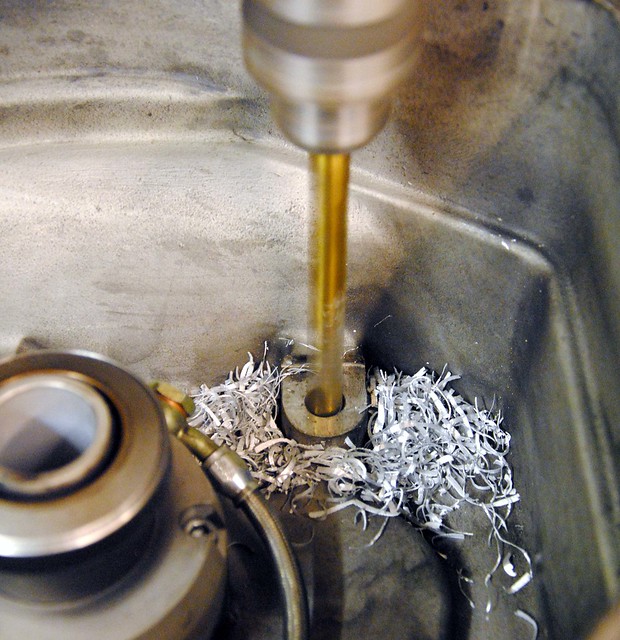
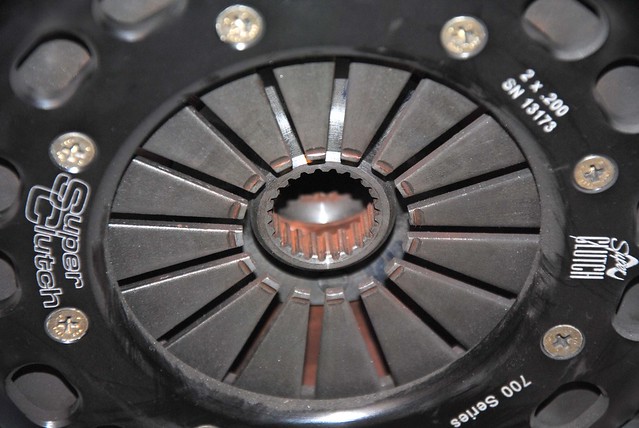
As the clutch is accessible, I thought it worth stripping it down to check it out. Having done 7 sprint events and several track days, it was surprisingly clean with little or no wear.
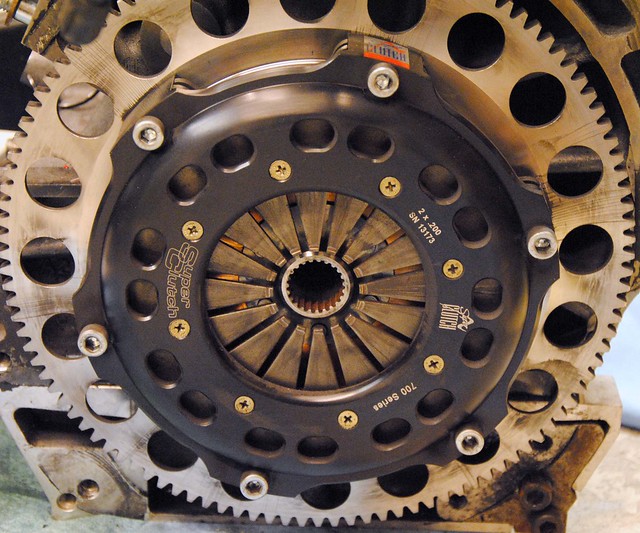
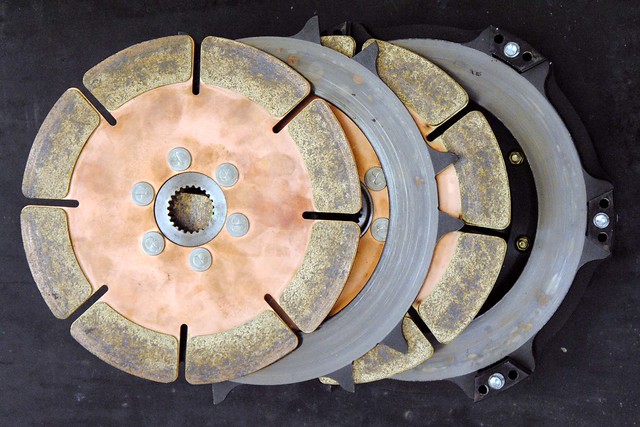
The only noticeable difference from new was a where the release bearing hand worn a groove in the spring - but no signs of distress anywhere.
Thanks to everyone who has contacted me and offered valued advice - an amalgam of knowledge is beginning to form
Dimensionally the two boxes are the same so it should fit but there are differences - namely the fixing bolts are M12 and screw into the gearbox, whereas the caterham six used M10 that screw into the bell housing (possibly only relevant to early factory Duratecs). The gear position is also said to be poor, so some mods are needed there, but I might test fit it to make my own mind up about that first.
This means drilling out the bell housing M10 threads to a M12 clearance hole.
As the clutch is accessible, I thought it worth stripping it down to check it out. Having done 7 sprint events and several track days, it was surprisingly clean with little or no wear.
The only noticeable difference from new was a where the release bearing hand worn a groove in the spring - but no signs of distress anywhere.
Edited by DCL on Tuesday 16th December 21:16
c9cwn said:
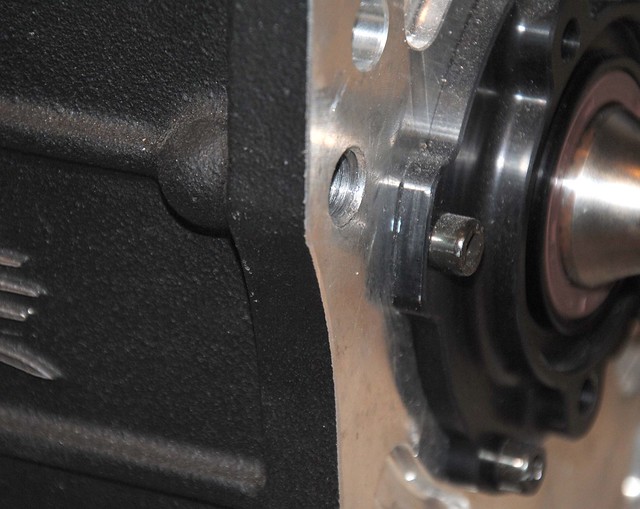
On the Sadev the top left threaded bolt hole where the bell housing is secured to the gearbox, has shorter threads in than the other 3. So you will need a shorter bolt for this hole.
Yeah, it came with a big sticker to that effect. Looks like there's been some issues with that not being noticed.Yesterday I started to look at what's involved with the prop-shaft upgrade. With the diff and prop out it gave me a change to compare them side by side.
The standard yoke is 70mm and the upgraded one is 82mm (2 3/4 and 3 1/4 inches) so half an inch bigger.
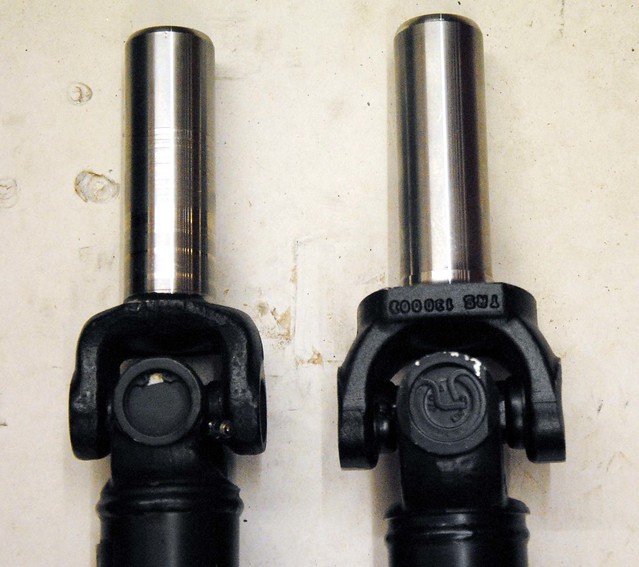
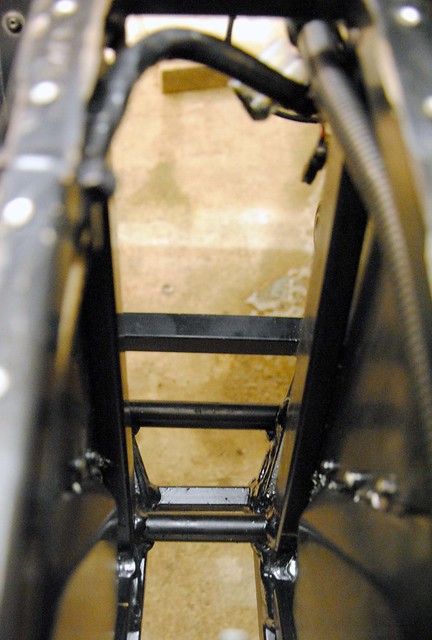
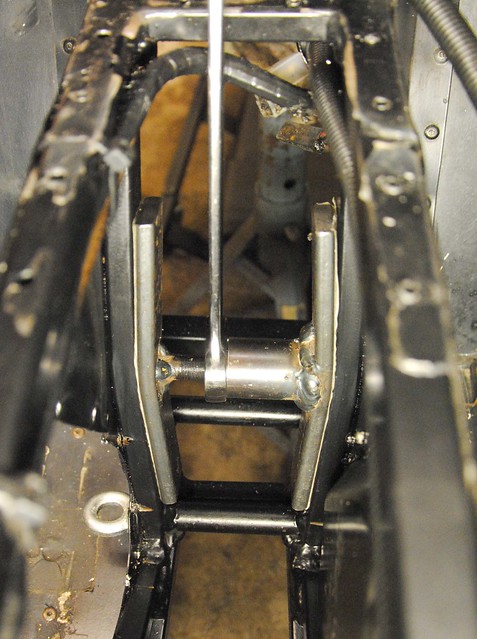
I originally thought that the mod to the chassis was to allow for increased running clearance, but it looks like it is simply needed to physically slide the front yoke it in place - the clearance between the chassis members being 75 mm. Maybe there's a possibility to dismantle the joint to get it past rather than bend the chassis.
I'm off for my Christmas lunch now so I ponder it between the small talk with a few beers.
The standard yoke is 70mm and the upgraded one is 82mm (2 3/4 and 3 1/4 inches) so half an inch bigger.
I originally thought that the mod to the chassis was to allow for increased running clearance, but it looks like it is simply needed to physically slide the front yoke it in place - the clearance between the chassis members being 75 mm. Maybe there's a possibility to dismantle the joint to get it past rather than bend the chassis.
I'm off for my Christmas lunch now so I ponder it between the small talk with a few beers.
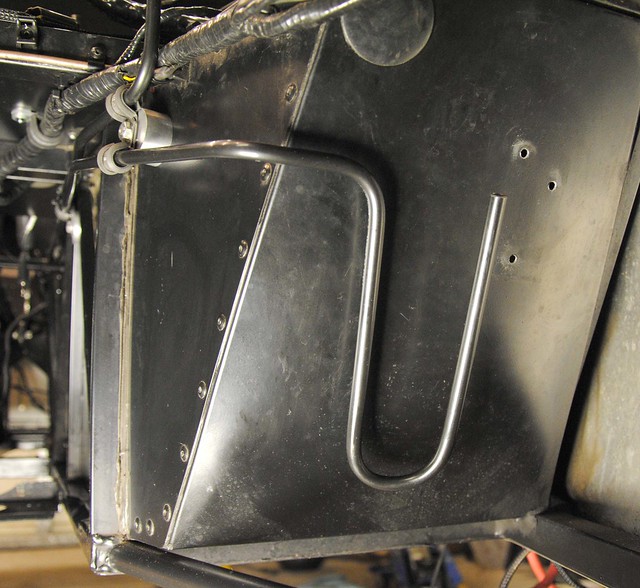
I must confess I've been putting off the the chassis 'bend', but today I felt up to the task and I'm pleased to say it went very well. I fabricated a jack with arms bent to the curve just a little more than the I was aiming for. It was jacked out until the arms touched along their length and then sprang back to leave just enough room to get prop shaft through. No damage or kinks .

. An update:
Bad man flu slowed progress over the festive period - I had five days set aside and only managed one on the car But I did bolt the gearbox to the engine and then had a go at putting it in the car
But it just wouldn't fit . . .
so tried again from underneath
Still no joy . . .
The obvious problem was that the Sadev is a little taller and hits the top of the tunnel before I can drop the front down.
But the factory fit these, so the real problem was that I have the deeper Cosworth sump - it just needs a bit more of an angle, something I didn't have.
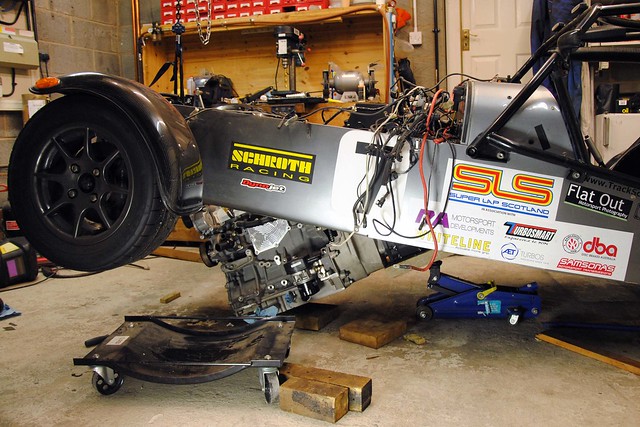
In the end I ended up fitting them separately. Not too much of a problem - the main one being reduced access to torque up the bell housing bolts - but still quite do-able.
The gearbox fit is extremely tight and clearance is really too small on one side. I expect I could run it like that (and accept the occasional contact with the chassis) but I think I will give it a little more thought, possible adjusting mounts to help matters.

With the engine in I decided to put the seat back in and fit the gear lever to assess the position. I first tried it as the factory had supplied it.

It was Ok, and very similar to the Caterham six, but I was unhappy with the angle - it would work better if it was a little more upright. I had been tipped off that fitting it backwards might help so tried this.
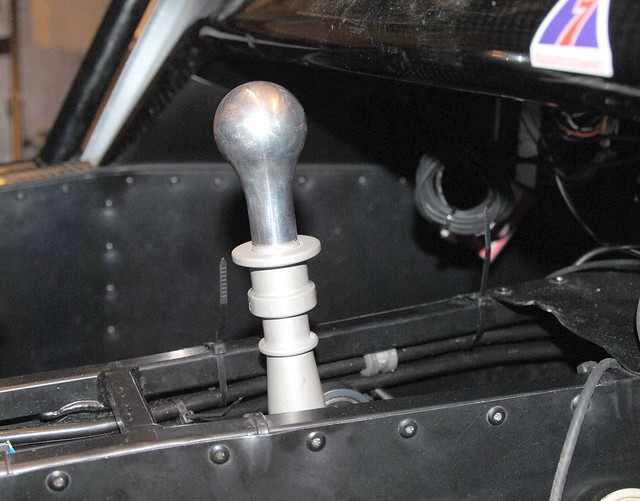
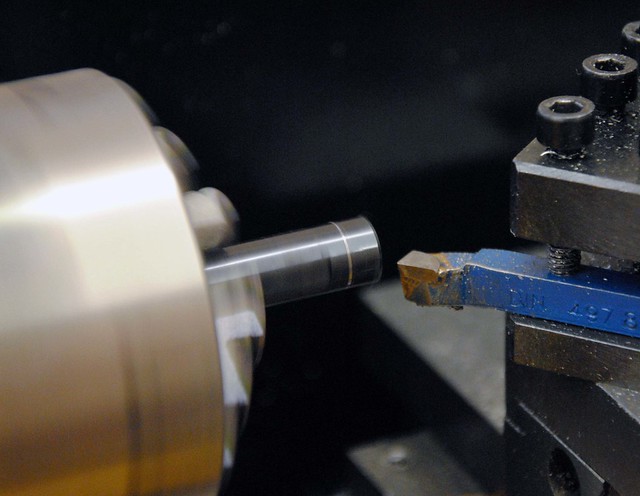
The reverse fitting needs the push rod length tweaked - but that was just another excuse to use the lathe There's still enough adjustment to move it significantly, so I'm happy I can make it work fine
The engine is now out again to allow me to tidy up a few things now that I know were the gearbox sits. Among these are some new fuel lines that will be used to upgrade the fuel system with a filter, fuel rail regulation, and a return line.
Bad man flu slowed progress over the festive period - I had five days set aside and only managed one on the car
But I did bolt the gearbox to the engine and then had a go at putting it in the carBut it just wouldn't fit . . .
so tried again from underneath
Still no joy . . .
The obvious problem was that the Sadev is a little taller and hits the top of the tunnel before I can drop the front down.
But the factory fit these, so the real problem was that I have the deeper Cosworth sump - it just needs a bit more of an angle, something I didn't have.
In the end I ended up fitting them separately. Not too much of a problem - the main one being reduced access to torque up the bell housing bolts - but still quite do-able.
The gearbox fit is extremely tight and clearance is really too small on one side. I expect I could run it like that (and accept the occasional contact with the chassis) but I think I will give it a little more thought, possible adjusting mounts to help matters.
With the engine in I decided to put the seat back in and fit the gear lever to assess the position. I first tried it as the factory had supplied it.
It was Ok, and very similar to the Caterham six, but I was unhappy with the angle - it would work better if it was a little more upright. I had been tipped off that fitting it backwards might help so tried this.
The reverse fitting needs the push rod length tweaked - but that was just another excuse to use the lathe
There's still enough adjustment to move it significantly, so I'm happy I can make it work fineThe engine is now out again to allow me to tidy up a few things now that I know were the gearbox sits. Among these are some new fuel lines that will be used to upgrade the fuel system with a filter, fuel rail regulation, and a return line.
Edited by DCL on Monday 12th January 08:42
SWR supplied it like this
The picture you refer to has the rod passing through the fork and is not connected. It was too long, and when you connected it, the gear lever pointed forward and would have hit the dash. Although I ordered the Caterham spec, I'm not convinced the factory was quite up to speed with the current Caterham installation. As you say there have been some mods and it is possible the push rod can be supplied in a shorter length.
The picture you refer to has the rod passing through the fork and is not connected. It was too long, and when you connected it, the gear lever pointed forward and would have hit the dash. Although I ordered the Caterham spec, I'm not convinced the factory was quite up to speed with the current Caterham installation. As you say there have been some mods and it is possible the push rod can be supplied in a shorter length.
With the engine and gearbox out, I decided to do a nuts & bolts rebuild of the rear end of the car so progress on the upgrade has been slow for that reason. But it's all back together now so an update is due.
Although the MBE9A4 can do flat shifts I had decided to go with the Geartronics set up. It is a well proven combination and suggested by SWR and various others I spoke to.
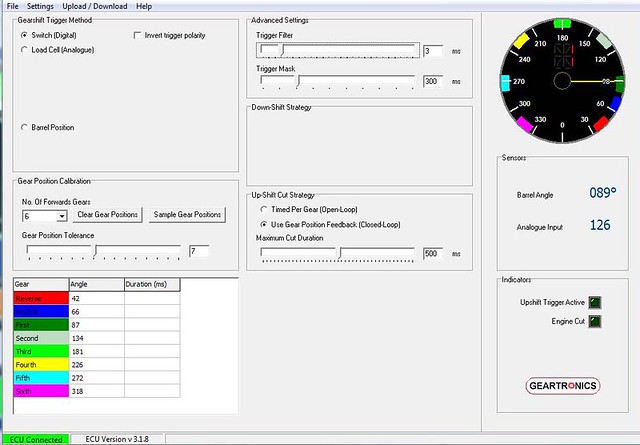
It is quite literally a plug and play, the harness plugging directly to the gearbox (it uses the Sadev postion pot) and a serial port to your PC. All that is needed is to selct each gear in turn and sample the gear.
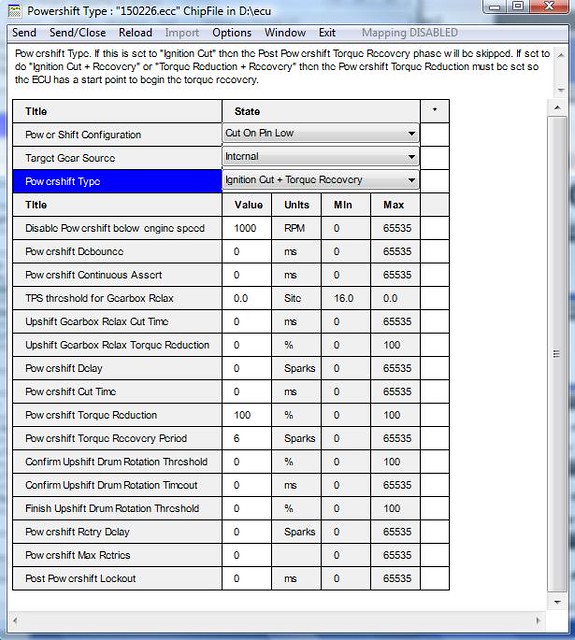
The MBE requires a wire to a programmable pin, I chose pin 19 as it was free - the only issue was that the pin was not physically there so some where ordered. It was set up to cut on pin low (closed loop) for the initial test but later set to 'cut and torque recovery'.
After some test on axles stands there was nothing left but but go for it
https://www.youtube.com/watch?v=f51UzDe358M
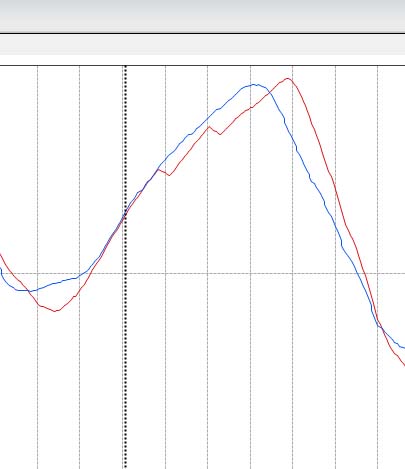
Some tweaks needed but pleased with the results. These two traces are in similar conditions and show the difference. The blue has three gear changes in it
Although the MBE9A4 can do flat shifts I had decided to go with the Geartronics set up. It is a well proven combination and suggested by SWR and various others I spoke to.
It is quite literally a plug and play, the harness plugging directly to the gearbox (it uses the Sadev postion pot) and a serial port to your PC. All that is needed is to selct each gear in turn and sample the gear.
The MBE requires a wire to a programmable pin, I chose pin 19 as it was free - the only issue was that the pin was not physically there so some where ordered. It was set up to cut on pin low (closed loop) for the initial test but later set to 'cut and torque recovery'.
After some test on axles stands there was nothing left but but go for it
https://www.youtube.com/watch?v=f51UzDe358M
Some tweaks needed but pleased with the results. These two traces are in similar conditions and show the difference. The blue has three gear changes in it
Edited by DCL on Sunday 1st March 15:21
It has been set up with Knockhill in mind. I chose the 1:1 box with 3.92:1 diff. With Kumho tyres, 8500 RPM it should give around 130 mph which is what I think my maximum speed will be. I was short shifting, while I'm running in the box, so a little more RPM in there, but we'll see if I've got it right when it's driven in anger. If not I've got a 3.64 ready to go
Update time!
I took the car to Northampton Motorsport to do some mapping of the throttle bodies (another story, another thread). While there, we tried some of the different MBE stratergies for the powershift. We found the torque reduction and torque recovery caused backfiring:
https://www.youtube.com/watch?v=dgSjbKBDZpI
Ingnition cut was smoother. We believe what was happening was that the late ignition of torque reduction was happening when the exhaust valve was open. This resulted in the fuel being ignited as it entered the exhaust. Ignition cut meant the source of ignition never occured.
Here's the result on a very wet and windy track:
https://www.youtube.com/watch?v=4yTtumXmG0s
So than brings the project to a close, but I will report back lap time comparisons once the weather improves.
Edited by DCL on Sunday 29th March 17:16
With the first competitive event last weekend, and my first time driving the car in the dry. Here's a few full chat gear changes.
https://www.youtube.com/watch?v=VwW7GzM33J0
Despite some poor driving on my part, a third in class and a few 10 ths of my PB without too much difficulty. The car is easily quicker, at a guess at least a second a lap. Flat-shifts just get better with the higher RPM - a few adjustments still to tested but that brings the project to a close.
Edited by DCL on Thursday 23 April 20:56
Yes, down shifts are with the clutch. You can get away without, but not reliably. Early days and still learning, but what I seem to be adopting is knocking down the gears late under braking. If you can drag the clutch a little it seems smoother, but that's easier said than done! Interestingly, up-shifting on the limiter (as in the video) works a treat. I suspect because it relaxes the drive train just before you change.
Gassing Station | Caterham | Top of Page | What's New | My Stuff