And so it begins... Rebuid - S2
Discussion


Hi All,
Hope you're all good. Well, it looks like the weather has finally broken, and as my 6 months tax runs out in a few days - I've gone for it. Following a few issues this summer with the Tiv, I've decided it's time I begin what I always intended, and start to rebuild my S2. Needless to say, I'm on a budget and it will probably take a few years, but the electrical gremlins I've been experiencing this summer have meant it's not been reliable enough to 'trust' (despite a good run of 5 weeks in every day use)!!
Last straw was having to have it recovered due to what I thought was an immobiliser/solenoid fault which I eventually fixed by replacing the fuel pump relay. Started, took up our drive, put the old relay back and....it started!!!! So not sure what I managed to fix.
Anyway - here she is, bonnet off (wow how much easier is it to work on the engine)!! Don't currently have a 'plan' as such - basically get everything off, replace all the corroded bits and definitely lots of interior work. Will probably do a partial body lift and assess the chassis to see whether it can be sorted in my garage or if serious welding is required and go from there.
No doubt I will need lots of advice - and I know exactly where to find it
Andrew
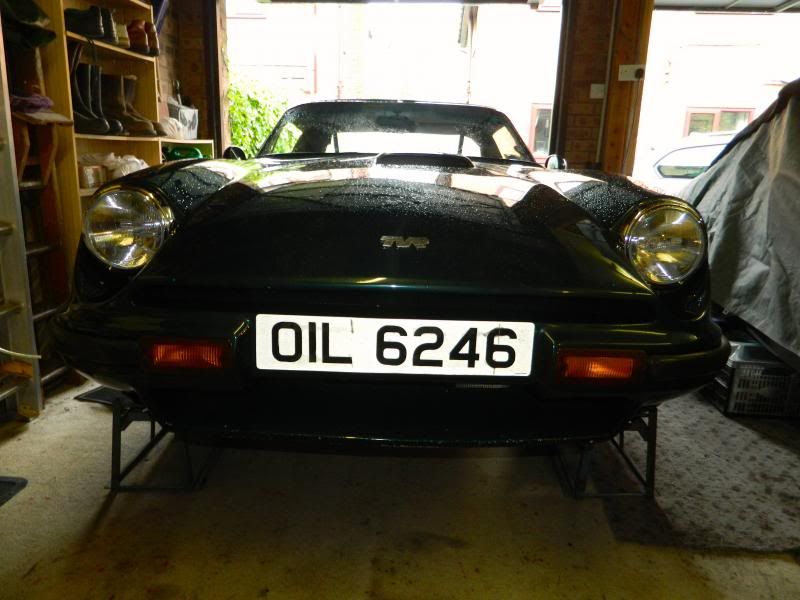
Before
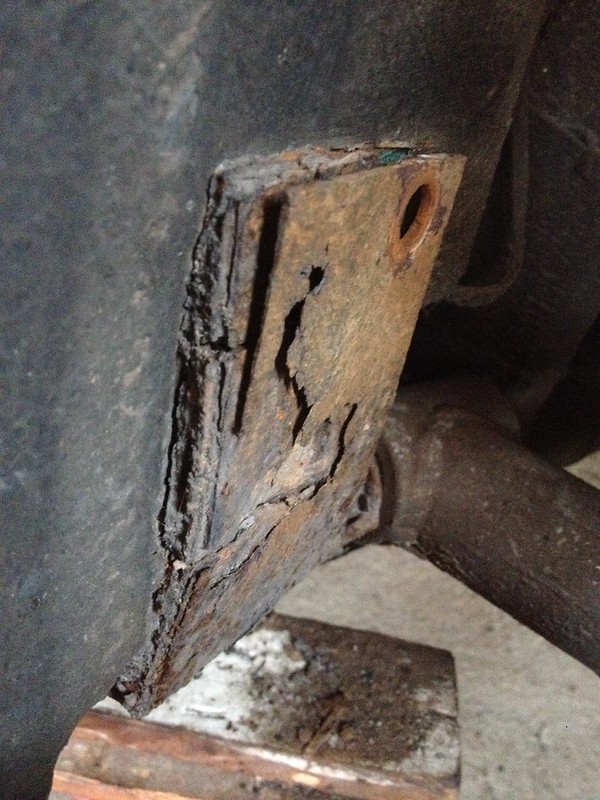
State of the bonnet hinges!! Lots of play...
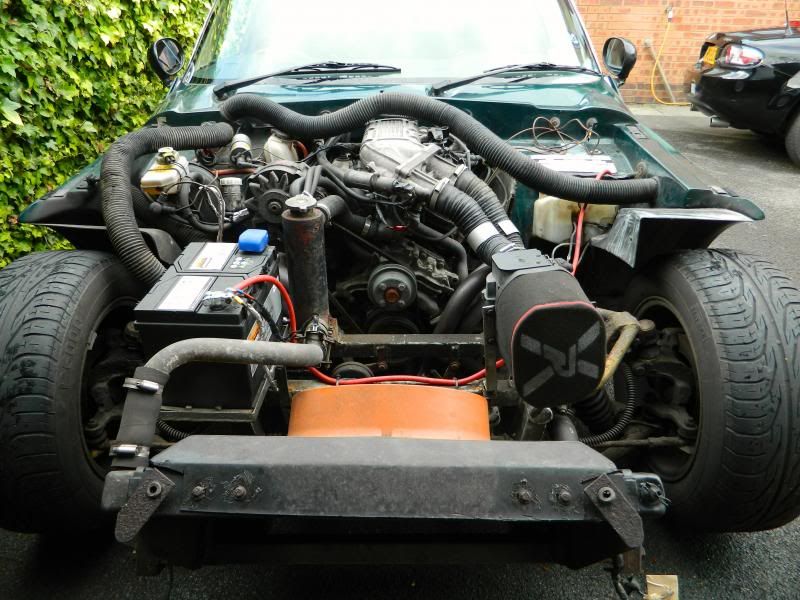
Bonnet removed
Lots to work on!!
Hope you're all good. Well, it looks like the weather has finally broken, and as my 6 months tax runs out in a few days - I've gone for it. Following a few issues this summer with the Tiv, I've decided it's time I begin what I always intended, and start to rebuild my S2. Needless to say, I'm on a budget and it will probably take a few years, but the electrical gremlins I've been experiencing this summer have meant it's not been reliable enough to 'trust' (despite a good run of 5 weeks in every day use)!!
Last straw was having to have it recovered due to what I thought was an immobiliser/solenoid fault which I eventually fixed by replacing the fuel pump relay. Started, took up our drive, put the old relay back and....it started!!!! So not sure what I managed to fix.
Anyway - here she is, bonnet off (wow how much easier is it to work on the engine)!! Don't currently have a 'plan' as such - basically get everything off, replace all the corroded bits and definitely lots of interior work. Will probably do a partial body lift and assess the chassis to see whether it can be sorted in my garage or if serious welding is required and go from there.
No doubt I will need lots of advice - and I know exactly where to find it
Andrew

Before

State of the bonnet hinges!! Lots of play...

Bonnet removed

Lots to work on!!

Thanks for all the messages!!
Will probably be realistically looking at a full body off. Thanks for all the offers of 'lifting' - probably will require a full body off party!! Probably look to do that in Spring/Summer next year when the weather comes back and the MG isn't occupying the other half of the garage.
Cheers,
Andrew
S2Mike said:
I admire the bravery Andrew. To take your "S" off the road voluntarily, expecting to be without for a year or so............
Do you have something to stand-in for the TVR on those days you need a "S" Fix. ??
Im not sure I could be without mine for very long.
Good Luck !
I have a 1974 MG Midget which is SORN for the winter but will be the stand in next summer. My Dad managed to keep up (just) with the TVR boys on one run - I would maybe hope to emulate his efforts!! Do you have something to stand-in for the TVR on those days you need a "S" Fix. ??
Im not sure I could be without mine for very long.
Good Luck !
Will probably be realistically looking at a full body off. Thanks for all the offers of 'lifting' - probably will require a full body off party!! Probably look to do that in Spring/Summer next year when the weather comes back and the MG isn't occupying the other half of the garage.
Cheers,
Andrew
FINALLY a couple of weekends in a row free and some progress. Spent today stripping the interior. Seats out, carpets out, dashboard out, all instruments removed from dashboard.
Spent a LONG time tracing and labelling wires, and I've decided that the alarm/immobiliser system that has clearly been installed as a retrofit at some point was definitely installed by an irishman when my car lived in Belfast (no offence Irish friends). My GOODNESS what a lot of wires. Eventually traced them all and CHOP CHOP goodbye semi-functioning alarm system. The siren was knackered and I've had recent problems starting so I've decided I can do without it.
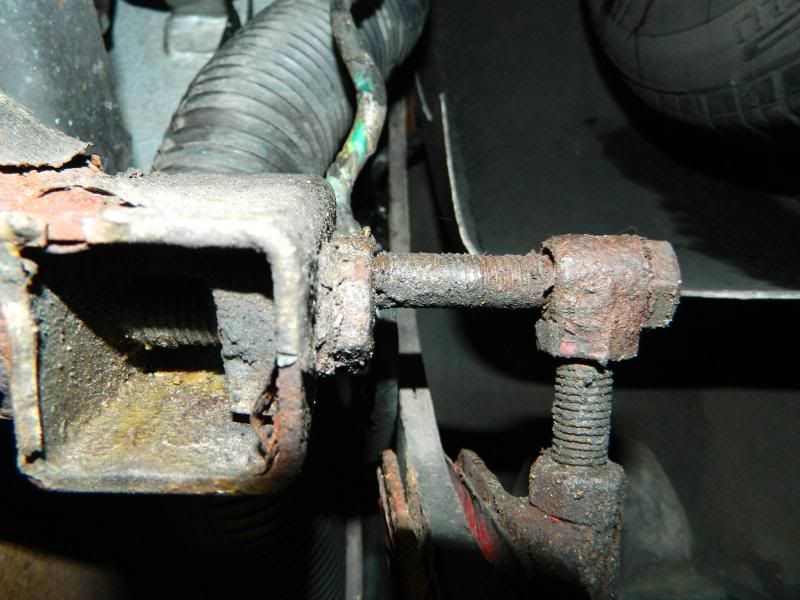
Next turned to the seat belts. Both sides removed with less effort than expected. Took plenty of elbow grease and a 3 ft long wrench but they all came undone eventually. The drivers side bolt sheered in 2 pieces it was so corroded. These were the bits I was most concerned about on the chassis, and as you can see from the pictures below…I was right!!
More work tomorrow and hopefully Monday. I have the day off to take the MG for its MOT, but assuming it's a pass….should have the afternoon to work on the TVR.


Managed to get garage so that MG just about fits for overnight storage still - tight though!!


Spent a LONG time tracing and labelling wires, and I've decided that the alarm/immobiliser system that has clearly been installed as a retrofit at some point was definitely installed by an irishman when my car lived in Belfast (no offence Irish friends). My GOODNESS what a lot of wires. Eventually traced them all and CHOP CHOP goodbye semi-functioning alarm system. The siren was knackered and I've had recent problems starting so I've decided I can do without it.
Next turned to the seat belts. Both sides removed with less effort than expected. Took plenty of elbow grease and a 3 ft long wrench but they all came undone eventually. The drivers side bolt sheered in 2 pieces it was so corroded. These were the bits I was most concerned about on the chassis, and as you can see from the pictures below…I was right!!
More work tomorrow and hopefully Monday. I have the day off to take the MG for its MOT, but assuming it's a pass….should have the afternoon to work on the TVR.
Managed to get garage so that MG just about fits for overnight storage still - tight though!!
Well, another busy weekend!
Electrics now fully labelled (I hope) and entire wiring loom removed :
:

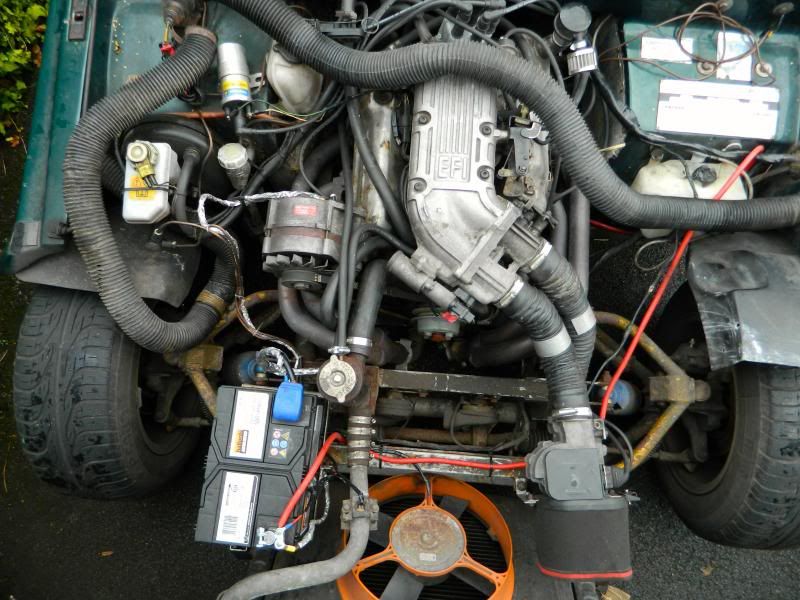
Currently labelled the wires connected to the below "plug in to white boxes bolted to drivers side behind engine"…but WHAT ARE THEY?!! They are pretty cruddy

Remainder of interior completely stripped - steering column and pedal box removed:

Boot stripped and fuel tank disconnected:

Brakes drained, master/servo removed, clutch drained, reservoir removed, mass air flow meters removed, oil drained, coolant drained, radiator removed, swirl pot removed, water pump removed….:

Source of mysterious oil puddle on top of engine - rocker cover gasket had not been fitted correctly:

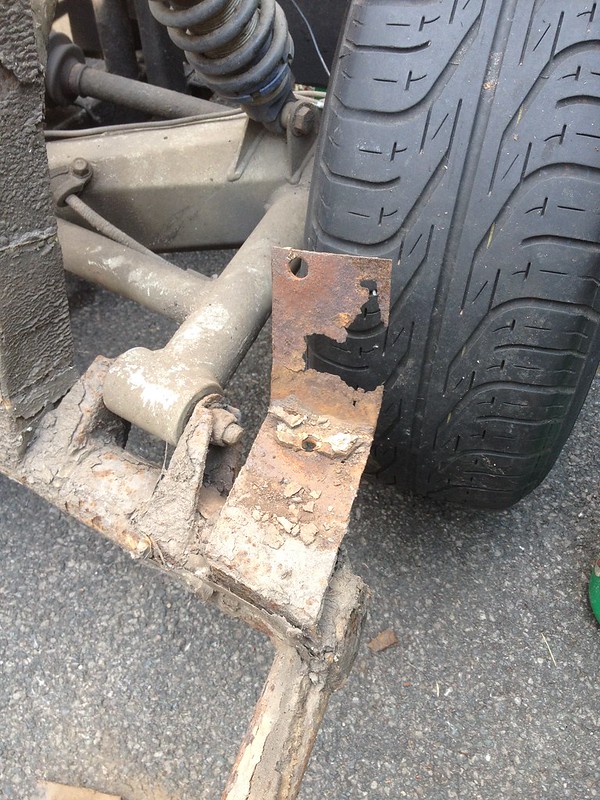
These brake pipe brackets at the front are pretty knackered:

Now on to main body-chassis bolts - this one required an angle grinder and a hack saw:

Summary of damage to date…
- accelerator cable locator (at engine end) plastic bit broken:

- one of the small copper tubes on the swirl pot came off with the pipe - so new swirl pot required
All in all though, the 'easy bit' has gone well - I'm really pleased with how quick progress has been. As I say though - this is the easy bit!! Only 3 bolts to go before I'm ready for the lift I think…
Andrew
Electrics now fully labelled (I hope) and entire wiring loom removed
:Currently labelled the wires connected to the below "plug in to white boxes bolted to drivers side behind engine"…but WHAT ARE THEY?!! They are pretty cruddy
Remainder of interior completely stripped - steering column and pedal box removed:
Boot stripped and fuel tank disconnected:
Brakes drained, master/servo removed, clutch drained, reservoir removed, mass air flow meters removed, oil drained, coolant drained, radiator removed, swirl pot removed, water pump removed….:
Source of mysterious oil puddle on top of engine - rocker cover gasket had not been fitted correctly:
These brake pipe brackets at the front are pretty knackered:
Now on to main body-chassis bolts - this one required an angle grinder and a hack saw:
Summary of damage to date…
- accelerator cable locator (at engine end) plastic bit broken:
- one of the small copper tubes on the swirl pot came off with the pipe - so new swirl pot required
All in all though, the 'easy bit' has gone well - I'm really pleased with how quick progress has been. As I say though - this is the easy bit!! Only 3 bolts to go before I'm ready for the lift I think…
Andrew
HvdWeerden said:
Good progress Andrew ! I think they are Ballast resistors, see topic
http://www.petrolheads.co.uk/xforums/topic.asp?h=0...
Han
Excellent - thanks Han, good link and link within that threat to a Phillpot mod (of course)!http://www.petrolheads.co.uk/xforums/topic.asp?h=0...
Han
THE BODY IS OFF!!!
Invested in a pair of heavy duty ratchet straps which was a good decision. Came off pretty easily, just that front section needed a bit of wiggling. Have got it up in the air such that the chassis can roll in and out of the garage underneath it. Few more pictures and my own version of the 'little shop of horrors' below. The drivers side outrigger is basically dust. The passenger side was repaired when I bought the car, but can't say I'm that happy with it!!


So - considering…. 2 new outriggers????? Or is that repairable? I guess I need to do some poking and see if there is any good metal left. Time to make some phone calls for estimates. Thinking of giving Surface and Design a call, and Xworks service who are both near ish me to see what sort of quotes I get.
Right, bed time I think after another hard weekends work!
Invested in a pair of heavy duty ratchet straps which was a good decision. Came off pretty easily, just that front section needed a bit of wiggling. Have got it up in the air such that the chassis can roll in and out of the garage underneath it. Few more pictures and my own version of the 'little shop of horrors' below. The drivers side outrigger is basically dust. The passenger side was repaired when I bought the car, but can't say I'm that happy with it!!
So - considering…. 2 new outriggers????? Or is that repairable? I guess I need to do some poking and see if there is any good metal left. Time to make some phone calls for estimates. Thinking of giving Surface and Design a call, and Xworks service who are both near ish me to see what sort of quotes I get.
Right, bed time I think after another hard weekends work!
Green ones are fastest - mine must have been very fast considering all the weight it had shed!!!
Are you having any painting done? Mine has a few minor bits of crazing. Will be considering a respray depending on price/availability of funds. Will be staying Green though I think Would like a nice possibly metallic british racing green sort of a colour
Andrew
Are you having any painting done? Mine has a few minor bits of crazing. Will be considering a respray depending on price/availability of funds. Will be staying Green though I think
Would like a nice possibly metallic british racing green sort of a colourAndrew
Not sure Mike - very open to suggestions and inspiration!!! It was light grey originally, which seems to work with the green. In my head I've been swaying from keeping it exactly the same to going for bright red and completely changing the bodywork colour. But on balance I'm thinking of keeping it classic - not sure I want to modernise it in looks.
That said I really like the picture of Joes V8S with the 'low maintenance' wheels and smoked lights as a subtly more modern look…
Much deliberating lies ahead!!!!
That said I really like the picture of Joes V8S with the 'low maintenance' wheels and smoked lights as a subtly more modern look…
Much deliberating lies ahead!!!!
My interior trim was a 'light beige' which I imagine looked the business when it was new, but I have found it a pain for getting my oily finger marks all over it when I have to take the door cards off every 5 minutes…!!
I'm thinking I'd quite like a slightly darker 'biscuit' / 'camel' / 'caramel' sort of a shade…
Kind of like in these seats http://www.pistonheads.com/gassing/topic.asp?h=0&a...
And keep the green carpet and have my wood veneer dash renovated. Plus some shiny silver bits of course!!
I'm thinking I'd quite like a slightly darker 'biscuit' / 'camel' / 'caramel' sort of a shade…
Kind of like in these seats http://www.pistonheads.com/gassing/topic.asp?h=0&a...
And keep the green carpet and have my wood veneer dash renovated. Plus some shiny silver bits of course!!
So I got a bit lazy with the pictures…but I have made more progress!!
Exhaust and Manifolds off - shock freeze spray and releasing oil worked a treat..on 9 out of 12. 3 breakages, all at the hot end (back of engine). All don't look like they'll be too bad. I've been dosing them with more oil and I've bought some sharp drills and an extraction tool to see if they work. One of them is pretty much dust so once drilled I reckon it will just collapse.
Petrol tank and carrier off - easy job as I replaced all this 2 years ago
Prop shaft off, engine and gearbox separated. Much easier job than when I had to do it with the body on because the prop shaft UJs were knackered. Much easier on my neck this time
Picking up engine lift and engine stand tomorrow that I am being loaned, fingers crossed engine out tomorrow afternoon!!
Gassing Station | S Series | Top of Page | What's New | My Stuff