What I've been doing in the garage today
Discussion


Hi All,
Decided that todays the day to commence with my winter workings and just managed to squeeze her into my workshop.
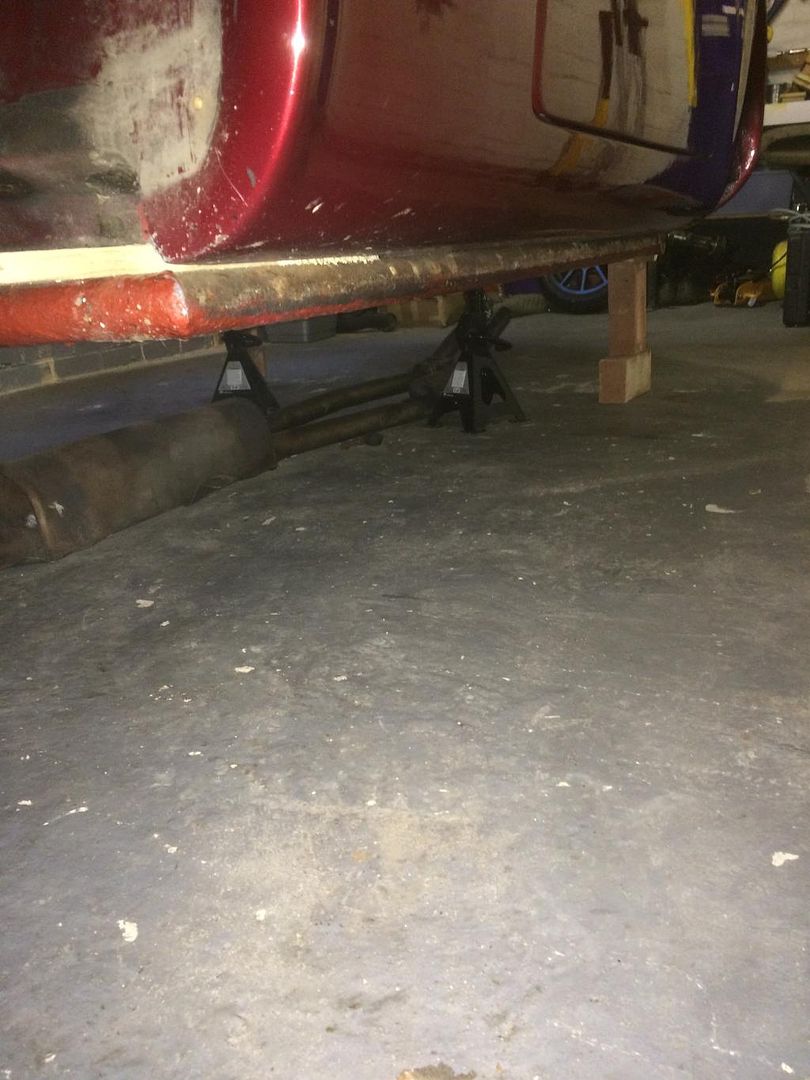
Started off by draining the coolant and removing the rad, definitely time for a new one, looks like rad welds been used at some point, there was no drain plug on the bottom so it turned into quite a messy job, axle stands will be better placed next time!
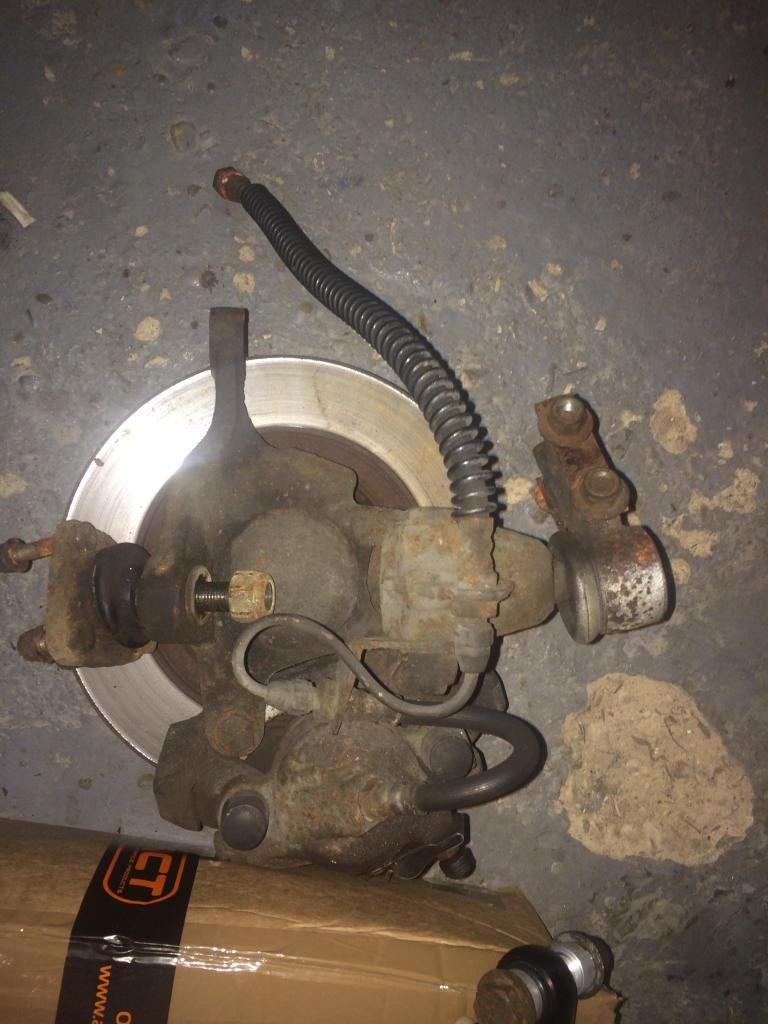
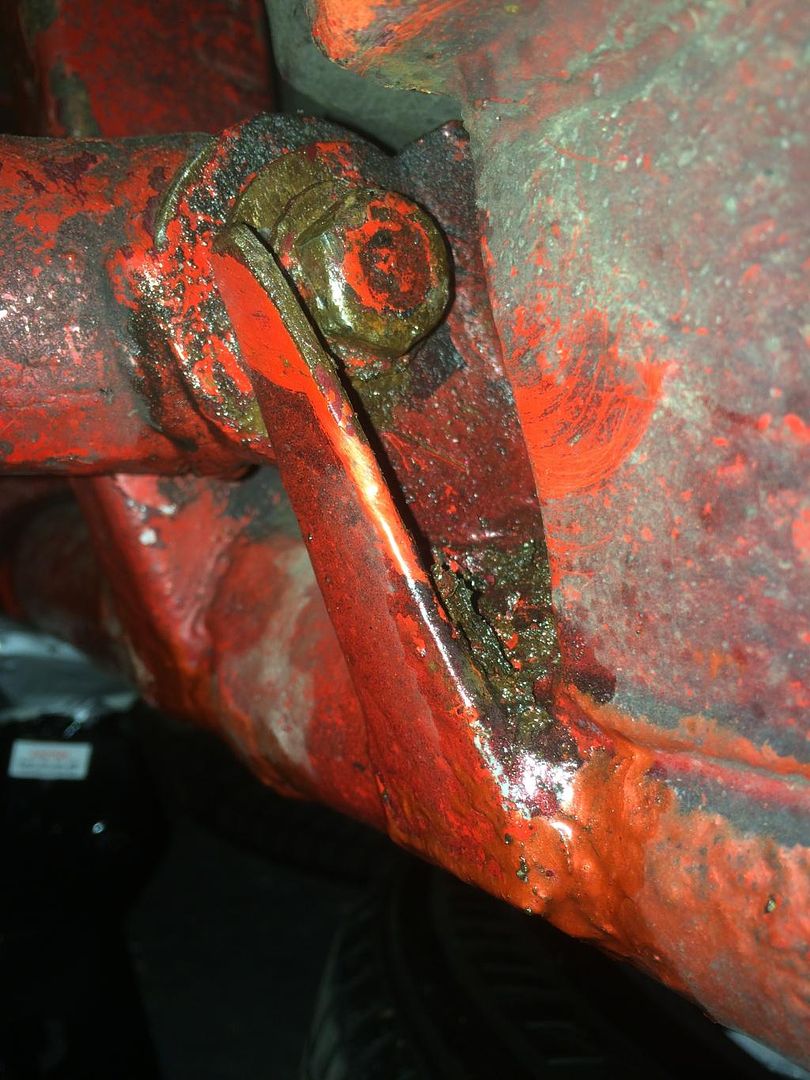
I then moved onto dismantling the suspension and after diving in head first realised I probably should have drained the brake fluid so I could remove the hubs and callipers etc. I managed to get the wishbones off without but will do this before tackling the other side. Is it just a case of undoing both bleed nipples and pumping the pedal until it's empty?
As expected, the further you delve the more bits you find could do with replacement, where's the best place to buy track rod ends, lower ball joints and ARB drop links? I guess it's also worth fitting braided brake hoses whilst they're off.
Finally, the wish bones and ARB are looking a bit tatty and I wonder if it's worth having these powder coated whilst I'm at it. I don't have much room either side of the car perhaps 75cm, will it be possible to get the ARB out at this? How much would you expect to pay for powder coating the four wishbones, ARB and rear trailing arms?
Thanks in advance.
Lawrie
Decided that todays the day to commence with my winter workings and just managed to squeeze her into my workshop.
Started off by draining the coolant and removing the rad, definitely time for a new one, looks like rad welds been used at some point, there was no drain plug on the bottom so it turned into quite a messy job, axle stands will be better placed next time!
I then moved onto dismantling the suspension and after diving in head first realised I probably should have drained the brake fluid so I could remove the hubs and callipers etc. I managed to get the wishbones off without but will do this before tackling the other side. Is it just a case of undoing both bleed nipples and pumping the pedal until it's empty?
As expected, the further you delve the more bits you find could do with replacement, where's the best place to buy track rod ends, lower ball joints and ARB drop links? I guess it's also worth fitting braided brake hoses whilst they're off.
Finally, the wish bones and ARB are looking a bit tatty and I wonder if it's worth having these powder coated whilst I'm at it. I don't have much room either side of the car perhaps 75cm, will it be possible to get the ARB out at this? How much would you expect to pay for powder coating the four wishbones, ARB and rear trailing arms?
Thanks in advance.
Lawrie
Good evening all, thanks for your responses.
I went for the Eezibleed kit from Gunsons, didn't read the instructions, looks like you guys know the rest...
Do you have a picture of them fitted Shaun? Would be happy to tag them onto my swirl pot order.
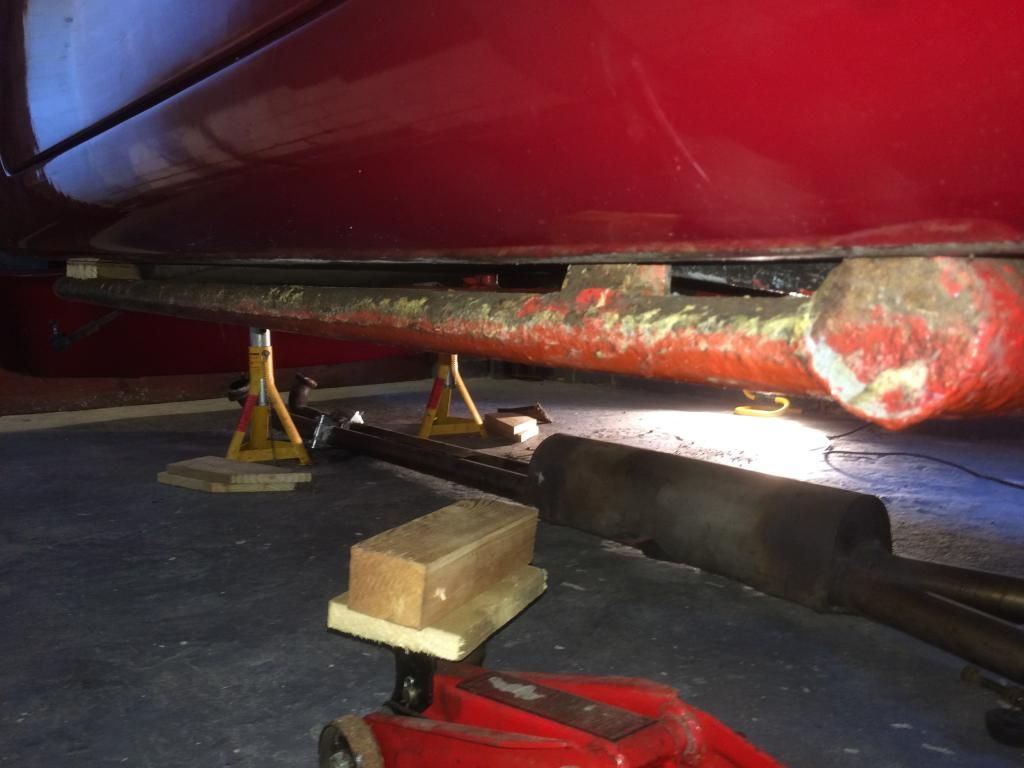
Got the rear end on axle stands now, will continue with suspension strip down this weekend.
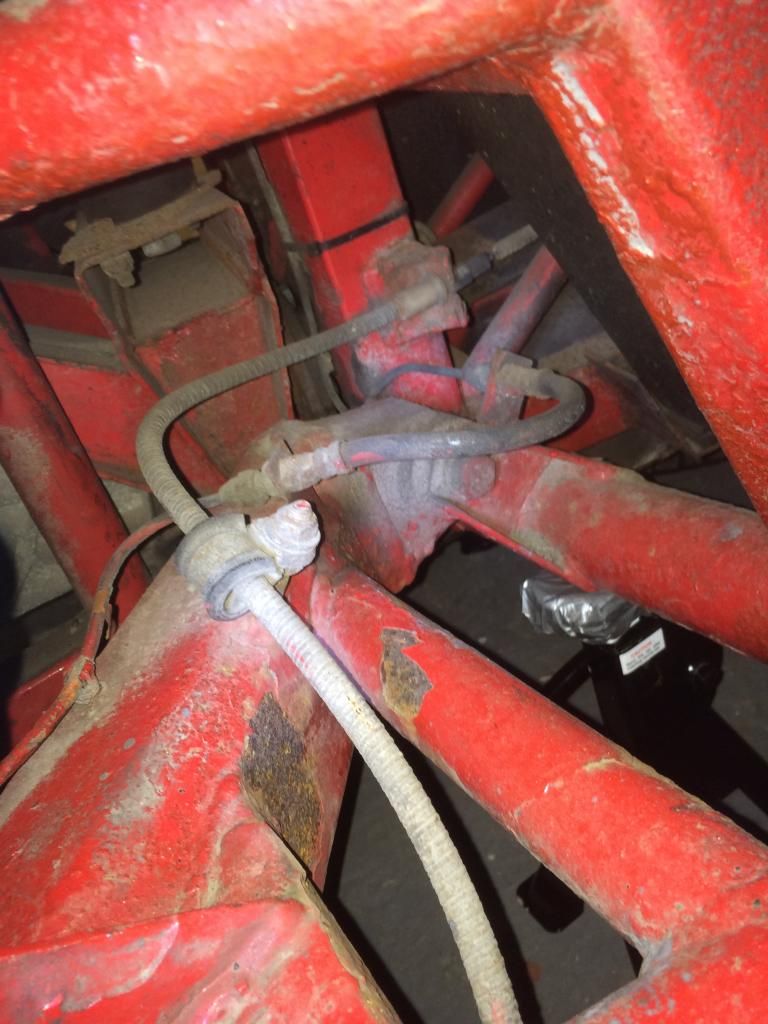
I'll be sending my brake pipes off to Stevsons so if anyone else wants to take a punt at theirs being the same as mine then now might be a good time to order, they seem to want a set to copy, however, I've seen previously that the kits are five pieces, but I count six, two each side up front and one each side at the rear?
Also discovered that my phone can go places I can't, kind of wish I hadn't bothered to be honest...
You lot will be sick of me if I decide to do a body lift
I went for the Eezibleed kit from Gunsons, didn't read the instructions, looks like you guys know the rest...
Do you have a picture of them fitted Shaun? Would be happy to tag them onto my swirl pot order.
Got the rear end on axle stands now, will continue with suspension strip down this weekend.
I'll be sending my brake pipes off to Stevsons so if anyone else wants to take a punt at theirs being the same as mine then now might be a good time to order, they seem to want a set to copy, however, I've seen previously that the kits are five pieces, but I count six, two each side up front and one each side at the rear?
Also discovered that my phone can go places I can't, kind of wish I hadn't bothered to be honest...
You lot will be sick of me if I decide to do a body lift
That puts that one to bed then, thanks Mike.
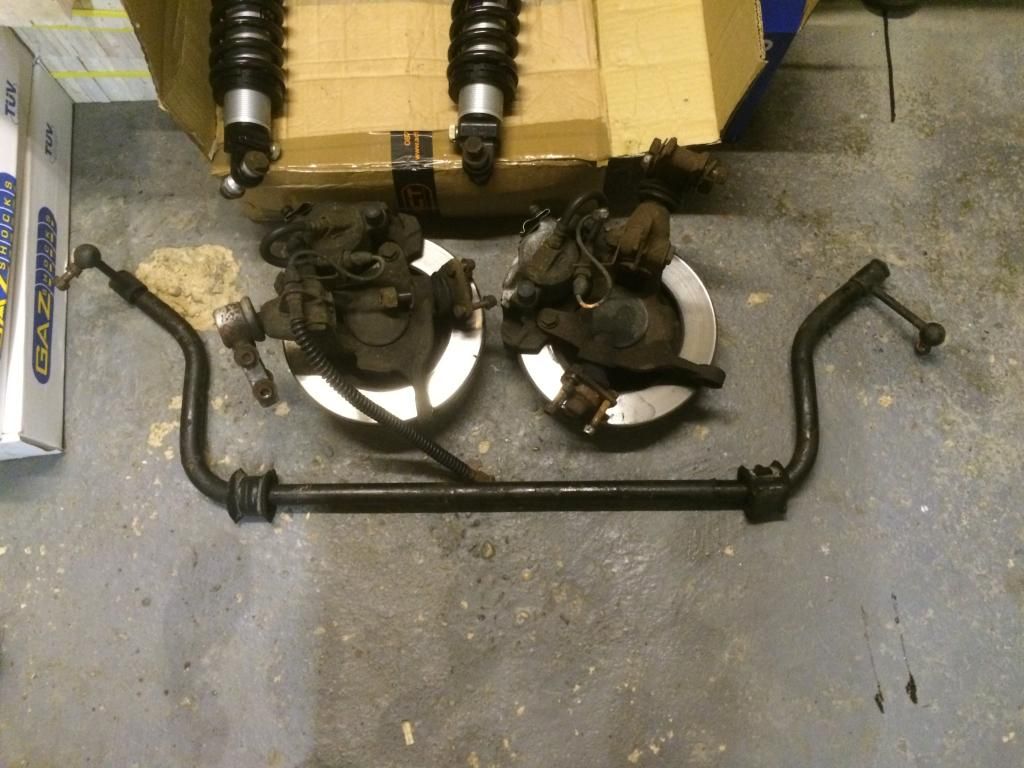
A collection of silicone hoses, bushes and shiny nuts and bolts, theres a new radiator somewhere too but it wouldn't fit in there
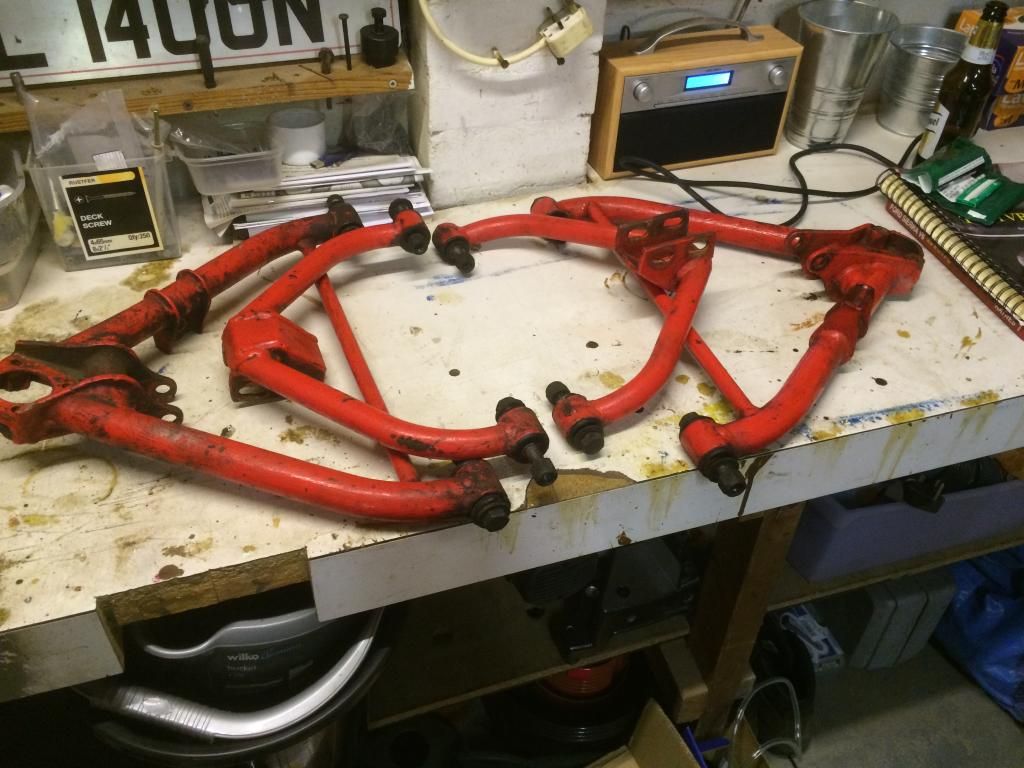
So what do we think about those outriggers? Obviously they're not going to get any better by themselves. Will a body lift be enough to get at everything? If welding is required do people do home visits?
A collection of silicone hoses, bushes and shiny nuts and bolts, theres a new radiator somewhere too but it wouldn't fit in there
So what do we think about those outriggers? Obviously they're not going to get any better by themselves. Will a body lift be enough to get at everything? If welding is required do people do home visits?
Hi Andy, I haven't sent anything off to them yet, thinking of going for the long ones up front though, anyone done this and have a recomended length?
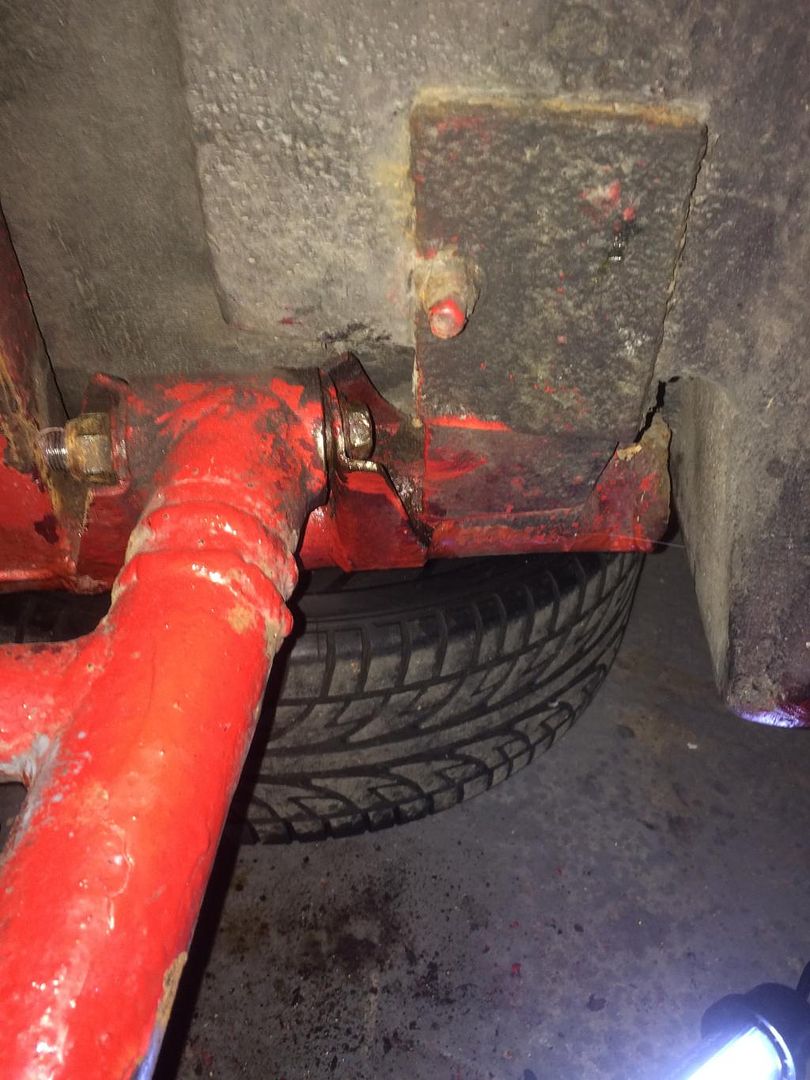
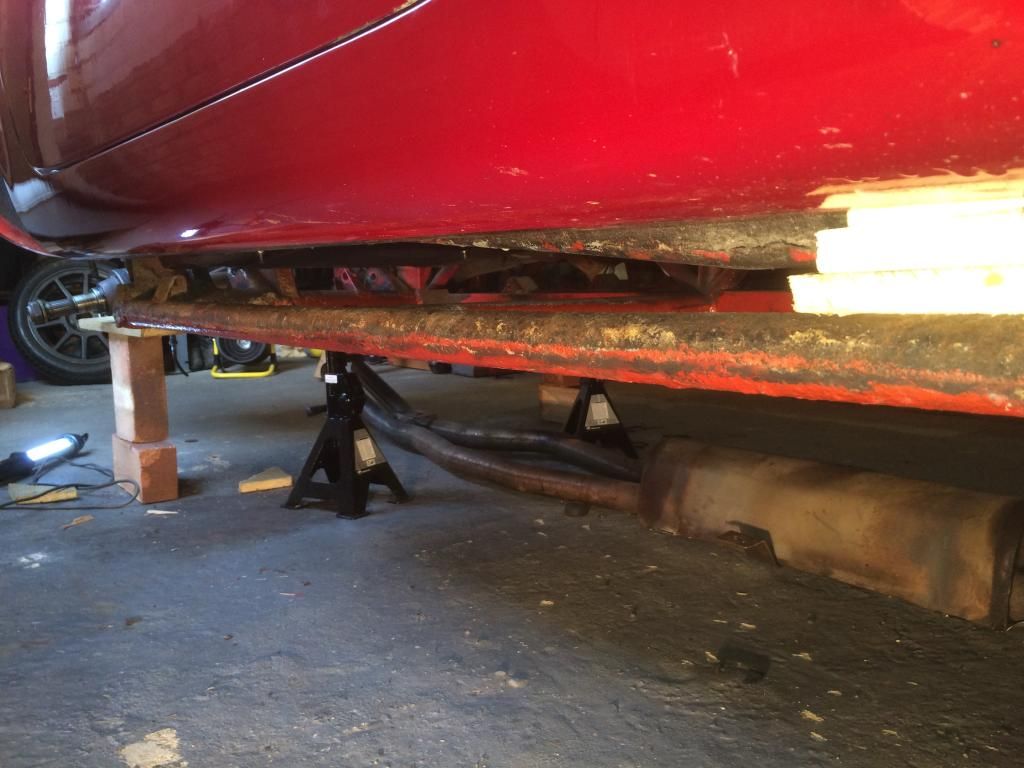
Tonight I have finished removing the front suspension, and managed to get the ARB out without any construction work.
Wishbones ready for de-bushing tomorrow, looks like they have poly bushes in already but i've bought new ones now
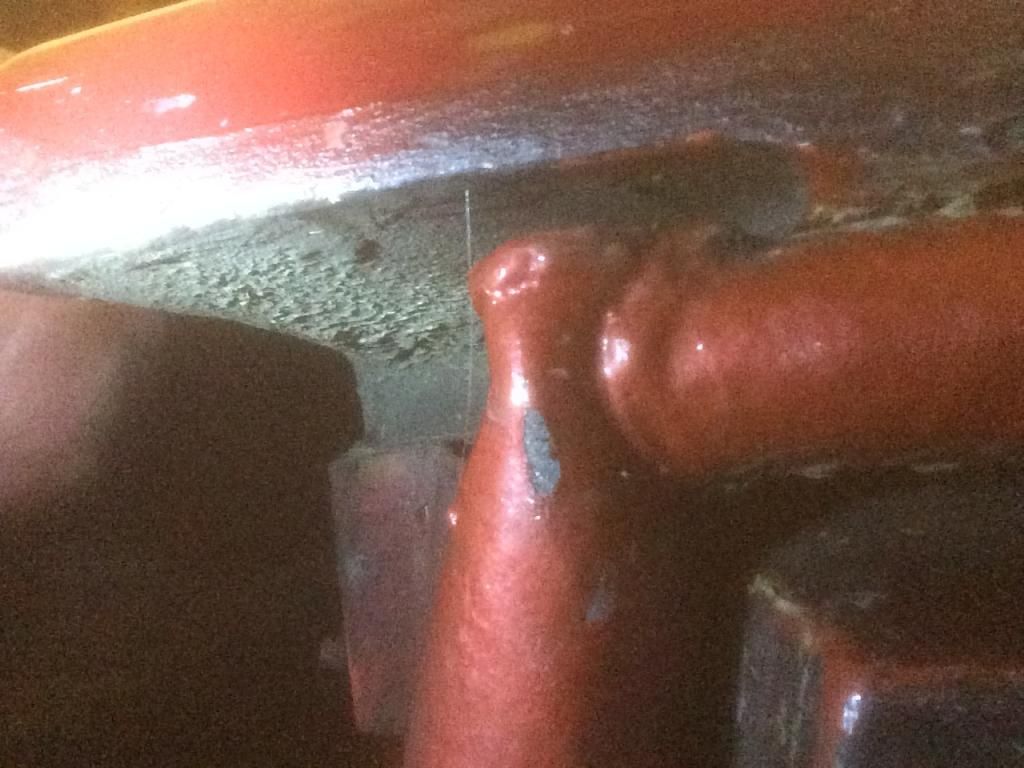
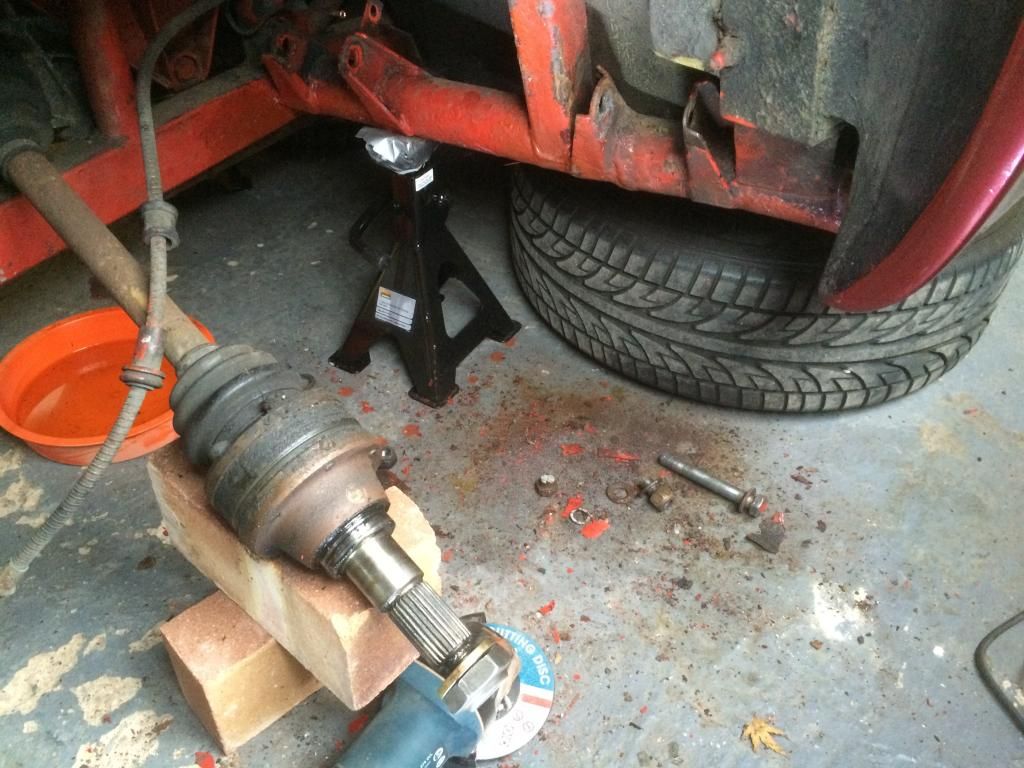
Removed the cold air feed pipes, wheel arches and the lower steel coolant pipe. Think I may go for the stainless versions from ACT. Not bothered about replacing the air feed pipes, does anywhere sell grommets to fill the holes?
Had a quick read of TVRgits site today and think a body lift is the way forward for this.
Tonight I have finished removing the front suspension, and managed to get the ARB out without any construction work.
Wishbones ready for de-bushing tomorrow, looks like they have poly bushes in already but i've bought new ones now
Removed the cold air feed pipes, wheel arches and the lower steel coolant pipe. Think I may go for the stainless versions from ACT. Not bothered about replacing the air feed pipes, does anywhere sell grommets to fill the holes?
Had a quick read of TVRgits site today and think a body lift is the way forward for this.
Today I have de-bushed the wishbones, they did have poly ones in already so came out easy enough though a couple seem to have been sitting at a slight angle so don't look too good. The uppers were fine and they're all free to a good home if anyone wants them?
Other than that nothing much to report, left the rear brakes draining, realise now that they should've been done at the same time as the fronts, the rear hoses will be removed and sent off to stevsons tomorrow. Thanks to whoever painted the chassis with the brake lines in place, they took a fair bit of oomph to get them off
The other newbie mistake I've discovered today was not opening the boot before disconnecting the battery...
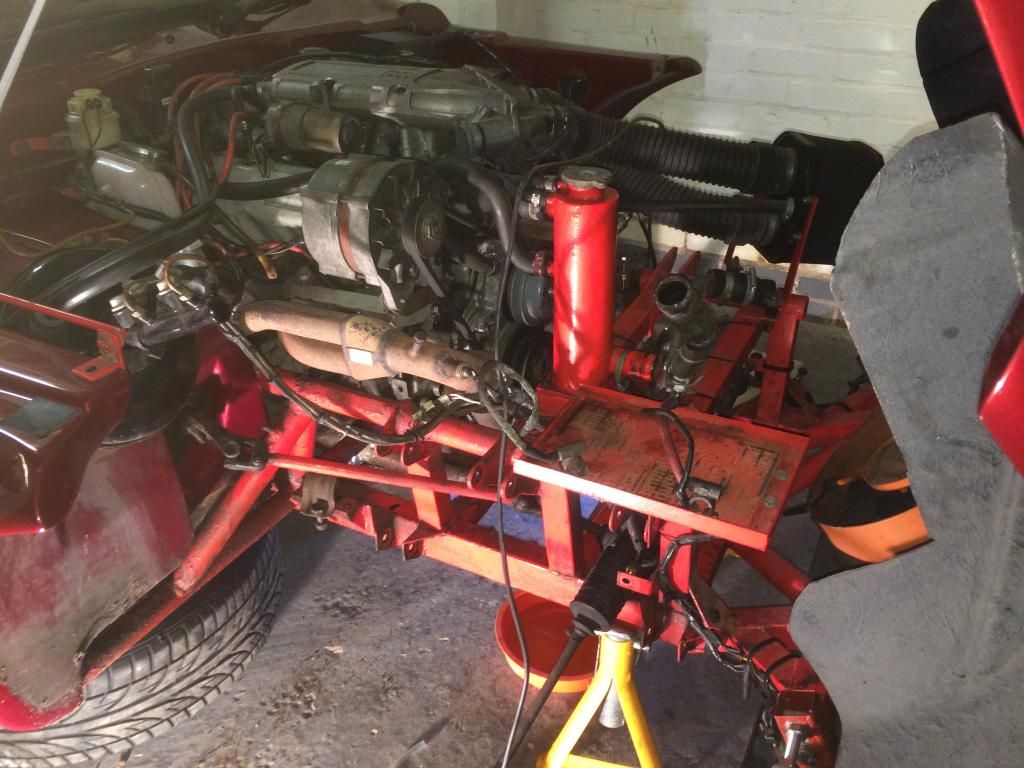
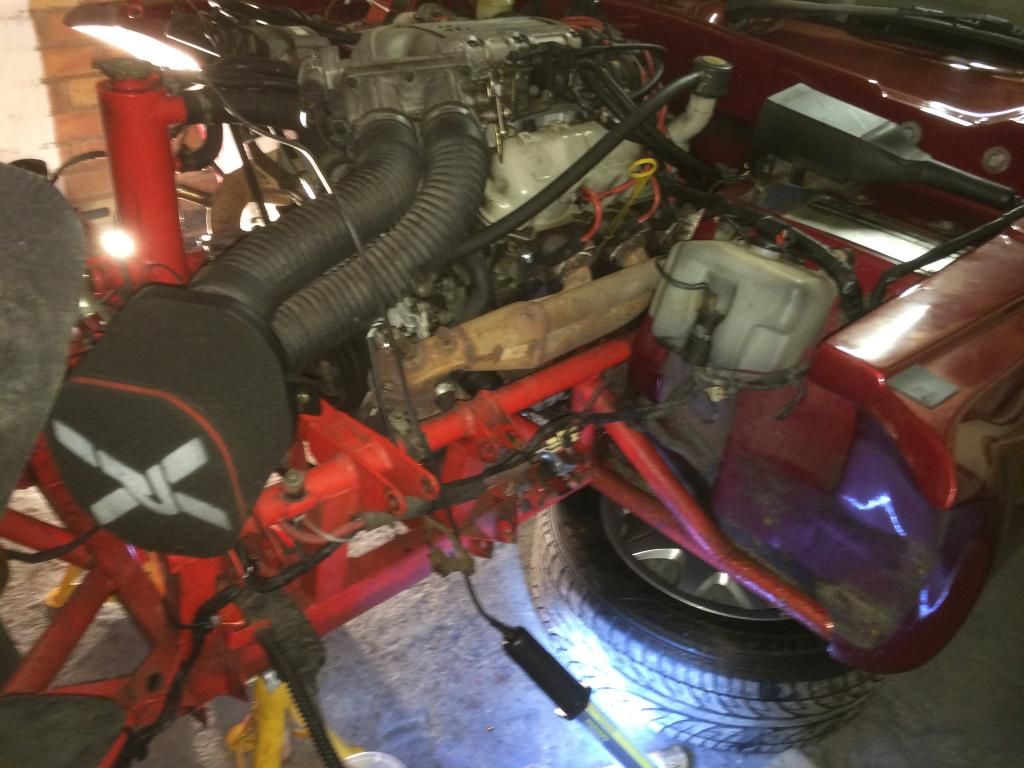
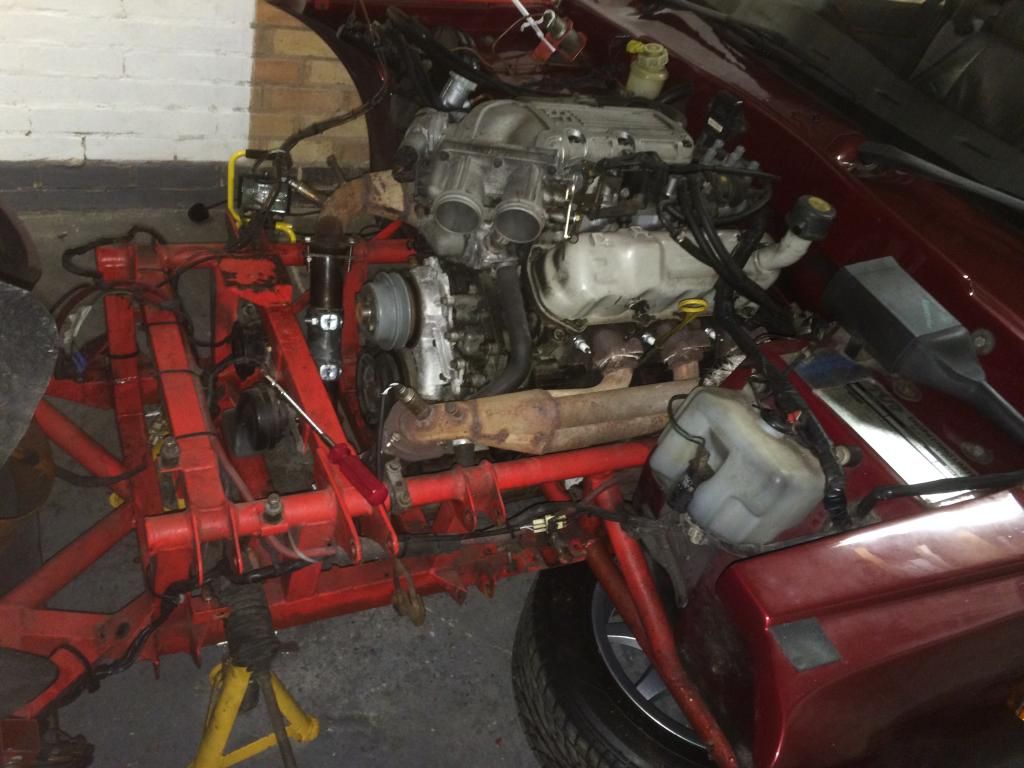
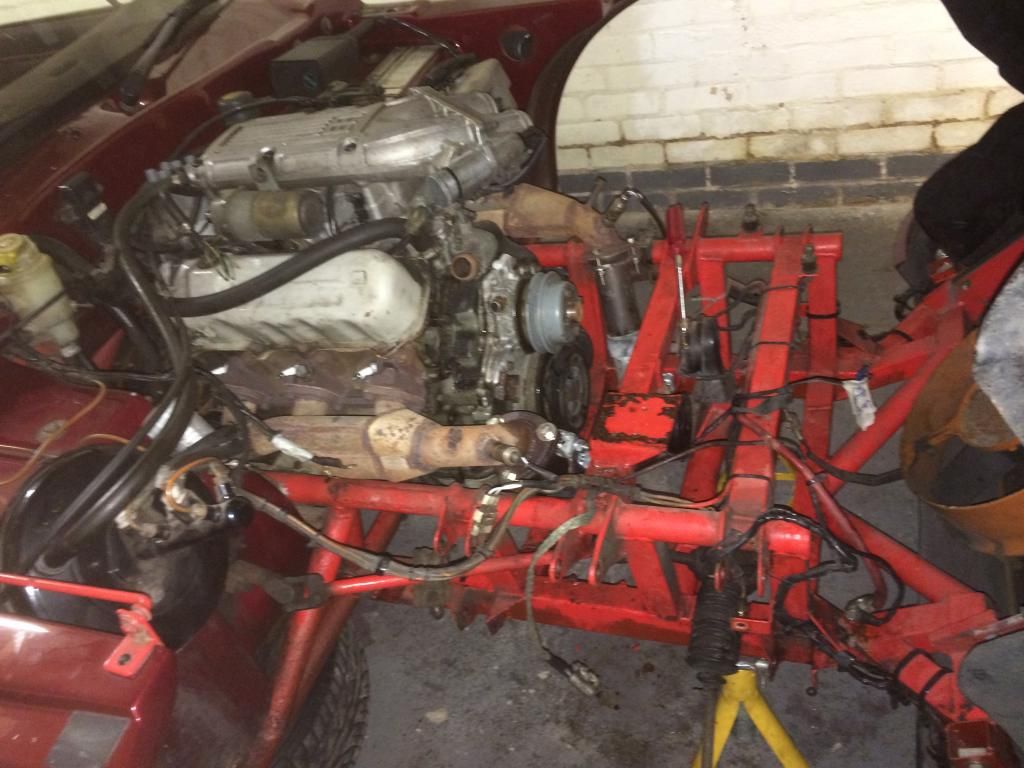
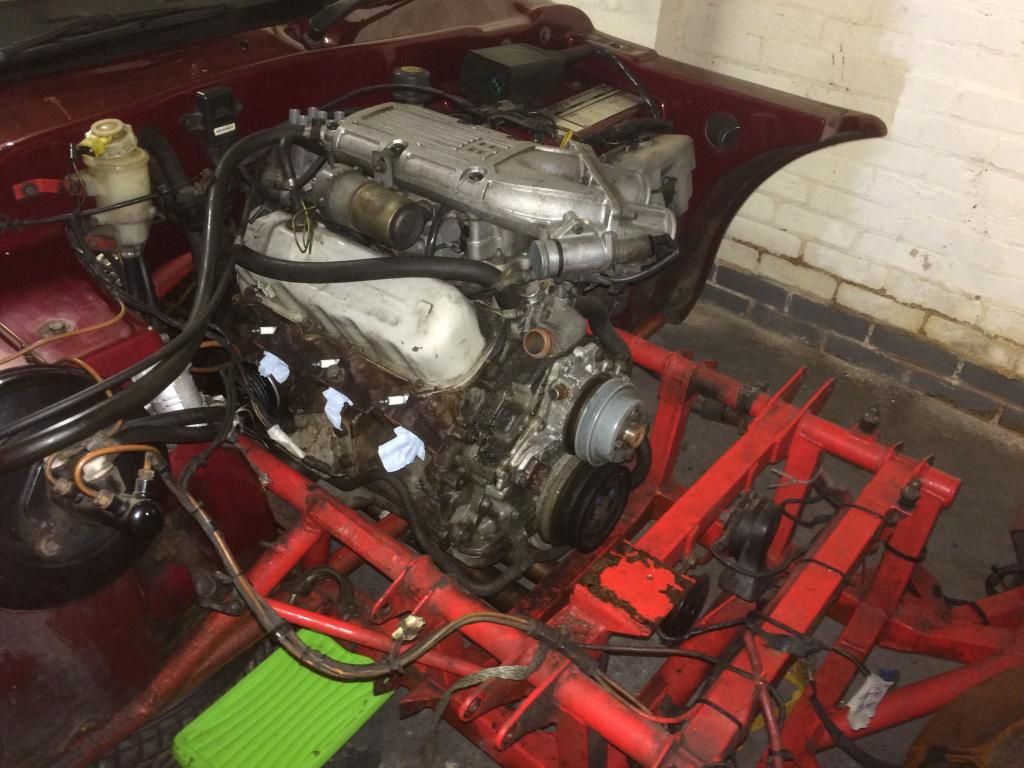
Started stripping the engine bay ready for tappet adjustment, removed the swirl pot and expansion tank in anticipation of a shiny replacement. I must say the engine is a dream to work on with the suspension out of the way and the bonnet right up!
Hadn't quite done enough reading up on rear trailing arm removal so i'll be looking for the special hub socket tonight, my neighbour says he has a large breaker bar.
Not sure what my de-cat pipes are all about but I think I'll get those off this week and have some straight forward stainless pipes made up.
Other than that nothing much to report, left the rear brakes draining, realise now that they should've been done at the same time as the fronts, the rear hoses will be removed and sent off to stevsons tomorrow. Thanks to whoever painted the chassis with the brake lines in place, they took a fair bit of oomph to get them off
The other newbie mistake I've discovered today was not opening the boot before disconnecting the battery...
Started stripping the engine bay ready for tappet adjustment, removed the swirl pot and expansion tank in anticipation of a shiny replacement. I must say the engine is a dream to work on with the suspension out of the way and the bonnet right up!
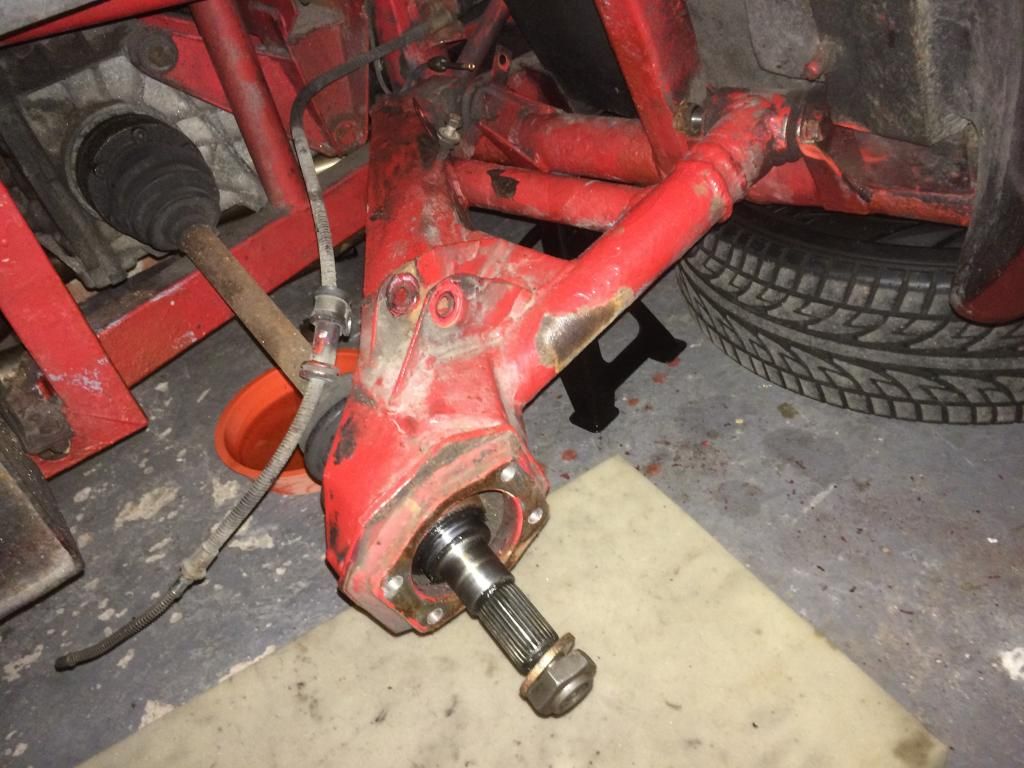
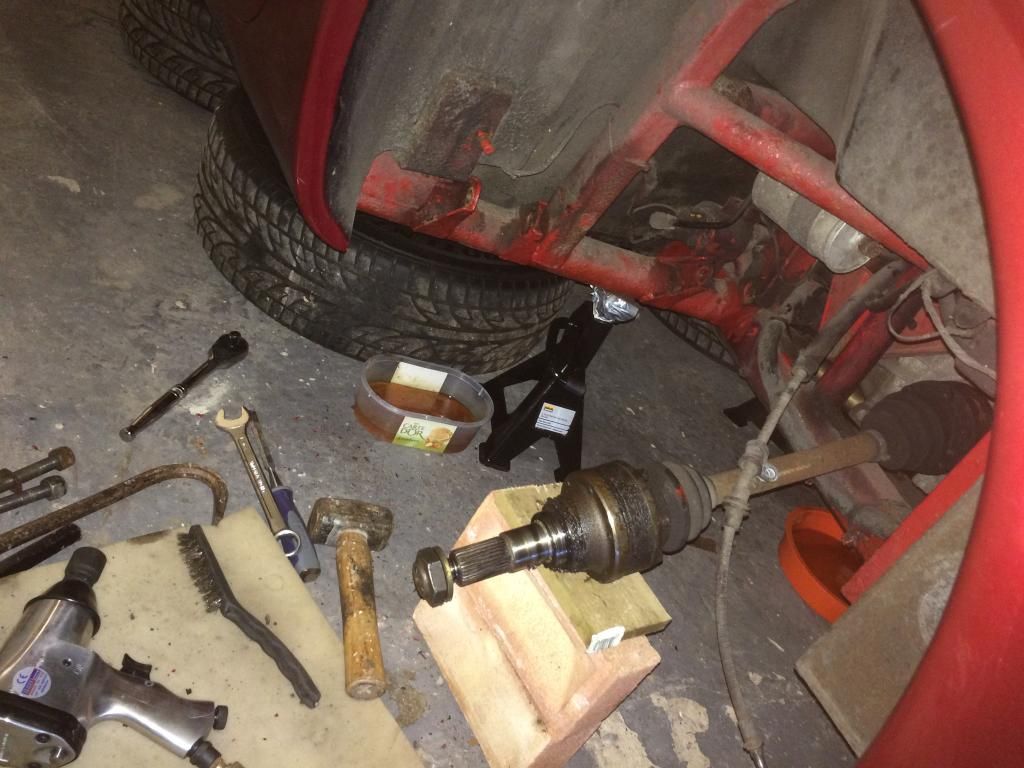
Hadn't quite done enough reading up on rear trailing arm removal so i'll be looking for the special hub socket tonight, my neighbour says he has a large breaker bar.
Not sure what my de-cat pipes are all about but I think I'll get those off this week and have some straight forward stainless pipes made up.
Update...
Now the owner of a set of imperial spanners, harder to find in a local shop than you may think!
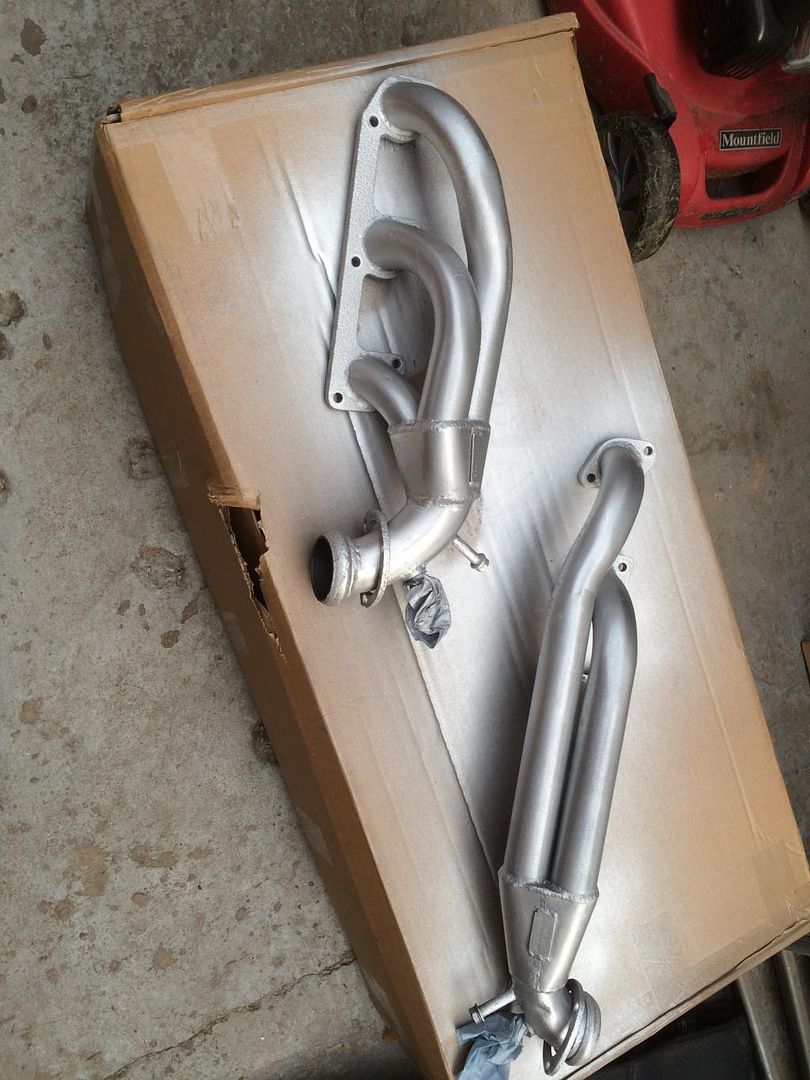
Manifolds off, one side had stainless bolts and came out really easily, other took a bit more persuasion. I thought that stainless were a no go for manifolds?
Hub nuts, surprisingly easy. Took some time to fathom out the drums.
Had enough of huffing and puffing for one day so gave up on the bolts which attach the trailing arms to the chassis, after I managed to find them under a few coats of paint, gave them a good wire brush and left them soaking in plusgas.
Now the owner of a set of imperial spanners, harder to find in a local shop than you may think!
Manifolds off, one side had stainless bolts and came out really easily, other took a bit more persuasion. I thought that stainless were a no go for manifolds?
Hub nuts, surprisingly easy. Took some time to fathom out the drums.
Had enough of huffing and puffing for one day so gave up on the bolts which attach the trailing arms to the chassis, after I managed to find them under a few coats of paint, gave them a good wire brush and left them soaking in plusgas.
Lawrie 1 - 1 TVR
Nearside trailing arm off, which looked to be the worst.
Offside I managed to get the inner bolt free but gave up on the other post hernia. The nuts off but I just can't get the bolt to shift.

There was loads more clearance on the nearside allowing me to get a socket on but the body mounting plate/bracket is obstructing the nearside mounting, not sure why.

I'll have another go tomorrow but it may be easier with the body off.
Why on earth?

Nearside trailing arm off, which looked to be the worst.
Offside I managed to get the inner bolt free but gave up on the other post hernia. The nuts off but I just can't get the bolt to shift.
There was loads more clearance on the nearside allowing me to get a socket on but the body mounting plate/bracket is obstructing the nearside mounting, not sure why.
I'll have another go tomorrow but it may be easier with the body off.
Why on earth?
Thanks Mark, had me worried then 
Shouting, swearing, religious ceremonies offering knuckle skin, fags, coffee, plusgas and beer and still no movement. Hacksaw tomorrow.
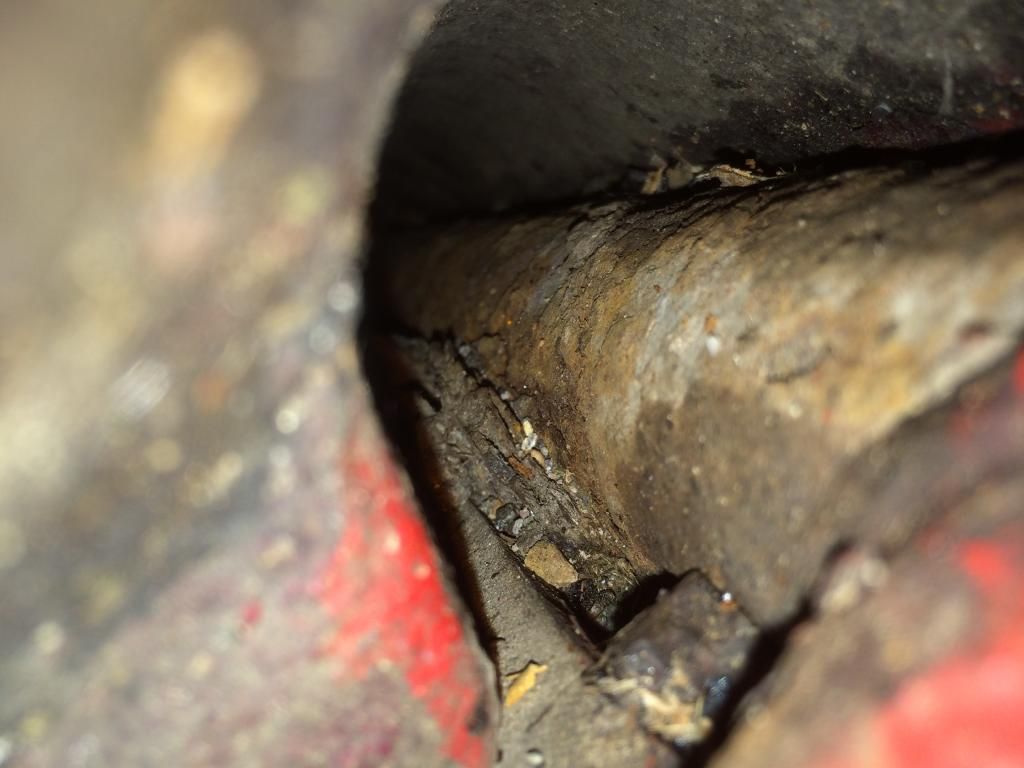
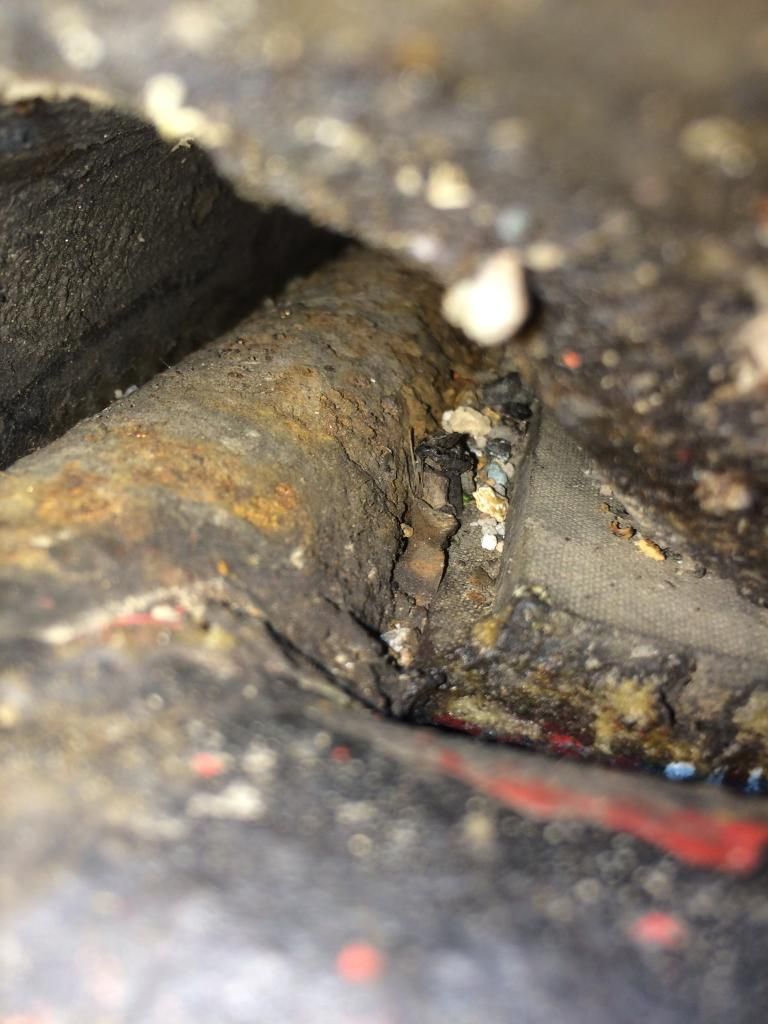
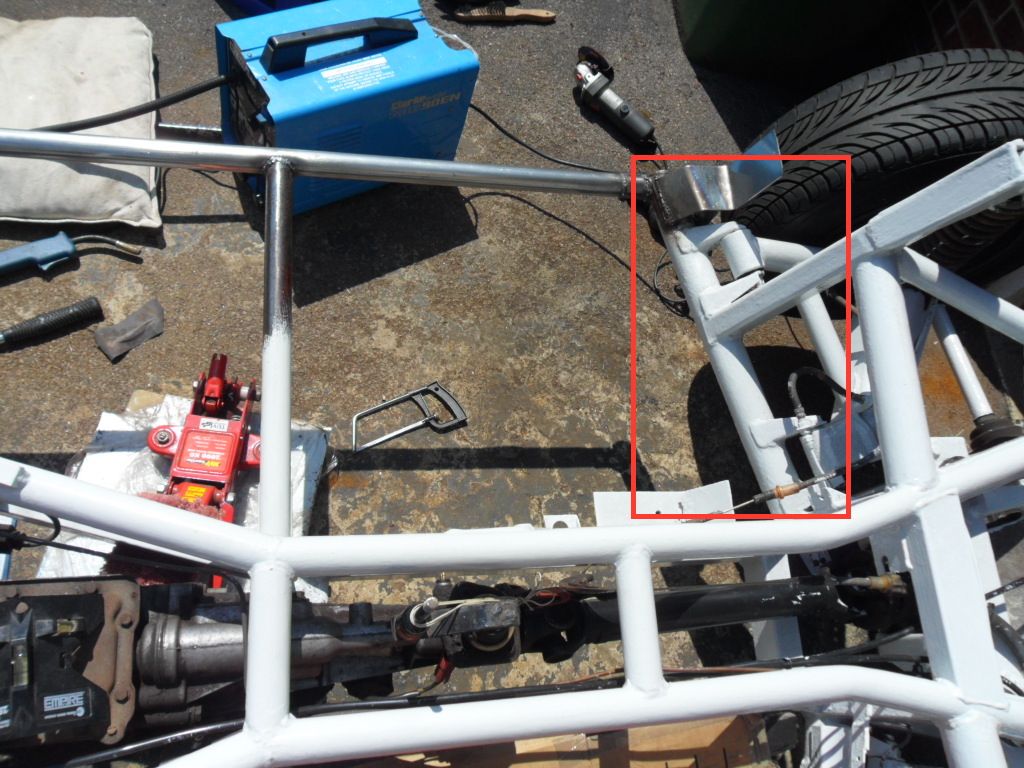
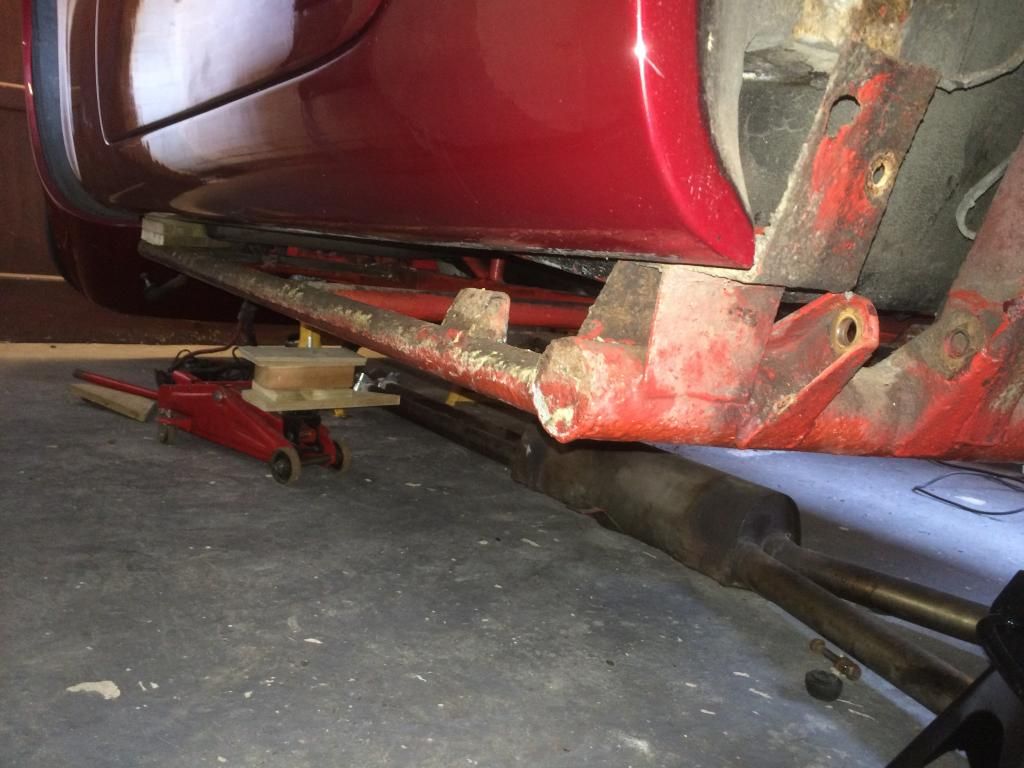
It's all not quite right though, this shot from the ground up shows the corner of outrigger has a bit of a dent. I'm guessing the seatbelt mount has been replaced after an 'incident' and helpfully obstructing access to the bolt. Even if I get it free I don't think I'll be able to get it out.
Obstuction
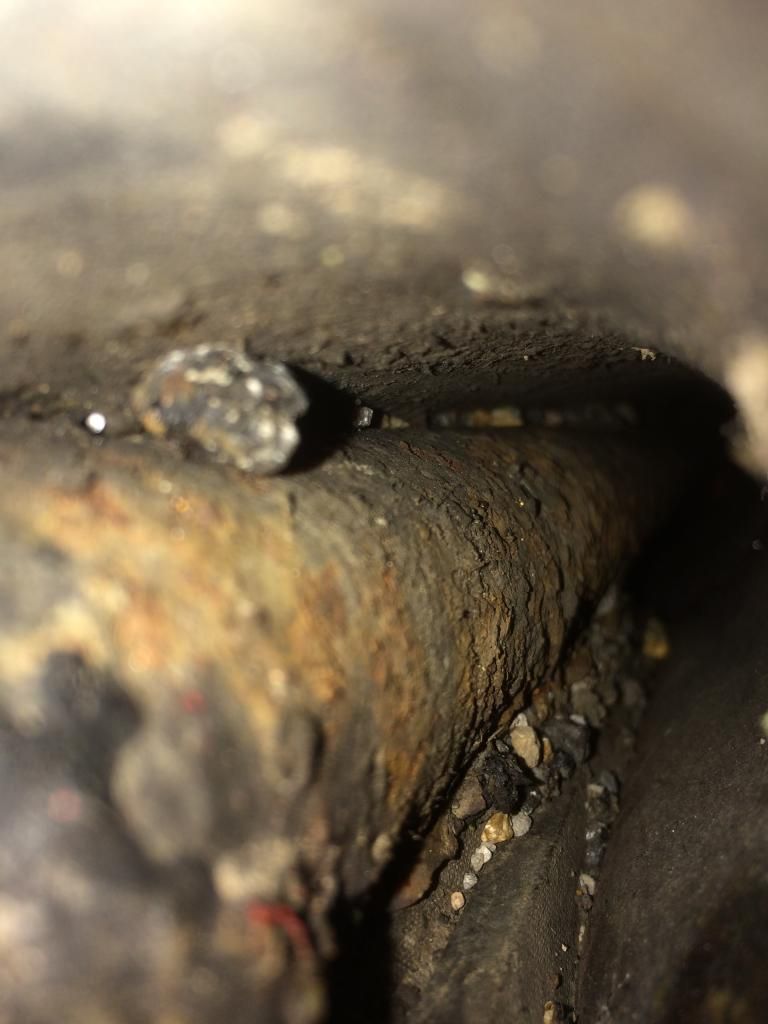
And from the wider angle, the bolt on seatbelt mounting looks to be in the wrong place to me?
I'll cut it out and re-asses the situation with the body off.
Shouting, swearing, religious ceremonies offering knuckle skin, fags, coffee, plusgas and beer and still no movement. Hacksaw tomorrow.
It's all not quite right though, this shot from the ground up shows the corner of outrigger has a bit of a dent. I'm guessing the seatbelt mount has been replaced after an 'incident' and helpfully obstructing access to the bolt. Even if I get it free I don't think I'll be able to get it out.
Obstuction
And from the wider angle, the bolt on seatbelt mounting looks to be in the wrong place to me?
I'll cut it out and re-asses the situation with the body off.
Finally got the trailing arm off
As expected, it's impossible to get a bolt in with the body mounting bracket where it is so that will have to be adjusted/replaced.
Fed up of spanners and sockets so decided to give the manifolds a lick of paint before packing up for the day.
Looking forward to a delivery of shiny bits tomorrow
As expected, it's impossible to get a bolt in with the body mounting bracket where it is so that will have to be adjusted/replaced.
Fed up of spanners and sockets so decided to give the manifolds a lick of paint before packing up for the day.
Looking forward to a delivery of shiny bits tomorrow

Been a bit slack this week, nothing to do with the discovery of chassis problems (out of sight out of mind).
Headed out to the garage today with a printout of TVRGits body lift guide.
Looks can be deceiving, I thought that these had been packed out with something but no, it was just rusty metal, had a slate like appearence What's left feels about as rigid as a kitkat wrapper.

I've undone the centre console and pulled it out the way but couldn't get anything on the bolts. Do the eyeballs in here feed hot air or are they linked to the cold air pipes? The gear knob had been glued on
Exhaust is off, every nut and bolt required a different size spanner or socket. Who on earth bodged everything on this car
All bolts requiring one set of hands are out but gave up on the front footwell bolts, turns out that paws don't work as well as hands.
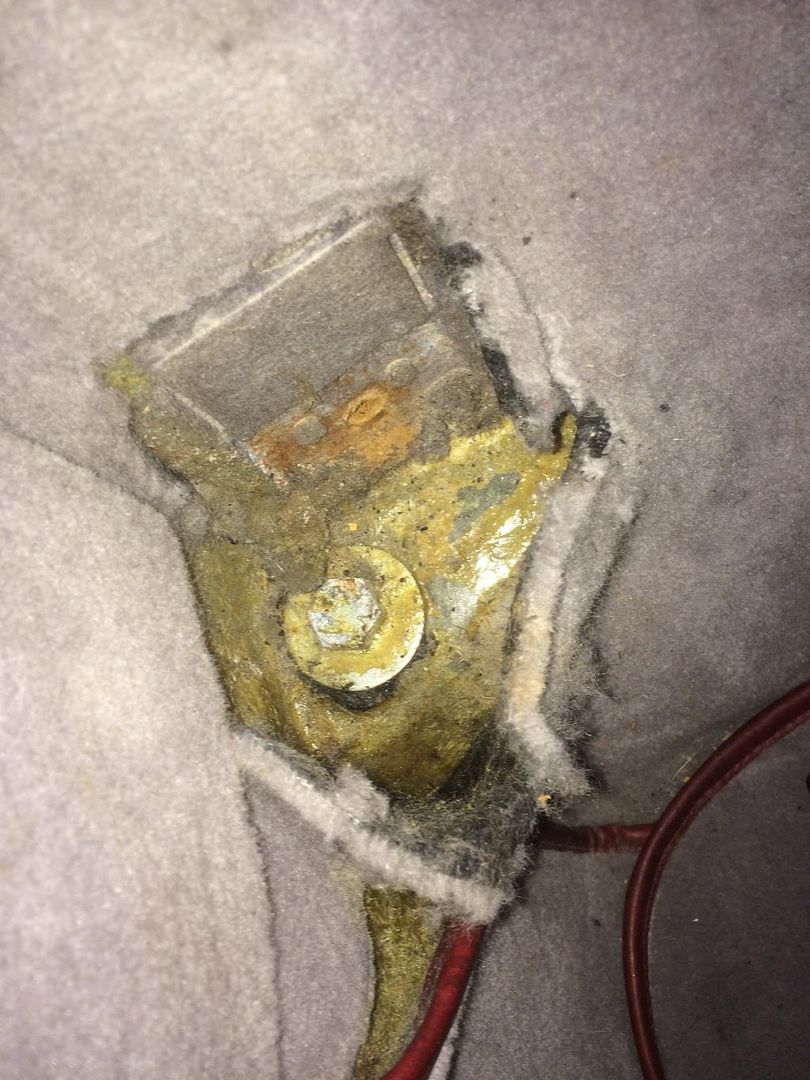
Took a few more engine bits off and noticed this, can anyone tell me what it is? The plastic cover is cracked and a bit battered and I have the need to add it to the ever-growing list.

Headed out to the garage today with a printout of TVRGits body lift guide.
Looks can be deceiving, I thought that these had been packed out with something but no, it was just rusty metal, had a slate like appearence
What's left feels about as rigid as a kitkat wrapper.I've undone the centre console and pulled it out the way but couldn't get anything on the bolts. Do the eyeballs in here feed hot air or are they linked to the cold air pipes? The gear knob had been glued on
Exhaust is off, every nut and bolt required a different size spanner or socket. Who on earth bodged everything on this car
All bolts requiring one set of hands are out but gave up on the front footwell bolts, turns out that paws don't work as well as hands.
Took a few more engine bits off and noticed this, can anyone tell me what it is? The plastic cover is cracked and a bit battered and I have the need to add it to the ever-growing list.
All bolts out now, couldn't get the petrol filler off and was hoping jacking the back up by 10mm would put a bit of tension on the pipe allowing me to pull it off.
The front lifts ok but jacking the back lifts the whole car.
Am I correct in thinking the top seatbelt mounts (behind shoulder) dont go into the chassis?
Ran out of time for today, will have another go tomorrow.
The front lifts ok but jacking the back lifts the whole car.
Am I correct in thinking the top seatbelt mounts (behind shoulder) dont go into the chassis?
Ran out of time for today, will have another go tomorrow.
Magpies, the hose clips are off but I couldn't get the hose off, not without risk of a hernia. I was hoping jacking the rear up by 10mm would put a little extra tension on it and help me to pull it off, I'll persevere before another attempt but cant see that one hose being enough to lift the chassis when jacking from the floor pan? I am only planning on a partial lift at this stage.
Thanks Glen, I counted 16 bolts, two in the boot, two lower belt mounting,two in the seat belt reels, two on either side of central exhaust mount, two in the seat belt buckle/latch/stalk/receptical whatever it is with the red button, two under centre console (both of these were only finger tight), four in footwells, plus the steering rack and the handbrake. I have ran a scraper down both sides, they were full of stones and sticky gunk which I assume is waxoyl. It was quite sticky, can I spray anything on that to dissolve it?
Just seems strange that the front lifted slightly with no effort but the rear wouldn't budge.
Hi Alan, excuse my ignorance but what does this actually do?
I've not been in the garage this week, dropped my trailing arms and wishbones off with Adrian this morning for a bit of TLC.
Today I've officially finished Christmas stuff so tomorrow I plan to get back on the case of getting the body lifted.
Thanks for the advice Mike, I'll look at dropping tank first, now wishing it wasn't 3/4 full...
Wooohoooo 
Turns out I had an additional pair of bolts. They cannot be seen from underneath the car anywhere, they fix the body to the horizontal part of the mountings which hold the seat belt reels. No chance of getting a spanner in and they were rusted solid, had to cut them off.
Lifted nicely with those removed. Got it up an inch or so and decided I'd had enough for today and beer was in order. Next I'll be checking there's enough play in everything and going for some more height.
Outriggers don't look too bad.
Alan, can you do mine whilst it's off?
Christmas tree packed away, time to get back into the garage.
Started off by getting under and cutting off a number of cable ties, removed the lower coolant hose, disconnected the wiring from the chassis in nearside wheel arch and checked there was enough play in all pipes and wires to lift.
Managed to get it up this far but now its stuck again, jacking the rear of the body lifts the whole car up, it's now clear of the petrol tank neck and the body isn't touching the tank in any places, so what else could it be stuck on. I've stuck my head and a torch in every place it will fit but I just can't see whats holding it down. The only place it does look a little tight is around the chassis where the gearbox sits but it's not touching.

I've been jacking up front then rear by 10mm at a time, is it just the way I'm lifting it or could something else be stuck that I have overlooked?
Thanks in advance.
Lawrie
Started off by getting under and cutting off a number of cable ties, removed the lower coolant hose, disconnected the wiring from the chassis in nearside wheel arch and checked there was enough play in all pipes and wires to lift.
Managed to get it up this far but now its stuck again, jacking the rear of the body lifts the whole car up, it's now clear of the petrol tank neck and the body isn't touching the tank in any places, so what else could it be stuck on. I've stuck my head and a torch in every place it will fit but I just can't see whats holding it down. The only place it does look a little tight is around the chassis where the gearbox sits but it's not touching.
I've been jacking up front then rear by 10mm at a time, is it just the way I'm lifting it or could something else be stuck that I have overlooked?
Thanks in advance.
Lawrie
Thanks for the advice everyone.
Pretty sure no more bolts as I've managed to get the body up a couple of inches front and back, something would have snapped by now if it was still bolted down, can confirm handbrake removed and cable not catching anywhere in view.
As advised I will try dropping the front back down and then attempt rear lift again as I've been trying to do both front and back a little at a time.
Am I being optimistic in hoping to raise enough to be able to pass the grinder between outriggers and sills without following body off guidelines?
From what I have read (I'll admit to not doing that particularly well) mostly partial lifts are done without draining coolant and brake fluid, I have drained and disconnected both. Ideally I'd have the body off but remember this task started as a thorough service, addition of shiny bits, with a chassis touch up where required, I just don't think I have the room to take it off completely, it's in a single garage with a flat roof and took best part of an hour to manoeuvre through the front door.
Also slightly put off by the fact that once the body is up it's not simply a case of stripping and painting, I need to have the corrective welding done to put right the previous bodge job, I can't weld (yet) and whilst I'd love to learn and happy to send myself on some sort of course, I don't think that Trevor's (named by better half ) the best place to be practicing.
Project hindered at the moment by constant visitors, buffet food and a distracting yet plentiful supply of single malt, real ale and good wine though the other halfs back at work tomorrow so I can get back on the case.
Not exactly loving her (him) but not giving up just yet.

Lawrie
Pretty sure no more bolts as I've managed to get the body up a couple of inches front and back, something would have snapped by now if it was still bolted down, can confirm handbrake removed and cable not catching anywhere in view.
As advised I will try dropping the front back down and then attempt rear lift again as I've been trying to do both front and back a little at a time.
Am I being optimistic in hoping to raise enough to be able to pass the grinder between outriggers and sills without following body off guidelines?
From what I have read (I'll admit to not doing that particularly well) mostly partial lifts are done without draining coolant and brake fluid, I have drained and disconnected both. Ideally I'd have the body off but remember this task started as a thorough service, addition of shiny bits, with a chassis touch up where required, I just don't think I have the room to take it off completely, it's in a single garage with a flat roof and took best part of an hour to manoeuvre through the front door.
Also slightly put off by the fact that once the body is up it's not simply a case of stripping and painting, I need to have the corrective welding done to put right the previous bodge job, I can't weld (yet) and whilst I'd love to learn and happy to send myself on some sort of course, I don't think that Trevor's (named by better half
) the best place to be practicing.Project hindered at the moment by constant visitors, buffet food and a distracting yet plentiful supply of single malt, real ale and good wine though the other halfs back at work tomorrow so I can get back on the case.
Not exactly loving her (him) but not giving up just yet.
Lawrie


Thanks for the heads up on the boot strut bolt Glen, that hadn't been causing a problem but would have done the further up it got.
Lowered the front back down and went for it at the back, precision seems to be key, a couple off mm at a time on each side. Also think my garage floor isn't quite level causing the chassis to lift ever so slightly off the axle stands when the body weight was lifted off, at this point before I was stopping.
Hopefully this is enough room to get everything done, it may go higher still but I think I'll settle with this, one of the fuel hoses at the rear was getting a bit tight.
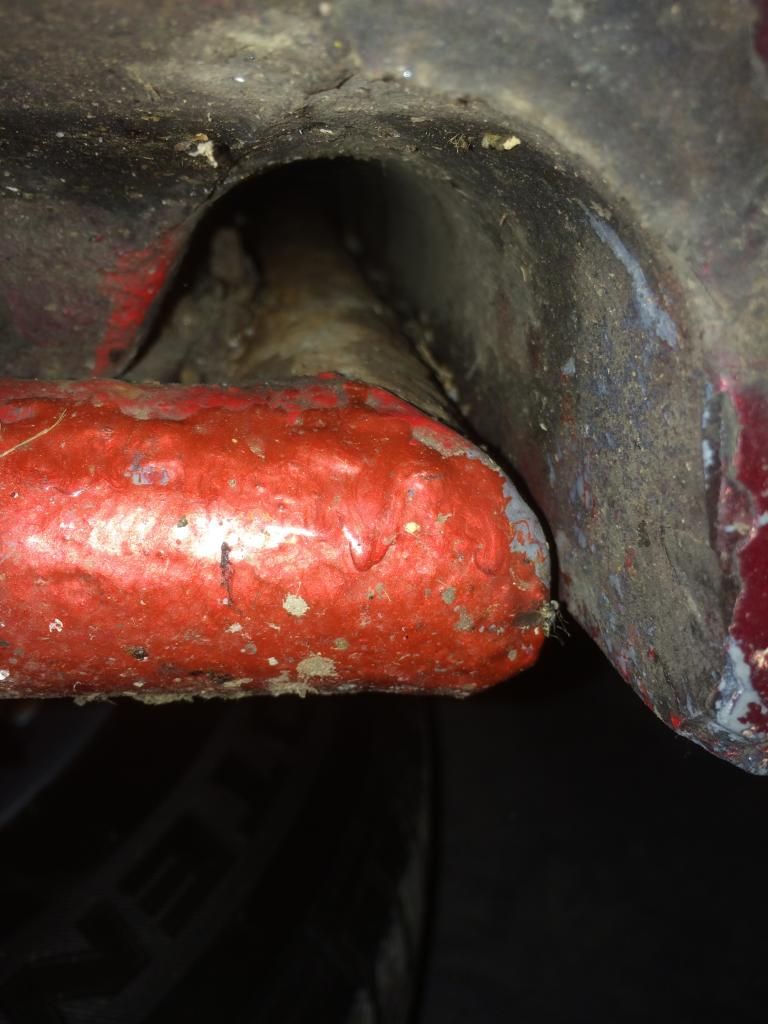
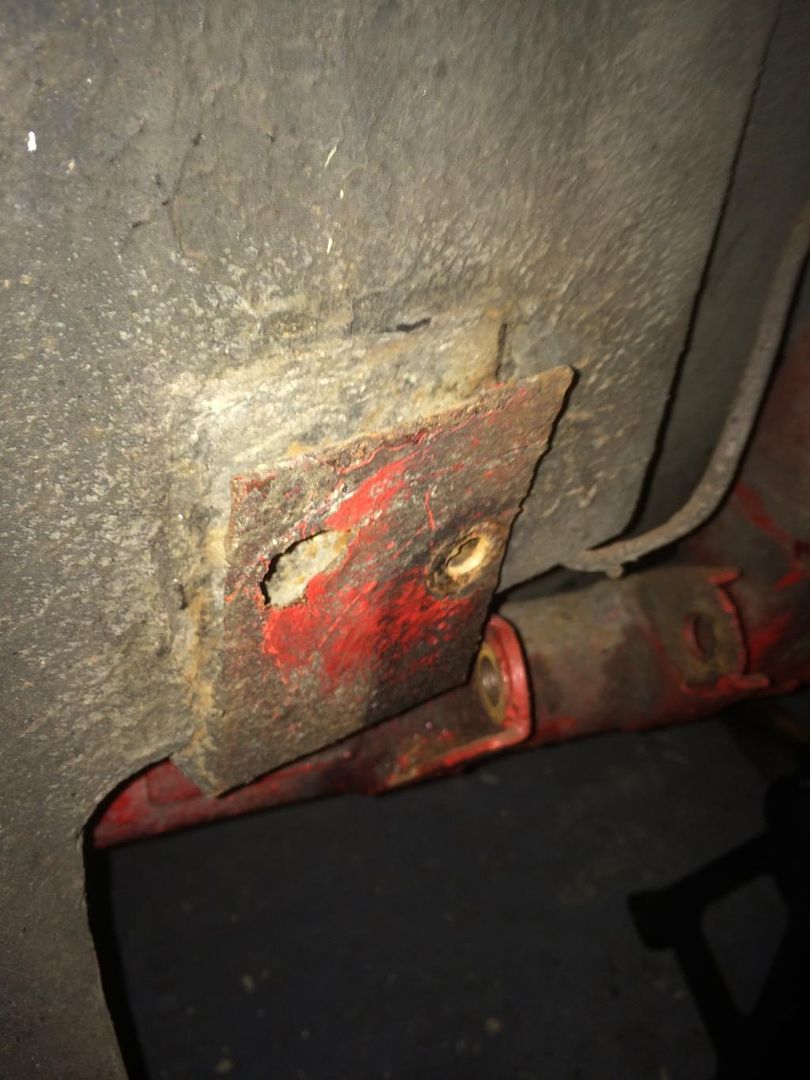
Damage can be seen here. Is it possible to buy the trailing arm hangers ready made?
Stripped the loom out of the engine bay and removed the fan/radiator bracket.
Feel like I've reached a milestone now I can start putting things right, big thanks again to everyone for all of the advice I couldn't have done it without you
glenrobbo said:
 Well done Lawrie.
I reckon you deserve to reward yourself this evening!
But have a nice drink of milk first
How do the outriggers look on the inside top of each corner?
Edited by glenrobbo on Wednesday 31st December 15:07
Milk? As in cheese? With wine?
magpies said:
Well done.
Adrian will hopefully be along to confirm how to sort the trailing arm locating tube.
Adrian has my trailing arms at the moment, I suppose the amount of work required will become clear when I can offer the repaired one up to the chassis. Which reminds me I need to get a set of bushes sent off to him...Adrian will hopefully be along to confirm how to sort the trailing arm locating tube.
Alan461 said:
They should be easy enough to fabricate from scratch if you find them unavailable.
My worry would be getting the geo's right when it's been put straight/altered,
maybe if you can line through from the un damaged side or compare lengths, angles, heights of the outriggers, struts, hangers etc.
If you want any bits made up, welding etc let me know
My plan is to get my old trigonometry set out, compare the offside inner hanger to nearside and if it looks about right I should be able to work something out by fitting the repaired trailing arm to the inner hanger to get an idea of where the outer hanger should be, if that makes sense. If that fails to work I'll stand back, close one eye, scratch my head, move around a bit and hope for the best :roll eyes: Open to suggestions though.My worry would be getting the geo's right when it's been put straight/altered,
maybe if you can line through from the un damaged side or compare lengths, angles, heights of the outriggers, struts, hangers etc.
If you want any bits made up, welding etc let me know
Might take you up on that offer Alan, would you be comfortable doing the lot? I'll pay the going rate obviously.
greymrj said:
Hi LawrieS, sorry but I am not clear whether it is the brackets or the tube which is worrying you. It looks as if the 'damage' you refer to is holes in the brackets which have opened out? Or are the brackets badly rusted?
The horizontal tube has a great big dent in it and the outer trailing arm hanger isn't in the right place, can't get a bolt back in. Also both seat belt reel fixing plates have holes in.More obvious looking from the floor up;
Edited by LawrieS on Wednesday 31st December 17:05
Gassing Station | S Series | Top of Page | What's New | My Stuff