The worst chassis ever?
Discussion


Hi all
I've dipped in here occasionally on previous occasions, and thought it time to share my experiences, and get lots of advice :-) , as I sort out my S3.
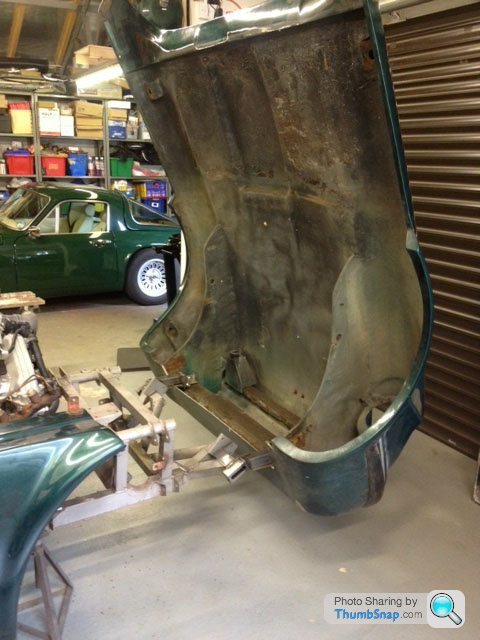
I picked it up very cheap after it had been 'resting' outside for 8 years. In a terrible state really - rotten chassis, interior shot because the hood was split, blistered paintwork, boot full of water (5 buckets full, actually). And so it goes on.
I'm looking at this as a fun project (honestly!) so not expecting everything to be entirely original as I was with my last project (TVR Taimar, TVR Sprint, last May). Hence the Granada Scorpio sitting in my garden at the moment.
I'll post a link to lots of pics in the very near future.
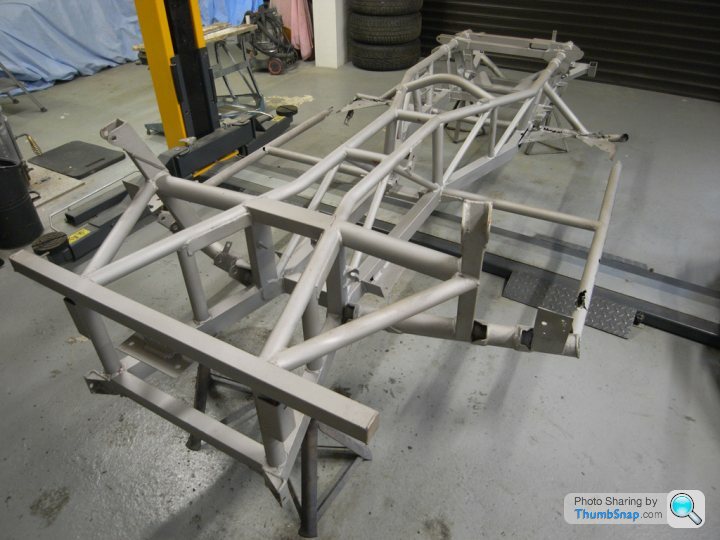
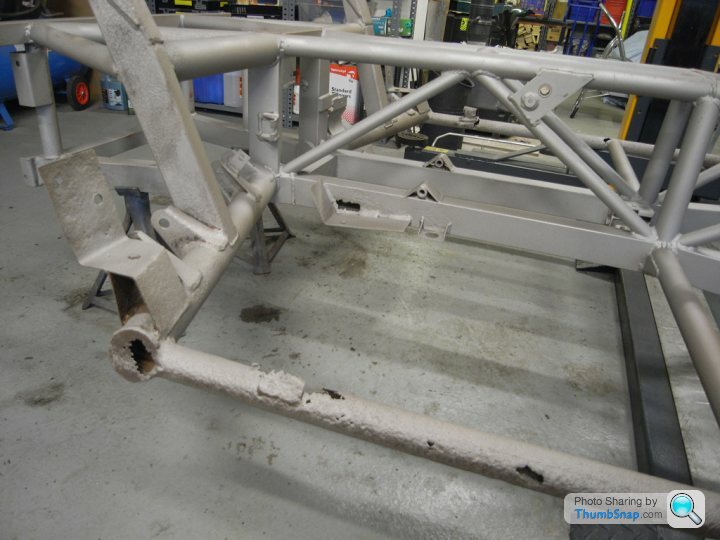
Long story short, I have everything apart now and just picked the chassis up from the blasters. I knew the outriggers were useless, and some of the box section at the front of the main backbone, and whilst some other holes appeared as well it looks repairable to me. (You may know better!?)
One question to start off with: I looked through the 'open wide bonnet' thread which looks like a great idea (well done to the designers) and found some really good pictures, but no drawings or dims. I'm assuming this would be a good time for me to make appropriate mods to the mounting points on the chassis, so those would be useful if they are available.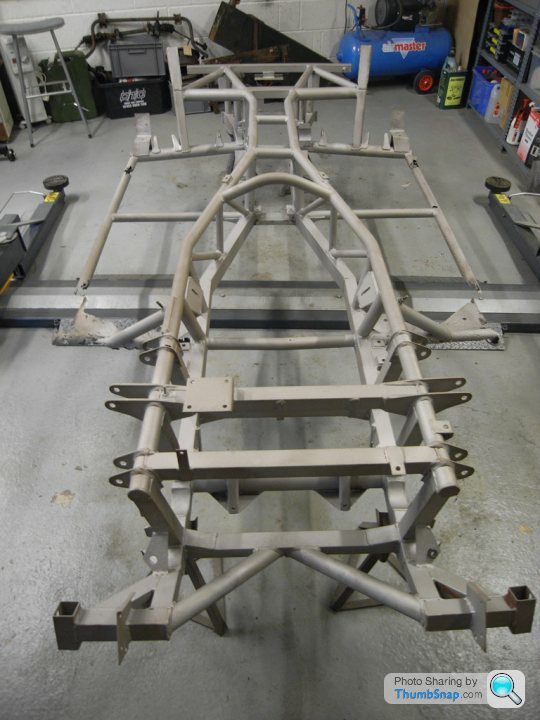
I've dipped in here occasionally on previous occasions, and thought it time to share my experiences, and get lots of advice :-) , as I sort out my S3.
I picked it up very cheap after it had been 'resting' outside for 8 years. In a terrible state really - rotten chassis, interior shot because the hood was split, blistered paintwork, boot full of water (5 buckets full, actually). And so it goes on.
I'm looking at this as a fun project (honestly!) so not expecting everything to be entirely original as I was with my last project (TVR Taimar, TVR Sprint, last May). Hence the Granada Scorpio sitting in my garden at the moment.
I'll post a link to lots of pics in the very near future.
Long story short, I have everything apart now and just picked the chassis up from the blasters. I knew the outriggers were useless, and some of the box section at the front of the main backbone, and whilst some other holes appeared as well it looks repairable to me. (You may know better!?)
One question to start off with: I looked through the 'open wide bonnet' thread which looks like a great idea (well done to the designers) and found some really good pictures, but no drawings or dims. I'm assuming this would be a good time for me to make appropriate mods to the mounting points on the chassis, so those would be useful if they are available.

Many thanks for the hinge info. I should be able to get started with the pics and Alan's dims, then a little bit of mocking up, suck it and see! I'll search further and look at Phillpot's arrangement on existing mounts, but since I have the option to modify easily at the moment, it must be the right time to do it.
The bonnet will need some modding anyway to clear the 24v I think, so easy to do some work on the underside as well.
Good to know there have been worse chassis around - This one is much more corroded than my Taimar was, but at least it seems straight!
Cheers.
Tony
The bonnet will need some modding anyway to clear the 24v I think, so easy to do some work on the underside as well.
Good to know there have been worse chassis around - This one is much more corroded than my Taimar was, but at least it seems straight!
Cheers.
Tony
Ah! Crossed posts! Thanks Phillpot - that thread really clears it up.
Some more pics here, if anybody is interested:
https://www.icloud.com/photostream/#A5GWZuqDJPkA8I
Tony
Some more pics here, if anybody is interested:
https://www.icloud.com/photostream/#A5GWZuqDJPkA8I
Tony
Hi Damian
Thanks for the offer. I may take you up on that if I decide on a T5. I do have a 2wd MT75 box which I could use, but I need to check out its condition first. I anticipate some work needed on it, so depending on what is needed I may go for a plan B!!
Different prop shaft fitting needed with this option, also, of course.
I'm tempted by the DG exchange, though I want some mods at the same time. If I decide not to do the work myself (and I might, this time!) Richard at RT Racing (I'm near sheffield) has the jigs. I'm thinking about the bonnet hinges, obviously, fitting plates for a roll cage, and possibly strengthening the chassis in places whilst I'm at it.
Any other suggestions, comments or pitfalls all gratefully received 👍

Superb pics! Thanks again!
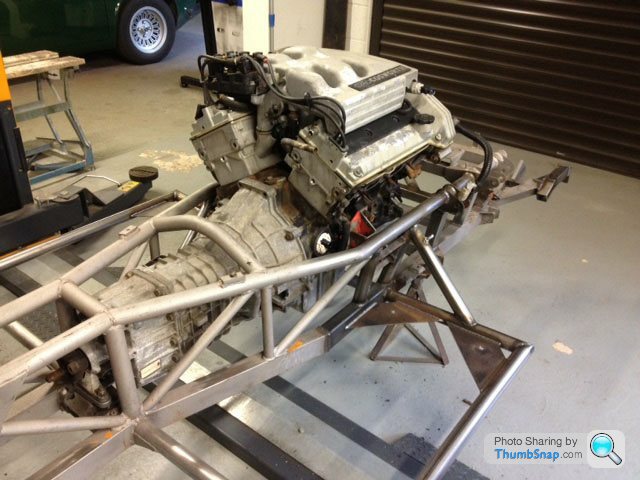
Cossie engine is looking great sitting in the chassis and the bigger bulge not as large as I thought it might be. Did the engine clear the bulkhead OK?
Once the chassis is sorted I will test fit all the parts before making it look pretty again, so probably lots of questions still to come!
Tony
Cossie engine is looking great sitting in the chassis and the bigger bulge not as large as I thought it might be. Did the engine clear the bulkhead OK?
Once the chassis is sorted I will test fit all the parts before making it look pretty again, so probably lots of questions still to come!
Tony
That's an interesting point. I have to say that mine looked worse with paint and muck all over it, all of which is removed leaving largely shiney steel to look at once it has been blasted. In my case, just a couple of new holes exposed.
I'm going to get an estimate from Richard at RT in sheffield to include some of the 'improvements' I am looking at. A matter of spending my Christmas bonus to save some time next year!
I'll keep you all posted when I get some feedback.
Incidentally, does anybody have recommendations for people able to supply or fabricate a roll cage? I assume that they are not available 'off the shelf' and expect to have it made as a one-off.
68 left eh! Aren't TVRs all one offs out of the factory 
Good to know the cossy engine clears the baulkhead. That's more fibreglass work saved.
Roll cage: I expect I'll get the tubes bent then build to fit . Getting some mounting plates welded onto the chassis first should give me a head start.
Thanks all.
Tony.
Good to know the cossy engine clears the baulkhead. That's more fibreglass work saved.
Roll cage: I expect I'll get the tubes bent then build to fit . Getting some mounting plates welded onto the chassis first should give me a head start.
Thanks all.
Tony.
. . . well not any more!
Got the chassis back from RT (same place as bigV8) a couple of weeks ago and thought you might like an update.
We ended up replacing far more than I had first anticipated, as some of the metal was thinner than I expected despite looking only slighted pitted after blasting. It took 3 weeks full time work by one one of the guys to sort out but I'm confident the chassis is now sorted.

Not always easy to spot things on the photo, so I tried to highlight areas of replacement in yellow.
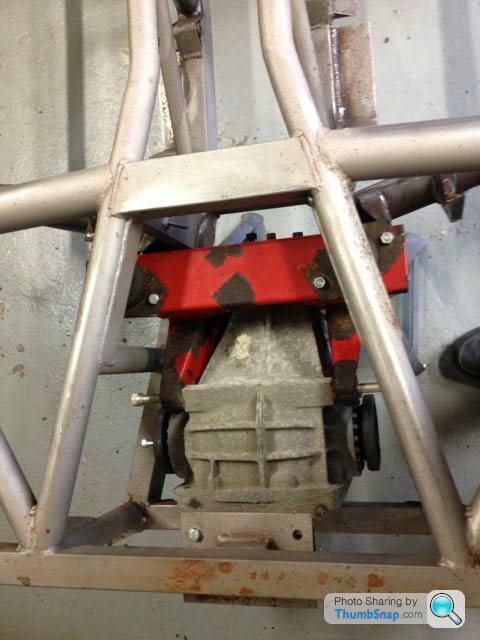
All the outriggers, of course; trailing arm mountings and chassis arm; centre box sections just behind the engine, and new engine mounts, some of the top rails, front cross member; square tube section and rear body mounts.
I now need to:
Fit the body to check location and drill some mounting holes (I'll fit the cossi engine, MT75 and cossi diff to double-check clearance and mounting at the same time).
Shorten the gear lever extension unit.
Finish the 'wide open' hinge mounts.
Cut a big hole in the bonnet to clear the top of the engine.
And generally sort out that everything fits before I get the chassis re-blasted and finish the surface.
Should keep me busy for a while
Tony
Got the chassis back from RT (same place as bigV8) a couple of weeks ago and thought you might like an update.
We ended up replacing far more than I had first anticipated, as some of the metal was thinner than I expected despite looking only slighted pitted after blasting. It took 3 weeks full time work by one one of the guys to sort out but I'm confident the chassis is now sorted.
Not always easy to spot things on the photo, so I tried to highlight areas of replacement in yellow.
All the outriggers, of course; trailing arm mountings and chassis arm; centre box sections just behind the engine, and new engine mounts, some of the top rails, front cross member; square tube section and rear body mounts.
I now need to:
Fit the body to check location and drill some mounting holes (I'll fit the cossi engine, MT75 and cossi diff to double-check clearance and mounting at the same time).
Shorten the gear lever extension unit.
Finish the 'wide open' hinge mounts.
Cut a big hole in the bonnet to clear the top of the engine.
And generally sort out that everything fits before I get the chassis re-blasted and finish the surface.
Should keep me busy for a while
Tony
Here is an update:
Trial fitted bits to finish things off before the powder coating.
Engine and gearbox fitted fine, as I expected, and I hope some new engine mounts will raise it a little further from the chassis rail and ARB.
LSD out of Granada Scorpio was no problem either, and seems to be the same ratio as the one already in my S3.
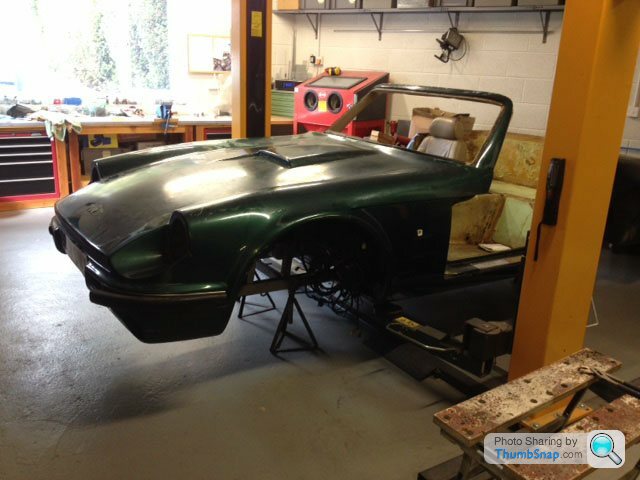
Body and bonnet fit was OK, but needed to drill body mounting holes in the new chassis plates and make some minor mods to one rear fixing plate and the new bonnet hinge brackets. All sorted now!
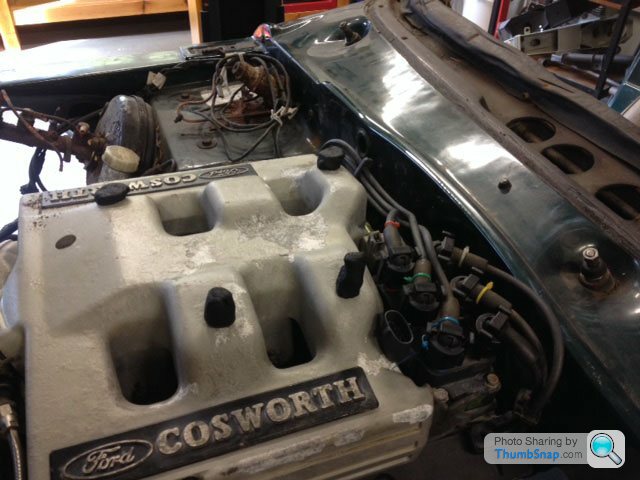
Enough engine clearance at the bulkhead and minumum 15mm under the bonnet. This would be enough but since I intend to raise the engine about 10mm I think it better to make a wider air scoop!
Checked the wide-open design worked - excellent!
Off to the powder coaters when it is all dismantled again . . .
Trial fitted bits to finish things off before the powder coating.
Engine and gearbox fitted fine, as I expected, and I hope some new engine mounts will raise it a little further from the chassis rail and ARB.
LSD out of Granada Scorpio was no problem either, and seems to be the same ratio as the one already in my S3.
Body and bonnet fit was OK, but needed to drill body mounting holes in the new chassis plates and make some minor mods to one rear fixing plate and the new bonnet hinge brackets. All sorted now!
Enough engine clearance at the bulkhead and minumum 15mm under the bonnet. This would be enough but since I intend to raise the engine about 10mm I think it better to make a wider air scoop!
Checked the wide-open design worked - excellent!
Off to the powder coaters when it is all dismantled again . . .
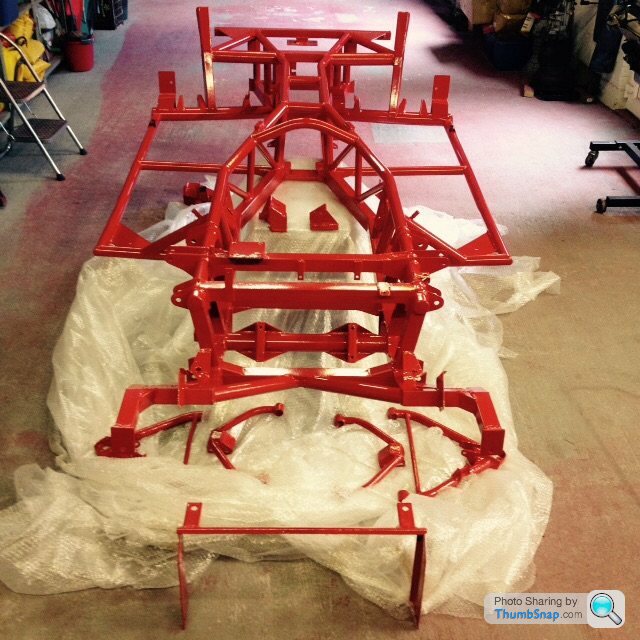
. . . is now very shiny and very red 
Apparently the correct way to powder coat a chassis is:
Complete all weldin and remove sharp edges;
Re-blast to key new metal and remove any last traces of rust;
Heat in oven to remove any grease etc;
Apply zinc coating whilst hot;
Then apply flexible epoxy coat.
TVR please take note !
This had better last longer than just a few years!
Tony.
Hi Mike
That's interesting and worrying at the same time! It actually looked to me as though I had about 20mm clear beneath a standard scoop. I was even considering modifying a spare sump I have and lowering the engine slightly to stay beneath a standard bonnet.
I'll probably check the clearance again when I have the chassis rolling with engine mounted.
Cheers.
Tony
Yes. I think they are worth about 10mm extra height on top of my old ones, which I used to mock up. ( I have now got some of those new mounts plus the metal covers). That will improve my sump clearance I hope, and takes bonnet clearance from 30mmm down to 20mm. Well worth checking again I think!
Gassing Station | S Series | Top of Page | What's New | My Stuff