V8S Rebuild begins!
Discussion


This thread follows on from my body off thread HERE
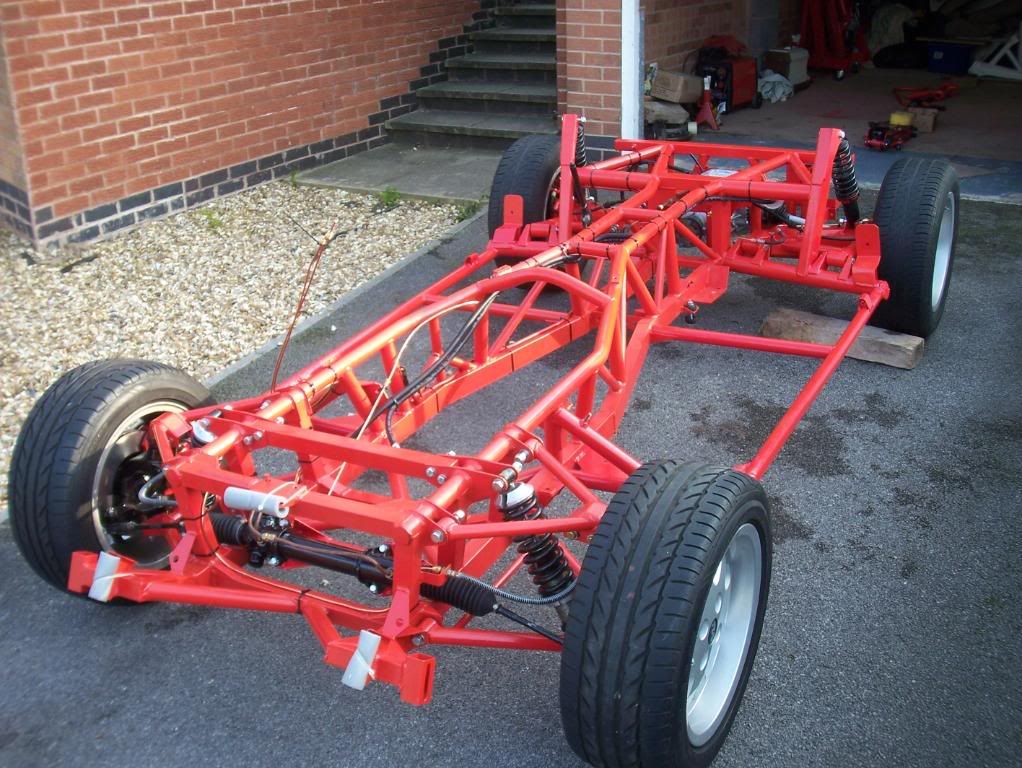
Fresh back from the powder coaters this morning, it's beautiful!
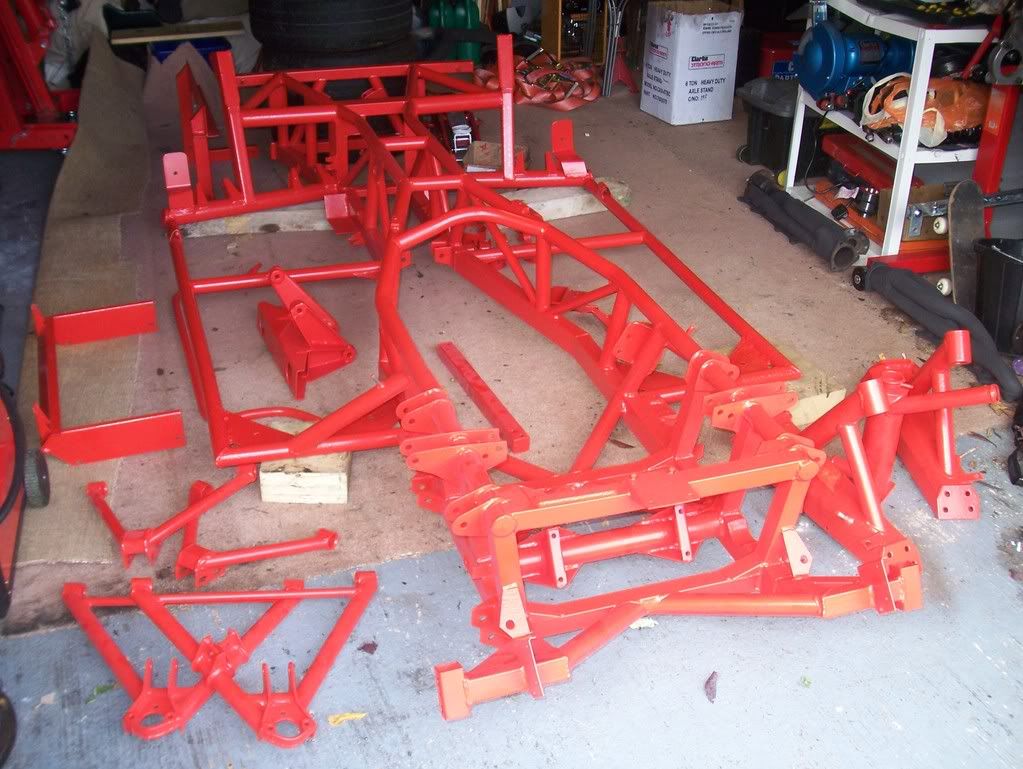
Powder coated
Chassis
Trailing arms
Front Wishbones
Swirl Pot
Radiator Housing
Diff carrier
Front chassis crossbar (V8 only, V6 is fixed)
Air intake pipe bracket
Fuel filter bracket
Fuel Tank Cradle (not shown)
Engine Mount Brackets
Various small items
£100 the lot! (Mates rates)
Previous Shotblasting was £95+vat
Fresh back from the powder coaters this morning, it's beautiful!
Powder coated
Chassis
Trailing arms
Front Wishbones
Swirl Pot
Radiator Housing
Diff carrier
Front chassis crossbar (V8 only, V6 is fixed)
Air intake pipe bracket
Fuel filter bracket
Fuel Tank Cradle (not shown)
Engine Mount Brackets
Various small items
£100 the lot! (Mates rates)
Previous Shotblasting was £95+vat
Edited by Barkychoc on Thursday 26th February 10:01
Edited by Barkychoc on Sunday 17th May 20:20

Erm erm.
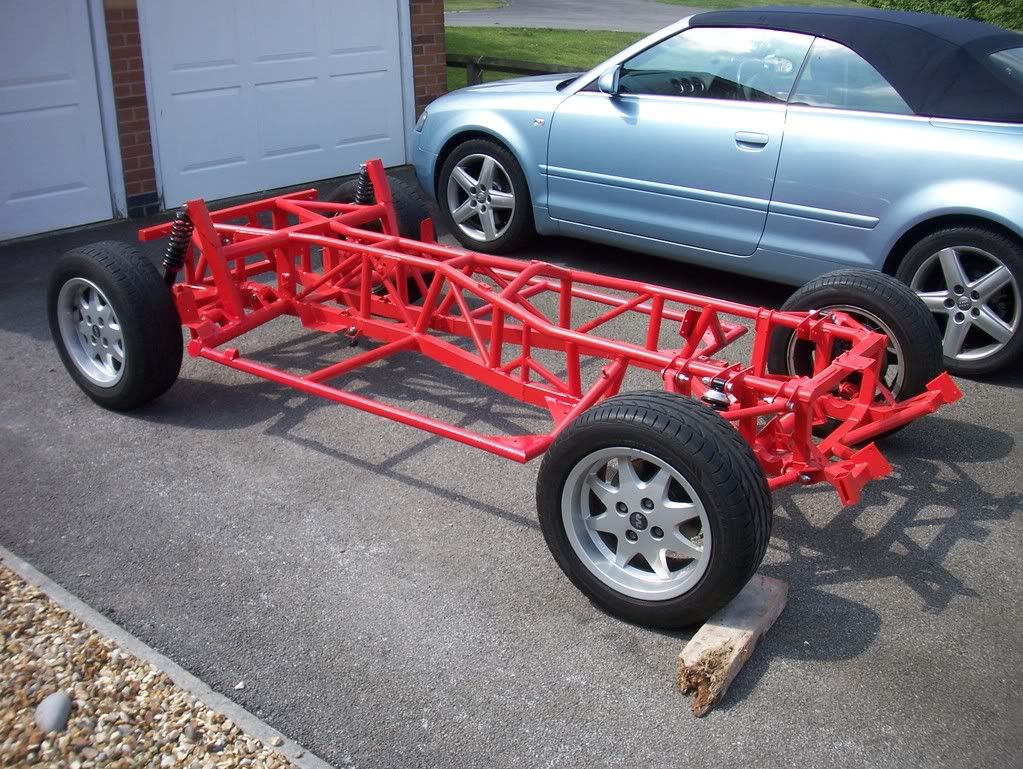
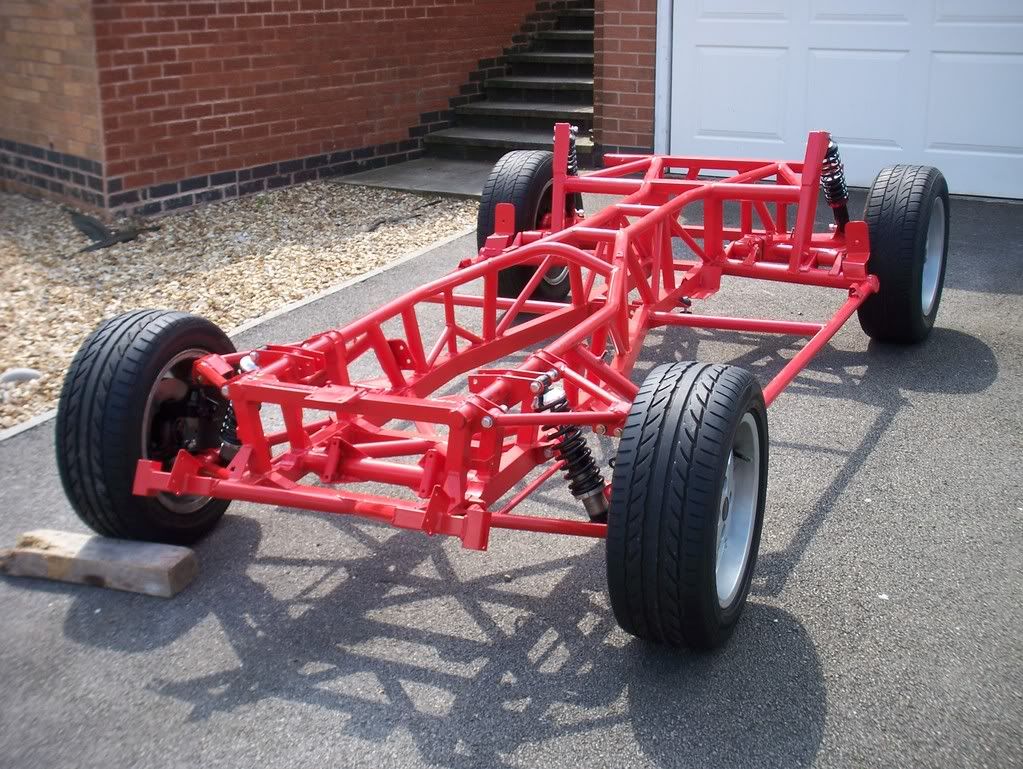
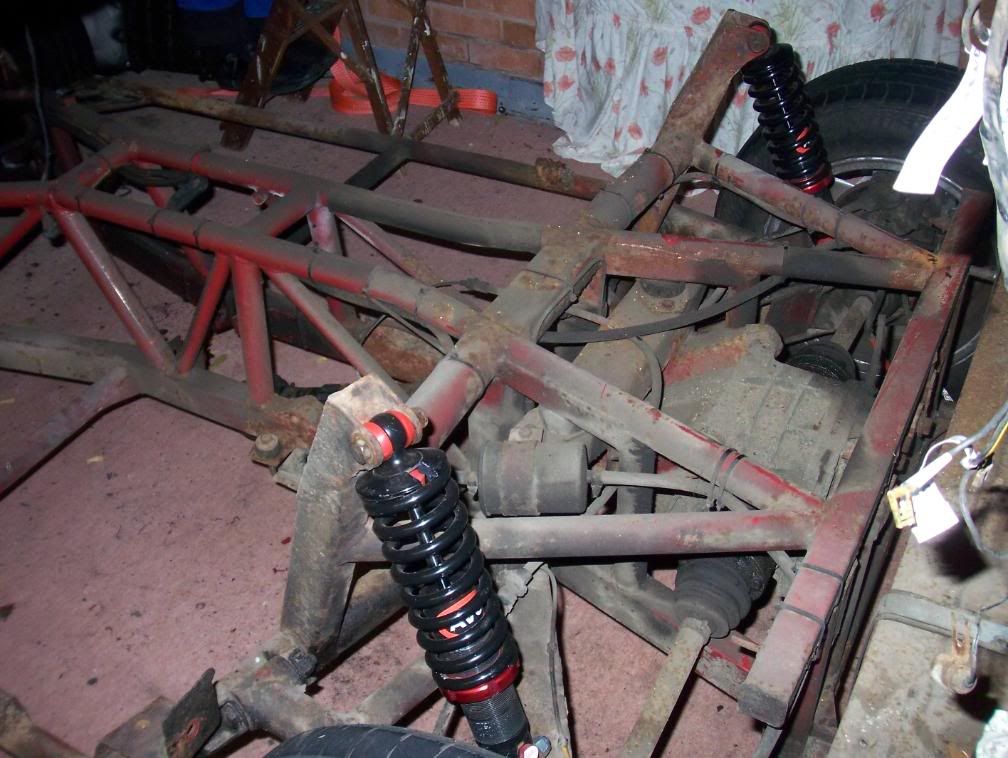
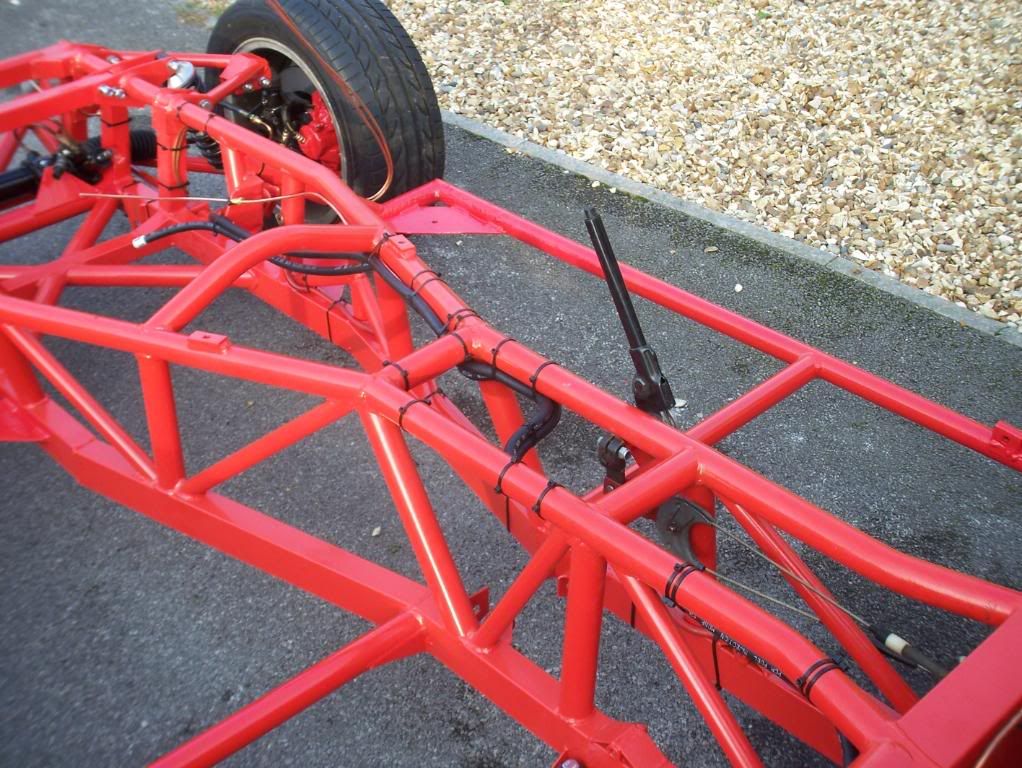
I have fitted the wishbones to the chassis.
Then I discovered I'd chucked away a couple of shims for the front suspension , so I made a couple of new ones today.
I may get a bit further tomorrow, it may even end up with the front wheels on.
I need to get the bushes fitted to the rear trailing arms, so no rear wheels can be fitted yet.
Chris
I have fitted the wishbones to the chassis.
Then I discovered I'd chucked away a couple of shims for the front suspension
, so I made a couple of new ones today.I may get a bit further tomorrow, it may even end up with the front wheels on.
I need to get the bushes fitted to the rear trailing arms, so no rear wheels can be fitted yet.
Chris


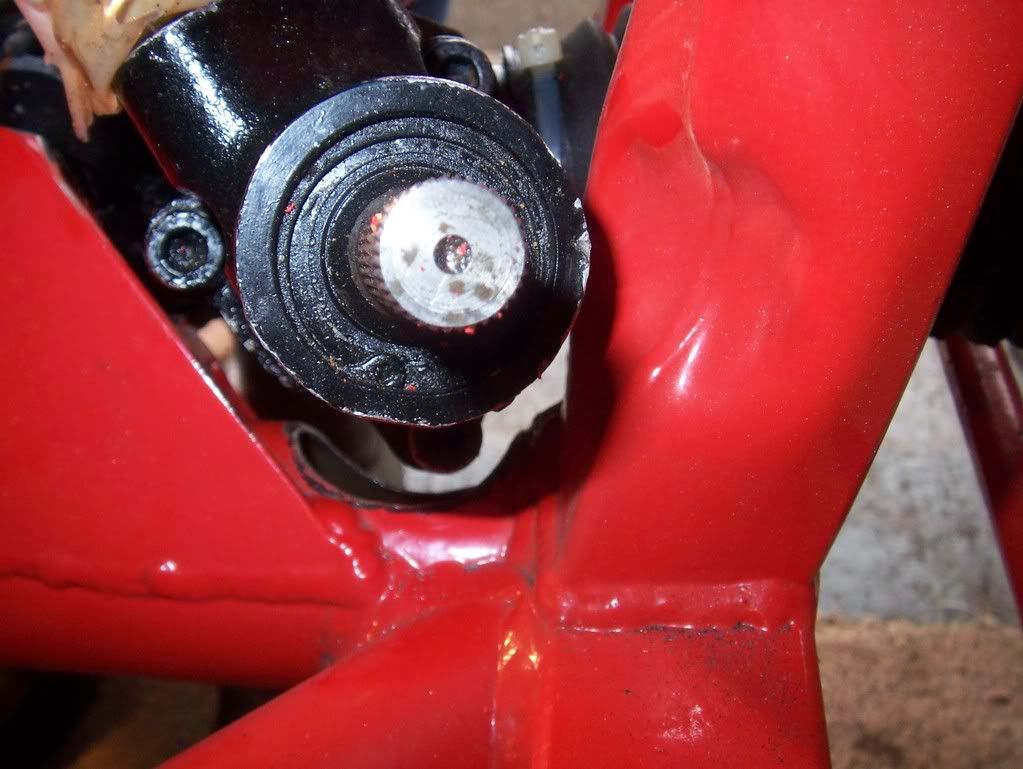
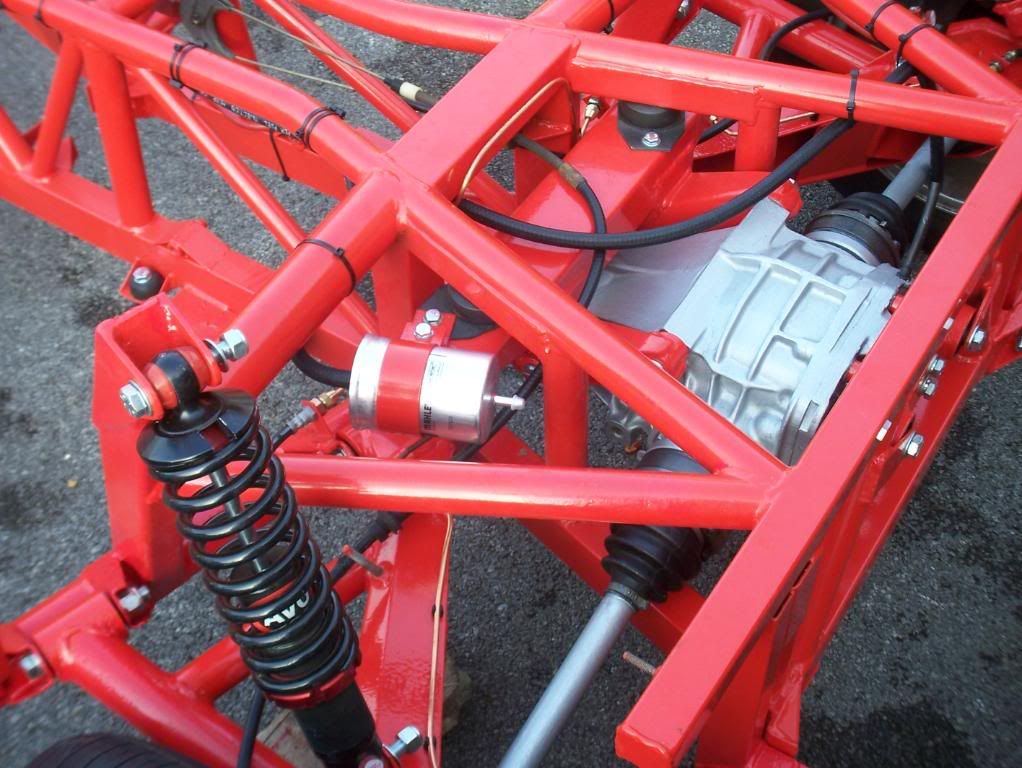
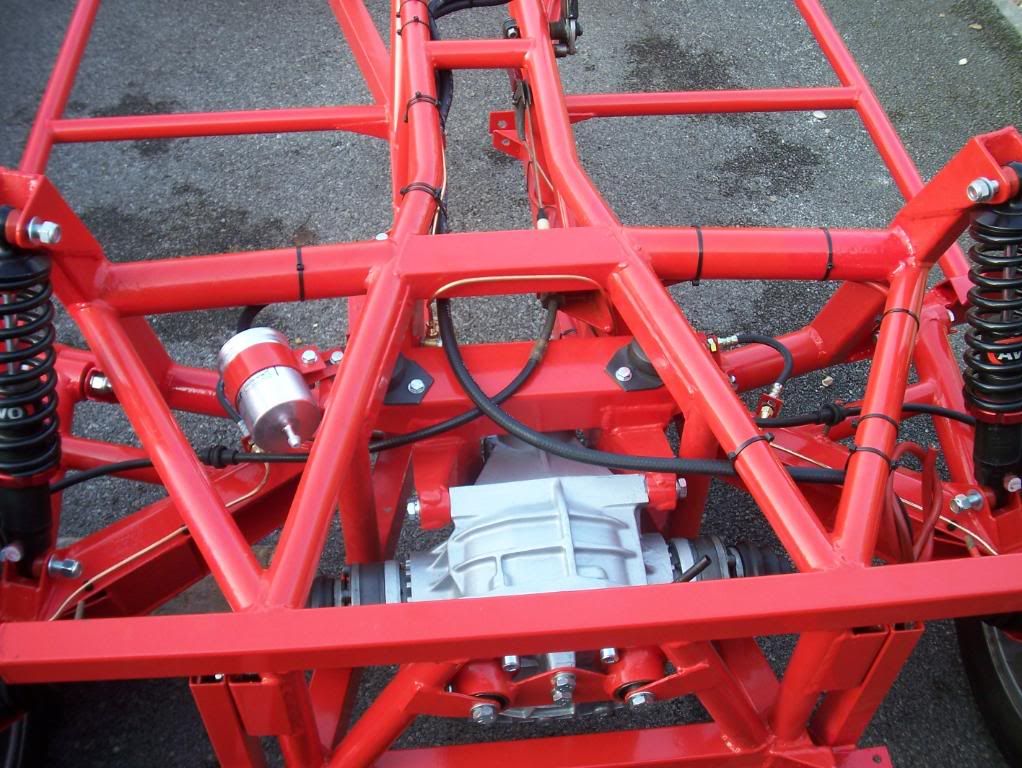
There are two rubber mounts on top of the diff carrier to mount it to the chassis - I discovered last night one of mine is broken, the steel baseplate is cracked right through.
I'll post a pic of it, it's very poor bit of design & worth checking if you have the opportunity.
I've had to order new ones from TVRcarparts - over £70 with VAT & delivery
I'll post a pic of it, it's very poor bit of design & worth checking if you have the opportunity.
I've had to order new ones from TVRcarparts - over £70 with VAT & delivery
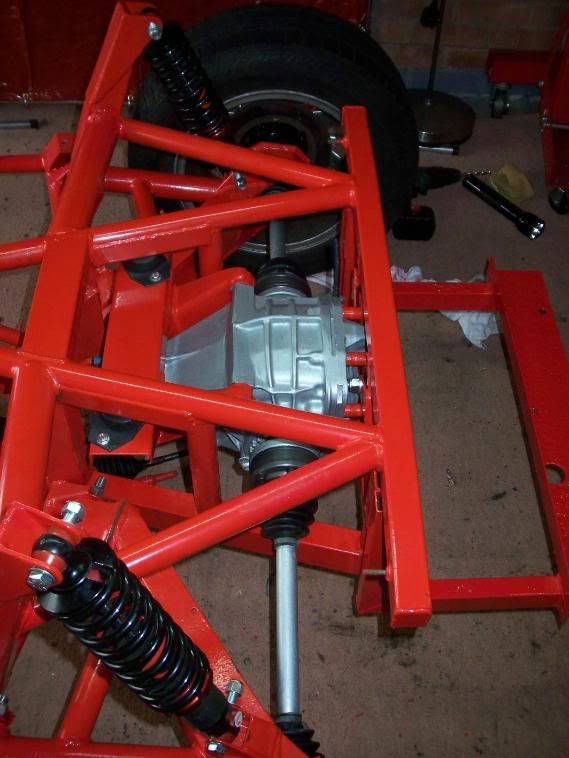
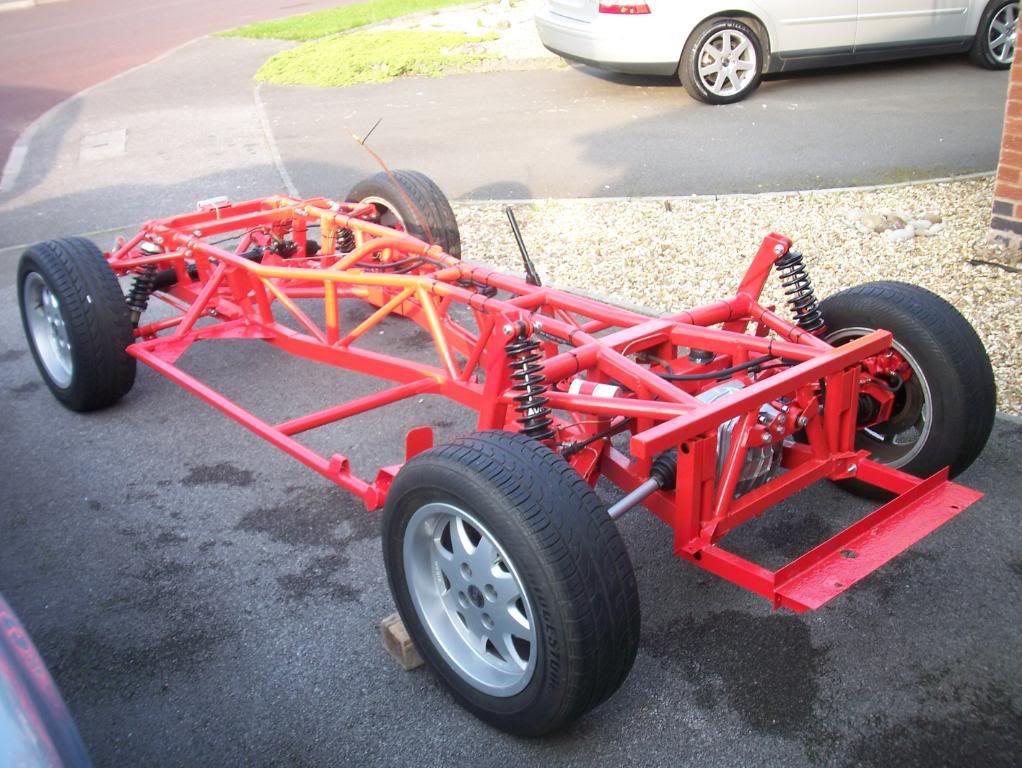
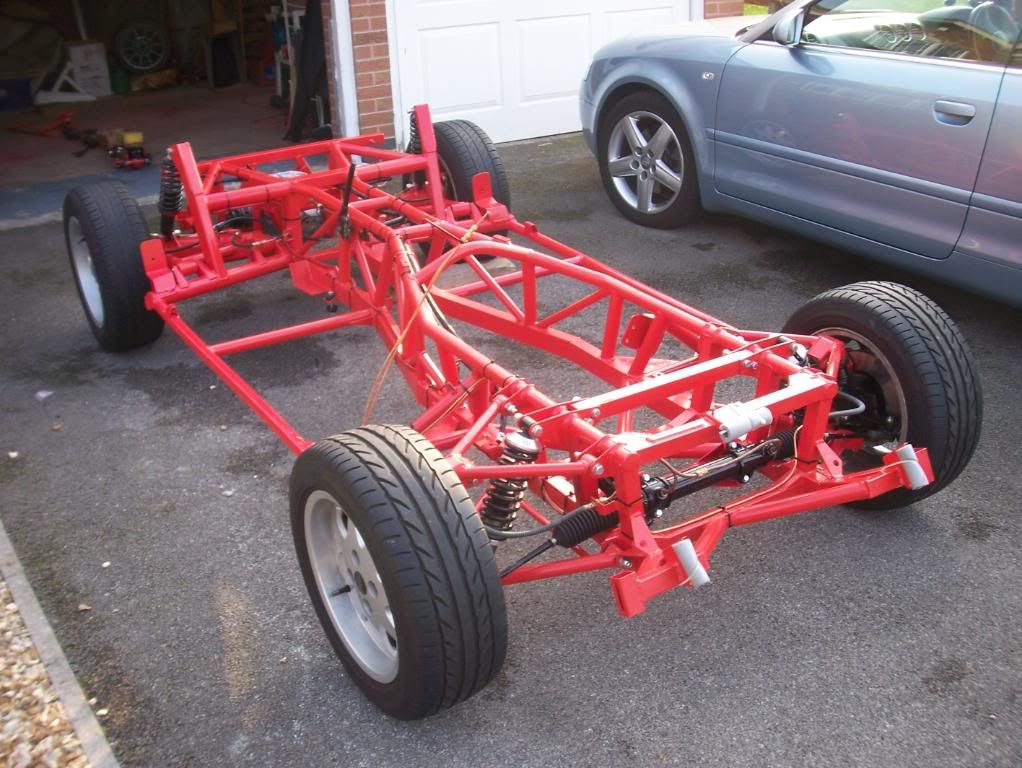
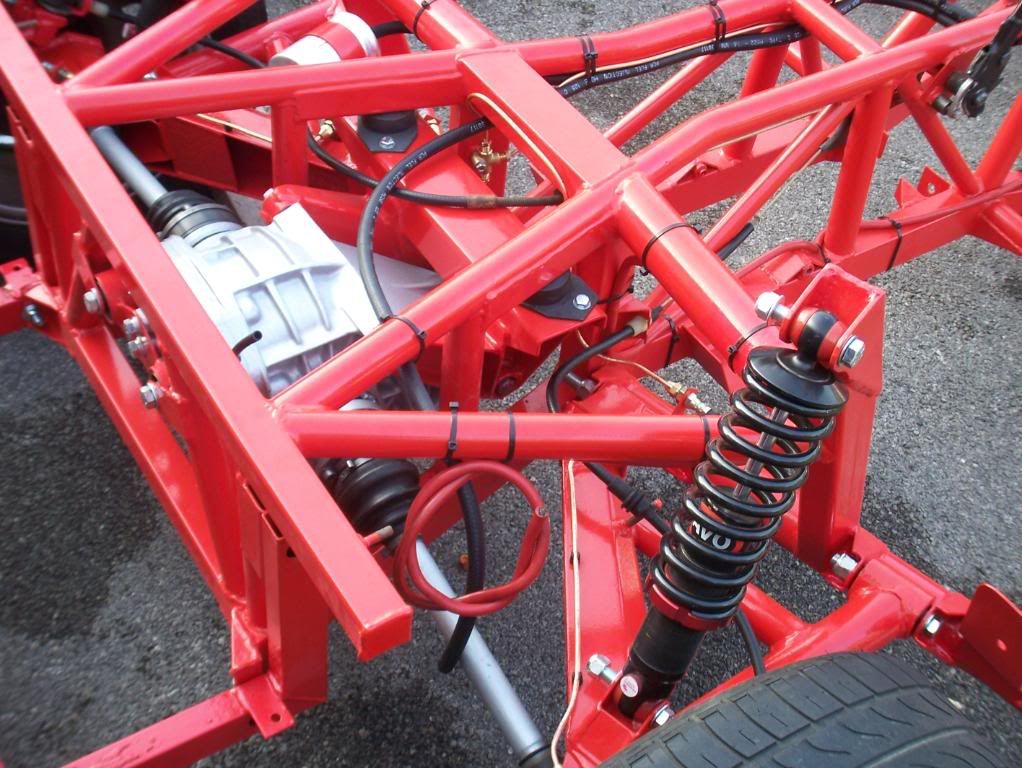
Diff & Driveshafts in.
Fuel tank cradle fitted by my 16 year old son - a rare appearance from his bedroom!
And for fun here's a before shot.
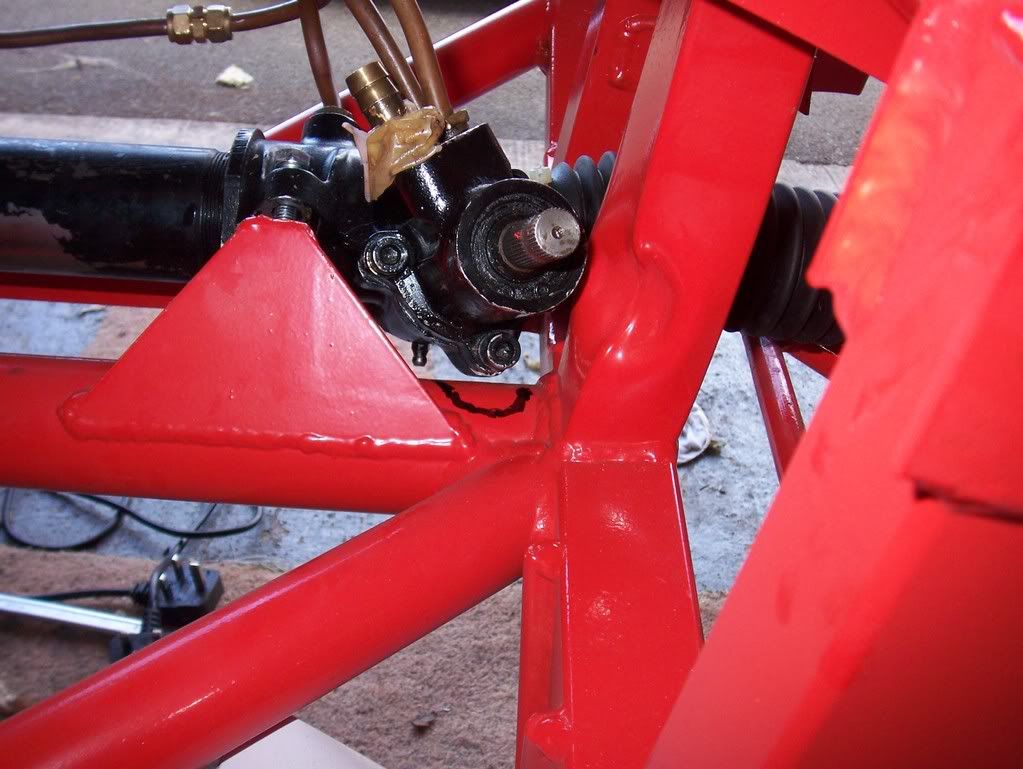
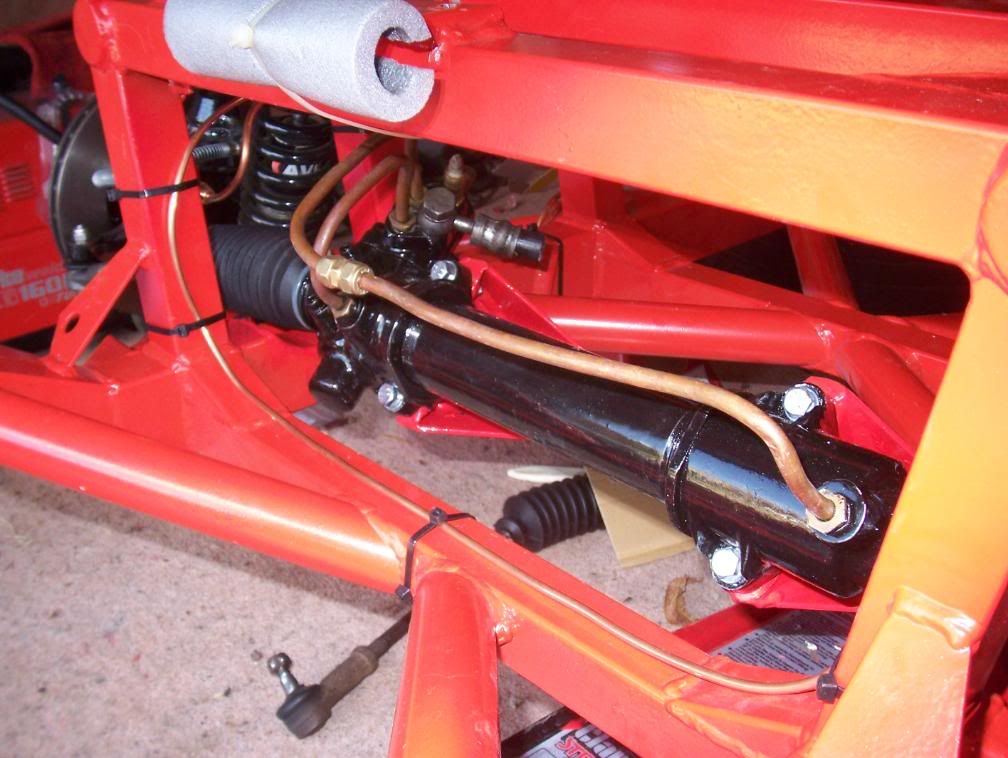
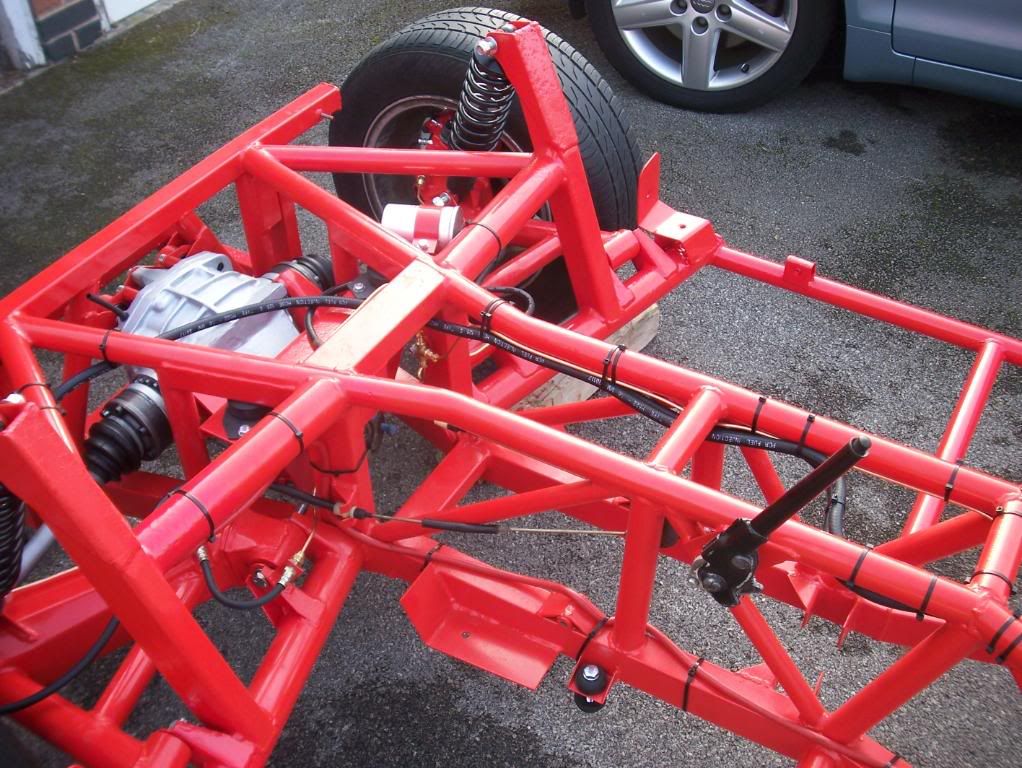
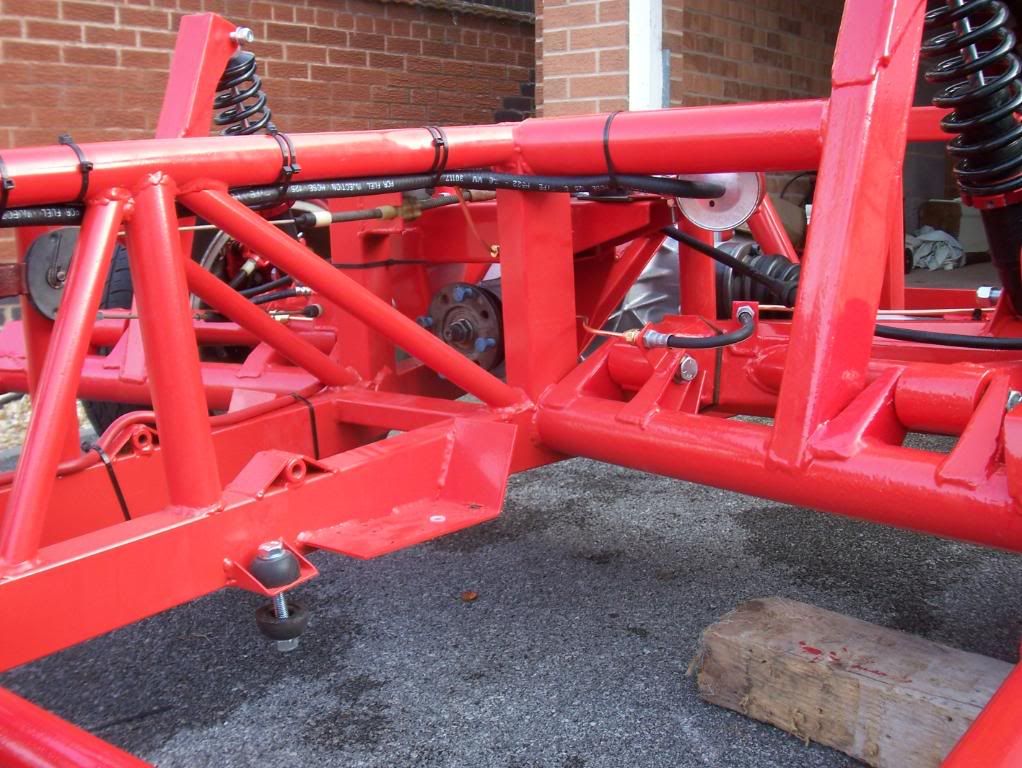
I then turned my attention to fitting the chim power steering rack - I ground the drivers side rack mounting point to get it to fit - then discovered I need to grind a bit of the main rack mounting tube on the chassis away too
Looks like the welder will see the light of day again - I nearly put it on ebay last week so its lucky I didn't.
Ah well I've come this far in for a penny......
Bit of a pain now its all been powder coated but never mind, it's a good job I bought a big tin of red smoothrite
Fuel tank cradle fitted by my 16 year old son - a rare appearance from his bedroom!
And for fun here's a before shot.
I then turned my attention to fitting the chim power steering rack - I ground the drivers side rack mounting point to get it to fit - then discovered I need to grind a bit of the main rack mounting tube on the chassis away too
Looks like the welder will see the light of day again - I nearly put it on ebay last week so its lucky I didn't.
Ah well I've come this far in for a penny......
Bit of a pain now its all been powder coated but never mind, it's a good job I bought a big tin of red smoothrite
Edited by Barkychoc on Saturday 9th August 19:25
A pic here of the issue fitting the power steering rack - I'm going to have to cut that tube and weld in a piece of metal to give the clearance.
However it is all reversible if it doesn't work - modifying that tube has no bearing on the manual steering rack at all.
However it is all reversible if it doesn't work - modifying that tube has no bearing on the manual steering rack at all.
Edited by Barkychoc on Sunday 10th August 16:20
Following on from above I have taken the angle grinder to my chassis to fit the power steering rack
From above look under the rack I have ground the tube away.
I've also had to grind the rack mounts - sorry no photos yet the camera battery went flat.
From below

Rack fitted
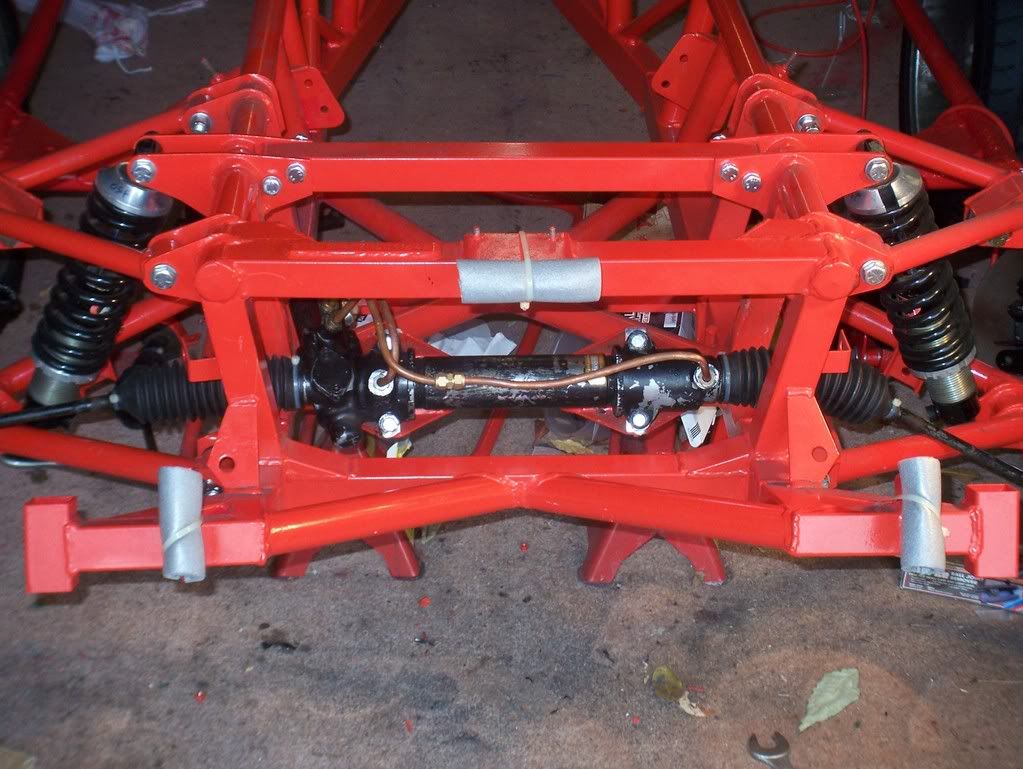
I've now removed the rack again, welded a plate into the hole and given it the first coat of hammerite.
From above look under the rack I have ground the tube away.
I've also had to grind the rack mounts - sorry no photos yet the camera battery went flat.
From below
Rack fitted
I've now removed the rack again, welded a plate into the hole and given it the first coat of hammerite.
Edited by Barkychoc on Friday 22 August 18:14

pies said:
Chris you are welding over those holes
Yes the hole is welded up now with a piece of steel - the camera went flat so no pic.Ray S said:
 Looking good Chris will all be worth it in finish.Will it be ready for next SCH Ray
I'm actually not a million miles off now - once fuel & brake pipes are sorted there's not a lot else before the body is ready to go back on.
Edited by Barkychoc on Friday 22 August 20:12
OK time for a picture update.
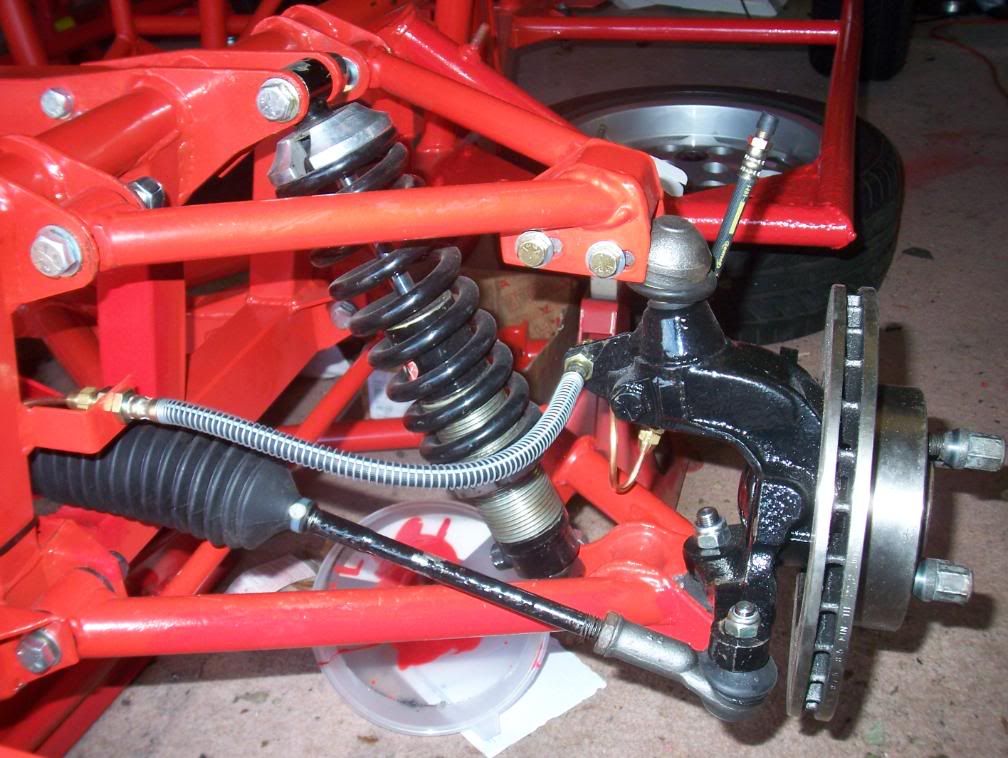
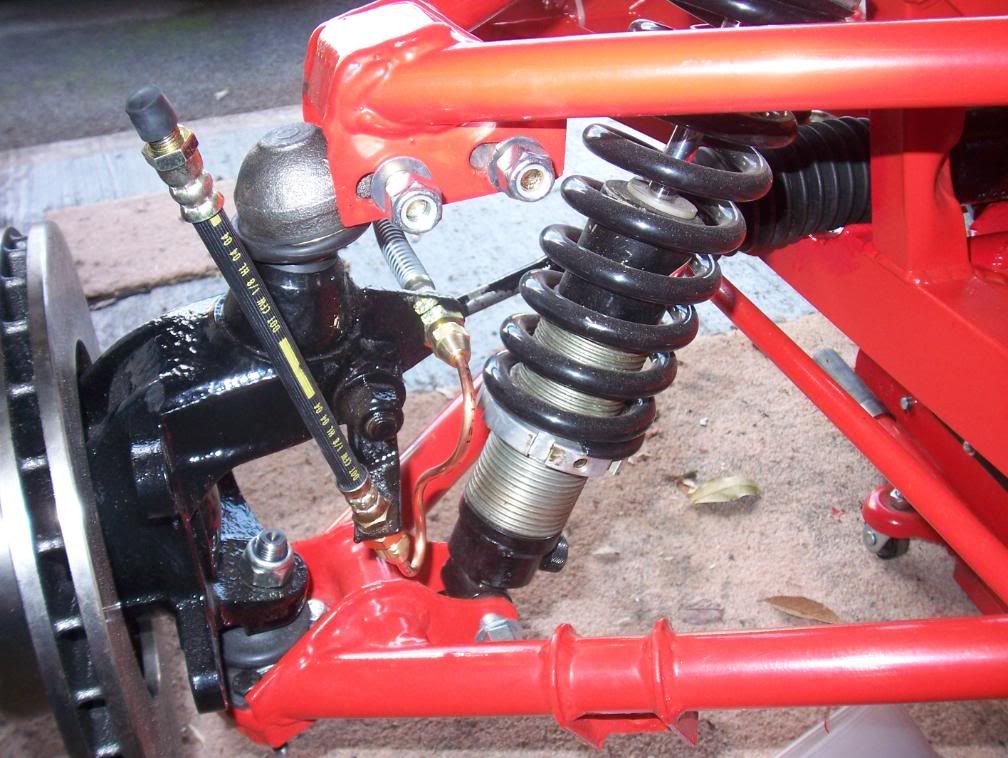
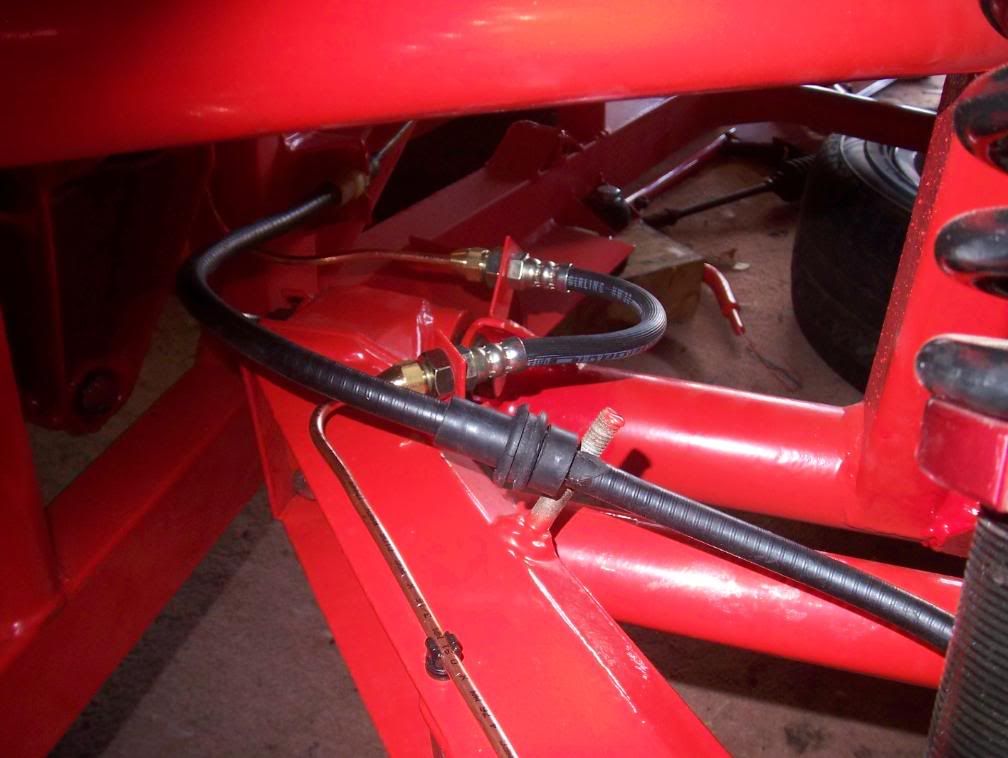
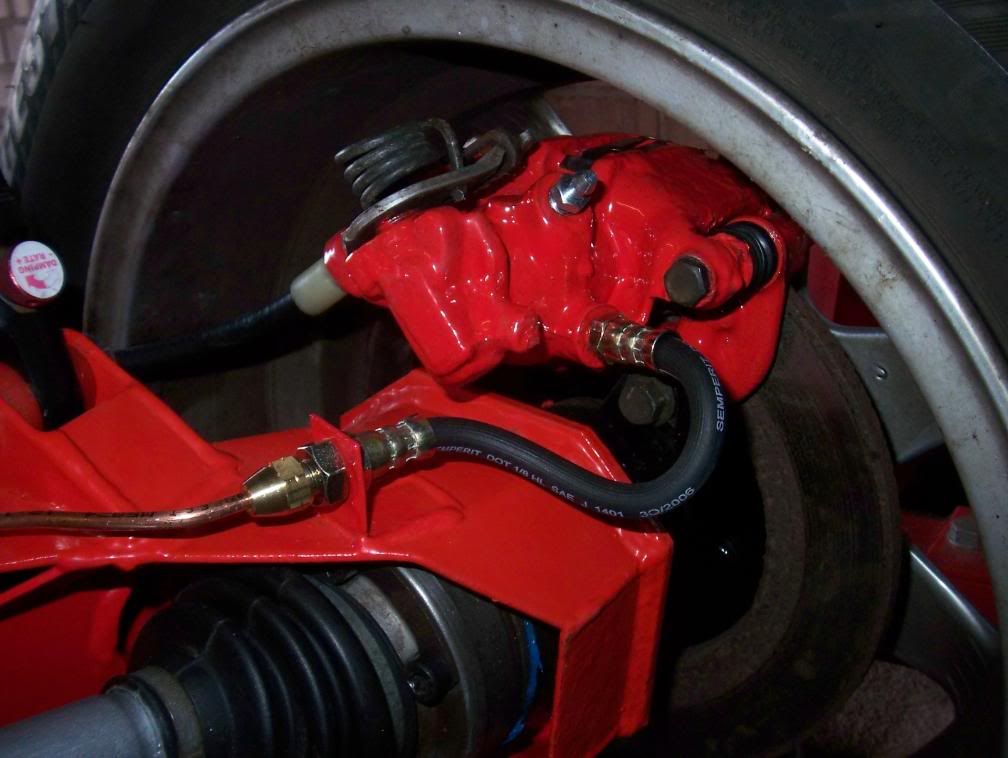
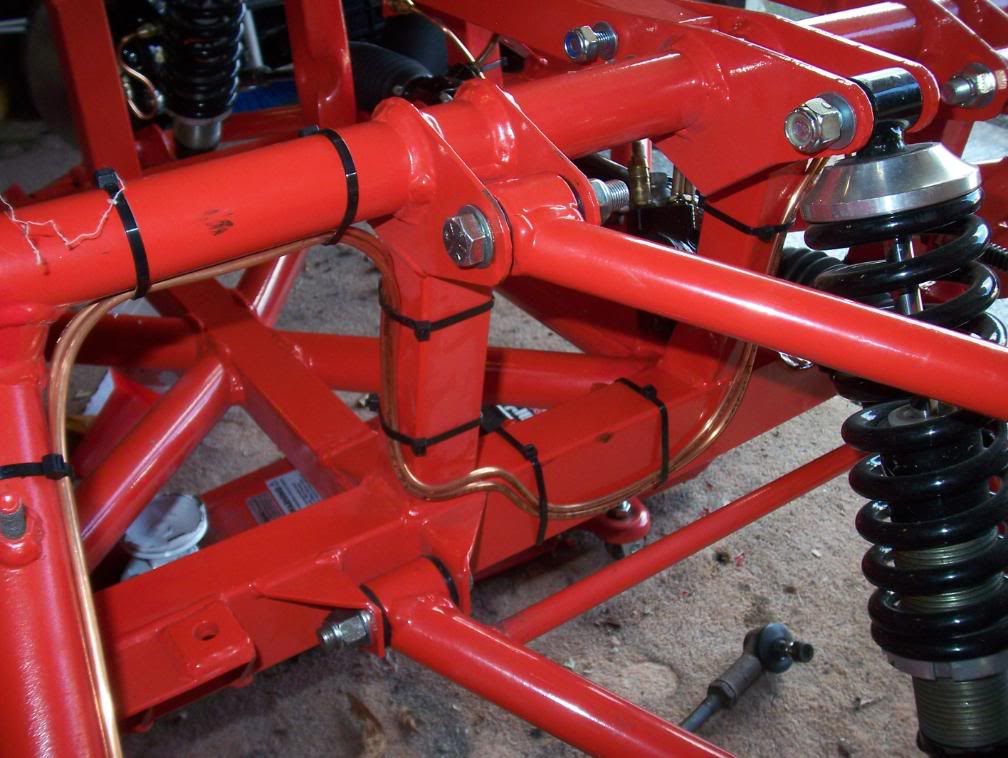
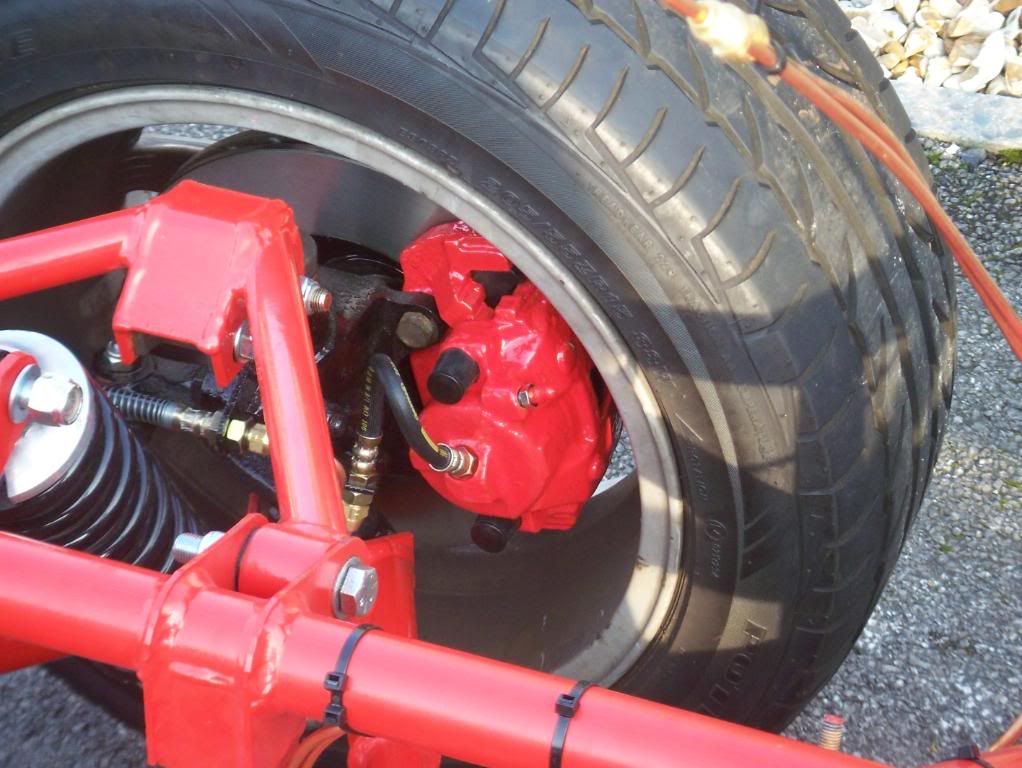
Nearside front showing brake pipes.
No calipers fitted yet I'm waiting for a replacement caliper piston due to arrive on monday.
I'm fitting xr4x4 calipers which allow use of 260mm discs (its another story but don't use xr4x4 discs - you need 2wd 260mm discs later ABS models or xr4i).
I'll touch up the track rod paint when I know the tracking is right.
Offside rear
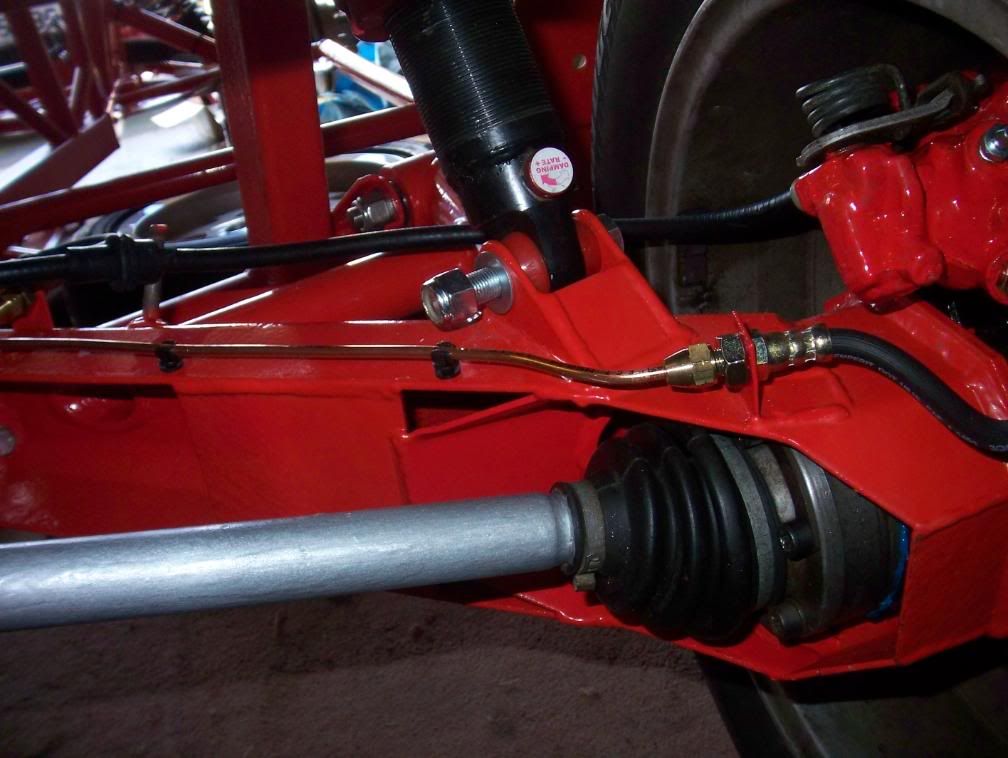
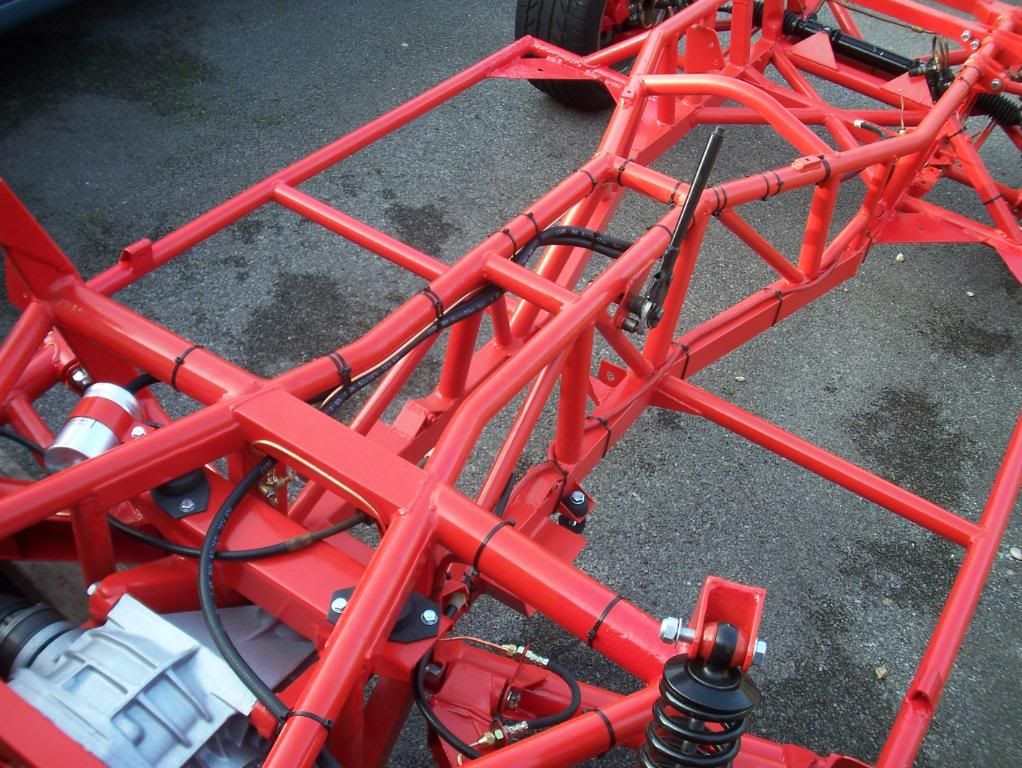
Nearside rear trailing arm pipe
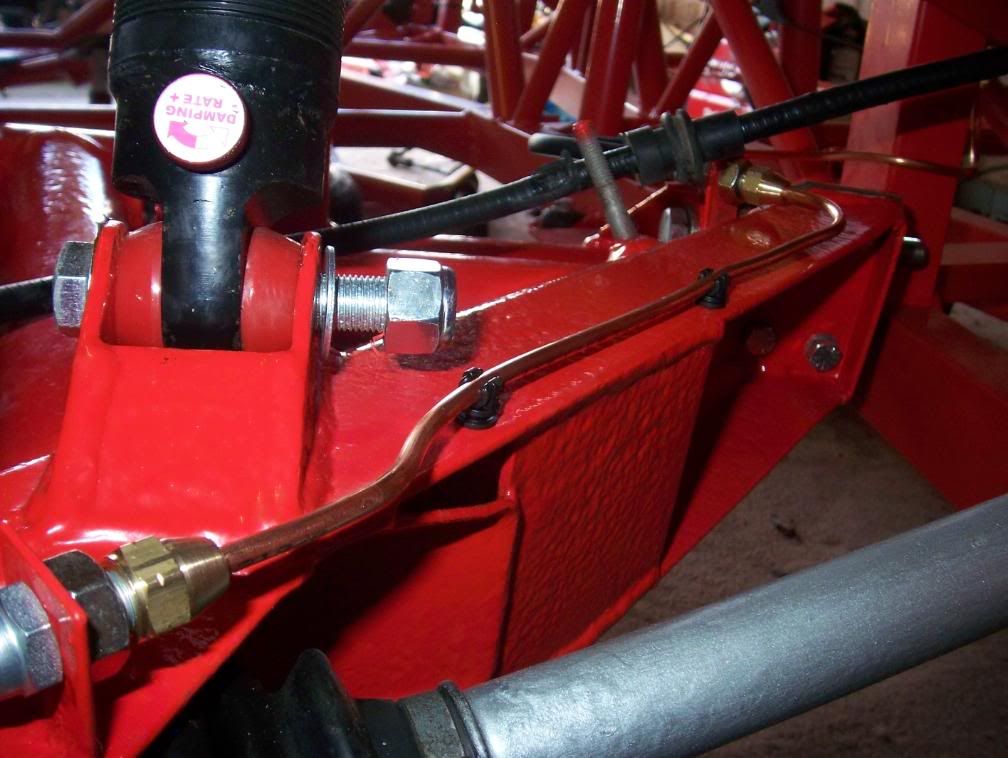
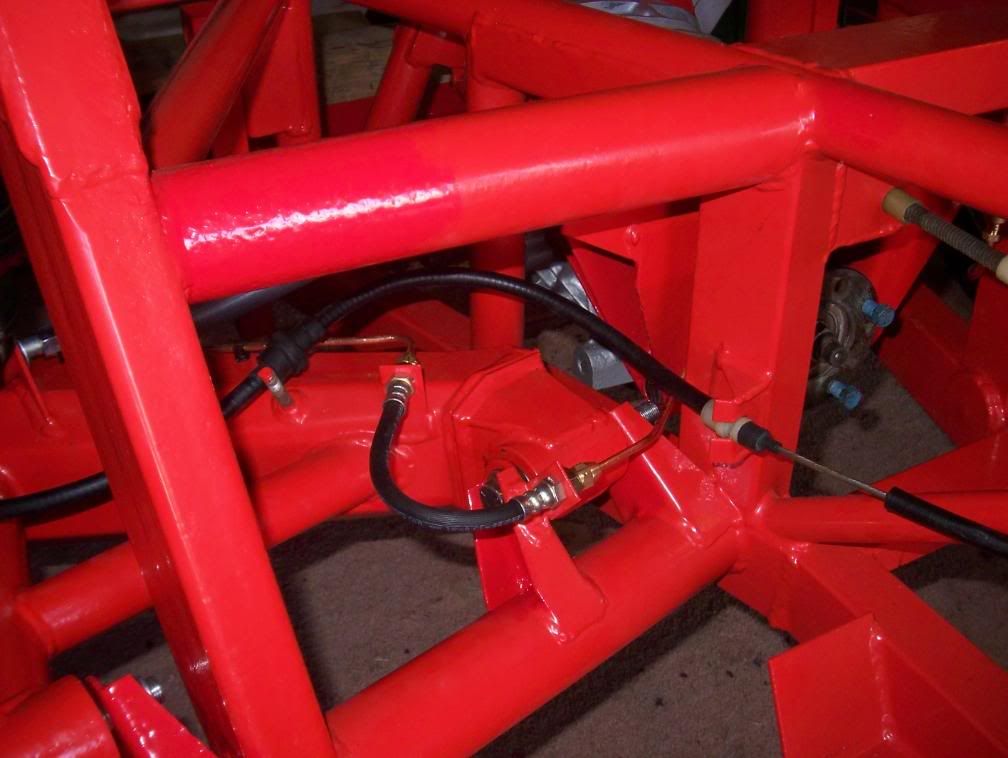
Rear brake pipe above diff to offside (cable ties needed here)
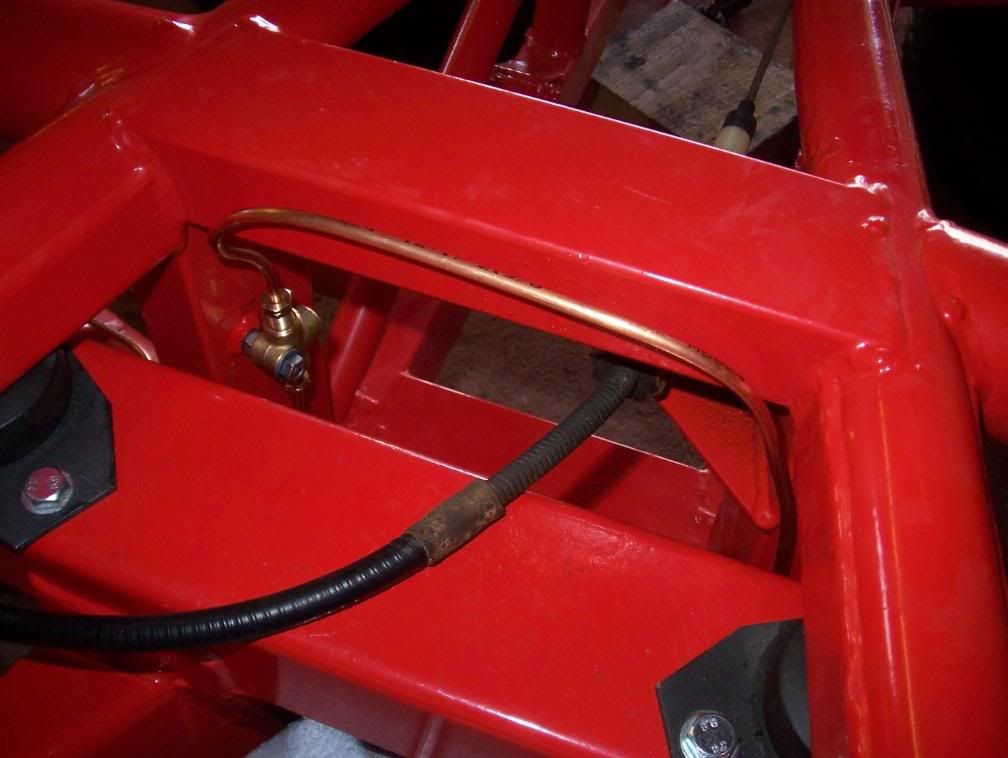
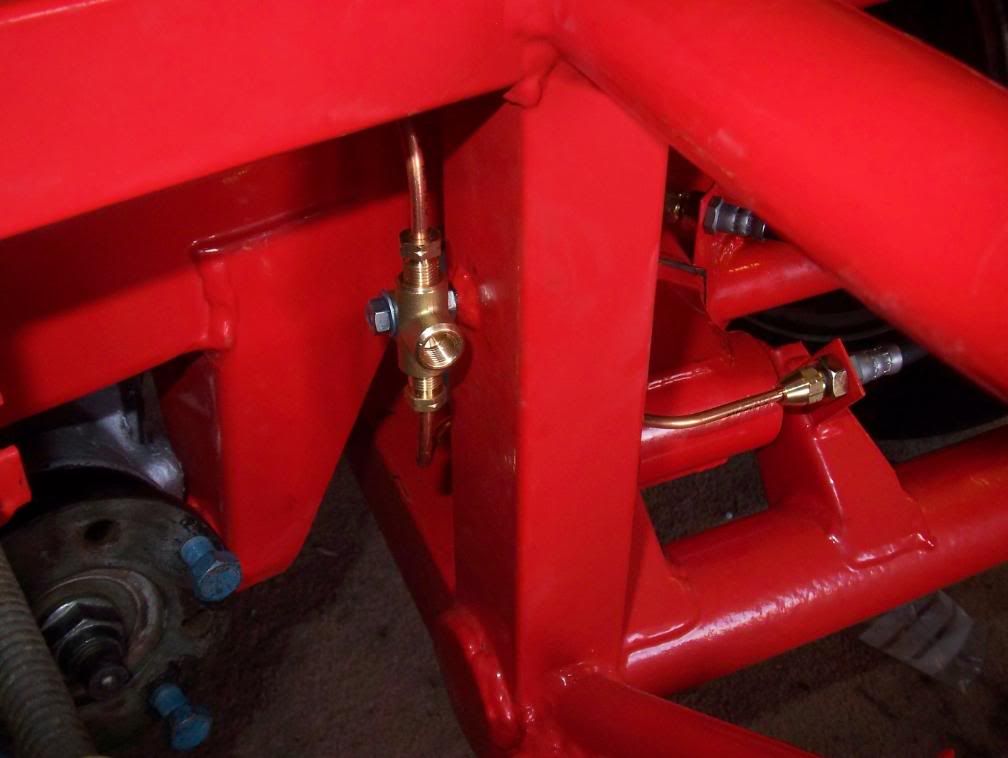
Rear Brake 'T', my original was imperial, I've replaced everything with metric.
Additional nut fitted under the 'T' as otherwise it is too near the chassis and you can't swing the spanner very well.
I know there's a pipe missing - I ran out of copper pipe
Routing of front brake pipes - faithful to original route
The pipes at the bottom left of the picture need to be covered by a piece of rubber hose for protection.
Front Brake pipe - again same as original route
A few more cable ties need to be fitted - I'm out of longer ones you may notice I've joined short ones together - they will be replaced.
None of the brake unions are done up tight at the moment as I need to undo all the flange joints and fit shakeproof washers, and the front flexi pipes to the calipers wil have to come off again anyway as you need to tighten it at the caliper end first (otherwise you'd twist the hose).
Left to do
Rebuild front calipers & fit.
Clean, paint & fit fuel tank.
Fit fuel pipes.
Fit rear brake pipe.
Fit starter supply cable.
Then I am going to put the body on - as I can't drive till next April I'm going to leave the engine expenditure till nearer the time.
Once the body is on there's still plenty to be done - connect & bleed brakes, replace heat shielding in engine area, fit the jag seats, sort out power steering pump & steering linkage, sit in drivers seat and make brrrrr noises
Nearside front showing brake pipes.
No calipers fitted yet I'm waiting for a replacement caliper piston due to arrive on monday.
I'm fitting xr4x4 calipers which allow use of 260mm discs (its another story but don't use xr4x4 discs - you need 2wd 260mm discs later ABS models or xr4i).
I'll touch up the track rod paint when I know the tracking is right.
Offside rear
Nearside rear trailing arm pipe
Rear brake pipe above diff to offside (cable ties needed here)
Rear Brake 'T', my original was imperial, I've replaced everything with metric.
Additional nut fitted under the 'T' as otherwise it is too near the chassis and you can't swing the spanner very well.
I know there's a pipe missing - I ran out of copper pipe
Routing of front brake pipes - faithful to original route
The pipes at the bottom left of the picture need to be covered by a piece of rubber hose for protection.
Front Brake pipe - again same as original route
A few more cable ties need to be fitted - I'm out of longer ones you may notice I've joined short ones together - they will be replaced.
None of the brake unions are done up tight at the moment as I need to undo all the flange joints and fit shakeproof washers, and the front flexi pipes to the calipers wil have to come off again anyway as you need to tighten it at the caliper end first (otherwise you'd twist the hose).
Left to do
Rebuild front calipers & fit.
Clean, paint & fit fuel tank.
Fit fuel pipes.
Fit rear brake pipe.
Fit starter supply cable.
Then I am going to put the body on - as I can't drive till next April I'm going to leave the engine expenditure till nearer the time.
Once the body is on there's still plenty to be done - connect & bleed brakes, replace heat shielding in engine area, fit the jag seats, sort out power steering pump & steering linkage, sit in drivers seat and make brrrrr noises
Edited by Barkychoc on Saturday 13th September 20:06
OK got quite a bit done today.
Rebuilt & fitted front calipers (60mm piston / 260mm disc sierra calipers).
Made & fitted last remaining copper brake pipe for rear brakes.
Fitted fuel hoses.
Fitted new fuel filter & bracket.
Fitted starter motor / main vehicle supply cable.
Left to do
Clean & fit fuel tank.
Clean underside of body & I may paint it black.
Replace heat shielding in engine bay.
Probably waxoyl the outriggers (the jury is still out).
Then thats it - body on time.......
Pictures below in no particular order.
Edited by Barkychoc on Saturday 20th September 21:28
V8ish said:
Absolutley Stunning!!
How far are you taking this resto? It would almost seem a shame to cover up this work with a shell that has gell cracks and scabs etc (does it?). Whats your plan for the body or is it in good nick?
I assume the engine with have some bling if not least a few hours with a rubbing compound, autosol etc?
The body is actually very good - a bit of a crack at the rear where it had a bit of action at some point but the body overall has no star cracks at all - the main problem is stone chips particularly on the sills & under the front end which I think is pretty standard stuff. The paintwork is another project for another day.........How far are you taking this resto? It would almost seem a shame to cover up this work with a shell that has gell cracks and scabs etc (does it?). Whats your plan for the body or is it in good nick?
I assume the engine with have some bling if not least a few hours with a rubbing compound, autosol etc?
Chris
Well folks after not doing much for a while and umming and aahing about whether to coat my outriggers or not, I've done them with a first coat of protection today.
I've used Bilt Hamber Dynax UB which is a new product that they have just released - its not on their website yet.
I've used some of their other products and found them to be excellent.
A 1 litre tin is £13 odd delivered, and I've used about half of it.
It is very nice to apply - runnier than the waxoyl glue, - I've given the petrol tank a coat too (I used a brush). Covered very well in one coat. I reckon it would be runny enough to use in a spray gun if thats your thing.
It needs another coat (they recommend 2 coats within 24 hours), so guess what I'm doing tomorrow night
Its hardly exciting progress but I'll try and post a pic tomorrow.
Then, erm, oh yeah, the body goes on
Then just the small matter of making the power steering work and rebuilding the engine
- ETA just googled Dynax UB and found this
Edited by Barkychoc on Sunday 16th November 19:35
TonupS2 said:
Chris that must have been painful painting those lovely red outrigers in thick matt black.
It was but in the end I thought it would be silly to miss the opportunity to coat the outriggers while they have no rust or damage at all - once it has set in you're only ever going to slow it down!Chris
Well just popped out to the garage and PUT THE BODY ON!
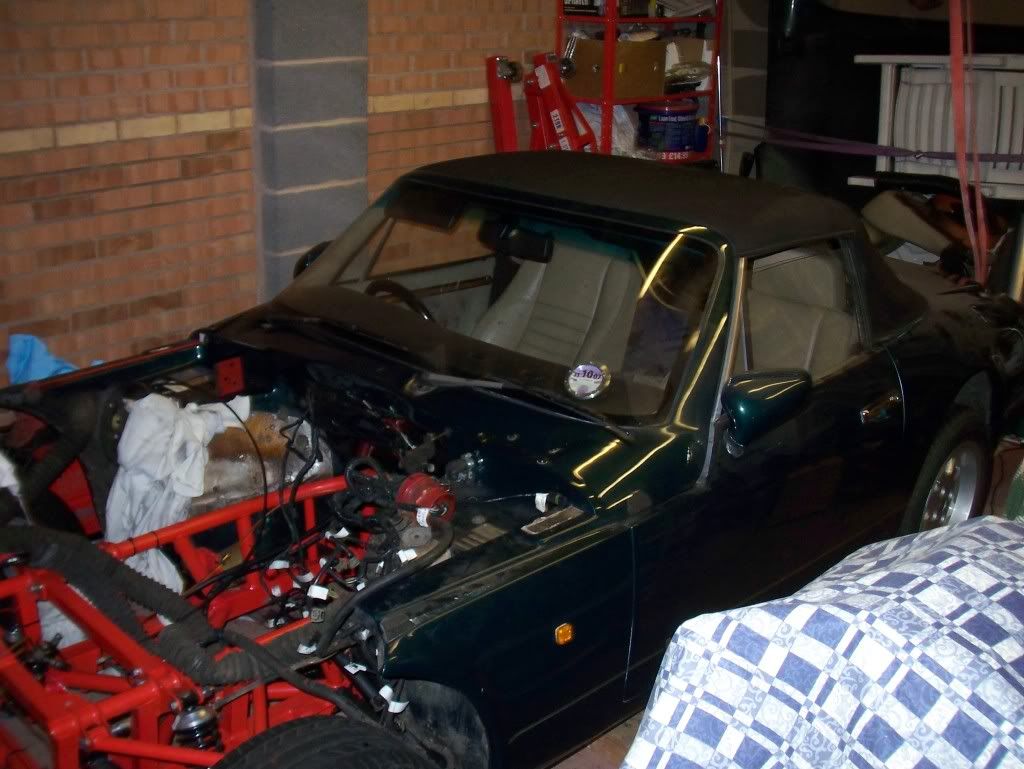

One slight hiccup - try as I might I couldn't get the body to go on properly.
If you fit the handbrake lever to the chassis remember to remove it before putting the body on
I can vouch for the totally useless fact that the handbrake lever can support the weight of the body!!
I'm really pleased - all the welding and brackets that I fabricated all fitted and lined up perfectly with the existing holes (and I wasn't very scientific about the measurements) - only the holes in the brackets under the rear wheelarches are a little bit off but nothing serious.
I am cream crackered now and going to have a beer
Edited by Barkychoc on Saturday 29th November 20:27
Well for the first time in over a year the old girl has been out of the garage for a wash!
The body is now fully bolted on and all holes lined up perfectly!
I need a 2.9 style bottom UJ to fit the power steering - the V8S one is too long.
Next weekend I hope to have the brakes and steering sorted (excluding PAS pump).
The body is now fully bolted on and all holes lined up perfectly!
I need a 2.9 style bottom UJ to fit the power steering - the V8S one is too long.
Next weekend I hope to have the brakes and steering sorted (excluding PAS pump).
Orophin said:
You mean to say you've had the car apart for over a year?? Crumbs. It's a big job then.
Not that massive really - its a combination of being able to find the time and also that I can't drive till April due to an operation I had last year (Mr DVLA says no driving for 12 months) - so there's been no need to rush.Edited by Barkychoc on Sunday 30th November 16:52
Gassing Station | S Series | Top of Page | What's New | My Stuff