Another body off!
Discussion


After rounding up a few enthusiastic bodies at last night's TVRCC meet a dozen of us did the lift with ease, started off using a jack and blocks and once we where sure the body and chassis where happily separated 10 of us lifted the body clear while the other two shoved the chassis out and pushed the body dolly in. Job done and time for a beer.
Pictures to follow and a big thanks to the east Yorks tvr gang, especially Duncan for his guidance (having done this before)
Pictures to follow and a big thanks to the east Yorks tvr gang, especially Duncan for his guidance (having done this before)
So here we go..
To recap the original task was a gearbox replacement and a replacement of leaky / old fuel and oil lines and a bit of a clean up so having got the chassis to this

I then found this

So having considered the options we carried on stripping, as the engine and box where out already a couple of evenings work had the body bolts out all wiring disconnected and a dolly made up to put the body on so we could move it easily.

A number of volunteers where then assembled and we started jacking the body off the chassis and using blocks, this made sure everything was disconnected and meant the starting point for the lift was a bit kinder on our backs !
Stage 1

Stage 2

Stage 3

No picture for the next bit but we had 5 bodies down each side and two spotters / chassis / dolly movers, the body was lifted, chassis pushed out of the way then the body dolly pushed under the shell and then the body lowered onto the dolly.

Then the bar opened !

Car parking was abit of an issue though, my father is considering loaning out his garage for future TVRCC meetings..

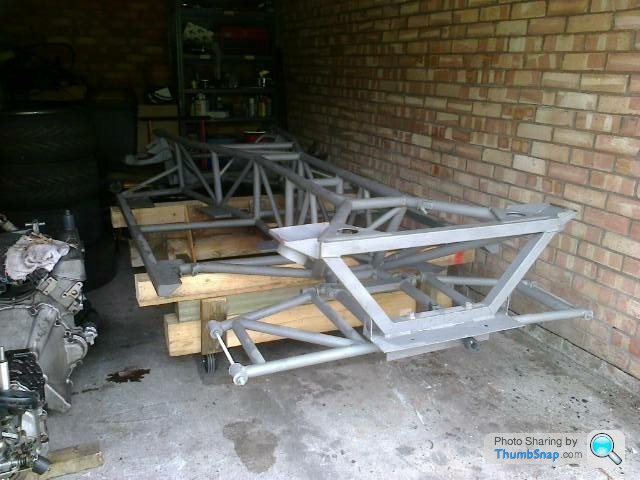
Body shell secured outside and chassis ready for further attention

To recap the original task was a gearbox replacement and a replacement of leaky / old fuel and oil lines and a bit of a clean up so having got the chassis to this

I then found this

So having considered the options we carried on stripping, as the engine and box where out already a couple of evenings work had the body bolts out all wiring disconnected and a dolly made up to put the body on so we could move it easily.

A number of volunteers where then assembled and we started jacking the body off the chassis and using blocks, this made sure everything was disconnected and meant the starting point for the lift was a bit kinder on our backs !
Stage 1

Stage 2

Stage 3

No picture for the next bit but we had 5 bodies down each side and two spotters / chassis / dolly movers, the body was lifted, chassis pushed out of the way then the body dolly pushed under the shell and then the body lowered onto the dolly.

Then the bar opened !

Car parking was abit of an issue though, my father is considering loaning out his garage for future TVRCC meetings..

Body shell secured outside and chassis ready for further attention

A bit more poking about found that the corrosion did extended further than could be seen with the body on but generally the chassis is not too bad, a couple more sections are a bit on thin side so both box section outriggers will be replaced.

We also found that some lazy t**t has chopped out the gearbox mount and re welded it rather than do the job properly, this was on top of castellated nuts without split pins, and one rear calliper bolt having almost fallen out due to having no lock wire fitted.

I then started on the rear end

While my father who is well practised in Cortina spring removal got on with the front.

After a day of heaving, levering and not too much sweary words we have a chassis almost ready for blasting
[URL=http://s885.photobucket.com/user/400wedge/media/My%20TVR/DSC_0455.jpg.html]
 [/URL]
And a considerable pile of "spare chassis"


We also found that some lazy t**t has chopped out the gearbox mount and re welded it rather than do the job properly, this was on top of castellated nuts without split pins, and one rear calliper bolt having almost fallen out due to having no lock wire fitted.

I then started on the rear end

While my father who is well practised in Cortina spring removal got on with the front.

After a day of heaving, levering and not too much sweary words we have a chassis almost ready for blasting
[URL=http://s885.photobucket.com/user/400wedge/media/My%20TVR/DSC_0455.jpg.html]
[/URL]And a considerable pile of "spare chassis"

Edited by B@man on Sunday 18th May 12:16


gmw9666 said:
This actually looks better than my old chassis lol
Fingers crossed it doesn't come back in a carrier bag, much testing with a hammer found that both box section outriggers need replacing, ones rotted out and the other is a bit thin so I'm doing both sides plus coilover conversation while doing the weldathon! The chassis was delivered this morning and the shot blaster has done a great job and it's back to bare steel in all but a couple of places and more importantly no further nasty surprises uncovered. Due to EDF kindly emptying my bank account while I have been on Holiday not much will happen for a few weeks so for now the chassis has been sprayed with light oil to keep the rust down.
Can anyone confirm the specification of the steel used, the tubes appear to be 1.5" or 38mm and the outriggers are 40x40 box - can anyone tell me the wall thickness so I can at least order some steel ?
Can anyone confirm the specification of the steel used, the tubes appear to be 1.5" or 38mm and the outriggers are 40x40 box - can anyone tell me the wall thickness so I can at least order some steel ?
Slow progress Resurrected my dads clarke mig by replacing the complete torch so I don't have to use it gasless all the time. I've also sorted out an account with BOC and this morning collected a bloody great bottle of Argoshield Light, which works out cheaper than rent free. Did s service on the Celica then went back to bed (only had two hours sleep  ) while my dad and a neighbour moved stuff about in the lock-up and got the chassis mounted on it's jig / dolly
I've also confirmed that the TVR spec steel is 1.6mm or 14 AWG and got some on order.
) while my dad and a neighbour moved stuff about in the lock-up and got the chassis mounted on it's jig / dolly I've also confirmed that the TVR spec steel is 1.6mm or 14 AWG and got some on order.
Edited by B@man on Saturday 12th July 20:39
Hi All,
It's been bead blasted and I left the suspension arms on mainly to preserve the various rubber bushes but a hint of laziness crept in too, it's come out pretty good actually, the only bits with old powder coating left are the rear spring locators and they are getting chopped off anyway. The threads look OK but Most of the suspension bolts will get binned during the rebuild anyway and those that aren't will get a tap ran down them before re-use - interestingly the front upper wishbone bolts have not had split pins fitted since I had the car and it's passed 4 MOT's
Thanks for the heads up on steel thickness, I got mixed up on AWG vs mm, luckily steel store quotes both....
Thanks Richard,
My father has now recruited one of his neighbours and a friend who "needed a new project" so that should speed progress a bit as the three of them are retired so can crack on while I concentrate on paying for it !!
We decided last night that as I've had to buy 3m of tube we may as well replace both front and rear most outrigger support tubes completely as the NS front one has some significant corrosion pitting and the planned changes to the rear suspension will mean its quicker to replace them than grind all the unwanted brackets and stuff off.
The order for steel is going in today so once we have built a trolley for the mig and it's new somewhat larger gas bottle we will be making a start on repairs before progressing to the suspension mods....
After not much going on first task was a bit of welding practice as not migged anything with shield gas for years, so first I cobbled up a welder cart making the mig plus gas a bit easier to move around, not pretty but not bad for an old bread crate trolley, some angle and a lump of conduit I found in a skip...

After attaching the chassis to the jig, a 1.5m piece of 50mm angle was then used to give a reference for the edge of the old outrigger and noticing that the existing one was bent like a banana.... once that was firmly in place time to cut

Another from the rear, note you can see the guides to support the new outrigger at the same height as the one now on the floor.

Must find some earplugs my ears are still ringing...
After attaching the chassis to the jig, a 1.5m piece of 50mm angle was then used to give a reference for the edge of the old outrigger and noticing that the existing one was bent like a banana.... once that was firmly in place time to cut
Another from the rear, note you can see the guides to support the new outrigger at the same height as the one now on the floor.
Must find some earplugs my ears are still ringing...
Getting somewhere, more construction less destruction !

This corner is looking a bit better

The only original part is the diagonal, I can understand why most people join the front out rigger mid way, its a really complex shape as 4 tubes join at this point and they are all at different angles. It must have taken over an hour to get this to fit however I'm glad I went this far back as there was evidence of corrosion inside this joint.

This corner is looking a bit better
The only original part is the diagonal, I can understand why most people join the front out rigger mid way, its a really complex shape as 4 tubes join at this point and they are all at different angles. It must have taken over an hour to get this to fit however I'm glad I went this far back as there was evidence of corrosion inside this joint.
Edited by B@man on Sunday 27th July 13:35
And so onto the nearside which looked OK (see later)
Reference angle moved to the other side of the jig, and the old parts cut off

When cutting the front tube off it was found to be full of blast media, further inspection once the outriggers where removed found this small hole in the corner of the tube.... replacing both sides was a good plan after all.

Reference angle moved to the other side of the jig, and the old parts cut off
When cutting the front tube off it was found to be full of blast media, further inspection once the outriggers where removed found this small hole in the corner of the tube.... replacing both sides was a good plan after all.
Edited by B@man on Tuesday 5th August 12:22


Whohooooooo !!!

Rest of the body mounting plates tacked in, flipped over the chassis and seam welded the whole lot, also welded up the bastardised gearbox mount and welded a spare bit of plate onto the front cross member as a jacking point.
Oh and I had a look under the body and found a hole in it and a lot of cracking around rear pair of O/S body mounting holes, I'd guess it's damage from it's 2003 "incident" that could't be seen due to the chassis, hmm GRP fumes lovely !
Coilover conversion next...
Edited by B@man on Saturday 9th August 19:53
Morning Ian,
As I'd considered Track v Roads coilover conversion but put off by the price we thought having this much access to the chassis would give us the opportunity to do a proper job on the mountings rather than a compromised modification based on what you can get at with the body on.
As I'd considered Track v Roads coilover conversion but put off by the price we thought having this much access to the chassis would give us the opportunity to do a proper job on the mountings rather than a compromised modification based on what you can get at with the body on.
OK onto the coilover conversion.... Please note that none of this is tested so if you decide to go down the same route it's at your own risk ! This is also the second side we did, first side took all day to figure out but making a copy on the other side was much quicker. The box section is welded over the top of the chassis to act as a jig.
First off the suspension tower in at's cortinaesque glory

5 minutes with the angry grinder later

Out with the CAD "Cardboard aided Design" templates where made up to fit around the top suspension tube and also extend down the suspension tower to spread the loading.

Cardboard template transferred to steel using our bracket machine (AKA Dad) and a bit of fettling to get a good fit.

Same with the rear bracket fitted.

The jig was then removed

It's only tack welded at the moment as I need to flip the chassis to get better access, once it's all seam welded the top will be reinforced back to the chassis before it's all tidied up.
First off the suspension tower in at's cortinaesque glory
5 minutes with the angry grinder later
Out with the CAD "Cardboard aided Design" templates where made up to fit around the top suspension tube and also extend down the suspension tower to spread the loading.
Cardboard template transferred to steel using our bracket machine (AKA Dad) and a bit of fettling to get a good fit.
Same with the rear bracket fitted.
The jig was then removed
It's only tack welded at the moment as I need to flip the chassis to get better access, once it's all seam welded the top will be reinforced back to the chassis before it's all tidied up.
Having spent a considerable length of time trying to figure out how on earth we could put a hole through the pressed lower spring pans to take the lower coilover bolt and coming up with not much as the thing won't even sit on the bench square never mind give a repeatable surface to measure anything from. I eventually realised that as long as the coilover mount is parallel to the inner wishbone bush centre it's fine so a Jig was needed....
So after a rummage in the scarp pile and some mig / grinder action we have a jig !

Bit of aly to measure the centres

Height from the base of the jig..

Drill 20mm holes..

I've got some 20mm OD bar on order which will be bored 1/2" to take the shock bolt..
So after a rummage in the scarp pile and some mig / grinder action we have a jig !
Bit of aly to measure the centres
Height from the base of the jig..
Drill 20mm holes..
I've got some 20mm OD bar on order which will be bored 1/2" to take the shock bolt..
Edited by B@man on Saturday 20th September 19:16


Gassing Station | Wedges | Top of Page | What's New | My Stuff