Head gasket progress
Discussion


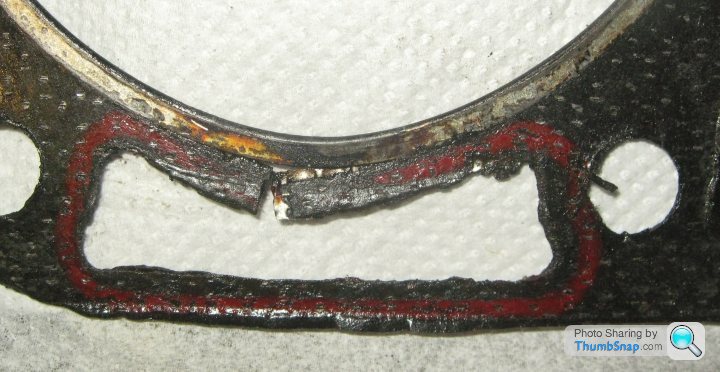
Well after about 8 hours work I have the nearside head off and I think I have found the culprit at the end of number 8 cylinder:
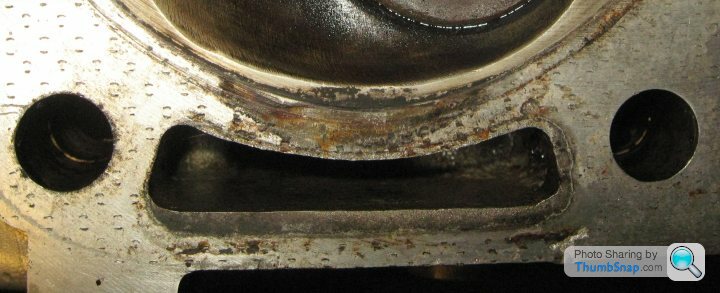
Here is the matching area on the block before cleaning up:

And on the cylinder head:
Looks like the gasket gave way behind the ring. It was a Rimmer's own brand one. I've started checking flatness with a sheet of glass but the head looks pretty good so far - will re-check in daylight.
Here is the matching area on the block before cleaning up:
And on the cylinder head:
Looks like the gasket gave way behind the ring. It was a Rimmer's own brand one. I've started checking flatness with a sheet of glass but the head looks pretty good so far - will re-check in daylight.
Yes the heads were off 2 years ago and I started noticing fluid burping again after about a year, which got progressively worse. Had to run the last couple of weeks on 7 cylinders ;^)
Yeah I am on ARP studs already. I think part of the problem is the folklore around installation and the need to re-torque after running the engine for a little bit. So this time I will run it up to temperature on fast idle, retorque, let it cool, retorque again, and hope job's a good'un...
Luckily the other side hasn't gone - that's a complete pain in the arris because the blower has to be removed too.
Not sure probably standard for the 3.9 North Coventry Kawasaki, albeit with thicker head gaskets (would that be about 9.75:1?)
The compression test gives about 195 when healthy, so the CR probably isn't too high.
But then there's the supercharger with 6psi of boost which should raise the effective CR to about 13.9? Although this drops off a bit at 4,500-5,200 rpm.
The compression test gives about 195 when healthy, so the CR probably isn't too high.
But then there's the supercharger with 6psi of boost which should raise the effective CR to about 13.9? Although this drops off a bit at 4,500-5,200 rpm.
Well I like cheap but I don't like nasty!
I had a look at the DPR installation notes but they don't mention the CR. So it's a bit of supposition really - I'll try and calculate it from the gasket thickness (need to find my micrometer first). I found a useful calculator to save me hurting my brain too much, here:
http://www.roversd1.nl/sd1web/capacity2.html
Plugging in my numbers gives a CR of 9.37:1 unboosted rising to - boosted - 12:1 at top RPM. And no - I don't get pinking, unless the fuel is especially dodgy.
I have checked the head for flatness and it started all under 3 thou. A bit of fettling and further cleaning has reduced this to 1.5 thou or under so there's no warping.
I developed an easy way to look for lower areas and the area which was the culprit was slightly depressed... you use a flat glass plate (check it for flatness first) and put some diluted poster paint over the head face (lying horizontal) then lay the plate on top. Press down with your finger. Any lower areas will show up darker - thicker layer of paint you see...
Before - you can see a redder area (thicker paint) where the gasket failed:

After a little very light abrasion in the areas which were "higher" - the red/pink area is much more uniform;

I've also checked the block with a straight edge just in case and all looks OK, maybe around 2 thou here and there.h
I had a look at the DPR installation notes but they don't mention the CR. So it's a bit of supposition really - I'll try and calculate it from the gasket thickness (need to find my micrometer first). I found a useful calculator to save me hurting my brain too much, here:
http://www.roversd1.nl/sd1web/capacity2.html
Plugging in my numbers gives a CR of 9.37:1 unboosted rising to - boosted - 12:1 at top RPM. And no - I don't get pinking, unless the fuel is especially dodgy.
I have checked the head for flatness and it started all under 3 thou. A bit of fettling and further cleaning has reduced this to 1.5 thou or under so there's no warping.
I developed an easy way to look for lower areas and the area which was the culprit was slightly depressed... you use a flat glass plate (check it for flatness first) and put some diluted poster paint over the head face (lying horizontal) then lay the plate on top. Press down with your finger. Any lower areas will show up darker - thicker layer of paint you see...
Before - you can see a redder area (thicker paint) where the gasket failed:
After a little very light abrasion in the areas which were "higher" - the red/pink area is much more uniform;
I've also checked the block with a straight edge just in case and all looks OK, maybe around 2 thou here and there.h
Yeah 9.3 is a little higher than 9.0 but only 4 or 5%... Back in the day you could still get 4* so I think the octane rating was better than unleaded is now.
Yeah you're correct about the ignition the reason being that the breakdown voltage of the plug gap is maybe 45% higher, due to the higher gas pressure in there. It is also well advanced.
i am taking a break from proceedings as the manifold is out I want to fit an AFR meter bung and I have lost the sodding bung I ordered off the flea a few months ago! Derr!!!
The manifold is really easy to remove with no cylinder head in the way ;^)
Found it on google books! Nice one I'll give it a read.
Yes it's done 65k in 24 years and been pretty reliable, the only problems I can put down to the original engineering are:
- the blower mount onto the left hand cylinder head bolt causes the head gasket to fail - fixed.
- the blower mount through the water pump caused the pump body to crack - fixed.
- finding the correct drive belt involved a bit of trial and error
- some idiot installed a fine pump pre-filter which caused a few issues...
and a few of the usual wedge niggles but not that many really.
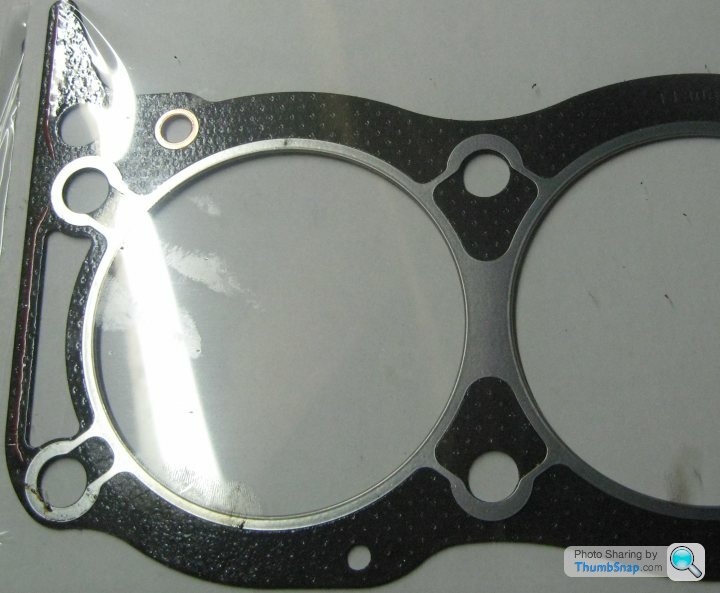
Cheers I already have the replacements - two row ones made by Elring Klinger (recommended by Martin). Here's a piccie (please ignore the greasy thumb prints...):
Also bear in mind that the other side is the same as the one I just took off, and there have been no problems there so far...
Also bear in mind that the other side is the same as the one I just took off, and there have been no problems there so far...
Hopefully that's a good thing!! ;^)
Latest is I detected two more shagged threads on this head - one I know about on the inlet and a new one on the exhaust.
As per a previous "engineering mod" on the exhaust I have tapped them out to M10, then I can put in M10 studding, and an M10 nut then clamps the parts together. The previous stripped thread was detected about 6 years ago and I took this approach and it works really well. And it's cheap, to boot!
The nut is undone first then the studding is removed when working on the exhaust. This means that the studding is screwed in/out with no force on the threads.
I have been looking at the gasket again and put it back on the head while I offered up the refurbed head up to check the studs will go in OK.
While it was sitting there the problem became very apparent - the sealing ring on that piston has distorted outwards too. I believe it's due to inadequate re-torquing on that row of studs.
I don't think the other side will necessarily fail because it's been there two years now. Besides to do that side I have to remove the supercharger which is a pile more work. With infinite time I would do both sides but I don't think the extra effort is necessary, and I always have the option to do that if needed while leaving the offside alone, at a later date.
Yeah just to recap a little - before the previous re-gasketing I had smooth (!) acceleration but eventually the coolant burping became intolerable.
After a while after the overhaul I started getting this "cutting out" problem where the engine would cut out if I pulled out to overtake. Turns out that was the fuel pre-filter clogged and the pipe from there collapsing under vacuum. Each time it cut out the fuel would be starved but I guess not immediately, it would take a few injector cycles to use up the exiting rail pressure, so it must have run lean.
There is a clear warning on the DPR installation sheet - any misfire and contact DPR - so I guess Dennis must have been well aware of the potential outcomes.
Maybe I need an AFR at every exhaust port! ;^)
Both sides are composite! (And have been since before I got the car) I'm not that silly. The only question is what the exact compressed thickness is of each side is, I think I can estimate this from the old gasket which has compressed and uncompressed regions, and a new unused gasket.
I did try asking the gasket manufacturers about this but they couldn't even come up with an uncompressed specification (poor show really.)
I did try asking the gasket manufacturers about this but they couldn't even come up with an uncompressed specification (poor show really.)
Nice one Rev - the beast breathes again...
While people are revealing technical data, do Elring also specify the roughness of the head/block surfaces? (I have heard it doesn't do to have them too smooth...)
These later composites also seem to have little prickles all over them in the dark grey areas, which come out and bite into the head side. I guess that helps to stop things moving about.
Yeah Rev is revving!
Mine is coming along just replacing ancillaries tonight and found my micrometer which unfortunately is a 25mm-50mm one so I had to make a 25mm "shim". Couldn't find my 0-1" one... ;^(
Anyhow it seems that the gasket I took off measures 1.3mm in the compressed area and 1.5mm in the uncompressed area. The one I am putting on measures 1.35mm before fitting. The feeler gauges show 1.2mm where I can stick them in between the newly fitted head and the block.
So I think we're looking at the difference between 1.2mm and 1.3mm.
Plugging that into the "CR calculator" gives: 9.82 (1.2mm) to 9.72 (1.3mm) which is only about a 1% difference. I don't think it will make all that much difference. Also, as the very slightly lower CR will be on the old side, it's less likely to experience further detonation and "go bad" like the one I've just replaced. Time will tell and I'll do the other side as and when, I've got enough spare gaskets now.
Just gotta finish off the exhaust manifold and get that back on and finish torquing the head. I want to check my wrench calibration before the final torquing (and build up a bit of arm strength!)
Edited by adam quantrill on Monday 12th January 22:48
Got a few more bits done today - got the boss welded into the manifold and also tidied up some of the pipe bashing it suffered when the stainless end went on which should flow gas a bit better.
I have realised that the manifold won't go on from above now I have the head on so I have to jack up the whole car - I think I have done this with the car up 18 inches in the air and the engine jacked up too. Another pain in the arris...
I have realised that the manifold won't go on from above now I have the head on so I have to jack up the whole car - I think I have done this with the car up 18 inches in the air and the engine jacked up too. Another pain in the arris...
I'm in the Jeep, although I only use the M11 for a junction then it's offski west.
Got the manifold back in place today, it went in with the starter off, engine jacked up and car about 18" off the ground, and it was pretty tight getting it back in. Not sure if I needed the starter off but at least I now know I can undo the bolts (they can be a pig sometimes!)
Just cut up 3 more copper manifold gaskets to I now have a full set for the offside.
Most of the remaining jobs are topside just putting bits back on.
I'm using some 1mm (ish) scrap copper sheet (if you can call copper sheet "scrap"!)
I don't think the thickness is particularly important anything between 0.8mm and 1.5mm will probably do. Even aly sheet is probably worth a try - I might try making an aly one too.
In terms of accuracy you don't have to bee too accurate, tinsnips are easily good enough, as long as you drill the holes in the right place. I scribed around the perimeter and middle of Rev's big-bore gaskets and then scribed crosshairs for each round hole.
The hard bit is cutting out the middle....
Gassing Station | Wedges | Top of Page | What's New | My Stuff