1969 Maserati Ghibli - The Resurection
Discussion


In 10 days time it will be 9 years since I took on what has turned out to be the biggest car project I've undertaken so far, and probably ever will. I've had one car project or another on the go, without a pause, for the last 30 years, so I went into restoring a sub £10k 1960's Maserati with eyes wide open, looking back I must have been staring into the dark. I love following the progress of projects, especially classics, on PH so I reckon its time to give it a go. I'm also hoping it will give me a much needed injection of enthusiasm as keeping motivation on the boil year after year can be difficult.
So I intend to post pictures perhaps once a week in chronological order till we get up to date.
30th October 2003, YWT 444G arrives at the Chadspeed garage.

So I intend to post pictures perhaps once a week in chronological order till we get up to date.
30th October 2003, YWT 444G arrives at the Chadspeed garage.
Wow, a bit overwhelmed by the response.
A little bit more info on the car then; Maserati Ghibli No. AM115.992 was manufactured in March 1969 for a Mr Michael S Binns who ordered it through Maserati Concessionaires London. Interior colour was white connolly leather, exterior paint Verdi Bosco (wood green). There is a massive gap in its history from when Mr Binns sold it to 1980 which I understand is when DVLA computerised their records, details I have are:
Mr Keith Alan of Birmingham Jan 1980 - still Green!
Mr John Britton of Sparkhill, January 1980 to July 1986
Olton Business Services of Alton March 1983 - Now Red
Mr Andreas Ove Ugland of Egham, July 1986 to October 1994
Mr John Bernard Ugland of Egham, October 1994 to April 2003
Chadspeed April 2003
I bought the car from Runnymede Motor Company who had taken it in as Px on a second-hand Aston Martin, which seems to be there usual marque, and they seemed to be a bit embarrassed to have a tatty project on there hands.


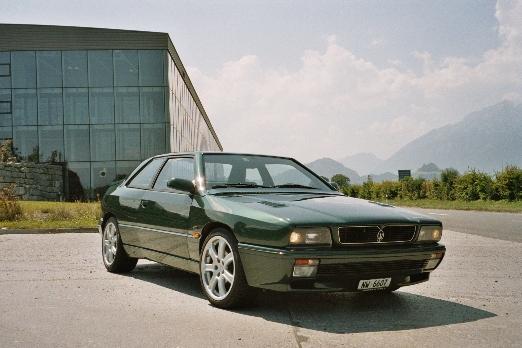
In the years I've had the car, its colour, past and present has been commented on a lot, here's the interior which although re-trimmed at some time is very close to original (except the red piping)

M'lud Sinclair, that DBS of yours looks magnificent, the other car that would have tempted me at the time I bought the Ghibli was a DBS V8. The vents in the front wings are indeed similar though as you will see in good time mine had rather more ventilation in that area than required.
The white wall tyres turned out to be American re-moulds and were sold to a guy for use on his wedding hire Beauford kit car, a fitting home for them I thought.
Any insight into the cars missing history would of course be most welcome.
A little bit more info on the car then; Maserati Ghibli No. AM115.992 was manufactured in March 1969 for a Mr Michael S Binns who ordered it through Maserati Concessionaires London. Interior colour was white connolly leather, exterior paint Verdi Bosco (wood green). There is a massive gap in its history from when Mr Binns sold it to 1980 which I understand is when DVLA computerised their records, details I have are:
Mr Keith Alan of Birmingham Jan 1980 - still Green!
Mr John Britton of Sparkhill, January 1980 to July 1986
Olton Business Services of Alton March 1983 - Now Red
Mr Andreas Ove Ugland of Egham, July 1986 to October 1994
Mr John Bernard Ugland of Egham, October 1994 to April 2003
Chadspeed April 2003
I bought the car from Runnymede Motor Company who had taken it in as Px on a second-hand Aston Martin, which seems to be there usual marque, and they seemed to be a bit embarrassed to have a tatty project on there hands.
In the years I've had the car, its colour, past and present has been commented on a lot, here's the interior which although re-trimmed at some time is very close to original (except the red piping)
M'lud Sinclair, that DBS of yours looks magnificent, the other car that would have tempted me at the time I bought the Ghibli was a DBS V8. The vents in the front wings are indeed similar though as you will see in good time mine had rather more ventilation in that area than required.
The white wall tyres turned out to be American re-moulds and were sold to a guy for use on his wedding hire Beauford kit car, a fitting home for them I thought.
Any insight into the cars missing history would of course be most welcome.
Edited by Chad speed on Saturday 21st April 15:49
Edited by Chad speed on Saturday 16th June 11:12
LordBretSinclair said:
Interesting that you got the car from Runnymede Roger.
Being an Aston man the firm is well known to me and the "boss" Martin is a good friend - small world
I wonder if your friend Martin recalls the car, I think the guy I dealt with at Runnymede was called Malcolm though, not Martin? Its nine years ago I know but its not every day you come across a Ghibli so any history or anecdotes, good or bad would be welcome.Being an Aston man the firm is well known to me and the "boss" Martin is a good friend - small world
Another picture taken on the day the car arrived

Edited by Chad speed on Sunday 22 April 09:36
Oelholm said:
Those white-walls are atrocious! Looking forward to reading about the restoration, even though I'm a bit annoyed that you'll only post weekly 
What did you decide re: the colour? Any pics of the original green?
EDIT: Googled and found this - is it similar?
The car isn't painted yet but this is a Ghibli in Verde Bosco:What did you decide re: the colour? Any pics of the original green?
EDIT: Googled and found this - is it similar?

With the white interior the car would certainly have looked striking cruising through late 60’s London traffic. I think the colour is great and I’m certainly keen on period colours on classics (I’ve had a yellow SE5a Scimitar and pistachio green Lotus Elite 501), the issue I have is metallic vs solid paint. I fully intend to use the car on a regular basis so inevitably it will take a few knocks and repairing a solid paint is, for me at least, much easier than a metallic. Unlike modern cars there are no panel joints or rubbing strips to disguise the join of new and old paint. I also have enough experience in automotive spraying to be happy spraying it myself in a solid colour, only done a bit of metallic and It wasn’t a great effort.
At this rate I can see my self imposed once a week picture post slipping.
This picture was taken a few days after I took ownership of the car and is the only one I have showing the damage to the nearside front wing. The car was delivered by the vendor on a car transporter and driven into the garage, unfortunately they forgot the brakes didn't work and crunched the front against a heavy steel work bench. After a somewhat heated phone call we came to an amicable agreement regarding compensation value.

Just a bit of general info on Ghibli’s for those interested, there were a number of detail changes as the car was developed through its 6 year production life, when manufacture ceased a total of 1149 coupes and 125 spyders had been made (precise production figures vary).
Here’s a link to Ruiz and Straub’s excellent guide courtesy of Ivan at The Car Nut
http://www.thecarnut.com/Manuals/Ghibli_features_a...
’Our’ Ghibli is a mid series production European 4.7, so on the outside; square headlight pods, no indicator repeaters on the wings, discrete indicators in the front grill, no bumper overiders at the front and slim or no overiders at the back. Inside we have toggle switches, metal not plastic air vents and ignition key in the dashboard. All Ghibli had air conditioning and electric windows but power steering was only an option, not taken up in our case.
bosscerbera said:
Kidstons are restoring - more like remanufacturing! - a yellow Ghibli Spyder at the moment.
Some excellent photo reference in the build up photos; I've been following it on their Facebook group.
Thanks for the heads up on that one, googled it but without success - got a link?Some excellent photo reference in the build up photos; I've been following it on their Facebook group.
P.S Loving your Espada, and the rest of your garage for that matter. Like my humble fleet, minimum 3 litre and not a FWD car in sight
4.7 litres of Maserati V8 with Quad camshafts, four twin choke 42 DCNF Webbers and dry sump lubrication.

I knew the engine was likely to need at least a top end rebuild, the car had been stored for a number of years, smoked badly and had low compression on three cylinders. Observing the exhaust at various throttle positions and oiling the bores before and after doing a compression test indicated worn bores/pistons on the three low compression cylinders and probably poorly seating valves on all cylinders. The distance from the front of the bonnet to the centre of gravity of the engine/box unit is huge and an estimate of the combined weight plus a bit for safety indicated that l would need an engine crane with a capacity well in excess of the usual one I borrow. The solution was to hire a commercial plant lifting crane, which was an absolute monster and able to lift 2500kg at 2 metres, sadly can’t find any pictures of it. As with most cars, extracting the engine takes most of the day to remove as many obstacles as possible, and then 15 minutes to lift the engine, roll the car back, and lower it onto a dolly. All went smoothly with the exception of removing the prop shaft as the bolts on the Hooke’s type UJ’s had previously been rounded. I was able to overcome this by sliding the female splined shaft out from the gearbox output shaft. A word of caution, this should only be attempted if you are prepared to do further work on the box or replace the now obsolete output shaft bearing. The rollers in the bearing are retained in a cage that, if even slightly worn, allows them to drop out when the prop shaft is removed. Guess what happened when I did it?
Engine out and two days worth of scraping to remove the ¼” thick underseal in the engine bay and the bulkhead sound proofing. Note holes in engine bay through to nearside inner wing along bonnet edge, and remains of original green paint.
Elderly said:
I have VERY fond memories of a passenger ride in a Ghibli.
Late 1960's, early hours of the morning in the West End.
I pulled up next to one at traffic lights in Orchard Street,
wound down the window of my Alfa and said in my best Italian - 'What a beautiful car'.
Much to my surprise it was driven by somebody whom I had been at school with.
The Alfa was rapidly parked, and I got into, what to me at the time was like the
interior of a space ship.
I will never forget watching the speedo as we accelerated along the road between Chalk Farm
and Swiss Cottage - and reached an indicated 137 'Leptons' .
.
Green with envy, I've never driven one or been a passenger. When I do eventually drive mine I'm under no illusions that it will be anything other than a 43 year old car but then I guess that's the point of a classic, foibles and short comings add to the character.Late 1960's, early hours of the morning in the West End.
I pulled up next to one at traffic lights in Orchard Street,
wound down the window of my Alfa and said in my best Italian - 'What a beautiful car'.
Much to my surprise it was driven by somebody whom I had been at school with.
The Alfa was rapidly parked, and I got into, what to me at the time was like the
interior of a space ship.
I will never forget watching the speedo as we accelerated along the road between Chalk Farm
and Swiss Cottage - and reached an indicated 137 'Leptons'
.Can you remember what colour the Ghibli you blagged a ride in was?
Verde Gemma is indeed an excellent choice if going metallic but I have to say I’ve seen it first hand and I've also seen that picture before (one of a series of about 6), and I think the picture has been ‘enhanced’ somewhat, either with a filter or digitally. The pictures posted of the Spyder tend to confirm the enhancement on the coupe. Both greens, Verdi Gemma and my original Verdi Bossco are shown here http://www.thecarnut.com/Manuals/Paint/Paint-chips...
The quality of the chips and pdf isn’t great but Verdi Gemma looks less dramatic.
However, sticking with none metallic, my current thinking is dark red/burgundy, something like

The quality of the chips and pdf isn’t great but Verdi Gemma looks less dramatic.
However, sticking with none metallic, my current thinking is dark red/burgundy, something like
The Surveyor said:
Chad speed said:
However, sticking with none metallic, my current thinking is dark red/burgundy[/pic]
That red is nice but will it show off those perfect Ghibli lines as well as a metallic? I know you're looking to paint the car yourself but given the overall cost of the refurbishement I'd be tempted to go with that lovely original Verdi Bossco and get a professional to put the top coats on.Just my opinion and it's your car etc etc... loving the updates on your beautiful Ghibli and i'll hopefully have some solid news on my Mexico project which is still stumbling it's way towards final paint.... slowly.
Paul
How about a thread on your Mexico Paul? Fantastic car and such a refined shape, a true gentleman's carriage - almost makes the Ghibli look like the young upstart.
With the engine and box out scraping away 35 years of tar like sticky oil and grime and degreasing the outside of the engine as much as possible was a days work.
Before we begin to strip it down though, perhaps a bit on the Maserati Tipo 107 engine. It really is a lovely piece of design, especially when viewed against contemporary engines - it’s older than you might think and can trace its architecture back to the 450s sports racing car of 1956. Notable features are light aluminium alloy crank case, sump and heads with dry sump lubrication with both scavenge and feed oil pumps running around the front portion of the crankshaft. The pistons have an usually low deck height (compression height) for the era and the CR is 8.5:1. One unusual arrangement is the chain adjustment between each pair of camshafts that alters the cam timing and relationship between inlet and outlet cams, not what you really want when just adjusting the chain tension.
The first obvious sign of trouble was the water pump, it had a lumpy crunchy feel when rotated by hand and would lock up every 2 to 3 turns so I knew that at least new bearings and a seal would be required. Lifting the cam covers revealed cam lobes with very little detectable wear (could the 43k on the clock be true?) but removing the cam chains exposed previous poor quality work. One chain had the centre plate of the soft link missing (its duplex) and on the other the soft link was fitted the wrong way round. It is a bit alarming finding poor workmanship because from that point on you have to doubt every component in the engine.
Removing the heads exposed water cavities almost entirely blocked by silt, corrosion and crystallised antifreeze, a legacy perhaps of the faulty pump. Inspecting the top of the cylinder bores revealed virtually no ridge where the rings reach the end of their stroke, again indicating low mileage, but there was severe vertical scoring on a number of bores. Removing the sump, unbolting the big end caps from the conrods and removing the piston/conrod assemblies revealed the reason. Many of the piston rings were glued in their groves with a brown toffee like substance and most of the oil control rings had broken causing the bore damage. The final disassembly of the crank assembly was straightforward with the exception of the flywheel retaining bolts, which required concerted use of a pneumatic impact driver wound up to maximum torque – well over 450ft/lbs. Removal of the oil pumps and timing gears was fiddly rather than difficult.
Engine inverted with crankshaft in place.

Cleaning, measuring and inspecting all the parts, I drew up a list of new components and required machining work. It was not looking good as several new parts, some major, were required including: one exhaust valve; a set of timing chains; pistons and rings; little end bearings; big end bearings; main bearings; clutch friction and pressure plate; and a complete set of gaskets and seals.
Engine parts requiring replacement

The parts were sourced from many places; particular difficulties were encountered with oversize big end and main bearings and the pistons. The original pistons are of AE manufacture, and as AE are still manufacturing pistons you might think that they may still be available – not so. AE informed me the dies used to produce the initial piston casting were/are owned by Maserati and only Maserati are able to procure them. Various Maserati specialists around the world (notably MIE) have new old stock but even by Maserati standards, they command a high price. These original pistons and their rings are rather crude compared to current designs and were hardly cutting edge in the mid sixties. I had experienced cylinder bore oil starvation at moderate RPM with very similar AE pistons in my Reliant Sabre (Ford 206E) several years ago.
Prices for bespoke pistons, including rings and wrist pins to suit existing little end bushes, turned out to be about three quarters the price of new old stock originals. I was on the verge of commissioning Arias to manufacture a set for me when, I had a bit of luck. I stumbled across an advert from a Ghibli owner in the States who had 24No. 95.0mm piston sets made by Wiseco; he had used 8 but had 16 surplus to requirements. I’ve used Wiseco pistons before in an overbored Kawasaki Z1100 engine and must say they are first class, as luck would have it I also had a colleague working in the States who was able to collect them. The pistons are a semi slipper type with relieved skirt but the crown design was to the Maserati US specification piston i.e. slightly raised to suit the hemi type combustion chamber. Rather than machine all of the raised crown away, only the area that would interfere with the Euro combustion chamber was milled to the Euro shape. This work was done by an old friend who served his apprenticeship with me many years ago. The compression ratio would now be slightly raised to 8.9:1.
New Wiseco piston (left). Original AE/Borgo piston (right)

I'll dig out the receipts for all the engine components and machining work, it'll be interesting to compare them to something like a Rover V8.
Chad
Before we begin to strip it down though, perhaps a bit on the Maserati Tipo 107 engine. It really is a lovely piece of design, especially when viewed against contemporary engines - it’s older than you might think and can trace its architecture back to the 450s sports racing car of 1956. Notable features are light aluminium alloy crank case, sump and heads with dry sump lubrication with both scavenge and feed oil pumps running around the front portion of the crankshaft. The pistons have an usually low deck height (compression height) for the era and the CR is 8.5:1. One unusual arrangement is the chain adjustment between each pair of camshafts that alters the cam timing and relationship between inlet and outlet cams, not what you really want when just adjusting the chain tension.
The first obvious sign of trouble was the water pump, it had a lumpy crunchy feel when rotated by hand and would lock up every 2 to 3 turns so I knew that at least new bearings and a seal would be required. Lifting the cam covers revealed cam lobes with very little detectable wear (could the 43k on the clock be true?) but removing the cam chains exposed previous poor quality work. One chain had the centre plate of the soft link missing (its duplex) and on the other the soft link was fitted the wrong way round. It is a bit alarming finding poor workmanship because from that point on you have to doubt every component in the engine.
Removing the heads exposed water cavities almost entirely blocked by silt, corrosion and crystallised antifreeze, a legacy perhaps of the faulty pump. Inspecting the top of the cylinder bores revealed virtually no ridge where the rings reach the end of their stroke, again indicating low mileage, but there was severe vertical scoring on a number of bores. Removing the sump, unbolting the big end caps from the conrods and removing the piston/conrod assemblies revealed the reason. Many of the piston rings were glued in their groves with a brown toffee like substance and most of the oil control rings had broken causing the bore damage. The final disassembly of the crank assembly was straightforward with the exception of the flywheel retaining bolts, which required concerted use of a pneumatic impact driver wound up to maximum torque – well over 450ft/lbs. Removal of the oil pumps and timing gears was fiddly rather than difficult.
Engine inverted with crankshaft in place.
Cleaning, measuring and inspecting all the parts, I drew up a list of new components and required machining work. It was not looking good as several new parts, some major, were required including: one exhaust valve; a set of timing chains; pistons and rings; little end bearings; big end bearings; main bearings; clutch friction and pressure plate; and a complete set of gaskets and seals.
Engine parts requiring replacement
The parts were sourced from many places; particular difficulties were encountered with oversize big end and main bearings and the pistons. The original pistons are of AE manufacture, and as AE are still manufacturing pistons you might think that they may still be available – not so. AE informed me the dies used to produce the initial piston casting were/are owned by Maserati and only Maserati are able to procure them. Various Maserati specialists around the world (notably MIE) have new old stock but even by Maserati standards, they command a high price. These original pistons and their rings are rather crude compared to current designs and were hardly cutting edge in the mid sixties. I had experienced cylinder bore oil starvation at moderate RPM with very similar AE pistons in my Reliant Sabre (Ford 206E) several years ago.
Prices for bespoke pistons, including rings and wrist pins to suit existing little end bushes, turned out to be about three quarters the price of new old stock originals. I was on the verge of commissioning Arias to manufacture a set for me when, I had a bit of luck. I stumbled across an advert from a Ghibli owner in the States who had 24No. 95.0mm piston sets made by Wiseco; he had used 8 but had 16 surplus to requirements. I’ve used Wiseco pistons before in an overbored Kawasaki Z1100 engine and must say they are first class, as luck would have it I also had a colleague working in the States who was able to collect them. The pistons are a semi slipper type with relieved skirt but the crown design was to the Maserati US specification piston i.e. slightly raised to suit the hemi type combustion chamber. Rather than machine all of the raised crown away, only the area that would interfere with the Euro combustion chamber was milled to the Euro shape. This work was done by an old friend who served his apprenticeship with me many years ago. The compression ratio would now be slightly raised to 8.9:1.
New Wiseco piston (left). Original AE/Borgo piston (right)
I'll dig out the receipts for all the engine components and machining work, it'll be interesting to compare them to something like a Rover V8.
Chad
Edited by Chad speed on Thursday 3rd May 18:12
The Surveyor said:
It was the shape of the Mexico that led me to buy the car unseen from a dealer in Rome, it's another stunning Maserati set off nicely by the Borrani's. It was a lust thing
I've just added a fresh picture on the earlier 'Mexico' thread so you can see the 'before' and the 'progress' pictures. I've decided to ditch the original carpets and get a fresh set made just to ensure that there isn't anything letting the finished car down, and the wheels, and the bumpers, and the brakes... and... lol
Paul
Hi Paul just seen your thread on the Mexico, just Fabulous. No idea how I missed it! , threads like that keep the fire burningI've just added a fresh picture on the earlier 'Mexico' thread so you can see the 'before' and the 'progress' pictures. I've decided to ditch the original carpets and get a fresh set made just to ensure that there isn't anything letting the finished car down, and the wheels, and the bumpers, and the brakes... and... lol
Paul
XJ13 said:
A fascinating thread Roger - thanks for posting.
You sound a man after my own heart. I have always carried out my own work on my cars as you seem to be doing and, despite the inevitable frustrations, have always found it very rewarding in the end. I could do as many do and throw a blank cheque book at one of the many marque specialists happy to take your money, but I prefer to do as much work as I am able. I get the most satisfaction that way. I do know my own limitations and entrust key jobs to professionals as required - more of a "project management" process really. However, when I do so, I tend to go direct to the craftsmen/tradesmen/engineering-specialists themselves rather than do so via a "marque specialist" - most of whom farm out these jobs themselves anyway and charge you a mark-up into the bargain. I have found this tends to apply more to the bigger firms - certainly in the Jaguar world. It is surprising how many of these large "marque specialists" employ relatively unskilled labour and have very few facilities of their own - almost everything is farmed out. The owners of these firms may be very skilled and experienced but simply trade on their name/experience and most of the actual work is carried out by spotty Halfords-rejects ....
Having said all that, I do appreciate that some people may not have the necessary facilities, confidence, imagination or time to restore a car and so have no other choice other than to go to a marque specialist.
-- Neville climbs down from his Hobby-Horse --
I look forward to reading about your continuing progress.
Agree whole heartedly with your sentiments on specialists, I intend to name those I favour and will also throw in a few prices I've paid along the way just to temper the view that a sub £10k Ghibli is a steal. Don't get me wrong I was happy with the price but even if I was paid the minimum wage for my time the bill would be well over the purchase price of the car. Loving the XJ13 project by the way.You sound a man after my own heart. I have always carried out my own work on my cars as you seem to be doing and, despite the inevitable frustrations, have always found it very rewarding in the end. I could do as many do and throw a blank cheque book at one of the many marque specialists happy to take your money, but I prefer to do as much work as I am able. I get the most satisfaction that way. I do know my own limitations and entrust key jobs to professionals as required - more of a "project management" process really. However, when I do so, I tend to go direct to the craftsmen/tradesmen/engineering-specialists themselves rather than do so via a "marque specialist" - most of whom farm out these jobs themselves anyway and charge you a mark-up into the bargain. I have found this tends to apply more to the bigger firms - certainly in the Jaguar world. It is surprising how many of these large "marque specialists" employ relatively unskilled labour and have very few facilities of their own - almost everything is farmed out. The owners of these firms may be very skilled and experienced but simply trade on their name/experience and most of the actual work is carried out by spotty Halfords-rejects ....
Having said all that, I do appreciate that some people may not have the necessary facilities, confidence, imagination or time to restore a car and so have no other choice other than to go to a marque specialist.
-- Neville climbs down from his Hobby-Horse --
I look forward to reading about your continuing progress.
Chrisw26 said:
Best of luck Chad Speed. Here's my SS in the Alps en route to our Le Marche honeymoon. Hope it provides inspiration. Cheers, Chris Wright 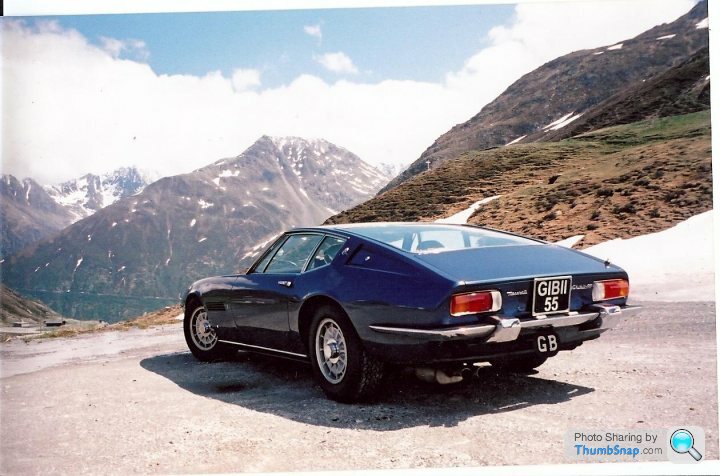
Great photo Chris, a similar one of a Ghibli in the Alps has been etched on my mind since an early age and surely played a part in my desire of these cars. The front cover of Autocar 1968, a few months before my car was commissioned.

More progress posts soon, been busy at work, gets in the way sometimes
Edited by Chad speed on Tuesday 8th May 23:07
Ghibli Engine and Gearbox - Its a Beast!

Once the engine was stripped I spent some time searching for an engine machine shop familiar with Maserati V8’s. Gosnay’s in Romford not only had a Tipo 107 engine currently undergoing rebuild but a Ghibli at that. This plus the fact they had the capability and the willingness to align the block on the boring machine using a mandrel through the main bearings, the only truly accurate method, convinced me to trust them with the work. This included: new valve guides; hardened exhaust valve seats; refaced inlet valve seats; refaced valves; light head skim; re-bore cylinder liners; re-grind crank main and big end journals; new little end bushes; set and hone con rod big ends; skim flywheel and balance the complete crank assembly to suit new lighter pistons.
After a week or so I received a phone call from them; they had found a crack on number 2 big end journal after the first grind. A Ghibli crank is rare as it differs from those of other Tipo 107 engines due to the dry sump oil pumps. This was a potentially serious problem, and a quote of £1750 for a second-hand one (with no guarantee of condition) from a Italian spares specialist (not too far away) made it even more serious. On inspection, the shell bearing housing on number 2 conrod had internal abrasion marks and the old shell bearings had flattened location tabs. It seemed likely that the shells had rotated in the con rod, overheated and caused heat stress to the crank. This was actually good news as the crack was likely to be only as deep as the case hardening, hopefully a few thou. Gosnay’s re-ground the crank a further two times before the crack disappeared but a couple of re-grinds cost a lot less than a second-hand crank. The knock-on effect of this was that I now needed –0.030” shell bearings which were more difficult to source and also more expensive. With all the machining work complete and new parts obtained, I stared to reassemble the engine with a degree of enthusiasm. The only difficulty experienced was fitting the scavenge pump body seal as it seemed too small and kept popping out of the groove just before I could bolt the cover in place. The pump was posted to Bill McGrath who came to the rescue by fitting the seal using a method that remains a mystery to me, I guess they’ve done it once or twice before.
You may recall the propshaft splined joint had to be removed from the gearbox as the UJ bolts were rounded. This resulted in the bearing rollers falling out of the bearing cage that had worn. The bearing seems to have been a special ZF item and is now obsolete so the closest alternative required a sleeve manufactured and pressed over the outer race of a new bearing to match the dimensions of the original. The gears, bearings, syncro rings and shafts all looked in remarkably good condition from the limited amount of inspection that is possible without stripping the whole box down. The ZF box has a good reputation for being robust and is certainly heavily built so with that in mind and the suspicion that the 43k mileage on the odometer was correct, I decided to just fit new input and output shaft seals and bell housing gasket.

With the exception of the timing chains, the engine is now fully assembled up to the heads and with the clutch and gearbox in place this is the current state of play.
I now began to look at the body structure to assess where to go next.
Once the engine was stripped I spent some time searching for an engine machine shop familiar with Maserati V8’s. Gosnay’s in Romford not only had a Tipo 107 engine currently undergoing rebuild but a Ghibli at that. This plus the fact they had the capability and the willingness to align the block on the boring machine using a mandrel through the main bearings, the only truly accurate method, convinced me to trust them with the work. This included: new valve guides; hardened exhaust valve seats; refaced inlet valve seats; refaced valves; light head skim; re-bore cylinder liners; re-grind crank main and big end journals; new little end bushes; set and hone con rod big ends; skim flywheel and balance the complete crank assembly to suit new lighter pistons.
After a week or so I received a phone call from them; they had found a crack on number 2 big end journal after the first grind. A Ghibli crank is rare as it differs from those of other Tipo 107 engines due to the dry sump oil pumps. This was a potentially serious problem, and a quote of £1750 for a second-hand one (with no guarantee of condition) from a Italian spares specialist (not too far away) made it even more serious. On inspection, the shell bearing housing on number 2 conrod had internal abrasion marks and the old shell bearings had flattened location tabs. It seemed likely that the shells had rotated in the con rod, overheated and caused heat stress to the crank. This was actually good news as the crack was likely to be only as deep as the case hardening, hopefully a few thou. Gosnay’s re-ground the crank a further two times before the crack disappeared but a couple of re-grinds cost a lot less than a second-hand crank. The knock-on effect of this was that I now needed –0.030” shell bearings which were more difficult to source and also more expensive. With all the machining work complete and new parts obtained, I stared to reassemble the engine with a degree of enthusiasm. The only difficulty experienced was fitting the scavenge pump body seal as it seemed too small and kept popping out of the groove just before I could bolt the cover in place. The pump was posted to Bill McGrath who came to the rescue by fitting the seal using a method that remains a mystery to me, I guess they’ve done it once or twice before.
You may recall the propshaft splined joint had to be removed from the gearbox as the UJ bolts were rounded. This resulted in the bearing rollers falling out of the bearing cage that had worn. The bearing seems to have been a special ZF item and is now obsolete so the closest alternative required a sleeve manufactured and pressed over the outer race of a new bearing to match the dimensions of the original. The gears, bearings, syncro rings and shafts all looked in remarkably good condition from the limited amount of inspection that is possible without stripping the whole box down. The ZF box has a good reputation for being robust and is certainly heavily built so with that in mind and the suspicion that the 43k mileage on the odometer was correct, I decided to just fit new input and output shaft seals and bell housing gasket.
With the exception of the timing chains, the engine is now fully assembled up to the heads and with the clutch and gearbox in place this is the current state of play.
I now began to look at the body structure to assess where to go next.
So, with the engine removed, machining done and the bottom end rebuilt (heads left off so I could check all was ok in storage) I turned my attention to the bodywork.
Initial inspection showed the wheel arches differed in shape and profile from one side to the other so the first step was to examine these areas more closely.
Using a twill wire brush in my trusty angle grinder I removed the paint from the off-side rear wheel arch lip through the primer to find a ¼” thick layer of body filler. Further exploratory grinding with the twill brush in a series of small patches revealed the whole area from the waistline down to the sills was covered in a similar layer of filler, and in places this was up to a ½” thick. Removing this quantity of filler is very time consuming; the only effective method I know of is grinding it away with the wire brush, which turns it into a fine powder. It became clear that part of the reason for the large quantity of filler was a previous attempt to repair rust between the inner/outer joint of the wheel arch. Unfortunately the method used was very crude, the rusty areas had been beaten back and rough patches brazed over the top. This had caused further and more extensive damage to the bodywork as the heat from the oxy/acetylene torch used in brazing had spread along the thin panels and causes them to wrinkle like a sweet wrapper.
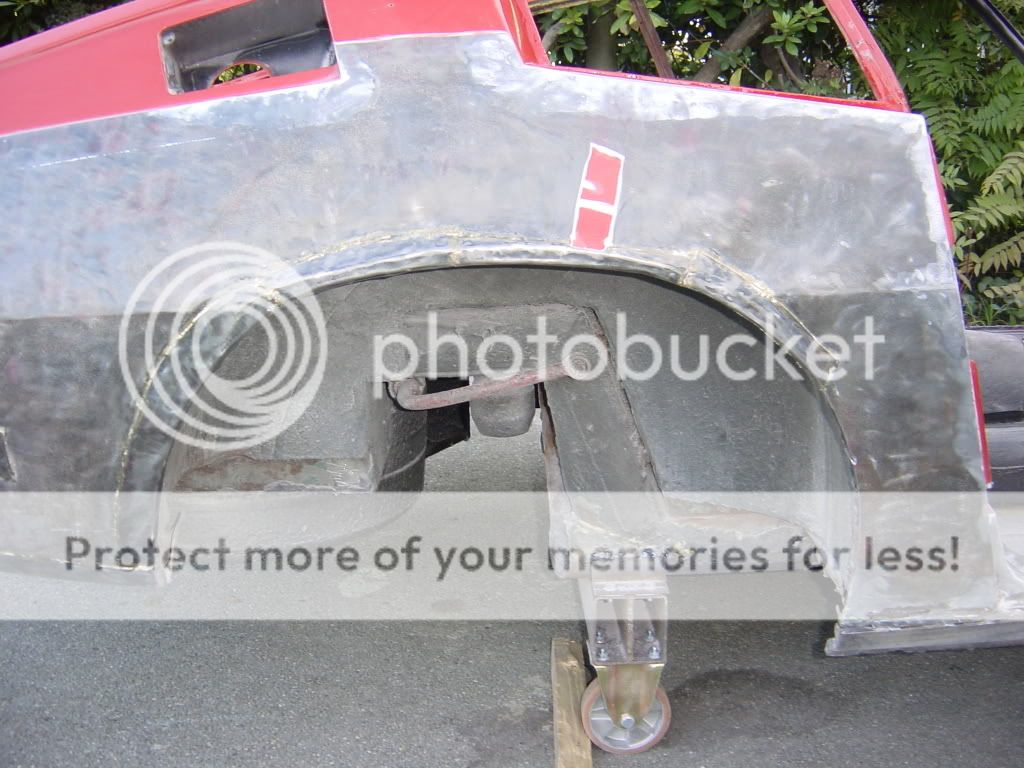
Removing the paint from the other rear arch again revealed a large quantity of filler over rust but thankfully this time there was no trace of the brazed patches. Repeating this stripping method at various spots around the body convinced me that all the paint and filler had to be removed from the entire body.
This decision was not taken lightly as to do it properly required removing the entire interior, glass, lights and bright-work. Indeed I decided to remove everything: suspension, engine bay components and loom so that the car would eventually be taken right down to a bare shell.

Initial inspection showed the wheel arches differed in shape and profile from one side to the other so the first step was to examine these areas more closely.
Using a twill wire brush in my trusty angle grinder I removed the paint from the off-side rear wheel arch lip through the primer to find a ¼” thick layer of body filler. Further exploratory grinding with the twill brush in a series of small patches revealed the whole area from the waistline down to the sills was covered in a similar layer of filler, and in places this was up to a ½” thick. Removing this quantity of filler is very time consuming; the only effective method I know of is grinding it away with the wire brush, which turns it into a fine powder. It became clear that part of the reason for the large quantity of filler was a previous attempt to repair rust between the inner/outer joint of the wheel arch. Unfortunately the method used was very crude, the rusty areas had been beaten back and rough patches brazed over the top. This had caused further and more extensive damage to the bodywork as the heat from the oxy/acetylene torch used in brazing had spread along the thin panels and causes them to wrinkle like a sweet wrapper.
Removing the paint from the other rear arch again revealed a large quantity of filler over rust but thankfully this time there was no trace of the brazed patches. Repeating this stripping method at various spots around the body convinced me that all the paint and filler had to be removed from the entire body.
This decision was not taken lightly as to do it properly required removing the entire interior, glass, lights and bright-work. Indeed I decided to remove everything: suspension, engine bay components and loom so that the car would eventually be taken right down to a bare shell.
dinkel - 'IMO: only a Khamsin tops the Ghibli - of the 60/70s Maseratis that is. Although the various bodied 3500/5000GT models are unbeateable'
The Khamsin tops the Ghibli? Interesting one that and I guess it comes down to whether the work of Gandini or Giugiaro floats your boat, for me naturally its the Ghibli.
Or if we are dreaming its got to be an A6GCS by Pininfarina http://ultimatecarpage.com/images/large/1526-1.jpg
PS
Anyone think we need a separate Classic Maserati thread, seems to be quite a lot of interest in them?

With the object of stripping the car of its suspension I tackled the front hubs, now I had jacked the car up a number of times before using the front cross member or differential, but this time I used the front offside jacking point. I wasn’t paying too much attention as I did so and whilst the car remained static, each vertical movement of the jack produced a sickening crunch as it drove it’s way up through the rust infested sill, bear in mind as well the car was without the weight of the engine and gearbox! I was a full 3 strokes of the jack before I realised what was happening.
The outer sills on both sides were reasonably new but clearly made in a workshop with limited equipment as they were welded from two pieces. Removal of the offside one revealed several previous attempts to repair inner sill rust damage, patch on patch. The only way forward now was to strip the car of all paint, filler and under seal, and then cut out any metal that could not be returned to the correct shape or that had lost it’s structural integrity.
Now that won’t buff out!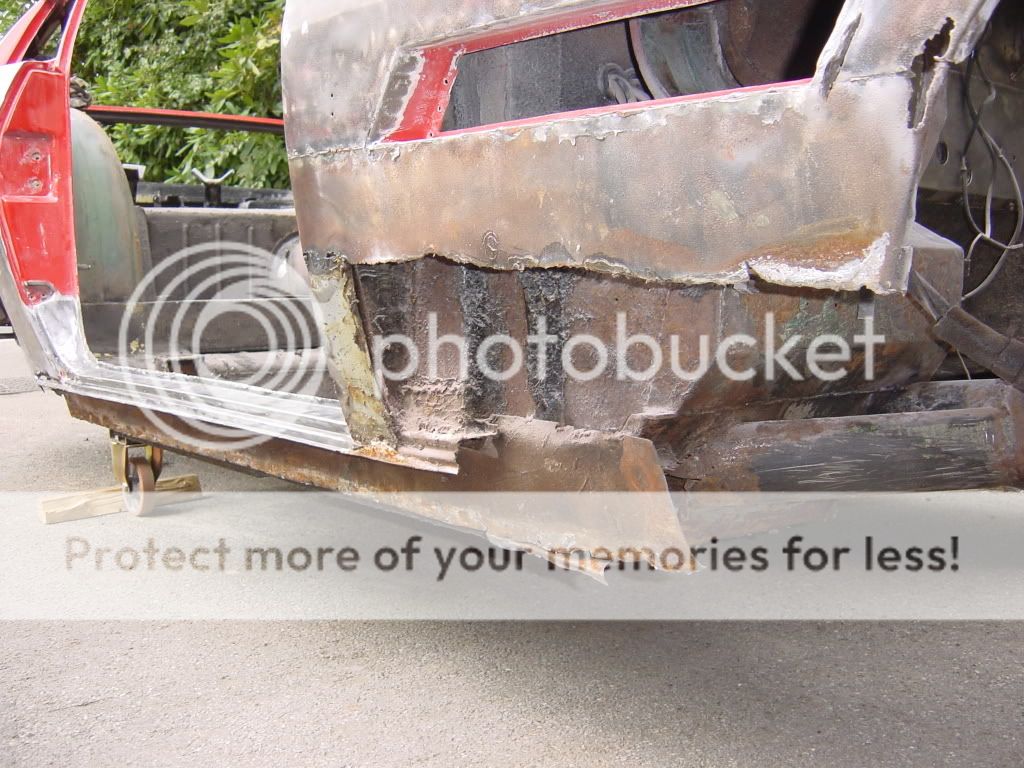
dockertrigger said:
What a car!, Good luck with the project!
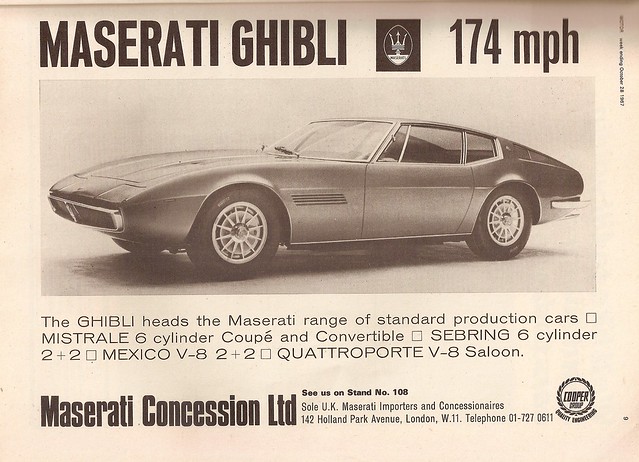
Maserati Ghibli Advert 1967 by Trigger's Retro Road Tests!, on Flickr
I have that very same advert on the wall in my garage, it covered a full page in a 1968 copy of Autocar and my car was actually supplied by that dealer as well.Maserati Ghibli Advert 1967 by Trigger's Retro Road Tests!, on Flickr
Notice the Ghibli shown is very much pre production though, no air intakes below the bumper, no door handles etc.
Gassing Station | Classic Cars and Yesterday's Heroes | Top of Page | What's New | My Stuff