1:72 MPM Boulton Paul Defiant Mk.1
Discussion


Despite the Special Hobby (part of the same CMK, MPM, Azur etc. conglomerate) Curtiss Hawk
http://www.pistonheads.com/xforums/topic.asp?h=0&a...
...turning into a nightmare (cowling doesn't fit properly and it's a 'mare to sort out) I bought this Defiant. I've always been fascinated by this aircraft. It somehow manages to look simultaneously right, and wrong:

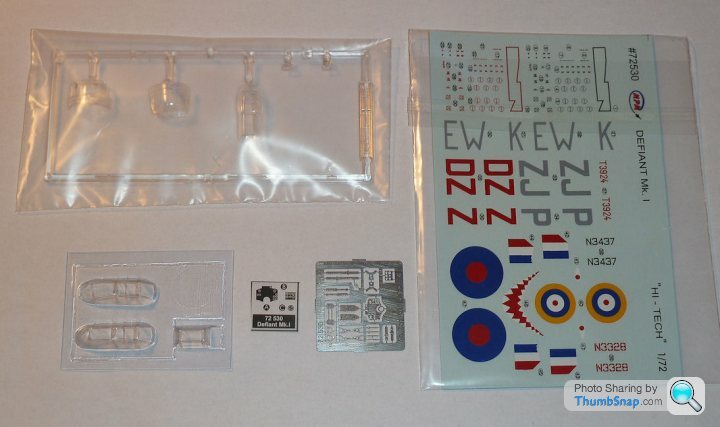
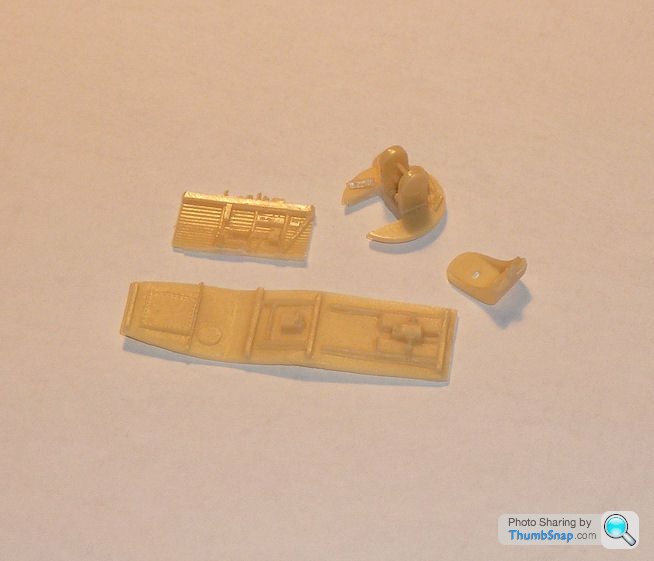
It's a multi-media kit with decent styrene parts (not quite as good as the Hawk), resin interior, photo etch fret, vacform canopy and nice decals:
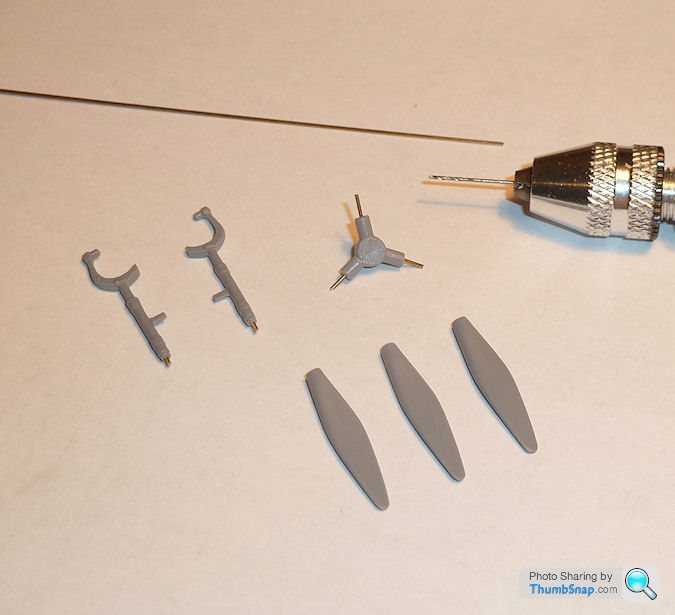
As with the Hawk, there's a lot of DIY involved, even the propeller blades are separate and will need drilling, pinning and dowelling. Wierd.
Instructions are beautifully unclear, which I suppose is good given the amount of fettling that will be required to align everything. There is a resin fuselage insert for the "in-use" turret and a styrene insert with the aerodynamic fairing. No mention s made of this in the instructions though.

I just hope I wont have to CAD and rapid-prototype any significant components as with the Hawk...
Undecided about finish - fancy black just for a change, but I love the green and earth schemes too.
I'll be adding Master Model brass gun barrels and perhaps a vacform turret transparency.
Wish me luck.
http://www.pistonheads.com/xforums/topic.asp?h=0&a...
...turning into a nightmare (cowling doesn't fit properly and it's a 'mare to sort out) I bought this Defiant. I've always been fascinated by this aircraft. It somehow manages to look simultaneously right, and wrong:
It's a multi-media kit with decent styrene parts (not quite as good as the Hawk), resin interior, photo etch fret, vacform canopy and nice decals:
As with the Hawk, there's a lot of DIY involved, even the propeller blades are separate and will need drilling, pinning and dowelling. Wierd.
Instructions are beautifully unclear, which I suppose is good given the amount of fettling that will be required to align everything. There is a resin fuselage insert for the "in-use" turret and a styrene insert with the aerodynamic fairing. No mention s made of this in the instructions though.
I just hope I wont have to CAD and rapid-prototype any significant components as with the Hawk...
Undecided about finish - fancy black just for a change, but I love the green and earth schemes too.
I'll be adding Master Model brass gun barrels and perhaps a vacform turret transparency.
Wish me luck.
Edited by dr_gn on Friday 30th August 20:27
Brigand said:
I haven't seen a kit of one of these for a long time, I remember having the Airfix one when I was a lad. Can't say I've noticed any around since then whilst I've been browsing.
I agree with you though dr, its a strangely good looking aeroplane...
MPM/CMK/Special Hobby do a range of them in 1:72 . Forget the Airfix one - it's hopeless.I agree with you though dr, its a strangely good looking aeroplane...
http://www.cmkkits.com/en/aircraft/index.php?fSort...
Classic Airframes also do 1:48 scale versions.
Interesting thread here comparing the Airfix & MPM mouldings. Check out the relatave turret and fin/rudder dimensions. I wouldn't have ever known which one was correct in terms of dimensions if two well built models were side by side, but, it is quite an extreme illustration of the differences.
http://airfixtributeforum.myfastforum.org/Airfix_v...
I've read that the MPM turret glazing is too tall, so I ordered a vacform replacement (for an Airfix Halifax ironically) and some master model gun barrels (I got 8 in fact, four for m Mosquito project):
http://master-model.pl/index.php?page=shop.product...
Here's Bomberguy's video on the Defiant for anyone interested:
http://www.youtube.com/watch?v=ce9My4IKydo
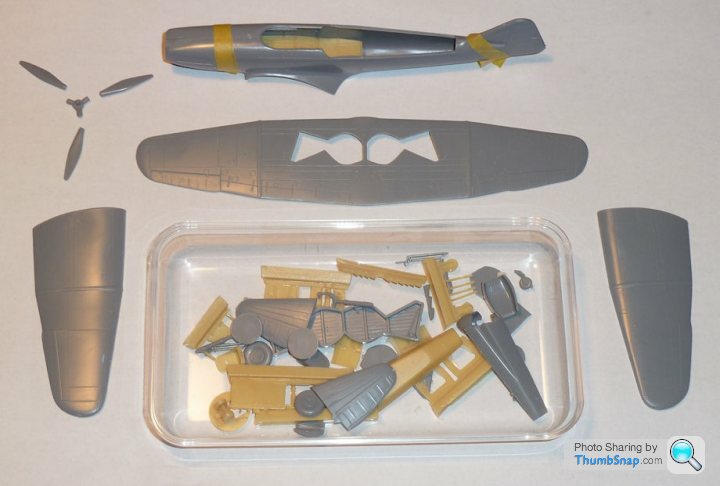
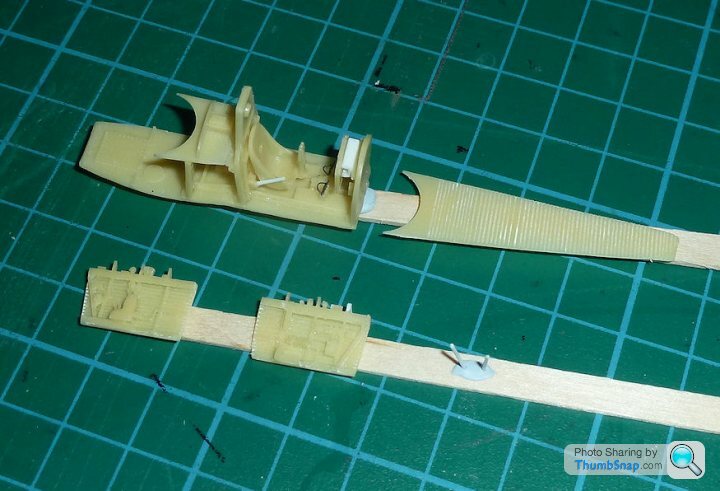
Glued the wings together tonight. A common issue with short run kits like this is the trailing edges are too thick. These required some internal thinning, and they are still a little heavy. Once filled and sanded externally it won't be too obvious I hope. As with the Hawk, the fit is surprisingly good, and the surface detail extremely refined:
A common complaint about this kit seems to be that the u/c legs are not strong enough. I was puzzled by this until I saw that there are no locating stubs for the legs - they are pretty much butt-jointed to the wheel wells. All it needs to sort it out is a few minutes with a pin drill and some 0.5mm brass rod. Bizzarrely, the propeller blades are also separate from the hub. Never seen this before on a 1:72 kit, but again, no real problem, just reinforce with brass rod:
It's nice to do some modelling rather than just assembly, and the bits you really have to work on make it more unique.
I also started cleaning up the resin bits. Again, as with the Hawk, some really nice details included, but fitting will need some trial and I suspect a bit of error:
Edited by dr_gn on Tuesday 3rd September 21:47
lufbramatt said:
Had the opportunity to examine the real Defiant when it was being restored at MAPS (I live 5 mins from their workshop) for Hendon. It's a beautifully engineered aircraft- things like the control column pivoting on a lovely machined ball and socket (whereas on a hurricane it just looks like a bit of scaffold tube pivoting on a bolt). The main wheels even have little bushes that get rid of mud from the tyres as the gear retracts. The wings and fuselage are very smooth- the panels fit perfectly and everything is flush riveted, not the motley collection of ill-fitting panels you find on a spitfire. Must have been a nightmare to manufacture in any sort of quantity!
I guess all those nicely engineered features added weight. I wonder how it would have performed without the turret, but with fixed machine guns? The wing looks thick enough to house a howitzer.Eric Mc said:
Boulton Paul's problem was that they had invented the powered turret and were keen to shove it into any aeroplane they could. The aircraft they built themselves - the Overstrand, Defiant, Roc etc were all about the turret.
According to Wikipedia they didn't "invent" the turrets:"Boulton Paul's designs were largely based on originals licensed from the French company SAMM (Societe d'Application des Machines Motrices)"
lufbramatt said:
dr_gn said:
I guess all those nicely engineered features added weight. I wonder how it would have performed without the turret, but with fixed machine guns? The wing looks thick enough to house a howitzer.
OK this info is shamelessly taken from Wikipedia but apparently even without the turret the Defiant was over 600kg heavier than a Hurricane. Boulton Paul also developed a variant with wing guns (the P.94) that had a top speed of 360mph, comparable with a Spitfire.Again, from Wikipedia, the loaded weight of a Hurricane MkII was 3480kg, and the Defiant 3781kg (difference about 300kg for approx. the same size aircraft). I'd have thought the turret plus gunner would have been at least 300kg, potentially - minus the turret - making it lighter than the Hurricane. Plus there would be the additional weight of the fairing mechanisms and the compromised aerodynamics to consider.
Without turret, less manouverable, but top speed almost the same as a contemporary Spitfire, but with 12 brownings or 4 20mm cannon...sounds like it could have been made into a formidable ground attack aircraft.
Eric Mc said:
Fair enough. But they certainly became extremely enthusiastic about making planes that used them.
Did the French air force order any aircraft - especially fighters - fitted with the French turrets? I seem to recall some of their ungainly Potez and Amiot bombers had turrets - but I can't think of any French fighters so equipped.
I guess they were simply responding to: Did the French air force order any aircraft - especially fighters - fitted with the French turrets? I seem to recall some of their ungainly Potez and Amiot bombers had turrets - but I can't think of any French fighters so equipped.
"Air Ministry Specification F.9/35 required a two-seater day and night "turret fighter" capable of 290 mph at 15,000 ft." (Ref. Wikipedia)
If they were making turrets and aircraft, it would make sense that they'd be enthusiastic about a turret equipped fighter aircraft requirement.
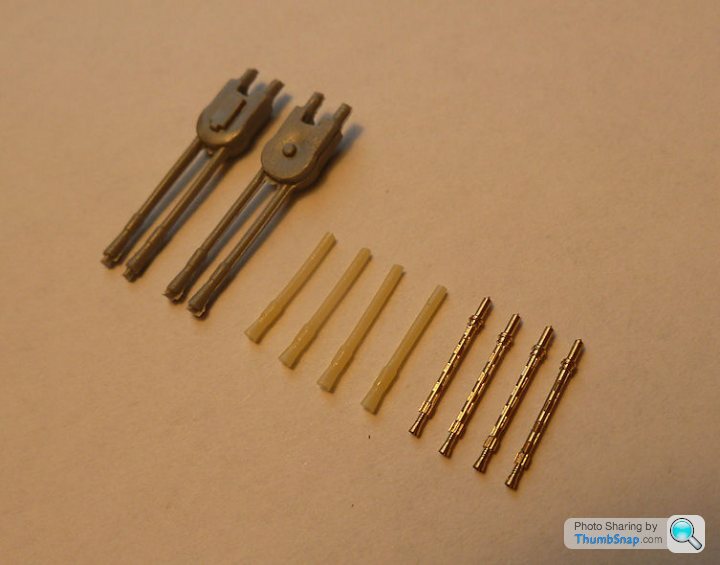
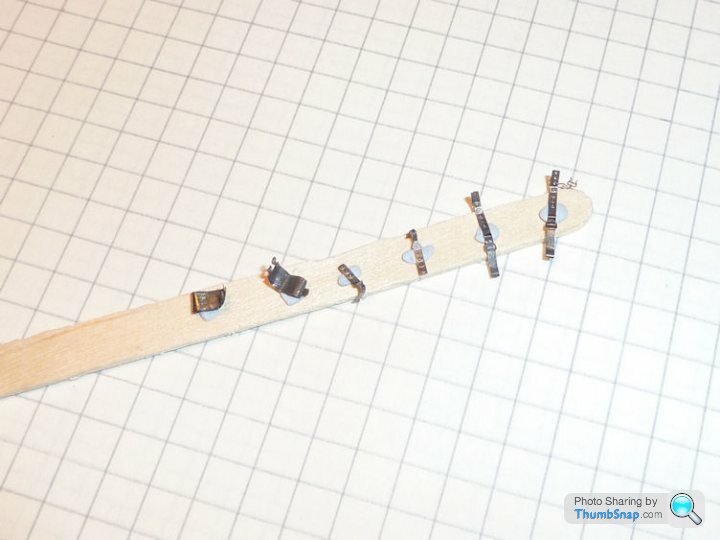
So here are the bits I've been waiting for. Master Model Brass gun barrels, compared with the resin and injection moulded kit versions. No prizes for guessing which ones I'll be using:
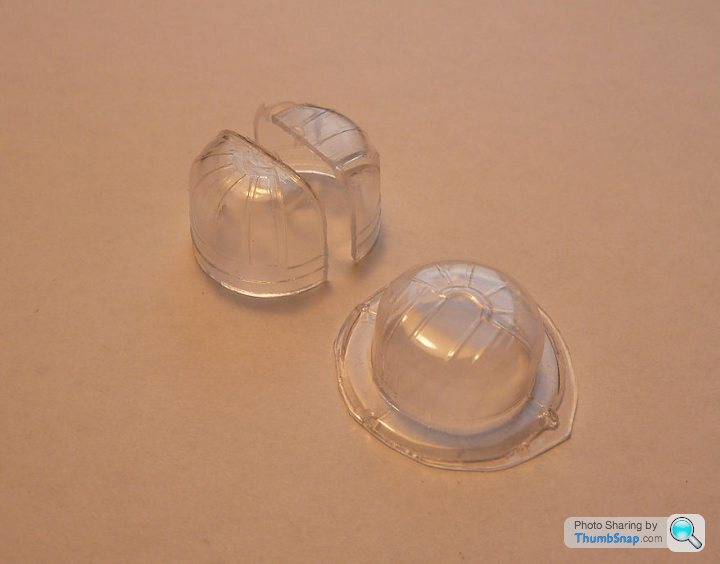
And the vacform turret glazing. Looking at it it's wrong, and the original is more correct in terms of dimensions:
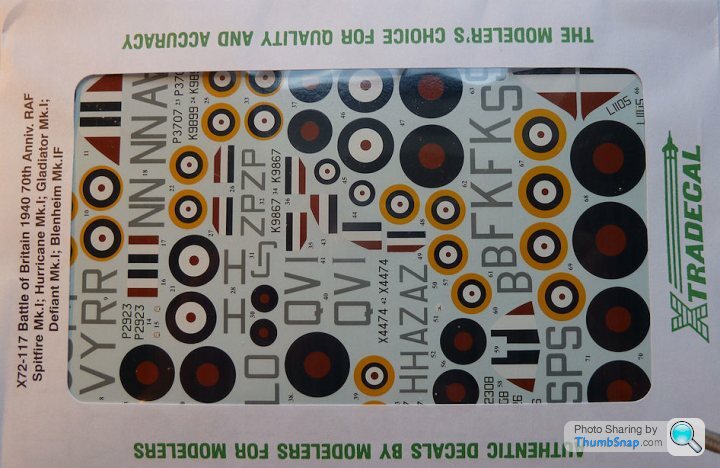
And some decent decals for a BoB version. I decided against all black in the end:
And the vacform turret glazing. Looking at it it's wrong, and the original is more correct in terms of dimensions:
And some decent decals for a BoB version. I decided against all black in the end:
Edited by dr_gn on Thursday 5th September 18:43
Brigand said:
dr_gn said:
So here are the bits I've been waiting for. Master Model Brass gun barrels, compared with the resin and injection moulded kit versions. No prizes for guessing which ones I'll be using:
/quote]
Blimey, its amazing the level of detail you can get with those brass parts, especially considering how small those gun-barrels will be.
I've yet to ever try using etched or brass parts on a kit, how well do they glue to the plastic/resin?
/quote]Blimey, its amazing the level of detail you can get with those brass parts, especially considering how small those gun-barrels will be.
I've yet to ever try using etched or brass parts on a kit, how well do they glue to the plastic/resin?

Good value too at about £5 for 4 barrels. For bonding the barrels into the resin breeches I'll probably use Araldite, because the barrels need to be adjusted to be absolutely parallel to look right.
Regarding the etch or resin parts, as ever, success depends upon preparation. Resin parts tend to either replace kit parts as corrections or version changes, or replace details that are not so well defined in the original kit. A good example are the resin cockpit sides commonly available. First you must scrape and sand all the existing injection moulded detail away, then thin the fuselage to compensate for the resin panels. It can be a long job to get everything to fit properly. For large resin parts (like the cockpit sides) I use Araldite because it gives you chance to adjust position before setting. Sometimes filler is required around the periphery of the new resin to cover any gaps up. Resin is sometimes greasy from the moulding process, and I always abrade the faces that are to be bonded.
Photo etch is similar, although sometimes it needs folding and glueing before fitment. Lightly abrading the glued edges is a good way of keying the material. I use medium viscosity cyano for most etch, with PVA or even Klear for smaller, low stress pieces.
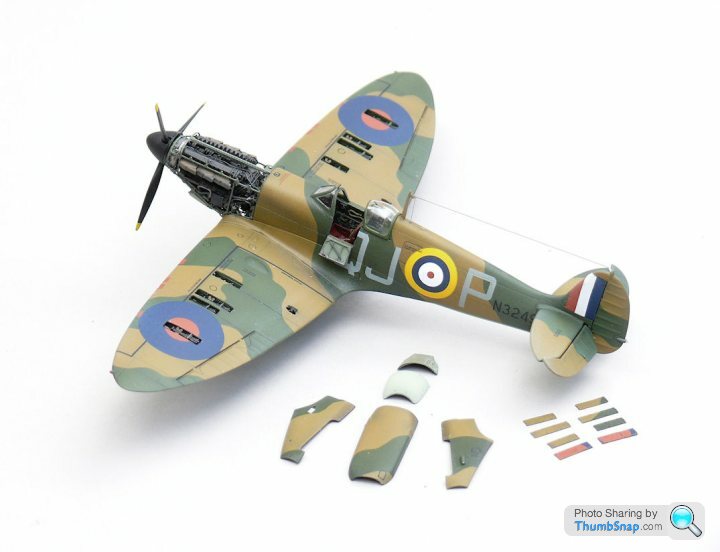
Resin and photo etch dramatically improve scale fidelity, but they are difficult to get right and you need to be totally confident in basic modellig techniques or else the model will probably look worse than if you'd built it OOB. This is my recently completed Tamiya 1:72 Spitfire. I added resin engine, cockpit and gun bays and there is plently of photo etch in there too. A lot of the original kit is sanded or cut away completely (like the entire nose section). It was a real job and a half to get everything fitting and looking right, but I think the effort was worth it:
Not done much modelling recently, but decided to have a go at the Defiant turret. Taped the kit turret glazing together - no way that's going to look right - it's in two halves (which don't line up), it's too high, not very transparent and the rear fairing doesn't fit it :
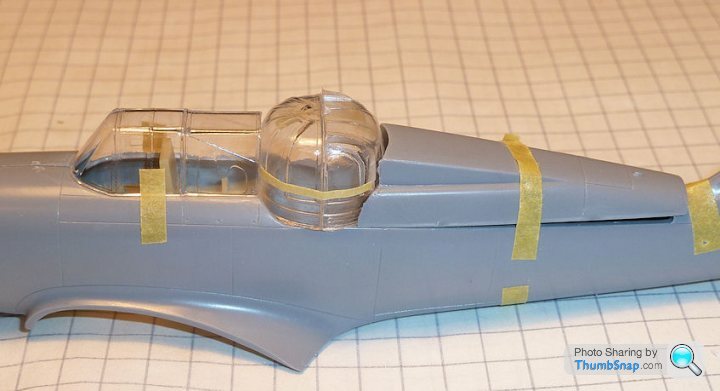
Apart form that it's fine....No problem I thought, I'll use the Falcon vacform one instead:
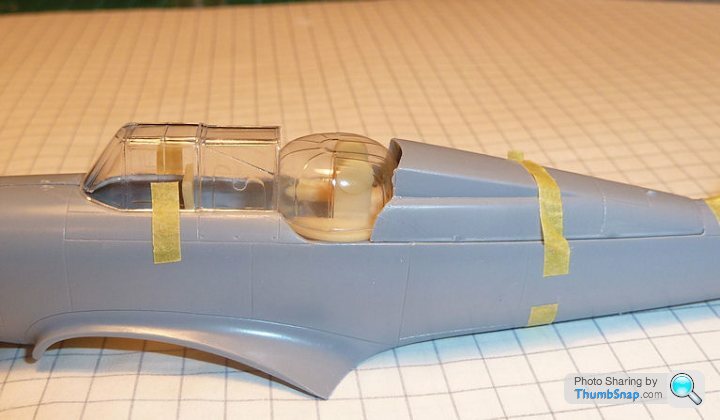
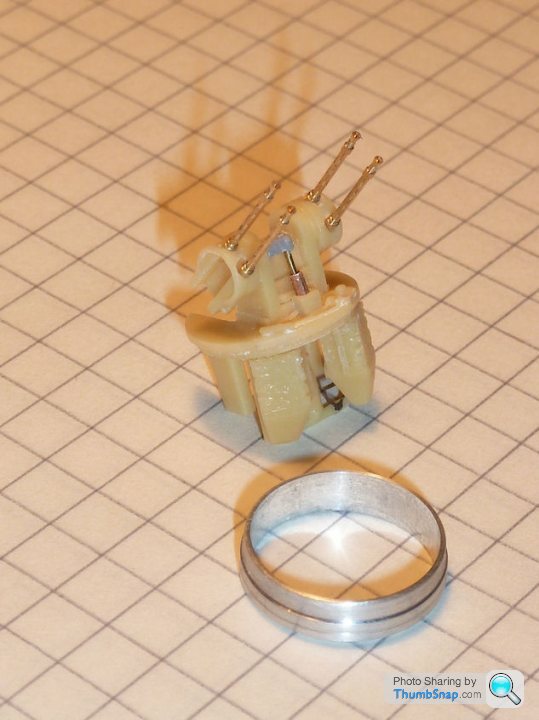
Much more transparent and better shape with no seams, but obviously too short, because unlike the original, the slew ring isn't included. In the end I though I'd simply make a slew ring out of aluminium on the lathe, and recess it to fit the vacform dome. I added a couple of circumferencial features while I was at it, and it's turned out quite well considering:
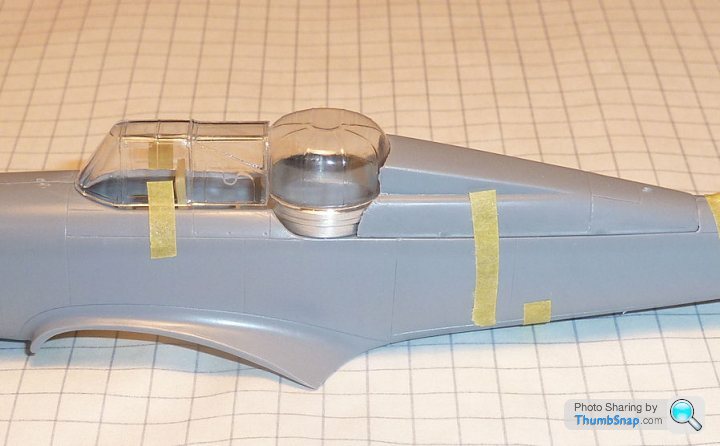
here it is without the dome fitted, and the rest of the turret components:
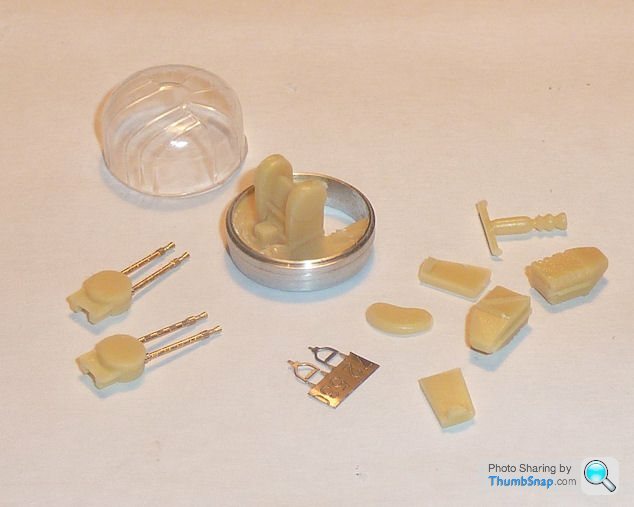
I'm going to try to model it with the rear doors open, to show some of the detail inside.
These short run kits are quite a challenge! They are enjoyable though, at least the Curtiss Hawk and this will certainly be unique models by the time i've finished them.
Apart form that it's fine....No problem I thought, I'll use the Falcon vacform one instead:
Much more transparent and better shape with no seams, but obviously too short, because unlike the original, the slew ring isn't included. In the end I though I'd simply make a slew ring out of aluminium on the lathe, and recess it to fit the vacform dome. I added a couple of circumferencial features while I was at it, and it's turned out quite well considering:
here it is without the dome fitted, and the rest of the turret components:
I'm going to try to model it with the rear doors open, to show some of the detail inside.
These short run kits are quite a challenge! They are enjoyable though, at least the Curtiss Hawk and this will certainly be unique models by the time i've finished them.
The resin cockpit is pretty much ready for painting now. Basically none of it fits, either to the fuselage or to the other resin bits of assembly. The cockpit sides had to be reduced in length, the instrument panel brought forward by around 3mm, the rear deck support trimmed in height being the main mods. I've also added a seat height adjuster and a couple of plastic rod braces to the back of the head armour (not fitted until the detail paiting is done). The resin rear deck is a bit of a strange addition since I think it's totally obscured by the rear fairing and turret. I'll paint it just in case.
Eric Mc said:
That's the "fun" of these short run kits I suppose.
Yup, I'm enjoying it really. You need plenty of reference pictures to get things right. I just noticed the instrument panel is still way too far back. According to the instructions it fits well under the windscreen , the reality is it fits much further towards the pilot (above the rudder pedals in my photo), with a bit sticking up behind the windscreen. Now I know why there aren't many completed examples of the MPM/Special Hobby Defiants and Curtiss Hawks online...
Eric Mc said:
I really need to have a go at some of the MPM/Special Hobby kits in my stash.
The only true short run kit I have built so far is a Huma (what happened to them) Messerschmitt 209. It went together really well. But I think the construction was assisted by the fact that all the components were polystyrene - no resin, white/etched metal or any other materials.
I think it's the dissimilar materials and their different moulding and gluing processes that seem to cause a lot of the problems with short run models.
This is the Hi-Tech version of the base kit (with added resin and etch etc), but all the plastic parts for building it as a full plastic model seem to be included also. In fact I'll be using the plastic dorsal fuselage section with the turret fairing in the up position. The resin version has the fairing down (which doesn't look like my idea of a Defiant).The only true short run kit I have built so far is a Huma (what happened to them) Messerschmitt 209. It went together really well. But I think the construction was assisted by the fact that all the components were polystyrene - no resin, white/etched metal or any other materials.
I think it's the dissimilar materials and their different moulding and gluing processes that seem to cause a lot of the problems with short run models.
It's a shame they didn't actually try building these kits themselves - they could easily have included a resin turret ring and a resin cowl for the Hawk and made them into kits that could be built fairly easily and accurately by modellers without access to a lathe / RP machines.
Eric Mc said:
I sometimes wonder if the inclusion of these "extras" are more of a marketing tool than a genuine effort to make the model "better" or "buildable"
I hardly ever use all the parts from any aftermarket set - some are worse than the original. An extreme example was the 1970's 1:32 Bf109 seat. the original Matchbox one was a far better representation than the Eduard photo-etch version. You also have to consider whether the amount of modification required to get an aftermarket part to fit will end up making the model look worse that if the original had been left in place. An example of this is vacform canopies; if the mating contours are complex, the original injection moulded version will invariably be a far better fit than you could ever achieve by hand trimming a vacform one. With my recent Tamiya Spitfire I sacrificed the better scale representation of the vacform windscreen for the perfect fit of the less realistic but much thicker original.Did some work on the turret this evening. It's mostly resin (and of course my turned aluminium slew ring), but I've also fitted the brass barrels and p/e stirrups, and scratchbuilt the hydraulic elevation cylinder form copper tube/rod and a spare undercarriage torque link. Gun pairs are temporarily fitted with PVA ready for test fitting the vacform dome:
Also prepared the p/e pilots harness and lap straps for the gunner. I learned from my previous Spitfire build to pre-bend the belts before painting, otherwise the paint tends to flake off:
Also prepared the p/e pilots harness and lap straps for the gunner. I learned from my previous Spitfire build to pre-bend the belts before painting, otherwise the paint tends to flake off:
Opened up the clamshell doors on the turret (despite assurances that this is the same turret as a Halifax, it's not - the Halifax didn't have these doors and has a different number of glazed segments as a result).
Glued the guns in position, and posed the turret how it will be when finished. Everything finally seems to fit apart from the vacform transparency in front of the turret - it just needs a fraction shaving off the port edge:
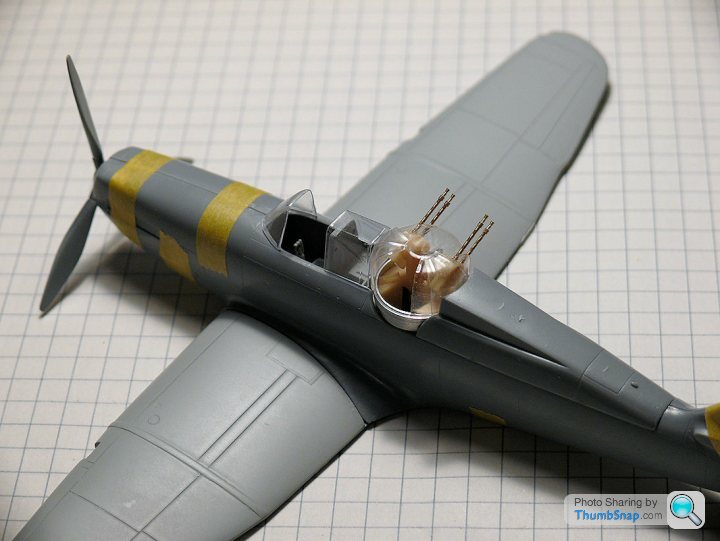
I was wondering whether this scenario could ever happen in reality ie the rear fairing 'up' with the turret turned. Apparently it is valid if you look at 3'23" in, on Bomberguy's video:
http://www.youtube.com/watch?v=ce9My4IKydo
Anyone any comments on this before I go any further? Ta.
Glued the guns in position, and posed the turret how it will be when finished. Everything finally seems to fit apart from the vacform transparency in front of the turret - it just needs a fraction shaving off the port edge:
I was wondering whether this scenario could ever happen in reality ie the rear fairing 'up' with the turret turned. Apparently it is valid if you look at 3'23" in, on Bomberguy's video:
http://www.youtube.com/watch?v=ce9My4IKydo
Anyone any comments on this before I go any further? Ta.
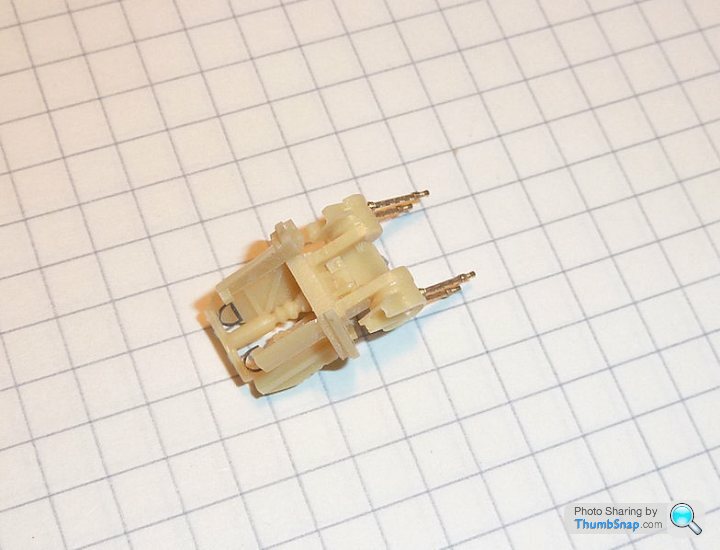
Here's a bit of progress on the turret. There are a few more bits to add, but that will do I think. Everything except the yellow resin is scratchbuilt or aftermarket (guns & canopy):


The more research I do on this aircraft, the more respect I have for the pilots and gunners who flew them.
The more research I do on this aircraft, the more respect I have for the pilots and gunners who flew them.
Eric Mc said:
It must have been awfully claustrophobic in that turret.
And did anybody ever successfully bale out of the turret?
I think they did. I e-mailed the Boulton Paul Association to see if they had any better details images of the turret than there are online. The archivist (also a keen modeller and IPMS member) sent me a ton of reference material and drawings (and other info). What I didn't realise was that there was another way out of the turret by moving it into the "guns forward" position, lifting the seat and kicking out an access panel in the rear fuselage. The gunner could then (in theory) drop out that way. Defiants apparently always took off and landed with the turret forward so that the gunner had a chance of getting out underneath in the event of the aircraft overturning. Looking at the drawings and photographs I still can't figure out how there was room to do that. This fuselage panel was also used for groundcrew to re-arm and empty the cartridge collector bags.And did anybody ever successfully bale out of the turret?
I think it is a fascinating aircraft.
Gassing Station | Scale Models | Top of Page | What's New | My Stuff