Papercraft... what have you started
Discussion


Inspired by the beautiful boat build the good Doctor has started on here
I've set myself a challenge as it's really quiet at work (*no doubt it will also spill over into my time at home too. Bye Bye Ps3 for the moment)
I'm going to attempt to build this..
 from http://global.yamaha-motor.com/yamahastyle/enterta...
However, I'm not a complete idiot, and this looks pretty daunting

So, in preparation, I chose two of the animal models as a basic primer in papercraft. I learned several things.
a) the paper in my printer was _slightly_ too thin
b) pritt stick is not tacky enough initially to hold the more complicated connections.
c) it's better to trim slightly inside the lines than outside, and a knife is better than scissors.
d) a steel ruler for folding over, and a paintbrush for pressing things together from the inside are pretty helpful.
here are some penguins, and a lemur (That Tail!!!! Argh!)


next up, something a bit more automotive,
I'll probably blast through this one without taking too many pics, but i'll post once done, and make a build thread for the bike. 34 pages of A4, and 21 pages of instructions - then the rider and panorama. Eeek!
I've set myself a challenge as it's really quiet at work (*no doubt it will also spill over into my time at home too. Bye Bye Ps3 for the moment)
I'm going to attempt to build this..
from http://global.yamaha-motor.com/yamahastyle/enterta...However, I'm not a complete idiot, and this looks pretty daunting
So, in preparation, I chose two of the animal models as a basic primer in papercraft. I learned several things.
a) the paper in my printer was _slightly_ too thin
b) pritt stick is not tacky enough initially to hold the more complicated connections.
c) it's better to trim slightly inside the lines than outside, and a knife is better than scissors.
d) a steel ruler for folding over, and a paintbrush for pressing things together from the inside are pretty helpful.
here are some penguins, and a lemur (That Tail!!!! Argh!)
next up, something a bit more automotive,
I'll probably blast through this one without taking too many pics, but i'll post once done, and make a build thread for the bike. 34 pages of A4, and 21 pages of instructions - then the rider and panorama. Eeek!
Slight progress update - work and drama relating to a toddler and a sky box have proven to be a bit of a distraction..
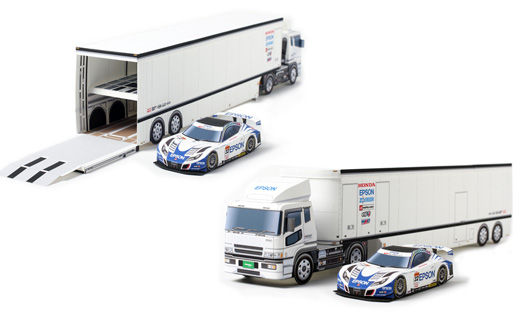
Decided to skip the transporter and make the smaller car first - I'll then make the Cab and the trailer last.
I must say, the bodyshell of the car was pretty complex, but mostly straight lines, so easier than I thought.
whoever decided to make a cut-out in the bottom of the floorpan for access is a genius,

There are a couple of things I want to tidy up, the exposed white on the blue sections where the joins are, and a little tape to hold the front wing/bonnet corners together without gapping.
Overall, about an hour's cutting and the same again carefully folding and sticking.
Decided to skip the transporter and make the smaller car first - I'll then make the Cab and the trailer last.
I must say, the bodyshell of the car was pretty complex, but mostly straight lines, so easier than I thought.
whoever decided to make a cut-out in the bottom of the floorpan for access is a genius,
There are a couple of things I want to tidy up, the exposed white on the blue sections where the joins are, and a little tape to hold the front wing/bonnet corners together without gapping.
Overall, about an hour's cutting and the same again carefully folding and sticking.
dr_gn said:
Not bad at all. With the gaps along the edges, I've been holding them together with Tamiya masking tape on the outside, and carefully applying PVA to the inside with a small brush along the join. Leave it until set and take the tape off and it gives a perfect join. You can clean the brush with detergent and warm water.
Oooh, that's a cracking call. I'll give that a try when I get a moment. WIP to date (deflector and mirrors to go on the cab, trailer to build)

I'm actually mildly disappointed, this is a step down in complexity from the animals, but I'm enjoying the process. Might do another Epson car (possibly the nsx) before trying the bike
Thanks Perdu. I'm really looking forward to the bike too.
The penguins were my first attempt, and they're not great. The lemur is better (but the model is not fantastic in terms of fit), the tail was a total nightmare. Its two peices, rolled into sectional tubes which then slot into each other - 1mm out and it won't fit. I spent about an hour swearing at it.
The penguins were my first attempt, and they're not great. The lemur is better (but the model is not fantastic in terms of fit), the tail was a total nightmare. Its two peices, rolled into sectional tubes which then slot into each other - 1mm out and it won't fit. I spent about an hour swearing at it.
I have memories of a partqork called Discovery in the eighties, and it was big on paper craft models. I spent days making a Da Vinci flying machine, but without scoring or a straight edge - and using kids scissors. It looked terrible but the sense of achievement was there.
As an aside, there'll be limited progress on the automotive front as the daughter has decided she needs the tortoise and macaw to go with the penguins. I had planned to knock them up today for her, but a wedding faire had to be attended.
As an aside, there'll be limited progress on the automotive front as the daughter has decided she needs the tortoise and macaw to go with the penguins. I had planned to knock them up today for her, but a wedding faire had to be attended.
Macaw started, and I'm not enjoying it. It's not a bad model, and it's not particulary tricky - It may just be my mood, or it may be 'cos I want to get that transporter finished and move on, I don't know.
The modelling is proving to be different - I don't know if this was printed on paper from a different ream, or if it's due to the shapes of the cuts, but scissors are working out much easier for the scalloped edges - the paper is tearing a bit if I use a craft knife.

I've got a blue felt-tip to go along the white edges of the paper - whilst they're still visible, they're not as offensive as the white joins.
The head was pretty taxing to do, several changing curves, patience is a positive, and letting the glue "grab" on one set of tabs before moving to the next is a requisite.

The modelling is proving to be different - I don't know if this was printed on paper from a different ream, or if it's due to the shapes of the cuts, but scissors are working out much easier for the scalloped edges - the paper is tearing a bit if I use a craft knife.
I've got a blue felt-tip to go along the white edges of the paper - whilst they're still visible, they're not as offensive as the white joins.
The head was pretty taxing to do, several changing curves, patience is a positive, and letting the glue "grab" on one set of tabs before moving to the next is a requisite.
dr_gn said:
The paper in my kit I'd describe as thin card. Some parts call for it to be doubled or tripled depending on how much stiffness is required.
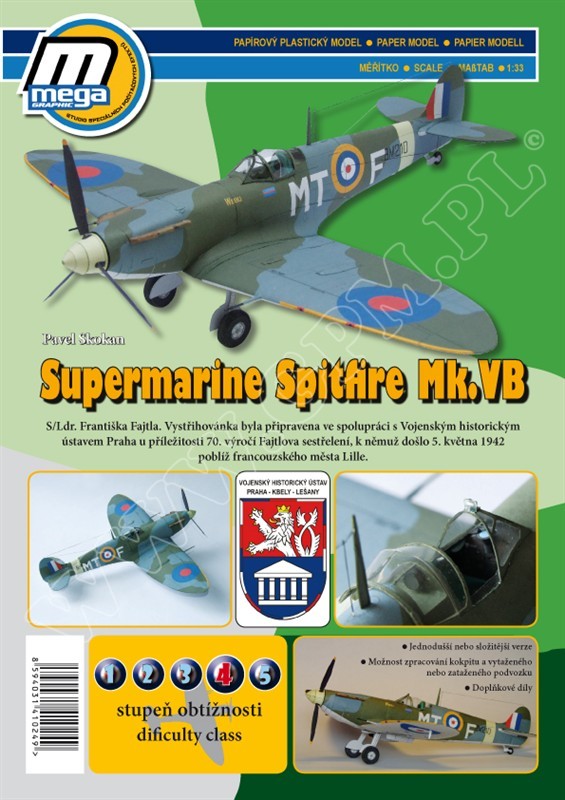
Looking forward to seeing the FW190. What make of kit is it?
I'm just using printer paper, as mine are printed off from the yamaha (mostly) website. Looking forward to seeing the FW190. What make of kit is it?
Ideally I'd be using something a little thicker - but that will have to wait till I place a new order from the supplier - it's a touch too thin, especially when you've applied glue, but if you go too thick it's going to cause issues with bending the model.
Dr_gn's model is an entirely different kettle of fish as it's a retail kit. I'd expect the standard to be significantly higher on the finished model (even bearing in mind the gulf in modelling skills)
Macaw ready for assembly.

My initial thoughts remain. I haven't particularly enjoyed this kit, but the daughter asked me to build it for her.. It's not as infuriating as the Lemur's tail, mind.
It's also strange with regards to the feathers - the wings and the tail are double-sided, and call for the inner and outer to be glued together.
The instructions could be better - the wings tell you to stick the two parts together before cutting the scalloped bottom section. It would be a definite advantage to do the same with the tail feathers too, however that is four steps earlier. I'm left with a lot of "white" on the tail that i'll try and cover up.
The legs are just tubes, and measure perhaps 4mm in diameter. Without a paintbrush to wrap the tube around, I'd have struggled not to crush them.
Assembly may not take place today
perdu said:
For paper do you have a 99p shop handy?
They sell a packet of 'card' which I use when printing model description labels
It cost me 99p (quel surprise)
It is quite a lot heavier than 70 80 or even 90 gsm paper but not so heavy that I would imagine you having trouble using it for these models
Here's my packet of 60 sheets


The mackaw, love it already
I'll check the local 99p establishments, along with their more expensive brethren next time I venture into townThey sell a packet of 'card' which I use when printing model description labels
It cost me 99p (quel surprise)
It is quite a lot heavier than 70 80 or even 90 gsm paper but not so heavy that I would imagine you having trouble using it for these models
Here's my packet of 60 sheets
The mackaw, love it already
(out-of-focus pic warning)

The Macaw is finished. (dead. expired. ceased to be)

I had a slight misfire and built the wings inside-out. The instructions were clear, I was just in a hurry to get it completed - fortunately, I noticed the error before the glue had fully dried out. Had the model been one I'd liked or enjoyed, I'd have re-done the wings - as it is, the daughter is happy enough with the result, so they stay.
I've told her my head is battered, and she can wait for the tortoise. Today's plan of attack, work commitments permitting, is the trailer for the Epson racer.
ecsrobin said:
Anyone like to share the links to where I find these awessome templates. Really like the macaw and the race transporter.
The yamaha stuff (including the animals) is here,http://global.yamaha-motor.com/yamahastyle/enterta...
The Epson stuff is here
http://www.epson.jp/sponsor/nakajima/craft/
Enjoy.

A little progress today - work has been pretty manic, and a hospital appointment ate into my lunchbreak yesterday.
Cab commplete.
Trailer appx 80% complete - only the roof and door to complete.
This has been much more fun than the macaw.

The trailer is a little under a foot long.

I also need to run a black pen under the trailer wheels to get rid of the white lines.
Cab commplete.
Trailer appx 80% complete - only the roof and door to complete.
This has been much more fun than the macaw.
The trailer is a little under a foot long.
I also need to run a black pen under the trailer wheels to get rid of the white lines.


dr_gn said:
Looks neat - well done.
Thanks. There are a few areas I'm not entirely happy with - As a colleague said, "there'll always be a fold you wished was crisper", but there are no major annoyances. I'm pretty happy with the way it turned out - it definitely has presence.I'd love to know who thought this fold and glue sequence was a good idea for the door though...

How are you supposed to exert any pressure to the flaps?
Anyhoo, I'll see if the daughter wants this one - if not, I've cleared a space at the back of my office desk.
Onwards...
That Corsair is amazingly built, although I'm not a fan of mascara-like panel lines.
The daughter refused flat-out to have the transporter, so it's living one the top of one of my Work PCs for the moment.

She's requested Olaf from frozen since I'm "clearly having fun doing this".
shouldn't take too long
The daughter refused flat-out to have the transporter, so it's living one the top of one of my Work PCs for the moment.
She's requested Olaf from frozen since I'm "clearly having fun doing this".
shouldn't take too long
dr_gn said:
I don't like such heavy panel lines either, but in this case I'm more than happy to make an exception. That must have taken some skill (plus I'm guessing the lines were a feature of the printed parts rather than him adding them).
Oh, I totally agree - that is a level of modelling I can only aspire to, and the printing is nothing to do with the modeller, and all to do with the kit.Ok, located some thin cardstock from Asda at the weekend. (20 sheets for £1.47 - I can live with that if it's no use)
Next up as a test - 2009 NSX
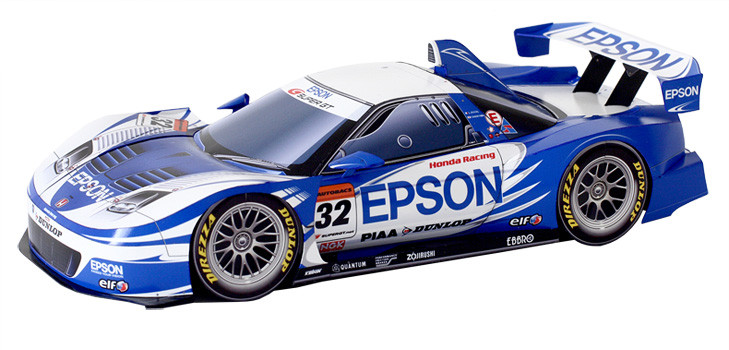
Printed out from here
http://www.epson.jp/sponsor/nakajima/craft/nsx2009...
only 3 sheets of card - as it happens, the version I'd printed out on paper had the same issue that the Transporter had anyway. If you print the PDF direct from chrome, it doesn't scale the first page to fit the paper for some reason, so save to Desktop, open in Reader and print seems to be the way forward.
Hopefully today will be a quiet day and I can get a full lunchtime's worth of work done on it. If all goes well, I'll be reprinting the motorbike on card, and starting that next.
Long term I have my eye on this, but i'm baulking at 15Eur postage
Next up as a test - 2009 NSX
Printed out from here
http://www.epson.jp/sponsor/nakajima/craft/nsx2009...
only 3 sheets of card - as it happens, the version I'd printed out on paper had the same issue that the Transporter had anyway. If you print the PDF direct from chrome, it doesn't scale the first page to fit the paper for some reason, so save to Desktop, open in Reader and print seems to be the way forward.
Hopefully today will be a quiet day and I can get a full lunchtime's worth of work done on it. If all goes well, I'll be reprinting the motorbike on card, and starting that next.
Long term I have my eye on this, but i'm baulking at 15Eur postage
A little bit of downtime today due to a server outage.
I'm finding working with this thin card easier than paper, as expected, it's a little more rigid - however when moistened by the glue, it has a tendency to de-laminate into two layers
(especially if the "flap" has been folded, and is a triangle 1mm*3mm in size)
Step 1 of 12 completed.

As the stock is a little thicker, the white edge is a little more notiiable, but it's also easier to run along with a dark pen (which isn't bleeding as much as paper) - which yields better results.
I'm finding working with this thin card easier than paper, as expected, it's a little more rigid - however when moistened by the glue, it has a tendency to de-laminate into two layers
(especially if the "flap" has been folded, and is a triangle 1mm*3mm in size)
Step 1 of 12 completed.
As the stock is a little thicker, the white edge is a little more notiiable, but it's also easier to run along with a dark pen (which isn't bleeding as much as paper) - which yields better results.
Step 2 - Both Doors and rear 3/4 panels complete.
truly horrid, horrid instructions for these. Each side is 6 pieces, 3 of them are curved on one axis. the wheelarch piece calls for a curve in one direction across the top of the wheelarch and a curve on the other axis across the other two panels.
I've ended up scrapping lot as the curvature didnt work out and it just looked _wrong_. It's not perfect (particularly for the bottom sills, but they are internal and won't be seen once complete)

The gap under where it says "10L" is intentional for the wing mirror.
Step 3 is attaching these two to the canopy built in step 1 - I'll leave the glue to set overnight and try tomorrow.
truly horrid, horrid instructions for these. Each side is 6 pieces, 3 of them are curved on one axis. the wheelarch piece calls for a curve in one direction across the top of the wheelarch and a curve on the other axis across the other two panels.
I've ended up scrapping lot as the curvature didnt work out and it just looked _wrong_. It's not perfect (particularly for the bottom sills, but they are internal and won't be seen once complete)
The gap under where it says "10L" is intentional for the wing mirror.
Step 3 is attaching these two to the canopy built in step 1 - I'll leave the glue to set overnight and try tomorrow.
Gassing Station | Scale Models | Top of Page | What's New | My Stuff