Airfix ME109 build
Discussion


I have two Airfix ME109 kits:
* A02029A, 109G-6 planned to do in Swiss colours
* A55106, 109E-3 'Starter Kit'
Why two? Well I ordered the G and got the E, so was sent the G (and didn't need to return the E; the postage was probably more than the kit). Thumbs up for Deanos Games' customer service.
-- The E
The E looks very similar to that built by dr_gn a couple of years back:
http://www.pistonheads.com/gassing/topic.asp?h=0&a...
It will be interesting to see if they've improved the alignment.
-- The G
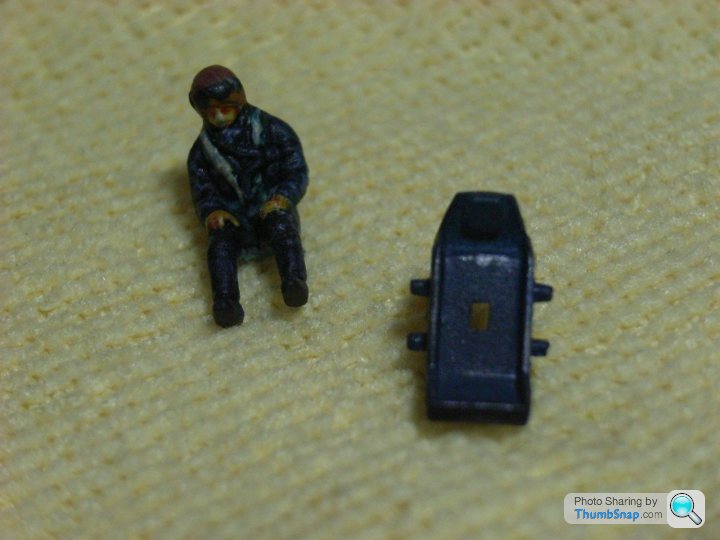
However, looking at the G, it's stripped right back with a one piece canopy and no cockpit tub, just a man (gripping fresh air) on a seat. To me it would be more suitable for the starter kit than the E.
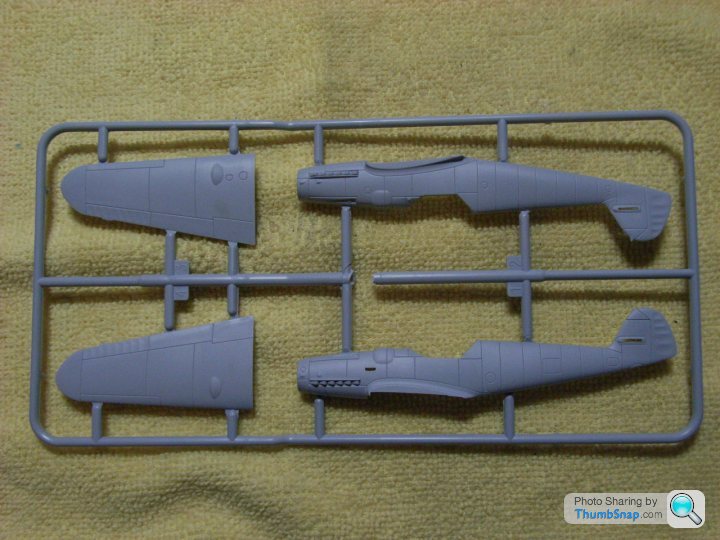
On the plus side, the G sprues have a couple of variants as there's a second canopy (larger glass area); the field fit 20mm cannon pods or (what look like) rocket packs for the wing hard points; choice of midline bomb or tank; and an extra air intake with the oversize tropical air filter. Stuff for the spares box.
All very simple and I'm a rank amateur builder, but would a build thread be of interest?
Any ideas on the cockpit? Copy from the E? I really bought the kit for the Swiss paint scheme, but know it'll bug me looking through the canopy and out the radiator vents...
* A02029A, 109G-6 planned to do in Swiss colours
* A55106, 109E-3 'Starter Kit'
Why two? Well I ordered the G and got the E, so was sent the G (and didn't need to return the E; the postage was probably more than the kit). Thumbs up for Deanos Games' customer service.
-- The E
The E looks very similar to that built by dr_gn a couple of years back:
http://www.pistonheads.com/gassing/topic.asp?h=0&a...
It will be interesting to see if they've improved the alignment.
-- The G
However, looking at the G, it's stripped right back with a one piece canopy and no cockpit tub, just a man (gripping fresh air) on a seat. To me it would be more suitable for the starter kit than the E.
On the plus side, the G sprues have a couple of variants as there's a second canopy (larger glass area); the field fit 20mm cannon pods or (what look like) rocket packs for the wing hard points; choice of midline bomb or tank; and an extra air intake with the oversize tropical air filter. Stuff for the spares box.
All very simple and I'm a rank amateur builder, but would a build thread be of interest?
Any ideas on the cockpit? Copy from the E? I really bought the kit for the Swiss paint scheme, but know it'll bug me looking through the canopy and out the radiator vents...
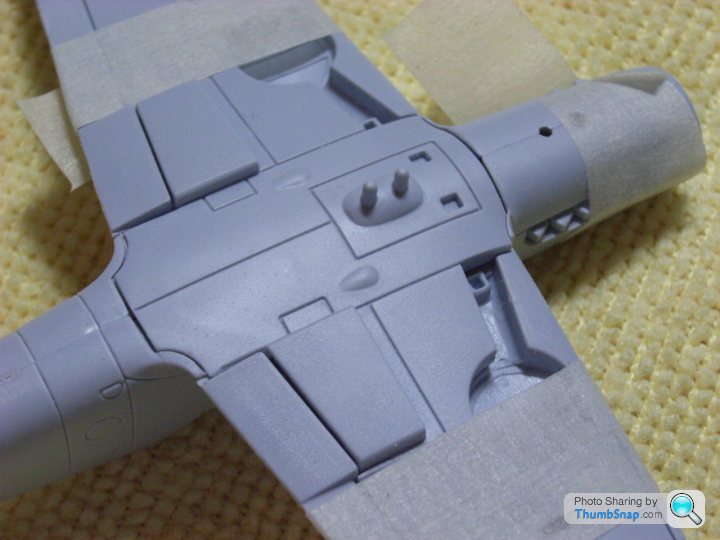
Thanks for all the feedback. Had a longer look and agree that the G is poor - there's almost no detail beside the trough panel lines. Not even a rivet in sight - is it actually an Airfix kit?
After some thought, I have decided to do the G for practice straight out-of-box with a simple splinter pattern from the E starter kit, and then use the E with the Swiss decal pack for effect where I can use positionable flaps, cockpit detail, etc. with some recent experience in my hands. (Dug out my Miliput and it had gone off - it was £1.65, so that gives some idea how long I've had it. At least it wasn't priced in psd.)
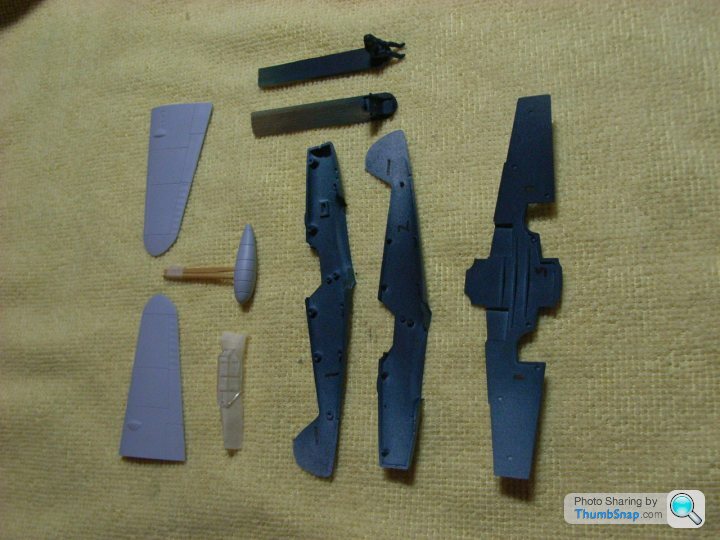
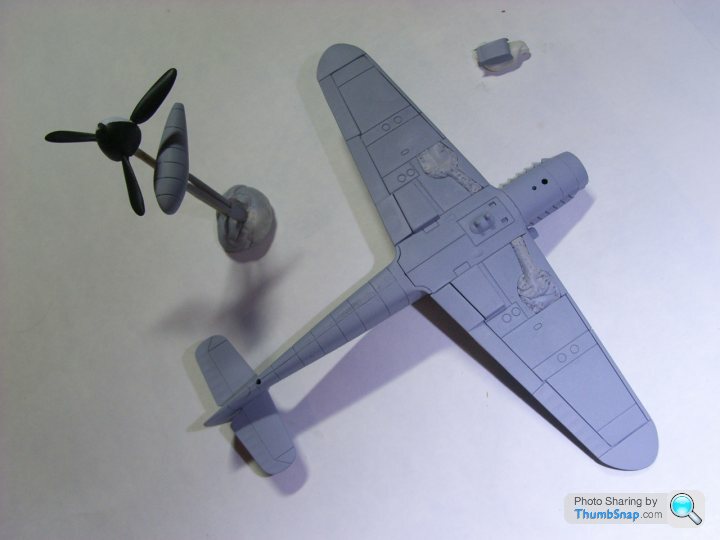
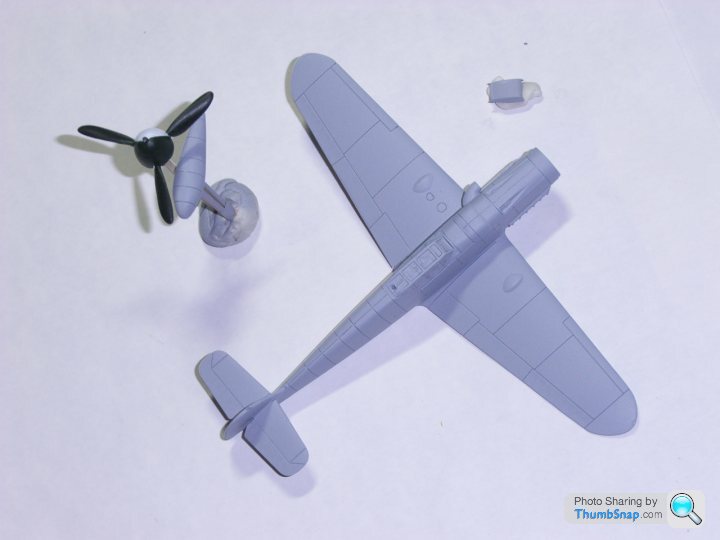
Here are some G sprue shots:
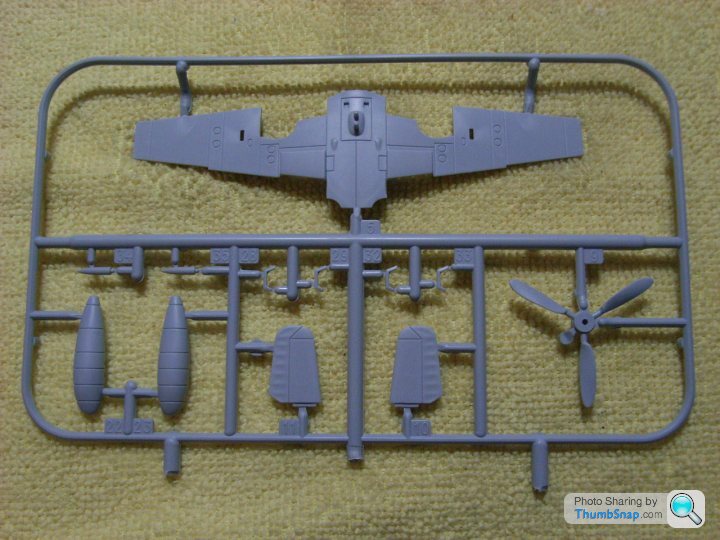
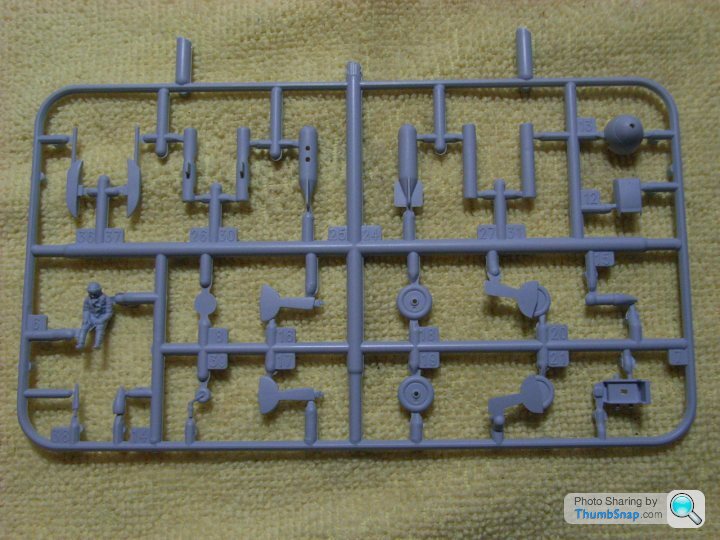
The tyres are featureless, so wheels up seems likely. Should mention the internal cockpit detail - ejector pin marks:

After some thought, I have decided to do the G for practice straight out-of-box with a simple splinter pattern from the E starter kit, and then use the E with the Swiss decal pack for effect where I can use positionable flaps, cockpit detail, etc. with some recent experience in my hands. (Dug out my Miliput and it had gone off - it was £1.65, so that gives some idea how long I've had it. At least it wasn't priced in psd.)
Here are some G sprue shots:
The tyres are featureless, so wheels up seems likely. Should mention the internal cockpit detail - ejector pin marks:
I'll try the water - nothing to lose.
Paint will be aerosol primer and then brushed acrylics (from the starter kit plus Citadel if they're still liquid).
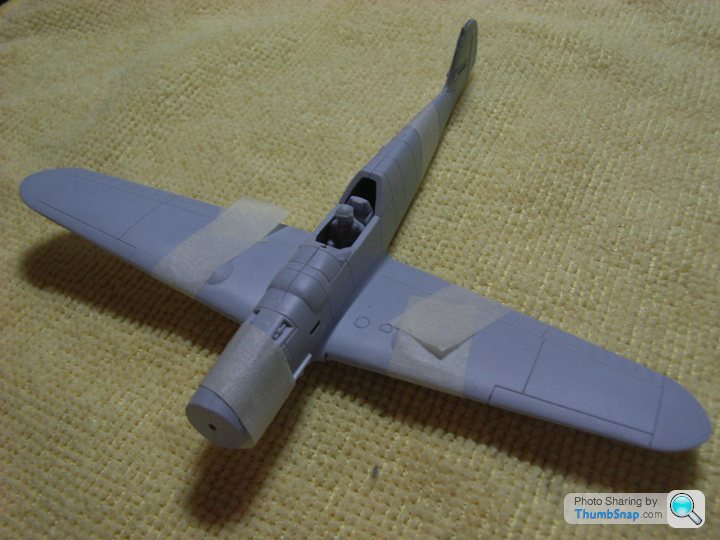
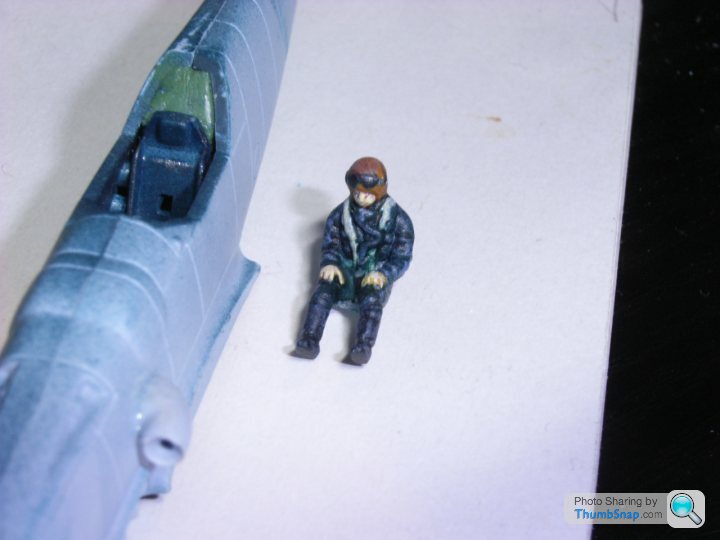
Here's progress so far, dry-fitted the fuselage, pilot and wings.
* Gates were pretty big and needed a fair bit of care (so I'll have to be extra careful on the more delicate parts).
* Some flash on the leading wing edge (and pilot).
* Had to drill out the four seat mount points, but that has fitted in snugly now.
* Panel fit has been OK - wing roots surprisingly good, just the underneath wing/fuselage joins that need some filler.
* Question about the fuselage centre-line - should it be shown on both top and bottom? Box art/paint scheme has one running along the top of the engine cowling, very faintly behind the pilot but not underneath.
Paint will be aerosol primer and then brushed acrylics (from the starter kit plus Citadel if they're still liquid).
Here's progress so far, dry-fitted the fuselage, pilot and wings.
* Gates were pretty big and needed a fair bit of care (so I'll have to be extra careful on the more delicate parts).
* Some flash on the leading wing edge (and pilot).
* Had to drill out the four seat mount points, but that has fitted in snugly now.
* Panel fit has been OK - wing roots surprisingly good, just the underneath wing/fuselage joins that need some filler.
* Question about the fuselage centre-line - should it be shown on both top and bottom? Box art/paint scheme has one running along the top of the engine cowling, very faintly behind the pilot but not underneath.
Quick status update:
* Drop tank made, smoothed and re-scribed.
* Canopy masked up (followed method on Swanny's Models, but without Future). Hope it's worth it!
* Removed the ejector pin marks that were plum in the middle of the cockpit sides.
* Cockpit interior and pilot primed (in Citadel Incubi Darkness - a dark turquoise/grey). A second coat + matt varnish on the sides should be sufficient for the interior as there's no other detailing. In hindsight I'd have masked the outer parts of the lower wing to avoid contaminating the areas I'll want to glue later. In double hindsight I'd have done that first (before the canopy) so I'd have got the second coat done tonight.
ETA: Note about Humbrol 92. This is discontinued, but is "Matt black green" or "Flat iron grey"; Humbrol recommend 32 as a possible alternative. The Incubi Darkness was my closest match.
Edited by sad61t on Friday 23 January 08:46
Last night's insomnial activity was to clean up the overspray; this highlighted the ejection pin marks on the mating surfaces of the wings and tail. I cleaned these up with a chisel edge blade and then a sanding block; the fit is noticeably improved over Wednesday's fit - would recommend it if you make this kit.
Planning to put on a second coat of primer this morning so it's dry for this evening. Then I'll be ready to paint the seat and pilot and be ready to glue the fuselage.
Planning to put on a second coat of primer this morning so it's dry for this evening. Then I'll be ready to paint the seat and pilot and be ready to glue the fuselage.
Hi all, been busy the last couple of days so it doesn't look like a lot:
* Painted the pilot and seat.
* Couple of matt varnish coats on the cockpit interior.
* Fitted the air intake.
* Scribed a tread pattern into the wheels.
Pilot took a while as it had some shading and highlighting applied (alas the right hand is just a misshapen lump), and a little bit of weathering on the seat's edges.
Edited by sad61t on Saturday 24th January 23:26
dr_gn said:
If you did want to add anything to the cockpit, you could add the angled rear bulkhead that fits in the fuselage behind the pilots head. The void that's currently there might be visible through the glazing. A simple bit of plastic might also be simple enough to make for an instrument panel.
Ahm, probably not. Had a go and got close but then it slipped through my fingers at about 100 fps, rattled off something and went over the event horizon. Spent two hours searching to no avail, literally turning furniture on its side by the end. I did find a library card I lost two years back and uncovered a Badger 250-1 airbrush (so old the vinyl hose is sticky to touch, but the can 'Contains CFC' still has pressure and it actually works, with water). Anyhow, think I'll stick to OOB, otherwise I could be here some time.Off to get the room in some semblance of order...
Info on the painting of the seat and pilot.
All paints are Citadel unless otherwise stated.
Both were primed in Incubi Darkness x2, painted, then finished with Purity Seal (satin varnish)
Seat:.
Highlighted in S.Polly Titanium (maybe, the label is too smudged to read, it's darker than the Pewter)
Washed in blue ink.
Pilot face and hands:
Bronze flesh, Flesh wash, then bleached bone highlights.
Harness:
straight bleached bone. The paint scheme has them as leather, but from pictures it looks a much paler webbing strap.
Uniform:
Highlighted in Elf Grey, washed in blue/black ink.
In hindsight a base of Enchanted Blue might have given a better match.
Boots:
Chaos black base coat, highlighted in Elf Grey and a darker blue/black wash.
Helmet:
Snakebite Leather, several attempts at washes but couldn't get a good effect. Ended up with just highlights in Bronze Flesh. I went with the paint scheme black for the goggles, though that seems unlikely for the time.
Edited by sad61t on Sunday 25th January 21:17
Hi Jamie,
Thanks for the feedback, agree the colours are lacking subtlety, to be polite. Mostly cost as I have a drawer full of decades old paints, including some Humbrol 30 circa 1980, that I thought I'd use up as I got back into the hobby. If I mess up a technique at least it's not new money down the drain, except the odd fiver for a model or two to work on. There's a few pots and cans gone straight in the bin, and I'll replace with new as necessary.
My attempts from my distant youth were truly shocking (spotted one Sabre in the back of a drawer at my parents' place this Christmas that looked like I'd applied the paint with a trowel). With the internet there's so many tips and videos for reference that I might get vaguely close to how I wanted them to look, given practice.
Hopefully I'll improve (wouldn't be difficult) but equally the bar seems to have been raised since squeezy glue and following the call-out was sufficient.
We probably spend longer painting the models than the fitters did, and repairs would have been carried out in all weathers, day and night with whatever paint they could get hold of. I'd imagine there'd be fifty shades of green, from various manufacturers and formulations, all marked "RAF Dark Green". A far cry from the Sunday Best that dr_gn is busy replicating on his (superb) Dambuster flypast Tornado.
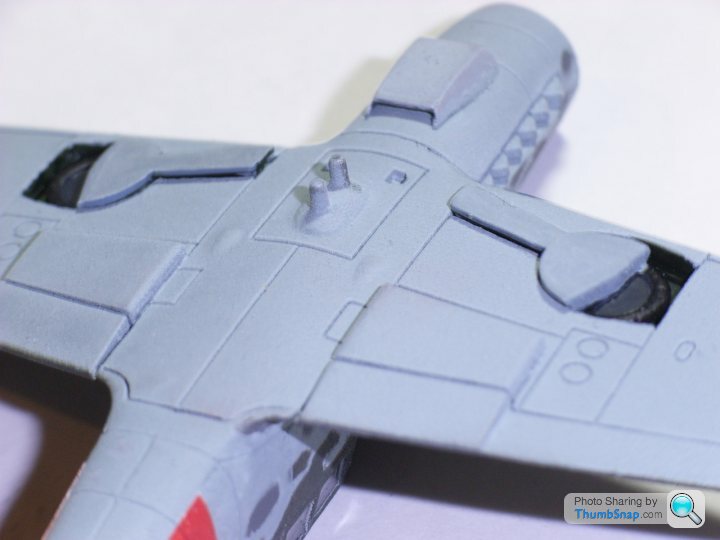
Anyhow, back on topic - I've had a second go at the pilot, bonded the fuselage halves and added a rear bulkhead in putty (never did find the plastic scratch one).
Anyhow, back on topic - I've had a second go at the pilot, bonded the fuselage halves and added a rear bulkhead in putty (never did find the plastic scratch one).
Assembled, rescribed and primer applied.
Not entirely happy with the edge on the prop boss - the coverage of the white was dire, taking five coats and leaving a ridge at the mask line. Cleaned it up but it's not as crisp as I'd hoped.
I've also filled the two slots in the wing for the auxiliary cannon pods (as the scheme I'm planning doesn't have them fitted). That and a couple of other places indicate I need a finer grade emery board. Any suggestions?
Next step is an all over coat of 247 Lichtblau (bought 245/6/7 as the coverage of the Humbrol is way better than my decade old Citadel, although Elf Grey is a very close match - needs a touch of blue).
dr_gn said:
It all looks very neat to me. Re. the emery board - have a look at the nailcare (or whatever its called) section at a supermarket - they should have all grades bonded to a flexible plastic backing.
How come you didn't paint the spinner white first, then the black? For most grey to white stuff I use Tamiya white primer. In this case a couple of coats might have been enough for the final finish.
Thanks for the info, I'll wander into Boots and pretend I'm David Bowie.How come you didn't paint the spinner white first, then the black? For most grey to white stuff I use Tamiya white primer. In this case a couple of coats might have been enough for the final finish.
Re spinner - lack of experience. In hindsight, white first on the light grey primer would have been the better order.
This is very much a learning process, and painting is my weakest point.
Hi all, got hold of a nail smoother sponge from Boots £2; 4 sides, about 4" long by 1" square with different grades on each side. Works well, and the abrasive strips are glued on separate 1mm backing so peel off if you need good access to fiddly areas.
Done an overall coat in 247 Lichtblau but it was so close to the grey primer that I can't tell the difference! Over thinned the paint - it worked on the starboard wing, but the port wing is blotchy - weird as it was the same mix at the same time. External mix syphon feed air guns are not consistent (said the operator, blaming his tools).
Also, masked up and ready for 246 Grauviolett; I'll then do the 245 Graugrun splinter over the top. My first attempt using tacky stuff for soft edged camouflage. [Note to self - need to fill the aerial hole.]
Hi dr_gn, tried to mask the leading edge, but it seeped in a couple of places and will need a touch up.
Very basic airbrush setup with 246 applied:
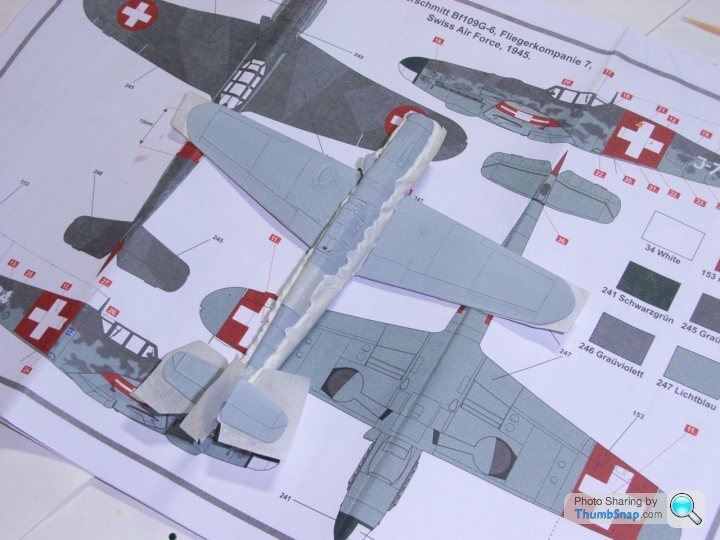
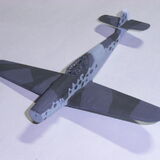
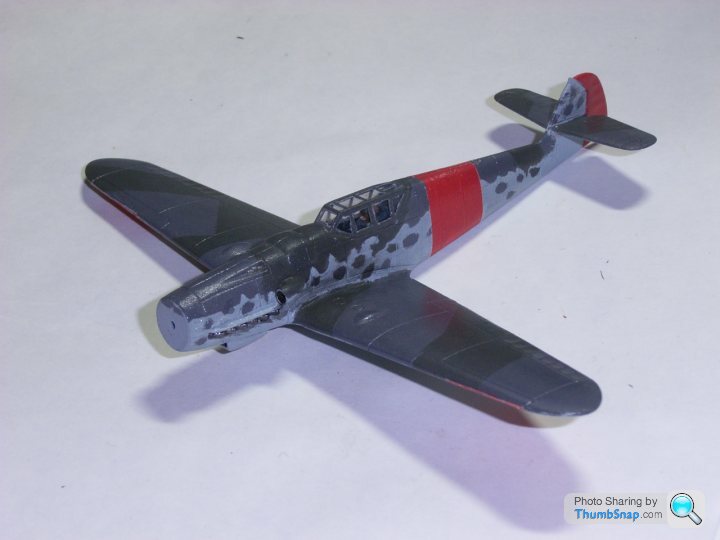
Here's the main camouflage pattern complete, with just the red areas for the insignia to go (white base coat already applied to the rudder). If I'm feeling super brave, might try masking the Swiss crosses instead of using the decals.
Thinking a clear coat at this point might be a good idea?
Very basic airbrush setup with 246 applied:
Here's the main camouflage pattern complete, with just the red areas for the insignia to go (white base coat already applied to the rudder). If I'm feeling super brave, might try masking the Swiss crosses instead of using the decals.
Thinking a clear coat at this point might be a good idea?

I know  - not a major hurdle, it was more frustration at what I thought would take a couple of minutes turning into the rest of the evening. It's the first really bad fit on the whole kit.
Have filed to fit, both on the sides and reducing the thickness, and took off the locating lug. They now fit, but need repainting as the grey flaked off in a couple of places.
- not a major hurdle, it was more frustration at what I thought would take a couple of minutes turning into the rest of the evening. It's the first really bad fit on the whole kit.Have filed to fit, both on the sides and reducing the thickness, and took off the locating lug. They now fit, but need repainting as the grey flaked off in a couple of places.
Edited by sad61t on Thursday 12th February 10:23
Experimenting with shadowing the panel lines (all previous have been raised panel lines), so tried the drop tank first:
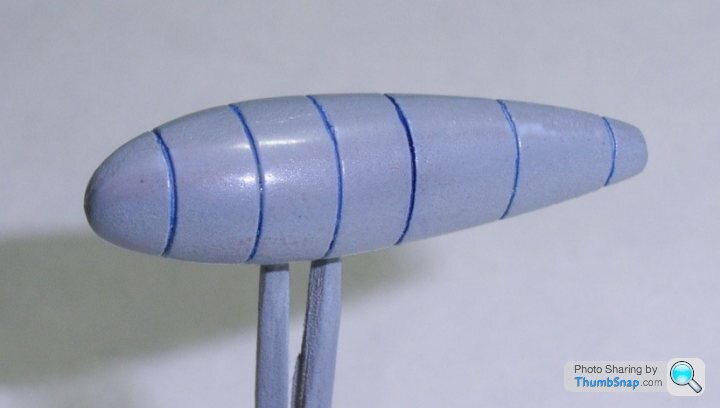
This is blue ink on the "247 Lichtblau". After the first line (centre band) I thinned it, but still looks a little brilliant for shadow. The extreme zoom exacerbates the effect, but what's your opinion? Suggestions for wash colour welcome.
This is blue ink on the "247 Lichtblau". After the first line (centre band) I thinned it, but still looks a little brilliant for shadow. The extreme zoom exacerbates the effect, but what's your opinion? Suggestions for wash colour welcome.
Edited by sad61t on Saturday 21st February 12:04
Gassing Station | Scale Models | Top of Page | What's New | My Stuff