Model Railway - Digwell Junction
Discussion


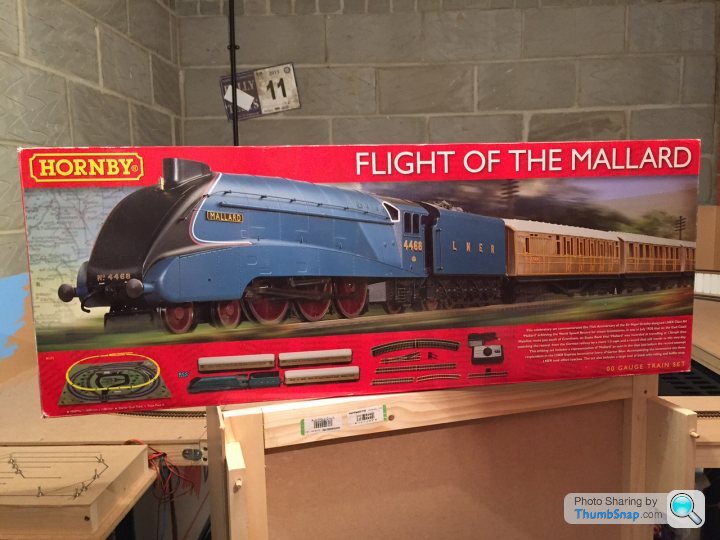
Last Christmas I opened a large present from Mrs RacingPete and to my surprise it turned out to be this...
Having been a bit into model railways when younger this got me into thinking, and as I had a little bit of spare space in the garage I decided to get building. I have always liked the turn of steam into diesel (plus the cars and planes can still be interesting then too) so mid '60s for the theme of the layout.
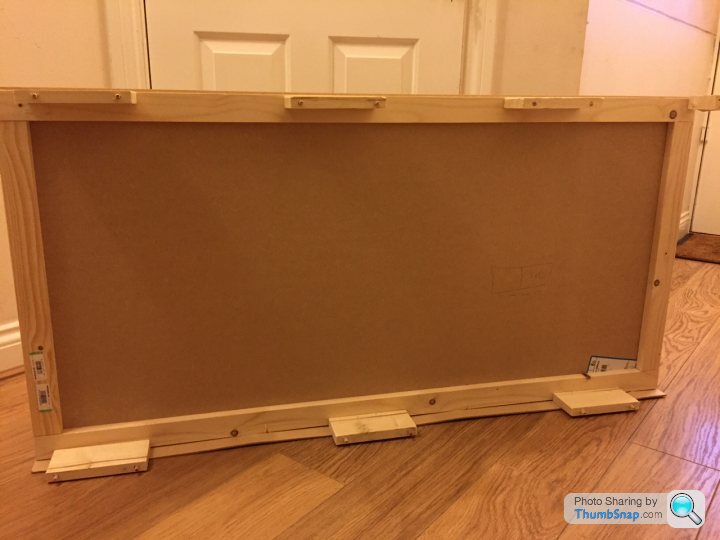
So have built a couple of baseboards, stuck to 4' x 2' boards 9mm thick so that they don't warp as much (or hopefully none at all), the picture below shows before a middle brace was put in place.
The idea is to have an oval (so the kids can at least drive a train round without running off the end of the track), and then to have an industrial area (a small brewery) and a branch line up to a town terminus.
This will hopefully allow for a bit of operational interest across the railway, as well as giving lots of opportunity to add different models into the scene (of cars and planes). The industrial area will be a variation of the shunting puzzle Inglenook Sidings, which is like a hanoi tower but with trucks. Then the branch will be an out and back line, to the oval below.
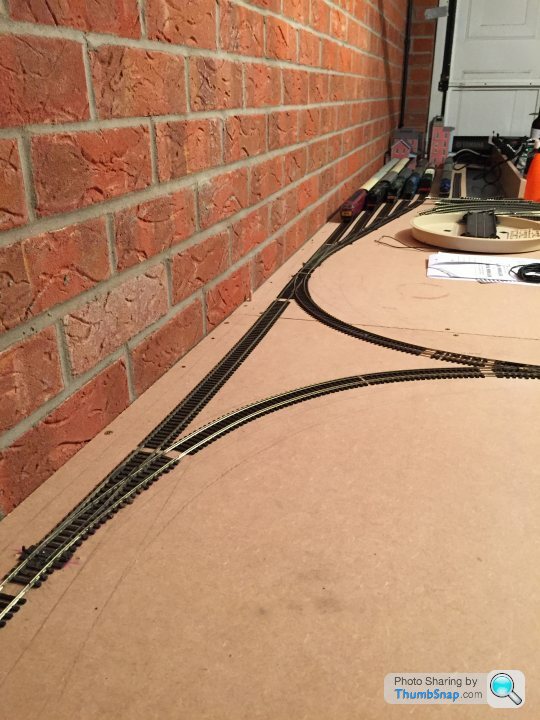
I toyed with having a twin line oval, but want the modelling to be key, and not just have a load of track and not space for the other stuff... so after a few spare evenings have laid the track for the lower level (just can't see the right hand side)
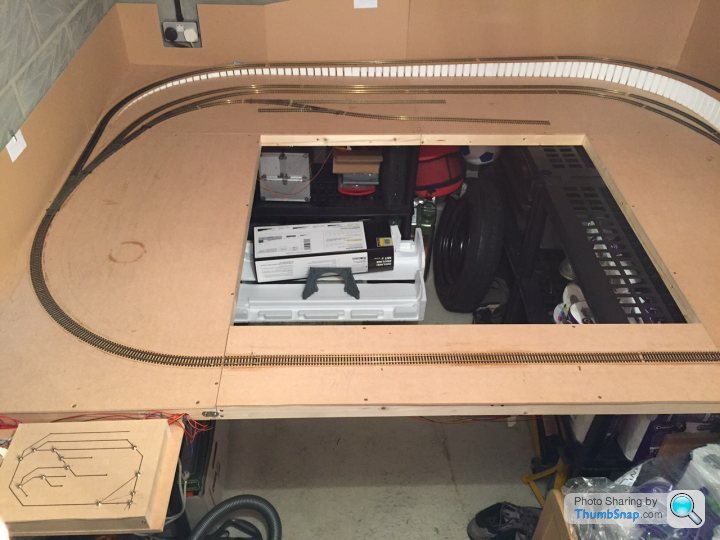
On the far side is a lower level station - I am not sure about this area, and may redo the track. The idea was to have a twin line station, with a goods area, and maybe some cattle/coal drops... need to mock it up to see if I really like it.
I have to get to the parents house to pick up some of the older models, but these are the current collection...
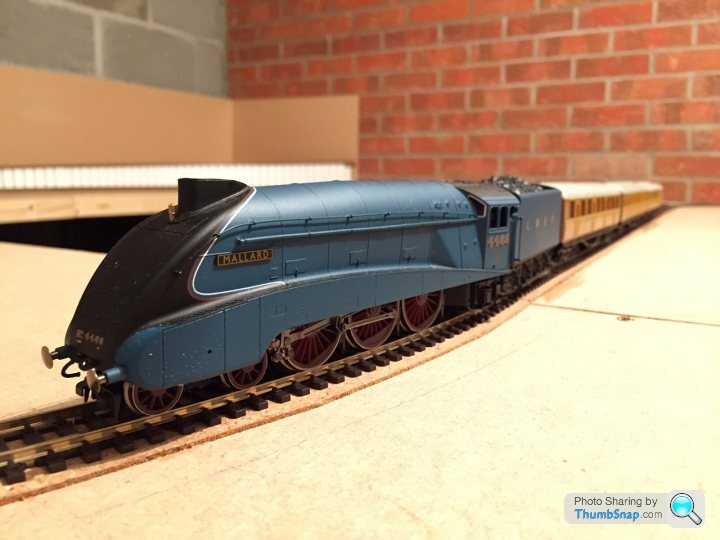
First the Hornby A4 Mallard that came in the set
My Dad, who grew up in the South got me a second hand finescale Hornby Merchant Navy Clan Line, which is a superb little model

At the moment I am going to leave them as they are, but will put some weathering on at a later date.
This is only the beginning and hopefully will keep this thread up to date as I go along.
Having been a bit into model railways when younger this got me into thinking, and as I had a little bit of spare space in the garage I decided to get building. I have always liked the turn of steam into diesel (plus the cars and planes can still be interesting then too) so mid '60s for the theme of the layout.
So have built a couple of baseboards, stuck to 4' x 2' boards 9mm thick so that they don't warp as much (or hopefully none at all), the picture below shows before a middle brace was put in place.
The idea is to have an oval (so the kids can at least drive a train round without running off the end of the track), and then to have an industrial area (a small brewery) and a branch line up to a town terminus.
This will hopefully allow for a bit of operational interest across the railway, as well as giving lots of opportunity to add different models into the scene (of cars and planes). The industrial area will be a variation of the shunting puzzle Inglenook Sidings, which is like a hanoi tower but with trucks. Then the branch will be an out and back line, to the oval below.
I toyed with having a twin line oval, but want the modelling to be key, and not just have a load of track and not space for the other stuff... so after a few spare evenings have laid the track for the lower level (just can't see the right hand side)
On the far side is a lower level station - I am not sure about this area, and may redo the track. The idea was to have a twin line station, with a goods area, and maybe some cattle/coal drops... need to mock it up to see if I really like it.
I have to get to the parents house to pick up some of the older models, but these are the current collection...
First the Hornby A4 Mallard that came in the set
My Dad, who grew up in the South got me a second hand finescale Hornby Merchant Navy Clan Line, which is a superb little model
At the moment I am going to leave them as they are, but will put some weathering on at a later date.
This is only the beginning and hopefully will keep this thread up to date as I go along.
I have been having a play with ballasting the track in the last few nights.
The process I am using is the standard one found online.... that is:
Both Woodland Scenic - but Ballast Grey Medium Blend (on the left) and Grey Fine Ballast (on the right)
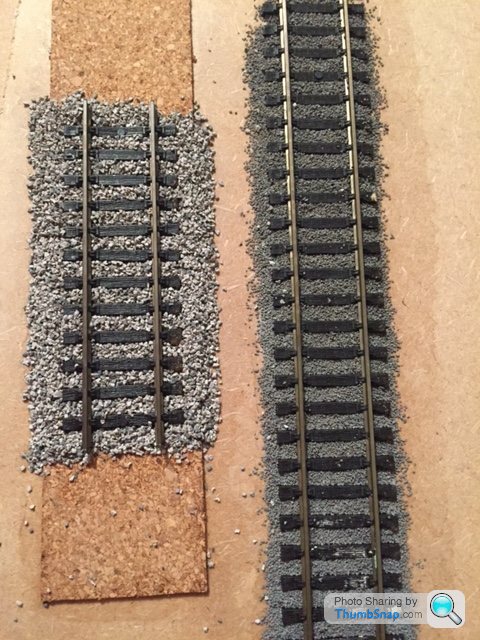
And a close up (a little blurred)

Now I did put the cork underlay on the medium ballast, as that is a better representation of what I have on the layout - but though I think the fine is more scale appropriate the medium looks better.
Also the colours can be weathered at a later date for heavier use lines, or at stations where the trains will be waiting for periods.
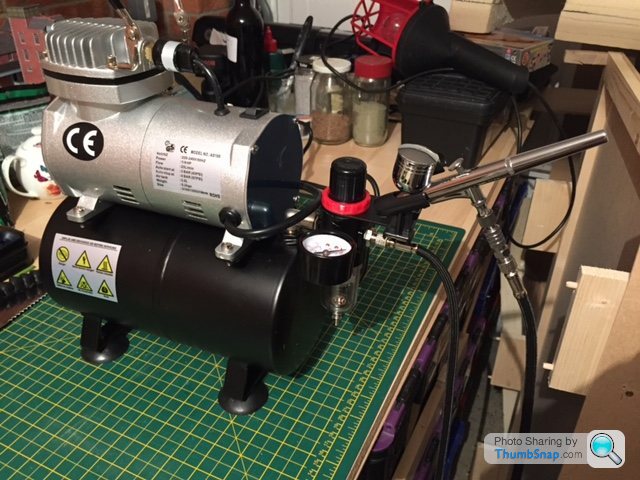
... and on to weathering and painting, this little thing turned up from Hong Kong (so hopefully) will get to play with it this weekend on some cheap test models I bought - first go at airbrushing so could be a complete disaster.
The process I am using is the standard one found online.... that is:
- Lay down the ballast on the track and move it using finger and brush so it is level, but not on the sleepers.
- Spray it with water (using a water spray container picked up from Tiger for 99p)
- Then once the ballast is soaking wet, add the glue
- For the glue, it is 50% PVA (Hobbycraft stuff, though Wickes wood glue equally good) and 50% water, and then a very small drop of washing up liquid, all mixed together.
- I use a shringe to pull the glue mix out of a bowl and place into the centre of the rails
- The wet ballast, and the washing up liquid help to reduce surface tension and draw it into the ballast
Both Woodland Scenic - but Ballast Grey Medium Blend (on the left) and Grey Fine Ballast (on the right)
And a close up (a little blurred)
Now I did put the cork underlay on the medium ballast, as that is a better representation of what I have on the layout - but though I think the fine is more scale appropriate the medium looks better.
Also the colours can be weathered at a later date for heavier use lines, or at stations where the trains will be waiting for periods.
... and on to weathering and painting, this little thing turned up from Hong Kong (so hopefully) will get to play with it this weekend on some cheap test models I bought - first go at airbrushing so could be a complete disaster.
MysteryLemon said:
I much prefer the look of the ballast on the left. I think the right looks too fine and uniform. It may be more true to scale but just doesn't look right to me.
Maybe a better mix of colour for the stuff on the right would look better? But otherwise, left ballast all day long.
I agree... it does look much better.Maybe a better mix of colour for the stuff on the right would look better? But otherwise, left ballast all day long.
Doing some maths to see how big the ballast would be if scaled up to real life, the prototype standard gauge on British track is 1,435mm. On OO gauge the track width is 16.5mm (which is 1:86 - which is why HO is more accurate for models, but OO gauge is always at 1:76).
So there are probably 20 stones that would sit in between the rails if they were placed side by side, so each ballast stone is let's say 0.825mm in size.
So scaled up they would be:
HO - 71.0mm
OO - 62.7mm
As appose to the fine ballast on the right, with 40 stones in between and thus the following real size stone:
HO - 35.5mm
OO - 31.4mm
Having done some research, ballast on UK railways vary from 12.7mm to 50.8mm in prototypical form - so as I am using OO scale, the larger ballast is not that far off the top range of UK ballast.. so will go for that!
As I continue my learning across all the things needed to build a model railway I have been sorting out the electrics for the line.
The first thing I have tackled is to electrify all the points so that they can be controlled from a central control panel, which will save jumping into the middle of the track when operating and having to manually change them all. Even more important for the parts that are going to go underneath the upper level.
I have picked up my old controller from my parent's house, along with some more of the old rolling stock, so will get some pics of those up soon. The controller is a Gaugemaster dual controller, but has an additional AC power output separate to those controlled by the dials (for accessories).
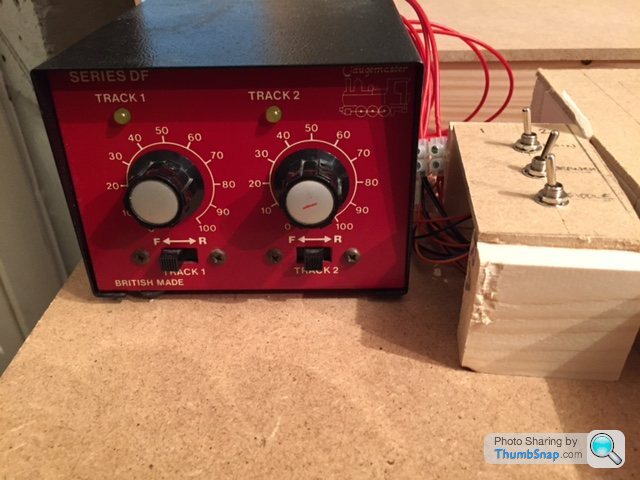
Therefore I have bought a lot of these to work off the AC power, along with a CDU.
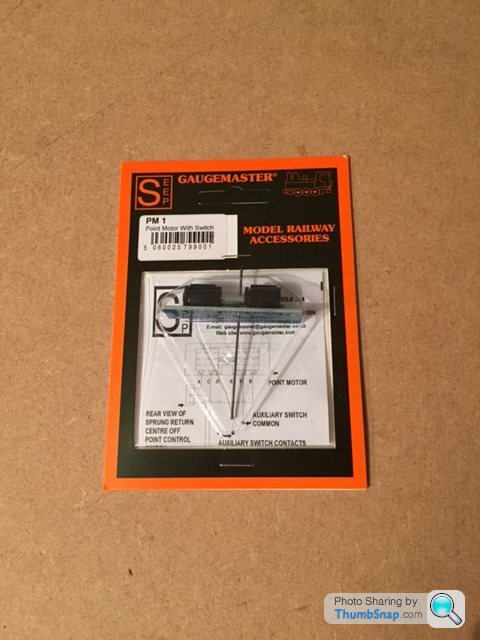
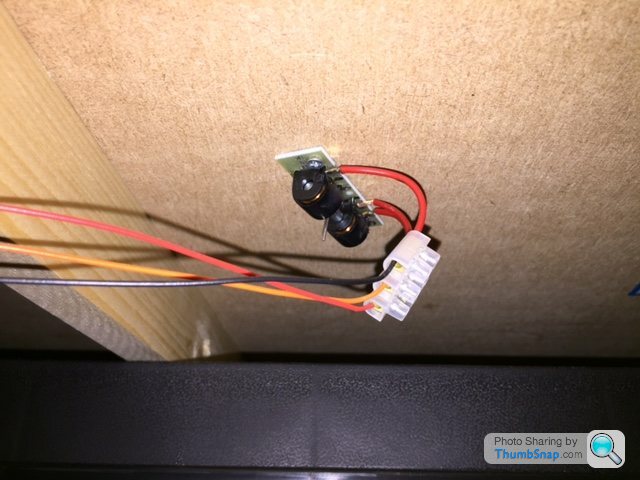
These then fit under the baseboard where the point is, and the wires go to a centre sprung on/off/on switch in my main control board. As I am using insulfrog points (this means the inside V part of the point is plastic to stop short circuiting when the point is changed) then I have not wired up the rest of the parts of the Point Motor. This is it fitted underneath.
So the box that then controls all these points I designed on a square grid to represent the track layout.
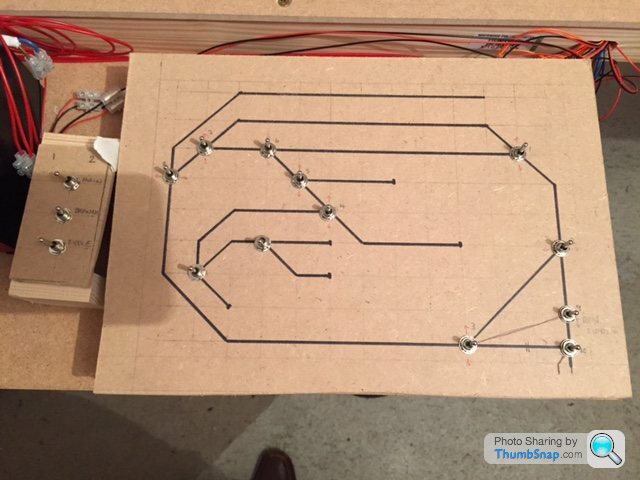
This is only representing the track on the lower level, and if you notice on the right I have got the points for the fiddle yard which I am building at the moment - as I designed this part after it has an extra switch, so might redo this box to make it a little neater at a later date.
The other part of the wiring was setting up what part of the track is powered by the controller. After visiting a model fair at the weekend I decided to look at having each section of the track (so currently set as main circle, branch line up the hill, fiddle yard) to all go through a central control box. This then decides which feed from the controller is active on that part of track.
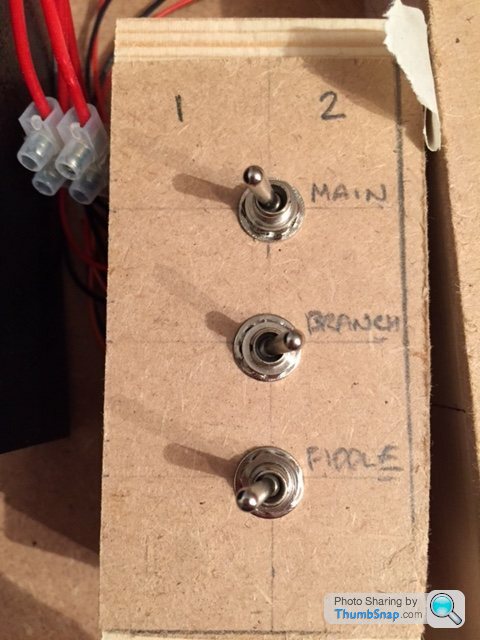
This then allows me to run a train around the main circle and up the branch line using the same controller all the way, or to allow me to run a train up and down the branch line, or move things around in the fiddle yard, without effecting a train circling on the main line.
All the control boxes are a little prototype, so once I am happy and have decided how many sections of the track I will operate I can then get the control boxes a bit better quality finish.
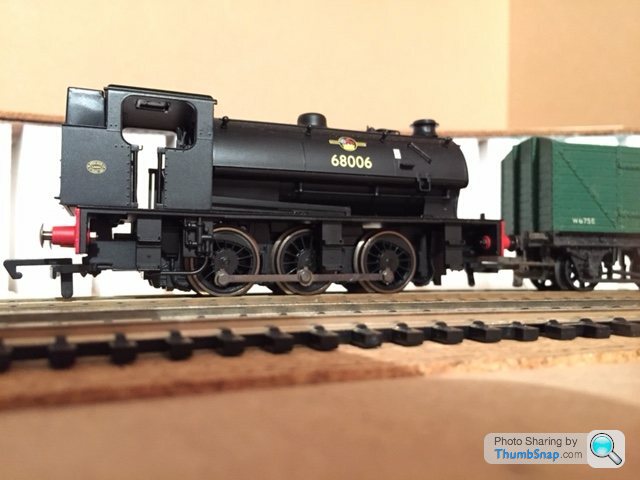
Also the wife has bought me another present for the line, a little LNER J94 tank engine... it is nicely geared so that you can't drive it round at stupid speeds and thus is very good at slow shunting - will be perfect for the inland industrial part that I will get onto.
The first thing I have tackled is to electrify all the points so that they can be controlled from a central control panel, which will save jumping into the middle of the track when operating and having to manually change them all. Even more important for the parts that are going to go underneath the upper level.
I have picked up my old controller from my parent's house, along with some more of the old rolling stock, so will get some pics of those up soon. The controller is a Gaugemaster dual controller, but has an additional AC power output separate to those controlled by the dials (for accessories).
Therefore I have bought a lot of these to work off the AC power, along with a CDU.
These then fit under the baseboard where the point is, and the wires go to a centre sprung on/off/on switch in my main control board. As I am using insulfrog points (this means the inside V part of the point is plastic to stop short circuiting when the point is changed) then I have not wired up the rest of the parts of the Point Motor. This is it fitted underneath.
So the box that then controls all these points I designed on a square grid to represent the track layout.
This is only representing the track on the lower level, and if you notice on the right I have got the points for the fiddle yard which I am building at the moment - as I designed this part after it has an extra switch, so might redo this box to make it a little neater at a later date.
The other part of the wiring was setting up what part of the track is powered by the controller. After visiting a model fair at the weekend I decided to look at having each section of the track (so currently set as main circle, branch line up the hill, fiddle yard) to all go through a central control box. This then decides which feed from the controller is active on that part of track.
This then allows me to run a train around the main circle and up the branch line using the same controller all the way, or to allow me to run a train up and down the branch line, or move things around in the fiddle yard, without effecting a train circling on the main line.
All the control boxes are a little prototype, so once I am happy and have decided how many sections of the track I will operate I can then get the control boxes a bit better quality finish.
Also the wife has bought me another present for the line, a little LNER J94 tank engine... it is nicely geared so that you can't drive it round at stupid speeds and thus is very good at slow shunting - will be perfect for the inland industrial part that I will get onto.
I haven't had much time in the garage over the last week, so not as much progress as I would like, but I have managed to get a few things done.
I continue to experiment with different techniques before applying to the layout, so this week I had a go at doing static grass. I picked up a static grass applicator at a model show a few weeks back, and also bought some 2mm long static grass (not sure on the colour of it though), but I do like the effect - much better than just normal grass scatter.

I have also started on some of the scenery as I don't want the track to be just a flat layout and have some contours in it.
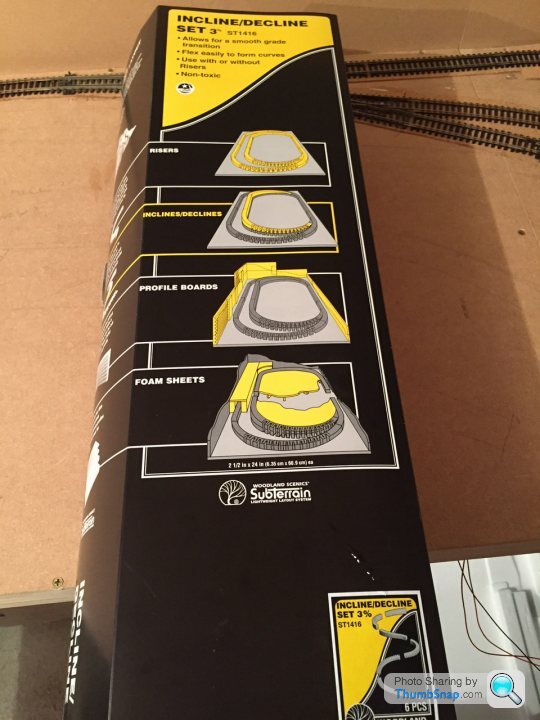
A few weeks back I put in the gradient up to the top section using Woodland Scenics incline, choosing 3% as that is the space I had to play with - testing with a few locos means all cope with 4 carriages on the back, with limited wheel spin, so happy with that... and if any issues then gives me chance to use a banker loco on it
This is the kit I used for the incline, which is just polystyrene cut so it can bend and comes in 6 parts... as shown on the box.
Now this is in place I have started on building up the hills around the edge, which links the top section to the ground level in a nice way. I am using Celotex in various layers and cut to shape to create the base for the lightweight hills and tunnels.
First the tunnels at the end of the station. The plan being to get the basic shape sorted and then chip off the celotex so that it is a smooth hillside with undulations, and the tunnel detailed underneath. Keeping it light means that I can remove it to still gain access, plus keeping it as one whole section to lift off.
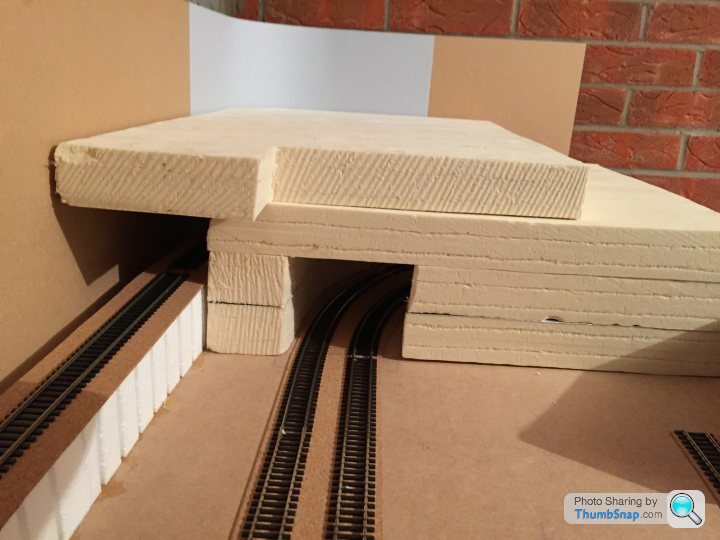
And then the other side of the track where it will be a cutting leading up to the tunnel.

Using Woodland scenics foam glue seems to do the job to stick the various layers of celotex together, but does take a little time to build them up.
I have also decided to put in a little river on the removable single track board section, so have cut out the baseboard and then added a new bit of wood to create the base for the river... which did let me have my first go with the airbrush - so much easier and nicer painting with an airbrush, can't wait to start using on other parts and models.
It is a bit rough, but will be covered up with the banking up to the main level.
Off to the parents this weekend, so hopefully will have a full stock roll call next week.... and thank you for all the comments so far (hopefully it will inspire)
I continue to experiment with different techniques before applying to the layout, so this week I had a go at doing static grass. I picked up a static grass applicator at a model show a few weeks back, and also bought some 2mm long static grass (not sure on the colour of it though), but I do like the effect - much better than just normal grass scatter.
I have also started on some of the scenery as I don't want the track to be just a flat layout and have some contours in it.
A few weeks back I put in the gradient up to the top section using Woodland Scenics incline, choosing 3% as that is the space I had to play with - testing with a few locos means all cope with 4 carriages on the back, with limited wheel spin, so happy with that... and if any issues then gives me chance to use a banker loco on it
This is the kit I used for the incline, which is just polystyrene cut so it can bend and comes in 6 parts... as shown on the box.
Now this is in place I have started on building up the hills around the edge, which links the top section to the ground level in a nice way. I am using Celotex in various layers and cut to shape to create the base for the lightweight hills and tunnels.
First the tunnels at the end of the station. The plan being to get the basic shape sorted and then chip off the celotex so that it is a smooth hillside with undulations, and the tunnel detailed underneath. Keeping it light means that I can remove it to still gain access, plus keeping it as one whole section to lift off.
And then the other side of the track where it will be a cutting leading up to the tunnel.
Using Woodland scenics foam glue seems to do the job to stick the various layers of celotex together, but does take a little time to build them up.
I have also decided to put in a little river on the removable single track board section, so have cut out the baseboard and then added a new bit of wood to create the base for the river... which did let me have my first go with the airbrush - so much easier and nicer painting with an airbrush, can't wait to start using on other parts and models.
It is a bit rough, but will be covered up with the banking up to the main level.
Off to the parents this weekend, so hopefully will have a full stock roll call next week.... and thank you for all the comments so far (hopefully it will inspire)
Yertis said:
Crikey – you're not hanging around are you? 
But won't this track configuration cause a short circuit?
This blog is making me do more on it so I can keep it updated, though I am mainly playing with techniques at the moment than putting anything permanent down But won't this track configuration cause a short circuit?
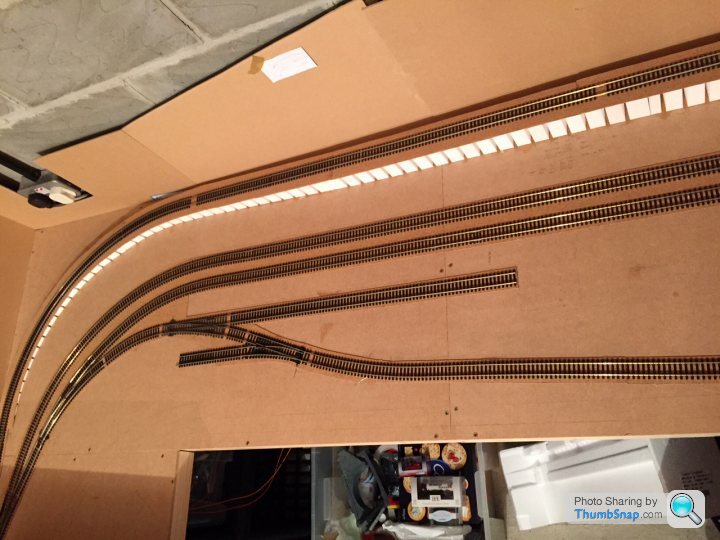
So the triangle is a run to the fiddle yard where I am going to put in 6 tracks off scene... It did require a bit of thinking on how to setup the electrics through the triangle, but I have a working solution now.
I have put isolated rail joints at the points on the main line circle to the fiddle yard, thus making sure that they do not short. Then have a separate feed to the whole of the fiddle yard at the beginning of the point on the right.
This means that if I run a train from the bottom I can set the main line feed, and the fiddle yard feed to the same controller and just drive them in and out.
If I need to drive a train in at the top of the triangle, then I set the mainline to one controller, and the fiddle yard to the other (and make sure that I have them set to opposite directions) - this then enables me to pass the mainline train to the fiddle yard.
The triangle will hopefully allow me to turn trains round to the opposite direction without having to touch them.
Has been a little slow progress during the last few weeks, with a mixture of summer holidays and family dos... but I have managed a little progress across the layout.
I have started on the fiddle yard area, which will sit under the main station across the right hand wall of the garage.
The first shot shows the triangle in place also, so that a train can leave on either direction - and also allows a train to be turned around without touching it
I have put 6 tracks in the fiddle yard and now wondering whether I need to put a run-around for the locos so that they can face the right way again, or just turn the whole train round using the triangle. The issue with using the whole triangle is that the train is not completely hidden when swapping directions (but I haven't decided if I care or not, as if I set up a running schedule I can always start with the trains the correct way round and reset at the end).
The 6 tracks (plus an extra one I was thinking about for where I could put the runaround.

If I extend the track to the right then I can get 5 coaches on the first two tracks, 4 coach trains on the next two and 3 coaches or goods trains on the last two.
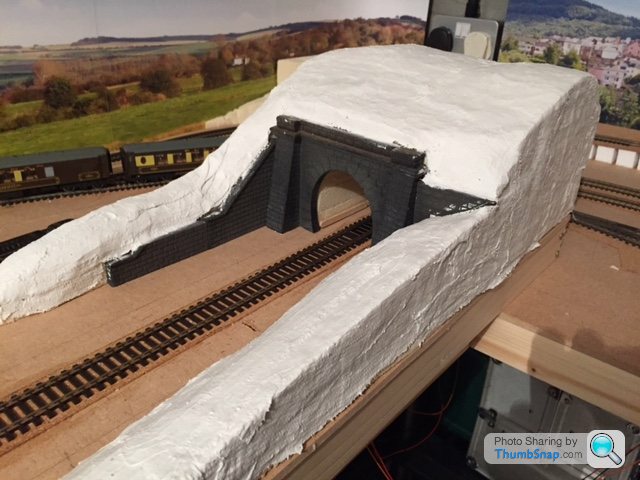
I have also continued a bit more with the tunnel section under the top board (which I also have built and put in place). Firstly adding the tunnel portal using some Wills scenic series brick sheets and flexing them into shape, as per the below photo.
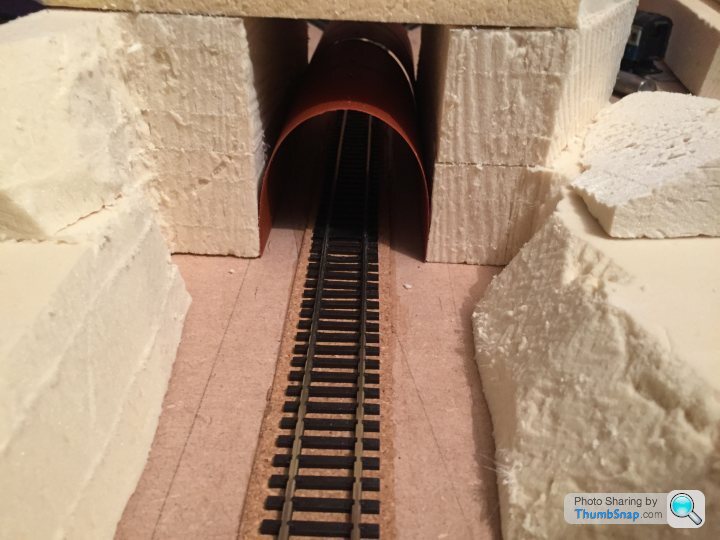
I then have carved out the Celotex a bit more and picked up a Gaugemaster tunnel portal to go on the front, though need to get a second one as the retaining wall on the right is the wrong way round (this won't be a waste as will use the same tunnel style on the other tunnels across the layout).
I will then cover the whole thing with plaster cloth to set hard and create the tunnel and cutting scene which leads down to the stream/canal (haven't quite decided on that yet)... and then the cutting will rise again the other side of the stream where I have put another scenic section with Celotex that will probably be the edge of a corn field (so I can stick in a harvest scene if I want).
As you can see from the fiddle yard shots above I have picked up some more of the trains from when I was younger from my parents, and will do something on the full stock list next.
I have started on the fiddle yard area, which will sit under the main station across the right hand wall of the garage.
The first shot shows the triangle in place also, so that a train can leave on either direction - and also allows a train to be turned around without touching it
I have put 6 tracks in the fiddle yard and now wondering whether I need to put a run-around for the locos so that they can face the right way again, or just turn the whole train round using the triangle. The issue with using the whole triangle is that the train is not completely hidden when swapping directions (but I haven't decided if I care or not, as if I set up a running schedule I can always start with the trains the correct way round and reset at the end).
The 6 tracks (plus an extra one I was thinking about for where I could put the runaround.
If I extend the track to the right then I can get 5 coaches on the first two tracks, 4 coach trains on the next two and 3 coaches or goods trains on the last two.
I have also continued a bit more with the tunnel section under the top board (which I also have built and put in place). Firstly adding the tunnel portal using some Wills scenic series brick sheets and flexing them into shape, as per the below photo.
I then have carved out the Celotex a bit more and picked up a Gaugemaster tunnel portal to go on the front, though need to get a second one as the retaining wall on the right is the wrong way round (this won't be a waste as will use the same tunnel style on the other tunnels across the layout).
I will then cover the whole thing with plaster cloth to set hard and create the tunnel and cutting scene which leads down to the stream/canal (haven't quite decided on that yet)... and then the cutting will rise again the other side of the stream where I have put another scenic section with Celotex that will probably be the edge of a corn field (so I can stick in a harvest scene if I want).
As you can see from the fiddle yard shots above I have picked up some more of the trains from when I was younger from my parents, and will do something on the full stock list next.
lufbramatt said:
Great progress so far. We used those Seep under baseboard point motors on a layout years ago, and found eventually they would destroy the mechanism on the points as they are quite fierce. I think the flexing of the tie bar would make the little spring pop out and the bits of rail that move would go floppy. Not sure if they have improved the design of the points at all as it was a few years ago, but it made the model railway unusable as points are a pain to replace once they have been ballasted in 
I think the key is making sure they are aligned really well at 90 degrees to the track so you don't put any sideways force on the tie bar.
Interesting to know... thanks for that - might go and check all the angles tonight.I think the key is making sure they are aligned really well at 90 degrees to the track so you don't put any sideways force on the tie bar.
Edited by lufbramatt on Wednesday 19th August 09:08
I have used a mixture of new points and some I salvaged from a layout I built when I was 10 (so those are quite old), so the older ones may suffer in this case.

Only gradual progress on the layout recently, but have managed to get two jobs done that I have been looking forward to.
1 - The continuation of the hills and scenery around the layout
2 - The picture back scene
I am continuing with using Celotex insulation boards for forming the hills and scenery changes, which has been nice and easy to work with and allows for sanding down to get the contours I want. I will eventually put on the plaster on top when I am happy with the slopes and lines I want.
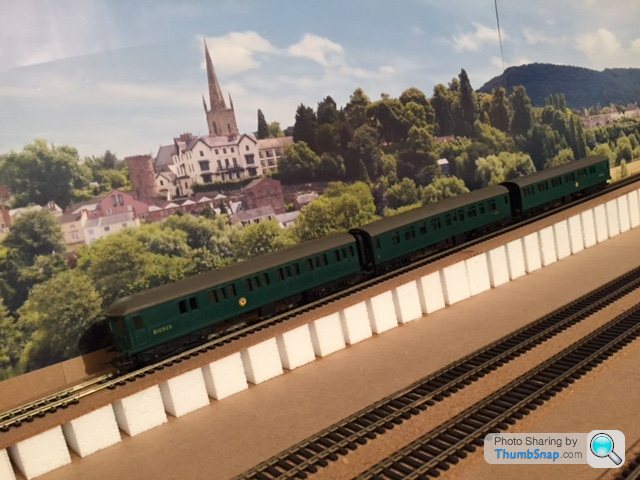
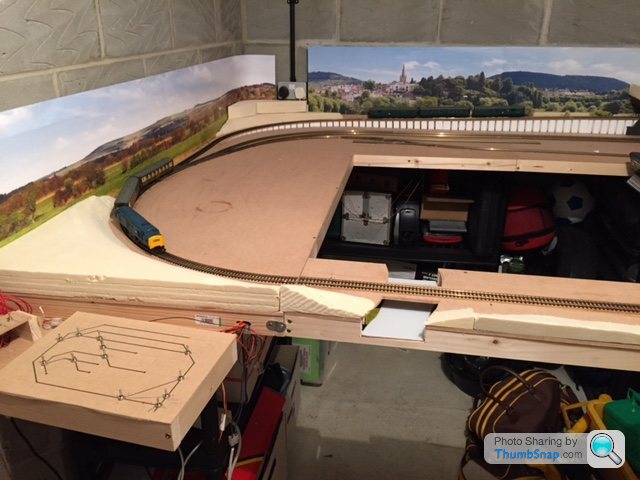
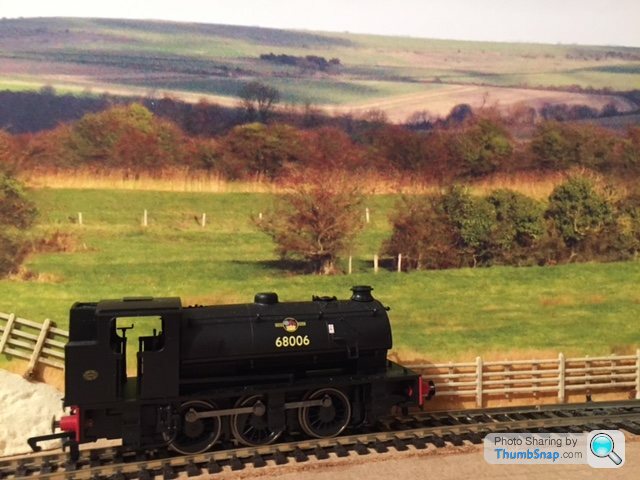
For the back scene I have used Gaugemaster photo back scenes, which I bought because I wanted a rolling hillside background. I am thinking Southern region around Wiltshire so wanted to represent the rolling hills of that region. Each one works well on their own...
A class 37 in front of the first back scene pulling a pullman special

And then the other back scene in front of the incline to the top level, with a (little out of era and location) class 4-sub
The issue I have with these back scenes is that they are from different seasons... now I do want to do late summer as my theme (harvest time in the fields etc), and if I combine the two in the overall view of the layout the colour difference is noticeable.
If I build up the hill at the transition point I might be able to get away with it and the difference of the two - or model two seasons in one layout, which could be fun... still undecided.
Hopefully now the kids are back in school and less hectic I can get some momentum up on this.
1 - The continuation of the hills and scenery around the layout
2 - The picture back scene
I am continuing with using Celotex insulation boards for forming the hills and scenery changes, which has been nice and easy to work with and allows for sanding down to get the contours I want. I will eventually put on the plaster on top when I am happy with the slopes and lines I want.
For the back scene I have used Gaugemaster photo back scenes, which I bought because I wanted a rolling hillside background. I am thinking Southern region around Wiltshire so wanted to represent the rolling hills of that region. Each one works well on their own...
A class 37 in front of the first back scene pulling a pullman special
And then the other back scene in front of the incline to the top level, with a (little out of era and location) class 4-sub
The issue I have with these back scenes is that they are from different seasons... now I do want to do late summer as my theme (harvest time in the fields etc), and if I combine the two in the overall view of the layout the colour difference is noticeable.
If I build up the hill at the transition point I might be able to get away with it and the difference of the two - or model two seasons in one layout, which could be fun... still undecided.
Hopefully now the kids are back in school and less hectic I can get some momentum up on this.
pherlopolus said:
I'm looking into the 3% inclines also, what did you place on top is it hardboard or a thin plywood?
I actually went for 1/8" thick cork cut to size and glued down on top of the Woodland Scenic risers, which made it much easier to cut correctly to size and place on the track... also keeps the track underlay consistent.I am going to weather the ballast on my track, so I think the lighter shade makes it easier to do that.
RobinOakapple said:
Here's a thought- any signmaker worth the name will have a BIG full colour printer that can print straight onto foamboard (and that comes in different thicknesses).
Take the pictures you want (or get them) and get the signmaker to print them out onto foamboard that is sufficiently flexible to bend around whatever curve you want it to, whereupon it will be stiff enough to stand up on its own.
I had a picture 1.5mtrs by 1mtr done that way, and it still looks good after several years.
Good idea... though I have tried to take the panorama type shot required and it isn't as easy as I first thought... really needs to be several pictures merged together taken from different viewpoints along a road to make sure there isn't a curve in a hedge or fence.Take the pictures you want (or get them) and get the signmaker to print them out onto foamboard that is sufficiently flexible to bend around whatever curve you want it to, whereupon it will be stiff enough to stand up on its own.
I had a picture 1.5mtrs by 1mtr done that way, and it still looks good after several years.
If anyone has any picture resources though for doing this, that would be great.
GreengiantPH said:
When ballasting, rather than use PVA which sets solid use Copydex in the same manner, pre wetting with water and a couple of drops of washing up liquid, mix Copydex 50/50 with water, drip on as per PVA. Takes about 4-5 days to finally go off but has the advantage you can pull up the track without wrecking it.
Interesting, I had not heard of doing that but makes sense. It sounds like a good idea, so trying to think of any downsides to doing this apart from the time to dry (which with my slow progress probably won't make that much difference).Does anyone have good sources for static grass?
With the nights drawing in and the summer trips out the way (plus the speed MysteryLemon is getting on with his Christmas Tree Project), I am going to start to step up the work on the railway.
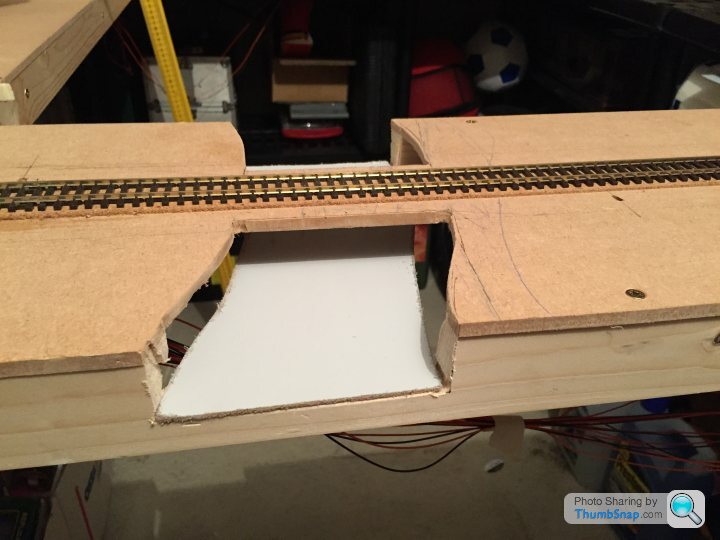
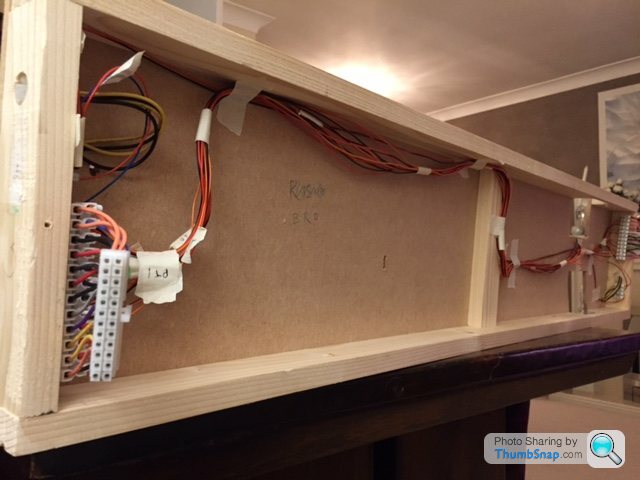
The first job this week is to sort out the wiring on the removable section. I wasn't happy with having lots of wires underneath dangling, along with only using connector blocks between the baseboards so I have raided the computer equipment and grabbed some 24 pin connectors, and some 4 pin connectors.
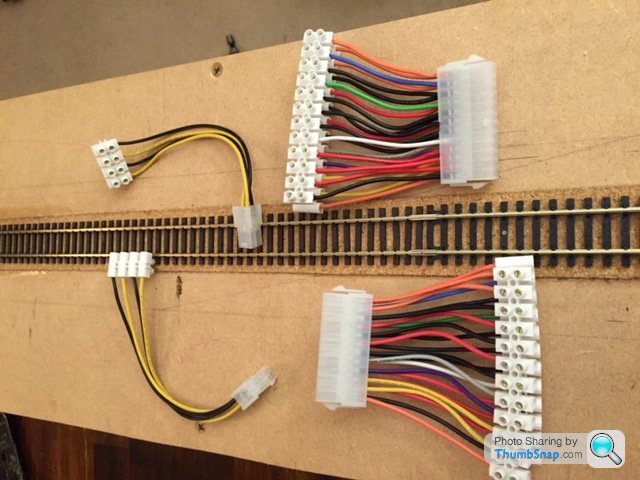
The plan is to use the 4 pins to carry the power to the fiddle yard and across the baseboard joins. Then using the 24 pin connector to connect up the point motors on the far side of the track. At the moment I only have 5 points on the far side, so this leaves room for a further 3 points to expand (which luckily is the amount I need to finish off the fiddle yard)
This has made the underneath a bit neater now and enables me to take the board upstairs (much to the pleasure of the wife) to start working on the scenery on this section.
Bit of a dull wiring update... so hopefully have some scenery stuff next.
The first job this week is to sort out the wiring on the removable section. I wasn't happy with having lots of wires underneath dangling, along with only using connector blocks between the baseboards so I have raided the computer equipment and grabbed some 24 pin connectors, and some 4 pin connectors.
The plan is to use the 4 pins to carry the power to the fiddle yard and across the baseboard joins. Then using the 24 pin connector to connect up the point motors on the far side of the track. At the moment I only have 5 points on the far side, so this leaves room for a further 3 points to expand (which luckily is the amount I need to finish off the fiddle yard)
This has made the underneath a bit neater now and enables me to take the board upstairs (much to the pleasure of the wife) to start working on the scenery on this section.
Bit of a dull wiring update... so hopefully have some scenery stuff next.
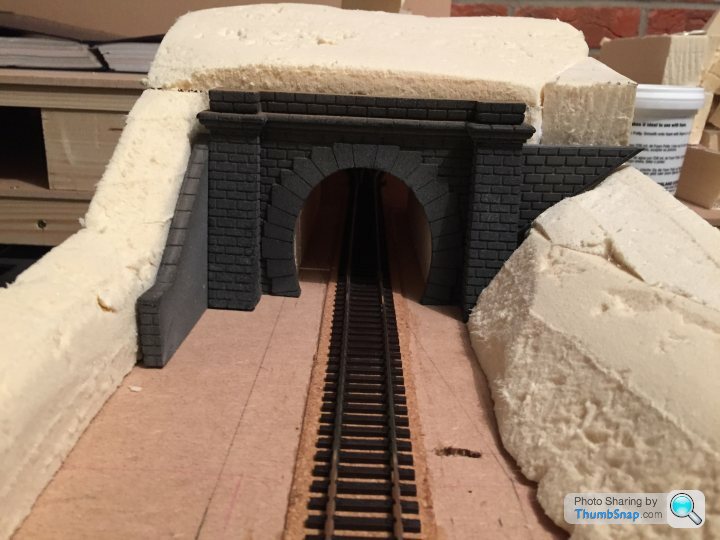
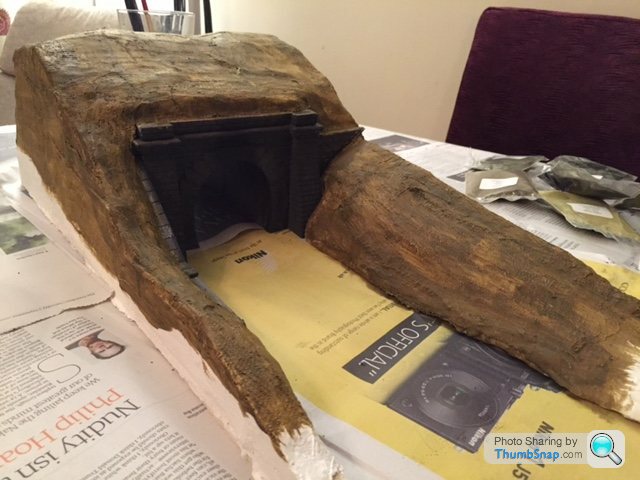
Manage to grab some time over the weekend to start work on the scenery - first task to sort out the tunnel on the removable track section.
I have had some Woodland Scenics plaster cloth hanging around for ages so thought I would give it a go over the Celotex foam. Laid on pretty easily (though from the instructions it said there was a bobbly side to the plaster, but that wasn't that obvious once off the roll), but needed to let it go off a little before applying to the vertical sides if not draping over the top.
Was a little niggly around the tunnel portal and supporting walls, but pretty pleased with it ahead of putting some paint on.
I also put the tunnel walls and roof in also, grabbing a printed pattern on to card and then flailing the edges to attach to the back of the tunnel portal.
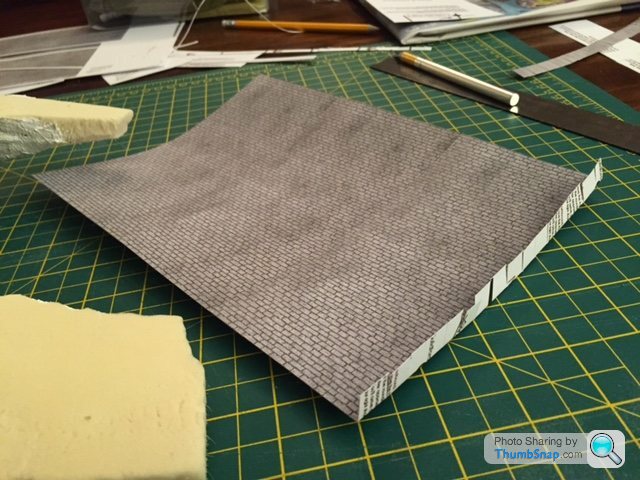
I had been thinking of using some brick walls from Will's for this, but with inspiration from MysteryLemon and printing them works great.
Here they are in place after gluing.

And finally the finished product ready for painting, grass and some weathering.
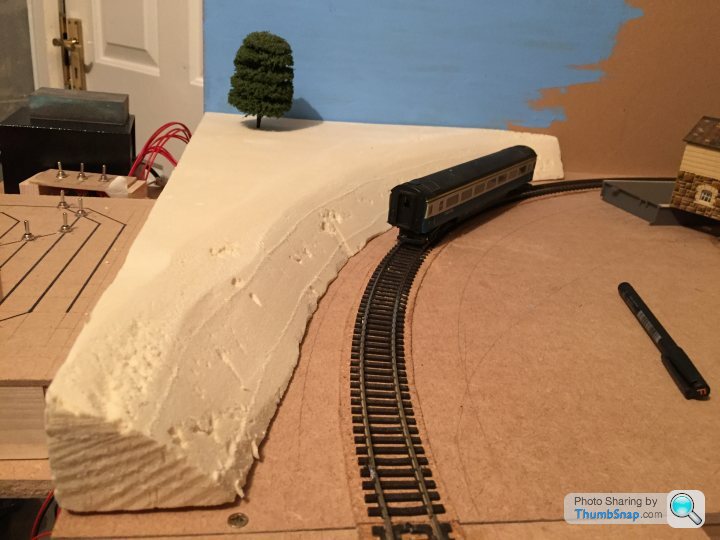
I have also been playing with the edges of the track near the backscenes. After being a little disheartened by them and thinking the scales didn't look correct and I might have to go back to the beginning and do some using my own images (thanks all for the advice on that) I am a little happier. After putting fencing in front of the backscenes then it starts to look more 3D and part of the railway. If I put some long static grass the same colour as the lower part of the wall in the fence then it will combine really well... as shown here.
I have had some Woodland Scenics plaster cloth hanging around for ages so thought I would give it a go over the Celotex foam. Laid on pretty easily (though from the instructions it said there was a bobbly side to the plaster, but that wasn't that obvious once off the roll), but needed to let it go off a little before applying to the vertical sides if not draping over the top.
Was a little niggly around the tunnel portal and supporting walls, but pretty pleased with it ahead of putting some paint on.
I also put the tunnel walls and roof in also, grabbing a printed pattern on to card and then flailing the edges to attach to the back of the tunnel portal.
I had been thinking of using some brick walls from Will's for this, but with inspiration from MysteryLemon and printing them works great.
Here they are in place after gluing.
And finally the finished product ready for painting, grass and some weathering.
I have also been playing with the edges of the track near the backscenes. After being a little disheartened by them and thinking the scales didn't look correct and I might have to go back to the beginning and do some using my own images (thanks all for the advice on that) I am a little happier. After putting fencing in front of the backscenes then it starts to look more 3D and part of the railway. If I put some long static grass the same colour as the lower part of the wall in the fence then it will combine really well... as shown here.
Messing around with wires and sanding down insulation pieces is not as fun as doing some scenery work... so have eventually got onto the fun stuff.
First up I started to ballast the track for the lift out section with the tunnel on.. it took ages to add the ballast and then work across every sleeper to remove the excess ballast, around 1 hours work just for the 4ft of track. I will be definitely looking at getting a ballast help tool for the rest of the track to hopefully speed up this process.
Once in place I used the standard 50/50 PVA/Water with a drop of washing up liquid technique... always amazed how much you can soak it in this stuff as the pic shows and it dries without trace - though adding lots on did make some of the ballast float away a little, so will have to watch out for that in future.

But once dried I am happy-ish with the results (get onto that later)...
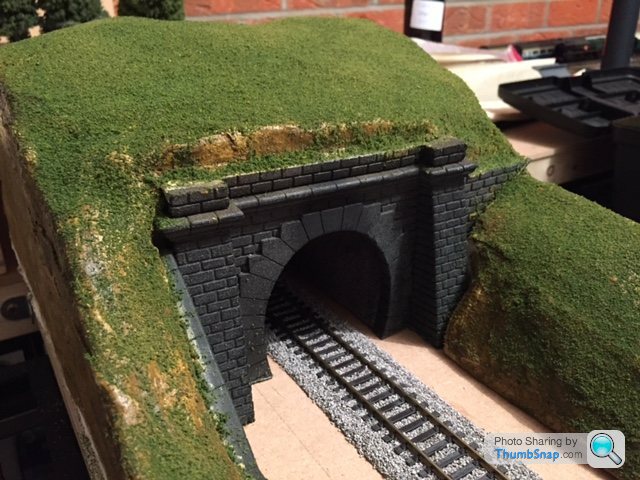
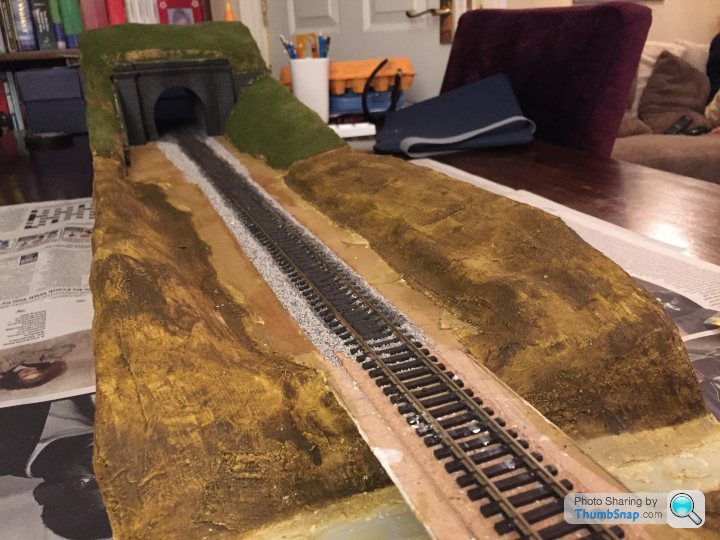
I then got onto the scenery on the hill I had plastered.... first starting with some Woodland Scenic Earth Undercoat painted in a mixture of patches across the hillside
Once this was dried then I started with a base of green fine turf, and then some highlighting with burnt grass in places.
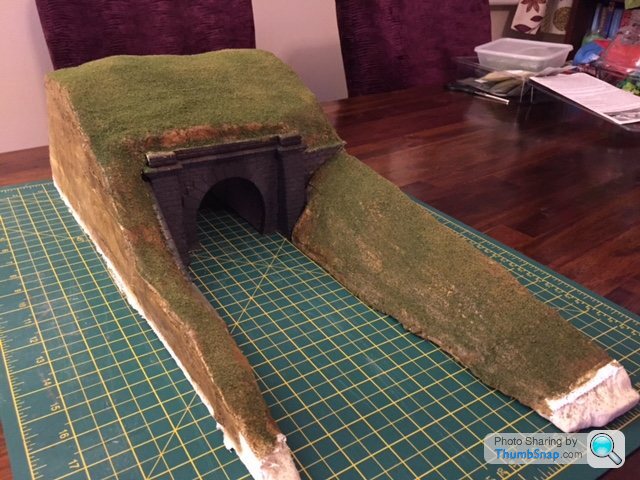
I have left some of the grass patchy in places and will add some shrubs, trees and static grass where I feel appropriate to complete the scene a bit more.
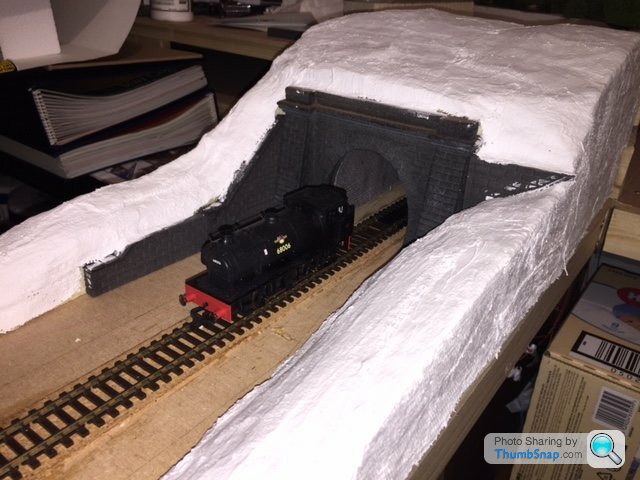
Also I decided to do some weathering on the tunnel portal and inside on the tunnel rood (I know most won't see it, but I like to make it as complete as possible).
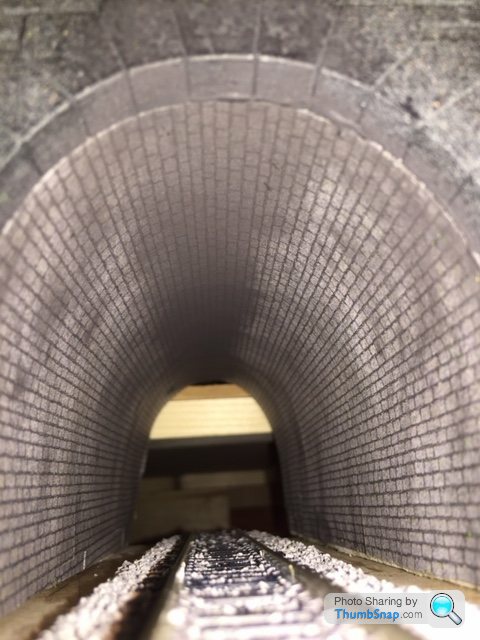
The picture above does show the bit of ballasting I am not too happy with - not sure if so much ballast should be showing above the sleepers as it does at eye level - I am hoping when I get round to doing some weathering on the track this will not be so obvious. And checking out some of the pictures I have taken of preserved lines the ballast is covering sleepers quite a lot... not sure if there is a technique I am missing to flatten it down a bit more though.
Anyway, with some moss, shrubs and static grass to go the overall effect is looking quite good I think, and am pleased with how the first attempt at scenery has gone.
Now need to finish up with what I will put between the ballast and the tunnel wall edges - trying to find some pics of how that looks like in real life, so any ideas welcome?
First up I started to ballast the track for the lift out section with the tunnel on.. it took ages to add the ballast and then work across every sleeper to remove the excess ballast, around 1 hours work just for the 4ft of track. I will be definitely looking at getting a ballast help tool for the rest of the track to hopefully speed up this process.
Once in place I used the standard 50/50 PVA/Water with a drop of washing up liquid technique... always amazed how much you can soak it in this stuff as the pic shows and it dries without trace - though adding lots on did make some of the ballast float away a little, so will have to watch out for that in future.
But once dried I am happy-ish with the results (get onto that later)...
I then got onto the scenery on the hill I had plastered.... first starting with some Woodland Scenic Earth Undercoat painted in a mixture of patches across the hillside
Once this was dried then I started with a base of green fine turf, and then some highlighting with burnt grass in places.
I have left some of the grass patchy in places and will add some shrubs, trees and static grass where I feel appropriate to complete the scene a bit more.
Also I decided to do some weathering on the tunnel portal and inside on the tunnel rood (I know most won't see it, but I like to make it as complete as possible).
The picture above does show the bit of ballasting I am not too happy with - not sure if so much ballast should be showing above the sleepers as it does at eye level - I am hoping when I get round to doing some weathering on the track this will not be so obvious. And checking out some of the pictures I have taken of preserved lines the ballast is covering sleepers quite a lot... not sure if there is a technique I am missing to flatten it down a bit more though.
Anyway, with some moss, shrubs and static grass to go the overall effect is looking quite good I think, and am pleased with how the first attempt at scenery has gone.
Now need to finish up with what I will put between the ballast and the tunnel wall edges - trying to find some pics of how that looks like in real life, so any ideas welcome?
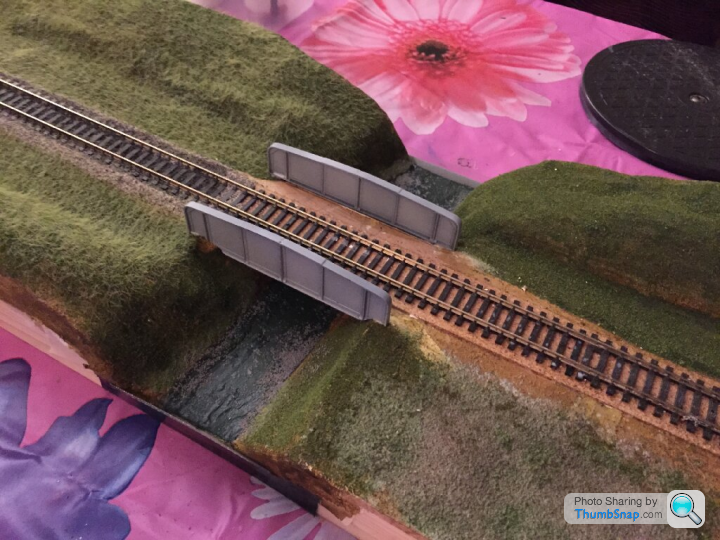
So have continued work on the tunnel board, continuing the hills down to a river which the railway crosses.
Started off cutting some girder bridge sides using a Peco kit - they were a bit longer than needed so sawed them in three and connected the two bits together using liquid poly, as well as filling gaps with left over spur plastic melted in liquid poly
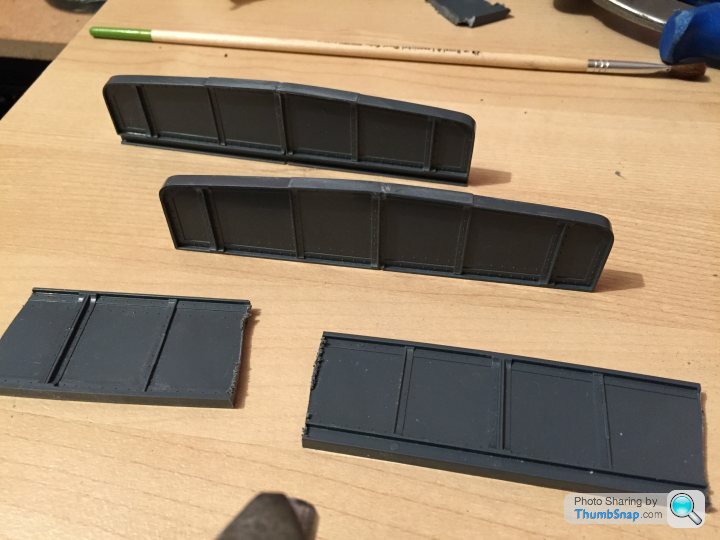
I then cut out the base board to create the river level and made sure the girder bridge sides fitted ok
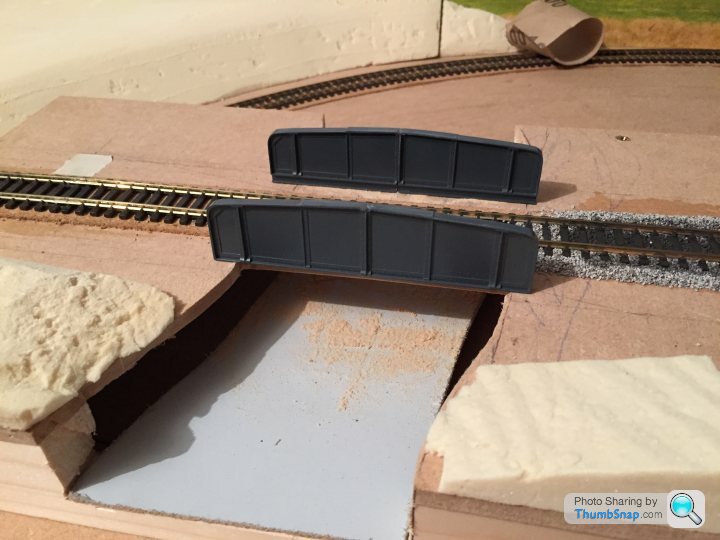
I then continued the banking from the tunnel down to the river and covered with plaster moulding

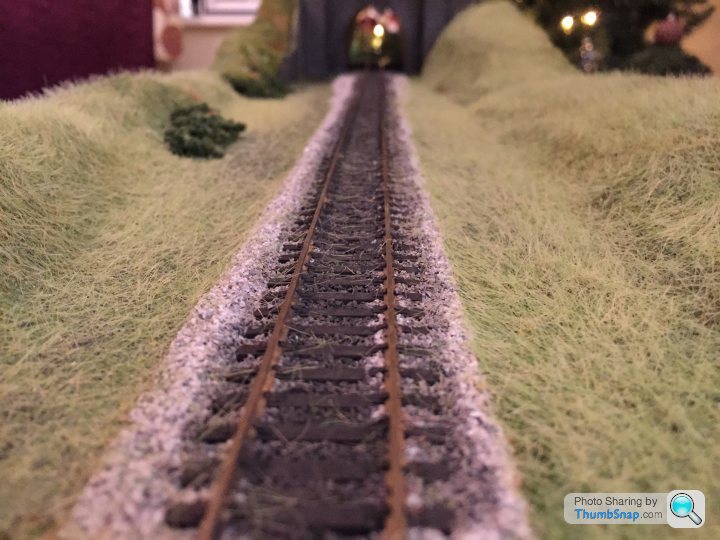
This allowed me to do an initial covering of soil coloured paint and finish with static grass across the whole section, this needs a bit of work to finish off and remove some of the unnatural straight lines, but have managed to add some rust to the rails and slight weathering to the ballast along the track.
After painting with the undercoat colour, that will show through where no grass lies
The picture below is before I cleaned up the rail tops from the rust, but with the static grass applied
Started off cutting some girder bridge sides using a Peco kit - they were a bit longer than needed so sawed them in three and connected the two bits together using liquid poly, as well as filling gaps with left over spur plastic melted in liquid poly
I then cut out the base board to create the river level and made sure the girder bridge sides fitted ok
I then continued the banking from the tunnel down to the river and covered with plaster moulding
This allowed me to do an initial covering of soil coloured paint and finish with static grass across the whole section, this needs a bit of work to finish off and remove some of the unnatural straight lines, but have managed to add some rust to the rails and slight weathering to the ballast along the track.
After painting with the undercoat colour, that will show through where no grass lies
The picture below is before I cleaned up the rail tops from the rust, but with the static grass applied
My little modelling is put to shame by Simon's on another thread - but still, I have done a little bit more on the layout, concentrating around the bridge and river.
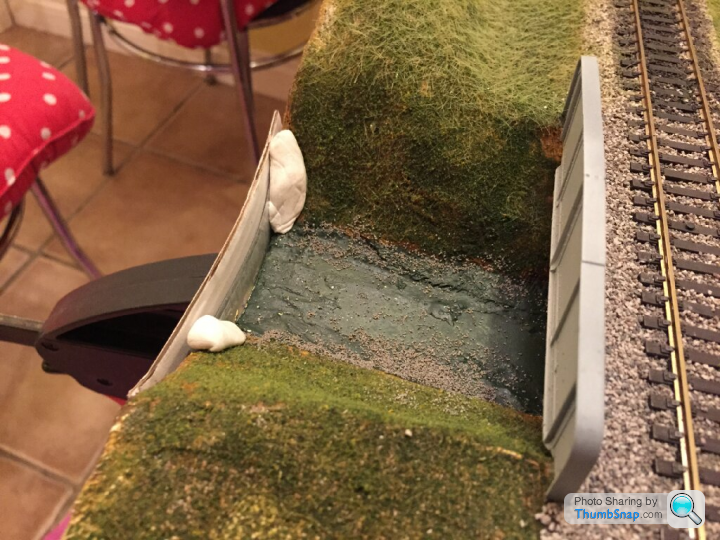
I have cut the bridge sides out a little better and given them a coat of primer ready for some weathering later and have painted the river bed, plus adding a base layer of grass on the banks... I dropped in a bit of fine stones to try and represent the river bed a bit better (all experimental).
Then using a bit of plastic from some packaging and a clamp, I sealed up both sides of the river and sealed the base several times with PVA glue, and then painted over again... ready to pour some Woodland Scenic EZ water.
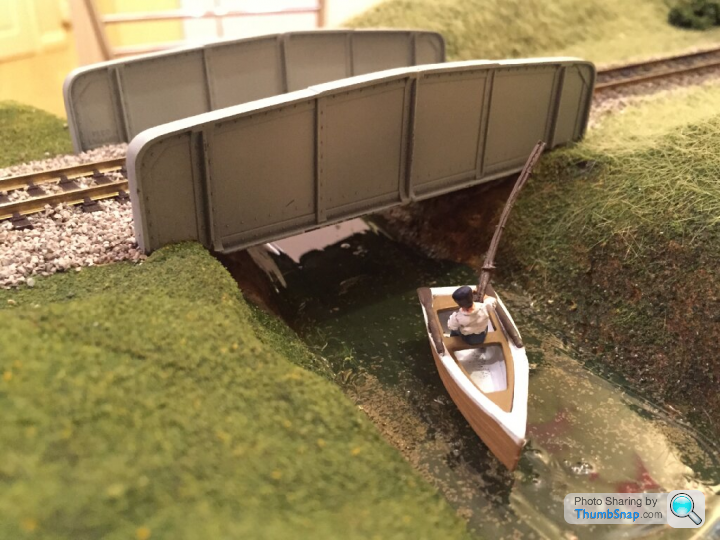
The EZ Water melts in a pan (it did destroy it so luckily didn't choose one of the wedding presents for this purpose), and once it is fully hot it is able to be poured out - the trick was making sure that it doesn't bubble as that is hard to get out)

Once poured in it dries pretty quickly so trying to manipulate it to all the corners (well banks) of the river was a race against time - also there was a little bit of the base that was not sealed, so some bubbles got into the EZ water too. Still needs some work on putting in some reeds (probably should have done this before the water, but will work out a way to add them after), and finishing off the banking with some bushes etc.
But here is the scene with a little cameo from a fisherman who looks to have caught something big...
Unfortunately I am moving house next week - but will probably work on this board as a practice/get good at scenery work till I find a place for the rest of the layout in the new house.
I have cut the bridge sides out a little better and given them a coat of primer ready for some weathering later and have painted the river bed, plus adding a base layer of grass on the banks... I dropped in a bit of fine stones to try and represent the river bed a bit better (all experimental).
Then using a bit of plastic from some packaging and a clamp, I sealed up both sides of the river and sealed the base several times with PVA glue, and then painted over again... ready to pour some Woodland Scenic EZ water.
The EZ Water melts in a pan (it did destroy it so luckily didn't choose one of the wedding presents for this purpose), and once it is fully hot it is able to be poured out - the trick was making sure that it doesn't bubble as that is hard to get out)
Once poured in it dries pretty quickly so trying to manipulate it to all the corners (well banks) of the river was a race against time - also there was a little bit of the base that was not sealed, so some bubbles got into the EZ water too. Still needs some work on putting in some reeds (probably should have done this before the water, but will work out a way to add them after), and finishing off the banking with some bushes etc.
But here is the scene with a little cameo from a fisherman who looks to have caught something big...
Unfortunately I am moving house next week - but will probably work on this board as a practice/get good at scenery work till I find a place for the rest of the layout in the new house.
Gassing Station | Scale Models | Top of Page | What's New | My Stuff