Airfix Hurricane 1/24
Discussion


I'm not used to a 'build' thread and have almost certainly not taken enough photos but here goes......
I've not built many models in since I was a youngster and now trying when I have time to have a go so I purchased several models, all the kit, paints, spray booth and remodelled the top of my garage to become my 'man cave'
I've purchased the 1/24 Typhoon but want to leave that for a while until I feel comfortable and I've just finished the 747/shuttle and it hangs quite nicely in Sam's bedroom (he's 5 and has two 747's and a Vulcan - one smashed 1/72 Spitfire and a completely knackered Harrier Jump Jet)....anyway......
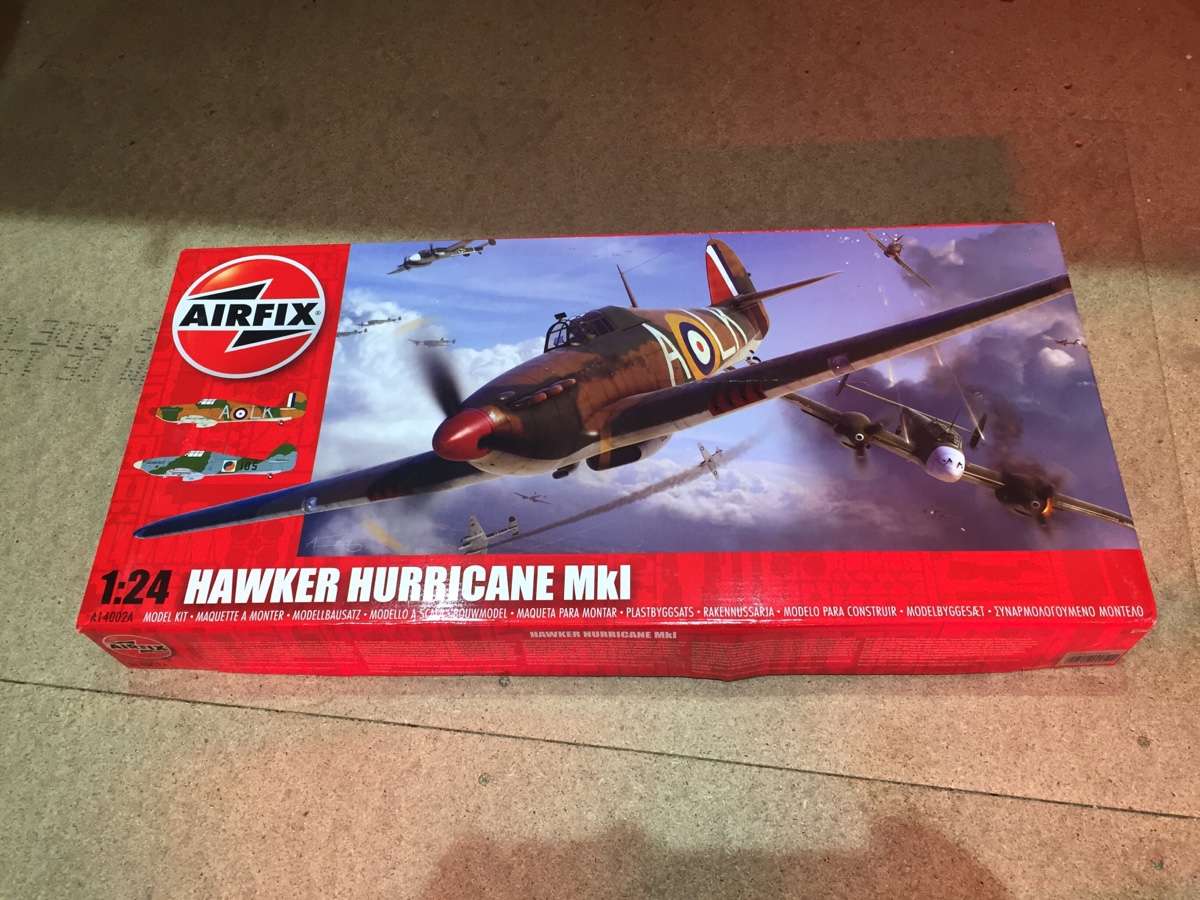
Box shot - Most will be familiar with the kit. It's quite old I believe aside from a change of artwork over the years. I'm sure I built this as a youngster but that would have been 40 years ago and my memory isn't quite what it was!
No inner box shot with all the bits, we know what we get there (I forgot actually )
)

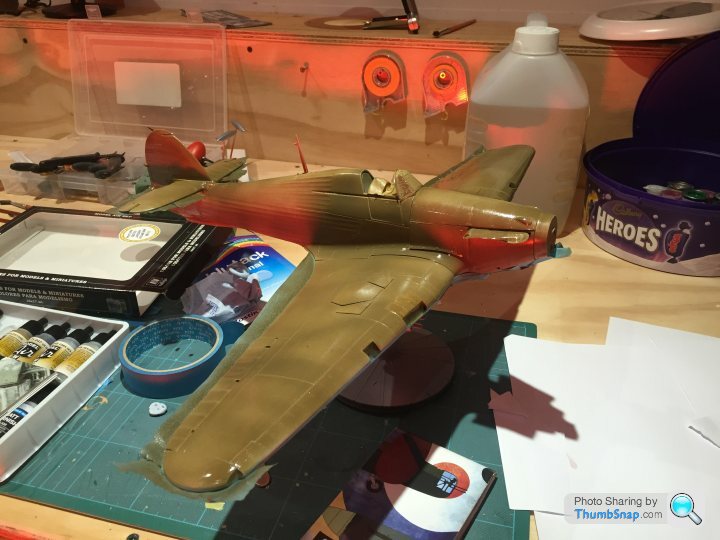
Not being a regular modeller I can only comment on my thoughts and I'm quite happy with the kit. The only issue I've had is the fusalge and some of the undercarriage parts are definately twisted which I'm sure will straighten as I build the kit. The rest of the parts so far are of a good quality with minimum of sanding required once glued.
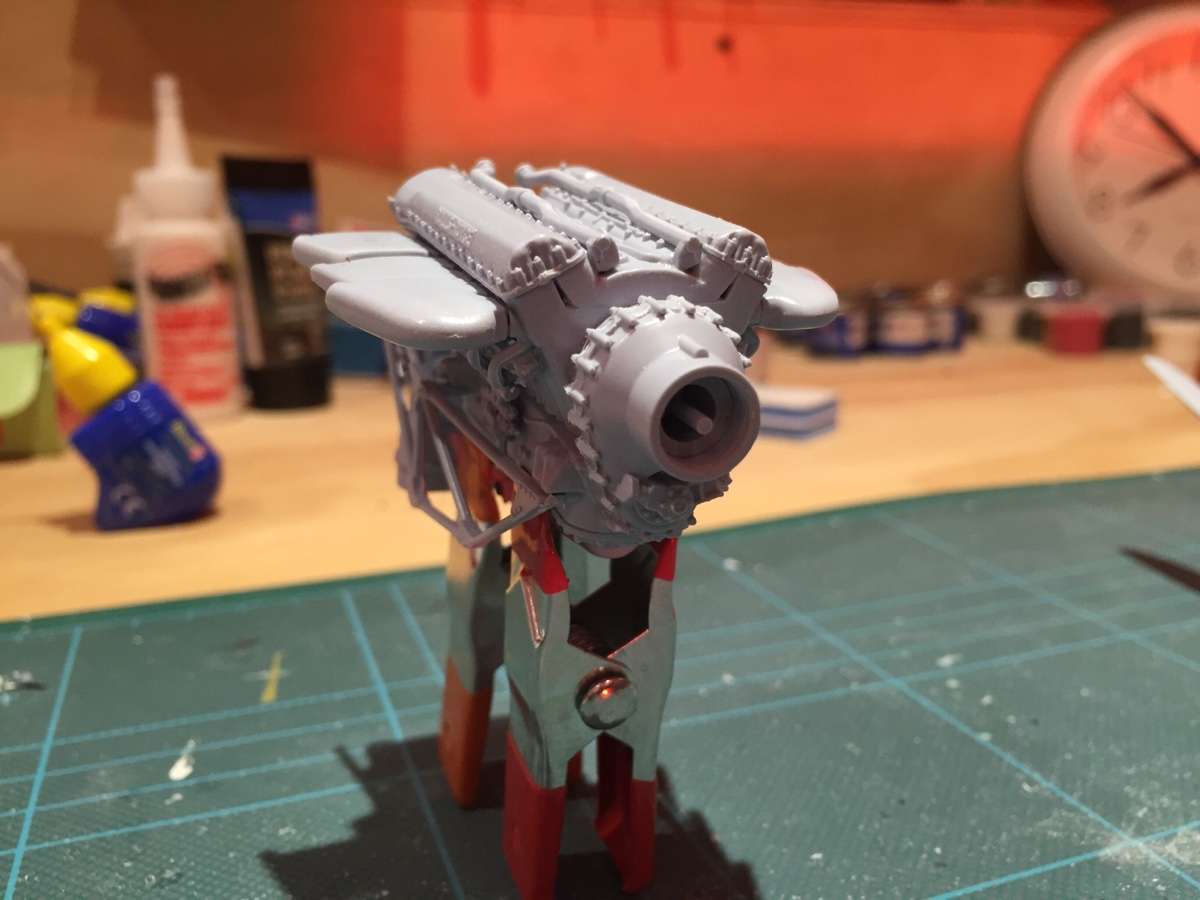
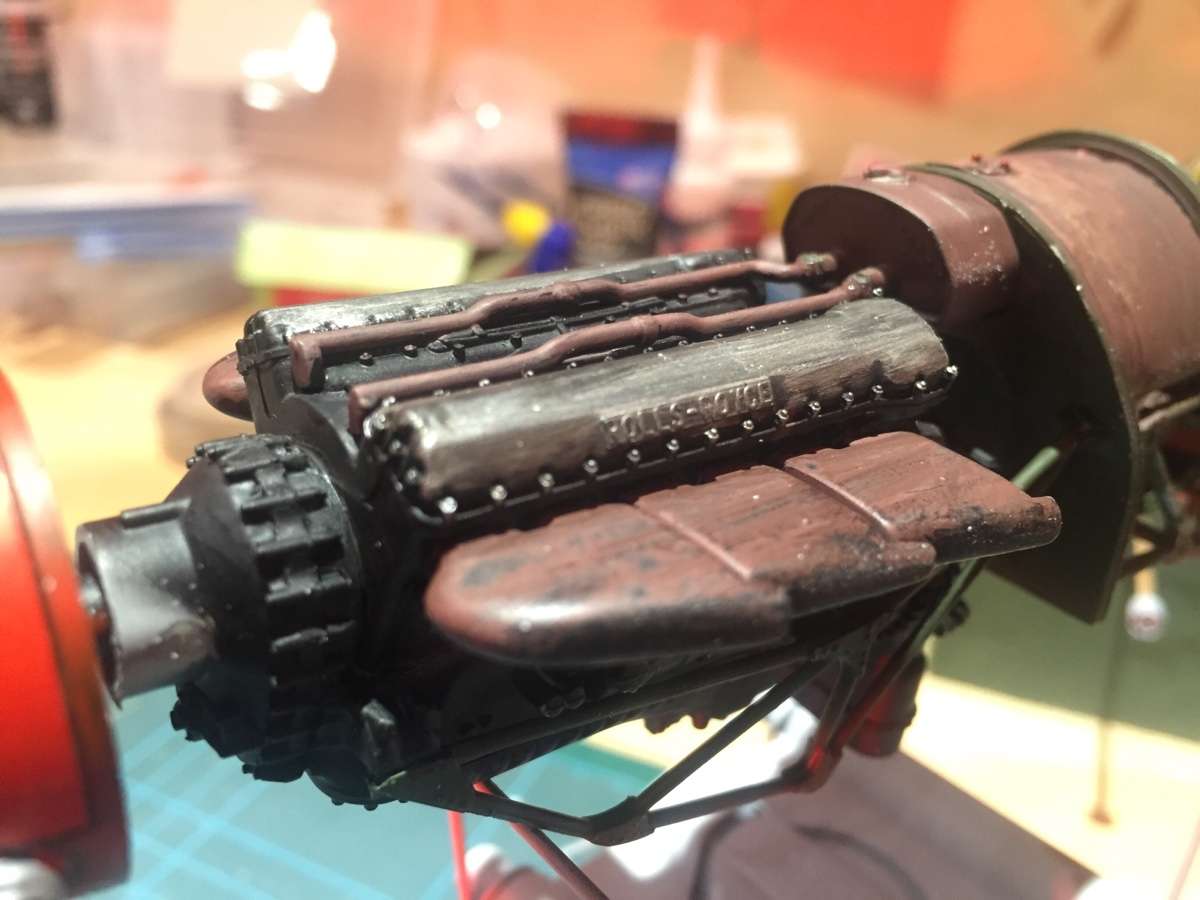
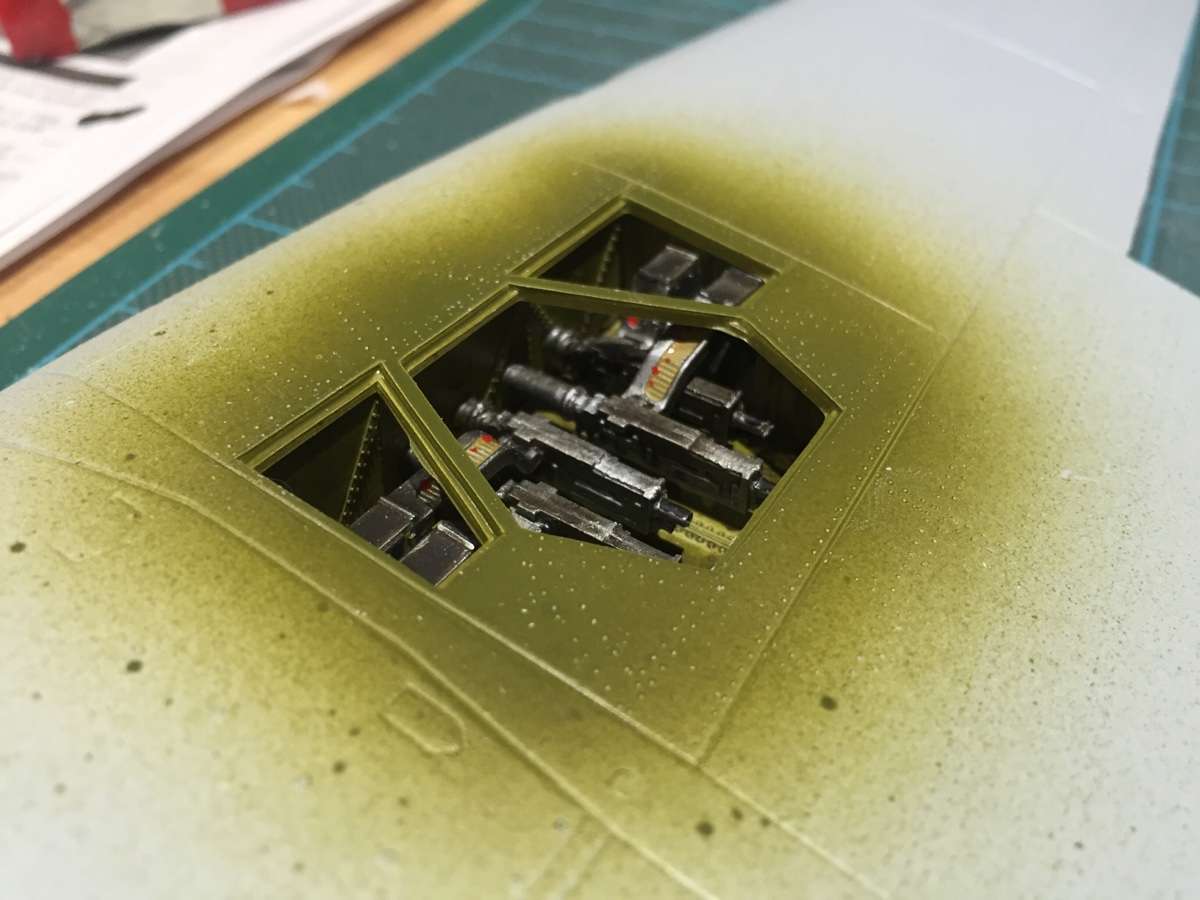
Engine and various other parts first (I haven't followed the instructions in order so I could keep going through the build)

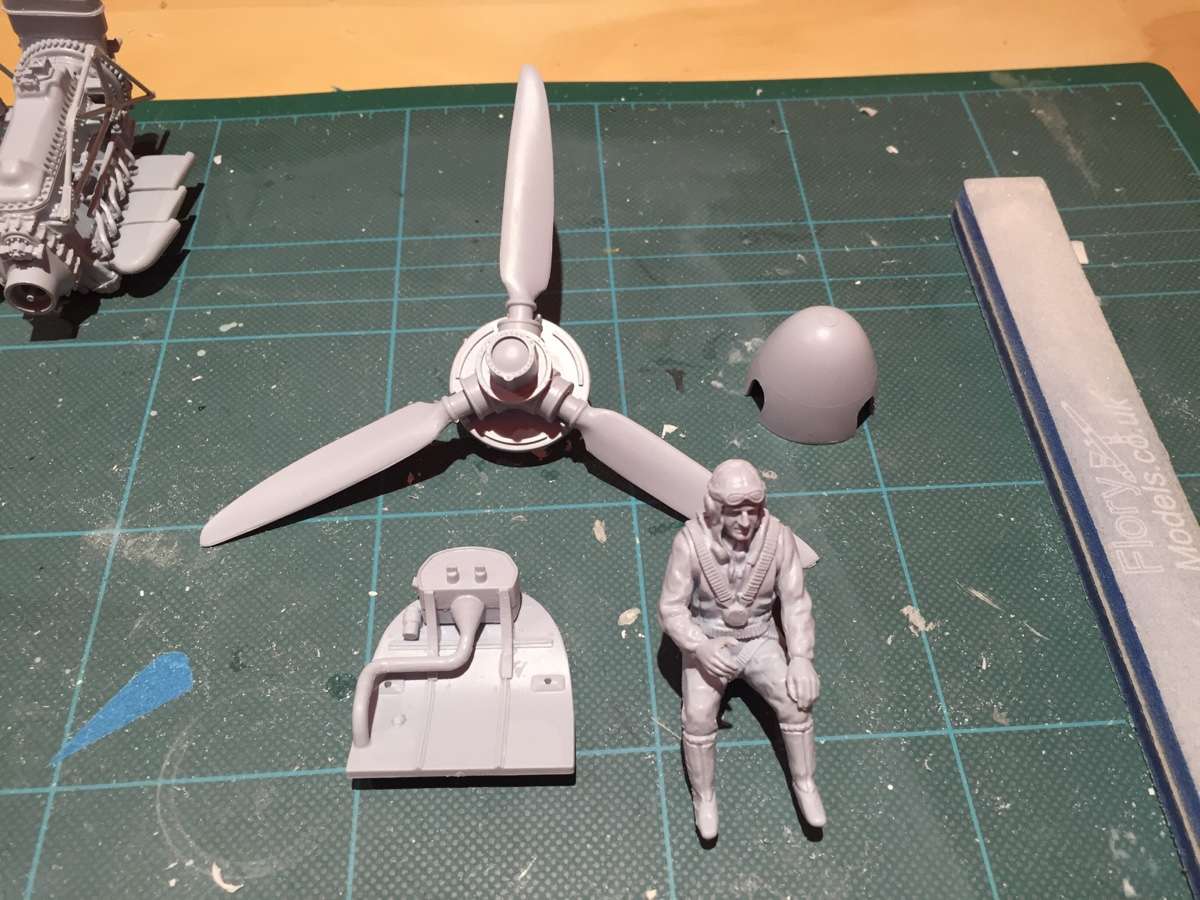
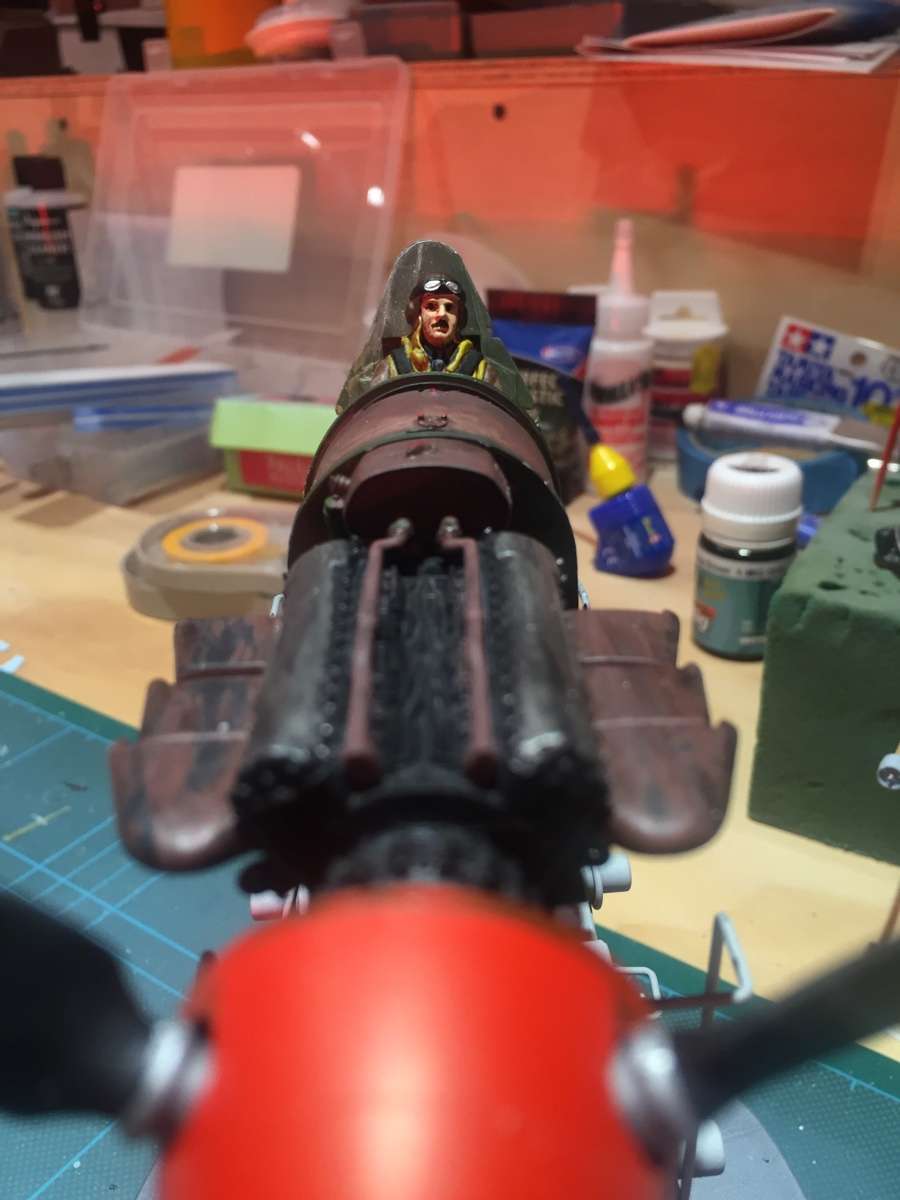
And the pilot, prop etc.
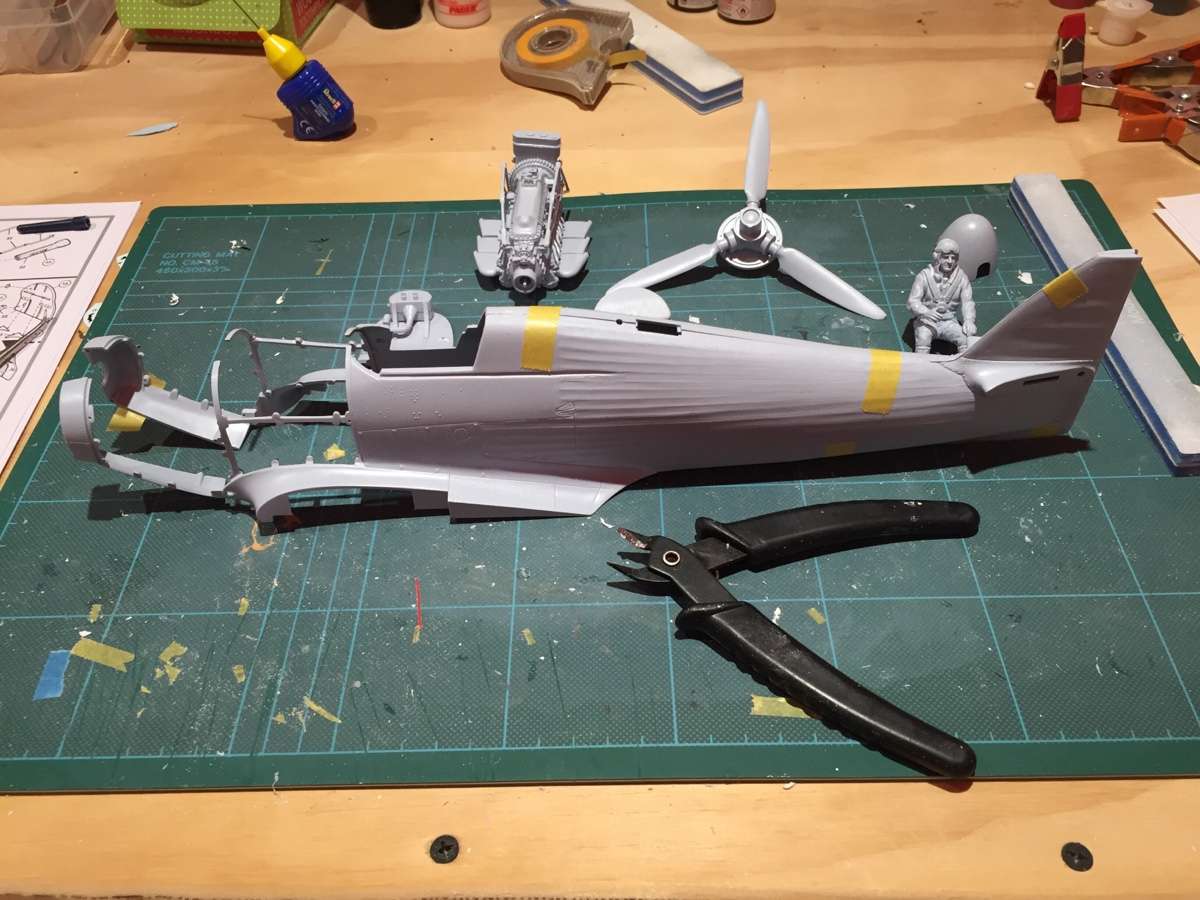
Test fit of the fusalage confirmed my thoughts re being pissed which may not be noticable from the photo, undercarriage box is much the same.
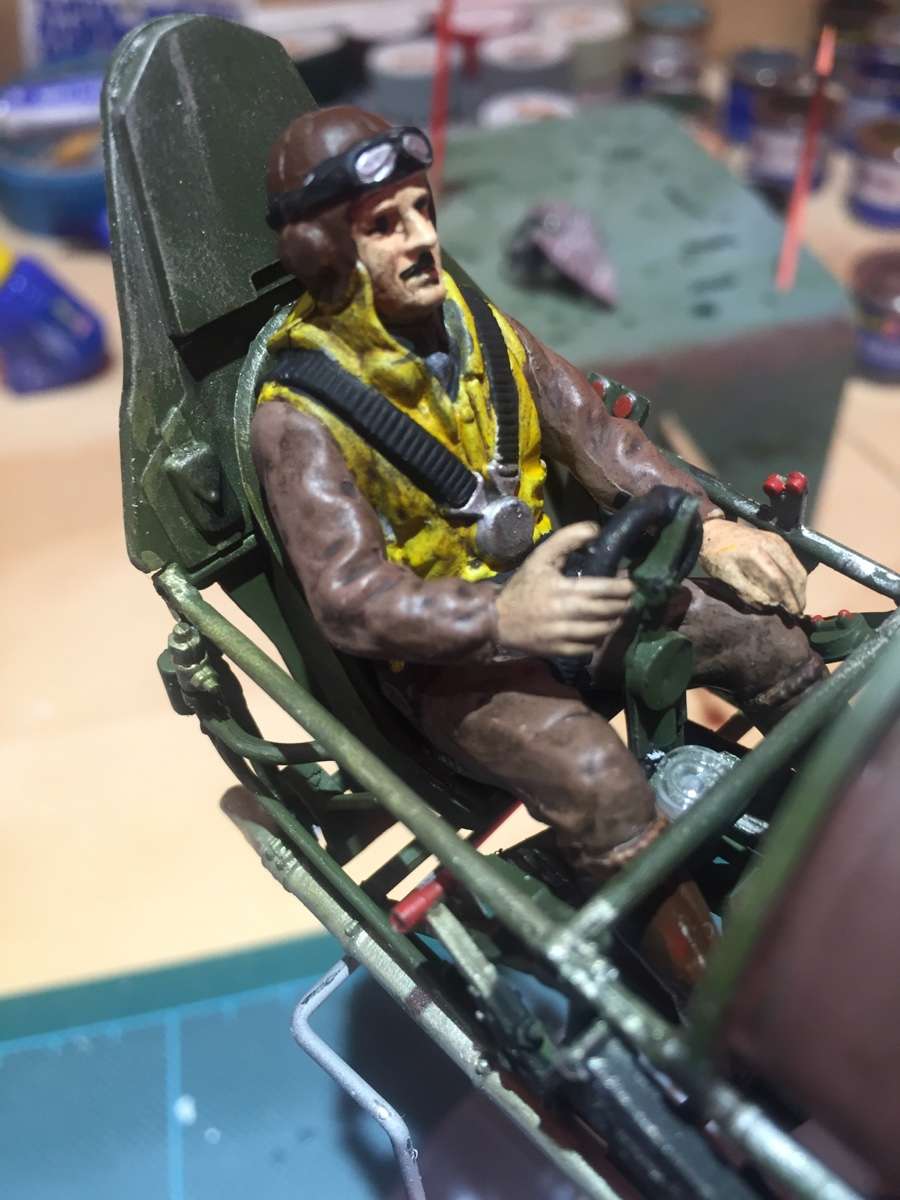
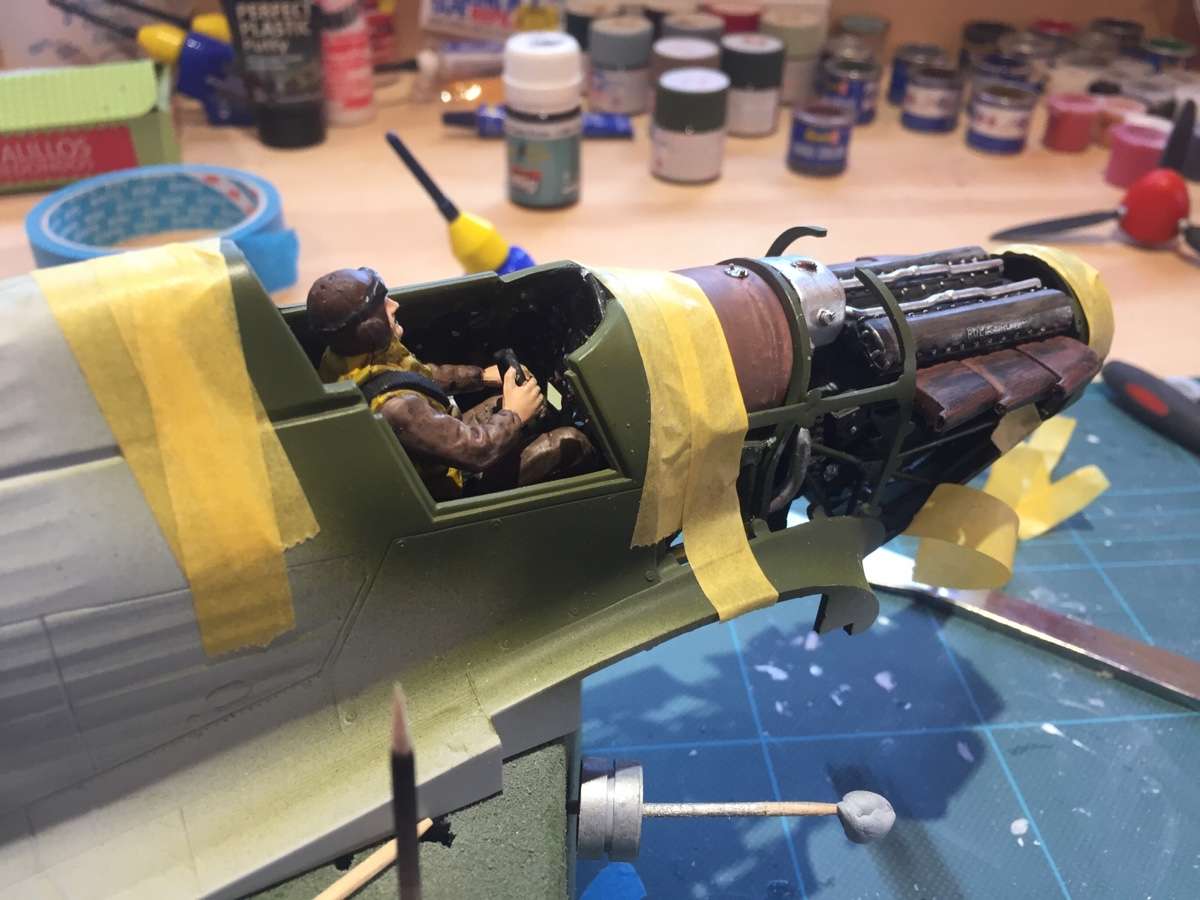
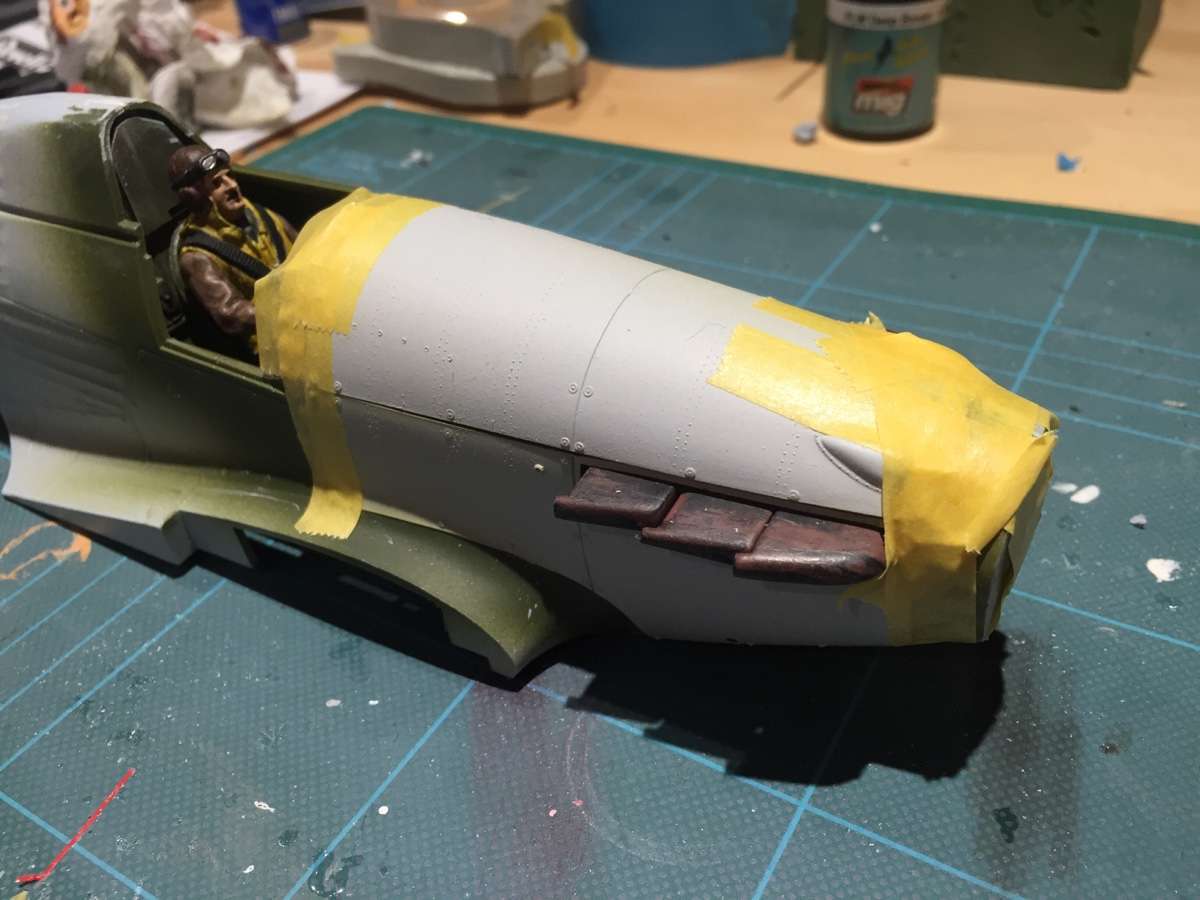
Fast forward a few days and the engine and cockpit is getting there. I'm not in the league of Dr_Gn or Eric buit have splashed a bit of paint here and there to try and add some detail.
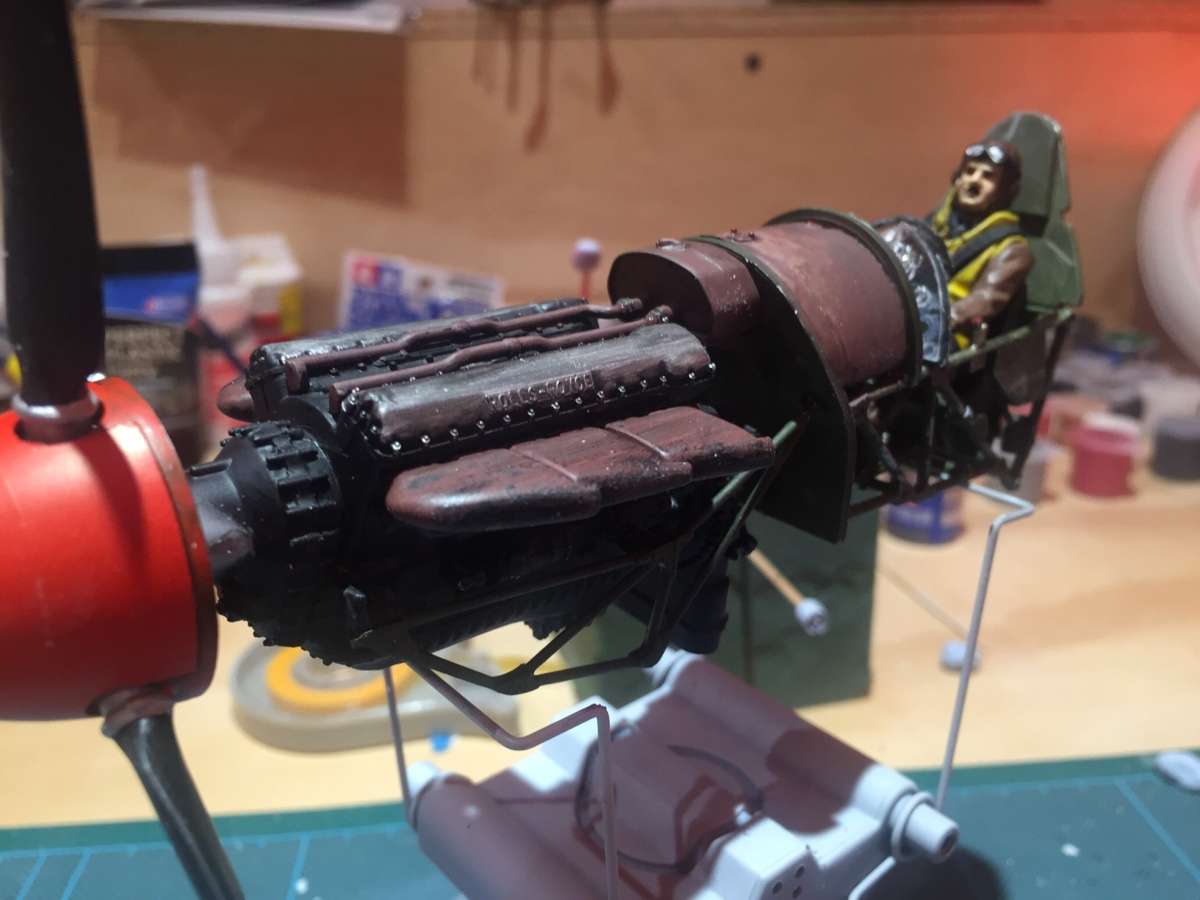
Note - the cockpit instruments are only placed for show in the photo, they actually glue to the side of the tub shortly
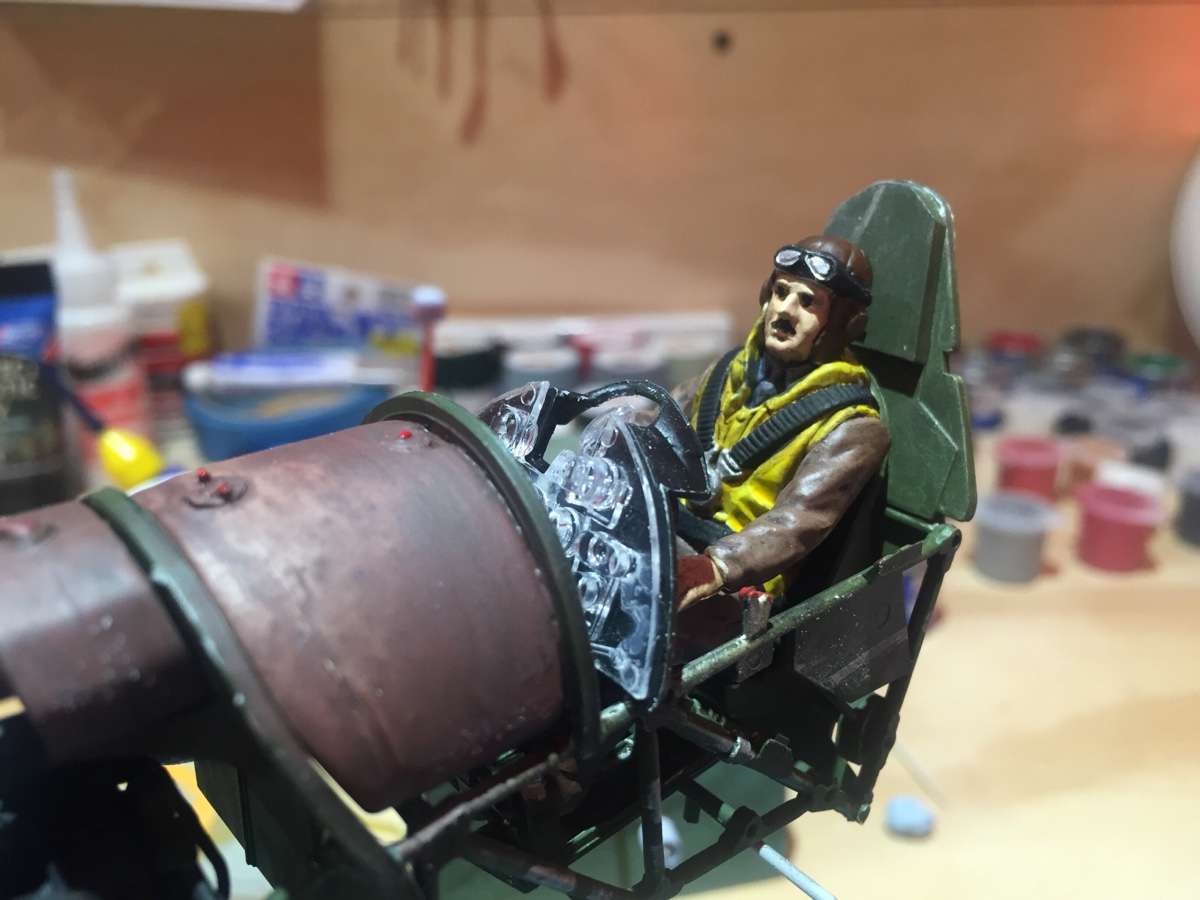
Added a bit of dark mud wash to the pilot and also some aluminium to the surrounding area to give a feel of 'use'
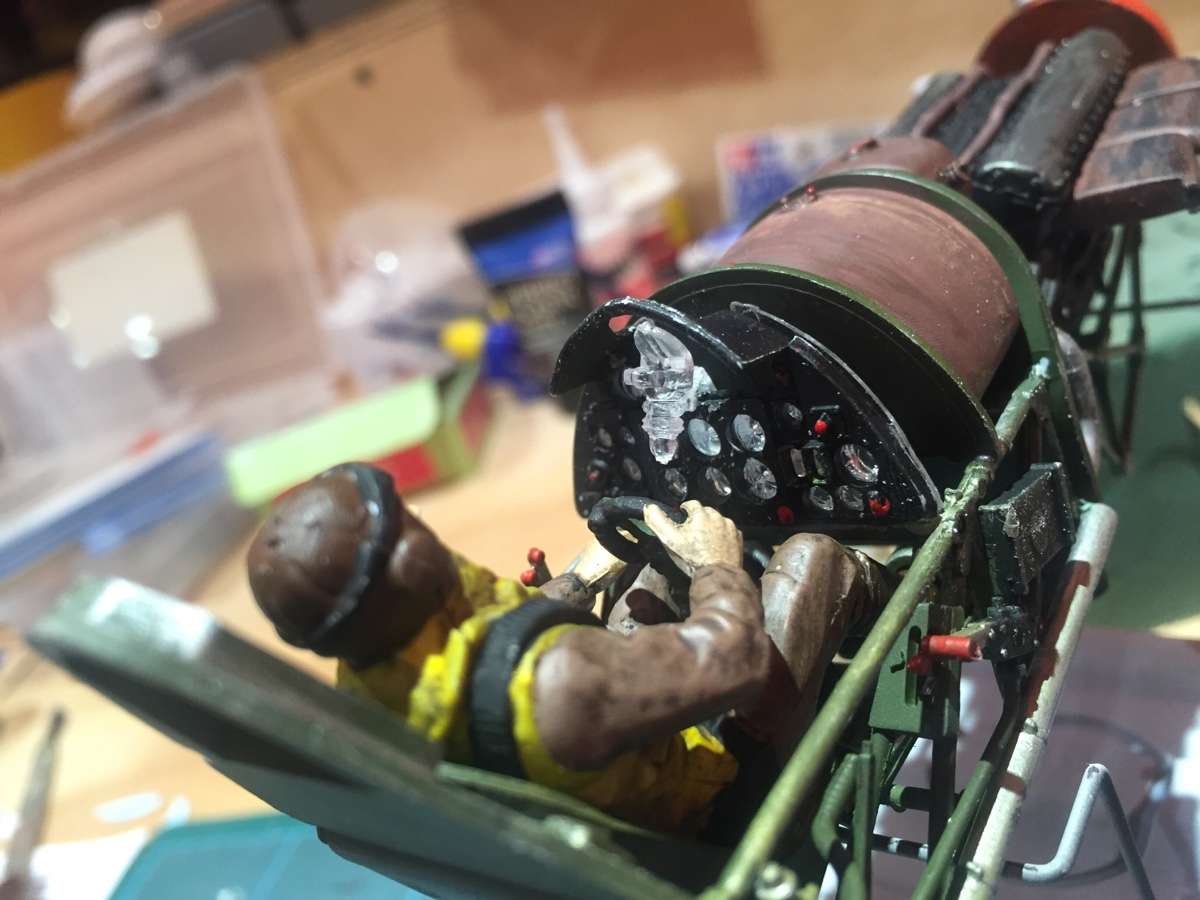
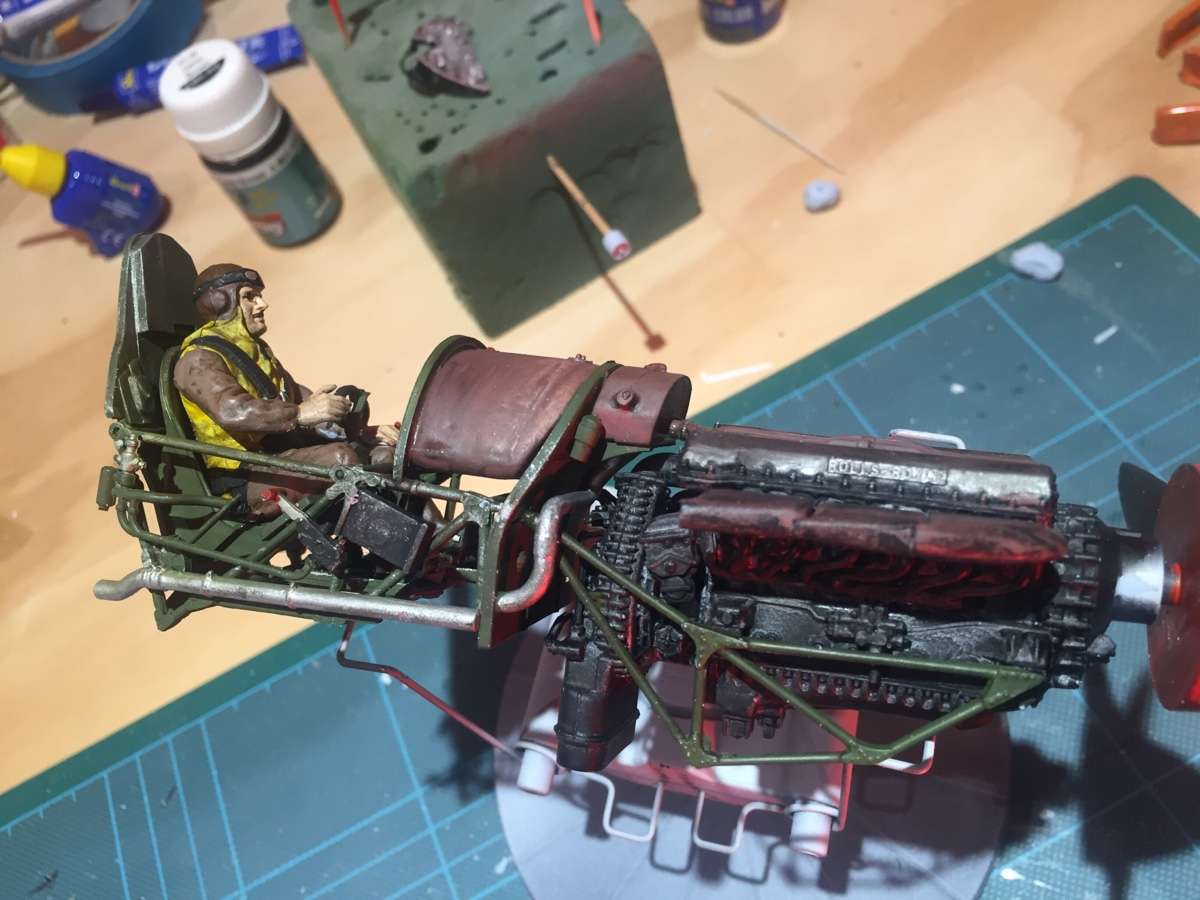
Oh and a 'tash because that's what they used to have
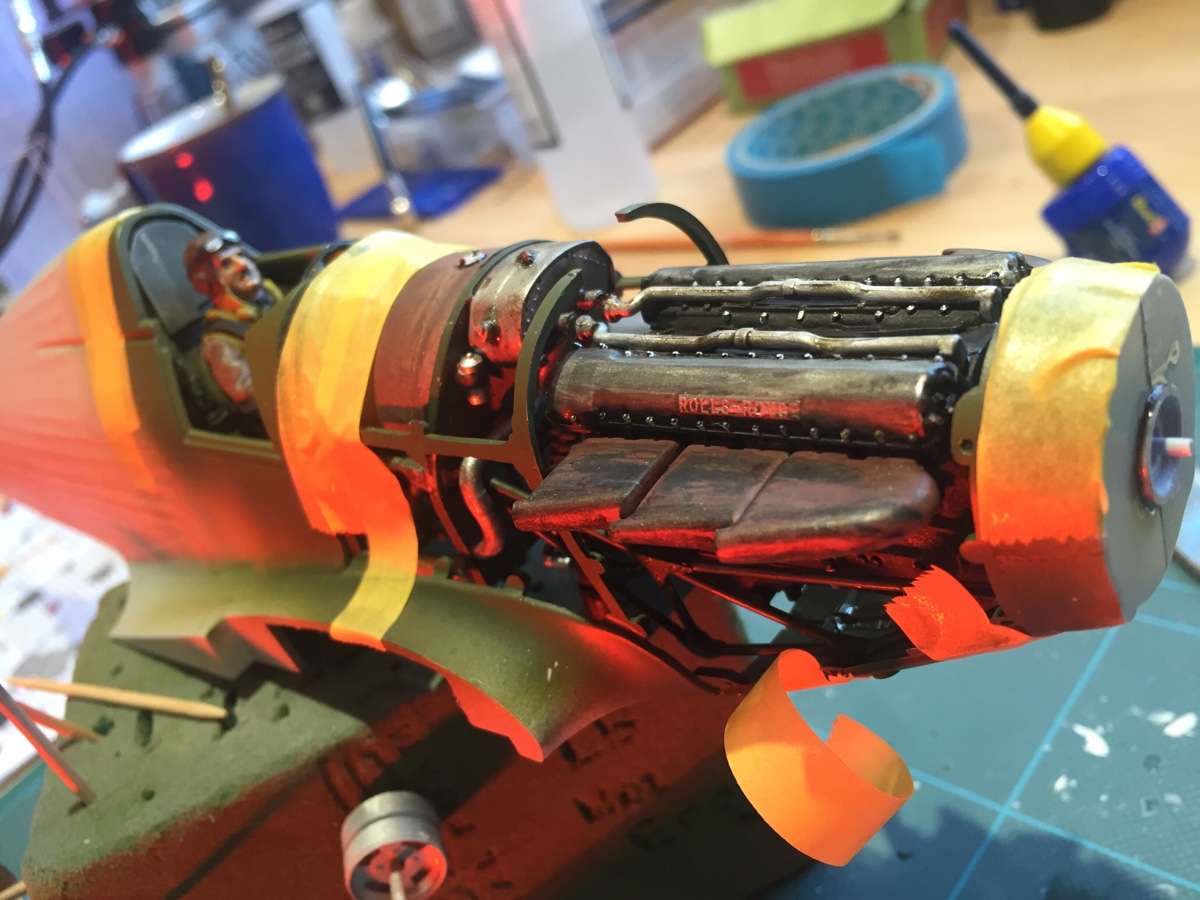
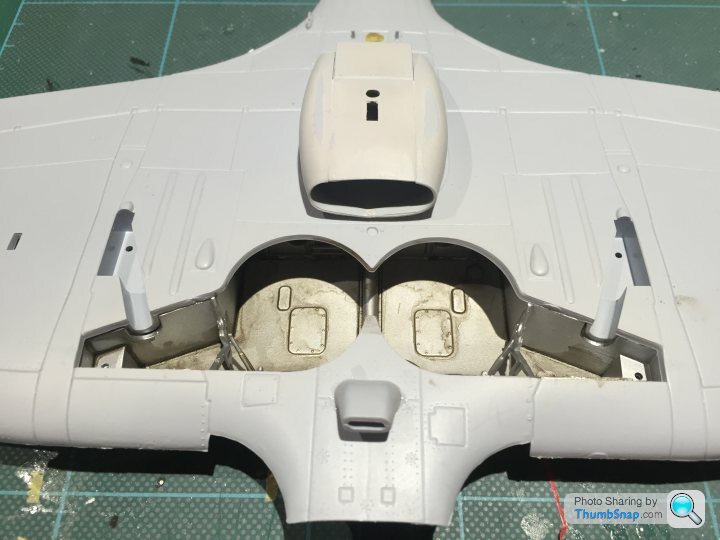
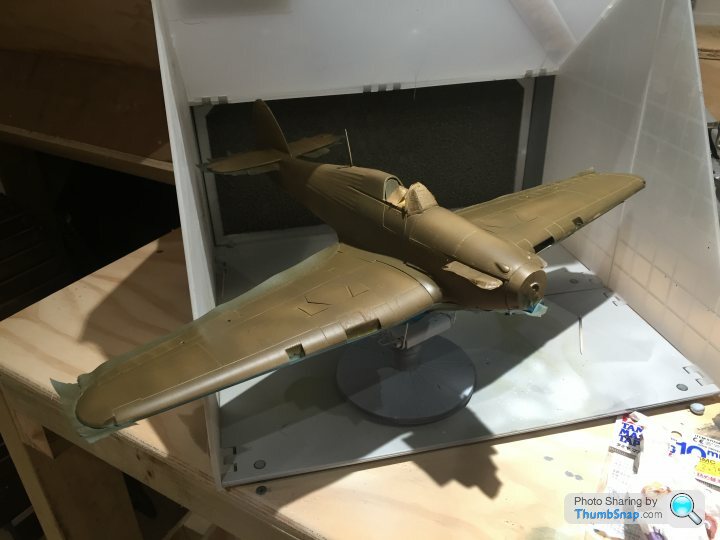
I've also primed other parts ready for next coat (the cockpit had some extra parts added and needed a bit of primer before another coat of green)
I've also glued the moving surfaces, and am ready for the next stage, alas I'm off to Germany tomorrow for a week and Spain the week after for a further week with no time to play inbetween
I'll update once I've made some more progress.
I've not built many models in since I was a youngster and now trying when I have time to have a go so I purchased several models, all the kit, paints, spray booth and remodelled the top of my garage to become my 'man cave'
I've purchased the 1/24 Typhoon but want to leave that for a while until I feel comfortable and I've just finished the 747/shuttle and it hangs quite nicely in Sam's bedroom (he's 5 and has two 747's and a Vulcan - one smashed 1/72 Spitfire and a completely knackered Harrier Jump Jet)....anyway......
Box shot - Most will be familiar with the kit. It's quite old I believe aside from a change of artwork over the years. I'm sure I built this as a youngster but that would have been 40 years ago and my memory isn't quite what it was!
No inner box shot with all the bits, we know what we get there (I forgot actually
)Not being a regular modeller I can only comment on my thoughts and I'm quite happy with the kit. The only issue I've had is the fusalge and some of the undercarriage parts are definately twisted which I'm sure will straighten as I build the kit. The rest of the parts so far are of a good quality with minimum of sanding required once glued.
Engine and various other parts first (I haven't followed the instructions in order so I could keep going through the build)
And the pilot, prop etc.
Test fit of the fusalage confirmed my thoughts re being pissed which may not be noticable from the photo, undercarriage box is much the same.
Fast forward a few days and the engine and cockpit is getting there. I'm not in the league of Dr_Gn or Eric buit have splashed a bit of paint here and there to try and add some detail.
Note - the cockpit instruments are only placed for show in the photo, they actually glue to the side of the tub shortly
Added a bit of dark mud wash to the pilot and also some aluminium to the surrounding area to give a feel of 'use'
Oh and a 'tash because that's what they used to have
I've also primed other parts ready for next coat (the cockpit had some extra parts added and needed a bit of primer before another coat of green)
I've also glued the moving surfaces, and am ready for the next stage, alas I'm off to Germany tomorrow for a week and Spain the week after for a further week with no time to play inbetween
I'll update once I've made some more progress.
Edited by HoHoHo on Saturday 14th November 20:03

dr_gn said:
Nice work so far - I think the fuselage will probably straighten itself if you tape it tightly enough and then wick some thin liquid cement along the joints.
Yep, I'm confident it will all come together once taped and glued as you suggest.I'm confused about the actual position of the instruments. The instructions don't match images on the web and if I fit as per instructions the two thin engine cover bars don't meet in the middle

I can't find a definitive answer and don't want to feck it up (I suspect I've already misplaced the HUD currently which I'll have to address).
Eric Mc said:
I think you are referring to the reflector gun-sight. To a Battle of Britain pilot, a HUD was something you put on when it was raining 
The Airfix 1/24 Hurricane was first released in 1973.
My instant thought too was "Graham Hill" when I saw the pilot. The actual pilot of LK-A was usually Ian Gleed, who was a very famous fighter pilot and survived the war. Your wife's reference to "The Village People" was a bit closer to the truth than you might have realised -

http://www.historyextra.com/feature/same-side-homo...
Thanks Eric - fountain of amazing trivia The Airfix 1/24 Hurricane was first released in 1973.
My instant thought too was "Graham Hill" when I saw the pilot. The actual pilot of LK-A was usually Ian Gleed, who was a very famous fighter pilot and survived the war. Your wife's reference to "The Village People" was a bit closer to the truth than you might have realised -
http://www.historyextra.com/feature/same-side-homo...
I was going to reply with 'well bugger me'
But have thought better of that reply
Ok my way to Hamburg and quite disappointed I'm not going to be around for a couple of weeks, I'm looking forward to completing this one

dr_gn said:
Don't forget to visit the Maritime Museum if you've not been before - thousands of unbelievable models. Also the Prototyp car museum around the corner, and of course the biggest model railway in the world. All rounded of be a nice relaxing evening at the Reeperbahn...
Thanks for the heads-up.I'm with a young colleague and I'm not sure he'll be up for it but I'll see if I can lose my way and find the venues.
As it happens our hotel is on the Reeperbahn. I've been to a number of cities in Germany but never Hamburg so don't know what to expect yet.
I do know it's a long drive in a 3.5T van fully loaded and I'd rather have my M5 on these roads
Eric Mc said:
HoHoHo said:
Thanks Eric - fountain of amazing trivia
I was going to reply with 'well bugger me'
But have thought better of that reply
Ok my way to Hamburg and quite disappointed I'm not going to be around for a couple of weeks, I'm looking forward to completing this one
The personal stories behind a particular aeroplane can be a great motivation to building and completing the model.I was going to reply with 'well bugger me'
But have thought better of that reply
Ok my way to Hamburg and quite disappointed I'm not going to be around for a couple of weeks, I'm looking forward to completing this one
I'm really enjoying this model and I'm looking forward to the finished product.
davepoth said:
HoHoHo said:
As it happens our hotel is on the Reeperbahn. I've been to a number of cities in Germany but never Hamburg so don't know what to expect yet.
It's quite lively. There aren't any live sex shows any more, but plenty of table dancing. The street with most of the brothels runs parallel about 100 yards behind the Reeperbahn towards the harbour. Don't ask me why I know.Make sure to eat currywurst.
Will obviously have a good look around the more exotic tourist attractions

tight5 said:
HoHoHo said:
I'm not in the league of Dr_Gn or Eric
Not many are !(I'm not either)
As long as you enjoy it, though.
Looking good to me.

I'm not by any means expecting a perfect show model (it's going to hang in my youngest son's bedroom) but it's good to play with and practice.
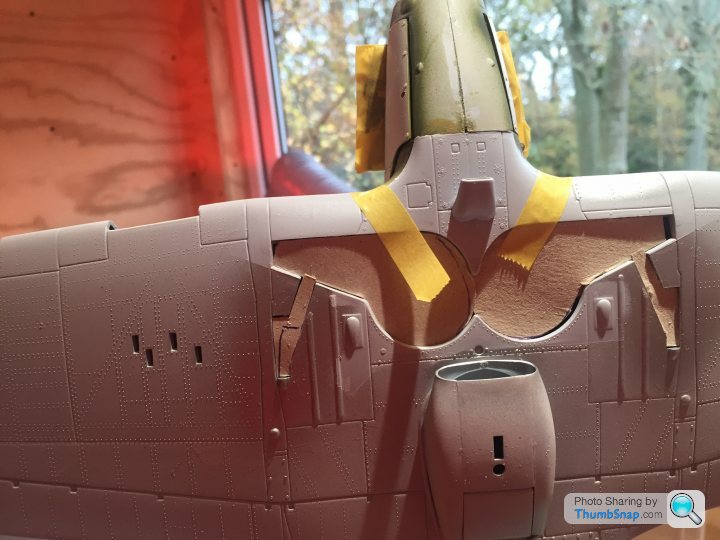
Bit more progress but I clearly need to work on my fine detail.....
The wheel wells need a little rub down at the rear

Graham Hill looking comfortable
Shame the top of the engine will be covered forever, it's going to hang in Sammy's room so no need to leave it loose. I will however not glue to side cowels so I'll be able to have a look from time to time
Now a quick question....
What's the best way to mask and then cut the canopy, is it simply mask properly, cut carefully and lots of practice?
The wheel wells need a little rub down at the rear
Graham Hill looking comfortable
Shame the top of the engine will be covered forever, it's going to hang in Sammy's room so no need to leave it loose. I will however not glue to side cowels so I'll be able to have a look from time to time
Now a quick question....
What's the best way to mask and then cut the canopy, is it simply mask properly, cut carefully and lots of practice?
dr_gn said:
If you mean apply masking tape to the transparency, then cutting along the frames with a scalpel, I'd advise simply masking accurately, and not cutting at all. If you cut in slightly the wrong place, or the blade wanders, you're screwed.
I do it by masking the edges first with thin strips, then filling in the middle with a mosaic of tape. If you chamfer the ends of the thin strips, you can get it perfect, even at 1:72. This is how I did my Defiant turret:
http://www.pistonheads.com/gassing/topic.asp?h=0&a...
It should be very easy at 1:24, especially on a Hurricane.
I do and thanks that's very helpful.I do it by masking the edges first with thin strips, then filling in the middle with a mosaic of tape. If you chamfer the ends of the thin strips, you can get it perfect, even at 1:72. This is how I did my Defiant turret:
http://www.pistonheads.com/gassing/topic.asp?h=0&a...
It should be very easy at 1:24, especially on a Hurricane.
I'm now off to Barcelona so will have to wait to have a go - by the way I went to the prototype museum in Hamburg, good way to spend a couple of hours, thanks for the tip
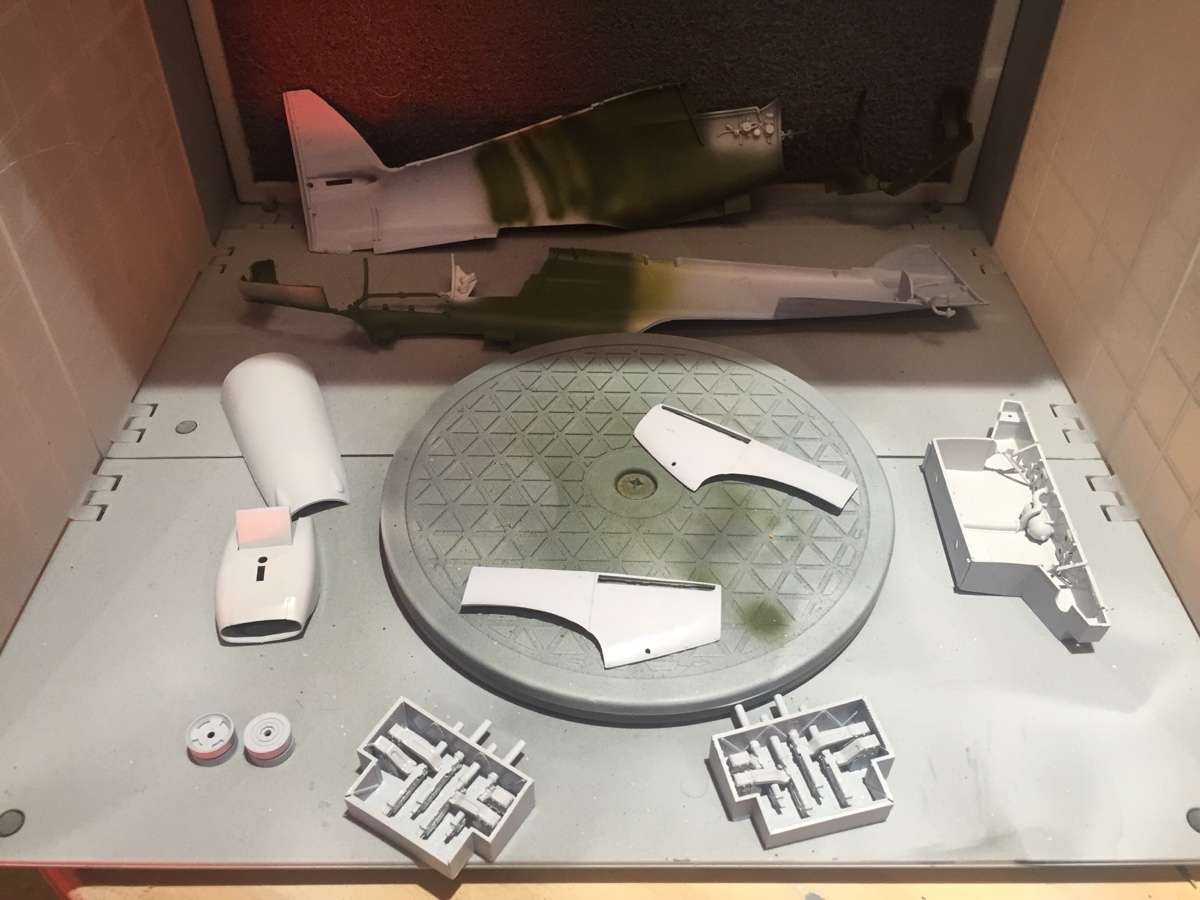
Some more progress and it's moving fast now!
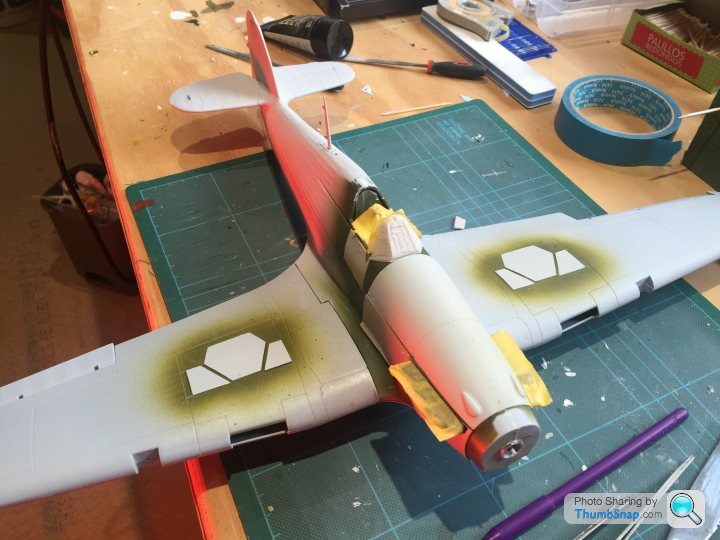
I then applied a dark earth to the entire top of the aircraft
Then using blutack marked the areas to be painted dark green
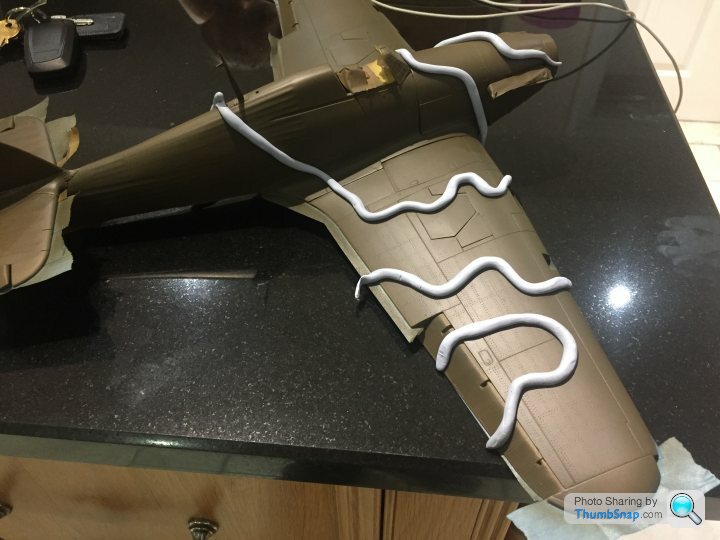
One side done (didn't have enough blutack to complete the exercise in one go!)
And all done
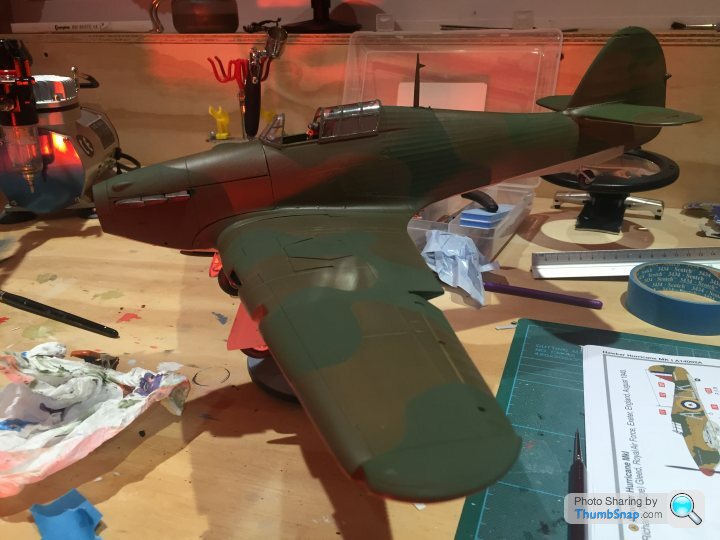
I'm guessing I'll attached the undercarriage and then apply a coat of klear, decals on and then more klear, then weather?
Anyway I'm really enjoying this and have learnt so much during the build
I then applied a dark earth to the entire top of the aircraft
Then using blutack marked the areas to be painted dark green
One side done (didn't have enough blutack to complete the exercise in one go!)
And all done
I'm guessing I'll attached the undercarriage and then apply a coat of klear, decals on and then more klear, then weather?
Anyway I'm really enjoying this and have learnt so much during the build
dr_gn said:
Might be a bad time to ask, but are you sure those colours are right? Doesn't look enough contrast to me - maybe the brown is a bit too dark?
Ah, good question.Vallejo suggest 'dark earth' for WWII too panels which is the colour I used but granted it does seem a touch dark......
It's certainly not too late to play around with the colours, have I mucked up?
The photo was in my man cave above the garage with my red heater on which doesn't help.
I've had another look this morning and it's definitely more brown than sand (as you suggest comparing it to the painting guide G) but doesn't look too bad.
I suspect once I finish, decal and hang in Sammy's room the colour difference will be long forgotten however yet another learning curve. I did some research prior to painting and noticed there's a million different colours to paint anything! I did also think Vallejo might know their paint from their paint!
One quick question......
I've used Dr_Gn's suggested method of canopy taping using think strips etc. and on the whole for a first attempt it went very well however there's a slight trace of grey primer between the clear plastic and green paint - where did I go wrong?
It's I my slight however noticeable
Edited to add I really have no idea what my last sentence is saying I know we write replies on a iPhones etc. when we're out and about but I really should read my replies before I hit submit
I've had another look this morning and it's definitely more brown than sand (as you suggest comparing it to the painting guide G) but doesn't look too bad.
I suspect once I finish, decal and hang in Sammy's room the colour difference will be long forgotten however yet another learning curve. I did some research prior to painting and noticed there's a million different colours to paint anything! I did also think Vallejo might know their paint from their paint!
One quick question......
I've used Dr_Gn's suggested method of canopy taping using think strips etc. and on the whole for a first attempt it went very well however there's a slight trace of grey primer between the clear plastic and green paint - where did I go wrong?
It's I my slight however noticeable
Edited to add I really have no idea what my last sentence is saying
I know we write replies on a iPhones etc. when we're out and about but I really should read my replies before I hit submit Edited by HoHoHo on Thursday 3rd December 14:04
dr_gn said:
HoHoHo said:
The photo was in my man cave above the garage with my red heater on which doesn't help.
I've had another look this morning and it's definitely more brown than sand (as you suggest comparing it to the painting guide G) but doesn't look too bad.
I suspect once I finish, decal and hang in Sammy's room the colour difference will be long forgotten however yet another learning curve. I did some research prior to painting and noticed there's a million different colours to paint anything! I did also think Vallejo might know their paint from their paint!
One quick question......
I've used Dr_Gn's suggested method of canopy taping using think strips etc. and on the whole for a first attempt it went very well however there's a slight trace of grey primer between the clear plastic and green paint - where did I go wrong?
It's I my slight however noticeable
I don't think you've done much wrong, it's just the edge of the primer layer showing. It might have been worsened if the paint has "torn" along the masked edge. You can get around this by running a new scalpel blade around each masked panel before removing the tape.I've had another look this morning and it's definitely more brown than sand (as you suggest comparing it to the painting guide G) but doesn't look too bad.
I suspect once I finish, decal and hang in Sammy's room the colour difference will be long forgotten however yet another learning curve. I did some research prior to painting and noticed there's a million different colours to paint anything! I did also think Vallejo might know their paint from their paint!
One quick question......
I've used Dr_Gn's suggested method of canopy taping using think strips etc. and on the whole for a first attempt it went very well however there's a slight trace of grey primer between the clear plastic and green paint - where did I go wrong?
It's I my slight however noticeable
The only paint I use on canopies is first the interior colour (usually a matt green), followed by the camo colour and finally matt varnish. If you've used a spray can primer, that layer will almost certainly be thicker than an airbrushed primer coat. On all my models the contrast between the matt interior green coat and the outer camo colour has been so slight that it becomes invisibe.
"Dark Earth" has a multitude of interpretations from various manufacturers, and if you use a "scale effect" to lighten the colour as well, the exact shade becomes a bit difficult to determine.
Edited by dr_gn on Thursday 3rd December 12:58
So are you suggesting you don't prime the canopy?
dr_gn said:
If you prime the canopy, you see the primer colour through the glazing when it's finished. Unless the 'real' interior colour happens to match the primer, then it will be wrong. TBH at 1:24 I'd probably spray the internal framing as well as the outside.
Simple answer is I don't prime the canopy framing - it's not worth it.
That is axactly the case and I can se white on th einside of the canopy.Simple answer is I don't prime the canopy framing - it's not worth it.
So do you tend to leave the canopy off until you absolutely have no choice or do you mask, spray and then glue in place and then over mask again?
dr_gn said:
No probs - canopies are one of the things that can make or break a model.
On yours, why not try getting a cocktail stick, dampen the end in Vallejo thinners and run it around the periphery of each panel, to see if you can flake/abrade the edges of the paint off (I often do this at 1:72 for light overspray errors).
Then re-mask and respray a coat of top colour, which would hopefully cover the exposed edges? It's the kind of thing that might work if you set aside an hour to just concentrate on getting that part right. All correction attempts like this come with a risk, but if it goes wrong you can send off for another canopy.
I think it's certainly worth a play that's for sure.On yours, why not try getting a cocktail stick, dampen the end in Vallejo thinners and run it around the periphery of each panel, to see if you can flake/abrade the edges of the paint off (I often do this at 1:72 for light overspray errors).
Then re-mask and respray a coat of top colour, which would hopefully cover the exposed edges? It's the kind of thing that might work if you set aside an hour to just concentrate on getting that part right. All correction attempts like this come with a risk, but if it goes wrong you can send off for another canopy.
Will revert re that.
Thanks.
FFS the decals are on however on the sides they are supplied in one piece for the two individual letters and the clear part of of the decal has gone silver on both sides I have tried to help matters spraying with a matt finish but that hasn't done any good whatsoever.
Frustrating but I'm sure there's a good reason and yet another learning curve!
Pics to follow shortly.
I have tried to help matters spraying with a matt finish but that hasn't done any good whatsoever.Frustrating but I'm sure there's a good reason and yet another learning curve!
Pics to follow shortly.
dr_gn said:
HoHoHo said:
FFS the decals are on however on the sides they are supplied in one piece for the two individual letters and the clear part of of the decal has gone silver on both sides I have tried to help matters spraying with a matt finish but that hasn't done any good whatsoever.
Frustrating but I'm sure there's a good reason and yet another learning curve!
Pics to follow shortly.
Hmmm, unfortunately it's not the topside of the decls that's the problem, it's the undersides, so no amount of varnish will solve the silvering issue. I have tried to help matters spraying with a matt finish but that hasn't done any good whatsoever.Frustrating but I'm sure there's a good reason and yet another learning curve!
Pics to follow shortly.
I'd try and remove the decals somehow - maybe high-tack adhesive tape, or dissolving with Microsol. If this doesn't work, then very lightly abrade the surface with went & dry, repaint and try again with a new set of decals. You could repaint using a lighter brown while you're at it?
The best way to pretty much guarantee no silvering is to place the decal, preferably on a gloss/satin surface, and then wick a small amount of Klear behind with a paintbrush. This will fill all the tiny air pockets between the decal carrier film and the paint surface. apply Microsol to the top of the decal and leave for a while.
On this occasion I'm not going to strip the decals, I'll leave as is and hang in Sammy's bedroom. The model whilst I'm quite pleased with the result doesn't warrant more work. However what it does do well is being used as a training exercise.
I've taken photos and I'm just waiting for Aperture to rebuild itself.............seems everything is throwing a wobbler at the moment.
My next model is a 1:144 A380 which I've started along with a Vickers Vanguard. I'll post some images but its too late for the build thread.
I find it amazing that a hobby that some make look so easy is actually quite difficult to get really good results.
On a side note, Sammy is thrilled with his new bedroom model and Mrs. HoHoHo would like to know why the RAF placed targets on the side of their aricraft
Gassing Station | Scale Models | Top of Page | What's New | My Stuff