Frog (Rovex) Hawker Typhoon build [not GB]
Discussion


hi
Watching the group build planning coming to fruition I decided to return to scale modelling after a VERY long absence.
Overcoming domestic displeasure can be very much a "manning up" process. SWWSMBO has not been the happiest bunny in the warren. "I thought you had grown up away from all that..."
Still here I is!
As I have a Frog Typhoon in my cache I chose that to start with.
Eric Mc did a very nice version of this kit a while ago, so I knew it could make up into a decent model, like most of the kits that emerged from Rovex in the sixties and seventies
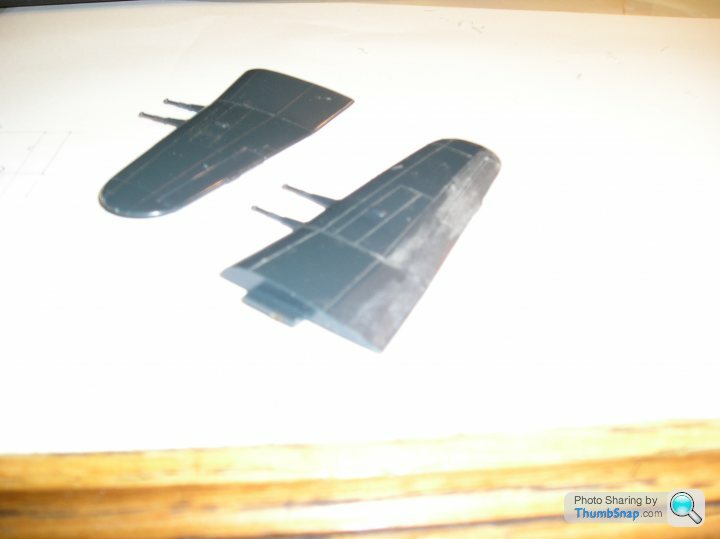
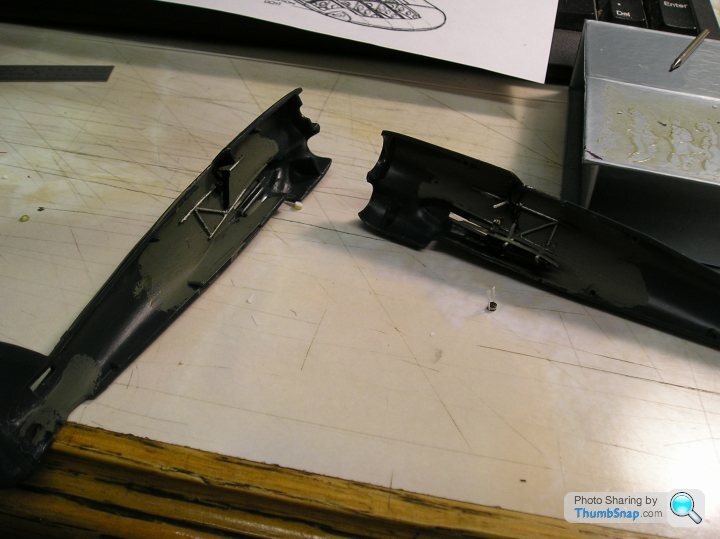
Looking at the mouldings, in a blackish grey 'styrene I detected the usual generous amount of plastic around the wings. Most models of the age had a set of wings that look too bulky to me, so I usually thinned out the trailing edges to get a more aerodynamic shape to them.
First thing for me then was to start to scrape off the huge amount of excess at the T.E, starting with the starboard wing upper and lower panels
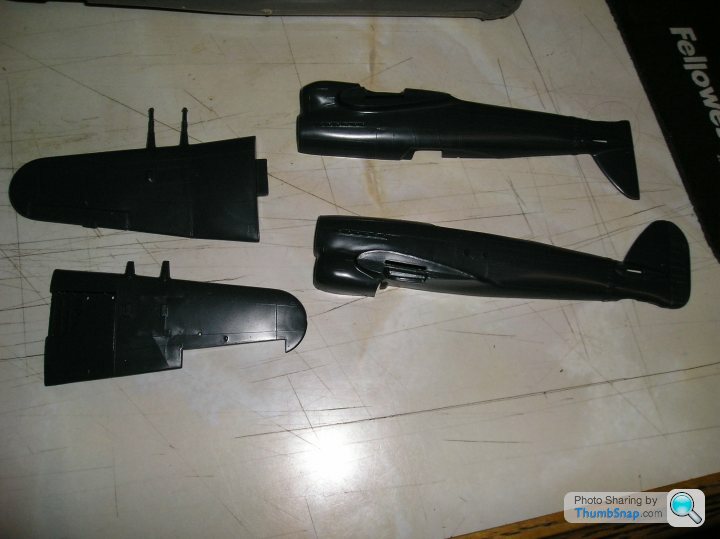
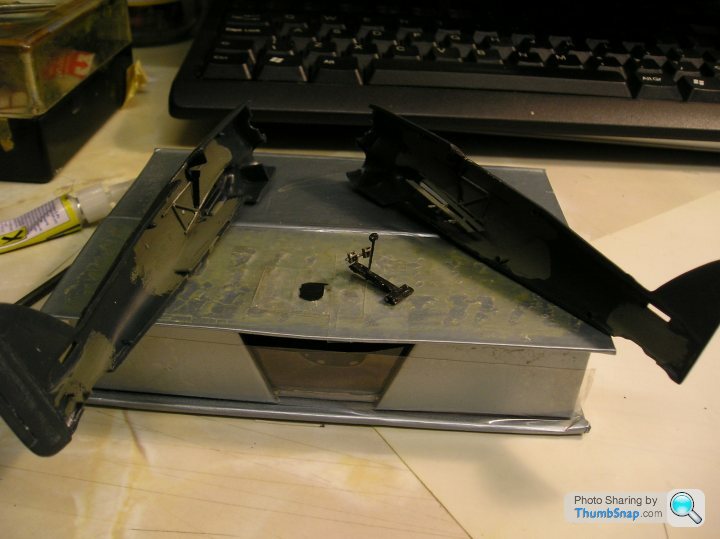
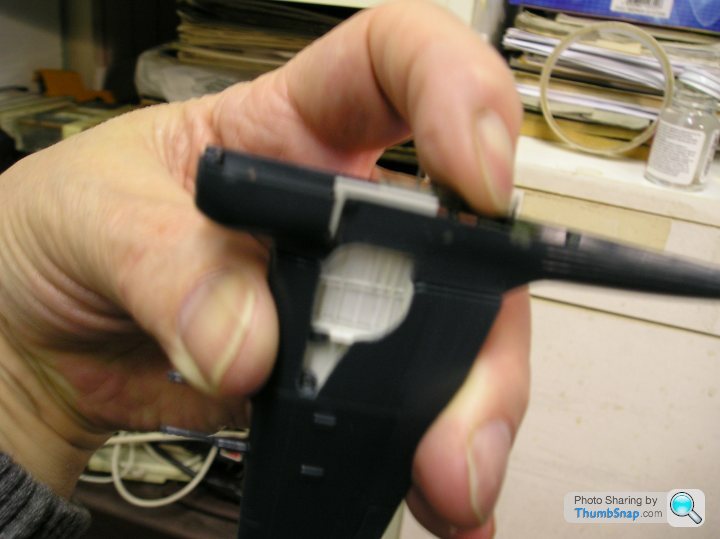
Shows the basic fuselage and wing mouldings untouched
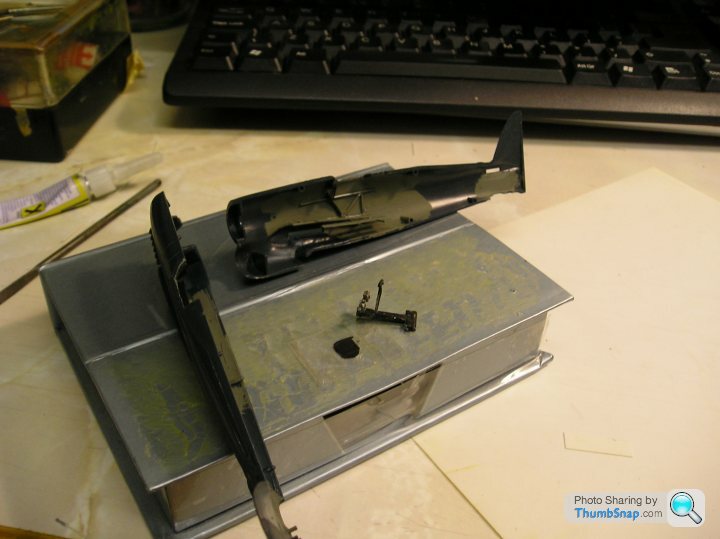
Shows the thinning out process underway
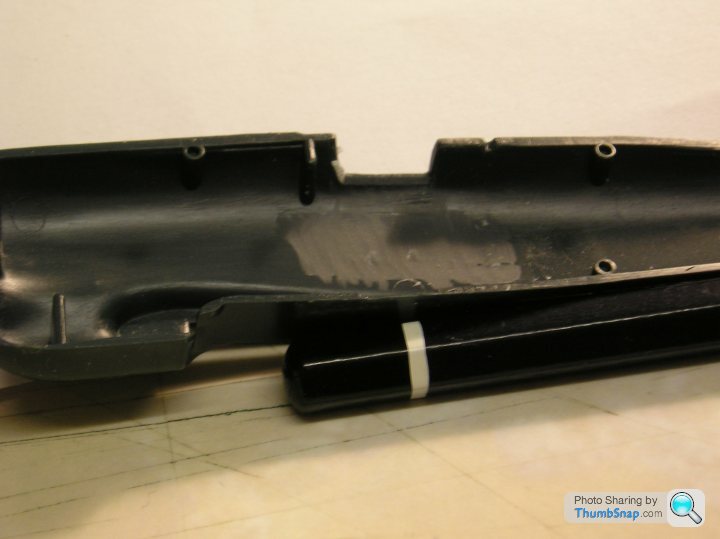
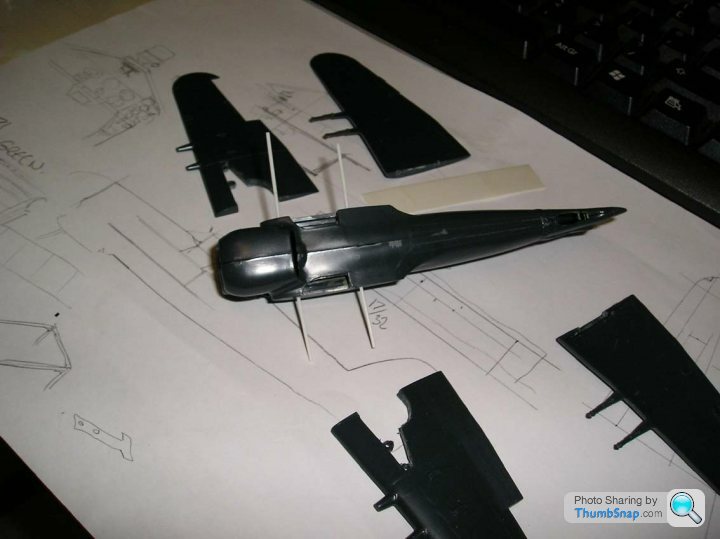
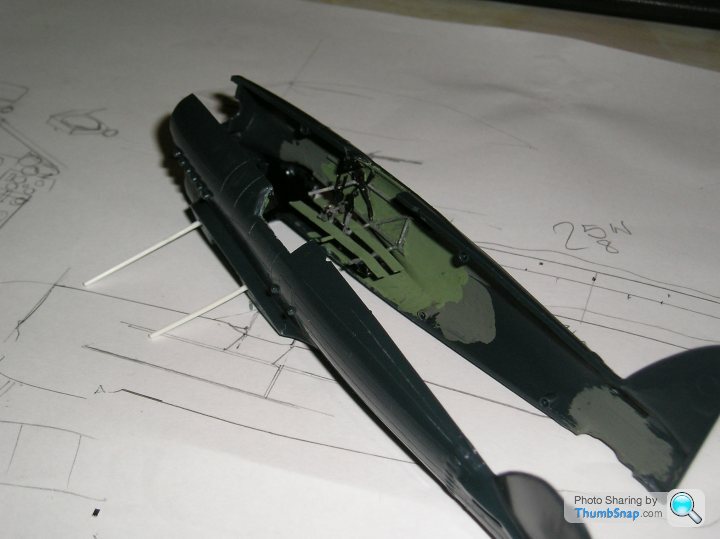
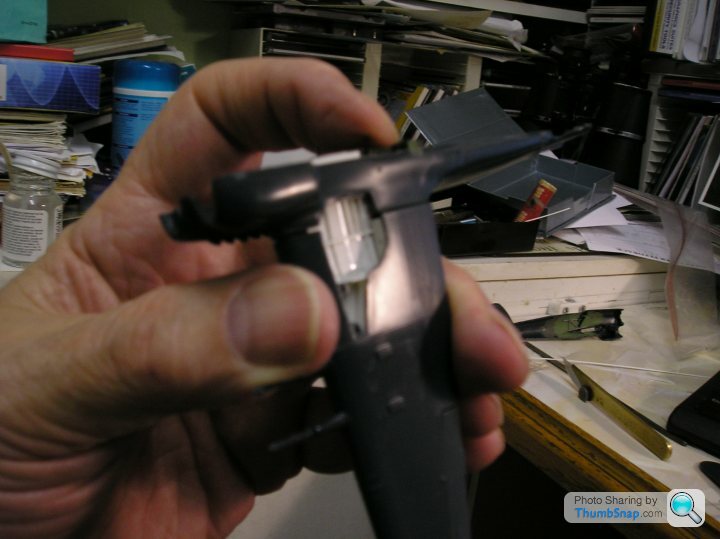
Now I have started the basic thinning out and cleaning up of the cockpit area, I will be doing some basic detailing but as I have decided that the canopy will stay closed much will not be seen and can be hinted at rather than a full detailled cockpit being needed
Hawker's had a strange method of building the Typhoon and Tempest series, using a tubular fore end married to a stressed skin rear end, joined just aft of the cockpit. Here I have added some of the tubular frames that can (maybe) be seen through a closed canopy and have added the pilot's footboards (no floor in these babies) and part of the instrument panel and the front edge of the opening door frame is visible too
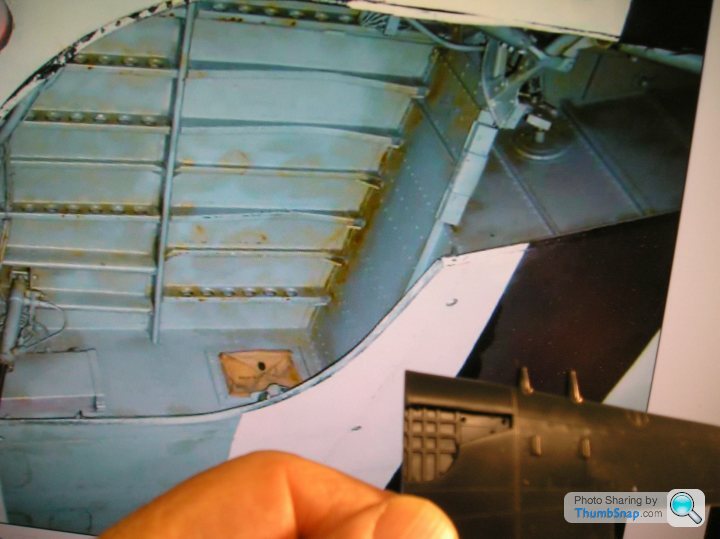
Frog made a very good attempt at wheel well interior
But it has to come out, new roof panels and framework detailing will be added as the build progresses.
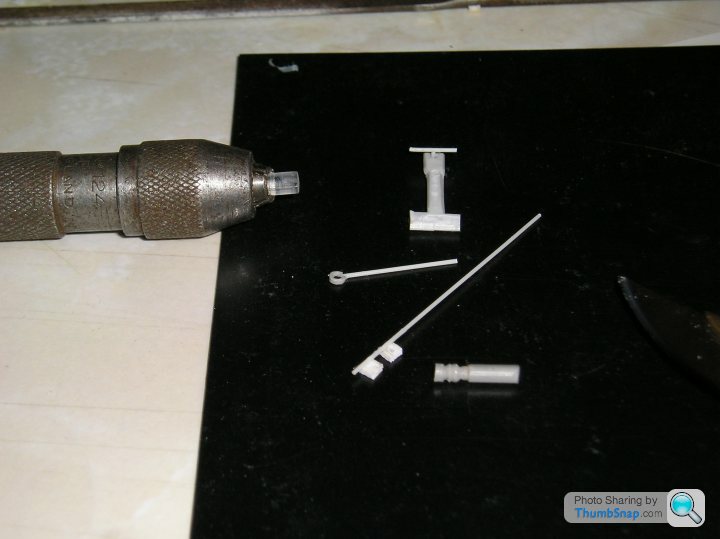
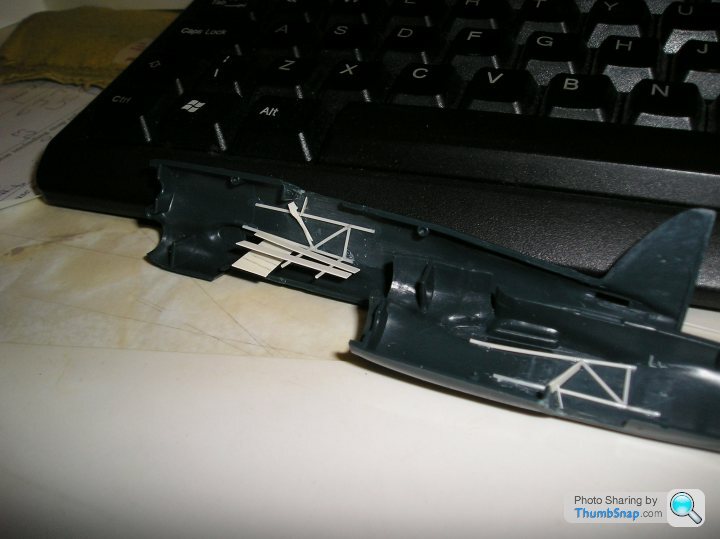
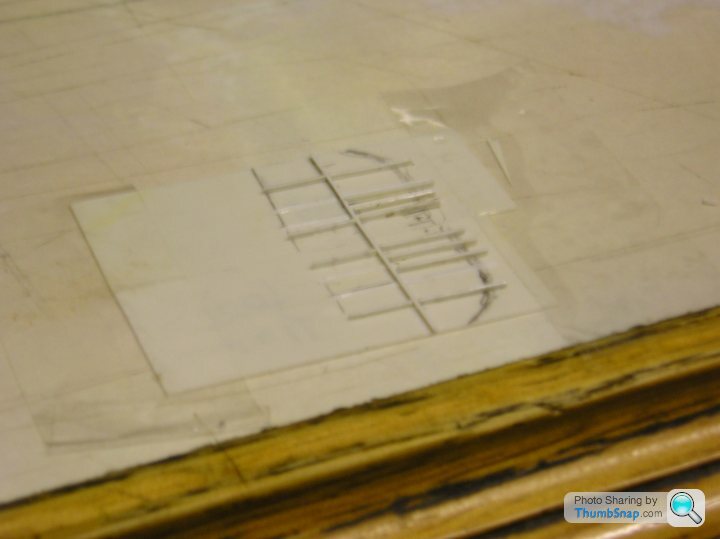
This is where I left off last night. The pieces shown here are the control support bracket (non-scale but invisible) forthe stick and rudder bar. This fits below the foot boards, painted black it wont be intrusive. Here too you can see the first version (OK there may be a couple of these made yet) of the mkll reflector sight (the funny nobbly strut thingy) the control yoke yet to be detailed with buttons and braces
There is also the rudder pedal bar and in crude condition at present, the two rudder pedals with the brake bars on top, yet to be cut off and added separately to the bar.
Also in view in my large pin vice is the first attempt at the glass cover for the magnetic compass that will live above the rudder pedals. This piece of clear styrene will probably be used as the upper portion of the reflector sight lens too.
All very tentative so far but it is giving me lots of pleasure using my modelling brain again
Here's one I did earlier
1980 IPMS Nats
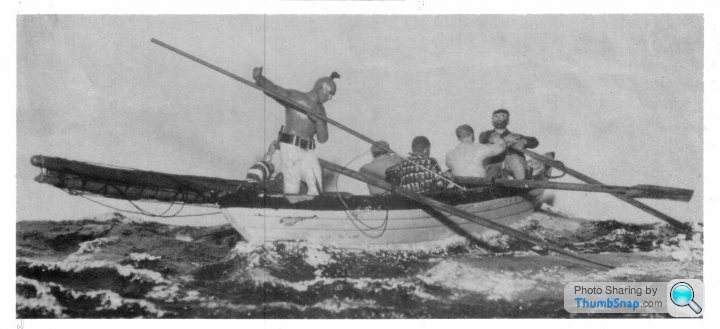
The Nantucket Sleigh Ride
I wonder where that is now?
Bill
Watching the group build planning coming to fruition I decided to return to scale modelling after a VERY long absence.
Overcoming domestic displeasure can be very much a "manning up" process. SWWSMBO has not been the happiest bunny in the warren. "I thought you had grown up away from all that..."
Still here I is!
As I have a Frog Typhoon in my cache I chose that to start with.
Eric Mc did a very nice version of this kit a while ago, so I knew it could make up into a decent model, like most of the kits that emerged from Rovex in the sixties and seventies
Looking at the mouldings, in a blackish grey 'styrene I detected the usual generous amount of plastic around the wings. Most models of the age had a set of wings that look too bulky to me, so I usually thinned out the trailing edges to get a more aerodynamic shape to them.
First thing for me then was to start to scrape off the huge amount of excess at the T.E, starting with the starboard wing upper and lower panels
Shows the basic fuselage and wing mouldings untouched
Shows the thinning out process underway
Now I have started the basic thinning out and cleaning up of the cockpit area, I will be doing some basic detailing but as I have decided that the canopy will stay closed much will not be seen and can be hinted at rather than a full detailled cockpit being needed
Hawker's had a strange method of building the Typhoon and Tempest series, using a tubular fore end married to a stressed skin rear end, joined just aft of the cockpit. Here I have added some of the tubular frames that can (maybe) be seen through a closed canopy and have added the pilot's footboards (no floor in these babies) and part of the instrument panel and the front edge of the opening door frame is visible too
Frog made a very good attempt at wheel well interior
But it has to come out, new roof panels and framework detailing will be added as the build progresses.
This is where I left off last night. The pieces shown here are the control support bracket (non-scale but invisible) forthe stick and rudder bar. This fits below the foot boards, painted black it wont be intrusive. Here too you can see the first version (OK there may be a couple of these made yet)
of the mkll reflector sight (the funny nobbly strut thingy) the control yoke yet to be detailed with buttons and braces There is also the rudder pedal bar and in crude condition at present, the two rudder pedals with the brake bars on top, yet to be cut off and added separately to the bar.
Also in view in my large pin vice is the first attempt at the glass cover for the magnetic compass that will live above the rudder pedals. This piece of clear styrene will probably be used as the upper portion of the reflector sight lens too.
All very tentative so far but it is giving me lots of pleasure using my modelling brain again
Here's one I did earlier
1980 IPMS Nats
The Nantucket Sleigh Ride
I wonder where that is now?
Bill
I have a minidrill (lightweight Dremel thingy) that I could thin out the sidewalls with but prefer the use of my number two blade as a scraper. With the blade I'm in control, with the machine it's a bit of a lottery, I've had melted sidewalls and even more to do, putting right in the past.
How much thinning does the cockpit need?
Can you thin the resin parts instead of going overboard on the fuselage?
How much thinning does the cockpit need?
Can you thin the resin parts instead of going overboard on the fuselage?
Well a little bit done tonight.
I used my minidrill as a cutting tool with a 0.031" dia drill and removed the incorrect wheel well details from both sides. This leaves me with a decision to make.
If I cut out the plastic that would allow the wheels to retract inside the fuselage/wing box I will need to fix the wing with new, different style location pins because the slat that goes into the fuselage slot is bang in the middle of the retracting space.
I am going to make up new inner wheel wells with the proper "looking" reinforcement ribs inside and I hope to add the inspection window you can see in the wheel well wall too. Shall I go all the way? Or will it be wasted effort?
Don't, under any circumstances ask my missus

I have a large shoe box full of "things under wings", rescued bombs, rockets, weapons systems (Matchbox Phantom fuselage mounted gun fuel tank, Airfix Hunter Aden gun pack etc) that also has some wheels and other discarded bits of kits.
Guess what I found?
I haven't been able to get a decent photo, so you can play at peering through thick fog at...
I used my minidrill as a cutting tool with a 0.031" dia drill and removed the incorrect wheel well details from both sides. This leaves me with a decision to make.
If I cut out the plastic that would allow the wheels to retract inside the fuselage/wing box I will need to fix the wing with new, different style location pins because the slat that goes into the fuselage slot is bang in the middle of the retracting space.
I am going to make up new inner wheel wells with the proper "looking" reinforcement ribs inside and I hope to add the inspection window you can see in the wheel well wall too. Shall I go all the way? Or will it be wasted effort?
Don't, under any circumstances ask my missus
I have a large shoe box full of "things under wings", rescued bombs, rockets, weapons systems (Matchbox Phantom fuselage mounted gun fuel tank, Airfix Hunter Aden gun pack etc) that also has some wheels and other discarded bits of kits.
Guess what I found?
I haven't been able to get a decent photo, so you can play at peering through thick fog at...
I wish I still had the old David Brown from the Stirling kit, jammy beggar...
I remember when my brother built the Stirling that all of the trolleys had the same configuration. I'm sure the extra ribs were on them.
Are they visible on the picture you showed us t'other day?
I would think that with such a very small sprue and moulding the braces would probably be on the real thing too.
EDIT IN BIG WRITING
belay that!
I've just examined the actual piece of what is honestly tat and I reckon you are right.
The sprue pieces are dissimilar on mine and very unconvincing
Mine are coming off too!
Edited by perdu on Tuesday 18th January 23:47
Bridge Plates, were fitted to all Allied Military Vehicles and seem to have had the "rounded up" weight of the machine stencilled on them (probably if in use "in theatre")
I have just Googled and found a picture of a Willy's Jeep with a number 2 stencilled on it, for two tons. None of that metric crapule in OUR war.
I think some American kit had square yellow bridge plates rather than round...
The yellow metal plates were intended as far as I can remember to act as weight markers so that MPs and engineers operating any bridge or ferry could decide whether they should allow the piece of kit to use the Bridge, since all bridging equipment had its own limits built in for safety
Post war most military vehicles were not number marked since all bridges by then were up to the same standards (allegedly) and all the yellow plates were un-numbered when I had a rifle.
I'm still worried about the blue you have on these pieces of kit, needs to be far darker to me near enough to roundel blue I'd think and as Eric rightly says much of the airfield kit was painted in Dark Green or Green/Brown camo
I think the trailers would be Blue though
Opened up a new minefield haven't you?
I think the n/s roundel is the thing too and white number/lettering is right.

Kenny, yes basically I did get the idea from Melville (Me? I love the book and have read it several times... I think I hear another go soon, a'calling me)
Not being sure how to mark his tattooos I just left the Heathen as "a South Sea Islander", in '79 there wasn't such a rich information resource available as the internet is these days.
I researched through several branches of Brum's Libraries though and managed to find suitable info for the catcher boat and her crew.
I had wanted to try my hand at a clinker built boat from plasticard for a while and the idea to make Nantucket Sleighride came from this.
I finished the boat in time for the IPMS nats in '80 and was lucky to win class Q and a separate Ships Trophy with it
That was when I was a competitive animal
I think he's dead now, 'cos now it's for fun alone
I have just Googled and found a picture of a Willy's Jeep with a number 2 stencilled on it, for two tons. None of that metric crapule in OUR war.
I think some American kit had square yellow bridge plates rather than round...
The yellow metal plates were intended as far as I can remember to act as weight markers so that MPs and engineers operating any bridge or ferry could decide whether they should allow the piece of kit to use the Bridge, since all bridging equipment had its own limits built in for safety
Post war most military vehicles were not number marked since all bridges by then were up to the same standards (allegedly) and all the yellow plates were un-numbered when I had a rifle.
I'm still worried about the blue you have on these pieces of kit, needs to be far darker to me near enough to roundel blue I'd think and as Eric rightly says much of the airfield kit was painted in Dark Green or Green/Brown camo
I think the trailers would be Blue though
Opened up a new minefield haven't you?
I think the n/s roundel is the thing too and white number/lettering is right.
Kenny, yes basically I did get the idea from Melville (Me? I love the book and have read it several times... I think I hear another go soon, a'calling me)
Not being sure how to mark his tattooos I just left the Heathen as "a South Sea Islander", in '79 there wasn't such a rich information resource available as the internet is these days.
I researched through several branches of Brum's Libraries though and managed to find suitable info for the catcher boat and her crew.
I had wanted to try my hand at a clinker built boat from plasticard for a while and the idea to make Nantucket Sleighride came from this.
I finished the boat in time for the IPMS nats in '80 and was lucky to win class Q and a separate Ships Trophy with it
That was when I was a competitive animal
I think he's dead now, 'cos now it's for fun alone
dr_gn said:
perdu said:
Bridge Plates, were fitted to all Allied Military Vehicles and seem to have had the "rounded up" weight of the machine stencilled on them (probably if in use "in theatre")
I have just Googled and found a picture of a Willy's Jeep with a number 2 stencilled on it, for two tons. None of that metric crapule in OUR war.
I think some American kit had square yellow bridge plates rather than round...
The yellow metal plates were intended as far as I can remember to act as weight markers so that MPs and engineers operating any bridge or ferry could decide whether they should allow the piece of kit to use the Bridge, since all bridging equipment had its own limits built in for safety
Post war most military vehicles were not number marked since all bridges by then were up to the same standards (allegedly) and all the yellow plates were un-numbered when I had a rifle.
I'm still worried about the blue you have on these pieces of kit, needs to be far darker to me near enough to roundel blue I'd think and as Eric rightly says much of the airfield kit was painted in Dark Green or Green/Brown camo
I think the trailers would be Blue though
Opened up a new minefield haven't you?
I think the n/s roundel is the thing too and white number/lettering is right.
Many thanks Perdu - very informatave. I have just Googled and found a picture of a Willy's Jeep with a number 2 stencilled on it, for two tons. None of that metric crapule in OUR war.
I think some American kit had square yellow bridge plates rather than round...
The yellow metal plates were intended as far as I can remember to act as weight markers so that MPs and engineers operating any bridge or ferry could decide whether they should allow the piece of kit to use the Bridge, since all bridging equipment had its own limits built in for safety
Post war most military vehicles were not number marked since all bridges by then were up to the same standards (allegedly) and all the yellow plates were un-numbered when I had a rifle.
I'm still worried about the blue you have on these pieces of kit, needs to be far darker to me near enough to roundel blue I'd think and as Eric rightly says much of the airfield kit was painted in Dark Green or Green/Brown camo
I think the trailers would be Blue though
Opened up a new minefield haven't you?
I think the n/s roundel is the thing too and white number/lettering is right.
No problem, I'll respray the tractor. I still fancy the blue, so if you happen to find the correct Humbrol or Revell number, I'll sort it. In fact, I want to add a rear view mirror on a stalk, so another coat wouldn't go amiss anyway.
Too late for the railway crane, but it doesn't really matter since it's not really an RAF crane at all is it - just a crane on a dockside that happened to be painted in the late RAF blue, slightly darkened with age.
How's that for a compromise?
I still think a kind of Roundel Blue with heavily weathered "out in all weathers matt" kind of way would be nearest
When I was shopping today I couldnt see a specific colour anywhere that is quite like it
Just looked up BS381c in an online colour chart
This one works nicely on my monitor, very close to my conceptions of true colours, rare enough on t'internet I find. Might be worth a bookmarking!
http://www.stephen.hull.btinternet.co.uk/bs381c.ht...
BS381 105 Oxford Blue looks nearest on my monitor but there is also BS381 108 Aircraft Blue and BS381 110 Roundel Blue to use as indicators of paintwork on windblasted airfields
If you chose an Oxford Blue as the tractor colour the RAF markings would have sufficient contrast to show up against it
Oh yes, BS381c is the standard paint spec for post war HMG equipment ISTR and can be cross ref-fed against other NATO kit too
Hmm looks a bit like my imagined image
I don't think it ought to be that same colour as the uniforms though do you? A leetle darker and not even slightly glossy for wartime finish. Even in peacetime airfield equipment gets wind lashed to a dull finish.
I did a tad more last night trying out a Revell sludge coloured grey green for the interior, but I'm not convinced
What d'you think guys?
I noticed on the photo I posted on your thread dr_gn that the fuselage frames in the cockpit are silver alloy tubing so they can be left in relief against the painted cockpit walls
So last night I picked out those frames and started putting together the joystick and rudder pedals onto the carrying block
That black square on the boxlid will become the standard blind flying panel when its finished
mind you, with all the squinting I'm having to do it is a dead cert that I cannot build to competition standards any more
Eric, Yertis, hey no
I don't mind there being a general Frog Nostalgia kick on this theme
For one thing when I let it slip back down the listings a "general topic additional" helps keep it alive.
(As long as I can mention my Tiffie too )
I just bought a pot of Humbrol 78 cockpit grengrey, would that do it better for me I wonder?
Does the side wall detail look too dark on the pics to you guys
I don't mind there being a general Frog Nostalgia kick on this theme
For one thing when I let it slip back down the listings a "general topic additional" helps keep it alive.
(As long as I can mention my Tiffie too
)I just bought a pot of Humbrol 78 cockpit grengrey, would that do it better for me I wonder?
Does the side wall detail look too dark on the pics to you guys
Making small pieces is getting difficult
You can't hardly see the ruddy things and sure will not be able to with the canopy on but here are the stick and rudder pedals (with toe brake bars) in place above the floor boards. On the port cockpit wall is the throttle quadrant with lever, made but not fitted is the u/cart lever.
Across the fuselage now is the centre brace bar of the space frame, when closed up it will join together the sides of the plane and also carry the magnetic compass. This is partly made and awaits trimming and painting on fixing. It can be seen with its hanging braces sitting in front of the starboard fuselage.
The Mkll gunsight will sit on its own section of spaceframe where other aircraft have a dash panel cover
The blind flying panel has vague scratches and paint blobs on it preparatory to having gloss varnish glazing put on, though I may try Klear instead. It's been sitting unused on my shelf for all this time
Now to find out where you guys get that lead tape that the doc swears by...
???
The Frog seat will do the job after a leetle loving attention
Bugger me I am enjoying this again!
Mrs P is NOT
Thanks for the additional research, but TBH I have already popped into Mike's Models and liberated XF-71 anyway on your recomendation.
Looks good to me
To me both colours look too pale, I'd look at something darker. But it only matters what you like and how you see it doesn't it.
I started cutting the wing slot area off the fuselage halves last night and will carry on with that tonight, (been busy living real life today dammit) I may be able to make the new wheel well inners without removing ALL of the root tab but if not I will drill and peg the wing roots so I can get enough visible depth in there
And I will repaint the cockpit side walls
Eric, I think she'd rather I played "piano inna brothel" instead of restarting modelling
Not gonna happen tho'
I'm a crap pianist and my eyes ain't what they wus
edit to allow for a suddenly appearing picture that was hiding
Edited by perdu on Saturday 22 January 17:04
Slow stuff this weekend, damn that real life stuff
Families, who'd have 'em?
Anyway
Finished cutting out the wheelwells and as I sort of suspected I had to remove all of the locating tabs to make space for the sculptured wheel well doors and a wheel in each one
Set out the locating dowels to use instead and carved out the spaces. I think I will do the silver "celly" finish instead at painting time, maybe even repaint the tail wheel space silver too. Not a lot of detail info for this out there...
And having bought the new Tamiya cockpit green and used it, well, I like it.
So that is one problem outta the way
I have near enough finished the cockpit section except for the armour plating and redoing the rather poor seat.
The cockpit instrumentation will do now, just needs the blind flying panel, and the mkll reflecting sight fixing to its cradle
You might just see the magnetic compass hanging off the fuselage crossbrace just above the rudder pedals which needs the excess trimming off after the cement has set solid tomorrow
To be honest I have overdone the detail in there just for the sake of it, most of it will vanish once the two halves are closed up
Just need to paint the throttle lever's quadrant in grey so the throttle is visible...
More to do tomorrow
I am expecting to sculpt away the sidewalls of the wells. A very thin plasticard stripe will make the new walls, didn't you do similar things to the 109?
Quite looking forwards to closing the fuselage, maybe tonight and beginning to make the wings "right" too
Yes that blue needs to be justa weathered dark blue
Airfix "used" to make a good colour match out of the tin, many years ago, I remember using their matt dark blue on the tractor from my brother's Stirling. (I wasn't allowed to make the bomber!)
Not sure why we didn't paint the bomb trollies though...
Although the Tiffie has slight differences in the wheel well area to the Tempest I like the idea of maybe using milliput carved clear of the edge of the hole and covering the top with a plasticard skin (already cut out to be trimmed up with rib details as per the photo I posted of Tiffie's well on your thread---which feels like years ago now )
Milliput carves beautifully for these operations
I just re read your Tempest thread from the start...
The blue I was talking about?
The tractor was near enough right in my memory before you repainted!

) Milliput carves beautifully for these operations
I just re read your Tempest thread from the start...
The blue I was talking about?
The tractor was near enough right in my memory before you repainted!
It'll all be all right on the night
Spent a quiet evening plotting out, cutting out and staking out the first three inner wheel well plates
And not a few minutes enjoying Google's set of Tiffie pics
Here're the rear walls and the centre fillets in place for the wells, both sides.
Omigod doesn't Mek still stink
A poor look up into the port side inner well now
blurry as buggery but you might see, through a thick fog
Really must learn to take photos
I'm sure dr_gn will sort out that blue on the tractor, wish I'd remembered seeing it earlier
Now then, a few more bits of the wheel wells done tonight
The roof/ceiling of the wells was made up in tandem and has been ribbed in a similar (not entirely, at 1/72 I think the extra detail would swamp the eyes) manner to Hawker's factory method
Most of these parts were made from 0.010" plasticard with additional detail from 0.005" (the shallow braces across the roof)
I have been carving away some of Frog's fine but blooming hard plastic to allow the wings with the wheel well pieces added to fit into the fuselage and the wings at the same time
A roughish shot or two here
Noticed already haven't you? I haven't finished the fuselage internals yet, but there is still a little more to do. Armour plate to make and decide whether to carry on with what Eric described as a not very nice (in other words though!) pilot's seat. Also detailing to taste, buttons and switches from dabs of paint next, safety harness, still can't fit the BF panel either until the halves are together.
I need to make the same decisions that the Tempest builders have and decide which colour the wheel wells should be, my picture shows an apparently pale bluish cast to what may be silver paint...
Still that is for another day.
I'm only doing a little bit at a time, enjoying finding new tests for myself by adding the unecessary details.
This may end up taking longer that your GB
And I really don't care, it's fun again
Yes the sidewall tubing isn't finished yet, I left it to dry and moved on.
I always follow round and pick up all the little snags before closing the joints.
Looking at the cockpit pictures I've found all that tubing looks to be silver paint finished so I am going to keep it "colour finished" rather than a dry brush on green painted tubes.
have to say its great fun back in the saddle.
Even if I am too poor sighted these days to be able to do this stuff with nekkid eyes like I used to!
Possibly summat on the lines of
RDX HE 500LB
But now I don't have dad to call on it's all just guesswork
He was an armourer during the war, probably able to reel these stencil details off in his sleep, bless him
It is just a basic H.E 500pounder after all
There must be a reference to this somewhere in cyberspace, just need a search term to find it
how about 500lb HE bomb?
never know your luck
This is exactly why I wanted this thread open for exchanges of ideas
I knew that the bomb's markings had to be out there
And so many other Turner books I hadn't see to look out for
I think the wheel wells will get a sort of washed out silver finish. Some of the colour on that picture I'm using seems to be "worn out" paint conducive to harsh conditions paint stress
Keep the thoughts and ideas coming folks
I picked up a Frank Wooton aircraft book in a charriddee shop some time ago
SHE hasn't forgiven me for it
(It had £7.50 on the label but the old dear at the counter thought it was "just a hardback book at £1.00"- I opened my mouth so the Hospice got what they'd asked for.. hell and fury
that's women!)
Gassing Station | Scale Models | Top of Page | What's New | My Stuff