G50 Install Issues...
Discussion


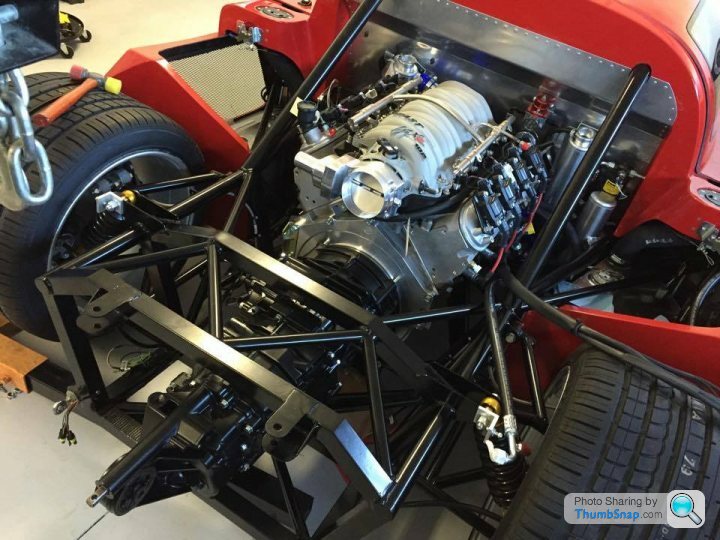
With the help of two friends, I got the LS7 installed yesterday. It looks really good nestled in there. The only problem at all was due to the swirl pot connection through the reducer to the engine's water outlet. It just wouldn't make the necessary turns no matter how we trimmed the hoses. Another solution (flexible line?) will have to be found.
The transaxle, though, was a different story. Despite using a clutch alignment tool to install the flywheel/clutch assembly, the gearbox simply won't slide home. The splines are definitely engaged, so that's not it. The gear selector fork is not obstructing things (it's just about to slide between the gearbox bearing mounts), so that's not it. I think the issue is that the nose of the output shaft isn't entering the crank bearing.
At this point, I'm pretty much at a loss as to what else to do or try. Any suggestions that I can attempt before being gone all next week? I'd really hate to have this hanging over my head all week.
Ken
Here's a idea:
Is it possible that my clutch alignment tool (heavy plastic) deflected under the weight of the pressure plate such that, while tightening those nine bolts, the concentricity between splines and crank bearing was slightly spoiled? That would account for the alignment tool being able to slide in and out with no trouble, while the steel clutch shaft is passing the splines but not entering the bearing.
Thoughts?
Ken
bluesatin said:
Which gearbox? Have you had the inside of the bell machined?
It's a G50-03 (with the uprated 5th gear), obtained from the factory.I haven't had anything done to it at all. As a factory-prepared box, it ought to install directly with no further machining required, right?
Ken
Storer said:
Ken
Another thought.
You are not trying to install the transmission with the clutch fork pivot pin in situ are you?
It has to be fitted after the box is bolted to the engine.
Paul
Hey Paul,Another thought.
You are not trying to install the transmission with the clutch fork pivot pin in situ are you?
It has to be fitted after the box is bolted to the engine.
Paul
That's a good thought, but no.

We're about to have lunch and then attack the box this afternoon. I'll run through the various measurements, take photos, etc. I'm also going to remove the clutch and see if the box will seat properly without it. If so, that'll narrow things down considerably. Also, not having the clutch in place will help with visualizing the proper alignment between engine and gearbox. Then, I'll just replace the clutch and slide the box back on. It's a good theory, anyway…
Ken
After a long afternoon of wrestling with the gearbox, I'm fairly convinced that the problem is an alignment issue caused by my clutch alignment tool allowing the weight of the pressure plate assembly to shift things every so slightly as it was tightened down - just enough to prevent the gearbox shaft from entering the crank bearing.
I have a second bearing on hand (previously measured as being identical to the one installed in the crank by AS) and it fits perfectly on the end of the gearbox shaft, so it's not a sizing incompatibility.
I'm fairly certain now that the solution will be to remove and reinstall the clutch while making a greater effort to avoid any deflection. I will say that I was surprised at just how close the entire flywheel and clutch assembly sits to the inner face of the bell housing. So close that the slight misalignment resulted in the starter ring scratching the paint inside the bell housing in a few spots.
I might not get this done tomorrow (I've got a local classic car show to attend), but I'll be less worried about it during my week away. Thanks, all, for the great advice. I'll post a note here to confirm that it's all set once I finally get the gearbox installed.
Ken
I'm still out of town, but a few friends stopped by my place thinking they'd get things sorted for me in my absence. That would've been really nice, but it wasn't to be.
Turns out that the guide tube on my G50-03's input shaft is both too long and too thick to allow the transaxle to seat properly. A call to Ultima revealed that they'd installed the wrong guide tube and a different part needs to be swapped in. They're sending me the new guide tube via FedEx, so it should arrive on Monday.
My friends tell me that the two screws holding the incorrect guide tube in place are hellaciously tight. The factory mentioned that they might have to be drilled out, so that's probably on schedule for the weekend.
More to come as the adventure continues...
Ken
Steve_D said:
Drilling would be a last ditch route for me.
Try an impact screwdriver. This will be better than an impact gun as it applies a force onto the end of the screw at the same time as trying to turn it.
Steve
Yep, I'm definitely planning to try the impact driver first. Hopefully, that'll work.Try an impact screwdriver. This will be better than an impact gun as it applies a force onto the end of the screw at the same time as trying to turn it.
Steve
This whole issue is evidently a known thing, with Porsche having changed from 34mm to 32mm guide tubes in the late '80s. I find it fairly remarkable that Ultima didn't confirm the matching fit of the gearbox and clutch it supplied with my kit.
Ken
OK, the impact driver didn't work at all, so I resorted to drilling out the screws as suggested by the factory.
The good news is that I got the screw heads drilled and the guide tube removed. The bad news is that there wasn't any of the screw shank left to grip. My "easy out" screw removers didn't work at all, so I drilled through one with a smaller drill and successfully removed it. The catch is that I smelled gear oil when I was done. So…
Are the guide tube screw holes meant to be through holes into the case or are they blind holes? Did I drill too far and, if so, what are the consequences? Needless to say, I'm not doing anything to the other one without further guidance.
Also, what's the correct thread pitch for these holes? M5? I'm going to need to clean the threads in the drilled hole(s)…
Thanks, all.
Ken
Yep, I did try that on the first screw (the one that I wound up drilling), but had no success. Historically, I've only had limited success using extractors - they seem to work, at best, about 50% of the time.
I'll try it again on the second screw, but not until I'm sure that drilling through (if the extractor doesn't work) won't cause any harm.
Since the gearbox isn't a pressure environment for the gear oil, but a splash environment, I'm confident that sealing the screws will be sufficient, even in the case of a through hole. Still, I'd like to hear that confirmed by the factory or someone with G50 experience.
Ken
OK, the gearbox is on. Long story short: I drilled out the recalcitrant guide tube screws, then cleaned the threads with a tap. The new guide tube was installed and the box wrestled into place by yours truly and his ever-patient wife. It slid right into place, was snugged up forthwith, and the rear support bolted on. Which leads me to the next adventure:
How the heck does one install the clutch fork pivot pin?!? My clutch fork was properly suspended by elastic bands and I can start the pivot pin through, but can't seem to get it aligned with the right side no matter how much I twiddle the fork through the slave cylinder hole. What's the secret?
Also, when it's finally in on the right side, will I need to exert much force to seat the left side needle bearing in its boss? Time for the small rubber mallet?
Ken
Hi Paul,
Yep, I installed the far (right) side bearing in the cast boss before installing the transaxle. Lots of grease, as you say, so I'd be surprised if a needle moved out of place.
I've just been able to slip the pivot pin in what seems like all the way, but I have no way of ascertaining that. There's still a small amount of the pin remaining outside the left side boss. Is that correct or should it be entirely within the boss?
As it stands now, I still have to fit the left side needle bearing over the pin (is the bearing meant to fit inside the cast boss, as with the other side?), then fit the black plastic cap and the bolted clip. How does the cap fit? Does it just butt up against the needle bearing? It won't fit over the bearing or within the cast boss, so I'm not clear on what I'm trying to achieve here.
Ken
Thanks, Paul & Steve!!
The wretched thing is on there. I was confident that there wasn't too much grease in the right side bearing and reasonably certain (wishful thinking?) that I didn't have a fallen needle. It finally occurred to me, though, that perhaps my elastics were hold the clutch fork too high on the right side so that I wasn't engaging the bearing at all. I tried reaching in through the slave cylinder hole and managed to pull down against the elastics just enough that the pin slipped into the bearing. Celebration ensued, believe me!!
I slid the left side bearing down a long, thin drift centered on the pin's screw hole and it pressed right into place. The plastic cap needed its leading edge very slightly beveled and it seated itself about halfway into the boss. With the metal clip and bolt in place, the whole thing is tight and secure. Job done.
Imagine how much easier all these little jobs would be if we had a proper, step by step, assembly manual, including tips for commonly encountered issues. Alas.
Thanks, again! Now I'll be able to sleep tonight.
Ken
Gassing Station | Ultima | Top of Page | What's New | My Stuff