Advice on Lean Too Construction.
Discussion


So SWMBO has set me yet another “small project” to complete and I am just looking for a little advice from the PH Massive before I start.
We have built, mostly, an extension onto the house (semi-detached 60’s build) which sits along the side and extends with the rear of the new kitchen about 3m past the old rear elevation. There is a new back door at 90 deg to the old rear elevation that opens out onto the old patio. The long term plan is to fill in the patio across the rear elevation with a “sun room” and utility when funds allow but with the winter approaching and a second dog likely to join the household she has tasked me with building a temporary “lean too” type utility room outside the kitchen door to allow the dogs (and probably kids) a drying area when coming back in the house from the garden. It would need to be weather tight and last about 4-5 years before being replaced.
Having taken a quick look my plan is to build a low, probably 3-4 course, wall of engineering brick up to the level of the existing DPC. This would be tied into the two existing walls and built up directly on the existing patio slabs using a few long threaded rods drilled and cemented into the ground running through it. I would then lay a DPC and use some 4x2 timbers to make a frame to bring the walls up to full height. The rods would bolt the bottom of the walls down and the sides would be tied into the existing walls. This frame could then be covered externally with some OSB and then a waterproof plastic and finally covered in some sort of shiplac(?) or other weatherproof covering. Internally I could use a few bits of plasterboard and paint to achieve a reasonable finish. There is a decent building salvage yard close to me and I was thinking of buying a PVC door, for the 2m wall facing the garden, and as many windows as I could fit into the longer 3m side for light. For the roof I was thinking of using some 6x2 to make an endplate and sideplate screwed directly to the existing walls and then some 6x4 to make rafters running down to the new end wall. Some more OSB to cover and then felt to weatherproof. I have some lead flashing left over that I could use to seal the edges that but up against the existing walls and there is a gutter downpipe that I could easily tie into for the run off.
I am thinking that this would not be too large a project but am probably deluding myself! There are a couple of questions that immediately spring to mind though.
1. Do you think that simply using a threaded rod and the existing patio is enough of a foundation or should I do it properly and dig out and concrete, bearing in mind that it is only a temporary structure?
2. What sort of fall do I need on the roof, would 5% be sufficient as the steeper the rake the harder the flashing becomes?
3. Are my, SWAG, estimations on timber sizes about right?
I am sure that there will be more to follow, and possibly a new thread on how I managed to destroy a two story extension by adding a lean too! ;-)
Thanks,
Jon
Pheo said:
Could you do it all timber, and make it freestanding? Given its temporary that might be easier?
The only problem with going completely freestanding is that making it watertight at the join with the existing structure. If I tie-in the roof to the walls, in my mind anyway, it makes it easier to achieve a waterproof seal. It also removes some of the problems associated with movement of the structure away from the house.SAB888 said:
What about Building Control and Planning Permission?
I have to say that I'm not really bothered by either. I have planning permission for a conservatory / additional structure in that space on the application that allowed the extension and planning control should not be interested as it is not a habitable.
option click said:
When I built my lean-to, I attached a ledger board to the house and hung the joists of that, in pretty much the same way that you'd do decking (except 12ft up from the ground)
From this:

to this:
That looks exactally like what I am thinking, albeit quite a bit bigger! What size timbers did you use, if you don't mind me asking?From this:
to this:
Ok, so back again, as SWMBO has now seen / talked to someone / had a bright idea (pick one or all) about making the roof "green". Having looked about online it would appear that a simple lightweight "green roof" weighs between 60 – 150km/m2. What I am after is a wet finger in the air to see if my plan of 4x2 rafters @ 400mm centres and an 18mm ply covering would be sufficient with the proposed span of approx 2m? I haven’t got the exact dimensions, as I am working 200 miles away form home and cannot get a tape measure to check but I don’t believe the extension projects past the back of the house by more than 2m. The rafters would be supported on one end on the existing house wall and sit on the wooden wall on the other.
Many thanks,
Jon
Many thanks,
Jon
I can only agree. Everything I can find is detailing the types of roof and planting ideas with very little / nothing about the actual rafter sizes. Looking at the data available I am thinking of creating an “extensive” green roof. This will be done by constructing the roof as if it were a normal lean-too construction but only applying the felt underlay layer. This would then be covered with a butyl pond liner to provide a waterproof layer that is also root barrier. On top of this I will use an old piece of carpet to provide the protection layer / drainage layer / filter layer in one and then about 80mm of substrate. This will be either purchased or made up of about 70% inorganic and 30% organic with a 300mm edging of gravel to allow water runoff and prevent the plants getting too close to the existing house. This will then be planted with sedums and wildflowers to create a visually pleasant and ecologically sound range of biodiversity. I just need to be sure that my rafters will be strong enough to cope for the 4-5 years the structure will be standing. I am happy to over engineer, indeed that would be my preference, but don’t want to go too crazy as this will increase the cost pushing the whole project out of reach.
Given everything that I’ve read we will probably create a green roof on the sunroom / utility when they are properly built but that will need structural calcs etc to pass building control as and when we get round to it.
Given everything that I’ve read we will probably create a green roof on the sunroom / utility when they are properly built but that will need structural calcs etc to pass building control as and when we get round to it.
I haven't paid for that one, but if it is recommended then I will. The sites that I’ve found most helpful have been these:
http://www.thegreenroofcentre.co.uk/Library/Defaul...
and
http://www.thegreenroofcentre.co.uk/green_roofs/di...
http://www.thegreenroofcentre.co.uk/Library/Defaul...
and
http://www.thegreenroofcentre.co.uk/green_roofs/di...
Having done some more research I’ve found some loading tables that state:
47x97 @ 400 centres the max span is 2m for 1.5kN/m2 (=153kg/m2)
47x97 @ 400 centres the max span is 1.47m for 4kN/m2 (=407.9kg/m2)
47x122 @ 400 centres the max span is 2.51m for 1.5kN/m2 (=152kg/m2)
47x122 @ 400 centres the max span is 1.85m for 4kN/m2 (=407.9kg/m2)
This would mean that for my small roof, <2m span, in a very sheltered spot and keeping the weight of the roof down as much as possible I should be ok with 47x97 @400 centres. Anyone violently disagree?
OK,
I have managed to take a couple of days off work and have sized up the extension / lean-too. In order to set the scene here are a couple of pics:
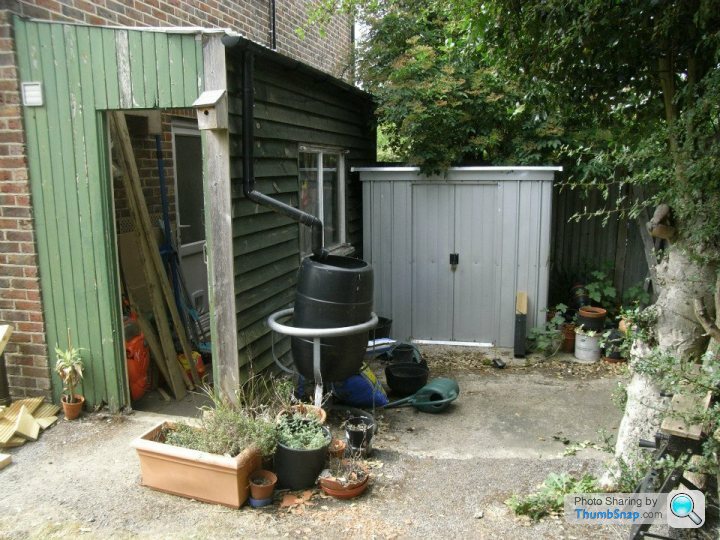
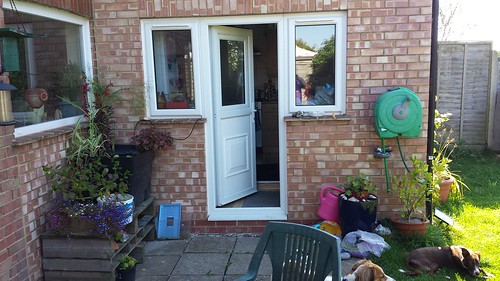
This is a side view of the extension showing how the new kitchen extends beyond the old house and you can clearly see the new back / kitchen door that will be the entrance to the lean-too. The side of the lean-too will also be in this plane and will be simple shiplap covered timber framed wall made of 2x4 with a 3.8mm exterior plywood sheet and then 25mm batons to hold the shiplap boards. I am going to try and source reclaimed double glazed widows as large as possible to help with light. There is a local building reclaim merchants that has proved very good in the past and, as I’m really not precious about openings or dimensions, I hope he will have something suitable. The first rafter will attach to this wall over the door and the end wall will be between the window and the hose reel. This gives a length / span for the lean-too of 2.8 meters and I am going to use a slope of approx 5% on the roof to ensure decent drainage.
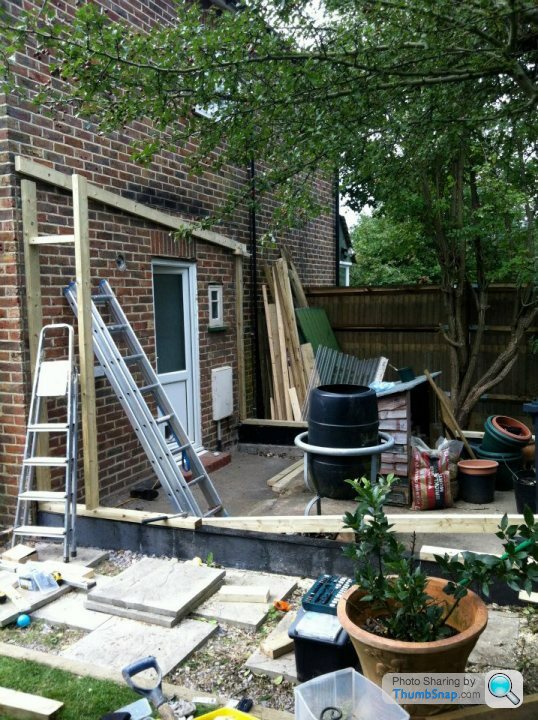
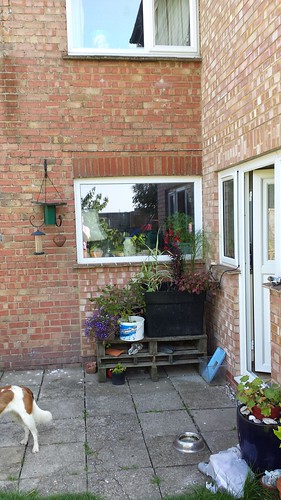
This is the same view but looking from the front showing where the existing French doors from the dining room were taken out and a window put back. The front of the lean-too will be in this plane and there will be a uPVC door in the centre, sourced as above. The width of the lean-too will just extend beyond the current window and this will give me a nice even 1.6 meters, allowing for 5 rafters @ 400 mm centres. There will be an end board fixed to the wall over the window to hang the rafters from.
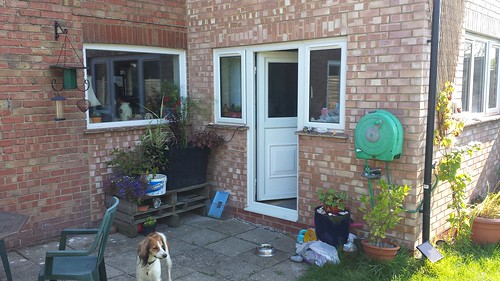
This last one is just another view showing both sides and the existing patio. I am going to try and build this without disturbing the patio so will be building about two layers of engineering brick directly onto the patio. This will bring allow me to put a DPC in line with the existing, an extension, DPC and thus ensure that I don’t damage the permanent structure. I will then use 2x4 to create a stud frame and cover this on the outside with a sheet of 3.8 mm exterior ply before using some 25 mm baton and shiplap to finish. The roof will be 2 x 6 rafters @ 400 mm centres which, according to the calculations I’ve found online, should support 150 kg/m2 over a span of 3.11 meters so my 2.8 meters is well within tolerance. Given that the site is very sheltered and the area small I am comfortable that this will be sufficient to hold a simple green roof.
I hope that no-one has any violent concerns about this but I am always open to suggestions. I will not be home for a few weeks to do any work but am hoping to complete the project in the October half term. I will post pics as I go! As ever thanks for any comments,
Jon
I have managed to take a couple of days off work and have sized up the extension / lean-too. In order to set the scene here are a couple of pics:
This is a side view of the extension showing how the new kitchen extends beyond the old house and you can clearly see the new back / kitchen door that will be the entrance to the lean-too. The side of the lean-too will also be in this plane and will be simple shiplap covered timber framed wall made of 2x4 with a 3.8mm exterior plywood sheet and then 25mm batons to hold the shiplap boards. I am going to try and source reclaimed double glazed widows as large as possible to help with light. There is a local building reclaim merchants that has proved very good in the past and, as I’m really not precious about openings or dimensions, I hope he will have something suitable. The first rafter will attach to this wall over the door and the end wall will be between the window and the hose reel. This gives a length / span for the lean-too of 2.8 meters and I am going to use a slope of approx 5% on the roof to ensure decent drainage.
This is the same view but looking from the front showing where the existing French doors from the dining room were taken out and a window put back. The front of the lean-too will be in this plane and there will be a uPVC door in the centre, sourced as above. The width of the lean-too will just extend beyond the current window and this will give me a nice even 1.6 meters, allowing for 5 rafters @ 400 mm centres. There will be an end board fixed to the wall over the window to hang the rafters from.
This last one is just another view showing both sides and the existing patio. I am going to try and build this without disturbing the patio so will be building about two layers of engineering brick directly onto the patio. This will bring allow me to put a DPC in line with the existing, an extension, DPC and thus ensure that I don’t damage the permanent structure. I will then use 2x4 to create a stud frame and cover this on the outside with a sheet of 3.8 mm exterior ply before using some 25 mm baton and shiplap to finish. The roof will be 2 x 6 rafters @ 400 mm centres which, according to the calculations I’ve found online, should support 150 kg/m2 over a span of 3.11 meters so my 2.8 meters is well within tolerance. Given that the site is very sheltered and the area small I am comfortable that this will be sufficient to hold a simple green roof.
I hope that no-one has any violent concerns about this but I am always open to suggestions. I will not be home for a few weeks to do any work but am hoping to complete the project in the October half term. I will post pics as I go! As ever thanks for any comments,
Jon
Well it's started! I managed to get a "working from home" day and so caught a train yesterday. I managed to get most things done by early afternoon and so started to clear the patio about 1530 hrs and then lifted the first slab and started to dig. Im really glad that fhe rain didnt stop and the clay was really claggy! The top of the foundation was a little lower than I had anticipated but I now have a wide trench leveled round ready for me to sink the foundation trench into. I am going to use a 300mm wide and 500mm deep foundation to support the, now 6, courses of engineering brick up to the DPC. The Woodford he stud walls and roc arrives on a on Monday, all £500 worth, and I have a window is being delivered tomorrow afternoon. I did take a couple of photos on the phone before I covered it over for the night and will post them once I get them online. I think that I'll have to order some ready mix concrete for the foundation as I don't fancy trying to mix over a cube by hand!
I'm now slightly concerned about the floor as the patio slabs are not as level as I remember and I am now thinking that I ought to lift them all and do something else. I know that the proper way would be to excavate and lay a concrete slab then insulate and for over that but I don't have either the energy or cash to do that. Especially as it only has to last about 5 years and it is really only a boot room / dog drying space / space for the freezer. I was thinking that I might lift the slabs and level the clay then use a bag of sand and a thwacker-plate to level it all before putting the DPC sheet down and the insulation over that. What is the PH view on this as a plan?
More to follow as I finish the foundation trench and pour concrete, hopefully tomorrow.
So that's digging finished for today. I've managed to sink the foundation trench down the side but not managed to turn the corner back to the house. I guess that will have to wait for tomorrow morning. I had to break to deal with kids and dogs and a trip to B&Q as I now find that no-one will deliver readymix on a Sunday and so it will all have to be made the old fashioned way, by hand! Oh well I've got to go back now as I couldn't get enough sand and cement in the car all at once. As before I've taken a quick snap on the phone and will post when I get the chance to upload them.
OK so update time again. First off I have uploaded some photos so here goes:
 [/url]
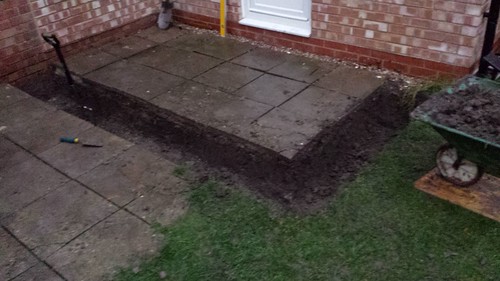
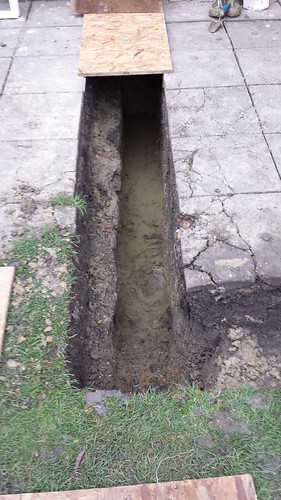
This is the overview of the end of day one. I have lifted the slabs that run along the proposed walls and dug round to the level of the existing foundations.
 [/url]
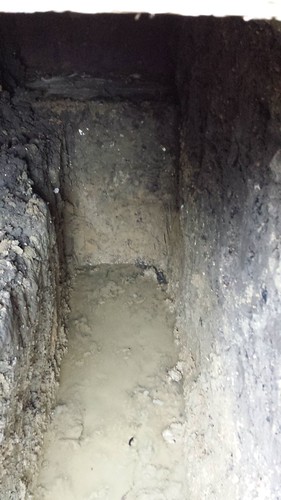
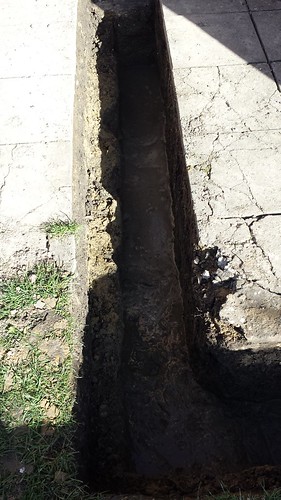
A side view of the trench facing back towards the house and this will be the wall with a window in it.
 [/url]
This is the other wall and will be the front with the door in it.
 [/url]
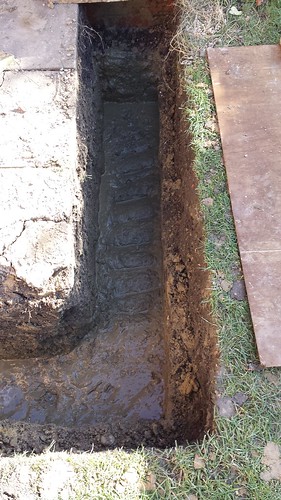
This is at the end of day 2 with the wall trench having been dug down 500mm and 300mm wide to create the foundation tgrench. As you can see the water table is a little higher than i remembered, or it is just wetter, so digging was interesting, albeit Somme like!
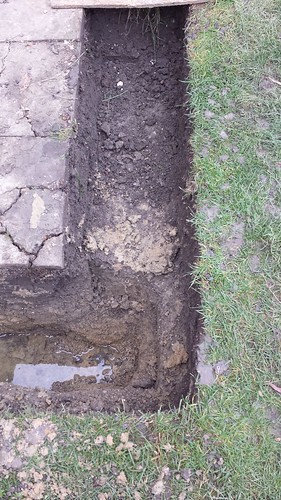
Detail of where I got to in the corner. The different levels are quite clear here.
This one is less clear but it does show the existing house foundation and the level that the new foundation will come too.

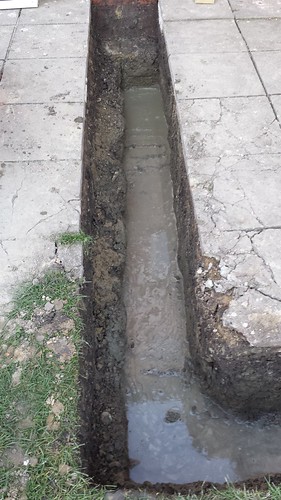
End of day 3 and the foudation trench is finished. I have managed to borrow a cement mixer for tomorrow so will start pouring concrete then.
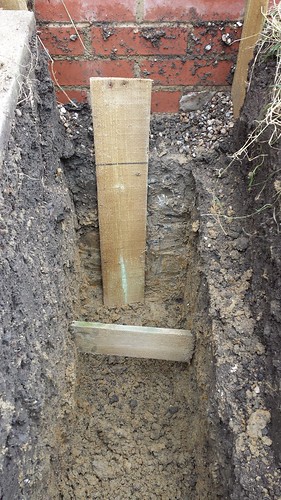
I used two boards to check the depth and width so I am confident that it is 300mm wide all round and down to the bottom of the trench and the depth is at least 500mm as that is the water table and the trench is all under water!
It's also worth remembering that there is lots of spoil, normally more than there should be, and it all has to go somewhere!
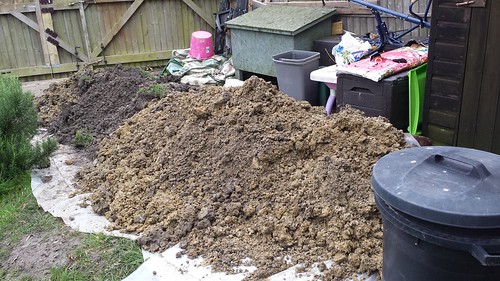
Anyone need some soil?
So that's where I am today. I have over a ton of aggregate, sand and cement on the patio waiting for a mixer and some water to become concrete and the wood will all be delivered tomorrow so lots to do.
[/url]This is the overview of the end of day one. I have lifted the slabs that run along the proposed walls and dug round to the level of the existing foundations.
[/url]A side view of the trench facing back towards the house and this will be the wall with a window in it.
[/url]This is the other wall and will be the front with the door in it.
[/url]This is at the end of day 2 with the wall trench having been dug down 500mm and 300mm wide to create the foundation tgrench. As you can see the water table is a little higher than i remembered, or it is just wetter, so digging was interesting, albeit Somme like!
Detail of where I got to in the corner. The different levels are quite clear here.
This one is less clear but it does show the existing house foundation and the level that the new foundation will come too.
End of day 3 and the foudation trench is finished. I have managed to borrow a cement mixer for tomorrow so will start pouring concrete then.
I used two boards to check the depth and width so I am confident that it is 300mm wide all round and down to the bottom of the trench and the depth is at least 500mm as that is the water table and the trench is all under water!
It's also worth remembering that there is lots of spoil, normally more than there should be, and it all has to go somewhere!
Anyone need some soil?
So that's where I am today. I have over a ton of aggregate, sand and cement on the patio waiting for a mixer and some water to become concrete and the wood will all be delivered tomorrow so lots to do.
Well feeling a little frustrated this morning. The mate with the concrete mixer promised that he'd drop it off last night or this morning, and sofar nothing, and I've rung the wood yard and they tell me that they don't even load the waggons until after lunch and I'm likely to be towards the end of the delivery route so no wood until late afternoon. This leaves me with nothing to do and possibly the best day of the week staring at me through the window. Not happy at the moment.
So as there's nothing else to do I thought I'd start a table of costs.
||Timber Merchant|| ||6x2 c16 timber 4.2m long X 5|| ||£3.28/m|| ||£68.80|| ||£239.37||
| Store | Item | Unit Cost | Item Total | Running Total | ||||
|---|---|---|---|---|---|---|---|---|
| Timber Merchant | 4th External Plywood Sheet X 4 | £10.32 | £41.28 | £41.28 | ||||
| Timber Merchant | 18mm OS Sheet X 6 | £18.60 | £111.60 | £152.88 | ||||
| Timber Merchant | 6X2 c16 timber 5.4m long X 1 | £3.28/m | £17.69 | £170.57 |
||Timber Merchant|| ||6x2 c16 timber 4.2m long X 5|| ||£3.28/m|| ||£68.80|| ||£239.37||
Looks like my table formatting could use some help! I'll try and sort that out later. So friend with concrete mixer apparently forgot to drop it off this morning so I've been hand mixing concrete in a wheelbarrow all day, well bar a trip back to the reclaim yard to source another 150 bricks (as there are 6 courses under the DPC not 2 as I thought, an external door and another window for the long wall. So far I've managed to mix and pour 600kg of concrete and the foundation trench is just under half full. I'm hoping that the mixer turns up tonight and so I can use it tomorrow to finish off. The wood also arrived at about 1600hrs so, hopefully, I now have all the materials to get the structure built. As ever photos to follow.
I'll try and sort that out later. So friend with concrete mixer apparently forgot to drop it off this morning so I've been hand mixing concrete in a wheelbarrow all day, well bar a trip back to the reclaim yard to source another 150 bricks (as there are 6 courses under the DPC not 2 as I thought, an external door and another window for the long wall. So far I've managed to mix and pour 600kg of concrete and the foundation trench is just under half full. I'm hoping that the mixer turns up tonight and so I can use it tomorrow to finish off. The wood also arrived at about 1600hrs so, hopefully, I now have all the materials to get the structure built. As ever photos to follow. So photos of todays efforts.
End of morning session with about 375kg of concrete mixed and poured. This is the front wall foundation and is, slightly, higher than the side wall, hence no water.
End of morning session and the side wall view. As you can see this side is slightly lower and so the standing water has covered the initial pour.

End of day with 600kg of concrete poured. I've tried to keep the level more even with this pour and the water is very thinly spread over the entire trench. I'm hopeful that it will all be gone by tomrrow morning.
Other wall.
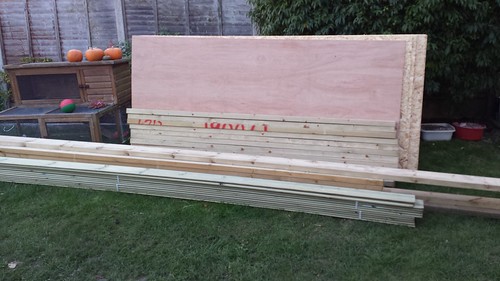
The wood was delivered and this is what £500 buys you today!
End of morning session with about 375kg of concrete mixed and poured. This is the front wall foundation and is, slightly, higher than the side wall, hence no water.
End of morning session and the side wall view. As you can see this side is slightly lower and so the standing water has covered the initial pour.
End of day with 600kg of concrete poured. I've tried to keep the level more even with this pour and the water is very thinly spread over the entire trench. I'm hopeful that it will all be gone by tomrrow morning.
Other wall.
The wood was delivered and this is what £500 buys you today!
So last night SWMBO and I decided that we were not going to go through another day of hand mixing concrete so a problem, an was hatched to hire one. Because I'd done this "mate with mixer" turned up at 0730hrs today and dropped off his. Still this meant that I managed to mix another 700kg in about 3 hours and finished the foundations. I have then turned my hand to turning some of the wood into walls. I've managed to create the end wall with the door in and cut most of the side wall, but not constructed it as the light had gone by then. Unfortunately the weather forecast is rain tomorrow so I don't think I will get to lay any bricks, or probably build any more walls. I'm hoping to catch a break and miss the worst of the weather so I can actually do something but I'm not really that hopeful. The only thing I am now worrying about, other than running out of time, is laying the bricks. It is one thing that I have not done before and I am slightly nervous about tackling it for the first time! As ever photos to follow.
Well rain stopped work for the majority of the day but we, SWMBO and I, did give up and simply head out after lunch and get wet! The foundations look great and I started to lay bricks in the drizzle. I've decided that I will never get a job laying bricks but at least the wall is strength, level and vertical even if it took me a long time and isn't the prettiest thing in the world. I'm not to worried as most of it will be underground and the rest will be half covered the shiplap anyway. If I had any advice to give I've it would be that everything takes twice as long as you think! As ever I'll post ph otoscope when I get round to uploading them.
So today is over and another day completed. The weather was good today and so we got quite a bit done. I had a helper, well two as the first had to go after lunch, and managed to get the brickwork complete. The DPC is now in place and covered over for the night. Hopefully I'll manage to get the walls up tomorrow.
Gassing Station | Homes, Gardens and DIY | Top of Page | What's New | My Stuff