DIY camper the VW way.
Discussion


Inspired by Tampon and his build thread, I thought i'd throw mine up here for inspiration and constructive criticism. Apologies for some of the poor photos, but most if not all have been taken with my phone just for convenience and speed. I'll get around to getting some proper photos closer to the finish. I'm not finished yet, but here is the story from July 2013 so far.......
I'd wanted a T4 for about 2 or 3 years, but after looking at many, many vans I just couldnt find something in my price range and in the condition I wanted it. I'd given up looking when a casual browse on eBay unearthed a T5 just a couple of miles down the road. In price range, and with a bit of initial work, a blank canvas.
So it started July 2013 when I bought it. At the time of purchase, it was a 2005 Versa conversion, 1.9 with 38k on the clock. Very clean and backed up with its history, an ideal base to start from.

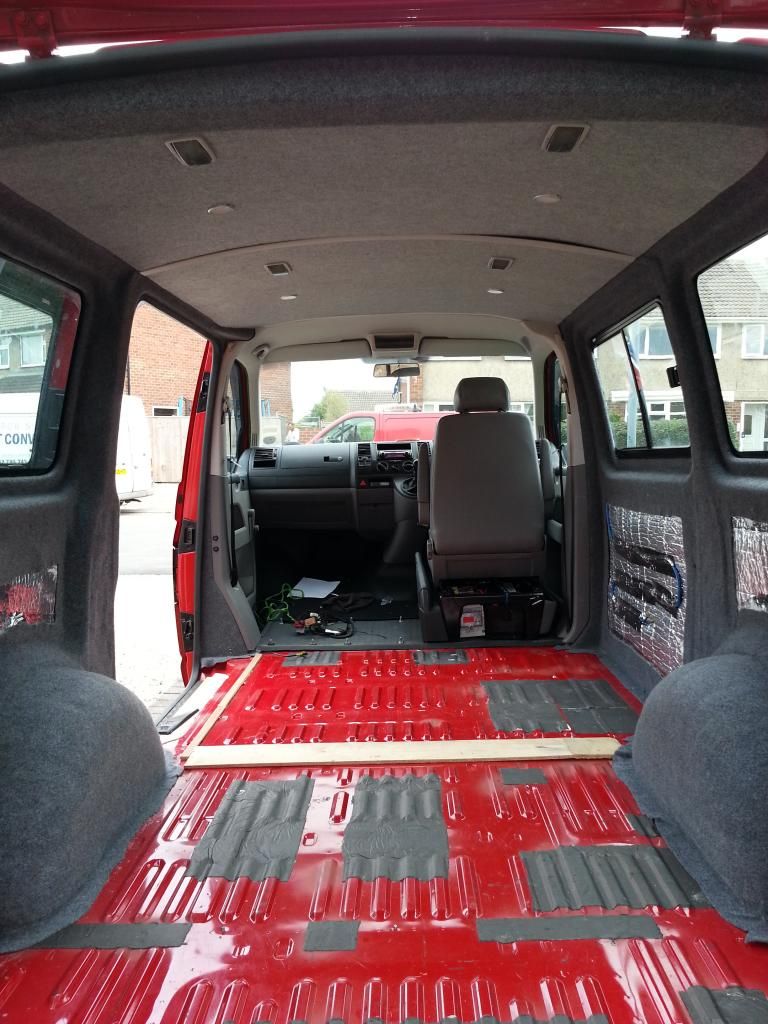
It was a case of removing the whole conversion in the rear and stripping it back to the bare bones of the van.
What I did think would be a fairly straight forward process did actually become a bit of a pain but perseverance and some quality tools (including 2 pairs of hands) eventually won in the end.
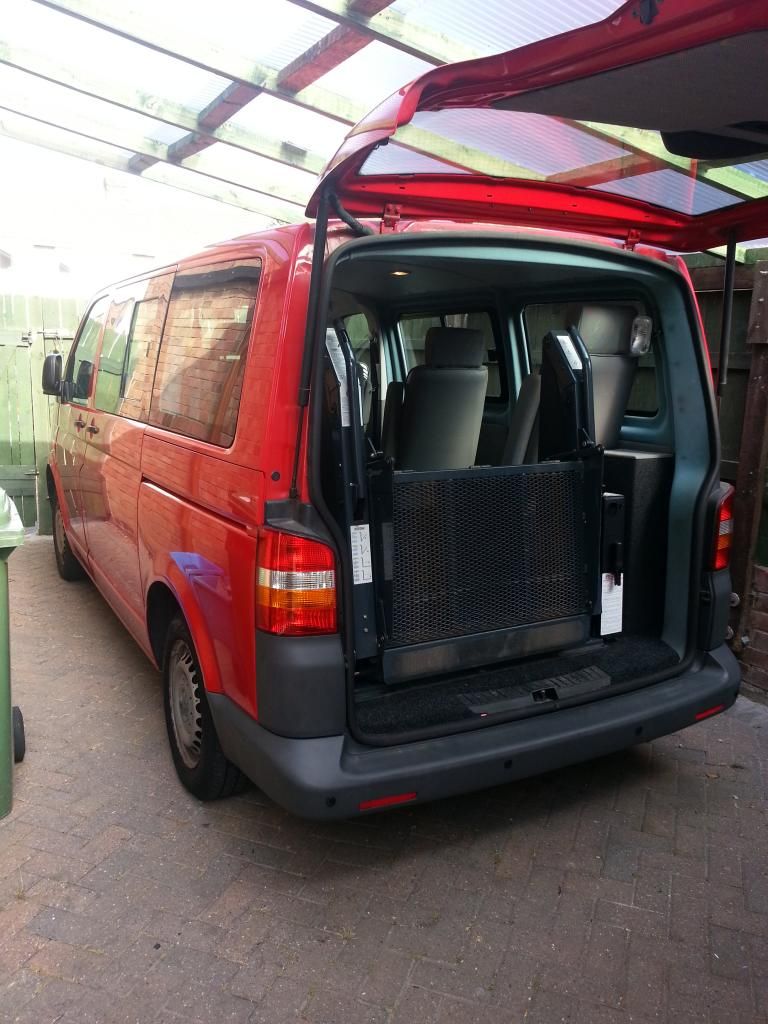
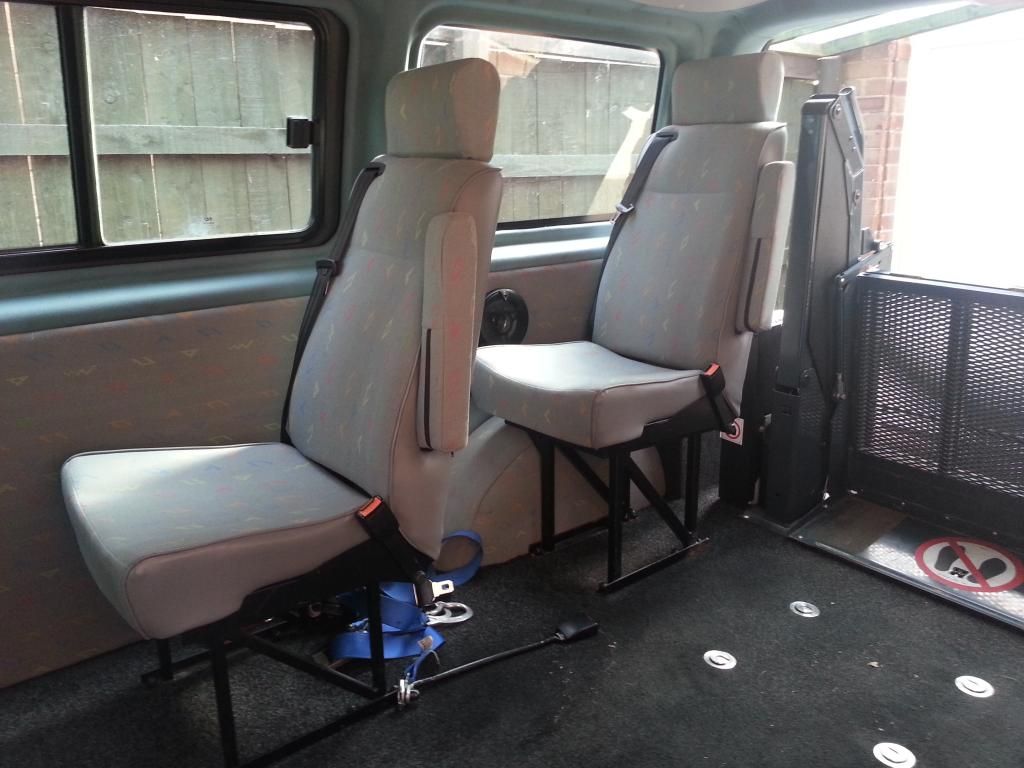
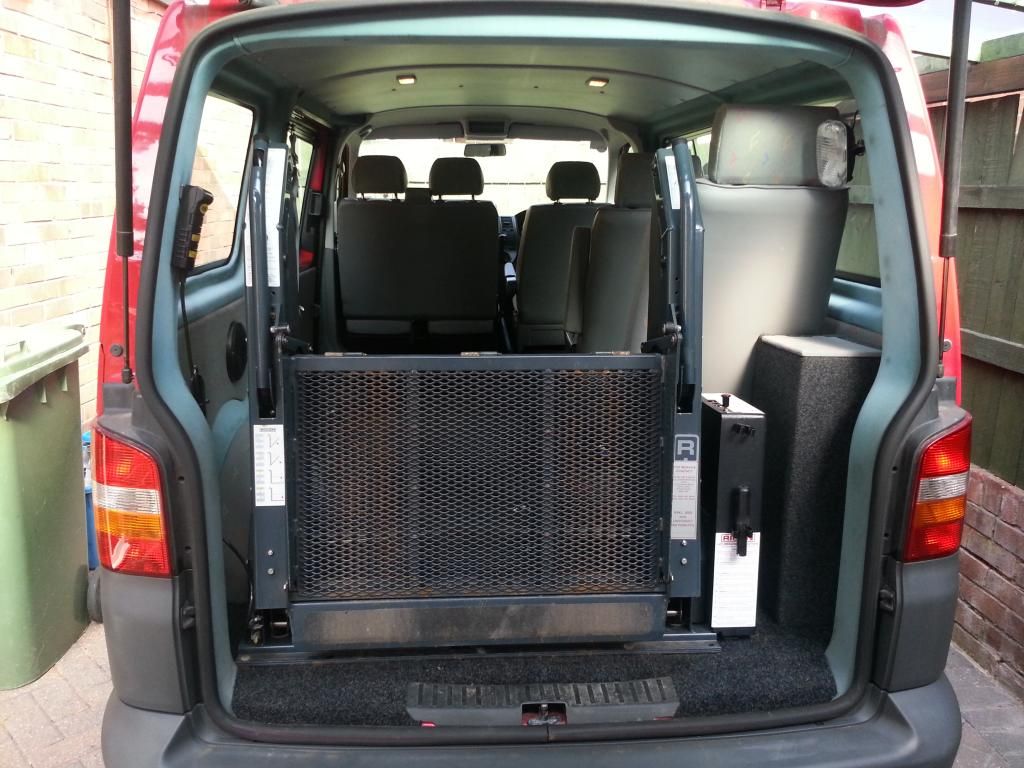
First of all, the wheelchair lift had to be removed. Being so heavy, it was lowered to the floor, unbolted disconnected and then lowered out onto itself manually using the hydraulic pump.
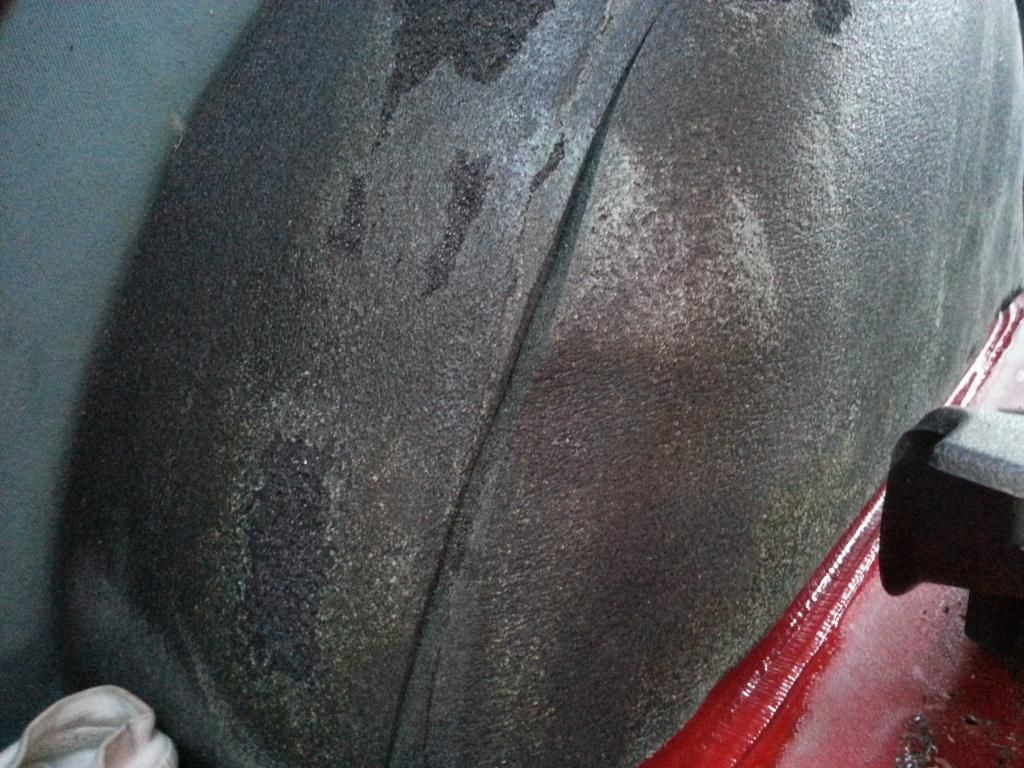
The seats then had to be unbolted. They came out easy enough, but the plates which they were bolted to were a different matter. I took all the plastics from under the van off, and then began removing the bolts (hi-tensile steel). A couple had to be drilled out using a very hard drill bit. By removing the plastics underneath, I was delighted to see that under the van, it was spotless. Undersealed and free from dirt, It looked like new. The plastics really do their job protecting it from corrosion.
The wheelchair unwin bolts were next. These are what the straps connect to onto the floor.
Some of these happened to be over the fuel tank. So, again crawling underneath, I lowered the tank onto a trolley jack, and with a very large wrench, managed to unbolt them whilst getting my arm between the fuel tank and floor in a very awkward position!
Once they were all out, all of the holes were treated with some red oxide paint to cover any bare metal, and then once dried, I heated up flashing tape, and pushed it into the hole to provide a seal. The tape was rollered and left to dry which created a watertight seal on the metalwork preventing any water from getting between body and tape.
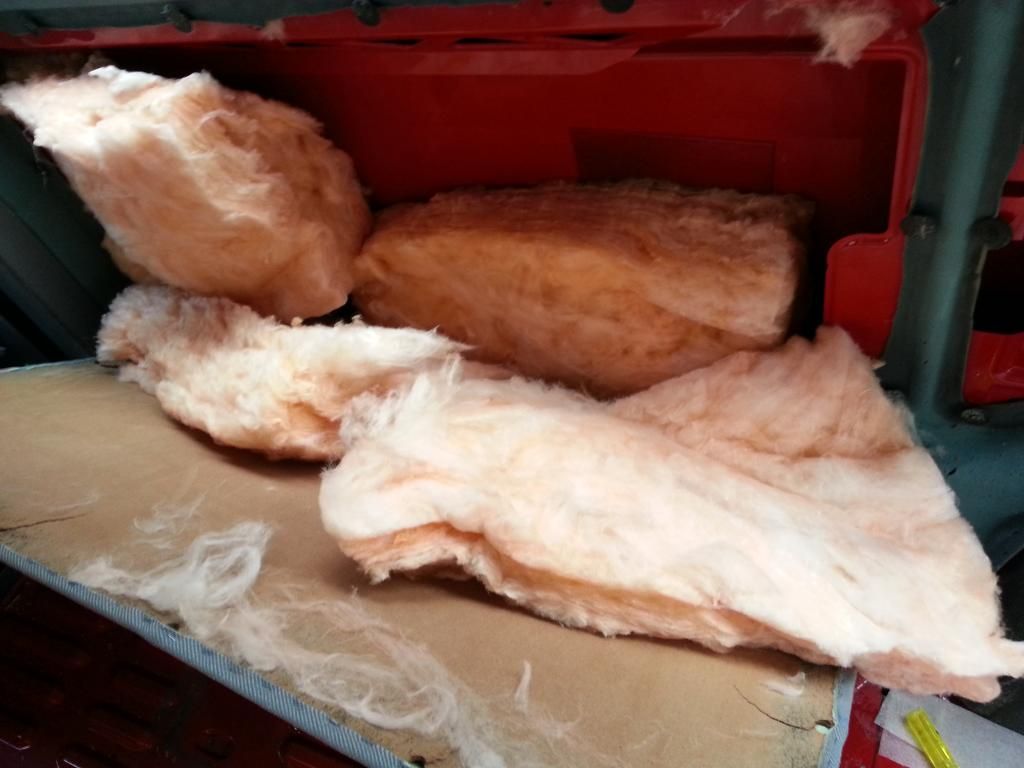
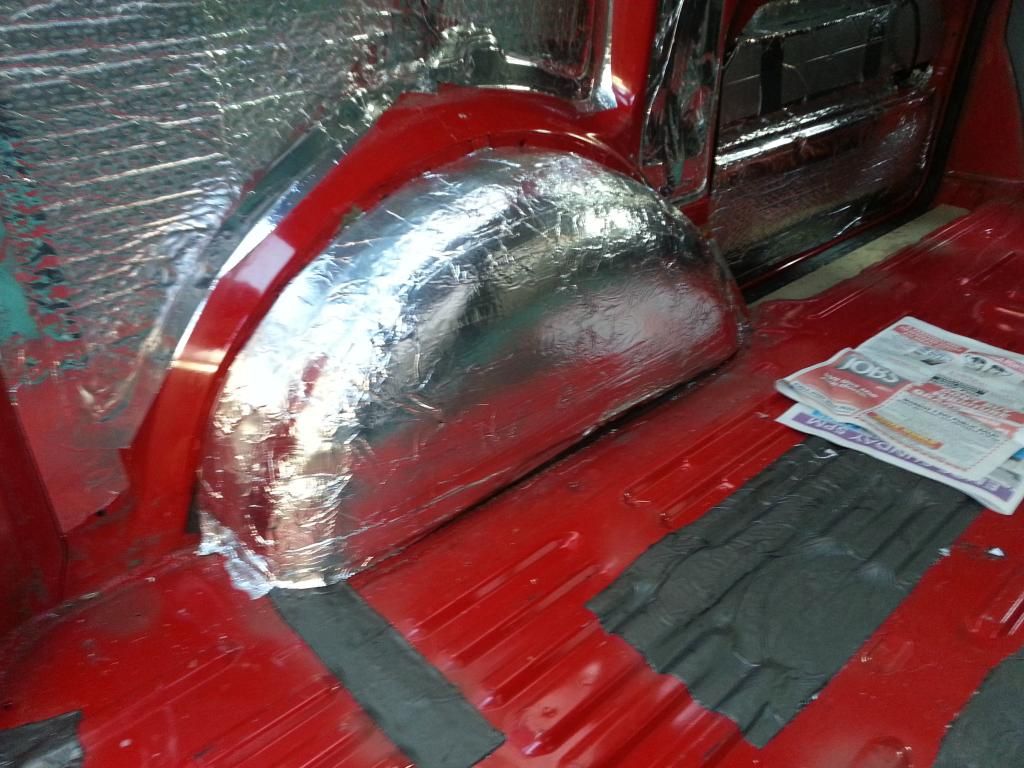
The conversion had some rather nasty cheap wool insulation too so this was taken out and thrown away
I did save some of the sound insulation though, particularly that on the arches however it was carefully removed so that some sound deadening could be placed there first
Once all removed, I began the laborious process of removing the old carpet, which took plenty of patience, Autoglym tar remover and half the skin off my hands
Once i’d finished that, I then wanted to start routing electrical cables and fitting Split Charge and 240v Hook up system to it.
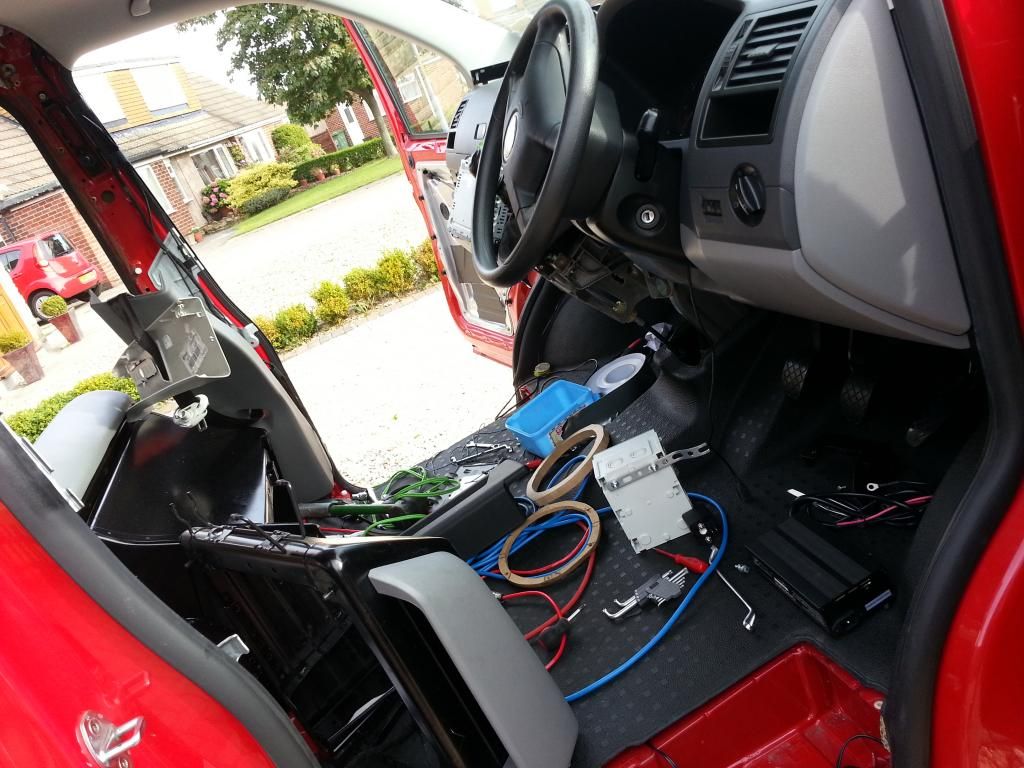
I contacted Martyn at Travelvolts ( www.travelvolts.com) several times and he was more than helpful in providing me with what I needed, making sure it wasn't overkill but also that what I wanted the system for was within the limits. He gave me excellent advice and was always willing to talk on the phone or via email. A massive thanks to him and his plans which make it so easy to do yourself providing you have some basic electrical knowledge. Not a great deal of photos here, largely due to concentrating on where the wires all went!
At the moment, I havent yet placed the sockets, so to avoid having to remove them as I play about with the design. The wires are ready and threaded around the van so I just need to connect up to the battery or to the 240v supply and attach the sockets.
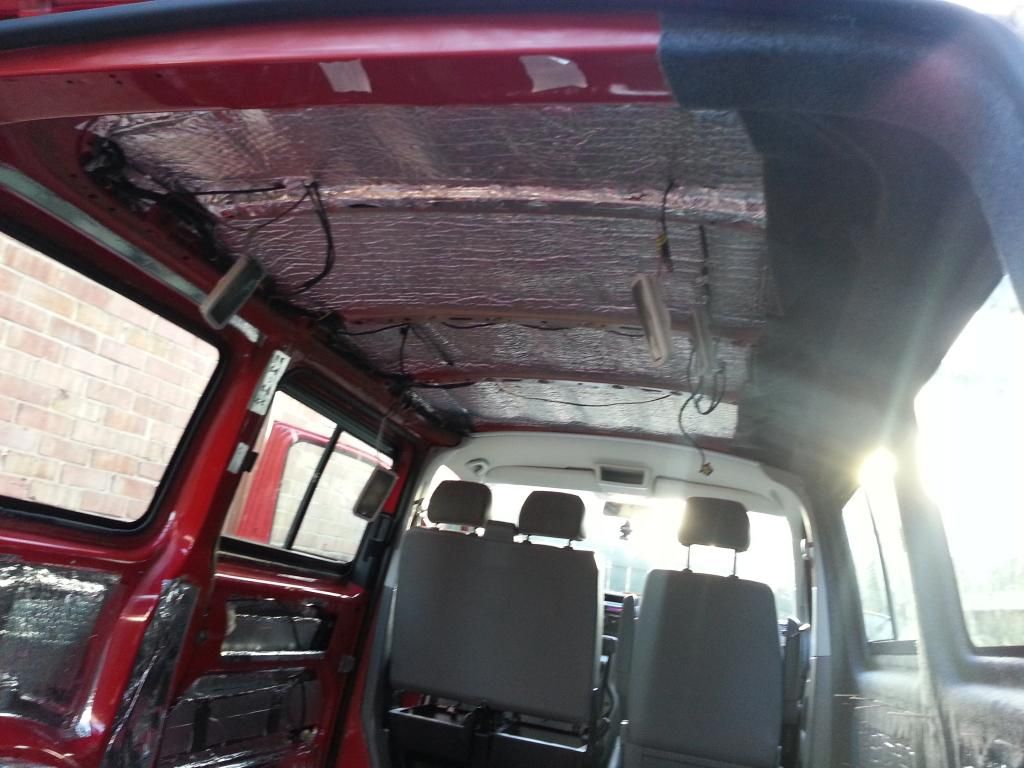
Having fitted the split charge, and leisure battery under the front seat, and the 240v hook up point under the bonnet, I then returned to insulating the van a bit more.
I used some very expensive double bubble foil which happened to be spare from an extension a friend had built. It wasn't the cheaper B&Q stuff which I had initially planned to use however, i’m not sure how much benefit that would be gained from using it.
The sound insulation had been replaced and was then taped over to provide a surface for the carpet to adhere to.
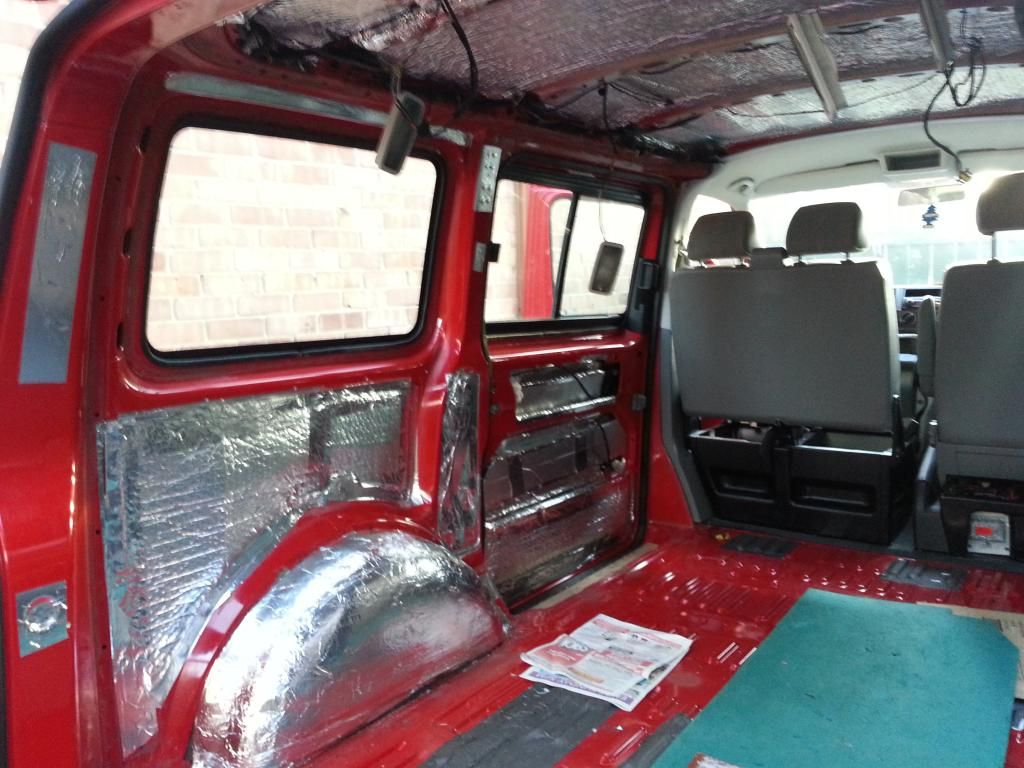
I then made ‘pillows’ of good old B&Q recycled bottle wool with the double foil, sealing them in and using foil tape to attempt to provide a seal from moisture.
Once that was done, it was time to contact megavanmats ( www.megavanmats.co.uk) to order some carpet and adhesive.
I bought 14 cans of adhesive which was probably overkill as I’ve still got a few cans left, however might yet use them for a couple of ideas I have to finish the interior build.
I then began carpeting the sides first, starting with the drivers side and taking my time over it. I had a spare pair of hands to assist me which was invaluable. I doubt I could have done it by myself as I was working with the whole roll at once and therefore needed that extra pair just to help hold it whilst I sprayed.
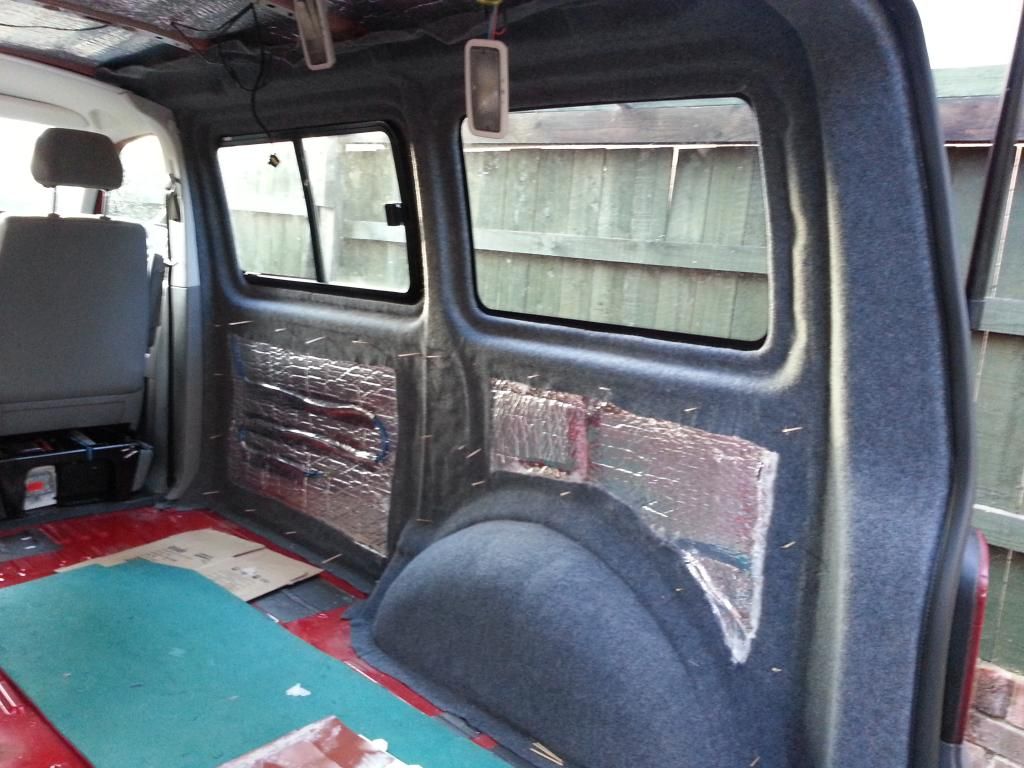
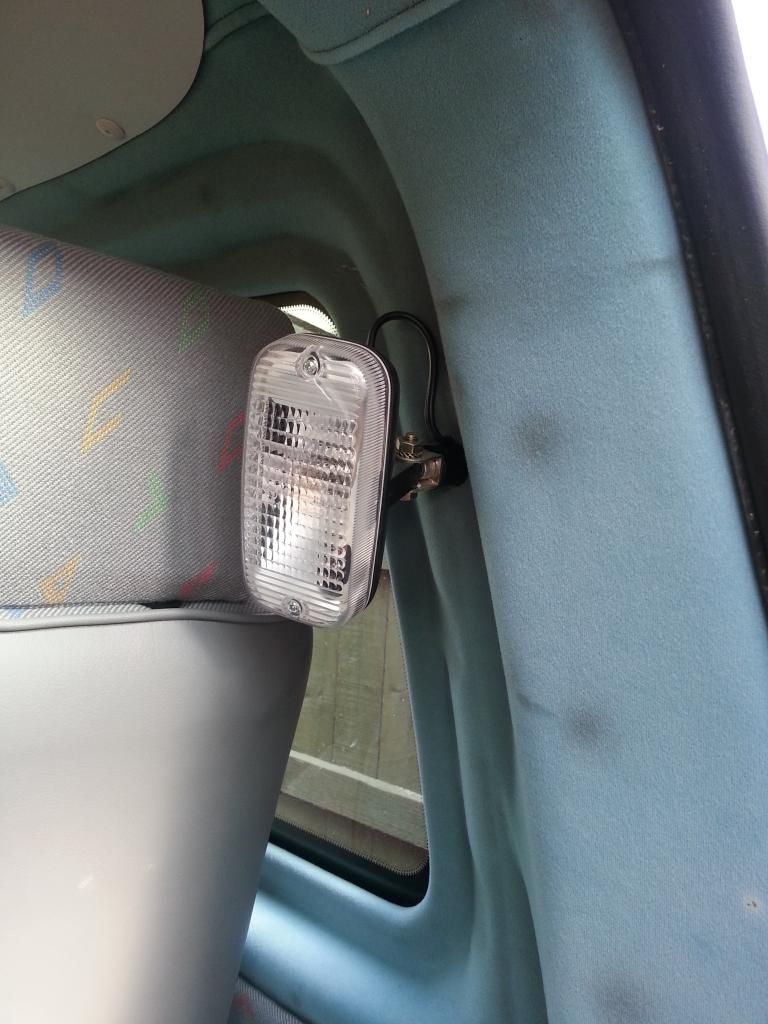
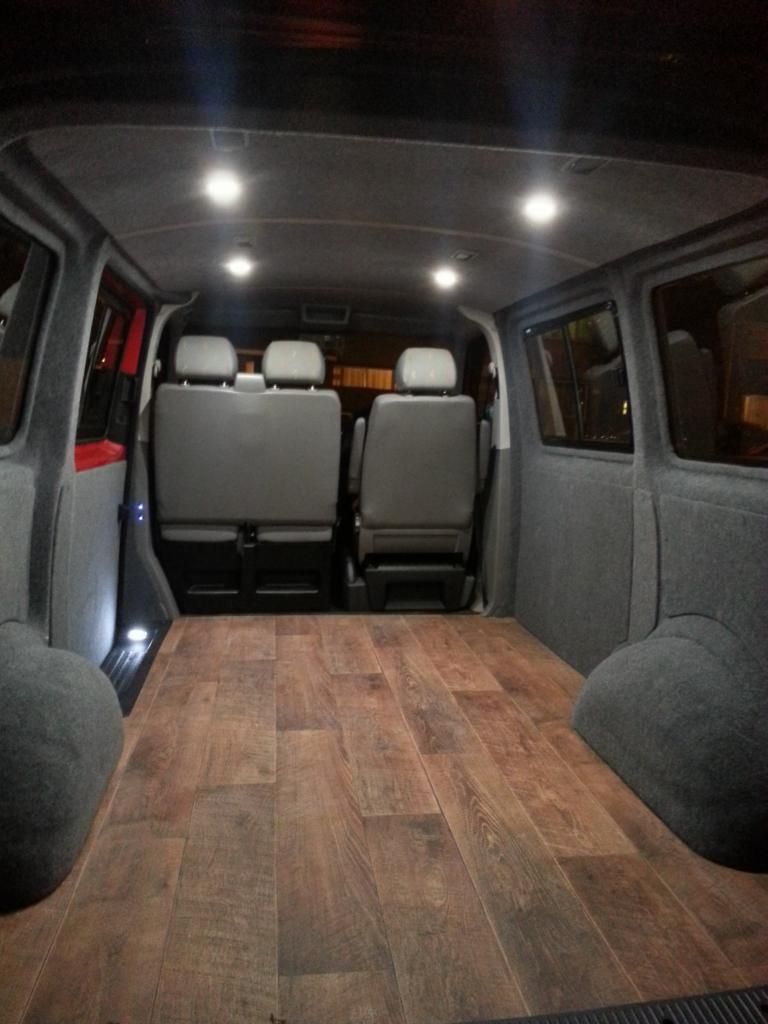
Once the side was completed, I then carpeted the roof in light smoke, adding a couple of spotlights into the lining adding to the rocker lights which were from the previous conversion. The spotlights could then be used when camping and the rocker lights used off the door switches to provide light when using the van day to day.
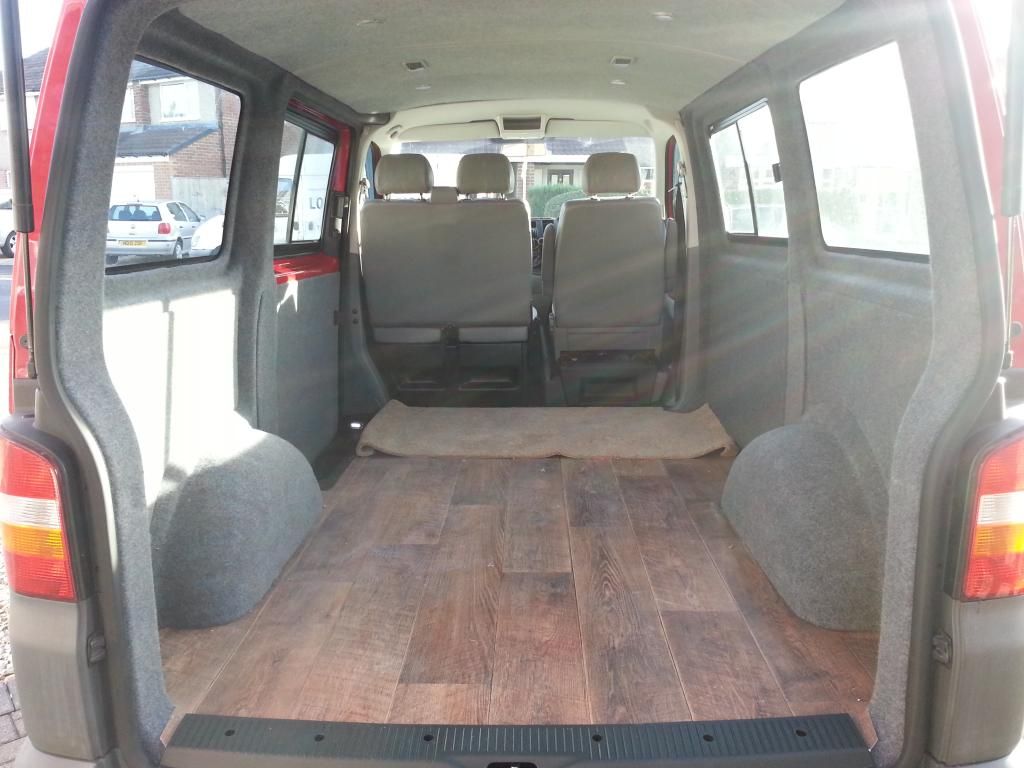
Once the sides and roof were carpeted, I then turned to sorting the floor out. After looking all over for 10x5 12 plywood sheet, I found these guys, just down the road from me.
www.falltimber.co.uk I was lucky that they were so close, so headed down to their yard, where I was able to get a piece cut into a nice square shape so that it would fit into the back of the van and simply needed shaping to make a proper fit. 12mm Latvian Birch, good quality stuff and nice and thick for the floor with the Kombi step which was already in the van.
I’d kept the old floor from the conversion (had holes in it for the seat plates) to use as a template and guide so once I’d used that to draw around, cut out the plywood using a jigsaw and a heavy blade.
It was a snug fit but went down well. I don't have any photos of it but I only needed a small extra piece in the bottom nearside corner to finish the floor.
I also needed a full length rear door trim so used my local VW Van centre to source one for the right finish.
I toyed with using Altro flooring, but I really liked the idea of a wood look design, so found some Lino which seemed quite a tough top finish so after laying it down onto ply with some overhang, stuck it down with the megavanmats adhesive and then trimmed it once it was snug in the van.
This resulted in a nice and close fit
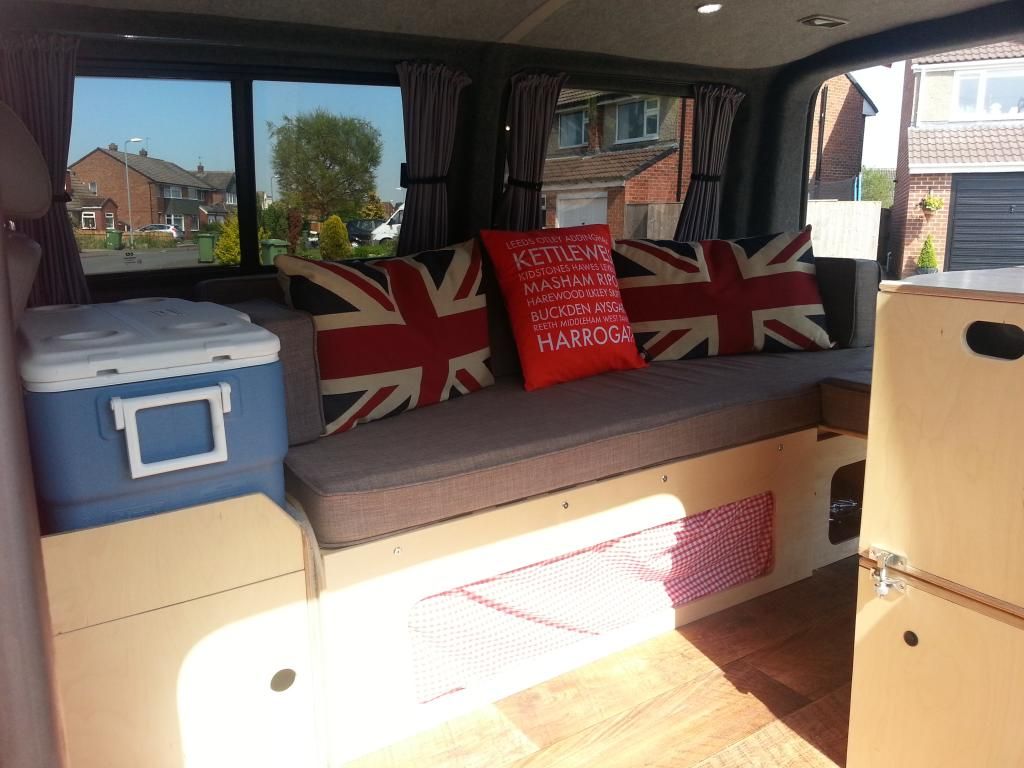
Cut templates from 3mm ply for new side boards, and carpeted over resulting in the project getting this far:
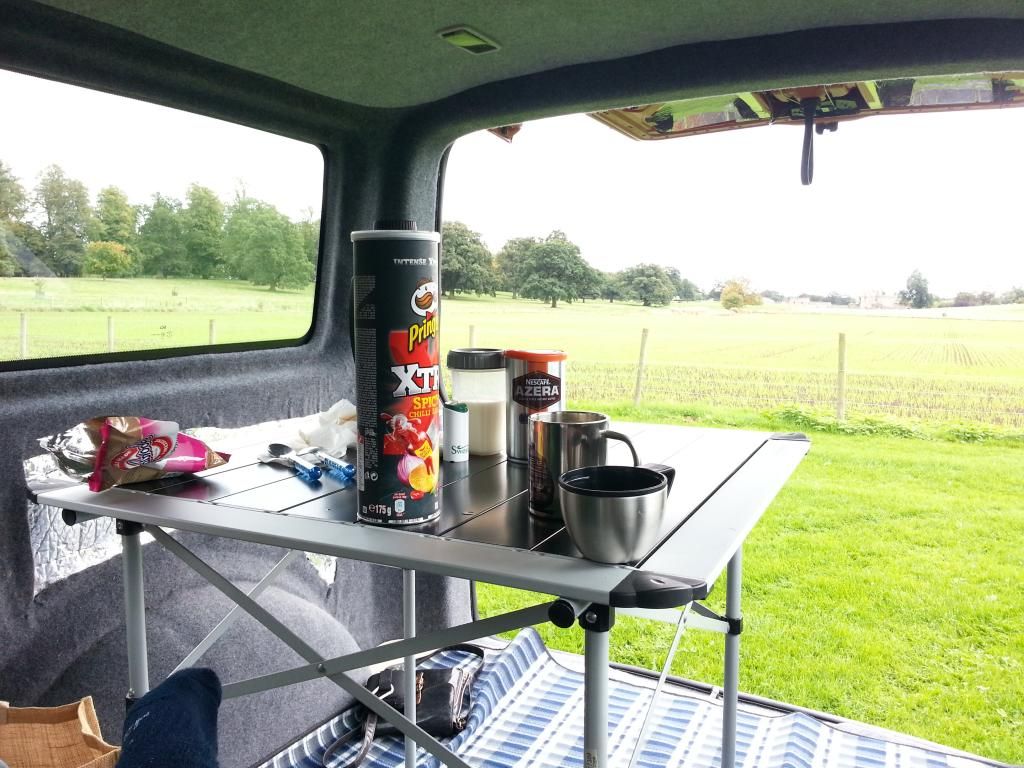
Went for a picnic in it!
At this point, I wanted to return to getting the exterior of the van sorted. First visited a locally ran company specialising in window tinting
From this:

to this:

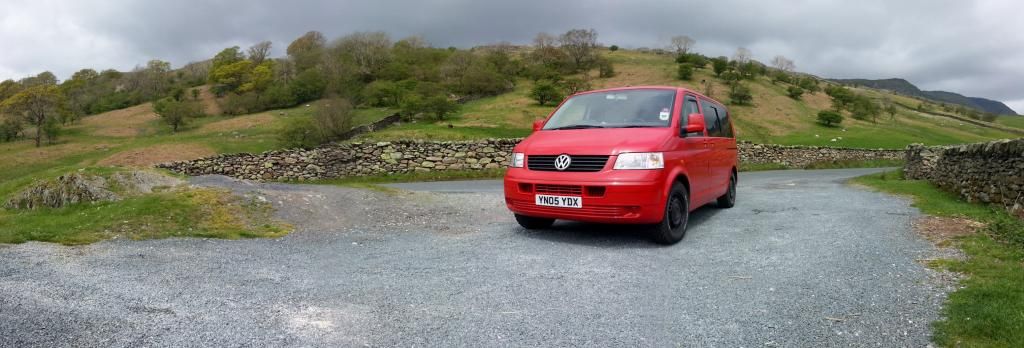
and after fitting a set of BF Goodrich tyres with some powder coated steels and a bit of detailing, this:
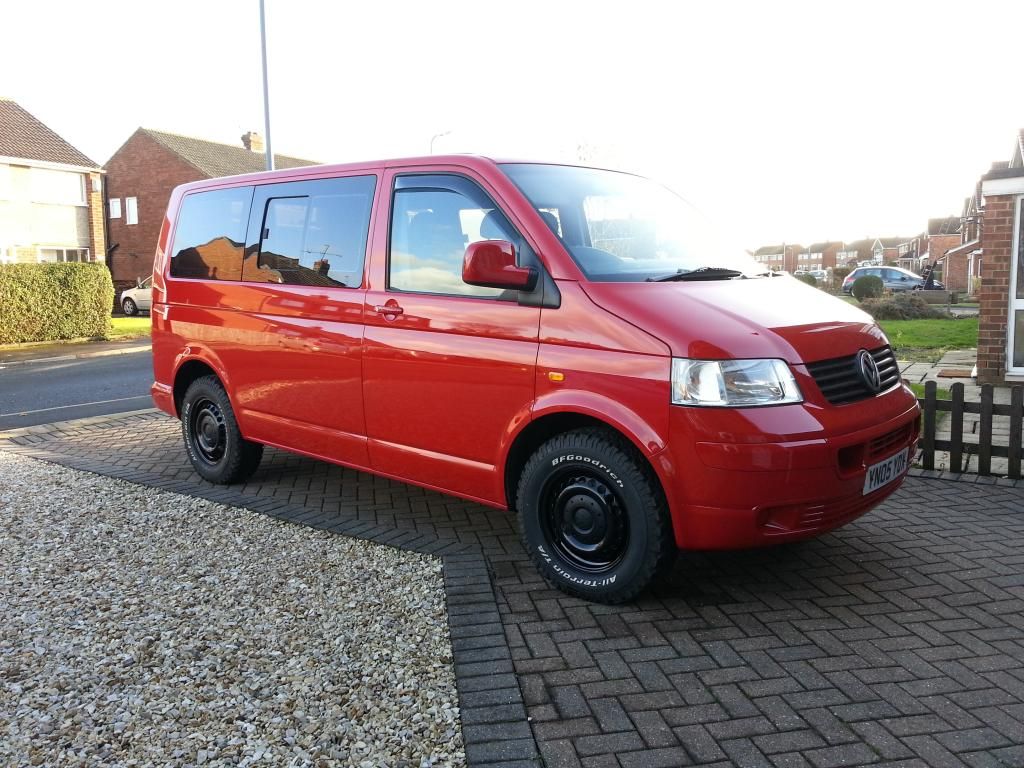
I thought long about having alloys and lowered suspension, however didnt want to ruin the ride, and thought that if I was driving around fields camping, then having something capable of pulling me through the mud of a British summer might help!
I’d held off from doing the interior until I’d done some of the exterior, to allow me some more time to sort out my ideas. I wanted to retain the length in the van so I didnt want to go for the R&R bed option, and liked a lot of the alternative layouts which I’d seen on here.
I think Suffolks T4 might have been one of the first which grabbed my eye, but having also seen several other designs, I considered going for a U Shape layout, and a double opposite bench. In the end though, I went with an L shape design.
I’m much a fan of the functional, and liked the Cambee and Amdro stuff particularly their use of Birch Ply as a material but finances just wouldnt have been able to stretch that far ready for this coming summer, so I had to think about doing it myself. What originally started as just thinking about layouts, then began to drift towards design, how to build and how to secure it.
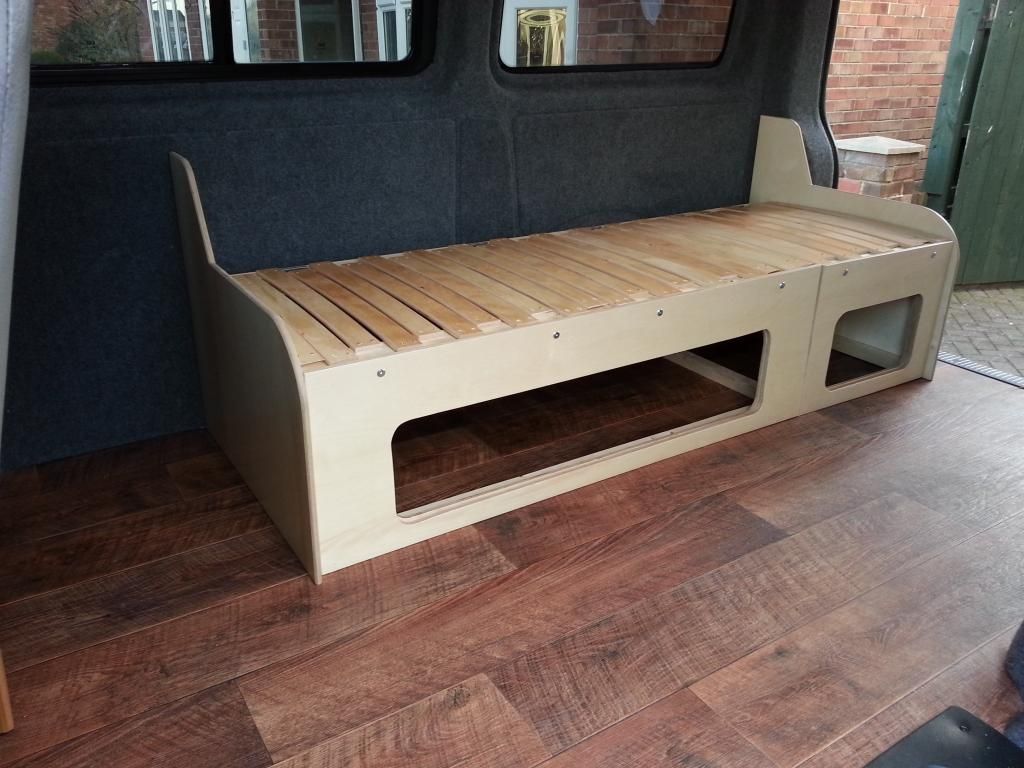
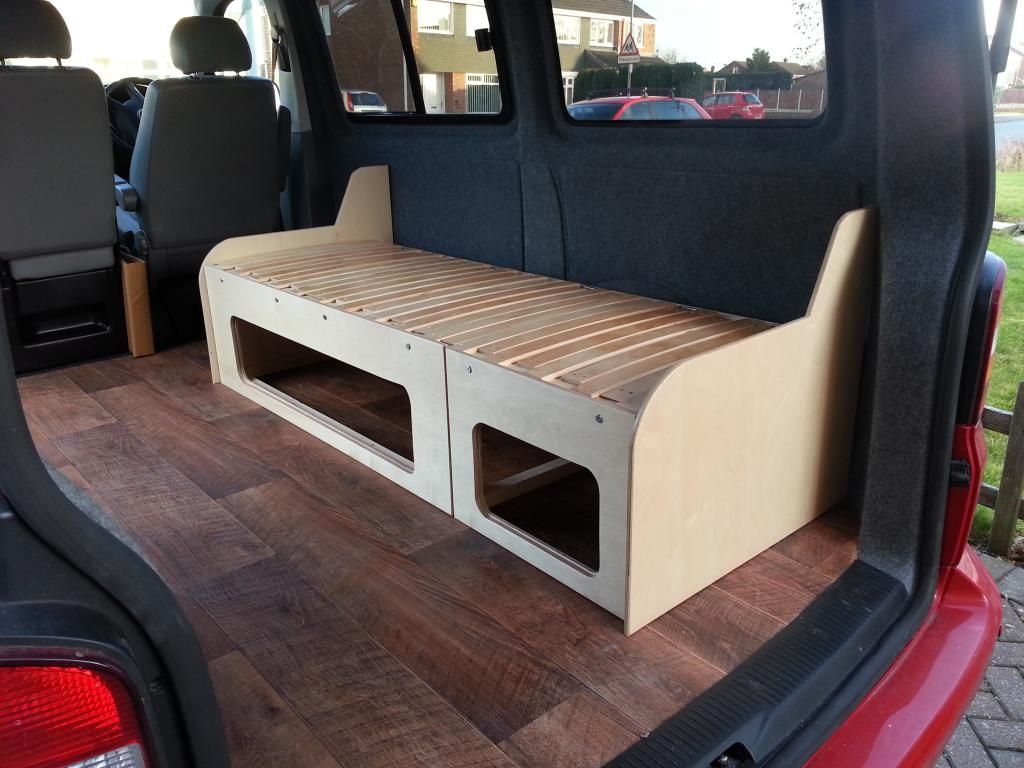
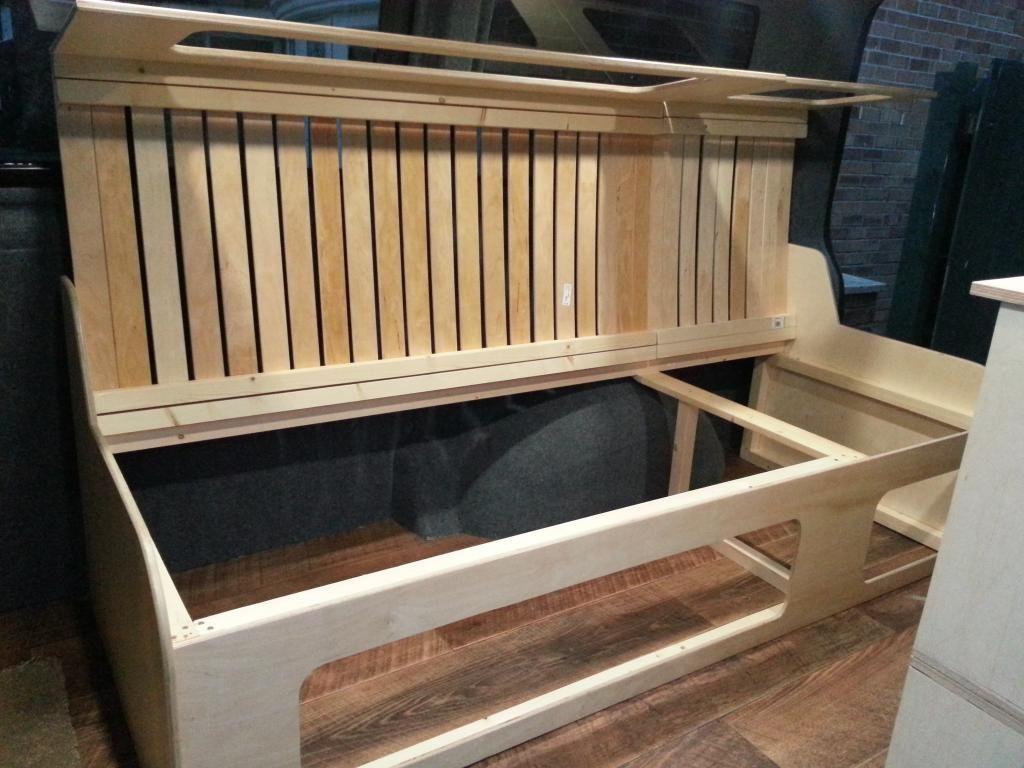
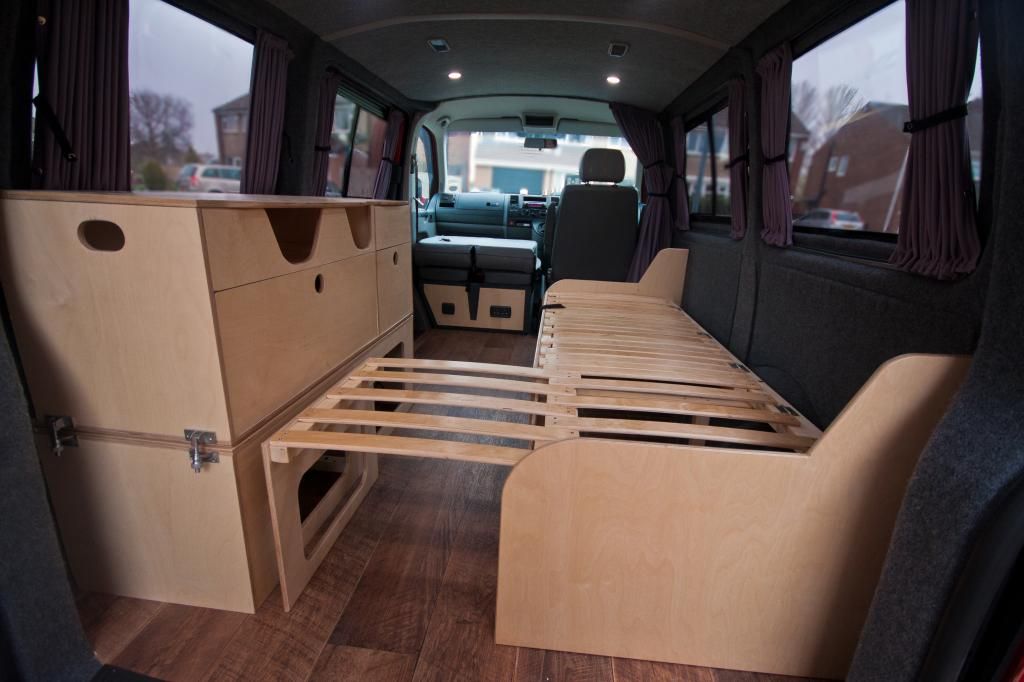
I scoured the internet for bed designs, pinching bits from each one. I then began to build it.
I first of all took a trip to Ikea and picked up a pair of bed slats, then trekked back to Fall Timber to pick up some more of their Latvian Plywood.
I knocked up a frame, glued and screwed it together and began cutting and fixing the slats to it


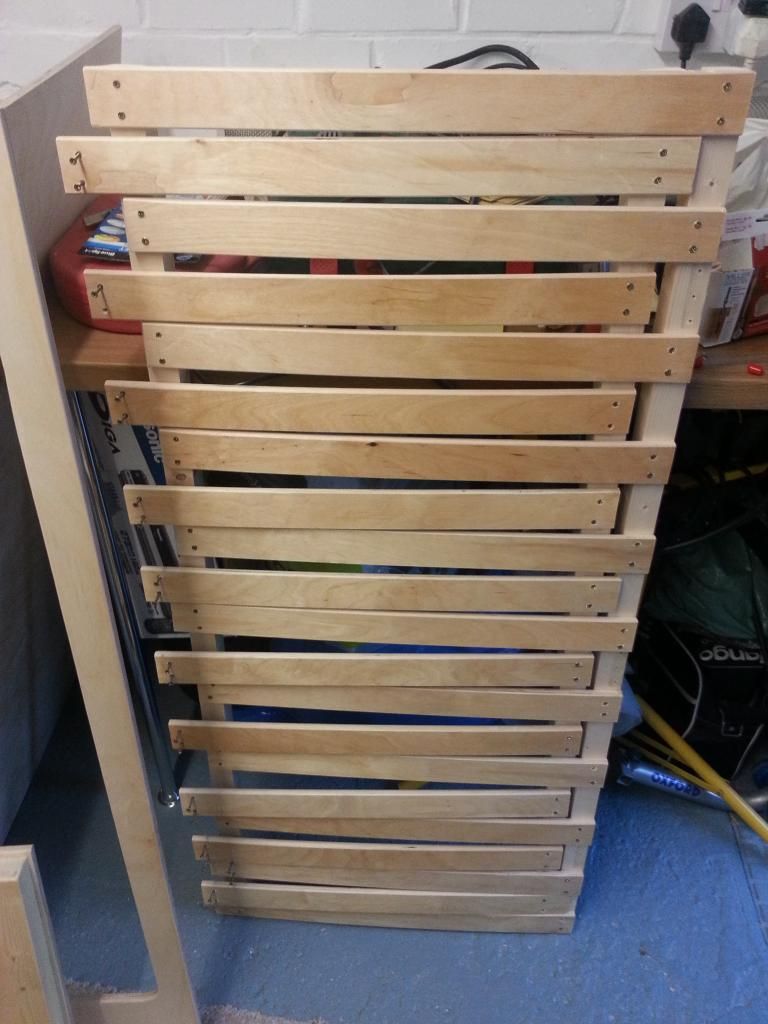
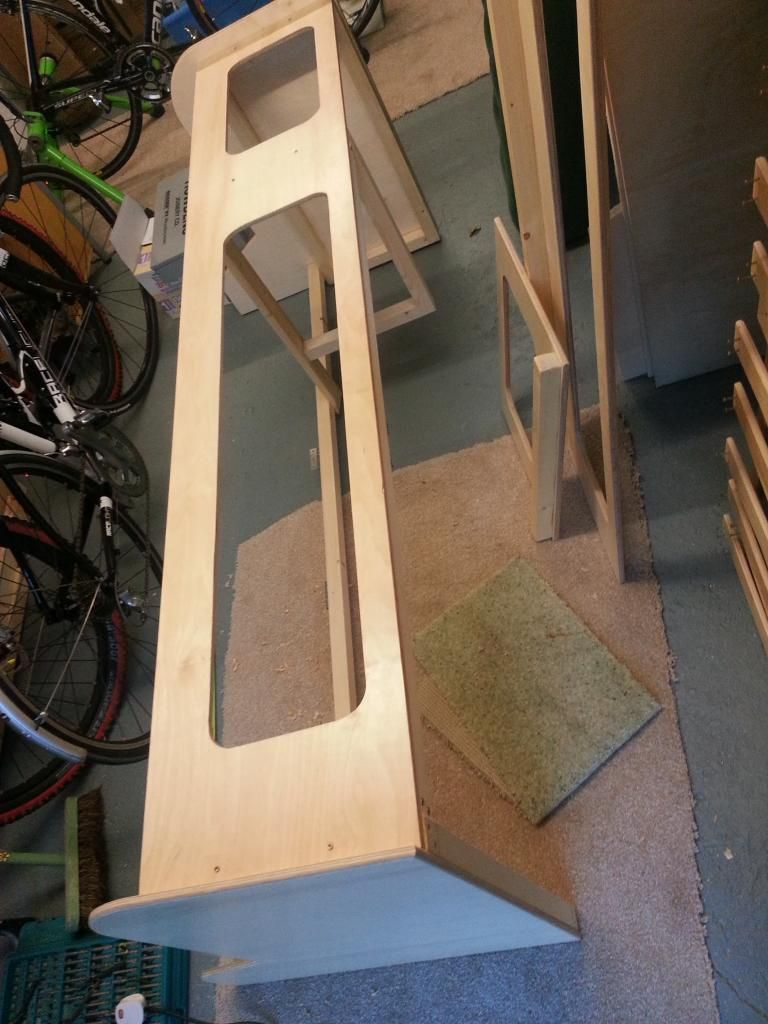
Once they were all fitted, I removed the top and began to build the base.
The frames were all glued and secured using Titebond glue, screwed and then the front panels bolted with cross bolts and inserts into the rear of the wood to ensure a secure and strong build.
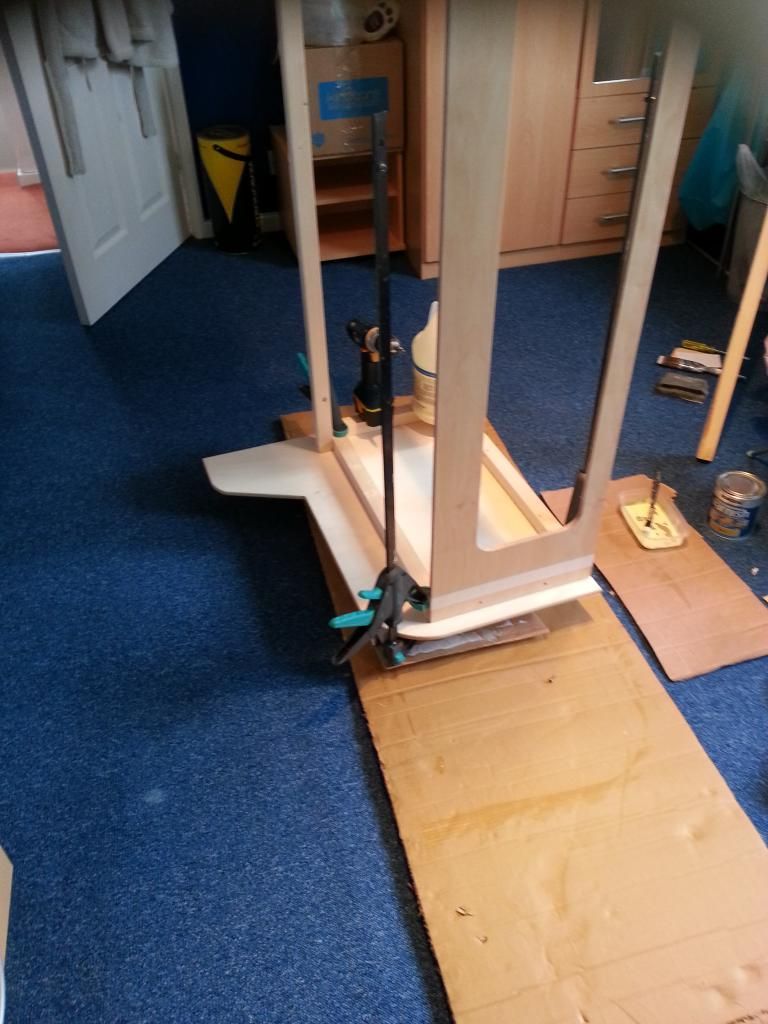
I spent hours and hours on making sure things were sanded, the edges were all routed over and then applied Ronseal quick drying clear varnish. In between coats, it was sanded back with 240grit and then sanded again. This has resulted in a really good finish, waterproof and hard wearing. I tested an off-cut and had a job getting it to mark. When it did, it wiped clean so it was just what I wanted. Really easy to apply as long as the coats aren’t too thick. I made sure the whole bed was coated at least with 2 coats to protect against moisture and where a finishing surface, 3-4 coats.
Just got to sort the upholstery for it (I’m going to have to get a pro to do this) Something fairly robust yet comfortable.
This is where we are right now, although I have started on the kitchen unit over the rear arch. I want something that can be removed for camping but can also be used inside. Again, back to the drawing board stealing ideas!
I'd wanted a T4 for about 2 or 3 years, but after looking at many, many vans I just couldnt find something in my price range and in the condition I wanted it. I'd given up looking when a casual browse on eBay unearthed a T5 just a couple of miles down the road. In price range, and with a bit of initial work, a blank canvas.
So it started July 2013 when I bought it. At the time of purchase, it was a 2005 Versa conversion, 1.9 with 38k on the clock. Very clean and backed up with its history, an ideal base to start from.


It was a case of removing the whole conversion in the rear and stripping it back to the bare bones of the van.
What I did think would be a fairly straight forward process did actually become a bit of a pain but perseverance and some quality tools (including 2 pairs of hands) eventually won in the end.
First of all, the wheelchair lift had to be removed. Being so heavy, it was lowered to the floor, unbolted disconnected and then lowered out onto itself manually using the hydraulic pump.
The seats then had to be unbolted. They came out easy enough, but the plates which they were bolted to were a different matter. I took all the plastics from under the van off, and then began removing the bolts (hi-tensile steel). A couple had to be drilled out using a very hard drill bit. By removing the plastics underneath, I was delighted to see that under the van, it was spotless. Undersealed and free from dirt, It looked like new. The plastics really do their job protecting it from corrosion.
The wheelchair unwin bolts were next. These are what the straps connect to onto the floor.
Some of these happened to be over the fuel tank. So, again crawling underneath, I lowered the tank onto a trolley jack, and with a very large wrench, managed to unbolt them whilst getting my arm between the fuel tank and floor in a very awkward position!
Once they were all out, all of the holes were treated with some red oxide paint to cover any bare metal, and then once dried, I heated up flashing tape, and pushed it into the hole to provide a seal. The tape was rollered and left to dry which created a watertight seal on the metalwork preventing any water from getting between body and tape.
The conversion had some rather nasty cheap wool insulation too so this was taken out and thrown away

I did save some of the sound insulation though, particularly that on the arches however it was carefully removed so that some sound deadening could be placed there first

Once all removed, I began the laborious process of removing the old carpet, which took plenty of patience, Autoglym tar remover and half the skin off my hands


Once i’d finished that, I then wanted to start routing electrical cables and fitting Split Charge and 240v Hook up system to it.

I contacted Martyn at Travelvolts ( www.travelvolts.com) several times and he was more than helpful in providing me with what I needed, making sure it wasn't overkill but also that what I wanted the system for was within the limits. He gave me excellent advice and was always willing to talk on the phone or via email. A massive thanks to him and his plans which make it so easy to do yourself providing you have some basic electrical knowledge. Not a great deal of photos here, largely due to concentrating on where the wires all went!
At the moment, I havent yet placed the sockets, so to avoid having to remove them as I play about with the design. The wires are ready and threaded around the van so I just need to connect up to the battery or to the 240v supply and attach the sockets.
Having fitted the split charge, and leisure battery under the front seat, and the 240v hook up point under the bonnet, I then returned to insulating the van a bit more.
I used some very expensive double bubble foil which happened to be spare from an extension a friend had built. It wasn't the cheaper B&Q stuff which I had initially planned to use however, i’m not sure how much benefit that would be gained from using it.

The sound insulation had been replaced and was then taped over to provide a surface for the carpet to adhere to.


I then made ‘pillows’ of good old B&Q recycled bottle wool with the double foil, sealing them in and using foil tape to attempt to provide a seal from moisture.
Once that was done, it was time to contact megavanmats ( www.megavanmats.co.uk) to order some carpet and adhesive.
I bought 14 cans of adhesive which was probably overkill as I’ve still got a few cans left, however might yet use them for a couple of ideas I have to finish the interior build.
I then began carpeting the sides first, starting with the drivers side and taking my time over it. I had a spare pair of hands to assist me which was invaluable. I doubt I could have done it by myself as I was working with the whole roll at once and therefore needed that extra pair just to help hold it whilst I sprayed.

Once the side was completed, I then carpeted the roof in light smoke, adding a couple of spotlights into the lining adding to the rocker lights which were from the previous conversion. The spotlights could then be used when camping and the rocker lights used off the door switches to provide light when using the van day to day.

Once the sides and roof were carpeted, I then turned to sorting the floor out. After looking all over for 10x5 12 plywood sheet, I found these guys, just down the road from me.
www.falltimber.co.uk I was lucky that they were so close, so headed down to their yard, where I was able to get a piece cut into a nice square shape so that it would fit into the back of the van and simply needed shaping to make a proper fit. 12mm Latvian Birch, good quality stuff and nice and thick for the floor with the Kombi step which was already in the van.
I’d kept the old floor from the conversion (had holes in it for the seat plates) to use as a template and guide so once I’d used that to draw around, cut out the plywood using a jigsaw and a heavy blade.
It was a snug fit but went down well. I don't have any photos of it but I only needed a small extra piece in the bottom nearside corner to finish the floor.
I also needed a full length rear door trim so used my local VW Van centre to source one for the right finish.
I toyed with using Altro flooring, but I really liked the idea of a wood look design, so found some Lino which seemed quite a tough top finish so after laying it down onto ply with some overhang, stuck it down with the megavanmats adhesive and then trimmed it once it was snug in the van.
This resulted in a nice and close fit
Cut templates from 3mm ply for new side boards, and carpeted over resulting in the project getting this far:


Went for a picnic in it!

At this point, I wanted to return to getting the exterior of the van sorted. First visited a locally ran company specialising in window tinting
From this:

to this:

and after fitting a set of BF Goodrich tyres with some powder coated steels and a bit of detailing, this:

I thought long about having alloys and lowered suspension, however didnt want to ruin the ride, and thought that if I was driving around fields camping, then having something capable of pulling me through the mud of a British summer might help!
I’d held off from doing the interior until I’d done some of the exterior, to allow me some more time to sort out my ideas. I wanted to retain the length in the van so I didnt want to go for the R&R bed option, and liked a lot of the alternative layouts which I’d seen on here.
I think Suffolks T4 might have been one of the first which grabbed my eye, but having also seen several other designs, I considered going for a U Shape layout, and a double opposite bench. In the end though, I went with an L shape design.
I’m much a fan of the functional, and liked the Cambee and Amdro stuff particularly their use of Birch Ply as a material but finances just wouldnt have been able to stretch that far ready for this coming summer, so I had to think about doing it myself. What originally started as just thinking about layouts, then began to drift towards design, how to build and how to secure it.
I scoured the internet for bed designs, pinching bits from each one. I then began to build it.
I first of all took a trip to Ikea and picked up a pair of bed slats, then trekked back to Fall Timber to pick up some more of their Latvian Plywood.
I knocked up a frame, glued and screwed it together and began cutting and fixing the slats to it


Once they were all fitted, I removed the top and began to build the base.
The frames were all glued and secured using Titebond glue, screwed and then the front panels bolted with cross bolts and inserts into the rear of the wood to ensure a secure and strong build.


I spent hours and hours on making sure things were sanded, the edges were all routed over and then applied Ronseal quick drying clear varnish. In between coats, it was sanded back with 240grit and then sanded again. This has resulted in a really good finish, waterproof and hard wearing. I tested an off-cut and had a job getting it to mark. When it did, it wiped clean so it was just what I wanted. Really easy to apply as long as the coats aren’t too thick. I made sure the whole bed was coated at least with 2 coats to protect against moisture and where a finishing surface, 3-4 coats.


Just got to sort the upholstery for it (I’m going to have to get a pro to do this) Something fairly robust yet comfortable.
This is where we are right now, although I have started on the kitchen unit over the rear arch. I want something that can be removed for camping but can also be used inside. Again, back to the drawing board stealing ideas!
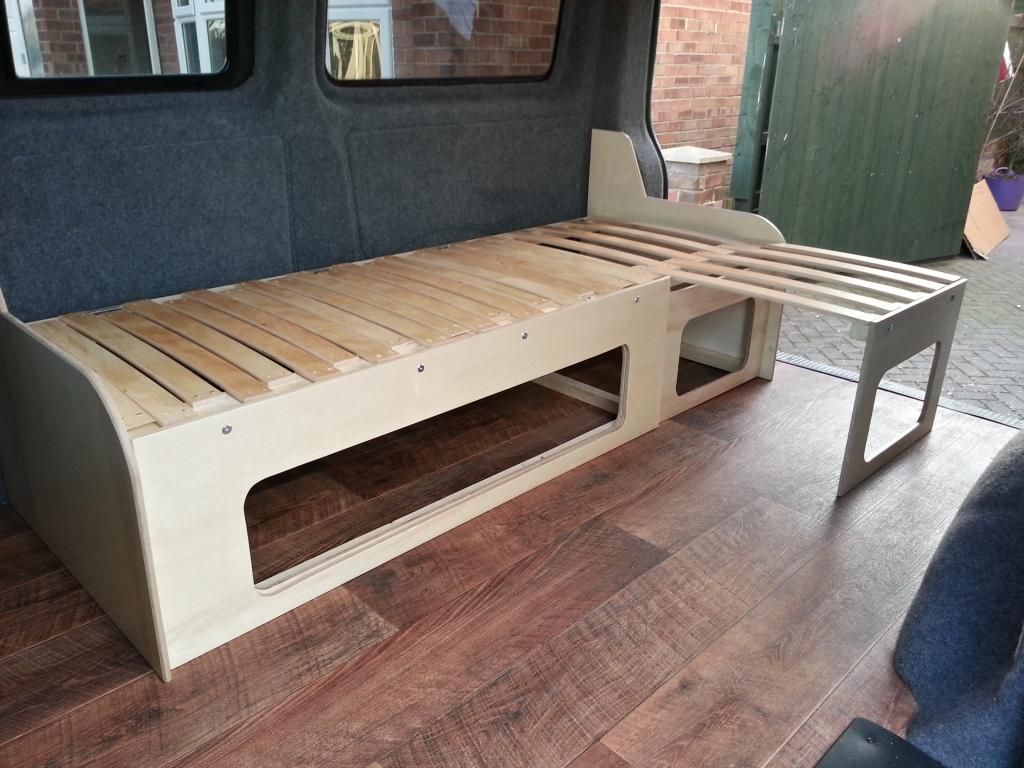
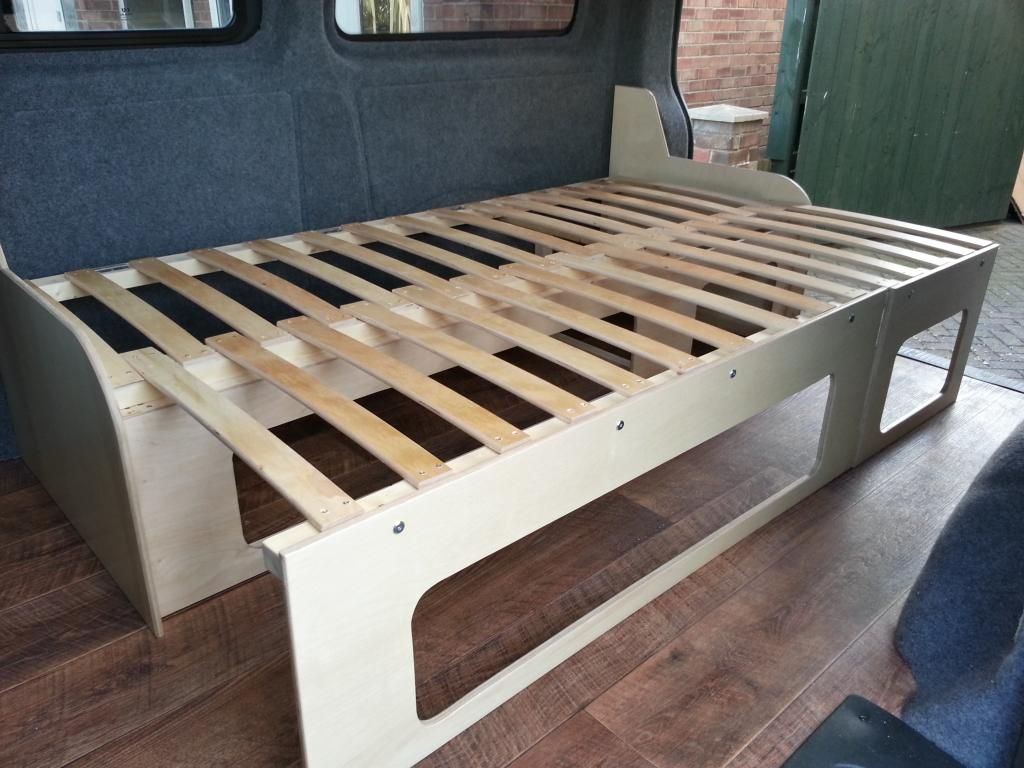
On the opposite side of the bed im building a box over the arch which will be secured to the floor. This will have some storage for gas and a small water container, and for a couple of pans. On top of this im building a camp kitchen box which will be secured to the top for transit by toggle latches or similar. It means I can then cook inside or outside the van. When outside it provides me with a table beside the bed. Finally I want a unit between the bed and driver seat for more storage and the cool box
I guess time will tell Rob, I'll see how it is once the upholstery is in place and i've been able to road test it so to speak. Its certainly pretty tough, although the weakness looks to be the slats. Even then, if Ikea are knocking these out for beds then they should be strong enough. If not, I'll have to modify what I have. I've been trying to test the 'leg' for robustness, and there might be a chance of it flexing outwards however, once the kitchen unit is fitted to the opposite side, then it'll pretty much butt up against it.
Those are great ideas, something I'd not considered in quite that way. I had thoughts of just a bar which had two notches in - one for each end of the panel and then fixing them in place once pulled out.
Any ideas on how the dowel might fix to the panel? If it was glued it'd be too stiff for it to lift up and then onto the back panel surely?
I posted this thread partly for others to use any ideas, and partly to obtain ideas from others on how to improve it. I'm not a carpenter, hardly worked with wood before except for cutting the odd bit of skirting/architrave so its all new to me. It takes me ages to think of the best solution for stuff as I have to go round and round the internet trying to find the best way, when if I was a carpenter I'd probably have known it!
Been out to see a few sewing specialists today about upholstery. I'd like to keep the work local if at all possible. I've got to get some foam too, but its a bit of a minefield when you look at comfort! Theres so many different grades that I dont want to go for something to find its rock hard to sleep on or too soft to sit on!
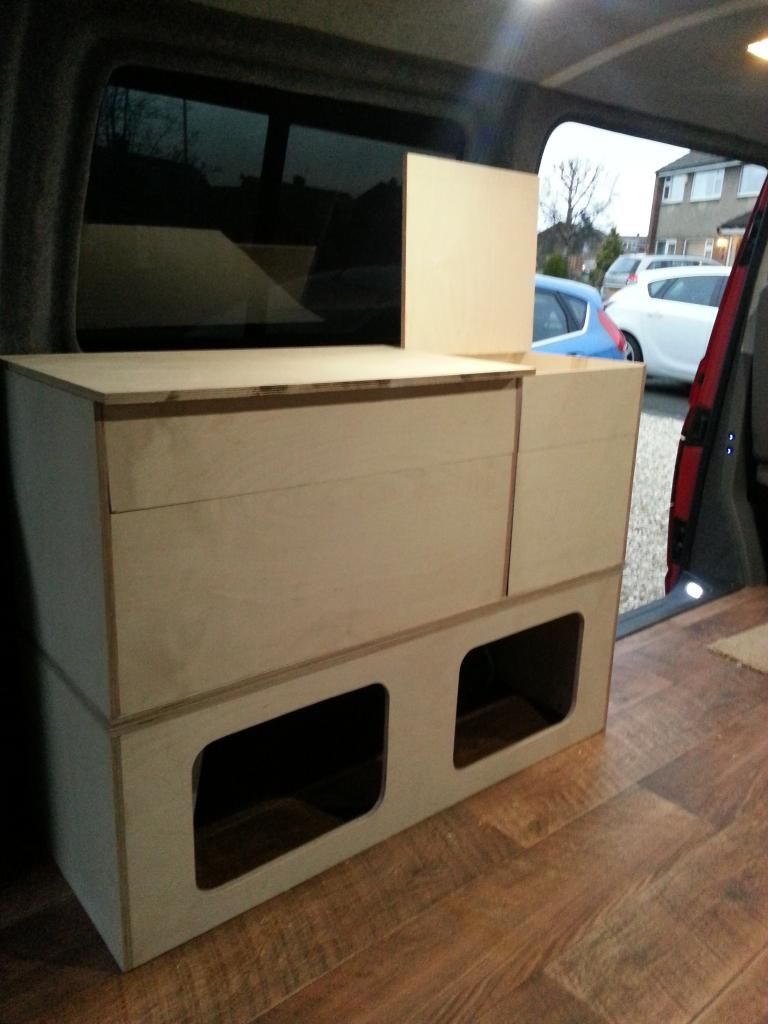
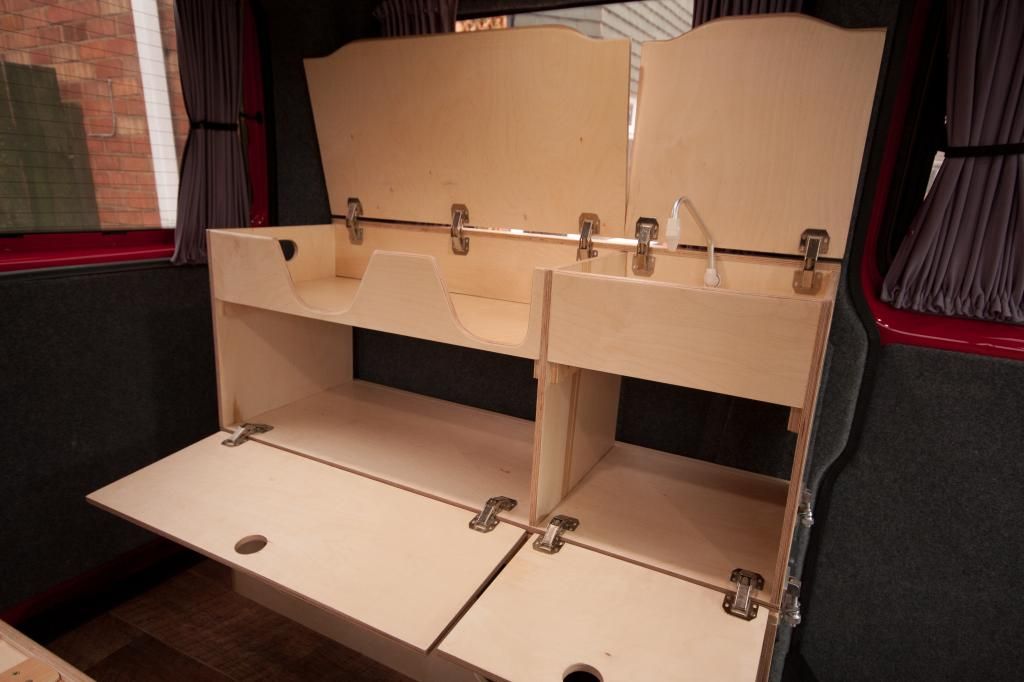
Also got the kitchen unit parts cut out, mocked it all up tonight in the van. The bottom bit (with the cut holes in it) will be secured to the floor of the van, and will remain in place. Its topped so its like a table when the unit on top is removed.
The top is yet to have some cutouts and a few cut backs to it, however it is generally what it'll be. The issue I have with it, is that it is heavy. It probably weighs as much as the bed unit, with all of its 12mm ply panels, and a 9mm shelf and back panel. I'm considering cutting holes in the back panel to reduce the weight and cover it with something lightweight. The panel should still have enough strength to support it.
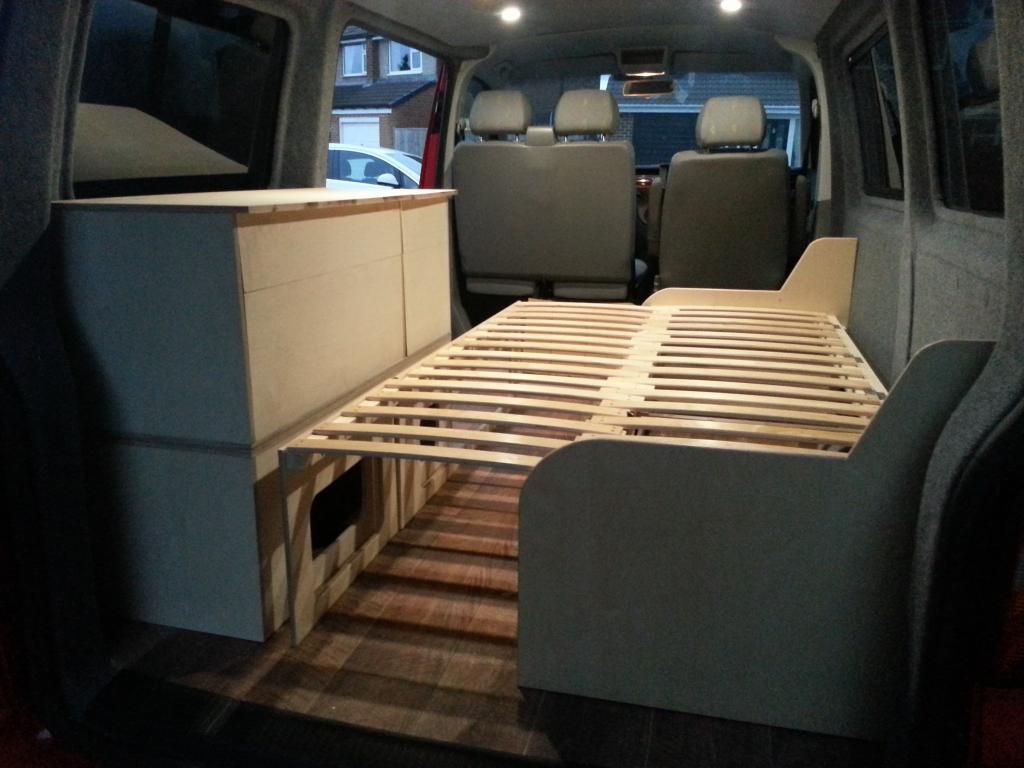
Another of the bed in the lift up position
Also got the kitchen unit parts cut out, mocked it all up tonight in the van. The bottom bit (with the cut holes in it) will be secured to the floor of the van, and will remain in place. Its topped so its like a table when the unit on top is removed.
The top is yet to have some cutouts and a few cut backs to it, however it is generally what it'll be. The issue I have with it, is that it is heavy. It probably weighs as much as the bed unit, with all of its 12mm ply panels, and a 9mm shelf and back panel. I'm considering cutting holes in the back panel to reduce the weight and cover it with something lightweight. The panel should still have enough strength to support it.


Another of the bed in the lift up position

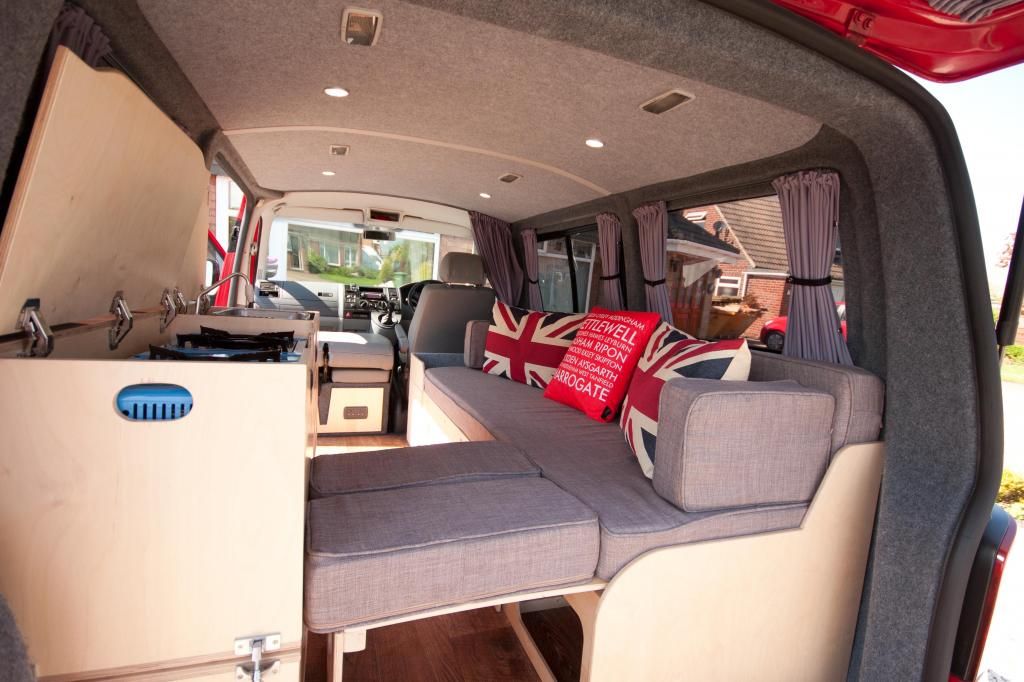
Finished wiring 12v sockets and 240v supply. Checked it all and everything is working as it should! Really pleased to get this far, and now the final touches of interior soft furnishings to go! Hopefully should get the upholstery back in the next week or so, I still need to build another cabinet to go between bed and driver seat which will house cool box and another storage area probably for shoes/boots etc. The bed is a grey linen (another shade of grey!). Did consider a beige colour, but as the factory seats and everything else was grey, decided to tie it all in.
Tested the kitchen unit out when locked in place whilst driving. Seems nice and solid, couple of rattles from the doors which I'll sort out with either magnet catches or something soft to cushion the tops, but no movement whatsoever between the 2 units. The base unit is secured to the floor using some of these (as is the bed).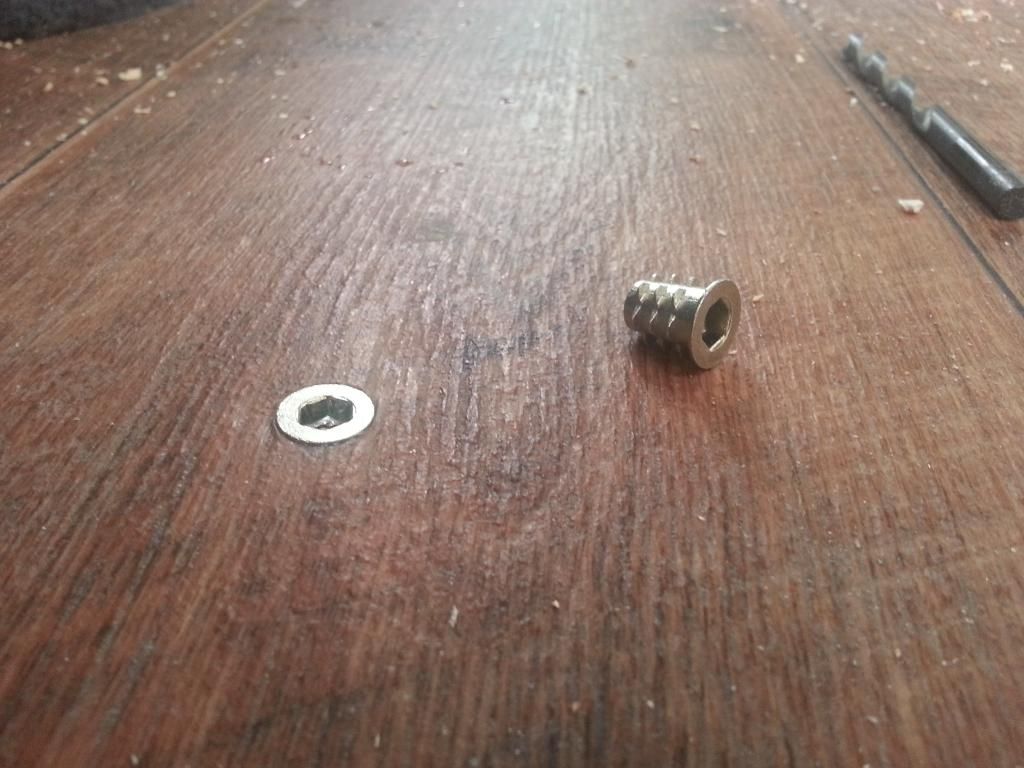
I've got furniture bolts which screw directly through the unit frames into the threaded inserts in the floor. They really grip tight so they should be strong enough. I cant pull at it and pull it out of the floor thats for sure!
The tap still isnt plumbed into the submersible as I havent got any tubing yet, but I'm going to sort that within the next week or so. I'm thinking about how I can use the submersible for a shower hose also so that I can rig it up to the side of the van, or under the tailgate for a quick wash!
Finally got some proper photos of it, instead of just being lazy with phone camera etc.
You can see the Brighton fasteners in place between the 2 side units:
A 12v socket and a switch which powers on and off another 12v socket under the unit. The pump will plug into this when connected to the tap/shower so that the water can be isolated. By attaching a plug to the pump, it means I can use the submersible outside of the van as well if I wanted to use the kitchen unit in an awning.

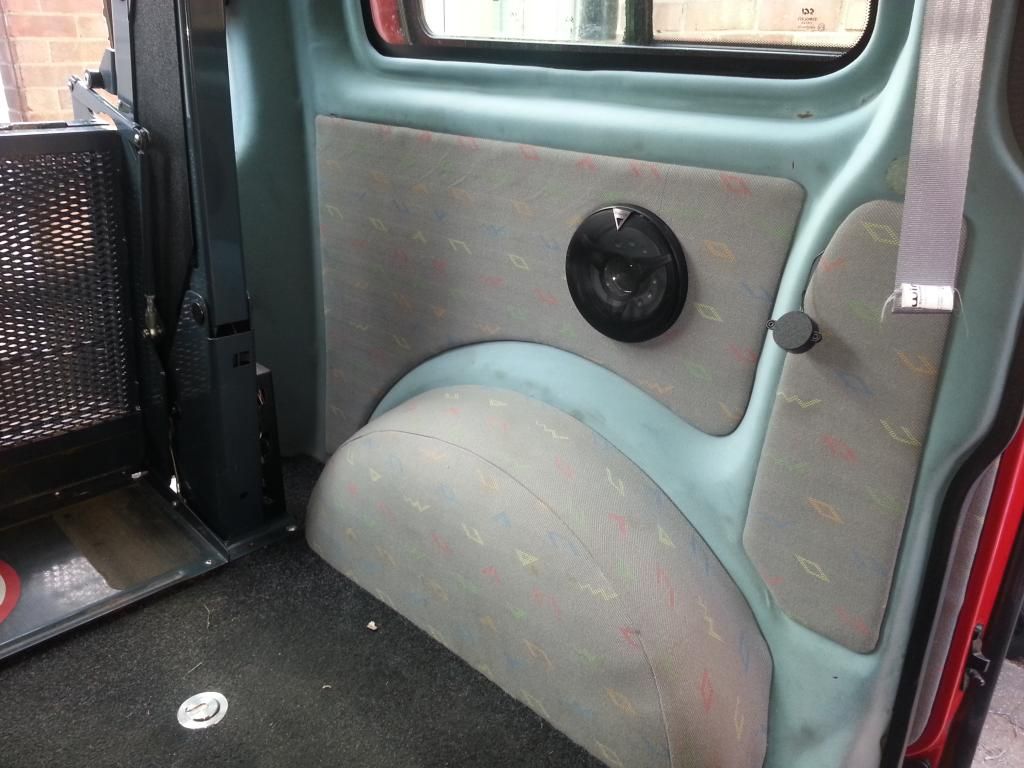
Front passenger carpeted, and a board made up to house the 2 240v 3 pin sockets, and another 12v supply. Love the fact that CBE kit can just be swapped in and out as necessary. I did consider dimmer switches on the lights (you can see the rocker switches which operate the lights on the side of the door)

Kitchen unit. The water will be provided by a 10l container under the kitchen unit, the 12v for the pump is under there too. I'm not putting doors on the fronts, instead will be plagiarising Suffolks idea by adding some curtain type cover for the gaps. I'll keep my gas canisters and pans under there too.

Tap in place, folds away for storage. The back is missing off the unit at the moment so I can connect the tap up to it.
Getting nearer to completion. That leg is surprisingly sturdy. If I find that it is tending to bow out, or I can hear any sounds of it breaking whilst in use, the plan is to remove all of the ply bed slats and replace them with standard Ikea flat slats. I'll then titebond these to the outer frame and use furniture bolts for a belt and braces approach in locking them down.

Its a bit of a grey-fest with grey upholstery, grey carpet and grey curtains! Desperately need to brighten the interior up with some colour! I'm planning to cover the holes beneath the bed and also beneath the kitchen unit with fabric on a wire. That way I can gain access to it easily, but everything under there remains out of sight.
What colours you reckon? Thinking of either -


Tested the kitchen unit out when locked in place whilst driving. Seems nice and solid, couple of rattles from the doors which I'll sort out with either magnet catches or something soft to cushion the tops, but no movement whatsoever between the 2 units. The base unit is secured to the floor using some of these (as is the bed).

I've got furniture bolts which screw directly through the unit frames into the threaded inserts in the floor. They really grip tight so they should be strong enough. I cant pull at it and pull it out of the floor thats for sure!
The tap still isnt plumbed into the submersible as I havent got any tubing yet, but I'm going to sort that within the next week or so. I'm thinking about how I can use the submersible for a shower hose also so that I can rig it up to the side of the van, or under the tailgate for a quick wash!
Finally got some proper photos of it, instead of just being lazy with phone camera etc.
You can see the Brighton fasteners in place between the 2 side units:

A 12v socket and a switch which powers on and off another 12v socket under the unit. The pump will plug into this when connected to the tap/shower so that the water can be isolated. By attaching a plug to the pump, it means I can use the submersible outside of the van as well if I wanted to use the kitchen unit in an awning.

Front passenger carpeted, and a board made up to house the 2 240v 3 pin sockets, and another 12v supply. Love the fact that CBE kit can just be swapped in and out as necessary. I did consider dimmer switches on the lights (you can see the rocker switches which operate the lights on the side of the door)

Kitchen unit. The water will be provided by a 10l container under the kitchen unit, the 12v for the pump is under there too. I'm not putting doors on the fronts, instead will be plagiarising Suffolks idea by adding some curtain type cover for the gaps. I'll keep my gas canisters and pans under there too.

Tap in place, folds away for storage. The back is missing off the unit at the moment so I can connect the tap up to it.

Getting nearer to completion. That leg is surprisingly sturdy. If I find that it is tending to bow out, or I can hear any sounds of it breaking whilst in use, the plan is to remove all of the ply bed slats and replace them with standard Ikea flat slats. I'll then titebond these to the outer frame and use furniture bolts for a belt and braces approach in locking them down.

Its a bit of a grey-fest with grey upholstery, grey carpet and grey curtains! Desperately need to brighten the interior up with some colour! I'm planning to cover the holes beneath the bed and also beneath the kitchen unit with fabric on a wire. That way I can gain access to it easily, but everything under there remains out of sight.
What colours you reckon? Thinking of either -
Thanks for the kind words chaps. I do like some of the finishes on the furniture boards, but also loved some of the functional looking ply conversions that I'd seen. There are a lot of pro companies out there who do a superb job and put a lot of effort into the details of their work, however, there are also some 'pro' companies which make things look ok on first glance but on closer inspection their work does not justify the cost of their services. I never imagined doing my own units and bed but as the conversion continued, I just decided to get some better tools and have a go myself. At least I know how everything has been built.
Mark, those fasteners are headed threaded inserts. They're screw in rather than push fit and have a headed finish to them to fit over the lino. I mistakenly purchased some non-headed ones which are now gathering sawdust. They're much better than just securing units in with a few screws and angle brackets or cabinet blocks.
Mark, those fasteners are headed threaded inserts. They're screw in rather than push fit and have a headed finish to them to fit over the lino. I mistakenly purchased some non-headed ones which are now gathering sawdust. They're much better than just securing units in with a few screws and angle brackets or cabinet blocks.
LeighW said:
You're making a very nice job. I've just bought a T5 to convert, so this is an interesting thread. I've changed the wheels, had windows fitted, started adding sound deadening, and am about to tackle the wiring, so there is still a looong way to go. 
Leigh, if you're enjoying it though, it goes quickly! I remember being right at the start of mine, pulling out the wheelchair lift and it dawned on me how much I had to do. Getting some solid ideas early on will save you having to undo or trying to do stuff later when most of the work is complete. Think about where you want cables to go, and get them routed in prior, or during insulation time. Make everything accessible in case you need to get to it later. Put the cables on top of the insulation.I kinda wished i'd ran speaker cables into the tailgate, however I did run 12v lighting cables into it, so may use that to pull some speaker cabling through. Its about the only place I can think of adding some extras into the rear.
LeighW said:
Thanks mate. I spent ages researching and planning what to do, even before I found a van to convert. I've nearly done the insulation now, and I'm waiting for my split charge and hookup system to arrive from extremevans, so next it's out with the front seats and half the dash to get the wires through, then run wires to where I'll need them, then seal in the insulation and line and fit the ply panels etc. A full side conversion is my plan (lwb furniture kit from evomotion design). Anyhow, enough of me cluttering your thread, keep up the good work!
Good luck with it, get a thread on the go!Just thought i'd update with the finished product. Had a couple of trips in the van, everything has been tested and works well. There isnt much i'd change (except for remembering to camp with some wheel blocks when the surface isnt level!) but I think I need a table inside the van as well as outside. I've got the outside stuff, need to buy myself an awning so that we've got space to put stuff when we go away from sites.
Plan on sorting out a table of some sort, with a couple of rails on the side of the kitchen unit.
Still havent sorted the curtains under the bed, (material put there for mock up only) but I actually like the ease of getting stuff out from under the bed, even if it doesnt look as good!
Coolbox fits just nicely. Handy location when a beer is required!
Action shot:
Plan on sorting out a table of some sort, with a couple of rails on the side of the kitchen unit.
Still havent sorted the curtains under the bed, (material put there for mock up only) but I actually like the ease of getting stuff out from under the bed, even if it doesnt look as good!


Coolbox fits just nicely. Handy location when a beer is required!

Action shot:

dienamic said:
What an amazing build, well done! I'm just about to start constructing my own bed and units, both to be removeable when not in use and I love the idea of this bed. How has the front board stood up against bowing out etc as mentioned earlier? Also, are there a couple of extra long slats in the wall side lump, that catch on the front when it's lifted to lift the back too, if that makes sense?
If you send me an email address through to me I'll do what I can to get some shots of how I built it. In short, the bed has been excellent with over 3 weeks worth of nights away.Hello chaps, don't know if you emailed or not but get in touch I'll be more than happy to give advice.
The van was great all last year and we completed about 3 weeks worth of camping in it! Not once has there been any issue with the bed - its surprisingly solid. Planning some more adventures this year but I need to work around how my currently 14month old daughter will sleep in there. She's now too big for her travel cot so can't sleep on a drop front seat.
I also need to build a table this spring. Planning on either a rail and clip system which can be stored against the van door when not used, or one on an offset pole which can swivel round.
barneyb said:
Hi Chicken Chaser!
Wicked layout for the van! just wondering if you had the plans for the bed you would possibly like to share?
cheers dude
Sorry no plans unfortunately but I could give you some measurements to work off. I'm off to France in it today for 16 days though so it'll probably be when I get back. For what it's worth, I'm not sure of the merit of the lifting bed, because of the access point in the front we very rarely need to lift the hatches up. Wicked layout for the van! just wondering if you had the plans for the bed you would possibly like to share?
cheers dude
Gassing Station | Tents, Caravans & Motorhomes | Top of Page | What's New | My Stuff