After 10 years in a glasshouse BMW e3 restoration begins
Discussion


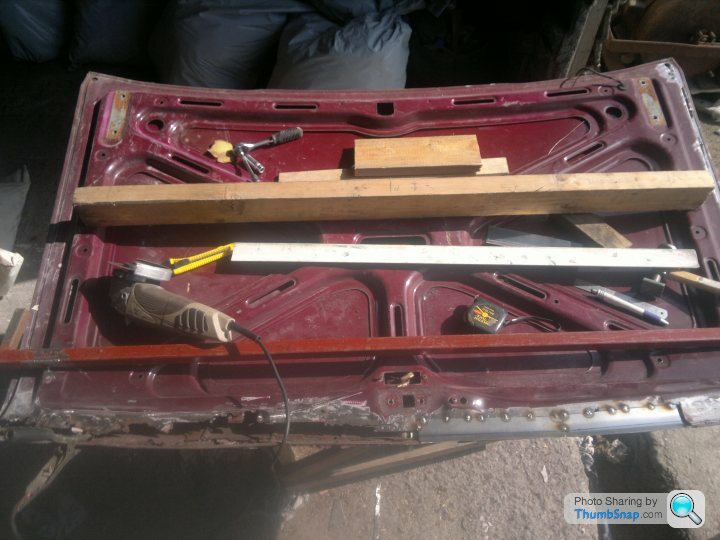
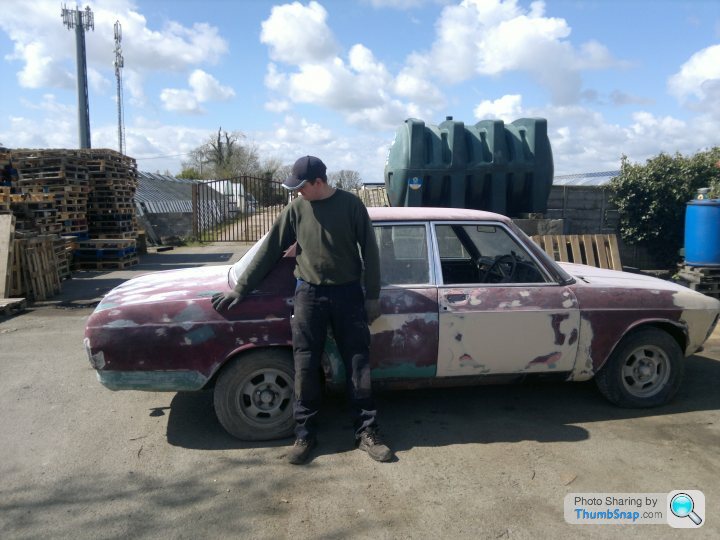
Well after a decade in the relative shelter of a glasshouse I have decided to recomission my dads 1975 BMW e3 2500. It drove from the glasshouse to a nearby shed so is mechanically not an issue (for the moment). I have just stripped the car and noticed a lot of rust in all the usual areas
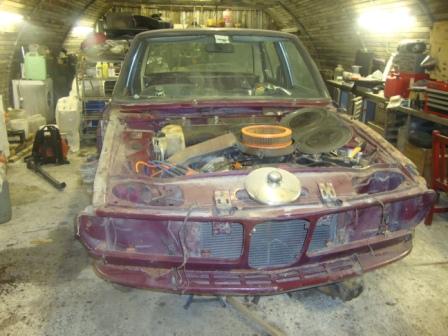
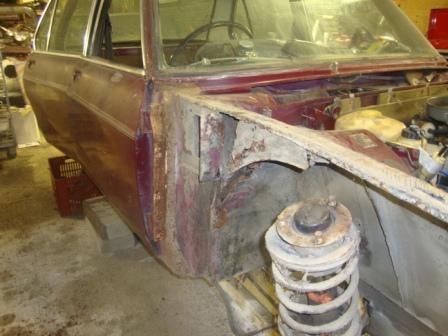
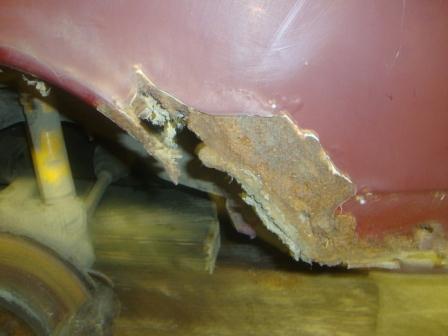
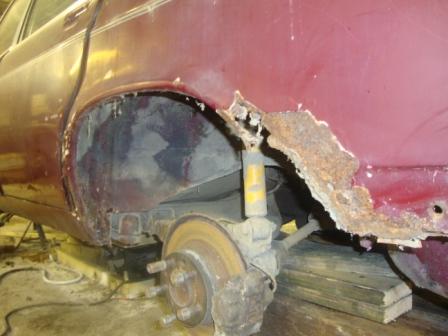
and as a picture describes many words, I'll let the rust speak for itself...
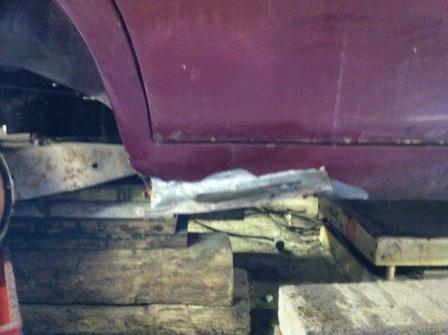
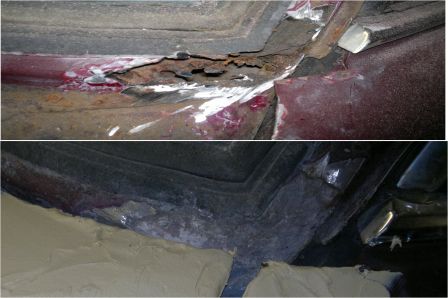
Offside wheel arch towards bulkhead and rusted through to drivers footwell, same passenger side;
Nearside rear wheel arch, same on door side of arch;
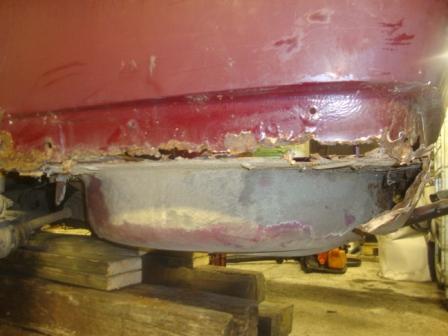
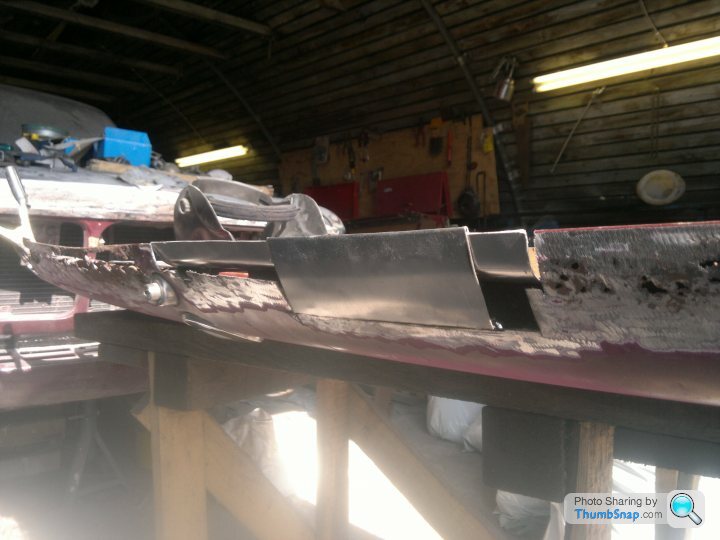
Boot floor;
My plan is to concentrate on the body for the moment, then once all welding is complete I will look at the mechanicals.
So, if anyone out there has any advice on bodywork repair, I hear a MIG welder is the tool to use? and I have a donor vehicle for metal. Experience wise, am I better off looking for an automotive welder or can a competent welder with no automotive experience handle this job?
Also, if anyone out there knows where one can source parts for one of these models I would really appreciate it, there is a very small following out there. Previous restorations of a Rover P5 and Daimler 250 V8 proved trouble free when it came to sourcing parts, i'm not finding it as easy with this car.
I will keep this post updated (with pics) and progress.
Andrew
and as a picture describes many words, I'll let the rust speak for itself...
Offside wheel arch towards bulkhead and rusted through to drivers footwell, same passenger side;
Nearside rear wheel arch, same on door side of arch;
Boot floor;
My plan is to concentrate on the body for the moment, then once all welding is complete I will look at the mechanicals.
So, if anyone out there has any advice on bodywork repair, I hear a MIG welder is the tool to use? and I have a donor vehicle for metal. Experience wise, am I better off looking for an automotive welder or can a competent welder with no automotive experience handle this job?
Also, if anyone out there knows where one can source parts for one of these models I would really appreciate it, there is a very small following out there. Previous restorations of a Rover P5 and Daimler 250 V8 proved trouble free when it came to sourcing parts, i'm not finding it as easy with this car.
I will keep this post updated (with pics) and progress.
Andrew
Ruskie said:
That is stunning. Top work!
Couldnt agree more, long road ahead before I reach that point! Since my last post I have managed to obtain a 2nd hand MIG welder and a very competent metal worker. This is his first auto project and he's just started on the front wing valances and I am impressed, what do you think? 

Cutting out rusted sections has also revealed some suprises with lead repair panels found in the outer o/s sill and rear strut turrets!!
So bodywork will continue until the welding is done and then I will get a lot of the mechanicals done before the paint shop take over (less chance of me scratching the fresh paint). The braking system is the main worry here as it seems RHD models have a complex system which can be replaced by a late e12 system, anyone have any recommendations on this?
The project only gets 2 days a week attention unfortunately but I will keep you all updated, thanks for the interest and tips!!
Hi all,
Finally, I have got around to updating, very happy with the progress so far, let me know your thoughts.
Here is progress so far, in sections, which is how we are concentrating on it as looking at the project in its entirety is daunting to say the least!!
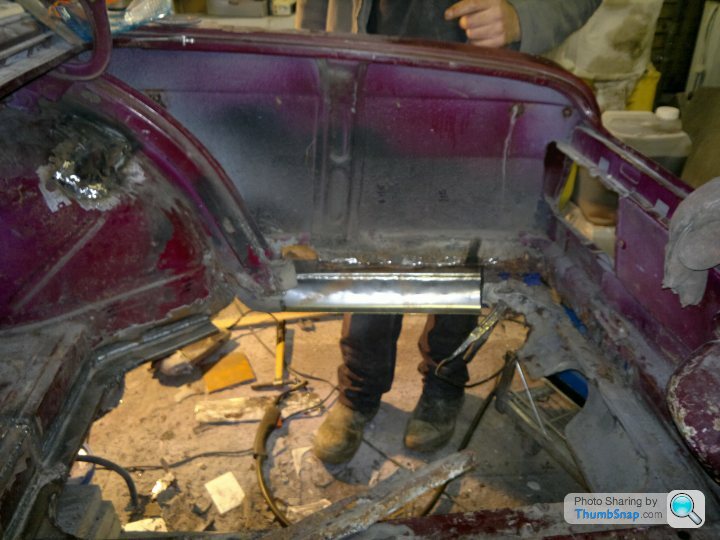
Interior rust:
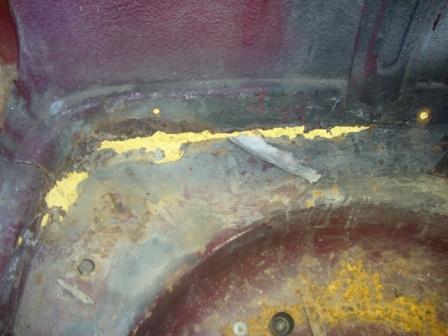
Drivers floor:

If my dad had put his foot down hard he may have gone through what was left under the carpet!!
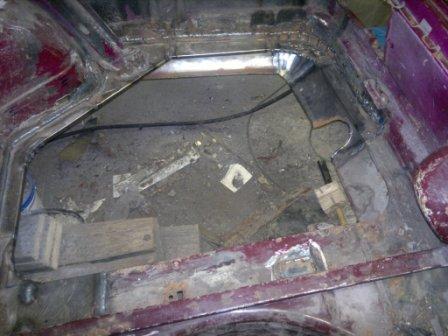
Passenger floor
url] |http://thumbsnap.com/uU8RXlRw[/url]
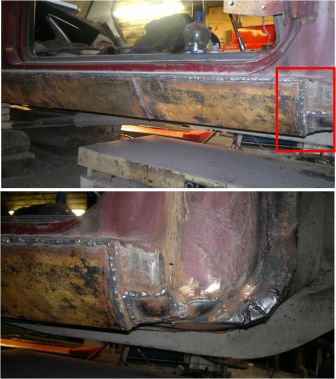
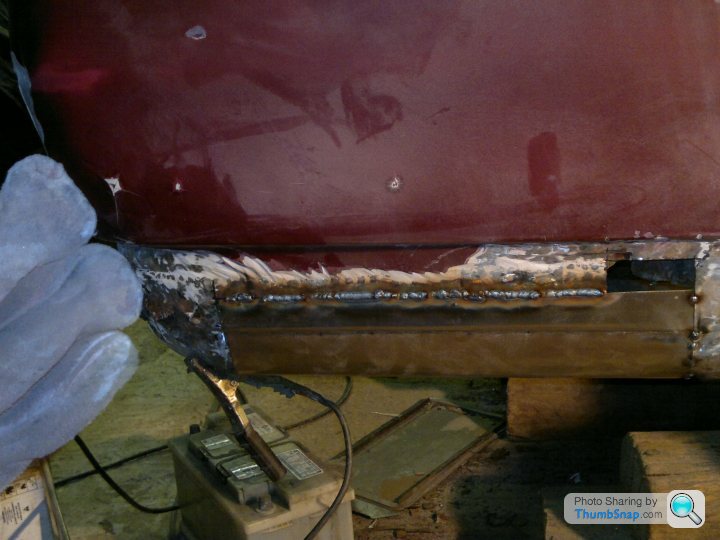
Sills:
Non-existent (in parts) sills [in other parts lead pieces were found] were repaired using new metal and a purpose shaping rig Ray fabricated. Thanks to Martin (BMW250L) for advice; replacing the entire sill sections was the only plausible option.
The section shown below is at the nearside just under the rear door.

Time consuming work, and complicated by the fact that the car is only 2-3 foot off the ground. One of those rolling jigs on e-bay would have been great here. We will know for the next time

The sections at the end of the sills, shown below at the edge of the nearside rear quarter panel, is an entire new section and the shape was not easy to produce but it looks really good, I have exploded the image but pictures cannot do it justice.
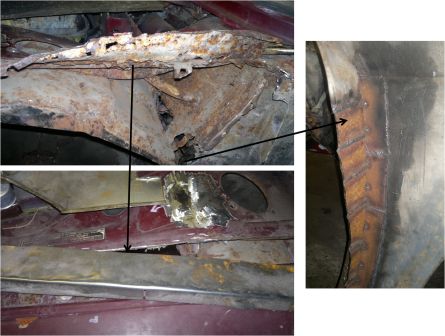
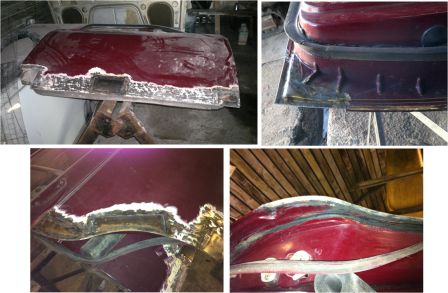
Rear quarter panel: (nearside especially)
The lower sections of the wheel arch are completely removed by rust in sections but the forward section has been repaired and a rear section has been purchased and will be fitted in the next welding stage.

The repair manages to keep the original shape around the arch, this was difficult due to the lack of template to work off.

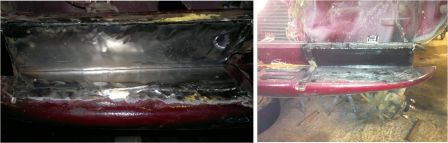
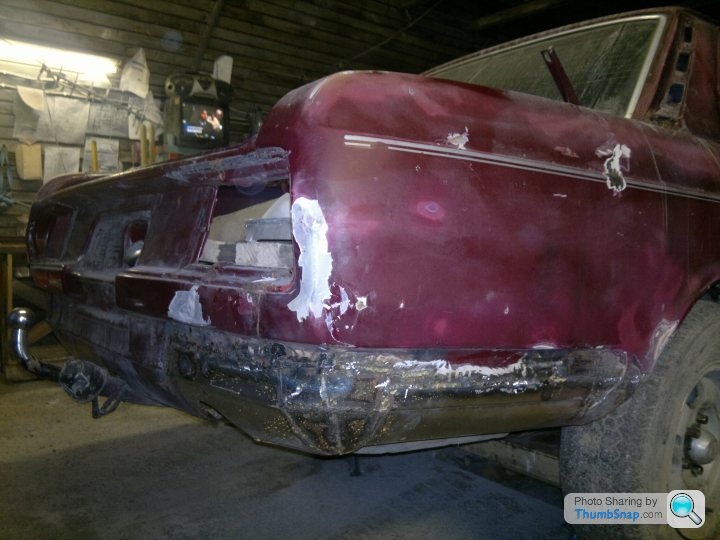
Bumper valence:
The entire section at the front had rotten metal in the crevices, this was replaced as required;
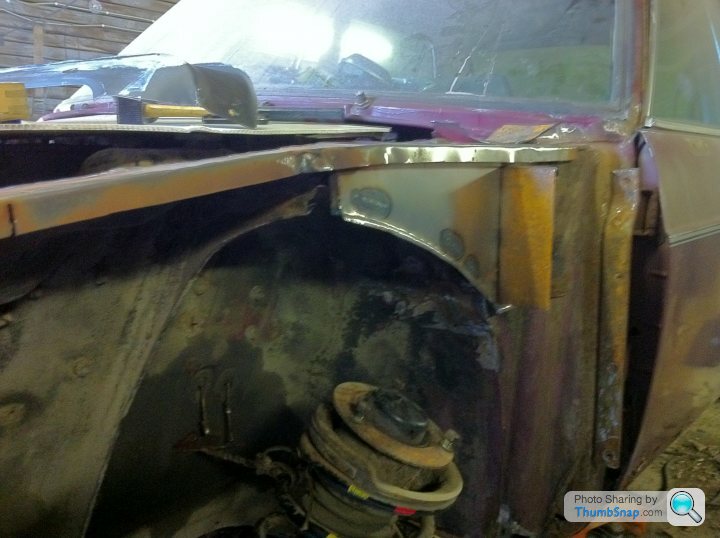
Wings and box sections:
One of the most problematic areas for rust in E3s did not let us down. Not only were the wings almost fatally eaten, the sills they sit on were not much better.
The box sections were repaired first, this was one of the first welding tasks undertaken as can be seen from my previous update.
Offside box section:
Welding work was carried out on the rear section down to the floor of the car under the pedals (see interior images). Being off-road in the glasshouse is not the origin of this rust, the car was on the road and passing MOTs with this extent of tin worm.

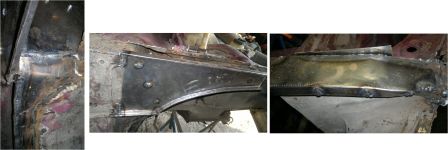
Nearside box section:
Same story here, still surprising for me to see the level of rust that was here, this car was absolutely rotten. The section to the right of the wheel was particularly intricate as shown in the image to the right;
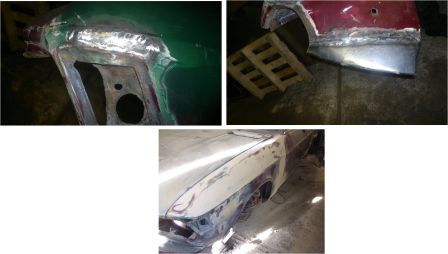
Wings:
The offside wing had major rust at the nose and end section near the front door. A donor wing was necessary for repair; again not an easy feat matching these but as good as new when finished.

Removing the wing from the donor car was a few hours work as it had become an integral/structural part of an abandoned shed. Looks well fitted and attached to the car.

The nearside wing had less rust at the nose but the rear section which meets the front door was badly affected. Note the creases at the edge of the weld, I was very impressed by this;

The nose and lower section where the bumper attaches required some metal; and then the second wing was attached to the car.
Some pretty severe rust around the lower nearside windscreen has been repaired without removing the windscreen as replacement rubbers are impossible to source.
Doors:
The final update for now on the bodywork is the 4 doors, all needing sections, mostly at the base. There is some weight in these panels - they will be even heavier now with the new metal The finish achieved at the edges is again very impressive.
We are getting through metal and gas like it's going out of fashion but summarising the work to date indicates the amount that has been done.
Another few weekends will see the rear section of the car welded; quarter panels finished, spare wheel well, petrol tank area and the lower section of the boot. There is still some welding required on the rear shock mounting points as well.

Mechanical work:
As with all E3s brakes are not their strongest area and after unused periods must be replaced I have received two servos and a master cylinder off Ian in Linwar; a very knowledgeable and helpful chap who is going to advice me on the bleeding process which can be complicated so that is much appreciated. All pipe work will be replaced at this time and we will see how calipers behave and replace as necessary.
This work will be done when the welding is finished and before the prep work begins for the bodyshop, I will be sure to update before then.
Sitting here summarising the work to date highlights a few major points;
1. The work that has been done is of really impressive quality, I must emphasise that this is a virgin project for our welder Ray and I think he has even impressed himself with the results.
2. If one knew the full extent of the tin worm starting out this car may would been left to disintegrate forever; seeing the progress, I am thankful for the rose tinted glasses we had at the time that gave the go-ahead!!
3. The rust in this car has been present a long time, back in the 90's when it was the daily driver for my dad, bringing myself, my sister and two neighbours to school every day which I am sure he will be surprised to hear, especially as a mechanic for 35 years.
Thanks for reading, I will update once the welding is complete!!
Finally, I have got around to updating, very happy with the progress so far, let me know your thoughts.
Here is progress so far, in sections, which is how we are concentrating on it as looking at the project in its entirety is daunting to say the least!!
Interior rust:
Drivers floor:
If my dad had put his foot down hard he may have gone through what was left under the carpet!!
Passenger floor
url]
|http://thumbsnap.com/uU8RXlRw[/url]Sills:
Non-existent (in parts) sills [in other parts lead pieces were found] were repaired using new metal and a purpose shaping rig Ray fabricated. Thanks to Martin (BMW250L) for advice; replacing the entire sill sections was the only plausible option.
The section shown below is at the nearside just under the rear door.
Time consuming work, and complicated by the fact that the car is only 2-3 foot off the ground. One of those rolling jigs on e-bay would have been great here. We will know for the next time
The sections at the end of the sills, shown below at the edge of the nearside rear quarter panel, is an entire new section and the shape was not easy to produce but it looks really good, I have exploded the image but pictures cannot do it justice.
Rear quarter panel: (nearside especially)
The lower sections of the wheel arch are completely removed by rust in sections but the forward section has been repaired and a rear section has been purchased and will be fitted in the next welding stage.
The repair manages to keep the original shape around the arch, this was difficult due to the lack of template to work off.
Bumper valence:
The entire section at the front had rotten metal in the crevices, this was replaced as required;
Wings and box sections:
One of the most problematic areas for rust in E3s did not let us down. Not only were the wings almost fatally eaten, the sills they sit on were not much better.
The box sections were repaired first, this was one of the first welding tasks undertaken as can be seen from my previous update.
Offside box section:
Welding work was carried out on the rear section down to the floor of the car under the pedals (see interior images). Being off-road in the glasshouse is not the origin of this rust, the car was on the road and passing MOTs with this extent of tin worm.
Nearside box section:
Same story here, still surprising for me to see the level of rust that was here, this car was absolutely rotten. The section to the right of the wheel was particularly intricate as shown in the image to the right;
Wings:
The offside wing had major rust at the nose and end section near the front door. A donor wing was necessary for repair; again not an easy feat matching these but as good as new when finished.
Removing the wing from the donor car was a few hours work as it had become an integral/structural part of an abandoned shed. Looks well fitted and attached to the car.
The nearside wing had less rust at the nose but the rear section which meets the front door was badly affected. Note the creases at the edge of the weld, I was very impressed by this;
The nose and lower section where the bumper attaches required some metal; and then the second wing was attached to the car.
Some pretty severe rust around the lower nearside windscreen has been repaired without removing the windscreen as replacement rubbers are impossible to source.
Doors:
The final update for now on the bodywork is the 4 doors, all needing sections, mostly at the base. There is some weight in these panels - they will be even heavier now with the new metal
The finish achieved at the edges is again very impressive. We are getting through metal and gas like it's going out of fashion but summarising the work to date indicates the amount that has been done.
Another few weekends will see the rear section of the car welded; quarter panels finished, spare wheel well, petrol tank area and the lower section of the boot. There is still some welding required on the rear shock mounting points as well.
Mechanical work:
As with all E3s brakes are not their strongest area and after unused periods must be replaced I have received two servos and a master cylinder off Ian in Linwar; a very knowledgeable and helpful chap who is going to advice me on the bleeding process which can be complicated so that is much appreciated. All pipe work will be replaced at this time and we will see how calipers behave and replace as necessary.
This work will be done when the welding is finished and before the prep work begins for the bodyshop, I will be sure to update before then.
Sitting here summarising the work to date highlights a few major points;
1. The work that has been done is of really impressive quality, I must emphasise that this is a virgin project for our welder Ray and I think he has even impressed himself with the results.
2. If one knew the full extent of the tin worm starting out this car may would been left to disintegrate forever; seeing the progress, I am thankful for the rose tinted glasses we had at the time that gave the go-ahead!!
3. The rust in this car has been present a long time, back in the 90's when it was the daily driver for my dad, bringing myself, my sister and two neighbours to school every day which I am sure he will be surprised to hear, especially as a mechanic for 35 years.
Thanks for reading, I will update once the welding is complete!!
Edited by kellya4 on Monday 23 January 15:01
dbdb said:
It is wonderful to see an E3 being restored like this. One of my uncles had one (a 3.0S?) in the mid 1970s and though I was really young at the time I still remember it well. It was a beautiful car and I have loved them ever since!!
Dare I ask for bigger pictures though?
I know, I was trying to compact the images because there is so many. Next time I will post them as individuals and not in a group, lesson learnt Dare I ask for bigger pictures though?
!!BMW250L said:
xGreat work Andrew, that is coming on really well!
When you have finished I would recommend filling the cars box sections, doors, chassis legs, etc with wax and using a rust inhibiting underseal. I chose Dinitrol, which is a good kit and comes in a 'pack'.
Here's a link to their website;
http://www.rejel.com/rejel-store/categoryid/29/lis...
Yes, I noted this in your restoration, this is definitely on the to-do list. When you have finished I would recommend filling the cars box sections, doors, chassis legs, etc with wax and using a rust inhibiting underseal. I chose Dinitrol, which is a good kit and comes in a 'pack'.
Here's a link to their website;
http://www.rejel.com/rejel-store/categoryid/29/lis...
BMW250L said:
Also, regarding the brakes/servos. I'd heard differing reports about the restored/refurbished LINWAR servo's, which worried me. I ended up buying new aftermarket servos from MOSS and adapted the brakets and fittings to suit. There appearance is similar to the original and all but the biggest BMW geeks wouldn't notice the difference. I hope you have a good experience with the refurb items.
Fingers crossed, I also thought about buying aftermarket servos but thought it would be easier to replace with original refurbished (even though it was considered a rubbish system when new). If I have to replace again I will go aftermarket (hopefully not for a few years). I hear a lot of the problems people have with the refurbished units is incorrect bleeding (from the pedal). Any advice you have on this would be much appreciated. I will be carrying out this work in 5-6 weeks once welding is finished. Also, silicon brake fluid can be an issue for seals and mineral based fluid is recommended although this can be a problem for all vintage cars. BMW250L said:
In respect of the cailpers, I had mine reburbished at BiggRed http://www.biggred.co.uk - who did a great job with new seals, pistons, etc, polymer coated and shipped back for about £250 for all 4 caliper - which isn't bad when you consider the fronts are 4pot and the rears are 2pot - took them about a week or 10 days - very good process and service!
I will be doing this, thanks, I was wondering what to do...BMW250L said:
Ebay.de is a great source of parts for these cars as they are far more popular in Germany. I don;t speak German, but just stick BMW E3 in the search box and scrol through the 100's of items, to see what I might need. Conact is always good and I have found that all my enquiries in english are answered in english and they are happy to quote UK delivery and ship without problems. The downside is it takes about a week to 10 days to recieve anything...
Yes, have been checking there regularly; lost out on a very reasonably priced bootlid so looks like this will remain a job on the welders to-do list unless another pops up!!Thanks for all the tips, I will keep this updated (with larger pics)!! Feel free to post a pic of the 3.0Si
!!ClaesB said:
 Great stuff! Nice to see someone who understands what great cars
 they really are. I have a 3,0si myself,also have lots of spare parts(if you have trouble finding something,send me an e mail)
Regards Claes
ClaesB said:
Contact info:claesbryngelsson@live.se And a picture!
Regards Claes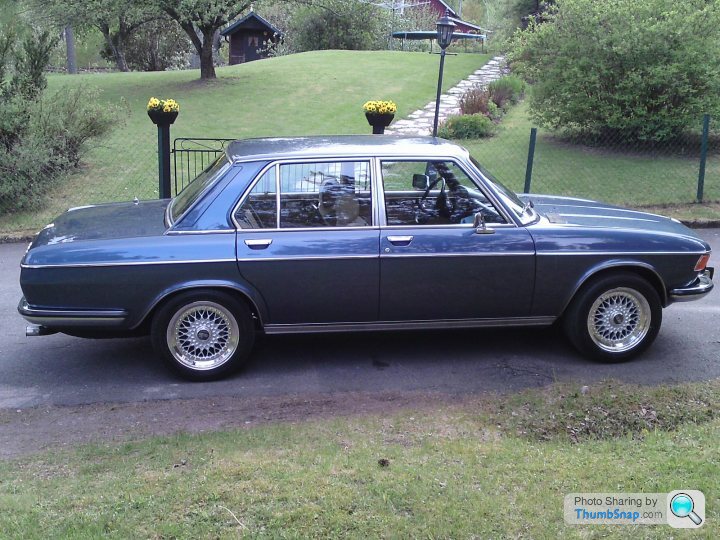
Wow, that's really nice, love the colour combination. And the wheels, are they BBS? The PH blog was just discussing "The mysterious ability of a set of BBS wheels to make an already cool car cooler still"Regards Claes
Edited by ClaesB on Wednesday 25th January 22:02
http://www.pistonheads.com/news/default.asp?storyI...
This is a perfect example!!
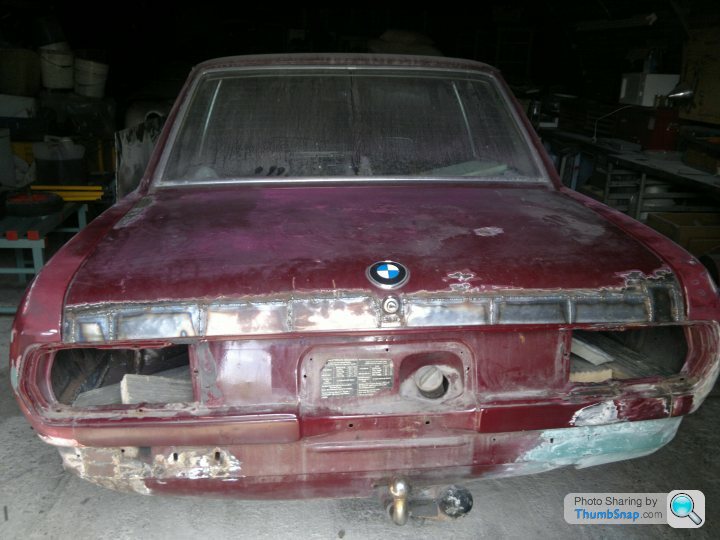
It has been 16 weeks since the last update and welding is finally complete. The work was mainly on the rear third of the car from the quarter panels back which had pretty extensive rust;
Nearside rear wheel arch:

Nearside boot floor:
Offside boot floor/tank area:

Welding begins on the tank area in sections:
Many sections later rust in this area has been completely replaced:
Work continues on the nearside boot floor:

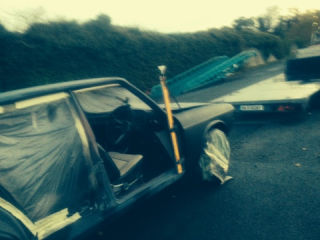
And finally, leaving the best til last, the rust on the boot lid was attacked. The entire closing area of the lid was rusted and needed to be cut out and replaced. This was a really difficult task to ensure the boot lock would still line up but was no problem to Ray who used a piece of timber to line up the edges and welded in one piece at a time.

And finally, welding completed and fitted, perfect alignment.
The next few weeks consist of hard labour prepping the body for paint using a home made ramp for the lower panels, lets hope there are no large gusts of wind!!.


After all this fresh metal I wonder is it right to put a BMW badge on it, it almost like we've made a good replica!!
The servos and master cylinder have been fitted; next step mechanically is all the metal pipework, handbrake cables and fluid changes then solve all inevitable mechanical issues as they arise.
Original ruined carpets have been shipped to Germany as templates for replacements.
I will update again once the bodywork is complete, thanks for reading.....
Nearside rear wheel arch:
Nearside boot floor:
Offside boot floor/tank area:
Welding begins on the tank area in sections:
Many sections later rust in this area has been completely replaced:
Work continues on the nearside boot floor:
And finally, leaving the best til last, the rust on the boot lid was attacked. The entire closing area of the lid was rusted and needed to be cut out and replaced. This was a really difficult task to ensure the boot lock would still line up but was no problem to Ray who used a piece of timber to line up the edges and welded in one piece at a time.
And finally, welding completed and fitted, perfect alignment.
The next few weeks consist of hard labour prepping the body for paint using a home made ramp for the lower panels, lets hope there are no large gusts of wind!!.
After all this fresh metal I wonder is it right to put a BMW badge on it, it almost like we've made a good replica!!
The servos and master cylinder have been fitted; next step mechanically is all the metal pipework, handbrake cables and fluid changes then solve all inevitable mechanical issues as they arise.
Original ruined carpets have been shipped to Germany as templates for replacements.
I will update again once the bodywork is complete, thanks for reading.....
Sorry for the delayed update, things have been moving along nicely, still a lot to do but we're progressing. Much of the recent work has been furthering along towards getting the body ready for paint; usual process of reducing amounts of filler down to wet and dry, one panel at a time...... 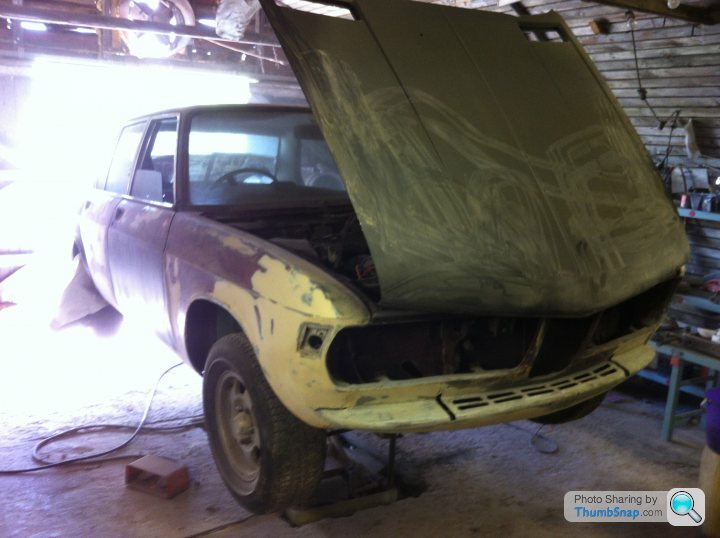
.......to here

Credit to project partner Arthur Hamilton for getting the car to this stage and saving us heaps of budget; it seems his paint shop prep skills from an early 1990s restoration of a 240 Jaguar he did had not completely disappeared, i'm really impressed (as was the body shop which is more important). They will put one of their guys on it for a week pre paint so it should be stunning when done.
We are hoping to get it into the paintshop at the end of next month, really looking forward to seeing it painted.
The underside has been wire brush cleaned for 2 weekends and coated with Dinitrol so we hopefully won't have to get the welding kit out again in 2020!!!
The car is now driving after a full week of renewing pipework, flushing and renewing fluids, replacing many non-major components and re-attaching the fallen back-box. It even has a handbrake now where it didn't have one in its last year on the road!!
The seats are off getting re-trimmed, the apparently usual BMW fraying has occurred and the seats deteriorate with every touch; I am expecting them back next week and will begin to rebuild the interior.
As I have a weeks holidays next week I will also clean up all chromework and the wheels so they will be ready when the car is painted.
And, I will also update this topic with further pics...
1 question: The windscreen rubber in the car is quite perished and we would like to replace it with a good one from a donor vehicle. I believe these are not available new and are a nightmare to get? Is swapping out a windscreen rubber possible or do they get destroyed on removal?
Thanks in advance,
I'm enjoying seeing all the other restored E3's so keep posting, it makes for great motivation.
Andrew
.......to here
Credit to project partner Arthur Hamilton for getting the car to this stage and saving us heaps of budget; it seems his paint shop prep skills from an early 1990s restoration of a 240 Jaguar he did had not completely disappeared, i'm really impressed (as was the body shop which is more important). They will put one of their guys on it for a week pre paint so it should be stunning when done.
We are hoping to get it into the paintshop at the end of next month, really looking forward to seeing it painted.
The underside has been wire brush cleaned for 2 weekends and coated with Dinitrol so we hopefully won't have to get the welding kit out again in 2020!!!
The car is now driving after a full week of renewing pipework, flushing and renewing fluids, replacing many non-major components and re-attaching the fallen back-box. It even has a handbrake now where it didn't have one in its last year on the road!!
The seats are off getting re-trimmed, the apparently usual BMW fraying has occurred and the seats deteriorate with every touch; I am expecting them back next week and will begin to rebuild the interior.
As I have a weeks holidays next week I will also clean up all chromework and the wheels so they will be ready when the car is painted.
And, I will also update this topic with further pics...
1 question: The windscreen rubber in the car is quite perished and we would like to replace it with a good one from a donor vehicle. I believe these are not available new and are a nightmare to get? Is swapping out a windscreen rubber possible or do they get destroyed on removal?
Thanks in advance,
I'm enjoying seeing all the other restored E3's so keep posting, it makes for great motivation.
Andrew
Does anyone know what model front and/or rear seats from other BMW's will fit my E-3? Two upholsterers have been unable to remove the headrests as they are ceased solid and cannot apply heat due to the fabric nearby. I have heard E38 seats bolt straight in the front but E34 and 32 have different width rails? My car is a 1976 therefore bolts directly to the floor and not onto perched rails like earlier models.
Many thanks for any info, promise to update by the end of the week with pics- interior (bar seats) is in, wheels looking brighter and booked into the panel shop today for ~2 week prep and a new overcoat.
Many thanks for any info, promise to update by the end of the week with pics- interior (bar seats) is in, wheels looking brighter and booked into the panel shop today for ~2 week prep and a new overcoat.
Update on progress as promised. But first, does anyone know where there are a set of good velour or leather seats available? I have searched in all the usual locations but have found nothing. It seems other E model seats will fit with some adjustment but I would prefer not to go down this road. Original colour is light; beige/cream but I think black would also suit. Let me know whats out there anyway, appreciate it.
Ok, so the custom made right hand drive carpets arrived......for an E3 long wheel base no explanation why or recompensense as this was clearly their mistake. The carpets were ordered and delivered 8 weeks before fitting so that didn't help my case. So, in the end, I had to cut, measure, cut again. At times, I think it would have been better to just buy carpet and cut from scratch as some pieces were so wrong. We put down sound deadening and glued the carpets to this, will look perfect with seats in (I hope).

Note the joining sections just behind the handbrake lever this is the worst part, rest looks good!!

Hours and hours totted up bringing the chromework back to life, I am not finished but here is a sample of the wheels....
Before:

After:

I have ordered a windscreen rubber direct from my local BMW dealer - 140 euros, not bad. I was recommended this website: http://bmwfans.info/parts/catalog/E3/Sedan/Europe/2500-M30/RHD/M/ it is a database of all parts with original BMW part numbers, I rang my dealer with the number and it went into his system, then ordered. Easy!! It also states which parts are still available.
The car is currently getting prepped by the panel shop before they spray it. That will include cleaning up the welds around the doors, boot, wings and ensuring every panel is going to end up wih a mirror finish.
Let me know if there are any seats around, appreciate the help. Will upadate in a few weeks when the painting is complete!!
Ok, so the custom made right hand drive carpets arrived......for an E3 long wheel base
no explanation why or recompensense as this was clearly their mistake. The carpets were ordered and delivered 8 weeks before fitting so that didn't help my case. So, in the end, I had to cut, measure, cut again. At times, I think it would have been better to just buy carpet and cut from scratch as some pieces were so wrong. We put down sound deadening and glued the carpets to this, will look perfect with seats in (I hope). Note the joining sections just behind the handbrake lever
this is the worst part, rest looks good!!Hours and hours totted up bringing the chromework back to life, I am not finished but here is a sample of the wheels....
Before:
After:
I have ordered a windscreen rubber direct from my local BMW dealer - 140 euros, not bad. I was recommended this website: http://bmwfans.info/parts/catalog/E3/Sedan/Europe/2500-M30/RHD/M/ it is a database of all parts with original BMW part numbers, I rang my dealer with the number and it went into his system, then ordered. Easy!! It also states which parts are still available.
The car is currently getting prepped by the panel shop before they spray it. That will include cleaning up the welds around the doors, boot, wings and ensuring every panel is going to end up wih a mirror finish.
Let me know if there are any seats around, appreciate the help. Will upadate in a few weeks when the painting is complete!!
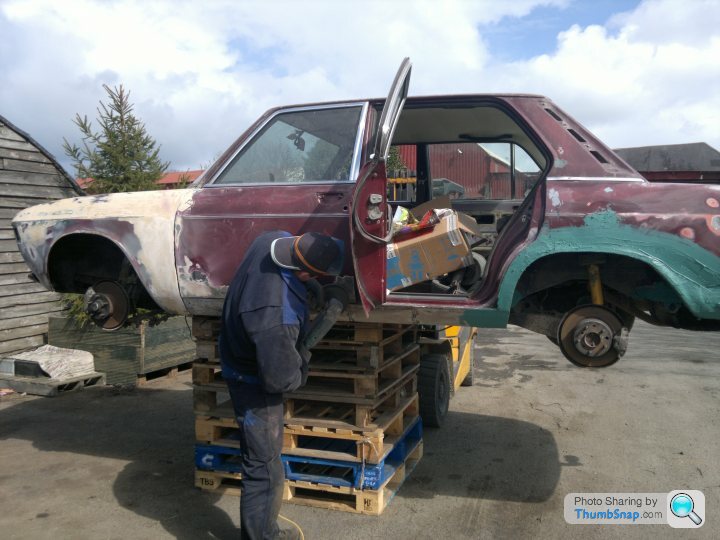
The project continues. There was no progress on the car for a little over a year due to a wedding and then waiting for a slot in our local bodyshop.
A the last update (Sept 2012) we had reached as good a preparation as possible for the amateur enthusiast and required a professional to spend some time getting panels perfect before painting. The car looked perfectly straight in the matt black primer finish but there is always a danger that a bright paint finish in natural daylight would show the true unevenness of panel finish. It took a while to find the right man for the job (local bodyshops tend to steer clear of classic cars and specialists were a bit of a distance). We found an Italian with decades of experience of car preparation and he set about applying and removing less and less filler until he was satisfied. Then it was off to the spray shop.
Note the yellow stick holding a funnel and pipe for manual gravity feeeding of fuel into the carbs - a new fuel tank and piping is still on the to-do list....

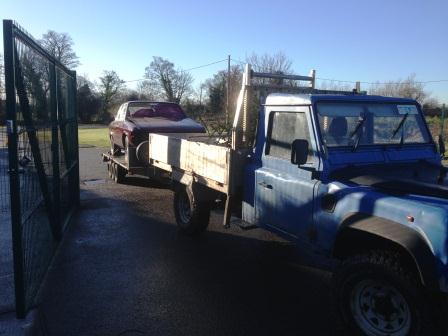
6 weeks later (including a break over Christmas) and it was ready to go, I am loving the colour. It's original, Malaga Red. Looks great.


Loaded up onto the trailer (carefully with winch)


And off we go...


Spent the remaining time that day getting the car into the shed and cleaning all the trim pieces ready for remounting
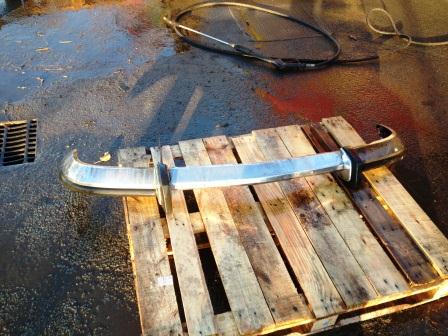
The pitting on parts of the bumpers is very bad in places; these will have to be replaced/re-chromed at some stage.

So, the plan now is to re-assemble the car and present it to my Dad in two weeks (this project is being done without his knowledge, the car was his daily from 1992-2000). Once he receives it we will work on the mechanicals together (he is the expert) and get the car on the road.
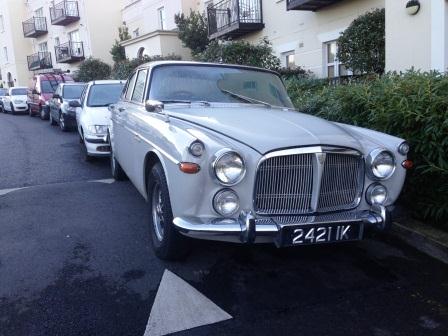
I always mean to take more pictures during the restoration but never do (or they're terrible quality) but I did manage to capture some other interesting vehicles at the weekend;
Barn stored Jag 240

Daimler v8

Jeep Cherokee 4.0

And a fabulous, 2 owner Rover P5B. On axel stands for years and then recommissioned, in daily use too. A real gem of a car...

Next update in 2 weeks when the car is re-assembled....
A the last update (Sept 2012) we had reached as good a preparation as possible for the amateur enthusiast and required a professional to spend some time getting panels perfect before painting. The car looked perfectly straight in the matt black primer finish but there is always a danger that a bright paint finish in natural daylight would show the true unevenness of panel finish. It took a while to find the right man for the job (local bodyshops tend to steer clear of classic cars and specialists were a bit of a distance). We found an Italian with decades of experience of car preparation and he set about applying and removing less and less filler until he was satisfied. Then it was off to the spray shop.
Note the yellow stick holding a funnel and pipe for manual gravity feeeding of fuel into the carbs - a new fuel tank and piping is still on the to-do list....
6 weeks later (including a break over Christmas) and it was ready to go, I am loving the colour. It's original, Malaga Red. Looks great.
Loaded up onto the trailer (carefully with winch)
And off we go...
Spent the remaining time that day getting the car into the shed and cleaning all the trim pieces ready for remounting
The pitting on parts of the bumpers is very bad in places; these will have to be replaced/re-chromed at some stage.
So, the plan now is to re-assemble the car and present it to my Dad in two weeks (this project is being done without his knowledge, the car was his daily from 1992-2000). Once he receives it we will work on the mechanicals together (he is the expert) and get the car on the road.
I always mean to take more pictures during the restoration but never do (or they're terrible quality) but I did manage to capture some other interesting vehicles at the weekend;
Barn stored Jag 240
Daimler v8
Jeep Cherokee 4.0
And a fabulous, 2 owner Rover P5B. On axel stands for years and then recommissioned, in daily use too. A real gem of a car...
Next update in 2 weeks when the car is re-assembled....
Gassing Station | Readers' Cars | Top of Page | What's New | My Stuff