Lotus Excel project
Discussion


Hello all,
Thought I'd chronicle the stupid thing I've just done.
www.danslotusproject.blogspot.com
My friends mum (edit: Now girfriend - no, not the mum!) has a Lotus Excel that she loves but it's been sat outside and not turned a wheel for at least a decade. The last tax disc says 1997!
I've been offered it and a barn to fix it up in for free as long as I don't change the colour.
His name's Henry.
I'll add some pictures when I get home.
Initial survey suggests:
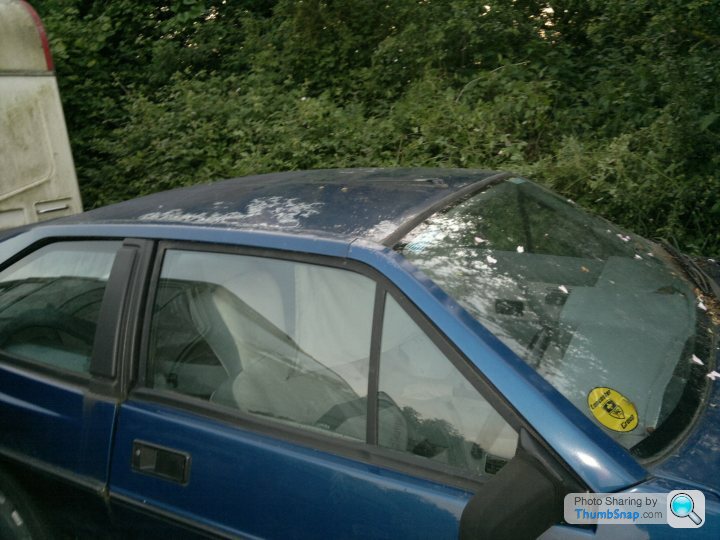
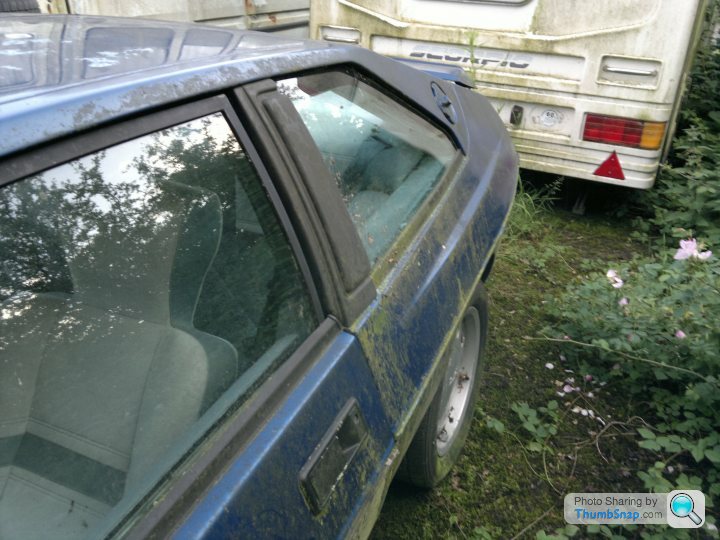
Bodywork: Solid but paint is ropey in places
Engine: All there. May or may not be siezed (if it is, then the project's off)
Suspension: Rear spring broken -That's the reason it was taken off the road in the first place
Electrics: Don't know - No battery
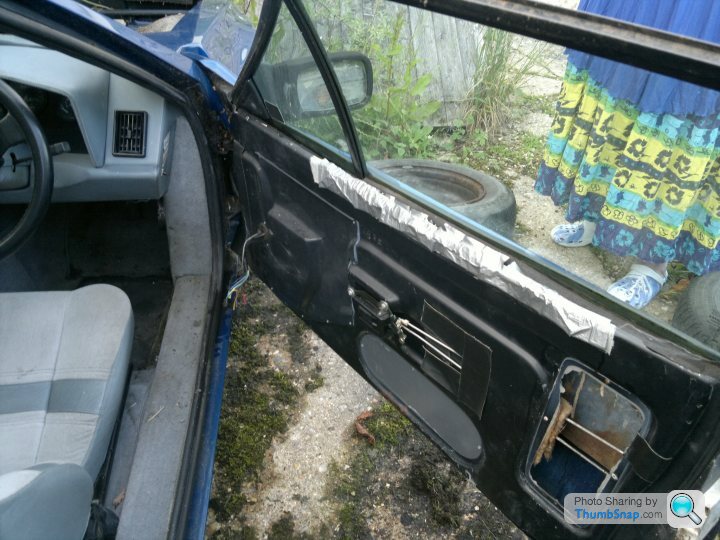
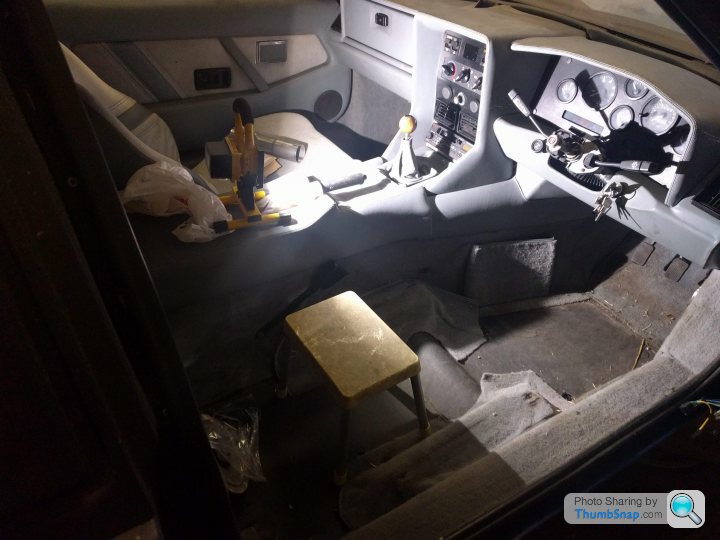
Interior: Door cards removed, headlining borked, seats and dash will probably clean up pretty well. Carpets dirty.
Chassis: Galvanised, so keeping my fingers crossed.
Also of note is that I may have bent the clutch pedal/pedalbox. What the piss have I let myself in for?
Thought I'd chronicle the stupid thing I've just done.
www.danslotusproject.blogspot.com
My friends mum (edit: Now girfriend - no, not the mum!) has a Lotus Excel that she loves but it's been sat outside and not turned a wheel for at least a decade. The last tax disc says 1997!
I've been offered it and a barn to fix it up in for free as long as I don't change the colour.
His name's Henry.
I'll add some pictures when I get home.
Initial survey suggests:
Bodywork: Solid but paint is ropey in places
Engine: All there. May or may not be siezed (if it is, then the project's off)
Suspension: Rear spring broken -That's the reason it was taken off the road in the first place
Electrics: Don't know - No battery
Interior: Door cards removed, headlining borked, seats and dash will probably clean up pretty well. Carpets dirty.
Chassis: Galvanised, so keeping my fingers crossed.
Also of note is that I may have bent the clutch pedal/pedalbox. What the piss have I let myself in for?
Edited by crofty1984 on Saturday 4th January 21:19
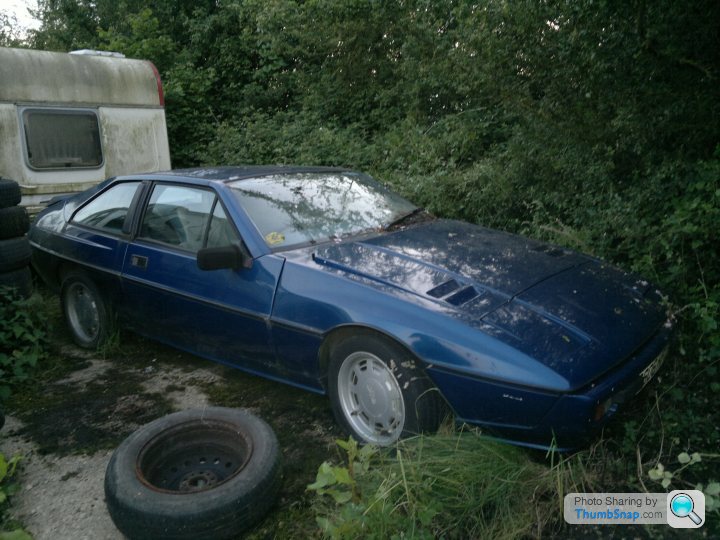
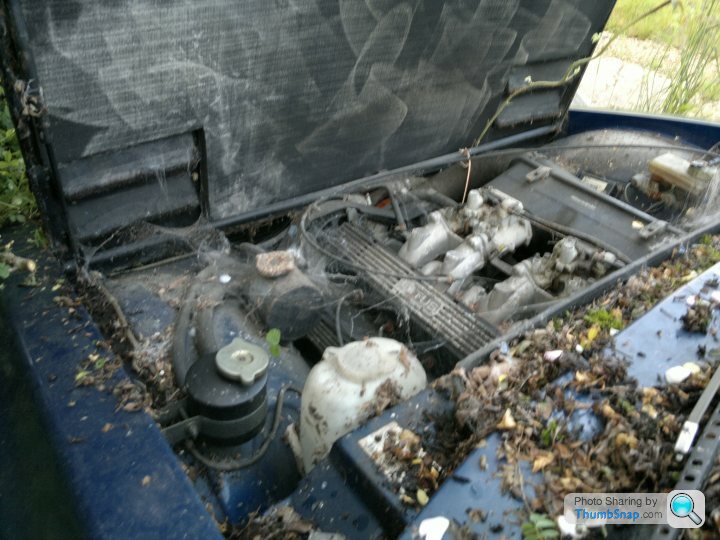
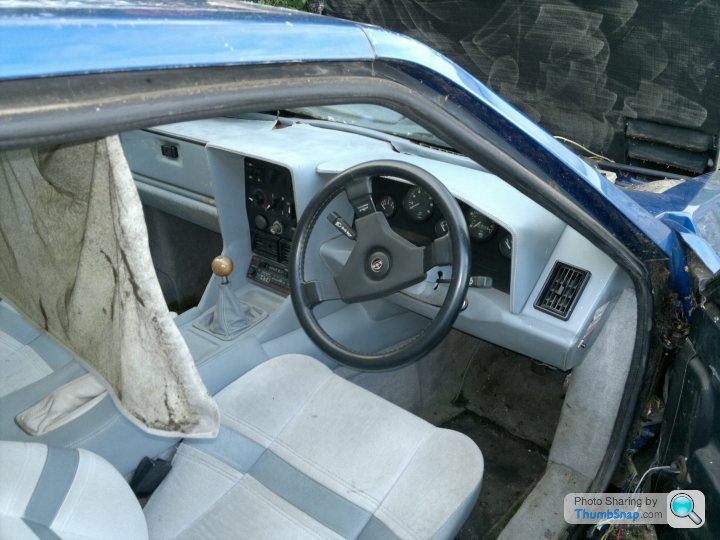
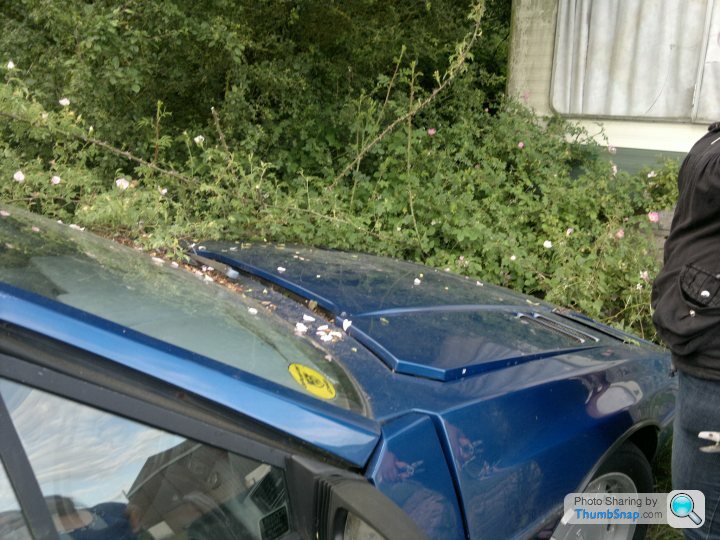
Well, here are the pictures.
Here's the most flattering shot:
Massive spiders under the bonnet.
I'm sure there's a "Twin Webbers" joke in there somewhere.
Headlining a shagged. Most of the rest of the interior looks like it should clean up OK.
A car in the hand is worth two in the bush!
Should go faster after a de-cat. (Last pun, I promise!)
Thanks for the kind words everyone 
It will either be better than expected or a complete b d, but there we go.
I've even made a blog! Though at the moment it's basically what I've said in this thread.
http://danslotusproject.blogspot.co.uk/
If I can I'm thinking of entering next year's PPC £999 challenge. Have to sort out a "base price" and see how much I have to spend. Even if I don't make it, I'll at least have a budget and a deadline.
I'm not going to strip it, but I definitely want to go to Snetterton and Cadwell with it. But it'll mainly be a road car. I'll be doing it up at my friend's mum's house and she wants to see it back to it's former glory, which is fair.
It will either be better than expected or a complete b
d, but there we go.I've even made a blog! Though at the moment it's basically what I've said in this thread.
http://danslotusproject.blogspot.co.uk/
If I can I'm thinking of entering next year's PPC £999 challenge. Have to sort out a "base price" and see how much I have to spend. Even if I don't make it, I'll at least have a budget and a deadline.
I'm not going to strip it, but I definitely want to go to Snetterton and Cadwell with it. But it'll mainly be a road car. I'll be doing it up at my friend's mum's house and she wants to see it back to it's former glory, which is fair.
Good luck Adam and McSam! Hope it all goes well.
Wulluff - Despite the caravans I can assure you that the people in question are not "of the non-stationary persuasion". They're lovely.
I'll be clearing some space in the barn next week with any luck. So maybe I'll have a bit more to tell next week. Going to see if I can crank it over with a spanner on the crank. If so, it's service, battery and cross your fingers time!
Just a quickie update, I've been putting together a list of jobs that'll need doing to get it to mechanically function and see an MOT centre. I'm not expecting an MOT pass, but if I get the fail sheet, it'll at least give the project a bit more direction. Any advice is more than welcome!
Pre-work - Clean out workshop!
Move car into workshop
Clean and tidy
Inspect Chassis
Plugs out, crank by hand
Diesel in bores (maybe)
Oil Service
Plugs
Battery
Try to start
Full service
Replace rear Spring
Clutch pedal and box
Clutch slave cylinder
Clutch master cylinder
Exhaust
New tyres
Refit Door cards
Remove loose headlining
MOT!!!
Actually, maybe I should add brakes to the list!
marshalla said:
Definitely. The Toyota calipers are notorious for seizing if they don't get exercised regularly.
Cheers, added a brake refurb. On a non-unrelated note, would you mind having a prod at the lotusexcel.net admin please? I'm still not a member so I can't read the technical articles or post anything.
Just a quick update.
I was down there clearing the barn out this weekend. It's still not done, but we've made some headway. Henry's a 1985 model, not '86 and was something like the 1200th car off the line, according to the VIN.
It also seems that the engine did run a couple of years ago, so that's promising. There's also areally thick thorny stalk growing through the panel gap between the bumper and slam panel
No more pictures unfortunately. Dan
Resurrecting the thread somewhat, but I've updated the blog with the latest goings on:
www.danslotusproject.blogspot.com
I'll get round to adding the pics here too at some point.
www.danslotusproject.blogspot.com
I'll get round to adding the pics here too at some point.
I haven't been round to see the Excel for a while, life has got in the way (stupid life!). Anyway, after a few weeks clearing a space in the barn, Henry has a new Home!
I (OK, Karen) took some "before" shots, prior to washing him off.
It took 3 and occasionally 4 of us to:
Pump up 4 tyres
Put on the spare wheel after one tyre exploded (at 20 psi!)
Find out he'd grown quite fond of his resting place
Jack up and free off 3 wheels individually through various applications of "gentle negotiation"
Free up the fourth with a big shove!
Push him to outside the barn and give him a wash
Really excited now - The project really begins!
We got him washed off and removed the branch lodged in the bumper. Looks a lot nicer now.
Karen's sister got roped in to do the steering whilst we made a 3 point turn in the field, then pushed him in backwards.
We managed to get the back corner about where it needed to be, but couldn't get the nose parallel to the wall as there's not much room to maneuver. Ended up jacking it up with the trolleyjack at 90 degrees as a makeshift dolly, then lifting the other corner manually and shoving like hell!
myles1972 said:
Watching with interest. Do you have a timeframe for completion?
HA! Erm, I mean no.Actually I'm hoping to have it running before Christmas and on the road next summer. Though by that I mean MOTed and road legal. Maybe another year before I've sorted the interior and bodywork.
Though I do quite like the idea of keeping the bodywork rough-looking and putting some insane powerplant in there. Not going to happen though.
I WOULD like to see what I can get out of the engine though. About 220+ would be nice but it's only the low compression version so It'd be a full stripdown and rebuild job with HC internals.
Trouble is, it's about an hour away at my girlfriend's folks' and I have 2 other projects so working on it's an "as and when" job.
I've Re-Updated the blog!
The chassis is in good nick and the engine turns by hand. The best bit - It turns on the starter too and tried to cough into life on a squirt of easy-start! I feel like it's trying to drag itself back to life from the brink. It wants to be back on the road again, it's just my job to repair the things that are stopping it. Sentimental sod.
Anyway, from www.danslotusproject.blogspot.com :
Today (actually yesterday) was a big day, I liberated a battery from my boat, which I MUST remember to put back tomorrow, and tried out the electrics, including the starter motor!
First I put back the 3 bolts I'd taken out of the oil cooler. Not exciting, but needed to be done.
So, battery in the boot:

The eagle-eyed amongst you may notice it's not quite a factory-fit installation.
A lot of the electrics were a bit gammy, so sprayed some electrical cleaner in and gave them a wiggle.
Results so far:
Working - Brake lights, 1 fog lamp, high beam flash on N/S headlamp, left indicator, stereo, horn, dash lights, windscreen wiper, electric windows, heater fan.
Not working - Headlamp motors, right indicator flashes very quickly on front only, interior light, the other fog lamp, hazard lights, heater pointer (I can get screen or feet but not vent), fuel pump.

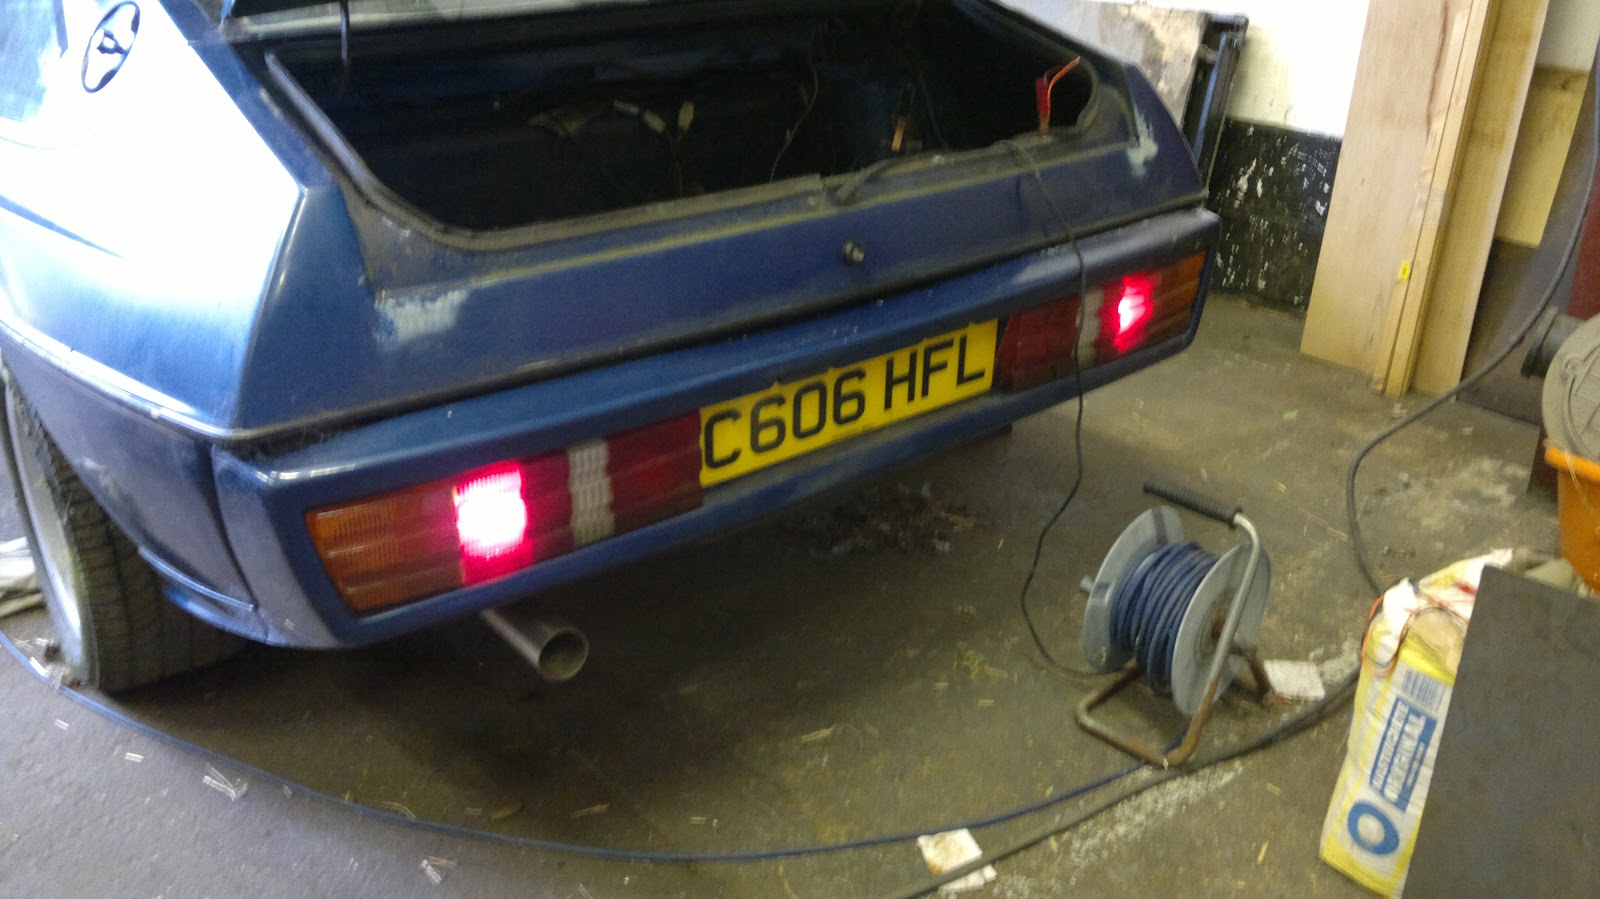

No fuel pump means no starting, but I did crank it over with a bit of easy start down the intake trumpets (how could I not) and there was firing! Not running by any stretch, but he did try, and it's the taking part that counts.
Talking about taking (a)part. The fuel pump had to come out so I'll try and free it up at home. There's 3 wires attached, 1 black, 1 positive feed and one that looks like it goes to a capacitor on the body of the pump. The black needs unscrewing, the other two are just spade connectors. Then a 13 or 14mm spanner takes the pipes off, with an adjustable to hold the "socket" steady (otherwise you just twist the pipe and it springs back). I tied the clear lower one up out of the way because it looked like a direct feed from the apparently empty tank.
After that it's just 3 nuts to get a spanner on to remove as a unit. Worth bearing in mind that if you then take it home and leave it on the kitchen step in the garden, it'll get wet if it rains in the night. I'm a genius.

The other job was to get the headlamp pods up. There's a knob between the front wheel and bumper on either side that you can apparently use to wind the headlight pods up manually in case you need to get yourself home. I say apparently as they were damned near jammed solid. Ended up getting a screwdriver on the end of the knob and doing it that way. mm by mm. Took ages!
From what I understand it only goes in one direction, has a mechanism on it like a medicine bottle, so the same rotation sends it up then down then up... I'm going to get an electric drill on it next time.

"ooh, I think I've got a bit of sleep in my eye!"
So that's sunday's report. I'll be playing with the pump at some point this week and seeing if I can free it up.
One point of concern was that it looks like petrol's been leaking into the boot. I should probably fix that.

The chassis is in good nick and the engine turns by hand. The best bit - It turns on the starter too and tried to cough into life on a squirt of easy-start! I feel like it's trying to drag itself back to life from the brink. It wants to be back on the road again, it's just my job to repair the things that are stopping it. Sentimental sod.
Anyway, from www.danslotusproject.blogspot.com :
Today (actually yesterday) was a big day, I liberated a battery from my boat, which I MUST remember to put back tomorrow, and tried out the electrics, including the starter motor!
First I put back the 3 bolts I'd taken out of the oil cooler. Not exciting, but needed to be done.
So, battery in the boot:
The eagle-eyed amongst you may notice it's not quite a factory-fit installation.
A lot of the electrics were a bit gammy, so sprayed some electrical cleaner in and gave them a wiggle.
Results so far:
Working - Brake lights, 1 fog lamp, high beam flash on N/S headlamp, left indicator, stereo, horn, dash lights, windscreen wiper, electric windows, heater fan.
Not working - Headlamp motors, right indicator flashes very quickly on front only, interior light, the other fog lamp, hazard lights, heater pointer (I can get screen or feet but not vent), fuel pump.
No fuel pump means no starting, but I did crank it over with a bit of easy start down the intake trumpets (how could I not) and there was firing! Not running by any stretch, but he did try, and it's the taking part that counts.
Talking about taking (a)part. The fuel pump had to come out so I'll try and free it up at home. There's 3 wires attached, 1 black, 1 positive feed and one that looks like it goes to a capacitor on the body of the pump. The black needs unscrewing, the other two are just spade connectors. Then a 13 or 14mm spanner takes the pipes off, with an adjustable to hold the "socket" steady (otherwise you just twist the pipe and it springs back). I tied the clear lower one up out of the way because it looked like a direct feed from the apparently empty tank.
After that it's just 3 nuts to get a spanner on to remove as a unit. Worth bearing in mind that if you then take it home and leave it on the kitchen step in the garden, it'll get wet if it rains in the night. I'm a genius.
The other job was to get the headlamp pods up. There's a knob between the front wheel and bumper on either side that you can apparently use to wind the headlight pods up manually in case you need to get yourself home. I say apparently as they were damned near jammed solid. Ended up getting a screwdriver on the end of the knob and doing it that way. mm by mm. Took ages!
From what I understand it only goes in one direction, has a mechanism on it like a medicine bottle, so the same rotation sends it up then down then up... I'm going to get an electric drill on it next time.
"ooh, I think I've got a bit of sleep in my eye!"
So that's sunday's report. I'll be playing with the pump at some point this week and seeing if I can free it up.
One point of concern was that it looks like petrol's been leaking into the boot. I should probably fix that.
kev b said:
Did you try tapping the fuel pump lightly with a hammer before removing it, as this often starts them ticking. The "capacitor" is a radio interference suppressor. I would make a new cambelt my first job, if the old one snaps you will be in for great expense!
Luckily the previous owner came into the barn to inform me that I should first try tapping it with a bit of wood then progres to hammer. No luck though, so I'm going to get it on a battery in my "home workshop" (living room floor) and see what I can do then strip it donw and free it up if possible.God shout on the cambelt though. I'll get one ordered.
That looks beautiful, breadvan.
I've a way to go, but made 1 big step this weekend, follow the links below!
http://www.youtube.com/watch?v=oaxhNfcLauU
http://www.youtube.com/watch?v=tTgmjMF0YqY
I've a way to go, but made 1 big step this weekend, follow the links below!
http://www.youtube.com/watch?v=oaxhNfcLauU
http://www.youtube.com/watch?v=tTgmjMF0YqY
Text from the Blog.
The Restoration Continues...
Well I've been at it again. With some help form the Excel forums this time.
The fuel pump has points and a linear motor to operate, it's a diaphragm pump, which is why you get that ticking sound before startup. Though I didn't. Because it was knackered.
Luckily, a chap from lotusexcel.net lent me 2 spare pumps he had. Using the bottom half of my old pump and the top half of one of his, I've managed to get a working fuel pump! Thanks Terry
The fuel leak was fixed with a bit of PTFE tape around the threads and tightening it up properly.
The reason the leak was intermittent was because it was on the downstream fitting, the fuel only flowed when the ignition was on. I learnt this by undoing the upstream end of the flowlock valve, then doing it back up again very quickly in a panic!
I thought Henry deserved his own battery so got one from Halfords. The first brand-new
thing I've fitted I think.
So the moment of truth!
OK, lumpy as hell but a start. After spending 10 minutes trying to open the fuel cap and nearly igniting my shoes, I got a gallon of fresh unleaded in the tank and tried agian with a lot more success!
This is actually the third run. The second one happened off-camera, which was a shame as there was a lot of drama and billowing smoke. The headlamp pods are jammed nearly solid. Having the ignition on burnt out (at least one) of the motors, which then burnt off all the WD40 it had on it from my previous attempts to free it. Bugger.
Other news is that I bought a slave and master cylinder for the clutch. They were wrong but I'm swapping them for the right ones on Tuesday.
The clutch pedal went down, but not back up again. I'm hoping it's a sticky master or slave cylinder, so I'm replacing them both. I've heard you can bend the clutch pedal and/or box if you're not careful, so I'm hoping it's not that or it'll be a pain to get to. The pedal doesn't look out of shape.
I got the headlamp rings off (2 plastic plugs on each) so the headlamps will have to come out whilst I play with the motors and try to free the mechanism.
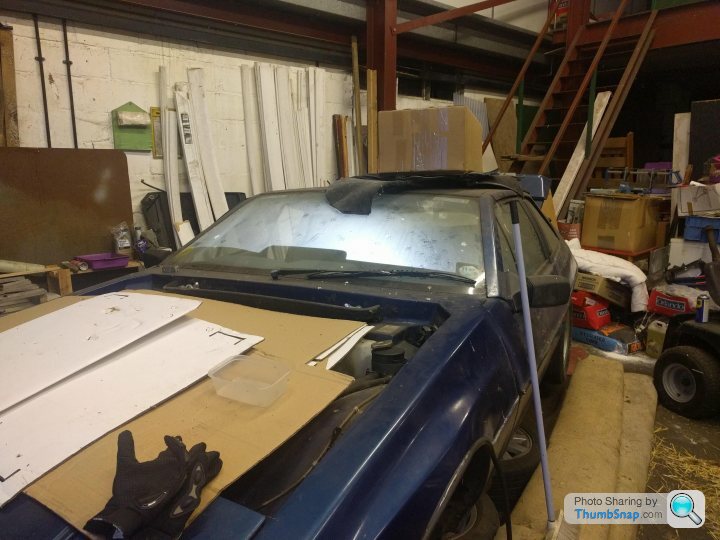
The bonnet finally came off!
Had to hammer in the right little 6mm allen socket and get a ratchet on it in the end. So I was on the right track before, but not quite violent enough. Once they're out you can take off the ram and disconnect the earth and the screen washers. There's a little union where you can take off the pipe next to the snail.
The next jobs are going to be to give the engine a thorough servicing and get that clutch working.
The Restoration Continues...
Well I've been at it again. With some help form the Excel forums this time.
The fuel pump has points and a linear motor to operate, it's a diaphragm pump, which is why you get that ticking sound before startup. Though I didn't. Because it was knackered.
Luckily, a chap from lotusexcel.net lent me 2 spare pumps he had. Using the bottom half of my old pump and the top half of one of his, I've managed to get a working fuel pump! Thanks Terry
The fuel leak was fixed with a bit of PTFE tape around the threads and tightening it up properly.
The reason the leak was intermittent was because it was on the downstream fitting, the fuel only flowed when the ignition was on. I learnt this by undoing the upstream end of the flowlock valve, then doing it back up again very quickly in a panic!
I thought Henry deserved his own battery so got one from Halfords. The first brand-new
thing I've fitted I think.
So the moment of truth!
OK, lumpy as hell but a start. After spending 10 minutes trying to open the fuel cap and nearly igniting my shoes, I got a gallon of fresh unleaded in the tank and tried agian with a lot more success!
This is actually the third run. The second one happened off-camera, which was a shame as there was a lot of drama and billowing smoke. The headlamp pods are jammed nearly solid. Having the ignition on burnt out (at least one) of the motors, which then burnt off all the WD40 it had on it from my previous attempts to free it. Bugger.
Other news is that I bought a slave and master cylinder for the clutch. They were wrong but I'm swapping them for the right ones on Tuesday.
The clutch pedal went down, but not back up again. I'm hoping it's a sticky master or slave cylinder, so I'm replacing them both. I've heard you can bend the clutch pedal and/or box if you're not careful, so I'm hoping it's not that or it'll be a pain to get to. The pedal doesn't look out of shape.
I got the headlamp rings off (2 plastic plugs on each) so the headlamps will have to come out whilst I play with the motors and try to free the mechanism.
The bonnet finally came off!
Had to hammer in the right little 6mm allen socket and get a ratchet on it in the end. So I was on the right track before, but not quite violent enough. Once they're out you can take off the ram and disconnect the earth and the screen washers. There's a little union where you can take off the pipe next to the snail.
The next jobs are going to be to give the engine a thorough servicing and get that clutch working.
Just a quick scribble whilst I remember. I'll have to get the pictures up once I'm home.
Yesterday's job was to start on the clutch, now I've got nice shiny new bits from Brake Engineering (excellent customer service by the way).
For those that are interested (so, me and no one else) Part numbers are:
Master Cylinder - MC1602BE
Slave Cylinder - WC1600BE
Unfortunately I was working single-handed for most of it so didn't get underneath the car last night. He is up on axle stands though.
Job 1 was to drain the fluid.
The pipe fitting into the slave cylinder was solid and I didn't want to risk rounding it off so the bleed nipple came out instead. Jumped back in the car and kept pumping the clutch pedal until no more fluid came out.
Next was to remove the master cylinder, which, due to me not having quite the right tool remains firmly attached. Anyway:
See how nice and accessible it is from the engine bay? Well then SURPRISE! all the mountings are on the inside of the car, in the footwell.
The panel under the dash needs to come off, simple job of 4 or 5 screws, then pull. Looks like I'll have to be careful lining up the heater hose when putting it back, but no worries.
The clutch M/C is up in the top right corner of the footwell. It's held on by 2 bolts (part of the M/C assembly) with nuts on the inside of the car which need undoing. Managed to get to one with a spanner, I'll have to come back later with a deep socket for the other. The bolt is quite long so the end of the bolt was hitting the back of my normal-sized socket before it got near the nut.
The actuator arm is held on by an R-clip which you can ping off and pull the linkage away. There's supposed to be 2 fibre washers, but they were missing.
I intended the M/C to be a belt n' braces approach to the clutch hydraulics, as it's usually the slave cylinder which jams. But mine is leaking, so it's a good job I'm sorting both ends.
The headlamps also came out so I could have a look behind them and replace the bulbs. Oiled up the mechanosm and it seems fairly free. Have to whip the motors out.
Anyway, some pictures below:
Clutch master cylinder in situ
This panel has to come out
There it is
Master cylinder connected to the pedal
A better shot
Behind the nearside headlight
If you don't have a proper engineer's marking pen, a Tippex pen will do just fine.
Last on the road...
Also, I found that a gaiter on the steering rack has had it.
Henry's impression of a Porsche 928.
This picture reminded me of a scene in Short-Circuit 2 "Initiating spectro-analyser!"
Couldn't find a shot of that particular scene, but here's a gratuitous pic of Johnny 5 anyway
Next steps:
Remove clutch hydraulics and replace. 3 more bolts and it'll be removed.
Remove Headlamp motors
Fix steering rack gaiter
Full service
Just another update, seeing as it's been a year!
Pics on the blog
It's been a while since any updates. I've not been near the Lotus much, due to house moves and one thing or another. I've been pottering about here and there but nothing too impressive.
Anyway, the progress so far:
CLUTCH
The clutch hydraulic components are all fitted and bled, I had the wrong slave cylinder, which was a pain, but got that all sorted now. In my opinion the clutch pedal doesn't have nearly enough travel, I think it's not returning up to the stop far enough. I'm going to get a new clutch pedal return spring and see how I get on. Then try re-bleeding again. I only seem to be getting the bottom inch or so of travel on the pedal. Anyone feel free to chip in with ideas!
ELECTRICS
Well the rats chewed through some of the loom, which is still holding together and passing current, but will obviously need more wire letting in before I replace the panel. (Those snaps are from the driver's footwell looking up). This may necessitate removing the driver's seat, but I hope not!
I've popped out the headlights and pods. Happily, the left motor works. Before I go buying a spare for the right hand side, I want to charge up the battery and get a multimeter on it to make sure current's going to all the right places. That's a task for January.
ENGINE
The engine's a runner, but I've started a service. The oil filter you can get to with half the airbox off, but my strap wrench started crushing the body of the filter, so the full airbox had to come off. That means taking the intake trumpets off (reminder for me - 2x10mm nuts per trumpet, spring washers, fixed stud for the lower one, loose bolt for the top). There are two pipes that go into the rear of the airbox, these need to come off, as does the throttle helper spring. Once that's off, you have better access to the oil filter, but it was still an absolute bugger to get off. Still, that's 10 years in a hedge for you. New filter is on and the airbox is back, but with only 2 trumpets. I lost a couple of the washers and a couple more were missing already. If I'm going to put this car back together, I might as well do it properly!
INTERIOR
The really ugly gashes where animals/mould/aliens had eaten through the C-pillar fabric was annoying me, so out it came! Like a harassed octopus, the car retaliated by covering me in black st. Foamy, rather than inky in this case though.
Pics on the blog
It's been a while since any updates. I've not been near the Lotus much, due to house moves and one thing or another. I've been pottering about here and there but nothing too impressive.
Anyway, the progress so far:
CLUTCH
The clutch hydraulic components are all fitted and bled, I had the wrong slave cylinder, which was a pain, but got that all sorted now. In my opinion the clutch pedal doesn't have nearly enough travel, I think it's not returning up to the stop far enough. I'm going to get a new clutch pedal return spring and see how I get on. Then try re-bleeding again. I only seem to be getting the bottom inch or so of travel on the pedal. Anyone feel free to chip in with ideas!
ELECTRICS
Well the rats chewed through some of the loom, which is still holding together and passing current, but will obviously need more wire letting in before I replace the panel. (Those snaps are from the driver's footwell looking up). This may necessitate removing the driver's seat, but I hope not!
I've popped out the headlights and pods. Happily, the left motor works. Before I go buying a spare for the right hand side, I want to charge up the battery and get a multimeter on it to make sure current's going to all the right places. That's a task for January.
ENGINE
The engine's a runner, but I've started a service. The oil filter you can get to with half the airbox off, but my strap wrench started crushing the body of the filter, so the full airbox had to come off. That means taking the intake trumpets off (reminder for me - 2x10mm nuts per trumpet, spring washers, fixed stud for the lower one, loose bolt for the top). There are two pipes that go into the rear of the airbox, these need to come off, as does the throttle helper spring. Once that's off, you have better access to the oil filter, but it was still an absolute bugger to get off. Still, that's 10 years in a hedge for you. New filter is on and the airbox is back, but with only 2 trumpets. I lost a couple of the washers and a couple more were missing already. If I'm going to put this car back together, I might as well do it properly!
INTERIOR
The really ugly gashes where animals/mould/aliens had eaten through the C-pillar fabric was annoying me, so out it came! Like a harassed octopus, the car retaliated by covering me in black s
t. Foamy, rather than inky in this case though.Wow, it's been a while. I've been saving for a house so Henry's taken a bit of a back seat. Back on it now though. If I can't get the clutch to free off I'll have to wap the engine and box out, which I could do without. Anyway, for those that are interested, from the blog:
www.danslotusproject.blogspot.co.uk
Makes a bit more sense with the pictures. They're on the blog but are a pain to transfer across. I'll just do with words first.
In the words of Sam Cooke... I't been a long time coming. Another house move and life got in the way of the Lotus, but I'm back on it all guns blazing. I knew he was taken off the road due to a broken spring, so took the wheels off to find out which one. Front Right, as it happens. Also there was a chicken.
All the brakes were in a similar condition - ropey as hell. I have a spare pair of rear calipers and will be refurbishing the fronts I think. New pads all round. Possibly new discs, but they may clean up.
A silver sebrite named Freya.
A moody shot of Henry.
I need a new cambelt, along with all the fluids, filters, etc. Spoke to [a gent who may or may not want to be named ] about which belt I need Apparently mine's near the changeover year between square tooth and round tooth. You can tell by the tensioner, cam covers and the belt itself. I'd say I've got the square tooth (the shot of the tensioner is terrible).
I'm spending so long in the footwell trying to sort this bloody clutch, plus I have some wiring to do I thought I'd take the seat out. You need a helper, you can't get a socket or spanner on the bolt as the rail gets in the way. You need a friend to hold the bolt steady with an open ended spanner held onto it vertically. You can't get a socket on it or a spanner on it "properly" because the sliding rails fold over and block access. Then you can get under the car and undo the four locknuts. I did the front first, then the back, once the fronts come out you can slide the chair further forward than is natural and gain access to the rear bolts.
The clutch release arm. This is where my problem seems to be. It's jammed solid I think. A bit of wobbling and it became very loose, now I seem to have managed to jiggle it back into place You can see the two bolts that hold the slave cylinder in place. There's also sometimes a clutch helper spring on the back of the arm, though mine doesn't have one and I'm informed it never had one, so presumably it's not *needed* if the car drove round fine before.
When attached to the car and pushing the clutch pedal, the slave cylinder moved very little. I thought I'd experiment pushing the master cylinder through its maximum stroke with my hand (eliminating the pedal assembly - more on that later)
At rest - 30mm out.
After one push - another 17mm out.
After a second push (not resetting between) - a further 17mm out.
One thing I notice is that pushing through the full stroke of the master cylinder is approx. 40mm.
For obvious reasons the clutch pedal only has a limited amount of travel. You can't push it forever, the floor gets in the way!
The arm of my master cylinder isn't long enough really, it's on the last couple of threads as it is, and you have to bring the pedal down from the top stop to get it to attach. So I think I'm only using about 3/4 of the available pedal travel, as the first 1/4 is taken up in bringing the "start" position down to meet the end of the Master cylinder actuation arm. I'm sure that can't be helping matters, so I'm going to make a longer clevis/fork section to bring the pedal arm up to meet the pedal at the very top of the travel, giving me the full stroke.
Also, I've put a new clutch pedal return spring on and it's not returning the pedal back up under its own strength. Presumably the returning clutch spring/arm/slave/master cylinder combo will help with the rest of the pushing?
I've decided I'm going to mount a bottle jack horizontally under the car, pushing on the arm instead of the slave cylinder and see if I can get the arm to move 17mm (presumably this is the correct amount going by my "experiments"). After that, I'm also going to make my longer clevis and mount that, and double extra mega check that the system is bled. Then it's up on blocks, start in gear, foot full on the clutch and dive on the brakes. Hopefully it'll free off and I don't have to take the engine & box out. If it keep stalling the engine after a couple of tries, then it looks like I'm all out of luck.
www.danslotusproject.blogspot.co.uk
Makes a bit more sense with the pictures. They're on the blog but are a pain to transfer across. I'll just do with words first.
In the words of Sam Cooke... I't been a long time coming. Another house move and life got in the way of the Lotus, but I'm back on it all guns blazing. I knew he was taken off the road due to a broken spring, so took the wheels off to find out which one. Front Right, as it happens. Also there was a chicken.
All the brakes were in a similar condition - ropey as hell. I have a spare pair of rear calipers and will be refurbishing the fronts I think. New pads all round. Possibly new discs, but they may clean up.
A silver sebrite named Freya.
A moody shot of Henry.
I need a new cambelt, along with all the fluids, filters, etc. Spoke to [a gent who may or may not want to be named
] about which belt I need Apparently mine's near the changeover year between square tooth and round tooth. You can tell by the tensioner, cam covers and the belt itself. I'd say I've got the square tooth (the shot of the tensioner is terrible).I'm spending so long in the footwell trying to sort this bloody clutch, plus I have some wiring to do I thought I'd take the seat out. You need a helper, you can't get a socket or spanner on the bolt as the rail gets in the way. You need a friend to hold the bolt steady with an open ended spanner held onto it vertically. You can't get a socket on it or a spanner on it "properly" because the sliding rails fold over and block access. Then you can get under the car and undo the four locknuts. I did the front first, then the back, once the fronts come out you can slide the chair further forward than is natural and gain access to the rear bolts.
The clutch release arm. This is where my problem seems to be. It's jammed solid I think. A bit of wobbling and it became very loose, now I seem to have managed to jiggle it back into place You can see the two bolts that hold the slave cylinder in place. There's also sometimes a clutch helper spring on the back of the arm, though mine doesn't have one and I'm informed it never had one, so presumably it's not *needed* if the car drove round fine before.
When attached to the car and pushing the clutch pedal, the slave cylinder moved very little. I thought I'd experiment pushing the master cylinder through its maximum stroke with my hand (eliminating the pedal assembly - more on that later)
At rest - 30mm out.
After one push - another 17mm out.
After a second push (not resetting between) - a further 17mm out.
One thing I notice is that pushing through the full stroke of the master cylinder is approx. 40mm.
For obvious reasons the clutch pedal only has a limited amount of travel. You can't push it forever, the floor gets in the way!
The arm of my master cylinder isn't long enough really, it's on the last couple of threads as it is, and you have to bring the pedal down from the top stop to get it to attach. So I think I'm only using about 3/4 of the available pedal travel, as the first 1/4 is taken up in bringing the "start" position down to meet the end of the Master cylinder actuation arm. I'm sure that can't be helping matters, so I'm going to make a longer clevis/fork section to bring the pedal arm up to meet the pedal at the very top of the travel, giving me the full stroke.
Also, I've put a new clutch pedal return spring on and it's not returning the pedal back up under its own strength. Presumably the returning clutch spring/arm/slave/master cylinder combo will help with the rest of the pushing?
I've decided I'm going to mount a bottle jack horizontally under the car, pushing on the arm instead of the slave cylinder and see if I can get the arm to move 17mm (presumably this is the correct amount going by my "experiments"). After that, I'm also going to make my longer clevis and mount that, and double extra mega check that the system is bled. Then it's up on blocks, start in gear, foot full on the clutch and dive on the brakes. Hopefully it'll free off and I don't have to take the engine & box out. If it keep stalling the engine after a couple of tries, then it looks like I'm all out of luck.
This is quite a slow restoration. Though I am back on it!
Trying to connect half the old exhaust to half the new exhaust halfway through a y-piece to half of a new one, which means cutting down both and using a stainless tube as a joining sleeve to provide strength.
Then rebuild the front brakes.
See you in 2023!
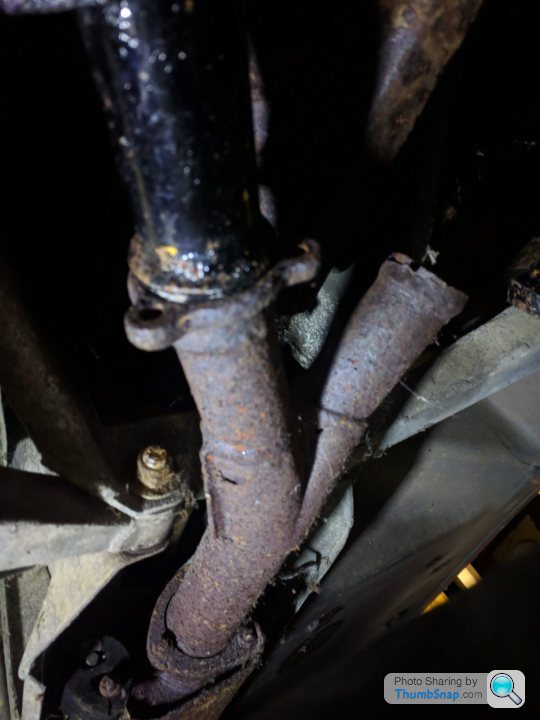
Trying to connect half the old exhaust to half the new exhaust halfway through a y-piece to half of a new one, which means cutting down both and using a stainless tube as a joining sleeve to provide strength.
Then rebuild the front brakes.
See you in 2023!
Gassing Station | Readers' Cars | Top of Page | What's New | My Stuff