Improving The Breed, 2006 Mustang GT.
Discussion


Hi all, I thought you might like to read about my car why I bought it and its evolution from a standard 2006 Ford Mustang GT towards being (in my eyes) the perfect street and strip hot rod, I probably should have done this thread as an ongoing thing but I never got around to it so it will have to be back dated.
2009
I had always liked the 2005 onwards S197 Mustangs ever since the car was released in the US in late 2004, combining the right balance of retro styled looks with modern reliable underpinnings and ease of day to day usability (something most classics cannot offer). But owning one was just a pipe dream at that time, as I was still an apprentice and did not have the disposable income to buy outright or enough to pay the loan/finance on such a car. By 2009 the oldest ones were nearly four years old and they had lost their initial high price, and after several test drives in manuals and automatics, I plumped for the car that is now my late 2006 GT Automatic, replacing my orange Focus ST-2. It must have been the right choice of car for me because nearly four and a half years on I have no desires to change it for anything else, and I can’t see that changing any time soon.
This is the car as it was when I bought it in July of 2009:


The only mods were; JBA Axleback exhausts, Apex Lowering Springs, a throttle body spacer and GT500 stripes.
The initial changes I made were to have the SVA wiring re-done by Atlantic Sports Cars as I was suspicious of the conversion it came with because of an intermittent cruise control problem. I had the stock brake hoses replaced with braided items whilst the car was in for an MOT and brake fluid change as well as having the failing stock strut mounts (a known weak point especially on lowered cars) with Steeda adjustable items, these are not only stronger but also allow the camber and caster to be corrected. In this case the excessive camber caused by the excessive lowering of the Apex springs that were on the car when I bought it.
Steeda Strut Mounts:

I also swapped the orange indicator/side light lenses for clear ones. This enabled me to move the side lights back to their original location in the bumper light clusters rather than having them mounted in the headlights (the headlights are drilled and the mounts from the sidelights are mounted in them), see the GT500 stripe removed pic)
Something else worthy of mention, I swapped the stock wiper blades for Trico beam type wiper blades – yes this car unlike many of the UK based S197 Mustangs goes out in the rain, and if you have been thinking about swapping to this type of wiper blade – do it, they are 10x better than the traditional framed wiper blade.
Naturally I removed the frankly embarrassing GT500 side stripes, is a GT not a GT500 so why the previous owner put them on I have no idea, a quick Google shows that it looks nothing like a 07-09 GT500!

2009
I had always liked the 2005 onwards S197 Mustangs ever since the car was released in the US in late 2004, combining the right balance of retro styled looks with modern reliable underpinnings and ease of day to day usability (something most classics cannot offer). But owning one was just a pipe dream at that time, as I was still an apprentice and did not have the disposable income to buy outright or enough to pay the loan/finance on such a car. By 2009 the oldest ones were nearly four years old and they had lost their initial high price, and after several test drives in manuals and automatics, I plumped for the car that is now my late 2006 GT Automatic, replacing my orange Focus ST-2. It must have been the right choice of car for me because nearly four and a half years on I have no desires to change it for anything else, and I can’t see that changing any time soon.
This is the car as it was when I bought it in July of 2009:
The only mods were; JBA Axleback exhausts, Apex Lowering Springs, a throttle body spacer and GT500 stripes.
The initial changes I made were to have the SVA wiring re-done by Atlantic Sports Cars as I was suspicious of the conversion it came with because of an intermittent cruise control problem. I had the stock brake hoses replaced with braided items whilst the car was in for an MOT and brake fluid change as well as having the failing stock strut mounts (a known weak point especially on lowered cars) with Steeda adjustable items, these are not only stronger but also allow the camber and caster to be corrected. In this case the excessive camber caused by the excessive lowering of the Apex springs that were on the car when I bought it.
Steeda Strut Mounts:
I also swapped the orange indicator/side light lenses for clear ones. This enabled me to move the side lights back to their original location in the bumper light clusters rather than having them mounted in the headlights (the headlights are drilled and the mounts from the sidelights are mounted in them), see the GT500 stripe removed pic)
Something else worthy of mention, I swapped the stock wiper blades for Trico beam type wiper blades – yes this car unlike many of the UK based S197 Mustangs goes out in the rain, and if you have been thinking about swapping to this type of wiper blade – do it, they are 10x better than the traditional framed wiper blade.
Naturally I removed the frankly embarrassing GT500 side stripes, is a GT not a GT500 so why the previous owner put them on I have no idea, a quick Google shows that it looks nothing like a 07-09 GT500!
2010
I left the car as it was for a few months but I soon tired of it catching on every hump and bump so I decided in 2010 to have the Apex springs which lowered the car around 2” replaced with Roush springs that only lowered the car around 1”. At the same time (I didn’t know how useful these would become at the time) I had the stock dampers swapped out for a set of Tokico D-Spec adjustable dampers and the rear lower control arms and front A-arms replaced with BMR tubular items (poly bushed). I have used some stock photos here as I can’t find (or didn’t take) the pictures of the parts I purchased.
BMR Suspension parts

Roush Springs

Tokico D-Spec Dampers


Look at the difference in ride height between the first picture and this one.
With these fitted by Hertford Mustang/Motorist Center (formally Hertford Tyres & Electronics) as they can do in 4 hours on a ramp what would take me far longer on axle stands and jacks and the insurance company duly notified the car was transformed. The driving experience was far more pleasant, it handled great and the ride was no longer bumpy and harsh. The extra 1” of clearance means that it also doesn’t catch on humps anymore - lower is not always better. I also replaced the stock paper air filter with a K&N washable panel filter around this time too.
For the rest of 2010 the car remained like that, other than replacing the worn out Pirelli P6000’s with a set of Goodyear Eagle F1 Asymmetric tyres. This was another miraculous transformation, the god awful P6000’s (well they are on a Mustang anyway) replaced with some decent rubber.
I left the car as it was for a few months but I soon tired of it catching on every hump and bump so I decided in 2010 to have the Apex springs which lowered the car around 2” replaced with Roush springs that only lowered the car around 1”. At the same time (I didn’t know how useful these would become at the time) I had the stock dampers swapped out for a set of Tokico D-Spec adjustable dampers and the rear lower control arms and front A-arms replaced with BMR tubular items (poly bushed). I have used some stock photos here as I can’t find (or didn’t take) the pictures of the parts I purchased.
BMR Suspension parts
Roush Springs
Tokico D-Spec Dampers
Look at the difference in ride height between the first picture and this one.
With these fitted by Hertford Mustang/Motorist Center (formally Hertford Tyres & Electronics) as they can do in 4 hours on a ramp what would take me far longer on axle stands and jacks and the insurance company duly notified the car was transformed. The driving experience was far more pleasant, it handled great and the ride was no longer bumpy and harsh. The extra 1” of clearance means that it also doesn’t catch on humps anymore - lower is not always better. I also replaced the stock paper air filter with a K&N washable panel filter around this time too.
For the rest of 2010 the car remained like that, other than replacing the worn out Pirelli P6000’s with a set of Goodyear Eagle F1 Asymmetric tyres. This was another miraculous transformation, the god awful P6000’s (well they are on a Mustang anyway) replaced with some decent rubber.
2011
Until June of 2011 no further upgrades or changes were made to the car other than routine servicing and maintenance. I replaced the stock air box and intake pipe with a Roush cold air intake, this also meant ditching the throttle body spacer (not that it did much of anything anyway) as it caused the new larger inlet pipe to interfere with the radiator header tank. A quick trip out to get four new stock length throttle body bolts to replace the longer ones used to fit the spacer, it added a little in the way of extra looks to the engine bay. Though contrary to popular belief there is no power advantage to be had on a modern car in fitting one of these intakes, well without a re-map (especially the cheap ones that don’t have an air dam). It gives an increase in induction roar and maybe a bit better throttle response but that’s about it. The stock alternator was faulty so that was replaced with a red powder coated Peak Performance unit shipped in from the US at the same time.
Old and New Alternators

Roush Cold Air Intake

Stock Intake and spacer removed

Stock Intake and Spacer

New Alternator fitted

New Cold Air Intake Fitted

In 2010 I had become hooked on drag racing (as a spectator) after spending a weekend at the FIA Main event and I was now getting the urge to give it a go with my own car. So I went to what is my local track, York Raceway and I spent the August bank holiday Monday chasing a 13 second timing slip. Unfortunately the 13 second run eluded me, managing a best of 14.05@96.79mph, but I was already hooked.
Wanting a consistent and good 13 meant a few changes had to be made to the car, I purchased these from BMR, lower control arm relocation brackets, they help put the geometry of the arms back to the stock location when the car is lowered.
Rear LCA relocation brackets

I also purchased an SCT3+ Tuner and more aggressive tune for track use.
SCT Tuning handset

With the brackets fitted by a local garage (A&A Motors) I got a run 13.88@100.44mph on the first attempt, a few more tweaks on the adjustable dampers and with tyre pressures 13.85@98.7mph was the result, I was very happy with that. The only other mod in 2011 was the fitment of a HID headlight system (I can feel the PH hatred burning the back of my skull already ).
).
Until June of 2011 no further upgrades or changes were made to the car other than routine servicing and maintenance. I replaced the stock air box and intake pipe with a Roush cold air intake, this also meant ditching the throttle body spacer (not that it did much of anything anyway) as it caused the new larger inlet pipe to interfere with the radiator header tank. A quick trip out to get four new stock length throttle body bolts to replace the longer ones used to fit the spacer, it added a little in the way of extra looks to the engine bay. Though contrary to popular belief there is no power advantage to be had on a modern car in fitting one of these intakes, well without a re-map (especially the cheap ones that don’t have an air dam). It gives an increase in induction roar and maybe a bit better throttle response but that’s about it. The stock alternator was faulty so that was replaced with a red powder coated Peak Performance unit shipped in from the US at the same time.
Old and New Alternators
Roush Cold Air Intake
Stock Intake and spacer removed
Stock Intake and Spacer
New Alternator fitted
New Cold Air Intake Fitted
In 2010 I had become hooked on drag racing (as a spectator) after spending a weekend at the FIA Main event and I was now getting the urge to give it a go with my own car. So I went to what is my local track, York Raceway and I spent the August bank holiday Monday chasing a 13 second timing slip. Unfortunately the 13 second run eluded me, managing a best of 14.05@96.79mph, but I was already hooked.
Wanting a consistent and good 13 meant a few changes had to be made to the car, I purchased these from BMR, lower control arm relocation brackets, they help put the geometry of the arms back to the stock location when the car is lowered.
Rear LCA relocation brackets
I also purchased an SCT3+ Tuner and more aggressive tune for track use.
SCT Tuning handset
With the brackets fitted by a local garage (A&A Motors) I got a run 13.88@100.44mph on the first attempt, a few more tweaks on the adjustable dampers and with tyre pressures 13.85@98.7mph was the result, I was very happy with that. The only other mod in 2011 was the fitment of a HID headlight system (I can feel the PH hatred burning the back of my skull already
).2012
2012 saw purely cosmetic mods rather than any performance mods, the front lip of the hood was corroded (a common problem that afflicts virtually all 05-08 Mustangs) so rather than repair it and risk it coming back, around Easter time I purchased a Cervini C-Type hood from the US and had it fitted and painted by Prestige Body Shop in Hull, at the same time I had the front bumper re-painted and the wings re-painted, this of course necessitated the removal of the tatty and tired old stripes.
The new Cervini C-Type Hood

Fitted


As you can see it makes quite a difference to the appearance of the car and the view out of the front. The new hood is a bit marmite to most, but I like it .
.
Later on in the year I swapped out the tail lamps for a pair of Raxiom smoked items, and fitted a new stack racing upper and lower grille set to the front, removing the useless front fog lights and giving it a darker more aggressive look. I used satin black vinyl rather than paint on all the red bits behind the grill that are normally obscured by the stock plastic item so I can return it to stock if I want. I also blacked out the rear of the trunk lid with satin black vinyl and I think you’ll agree it looks pretty damn good now.
Raxiom Smoked Tail Lights

Stack Racing Upper and lower Grille

Exterior pictures 8 and 9 show the difference between the stock and smoked lights. As you can see they are not totally black so (50 state DOT approved in the US) I gambled that they would pass an MOT in the UK with no problem (they did ) It was a simple plug and play operation to fit them as they are essentially OEM lights just with smoked lenses.
Driver Side fitted

Both fitted

The centre blacked out with vinyl to complete the rear end


I had the now worn out Goodyears replaced (around 2mm of tread left and 18,000 miles on them with numerous passes on the drag strip with their associated burn outs) with Toyo T1 Sport tyres, which imho are a better tyre than the Goodyears, they just seem suit the car better. I had always dismissed Toyos as something Japanese car owners rave about because they want Japanese tyres on their cars and always going with a more traditional European brand. However, I am happy to admit that I was very wrong and they are great tyres, even netting me a slight performance increase running a new PB of 13.59@101.11mph on them.
Video:
13.59@101.11mph
The timing ticket for that run:

I also purchased a decent helmet rather than using a loaner from York and deciding I wanted to race, a dial-in board.
Simpson Bandit Helmet

Dial In Board

After the end of 2012 and running in 4 rounds out of 10 in American Super Stock at York Raceway I finished 6th overall (two round wins, and 3 top 3 qualifiers) taking the Most Promising Newcomer Trophy.

Burnout picture:

As well as racing the car is practical too, this lot fitted in the boot with no problem, plus a couple more bags of groceries.

2012 saw purely cosmetic mods rather than any performance mods, the front lip of the hood was corroded (a common problem that afflicts virtually all 05-08 Mustangs) so rather than repair it and risk it coming back, around Easter time I purchased a Cervini C-Type hood from the US and had it fitted and painted by Prestige Body Shop in Hull, at the same time I had the front bumper re-painted and the wings re-painted, this of course necessitated the removal of the tatty and tired old stripes.
The new Cervini C-Type Hood
Fitted
As you can see it makes quite a difference to the appearance of the car and the view out of the front. The new hood is a bit marmite to most, but I like it
.Later on in the year I swapped out the tail lamps for a pair of Raxiom smoked items, and fitted a new stack racing upper and lower grille set to the front, removing the useless front fog lights and giving it a darker more aggressive look. I used satin black vinyl rather than paint on all the red bits behind the grill that are normally obscured by the stock plastic item so I can return it to stock if I want. I also blacked out the rear of the trunk lid with satin black vinyl and I think you’ll agree it looks pretty damn good now.
Raxiom Smoked Tail Lights
Stack Racing Upper and lower Grille
Exterior pictures 8 and 9 show the difference between the stock and smoked lights. As you can see they are not totally black so (50 state DOT approved in the US) I gambled that they would pass an MOT in the UK with no problem (they did
) It was a simple plug and play operation to fit them as they are essentially OEM lights just with smoked lenses.Driver Side fitted
Both fitted
The centre blacked out with vinyl to complete the rear end
I had the now worn out Goodyears replaced (around 2mm of tread left and 18,000 miles on them with numerous passes on the drag strip with their associated burn outs) with Toyo T1 Sport tyres, which imho are a better tyre than the Goodyears, they just seem suit the car better. I had always dismissed Toyos as something Japanese car owners rave about because they want Japanese tyres on their cars and always going with a more traditional European brand. However, I am happy to admit that I was very wrong and they are great tyres, even netting me a slight performance increase running a new PB of 13.59@101.11mph on them.
Video:
13.59@101.11mph
The timing ticket for that run:
I also purchased a decent helmet rather than using a loaner from York and deciding I wanted to race, a dial-in board.
Simpson Bandit Helmet
Dial In Board
After the end of 2012 and running in 4 rounds out of 10 in American Super Stock at York Raceway I finished 6th overall (two round wins, and 3 top 3 qualifiers) taking the Most Promising Newcomer Trophy.
Burnout picture:
As well as racing the car is practical too, this lot fitted in the boot with no problem, plus a couple more bags of groceries.
2013
So into 2013 and another expensive year for parts, I ordered a load more stuff from BMR:
Adjustable upper control arm and relocation bracket
Adjustable panhard brace and re-location bracket
Moser differential cover
Front and rear prop shaft loops
Moser differential cover

Upper control arm

Upper control arm relocation bracket

Panhard rod relocation bracket

Adjustable panhard rod

Front prop shaft loop

Rear prop shaft loop

A quick shot of the rear underside of the car, bit grubby and mucky with added rusty axle for effect (it’s a road car not a museum piece after all):

I also purchased another pair of wheels the same as what is on the car and a pair of Mickey Thomson ET Street Radial II’s hence why I now have the prop shaft loops as they are required in the regulations for racing with any type of slick tyre or drag radials.
The tyres, really soft and bloody sticky when warmed up properly.

The HID haters amongst you will also be pleased to know that I have also removed the system after one of the ballasts packed in, I went back to filament lamp bulbs because I did not have a spare ballast and after managing to source a pair of Phillips extreme bulbs from the US for the price of a new ballast, I decided that the difference wasn’t worth the worry of it going again and having to unwire around one third of the system to replace the faulty ballast – I expected far longer out of them to be honest.
I also invested in a full 3 layer fire suit; I don’t need a suit for racing my car at York but as I intended to do some racing under MSA sanction at Santa Pod I knew would need one, it is high enough spec to allow me to run in Super Comp/Super Gas/Super Pro if I ever get a car that goes that fast!
Also some of the cars in the American Super Stock class at York dip well into the 9’s so the idea of wearing such a thing isn’t as daft as it sounds.

Laugh all you want but safety should come before looking a pillock.
With the suspension parts fitted and the new drag radials on, my times dropped to 13.322@100.48mph.
The Timing ticket for that run.

I also purchased a Replay HD motorsport camera and suction mounting for my window, one of my quicker runs:
13.322@100.48mph
I took part in the beginners dial in day that was put on at Santa Pod to get more tutorage on bracket racing and more track time earlier in the year, its postponement due to snowy weather from a regular RWYB to its own slot meant that the 20 or so of us that attended had a nicely prepped drag strip to ourselves here is a couple of vids of me chasing down slower cars (always better than videos of me as the faster car as they don’t really show anything other than a ¼ mile run).
A couple more videos:
Hunting down Andy Dibley (Camaro) in his 3rd Gen Camaro
Vid 2:
Hunting down Colin Theobald (Santa Pod commentator) in his a diesel Audi Estate
The drag radials did however, highlight an increase in strain on the transmission during the burn out because it is fighting the rear brakes as well as the traction in the transition period where the car comes into burnout. With this in mind it was obvious a line lock was needed; so I ordered the bits from Jegs (solenoids and fittings) and Speed Flow (custom hoses) plus a few bits from Maplin (switches, wire etc.) and fitted a dual solenoid line lock system. The only issue for me was where to mount the activation switch for the line lock because I didn’t want to drill the dash.
Solenoid activated valves and NPT fittings

Extra brake hoses

Isolator switch fitted

The panel the isolator switch is mounted to is cheap to replace and also was already cut from the previous owner (assuming an iPod connector).
Drivers side line lock fitted

Passenger side line lock fitted

The wiring wasn't done at this point hence the cables being coiled up.
The place of where to mount the switch without drilling a hole in the dash was solved when I remembered I had an old removable (cup holder type) ash tray from a Ford Focus I had previously owned. It was brand new so was the perfect candidate. The mounting problem solved in a neat way and it allows me to take the switch out when I am not on the track. The covered toggle switch in the centre console also means that there is no risk of the system being live on the road and anything shorting the connectors in the console centre box.
Switch install

My first MSA event at Santa Pod Summer nationals meant that the car required (due to rules about having vinyl or painted on numbers) my class and race number put on in vinyl, with my name on the windows.

(Photo courtesy of “Mad Welshman”)
Here is a video of me hunting down Ricky Hale in his Mk 4 Supra, his car was dialled 0.99 seconds slower than mine so he leaves the line first.
Hunting down Ricky Hale in his Mk 4 Supra
Yes I was happy that I had taken my first race win at an MSA event
The end of the 2013 season placed me 9th in the American Super Stock standings which for my first full season (I missed round 2 and round 3 as I was spectating at the FIA main event at Santa Pod) which out of a total of a total of 42 competitors isn’t bad to be honest. Hopefully I will fare better next year but we shall have to see what transpires.
So now the 2013 season has drawn to a close I bought another pile of bits to fit/have fitted to hopefully put me into the 12 second bracket.
More from BMR:
Front K-Member and engine mounts and Front Radiator support


And a pile of Ford Racing stuff
Intake Manifold
Traction Lok diff rebuild kit
Diff install kit
Axle end bearings and oil seals
3.73:1 gears (replace the stock 3.31:1 gears)

(Actually a photo of the 64,000 mile 3.31:1 gears removed from the car but you get the idea)

Ford Racing intake manifold

The K-member is stiffer and half the weight of the stock one, the new radiator support is slightly lighter than stock too, reducing the nose weight and hopefully quickening the cars response time off the line. The only minor issue is the polyurethane engine mounts, they have removed the last vestiges of comfort from the car vibration from the drive train is sent straight into the structure rather than being dampened out by the front engine mounts. This only happens at low speed mind once the car is moving at anything above a slow walking pace the vibration is gone. The 3.73:1 gears (fitted by Lagonda Garage in Billingham (nr Middlesbrough)) increase the acceleration somewhat but don’t adversely affect the fuel economy for day to day use like a set of 4.10:1 gears would, the long distance cruise fuel usage is dropped from ~25mpg US (30mpg UK) to 22mpg US (26.4 mpg UK).
The Ford Racing intake manifold bins the charge motion plates letting in something like 15-20% more air at WOT, and saves me something like ~8oz nose weight by removing the drive servo for the charge motion plates and some of the metal parts on the manifold.
The K-Member fitted, the steering rack is in the foreground, the k-member behind it.


The Old K-Member and Radiator Support
The Engine bay with the stock manifold removed

The charge motion plates shown in the bottom of the intake manifold

Another shot of the engine bay sans intake manifold.

The Ford Racing intake manifold fitted

Another re-tune was necessary to make the car run correctly with the Ford Racing intake manifold and this was provided by Justin’s Performance Centre in the US, and after a couple of runs out to data log so the tune can be refined the car is running sweet as a nut, this isn’t far off the stock tune I have also been supplied with a much more aggressive race tune.
The results quarter mile results of all those parts and money will have to wait until next year as the weather has thwarted us.
As you can see I have done this properly, the car is set up to make the best use of the power it has by maximising the ability to deploy that power on track. I have always maintained that there is no such thing as too much power only a lack of ability to apply it to the road. High quality parts have been used throughout if I can’t afford a good quality aftermarket part I won’t make the change from a stock part.
The journey I have gone through with this car has gone from having a lightly modified car to creating what is for me the perfect modern street and strip hot-rod without banishing the car to being a weekend and track toy. Sure the suspension is a little bit more race than road now but if I want to race it there has to be a compromise somewhere, in this case I have traded NVH and some of the comfort for consistency and performance. The car has and always will retain enough of its original identity to still be a Ford Mustang and will also maintain its day to day usability, whilst being unique to me and my needs/wants. I have managed to avoid making it look like something it is not and avoided sticking chav tat all over it. Even the stereo and speakers etc. are all stock parts (I’d only replace them with good quality aftermarket components if they broke/wore out).
So into 2013 and another expensive year for parts, I ordered a load more stuff from BMR:
Adjustable upper control arm and relocation bracket
Adjustable panhard brace and re-location bracket
Moser differential cover
Front and rear prop shaft loops
Moser differential cover
Upper control arm
Upper control arm relocation bracket
Panhard rod relocation bracket
Adjustable panhard rod
Front prop shaft loop
Rear prop shaft loop
A quick shot of the rear underside of the car, bit grubby and mucky with added rusty axle for effect (it’s a road car not a museum piece after all):
I also purchased another pair of wheels the same as what is on the car and a pair of Mickey Thomson ET Street Radial II’s hence why I now have the prop shaft loops as they are required in the regulations for racing with any type of slick tyre or drag radials.
The tyres, really soft and bloody sticky when warmed up properly.
The HID haters amongst you will also be pleased to know that I have also removed the system after one of the ballasts packed in, I went back to filament lamp bulbs because I did not have a spare ballast and after managing to source a pair of Phillips extreme bulbs from the US for the price of a new ballast, I decided that the difference wasn’t worth the worry of it going again and having to unwire around one third of the system to replace the faulty ballast – I expected far longer out of them to be honest.
I also invested in a full 3 layer fire suit; I don’t need a suit for racing my car at York but as I intended to do some racing under MSA sanction at Santa Pod I knew would need one, it is high enough spec to allow me to run in Super Comp/Super Gas/Super Pro if I ever get a car that goes that fast!
Also some of the cars in the American Super Stock class at York dip well into the 9’s so the idea of wearing such a thing isn’t as daft as it sounds.
Laugh all you want but safety should come before looking a pillock.
With the suspension parts fitted and the new drag radials on, my times dropped to 13.322@100.48mph.
The Timing ticket for that run.
I also purchased a Replay HD motorsport camera and suction mounting for my window, one of my quicker runs:
13.322@100.48mph
I took part in the beginners dial in day that was put on at Santa Pod to get more tutorage on bracket racing and more track time earlier in the year, its postponement due to snowy weather from a regular RWYB to its own slot meant that the 20 or so of us that attended had a nicely prepped drag strip to ourselves
here is a couple of vids of me chasing down slower cars (always better than videos of me as the faster car as they don’t really show anything other than a ¼ mile run).A couple more videos:
Hunting down Andy Dibley (Camaro) in his 3rd Gen Camaro
Vid 2:
Hunting down Colin Theobald (Santa Pod commentator) in his a diesel Audi Estate
The drag radials did however, highlight an increase in strain on the transmission during the burn out because it is fighting the rear brakes as well as the traction in the transition period where the car comes into burnout. With this in mind it was obvious a line lock was needed; so I ordered the bits from Jegs (solenoids and fittings) and Speed Flow (custom hoses) plus a few bits from Maplin (switches, wire etc.) and fitted a dual solenoid line lock system. The only issue for me was where to mount the activation switch for the line lock because I didn’t want to drill the dash.
Solenoid activated valves and NPT fittings
Extra brake hoses
Isolator switch fitted
The panel the isolator switch is mounted to is cheap to replace and also was already cut from the previous owner (assuming an iPod connector).
Drivers side line lock fitted
Passenger side line lock fitted
The wiring wasn't done at this point hence the cables being coiled up.
The place of where to mount the switch without drilling a hole in the dash was solved when I remembered I had an old removable (cup holder type) ash tray from a Ford Focus I had previously owned. It was brand new so was the perfect candidate. The mounting problem solved in a neat way and it allows me to take the switch out when I am not on the track. The covered toggle switch in the centre console also means that there is no risk of the system being live on the road and anything shorting the connectors in the console centre box.
Switch install
My first MSA event at Santa Pod Summer nationals meant that the car required (due to rules about having vinyl or painted on numbers) my class and race number put on in vinyl, with my name on the windows.
(Photo courtesy of “Mad Welshman”)
Here is a video of me hunting down Ricky Hale in his Mk 4 Supra, his car was dialled 0.99 seconds slower than mine so he leaves the line first.
Hunting down Ricky Hale in his Mk 4 Supra
Yes I was happy that I had taken my first race win at an MSA event
The end of the 2013 season placed me 9th in the American Super Stock standings which for my first full season (I missed round 2 and round 3 as I was spectating at the FIA main event at Santa Pod) which out of a total of a total of 42 competitors isn’t bad to be honest. Hopefully I will fare better next year but we shall have to see what transpires.
So now the 2013 season has drawn to a close I bought another pile of bits to fit/have fitted to hopefully put me into the 12 second bracket.
More from BMR:
Front K-Member and engine mounts and Front Radiator support
And a pile of Ford Racing stuff
Intake Manifold
Traction Lok diff rebuild kit
Diff install kit
Axle end bearings and oil seals
3.73:1 gears (replace the stock 3.31:1 gears)
(Actually a photo of the 64,000 mile 3.31:1 gears removed from the car but you get the idea)
Ford Racing intake manifold
The K-member is stiffer and half the weight of the stock one, the new radiator support is slightly lighter than stock too, reducing the nose weight and hopefully quickening the cars response time off the line. The only minor issue is the polyurethane engine mounts, they have removed the last vestiges of comfort from the car vibration from the drive train is sent straight into the structure rather than being dampened out by the front engine mounts. This only happens at low speed mind once the car is moving at anything above a slow walking pace the vibration is gone. The 3.73:1 gears (fitted by Lagonda Garage in Billingham (nr Middlesbrough)) increase the acceleration somewhat
but don’t adversely affect the fuel economy for day to day use like a set of 4.10:1 gears would, the long distance cruise fuel usage is dropped from ~25mpg US (30mpg UK) to 22mpg US (26.4 mpg UK).The Ford Racing intake manifold bins the charge motion plates letting in something like 15-20% more air at WOT, and saves me something like ~8oz
nose weight by removing the drive servo for the charge motion plates and some of the metal parts on the manifold.The K-Member fitted, the steering rack is in the foreground, the k-member behind it.
The Old K-Member and Radiator Support
The Engine bay with the stock manifold removed
The charge motion plates shown in the bottom of the intake manifold
Another shot of the engine bay sans intake manifold.
The Ford Racing intake manifold fitted
Another re-tune was necessary to make the car run correctly with the Ford Racing intake manifold and this was provided by Justin’s Performance Centre in the US, and after a couple of runs out to data log so the tune can be refined the car is running sweet as a nut, this isn’t far off the stock tune I have also been supplied with a much more aggressive race tune.
The results quarter mile results of all those parts and money will have to wait until next year as the weather has thwarted us.
As you can see I have done this properly, the car is set up to make the best use of the power it has by maximising the ability to deploy that power on track. I have always maintained that there is no such thing as too much power only a lack of ability to apply it to the road. High quality parts have been used throughout if I can’t afford a good quality aftermarket part I won’t make the change from a stock part.
The journey I have gone through with this car has gone from having a lightly modified car to creating what is for me the perfect modern street and strip hot-rod without banishing the car to being a weekend and track toy. Sure the suspension is a little bit more race than road now but if I want to race it there has to be a compromise somewhere, in this case I have traded NVH and some of the comfort for consistency and performance. The car has and always will retain enough of its original identity to still be a Ford Mustang and will also maintain its day to day usability, whilst being unique to me and my needs/wants. I have managed to avoid making it look like something it is not and avoided sticking chav tat all over it. Even the stereo and speakers etc. are all stock parts (I’d only replace them with good quality aftermarket components if they broke/wore out).
Edited by PanzerCommander on Monday 4th November 12:04
The Future
I am planning on buying a UPR spherical bearing to replace the bush on the axle housing next year and a wideband AFR gauge to assist with any future tune refinements.
I am toying with the idea of some skinny wheels and tyres for the front, purely for track use to further quicken the front end response.
Other than that they do say “never say never” but I don’t think I’ll be going much further, there is no real need. When the exhaust needs replacing I’ll go with a custom stainless system which is simply: headers -> cats - >H-pipe -> back box, I’ll also fit better pads and disks when the standard ones wear out.
Some may ask why I have not upgraded to bigger brakes, well the answer is simple; the stock sized ones are fine for road and drag strip use, I have to stop from just over 100mph and have around half a mile to do it on the strip so they’ll never be a problem in that respect. I can with a good solid stomp make the ABS can kick-in in the dry so again they are more than adequate. So really unless you are circuit racing/track days or driving like a loon on the public roads you don’t need bigger brakes than stock.
Thanks guys.
The class(es) I run in do allow me to make internal changes to the engine. I will at some point in the future be getting the gearbox and engine re-freshed and checked over. So whilst the engine is out and in bits it makes sense to have the ports done, the head skimmed and some Ford Racing hot-rod cams fitted. I could If I was feeling flush fit the 5 litre stroker kit, but that’s a heap more money.
I would have to be careful not to go faster than 12.00 second ET as that will necessitate the fitting of a cage and other safety equipment, which impacts the cars daily usability, I'd have to move into the Pro ET class too (but that’s not a problem), it would still meet the rules in A/SS at York. But to be fair if I wanted to go quicker than a 12.00 I'd buy/build/have built a dedicated race car.
Greg_D said:
Great write up, i enjoyed reading that. I'm loving that you haven't just gone for a turbo/SC conversion to get the numbers, you've uprated everything else first. Was the diff cover a cosmetic addition or necessarry to house the new ratios? Are you allowed a new cam for the class you are running? how about optimised heads? Raised compression etc....
Lovely car, the dark accents look great
Thanks, the diff cover serves two purposes, one - cosmetic, it looks far better than the stock one and it provides extra strength to the axle and bracing to the bearing mounts.Lovely car, the dark accents look great
The class(es) I run in do allow me to make internal changes to the engine. I will at some point in the future be getting the gearbox and engine re-freshed and checked over. So whilst the engine is out and in bits it makes sense to have the ports done, the head skimmed and some Ford Racing hot-rod cams fitted. I could If I was feeling flush fit the 5 litre stroker kit, but that’s a heap more money.
I would have to be careful not to go faster than 12.00 second ET as that will necessitate the fitting of a cage and other safety equipment, which impacts the cars daily usability, I'd have to move into the Pro ET class too (but that’s not a problem), it would still meet the rules in A/SS at York. But to be fair if I wanted to go quicker than a 12.00 I'd buy/build/have built a dedicated race car.
Dr G said:
I enjoyed reading that, fair play to you sir.
Many would be tempted to simply supercharge it and whack stupid wheels on.
Thanks,Many would be tempted to simply supercharge it and whack stupid wheels on.
Yeah many go down the supercharger route, to each his own I guess. I am just lucky that I have had a good friend on hand who has been around the sport for years (also now my crew chief) to guide me onto the right path
Edited by PanzerCommander on Tuesday 29th October 21:33
StangGT said:
Great write up... How did you tend to pick your parts from the myriad of options available?
Advice, research and more research basically. Once I started getting more into RWYB (numbers chasing) and then into actual racing I began bouncing ideas of my friend Chris (TheMighty) who is also my crew chief. And then after deciding whether its a good idea or not I buy the best that I can afford. The BMR stuff is great and I am glad I went down that route (there are also not a lot of suppliers that do the whole package like BMR do). When it comes to the differential etc. I went Ford Racing because they are quality components straight from the factory and bolt right in with no fiddling (the Intake manifold for instance was a perfect fit of the bat.Alias218 said:
Louvres on the rear window! Love louvres.
I thought about that when I first bought the car but the passenger side rear window is a god send at oblique junctions and for general blind spot checks and I would never want to block it off.Justaredbadge said:
Great write up. Nicely modified car too.
No point in silly power if you can't.put it down on the road efficiently.
I would like to get a Mustang in the next couple of years...
would there be any advantage to a manual over an auto for racing?
Buy one you won't regret it No point in silly power if you can't.put it down on the road efficiently.
I would like to get a Mustang in the next couple of years...
would there be any advantage to a manual over an auto for racing?
Depends on the racing - for drag racing (and by that I mean competition not RWYB) imho an auto is the best bet because unless you build a street eliminator car out of one you'll be bracket racing and consistency is the name of the game
But if you want to put it on a circuit you'll want the manual.bassett said:
I do love the look of these and the colour of yours suits it well. Cant help but think it needs some stripes back on.
How easy is it to get parts for these and is there a hefty premium for them?
Adam
I prefer it without - but to each his own How easy is it to get parts for these and is there a hefty premium for them?
Adam
The parts are easy to get over here, you typically pay cost + shipping + duty + VAT generally the price you see in $ is what you pay in £ with the current exchange rate. If you want fast air freight you do pay far more. Big items like the hood are very expensive to send by air because you essentially get charged for one 500kg pallet even if it only contains the one item. Small stuff comes via air, big/awkward stuff by container (various shipping companies like STS Imports handle it all).
Remagel2507 said:
Brilliant write up OP, interesting to see the modifying route that you took as the other tuned mustangs I have seen have all been about raw power
Yeah most people go down the big power route and I may do in the future but as Justaredbadge said there is little point in having all that power if you can't put it to the track.I am chomping at the bit to get on the track and test the latest parts out but sadly that will have to wait until February next year at the earliest as there are no more RWYB sessions until then (the race season starts mid April).
StangGT said:
They're quite roomy in the back for (up to 2) kids. Mine are 8 & 6 and fit no probs. boot is roomy but not enormous. My kids love the v8 noise and are always asking if we can go out in the 'musty'
what he said, if they are very young the car also has isofix points in the back too.Fully grown teens might be a bit of an issue if they are tall though.

So here we are 2014, still no track time yet but hey ho that’s drag racing in the UK for you we had a few good weekends (albeit windy) but I was awaiting a few parts and as soon as they were fitted the rain returned, maybe I should have bought a tank and gone tearing up ATV parks and 4x4 trails instead…
Nothing performance related (in terms of actually making the car faster) but things that do relate to the vehicles general performance of the engine and drive train if that makes sense. I learned last year at the dial in day that hot lapping really makes the transmission wince and can drastically affect the times so a transmission temperature gauge was in order as was a wideband AFR gauge with data logger output to better the tunes. With gauges on the brain I also ordered an oil pressure gauge for the engine too as the engine has no stock oil pressure sensor just a pressure switch to make the idiot light and idiot gauge on the instruments “work” (the battery condition gauge is the same).
So after browsing Auto Meter I bought the following stepper motor drive gauges:
Auto Meter Cobalt transmission temperature gauge:

Auto Meter Cobalt oil pressure gauge:

Auto Meter Cobalt AFR gauge (digital):

For those wanting to fit a Wideband it has to be a proper full kit with the sensors, DO NOT be tempted by the cheaper (by 2/3 of the price) AFR gauges that connect to the stock upstream oxygen sensors, as this will not give the correct readout. Some cars do come with wideband sensors as stock, the 05-09 Mustang is not one of them, buy the full kit!
Mounting the gauges was taken care of by a company called Speed of Sound: http://www.speedofsoundllc.com/05_Radiopanels.html and their dash fascia that replaces the stock double DIN stereo with a single DIN stereo and three 2 & 1/16” gauge holes. I placed a bit of matt black vinyl on the front of the facia as their satin black wasn’t quite satin enough for me, that way it looks like the stock black plastic dash panels.
The new radio was on a half price offer in the January sale at Halfords and is a Sony CDX-GT570UI, the radio harness adaptor (Kit No: 70-5521) came from Installer.com in the US the site look a bit mad (possibly NSFW if your employer doesn’t like large breasted manga comic style women) but I can’t fault the service. I joined this harness with the radio end of the harness that came with the new radio.
Radio:

For wiring a new radio into a Mustang GT (for those thinking of doing it or are just interested) see Mole Hill Mikes instructions here:
http://www.s197.co.uk/s197/forum/phpBB3/viewtopic....
I have made good use of bullet type plugs to make it easier to remove gauges and parts of the harness if I have to.
I’ll apologise in advance for the lack of photos because the weekend I decided to do this load of modifying it was cold and wet, and I was pissed off so I just wanted to get it done so no photo heavy write up – sorry
The first stage of the modification was carried out by a mate of mine at A&A Motors as it requires a ramp because the downpipe and cats have to be removed to drill a hole in the driver’s side downpipe to weld the boss in place for the wideband oxygen sensor to mount in (I don’t want swarf and metal chippings in the cat!). The hole in the boss was then plugged so the car could still be driven (see Note2 later on). At the same time he also fitted the transmission temperature sender and ran its wire harness into the passenger foot well. He had to drop the transmission a bit to make it easier as there is only 2” clearance between the body and the transmission. With that done and the readies handed over I now just had to wait for the remaining part (the fascia) to arrive from the US, which was delayed due to the ship having an engine fault.
With the last of the parts now delivered, the first thing I did was all the other activities around a 70,000 mile service, because messing around with the plumbing means that having no oil in the motor and given the location having the oil filter off is a sensible idea as it gives me more room to work.
I removed the stock oil pressure switch from the hole and cut the wire, setting this aside I cleaned the threads in the hole mopping up any excess oil. Before I could mount the new sender I had to fit a 1/4 NPT to 1/8 NPT adaptor so that I could screw in the new oil pressure sender (1/8 NPT thread), with that done I fitted the new oil filter and filled the engine with 6 quarts (5.7liters) of Lucas 5w-20 oil.
I make a temporary earth from the old oil pressure switch to allow me to run the engine up (leak check) with no dash warnings; thankfully all was well (I’ll keep any eye on it for a week or so). Whilst the engine etc. was cooling off I stripped the interior and removed the old radio, these cars are built very nicely when it comes to taking things apart, it literally click fits for the most part, though I wish the HVAC wires were a tad longer to make their fitting and removal easier. I took this opportunity to test the new radio which worked nicely – this is going far too well.
Fitting the wideband AFR gauge
The first task is to remove driver’s side wheel and wheel arch boot this gives reasonable access for the wiring, you will have to be under the car to mount the oxygen sensor, this goes in the BOSS already welded into the exhaust, this was placed on the driver’s side as it was the only available place to put it. A 22mm spanner is needed to screw the sensor (you can’t get a socket or ring spanner with ratchet in) into the boss, I tightened it up to the point where I couldn’t tighten it any more.
NOTE 1: The sensor in the Autometer gauge kit already had thread sealant applied so no high temperature sealer was required, other gauge kits may require it.
NOTE 2: DO NOT under ANY circumstances start the engine to leak check at this point, the new oxygen sensor has to have a power supply to its heater otherwise it will be killed!
The next job is to run the harness in, its quite thick with a big connector on the end so it was going to be a pain to pass through the firewall grommets, I cut a small cross in the large pre-existing grommet and pushed the gauge connector through (I ran the original pressure switch earth and oil pressure sender harness in at this point too) into the cabin and got as much of the cable through as possible, you can then pull any extra you need back through.
I connected up the sender to the harness and along with the pressure sender harness zip tied it up to an original loom, being careful to leave some slack to allow the engine to move around. I then gummed up the cut out with silicone sealant so ensure no water could get through the grommet. With all the cables secured the wheel arch boot and wheel can be re fitted and the car can be taken off the jack stands.
Now you have to route the cable to your gauge location, I went with the centre console. The good thing is that there is a pre-existing loom that runs around under the dash that can be used to support the cable, zip ties are used. I chose this point to mount the phono jack I will be using to connect the signal out and signal ground to my SCT tuner. I connected the signal to the centre pin and the ground to the outside.
I pulled all the wires through into the centre console and made sure that each gauge’s loom was separate to avoid the almost inevitable rats nest caused by the mystical wire pixies that seem to be able to stealthily tangle up wires and cables that were placed neatly.
Given that the signal out and signal ground are already connected (I used bullet plugs in line with them to make the install easier) the wires remaining are:
WOT switch
Ground
+12V
There is no lighting connection because the gauge is digital (an analogue style gauge might have one though), I don’t have a mechanical throttle nor any other way of connecting the WOT switch so I tied this in with the ground connection, this just means it will monitor for peak conditions all the time rather than just at WOT.
For power I have run a mini add-a-circuit from the fuse box in the passenger foot well, I have piggy backed on the automatic gearboxes overdrive enable/disable power as it was one of the few active switched lives in that box that wasn’t already on the 10A circuit limit, this feeds through a 3A fuse into the wideband gauge.
That’s it, the gauge can now be connected and the engine started to check its operation.
Finishing the install, centre console
I pre-mounted the gauges in the new fascia panel (with thanks to Dremel here, that little tool of theirs is worth its weight in gold) with their angle plates in place to point them towards the driver, and no doubt saved me hours in slowly grinding out the holes for the gauges (and some use of a hand file to get the radio cage to fit) - $70 for this and I still have to make adjustments…
The switched live (as mentioned above) is already there as is the transmission temperature gauge harness which I ran in at the same time.
The earth was provided by drilling a hole in the pre-existing metal work (use cutting fluid or do it in stages as the metal is thick and hard) and crimp on eyelets placed on all the connections that required and earth (five in total).
This is where things (aside from frequent stops for the weather) started to go wrong The lighting feed I thought I had from the radio harness turns out to be a duff connection. The dash lighting is controlled by the CAN bus not a variable voltage supply, one saving grace is the rear fog light (not standard fit on a US car) which has a switched light supply on it. so I have to rip out the driver’s side dash panel to get at it. This allows me to remove a section of the insulation and solder (no bodge job scotch locks used here thank you very much) in a lead to provide power to the gauges (the gauges use LED backlights so the circuit won’t even notice the drain) and run in the wire under the dash to the centre console.
The next step is simply a case of connecting everything up including a 1A fuse for the pressure and temperature gauges.
The radio is fixed into the cage (already mounted in the fascia) and connected up to the wiring harness and Arial connection; a quick test (ignition on, engine off) before bolting it back together reveals no immediate issues (no escaping magic smoke and fire pixies).
Now the interior is put back together and the car taken for a drive
Install, power off:

Install, power on:

All that remains is for me to do some data logging to get the tune refined, thanks for reading the update (I realise it’s a lot of text – sorry)
The next update will hopefully be after I have been on the track (2/3 weeks’ time at Santa Pod weather depending).
Nothing performance related (in terms of actually making the car faster) but things that do relate to the vehicles general performance of the engine and drive train if that makes sense. I learned last year at the dial in day that hot lapping really makes the transmission wince and can drastically affect the times so a transmission temperature gauge was in order as was a wideband AFR gauge with data logger output to better the tunes. With gauges on the brain I also ordered an oil pressure gauge for the engine too as the engine has no stock oil pressure sensor just a pressure switch to make the idiot light and idiot gauge on the instruments “work” (the battery condition gauge is the same).
So after browsing Auto Meter I bought the following stepper motor drive gauges:
Auto Meter Cobalt transmission temperature gauge:
Auto Meter Cobalt oil pressure gauge:
Auto Meter Cobalt AFR gauge (digital):
For those wanting to fit a Wideband it has to be a proper full kit with the sensors, DO NOT be tempted by the cheaper (by 2/3 of the price) AFR gauges that connect to the stock upstream oxygen sensors, as this will not give the correct readout. Some cars do come with wideband sensors as stock, the 05-09 Mustang is not one of them, buy the full kit!
Mounting the gauges was taken care of by a company called Speed of Sound: http://www.speedofsoundllc.com/05_Radiopanels.html and their dash fascia that replaces the stock double DIN stereo with a single DIN stereo and three 2 & 1/16” gauge holes. I placed a bit of matt black vinyl on the front of the facia as their satin black wasn’t quite satin enough for me, that way it looks like the stock black plastic dash panels.
The new radio was on a half price offer in the January sale at Halfords and is a Sony CDX-GT570UI, the radio harness adaptor (Kit No: 70-5521) came from Installer.com in the US the site look a bit mad (possibly NSFW if your employer doesn’t like large breasted manga comic style women) but I can’t fault the service. I joined this harness with the radio end of the harness that came with the new radio.
Radio:
For wiring a new radio into a Mustang GT (for those thinking of doing it or are just interested) see Mole Hill Mikes instructions here:
http://www.s197.co.uk/s197/forum/phpBB3/viewtopic....
I have made good use of bullet type plugs to make it easier to remove gauges and parts of the harness if I have to.
I’ll apologise in advance for the lack of photos because the weekend I decided to do this load of modifying it was cold and wet, and I was pissed off so I just wanted to get it done so no photo heavy write up – sorry
The first stage of the modification was carried out by a mate of mine at A&A Motors as it requires a ramp because the downpipe and cats have to be removed to drill a hole in the driver’s side downpipe to weld the boss in place for the wideband oxygen sensor to mount in (I don’t want swarf and metal chippings in the cat!). The hole in the boss was then plugged so the car could still be driven (see Note2 later on). At the same time he also fitted the transmission temperature sender and ran its wire harness into the passenger foot well. He had to drop the transmission a bit to make it easier as there is only 2” clearance between the body and the transmission. With that done and the readies handed over I now just had to wait for the remaining part (the fascia) to arrive from the US, which was delayed due to the ship having an engine fault.
With the last of the parts now delivered, the first thing I did was all the other activities around a 70,000 mile service, because messing around with the plumbing means that having no oil in the motor and given the location having the oil filter off is a sensible idea as it gives me more room to work.
I removed the stock oil pressure switch from the hole and cut the wire, setting this aside I cleaned the threads in the hole mopping up any excess oil. Before I could mount the new sender I had to fit a 1/4 NPT to 1/8 NPT adaptor so that I could screw in the new oil pressure sender (1/8 NPT thread), with that done I fitted the new oil filter and filled the engine with 6 quarts (5.7liters) of Lucas 5w-20 oil.
I make a temporary earth from the old oil pressure switch to allow me to run the engine up (leak check) with no dash warnings; thankfully all was well (I’ll keep any eye on it for a week or so). Whilst the engine etc. was cooling off I stripped the interior and removed the old radio, these cars are built very nicely when it comes to taking things apart, it literally click fits for the most part, though I wish the HVAC wires were a tad longer to make their fitting and removal easier. I took this opportunity to test the new radio which worked nicely – this is going far too well.
Fitting the wideband AFR gauge
The first task is to remove driver’s side wheel and wheel arch boot this gives reasonable access for the wiring, you will have to be under the car to mount the oxygen sensor, this goes in the BOSS already welded into the exhaust, this was placed on the driver’s side as it was the only available place to put it. A 22mm spanner is needed to screw the sensor (you can’t get a socket or ring spanner with ratchet in) into the boss, I tightened it up to the point where I couldn’t tighten it any more.
NOTE 1: The sensor in the Autometer gauge kit already had thread sealant applied so no high temperature sealer was required, other gauge kits may require it.
NOTE 2: DO NOT under ANY circumstances start the engine to leak check at this point, the new oxygen sensor has to have a power supply to its heater otherwise it will be killed!
The next job is to run the harness in, its quite thick with a big connector on the end so it was going to be a pain to pass through the firewall grommets, I cut a small cross in the large pre-existing grommet and pushed the gauge connector through (I ran the original pressure switch earth and oil pressure sender harness in at this point too) into the cabin and got as much of the cable through as possible, you can then pull any extra you need back through.
I connected up the sender to the harness and along with the pressure sender harness zip tied it up to an original loom, being careful to leave some slack to allow the engine to move around. I then gummed up the cut out with silicone sealant so ensure no water could get through the grommet. With all the cables secured the wheel arch boot and wheel can be re fitted and the car can be taken off the jack stands.
Now you have to route the cable to your gauge location, I went with the centre console. The good thing is that there is a pre-existing loom that runs around under the dash that can be used to support the cable, zip ties are used. I chose this point to mount the phono jack I will be using to connect the signal out and signal ground to my SCT tuner. I connected the signal to the centre pin and the ground to the outside.
I pulled all the wires through into the centre console and made sure that each gauge’s loom was separate to avoid the almost inevitable rats nest caused by the mystical wire pixies that seem to be able to stealthily tangle up wires and cables that were placed neatly.
Given that the signal out and signal ground are already connected (I used bullet plugs in line with them to make the install easier) the wires remaining are:
WOT switch
Ground
+12V
There is no lighting connection because the gauge is digital (an analogue style gauge might have one though), I don’t have a mechanical throttle nor any other way of connecting the WOT switch so I tied this in with the ground connection, this just means it will monitor for peak conditions all the time rather than just at WOT.
For power I have run a mini add-a-circuit from the fuse box in the passenger foot well, I have piggy backed on the automatic gearboxes overdrive enable/disable power as it was one of the few active switched lives in that box that wasn’t already on the 10A circuit limit, this feeds through a 3A fuse into the wideband gauge.
That’s it, the gauge can now be connected and the engine started to check its operation.
Finishing the install, centre console
I pre-mounted the gauges in the new fascia panel (with thanks to Dremel here, that little tool of theirs is worth its weight in gold) with their angle plates in place to point them towards the driver, and no doubt saved me hours in slowly grinding out the holes for the gauges (and some use of a hand file to get the radio cage to fit) - $70 for this and I still have to make adjustments…
The switched live (as mentioned above) is already there as is the transmission temperature gauge harness which I ran in at the same time.
The earth was provided by drilling a hole in the pre-existing metal work (use cutting fluid or do it in stages as the metal is thick and hard) and crimp on eyelets placed on all the connections that required and earth (five in total).
This is where things (aside from frequent stops for the weather) started to go wrong The lighting feed I thought I had from the radio harness turns out to be a duff connection. The dash lighting is controlled by the CAN bus not a variable voltage supply, one saving grace is the rear fog light (not standard fit on a US car) which has a switched light supply on it. so I have to rip out the driver’s side dash panel to get at it. This allows me to remove a section of the insulation and solder (no bodge job scotch locks used here thank you very much) in a lead to provide power to the gauges (the gauges use LED backlights so the circuit won’t even notice the drain) and run in the wire under the dash to the centre console.
The next step is simply a case of connecting everything up including a 1A fuse for the pressure and temperature gauges.
The radio is fixed into the cage (already mounted in the fascia) and connected up to the wiring harness and Arial connection; a quick test (ignition on, engine off) before bolting it back together reveals no immediate issues (no escaping magic smoke and fire pixies).
Now the interior is put back together and the car taken for a drive
Install, power off:
Install, power on:
All that remains is for me to do some data logging to get the tune refined, thanks for reading the update (I realise it’s a lot of text – sorry)
The next update will hopefully be after I have been on the track (2/3 weeks’ time at Santa Pod weather depending).
Edited by PanzerCommander on Monday 24th March 18:28
Well another small update I have installed a polished aluminium catch can on the outlet side of the engine breather (its not really a proper PCV) to catch all the oil that gets drawn out of the camshaft covers.
I went for the UPR Catch can kit because it is made to fit the car, rather than a universal kit.
The kit:

The short pipe connecting the camshaft cover to the intake in the center of this picture is the one to be replaced:

The pipe simply un-clips and as the connectors are not needed for the install I put the pipe away safely so it can be re-fitted if I ever decide I don't want the catch can on the car.
In the next picture you can see the can installed, however this was not without its problems:

As you can see the tank is bolted to the strut tower on a pre-existing bolt, now the bracket underneath carries an air conditioning component (not sure what it is (its not the high or low side of the pressure system)), I am sure somebody will tell me). THis would not allow the catch can to sit as per UPR's instructions, it basically sat on the cam cover with around 1" of space between the top of the turret bracket and the tanks mounting bracket.
So inverting the bracket for the catch tank gave me a bit of extra room but not enough. So I removed the black bracket from the tower and bent it out a bit more to give more clearance. A foam tape number plate pad should prevent it from vibrating against the shock tower. This gave me the clearance I needed to install the tank:

As you can see it only just fits with probably 5mm or so clearance between the base of it and the cam cover.
And finally the pipes installed and hooked up:

The kit did not supply the jubilee clips and didn't call for them, given its low pressure they probably aren't necessary but for a couple of quid the extra security is worth it in my opinion.
For those that are wondering the catch tank has a screw off base to collect the oil blown back into the intake. What the catch can has is a wire wool filter in the top that catches the oil vapor, once stopped by the filter it to runs down into the base of the can where it pools.
I have been back to the track and I do have some video (needs editing first and I can't find my premier pro disk), I have had a couple of data logged runs which have resulted in a tune file coming back from the US that will hopefully be tested this weekend. The car has run slower than it did in the past in light of the tune being very very safe (only the 3.73 gears making up for the apparent power loss). So we shall see what comes this weekend at York Raceway.
And for those wondering how I did at the track, well at the Big Bang at Santa Pod, I managed to qualify 5th out of seven cars and took the runners up trophy being beaten by 0.08 of a second.
Last weekend at The Festival of power I qualified 3rd of nine cars and sadly went out in the first round by being a bit too quick of the start line (0.068 seconds) but the rain came down and stopped play all together which meant that no further points were awarded (no more rounds won/lost) over and above round one so punishment for being silly was avoided.
I went for the UPR Catch can kit because it is made to fit the car, rather than a universal kit.
The kit:
The short pipe connecting the camshaft cover to the intake in the center of this picture is the one to be replaced:
The pipe simply un-clips and as the connectors are not needed for the install I put the pipe away safely so it can be re-fitted if I ever decide I don't want the catch can on the car.
In the next picture you can see the can installed, however this was not without its problems:
As you can see the tank is bolted to the strut tower on a pre-existing bolt, now the bracket underneath carries an air conditioning component (not sure what it is (its not the high or low side of the pressure system)), I am sure somebody will tell me). THis would not allow the catch can to sit as per UPR's instructions, it basically sat on the cam cover with around 1" of space between the top of the turret bracket and the tanks mounting bracket.
So inverting the bracket for the catch tank gave me a bit of extra room but not enough. So I removed the black bracket from the tower and bent it out a bit more to give more clearance. A foam tape number plate pad should prevent it from vibrating against the shock tower. This gave me the clearance I needed to install the tank:
As you can see it only just fits with probably 5mm or so clearance between the base of it and the cam cover.
And finally the pipes installed and hooked up:
The kit did not supply the jubilee clips and didn't call for them, given its low pressure they probably aren't necessary but for a couple of quid the extra security is worth it in my opinion.
For those that are wondering the catch tank has a screw off base to collect the oil blown back into the intake. What the catch can has is a wire wool filter in the top that catches the oil vapor, once stopped by the filter it to runs down into the base of the can where it pools.
I have been back to the track and I do have some video (needs editing first and I can't find my premier pro disk), I have had a couple of data logged runs which have resulted in a tune file coming back from the US that will hopefully be tested this weekend. The car has run slower than it did in the past in light of the tune being very very safe (only the 3.73 gears making up for the apparent power loss). So we shall see what comes this weekend at York Raceway.
And for those wondering how I did at the track, well at the Big Bang at Santa Pod, I managed to qualify 5th out of seven cars and took the runners up trophy being beaten by 0.08 of a second.
Last weekend at The Festival of power I qualified 3rd of nine cars and sadly went out in the first round by being a bit too quick of the start line (0.068 seconds) but the rain came down and stopped play all together which meant that no further points were awarded (no more rounds won/lost) over and above round one so punishment for being silly was avoided.
Edited by PanzerCommander on Monday 28th April 00:01
Quick update, I have a video sorted now, Qualifying run 2; Festival of Power:
13.34@103.72 Qualifying run
Sadly it was a 13.3471 on a 13.35 second dial in, break out by 0.0029 of a second...
13.34@103.72 Qualifying run
Sadly it was a 13.3471 on a 13.35 second dial in, break out by 0.0029 of a second...
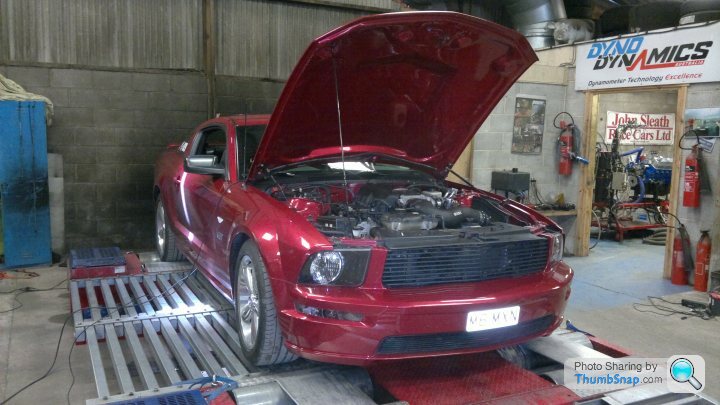
Another quick update on the progress front.
I am now through with US based tuners, I am sick to death of single line or in some cases one word e-mail replies (they don’t even have the standard canned footer of “thanks for your business" on them) and the lack of listening in general.
The revised tune that came back from the tuners in the US still allowed the engine to peak at 7400rpm in the burnout, which isn't ideal for large V8 which has a factory limiter of 6500 and a stock shift point of 6250, there is obviously a couple of hundred RPM to play with on this as it is set as a safe limit for longevity (usually around 300rpm more and raise the shift ceiling to 6500) of the engine and drive train.
So with my confidence in remote tuning damaged I phoned John Sleath Race Cars Ltd. and booked in for a dyno tuning session. The car now has a rev limiter and I have a power figure, 271bhp at the rear wheels, (John only gives a rear wheel figure as estimating the crank figure from the rundown drag is just that – an estimate) so given that the transmission losses for a 2006 Mustang GT auto are in the 20 - 25% range I will take the conservative option of 20% which means the car is putting out around 325hp at the flywheel which given the reported gains for the mods I have fitted (cold air intake, tune and FRPP manifold) is about right. But that is a guestimate, might be more might be less. But I am still very happy with the results. The old race tune was run on the dyno from the US and it was only 0.5hp less than Johns tune (the AFR was a bit richer on that tune so it probably explains it).
Here is a picture of the car on the rolling road:
And a video of the dyno pull. You will need reasonable speakers to listen to this otherwise you will just get the howl of the car interacting with the dyno rather than the engine noise of the car, enjoy:
Dyno pull
When I looked at the on track trace (you will hear it on the last video at Santa Pod that I posted) there appeared to be a little dip in revs are in 4th gear on the track, its nothing to do with a bad tune its simply the gearbox locking up and putting a bit of extra load on the engine at that point there isn't much that can be done at that point to compensate for it, but at least I now know it isn't a problem
July/August 2014:
Here comes the next updates, it’s been slow over the past year, to be honest most of what I wanted to do has been done and now I am just titivating. Though a change that I wasn’t expecting to do was to give the rear end a bit of an-uplift, a minor collision occurred at the start of July when somebody ran into the back of me. This resulted in a bent off side exhaust and creased and miss-shapen back bumper:


It’s hard to see on those pictures to be honest but was more obvious close up that it wasn’t quite the right shape.
Because the exhaust was bent on the over axle pipe as well as the back box which meant replacing the entire system (actually the stock bends were so bad it was hard to tell what was accident damage and what came from the factory) from the H-Pipe exit backwards. Given it has an aftermarket system already I stipulated that that an aftermarket system was to be fitted as a replacement, there is little point in them fitting a stock ford system when all I would do is cut it off, weigh it in and fit an aftermarket system again.
Being an honest chap I ordered the same system that is currently fitted, a JBA system at the same time as I ordered the bumper. However 24 Hours later I get an e-mail from CJ Pony parts saying that the JBA system is discontinued. I decide to go for a MagnaFlow system instead, which worked out £260 more expensive (including taxes and shipping). I ordered this before okaying it with the insurers as it had to be ordered in from the manufacturer. I was told a week.
After a week I setup a text chat window with CJ Pony Parts and they said that MagnaFlow had put it back to the following week, wonderful. The following week I get the same response so I can the MagnaFlow system and just get them to send me the bumper; the extra for the exhaust refunded. The bumper I ordered is the GT500/California Special bumper, rather than a stock GT one. The main difference is it has a Faux diffuser between the exhausts. Even though its more expensive (double) an oddity in the shipping means that it only cost £25 more than a stock one. A difference I am happy to pay myself if the insurance company doesn’t like it.
Given the pain in the arse with the exhaust I decide to get in touch with a localish exhaust guy. Len who runs PipeTech (http://www.pipetech1.co.uk/) based in Hunmanby North Yorkshire about getting a system made up. It was (after a right PITA getting it authorised) A great service, Len the owner came down to hull took some measurements for the silencers to get them made up and I then took the car there the following week for the two day job:


PipeTech: http://www.pipetech1.co.uk/
Sounds fantastic, looks great and the service was top notch – highly recommended if you want a custom system building
A GT500/California Special rear bumper; it looks a bit fresher than the stock one and the diffuser compliments the deck black out and smoked lights perfectly:


The work was carried out by Prestige accident Repair Limited (they did the front end for me when I bought the new hood): http://www.prestigebodyshop.co.uk/
They do a fantastic job, highly recommended.
I do have some slim line LED Fog and Reverse lights in the works to replace the ones that are currently there. You can’t see the bumper impact absorbing foam that’s behind it but that was also replaced.
In an attempt to tidy up under the hood a little more I ordered these:

CPC Radiator Cover extensions from CJ Pony parts; but they won’t just fit out of the box as I have bits that aren’t stock under the hood. First the nearside one has to have a notch cut in it to allow it to clear the air intake box (right side of the picture).
The offside panel needed the bump stop hole elongating so that I could still use the hood prop (supposed to be used with Gas struts but they are not strong enough to cope with the fibreglass hood), this is shown on the right hand side of the picture.
Installed:

I am not entirely convinced but at $77 they weren’t a hugely expensive gamble and were stuck on the back of a service parts order so I didn’t take a kicking for shipping costs either.
Nothing much more on the performance side for now but there are a few things on the boat as it were from the USA and UK suppliers so watch this space
Here comes the next updates, it’s been slow over the past year, to be honest most of what I wanted to do has been done and now I am just titivating. Though a change that I wasn’t expecting to do was to give the rear end a bit of an-uplift, a minor collision occurred at the start of July when somebody ran into the back of me. This resulted in a bent off side exhaust and creased and miss-shapen back bumper:
It’s hard to see on those pictures to be honest but was more obvious close up that it wasn’t quite the right shape.
Because the exhaust was bent on the over axle pipe as well as the back box which meant replacing the entire system (actually the stock bends were so bad it was hard to tell what was accident damage and what came from the factory) from the H-Pipe exit backwards. Given it has an aftermarket system already I stipulated that that an aftermarket system was to be fitted as a replacement, there is little point in them fitting a stock ford system when all I would do is cut it off, weigh it in and fit an aftermarket system again.
Being an honest chap I ordered the same system that is currently fitted, a JBA system at the same time as I ordered the bumper. However 24 Hours later I get an e-mail from CJ Pony parts saying that the JBA system is discontinued. I decide to go for a MagnaFlow system instead, which worked out £260 more expensive (including taxes and shipping). I ordered this before okaying it with the insurers as it had to be ordered in from the manufacturer. I was told a week.
After a week I setup a text chat window with CJ Pony Parts and they said that MagnaFlow had put it back to the following week, wonderful. The following week I get the same response so I can the MagnaFlow system and just get them to send me the bumper; the extra for the exhaust refunded. The bumper I ordered is the GT500/California Special bumper, rather than a stock GT one. The main difference is it has a Faux diffuser between the exhausts. Even though its more expensive (double) an oddity in the shipping means that it only cost £25 more than a stock one. A difference I am happy to pay myself if the insurance company doesn’t like it.
Given the pain in the arse with the exhaust I decide to get in touch with a localish exhaust guy. Len who runs PipeTech (http://www.pipetech1.co.uk/) based in Hunmanby North Yorkshire about getting a system made up. It was (after a right PITA getting it authorised) A great service, Len the owner came down to hull took some measurements for the silencers to get them made up and I then took the car there the following week for the two day job:
PipeTech: http://www.pipetech1.co.uk/
Sounds fantastic, looks great and the service was top notch – highly recommended if you want a custom system building
A GT500/California Special rear bumper; it looks a bit fresher than the stock one and the diffuser compliments the deck black out and smoked lights perfectly:
The work was carried out by Prestige accident Repair Limited (they did the front end for me when I bought the new hood): http://www.prestigebodyshop.co.uk/
They do a fantastic job, highly recommended.
I do have some slim line LED Fog and Reverse lights in the works to replace the ones that are currently there. You can’t see the bumper impact absorbing foam that’s behind it but that was also replaced.
In an attempt to tidy up under the hood a little more I ordered these:
CPC Radiator Cover extensions from CJ Pony parts; but they won’t just fit out of the box as I have bits that aren’t stock under the hood. First the nearside one has to have a notch cut in it to allow it to clear the air intake box (right side of the picture).
The offside panel needed the bump stop hole elongating so that I could still use the hood prop (supposed to be used with Gas struts but they are not strong enough to cope with the fibreglass hood), this is shown on the right hand side of the picture.
Installed:
I am not entirely convinced but at $77 they weren’t a hugely expensive gamble and were stuck on the back of a service parts order so I didn’t take a kicking for shipping costs either.
Nothing much more on the performance side for now but there are a few things on the boat as it were from the USA and UK suppliers so watch this space
Another small update from me:
I removed the CPC radiator extension covers as they were rubbing on the underside of the fibreglass hood and on the lip, this is because of the thicker seams on the fibre glass hood. Never mind; I might see if I can flee bay them (they have been drilled and cut to suit my Roush intake and the hood prop).
Firstly I had been having some pretty nasty noises from the rear end whilst the car was heavily laden (bangs and screeches) which is never good. I traced the problem to the Panhard brace contacting the Panhard rod and then to the bump stops which had been cut down; these are the old bump stops:

Straight from the bodge it and scarper school of motor vehicle upgrades. Car hitting the bump stops after being lowered? I know lets not spend £30 for a set of four Ford Racing Bump Stops (front and rear) and five minutes installing them, we'll cut the OEM ones down to size. This solves one problem and creates another - the suspension moves out of tolerance.
The Ford Racing replacements, Left:

Right:

Now onto the Panhard Rod, here is the old one and the new one side by side:

For those that don't know the Panhard rod connects one side of the axle diagonally to the opposite side of the body tub (the car is a monocoque like most modern cars are these days, not body on chassis). The Panhard Brace then connects the body end of the rod to the other side of the body tub. This spreads the load over both sides of the car.
Where had the problem been coming from then, well the suspension had been moving out of tolerance due to the cut down bump stops, this means that the flange on the old pressed Panhard brace had been rubbing on the Panhard rod during large suspension deflections. This would not normally happen but the rod is 2" further back at the axle end to clear the diff cover.
The new brace is a slightly different shape and has no flange. This should clear any contact issues, if it doesn't I'll have to have a re-think.
The new brace fitted:

Its dirty under there (well the car is used as a daily drive) If you follow the Panhard rod along from the anchor point in the foreground you can see the slightly oval patch of rusty rod where it has been catching (I have rubbed down and painted it with Hammerite to reseal it.
The next bits to test fit where the new Weld Racing Wheels and their Mickey Thomson E/T fronts:


The wheels are three piece forged Weld RT-S (15x4) and the Tyres Mickey Thomson E/T fronts (27.5x4.5 R15). The pair of front wheels weighs just less than one stock front wheel. This weight reduction will help weight transfer on launch (they are only for the track) and they also offer reduced rolling resistance on track. I imagine at higher speeds they will also offer some aerodynamic improvement, though at my usual terminal speed of around 101/102mph I doubt I'd notice it.
I removed the CPC radiator extension covers as they were rubbing on the underside of the fibreglass hood and on the lip, this is because of the thicker seams on the fibre glass hood. Never mind; I might see if I can flee bay them (they have been drilled and cut to suit my Roush intake and the hood prop).
Firstly I had been having some pretty nasty noises from the rear end whilst the car was heavily laden (bangs and screeches) which is never good. I traced the problem to the Panhard brace contacting the Panhard rod and then to the bump stops which had been cut down; these are the old bump stops:
Straight from the bodge it and scarper school of motor vehicle upgrades. Car hitting the bump stops after being lowered? I know lets not spend £30 for a set of four Ford Racing Bump Stops (front and rear) and five minutes installing them, we'll cut the OEM ones down to size. This solves one problem and creates another - the suspension moves out of tolerance.
The Ford Racing replacements, Left:
Right:
Now onto the Panhard Rod, here is the old one and the new one side by side:
For those that don't know the Panhard rod connects one side of the axle diagonally to the opposite side of the body tub (the car is a monocoque like most modern cars are these days, not body on chassis). The Panhard Brace then connects the body end of the rod to the other side of the body tub. This spreads the load over both sides of the car.
Where had the problem been coming from then, well the suspension had been moving out of tolerance due to the cut down bump stops, this means that the flange on the old pressed Panhard brace had been rubbing on the Panhard rod during large suspension deflections. This would not normally happen but the rod is 2" further back at the axle end to clear the diff cover.
The new brace is a slightly different shape and has no flange. This should clear any contact issues, if it doesn't I'll have to have a re-think.
The new brace fitted:
Its dirty under there (well the car is used as a daily drive) If you follow the Panhard rod along from the anchor point in the foreground you can see the slightly oval patch of rusty rod where it has been catching (I have rubbed down and painted it with Hammerite to reseal it.
The next bits to test fit where the new Weld Racing Wheels and their Mickey Thomson E/T fronts:
The wheels are three piece forged Weld RT-S (15x4) and the Tyres Mickey Thomson E/T fronts (27.5x4.5 R15). The pair of front wheels weighs just less than one stock front wheel. This weight reduction will help weight transfer on launch (they are only for the track) and they also offer reduced rolling resistance on track. I imagine at higher speeds they will also offer some aerodynamic improvement, though at my usual terminal speed of around 101/102mph I doubt I'd notice it.
Gassing Station | Readers' Cars | Top of Page | What's New | My Stuff