My e36 track car
Discussion


Well, I've been doing this journal on another site, but it's not as busy as this. So I'll drop all my posts into this 1st one... Go grab a cuppa! (it's not actually that long, i promise...)
Well, as any good story starts, this one begins with a break-up. Broke up with my long term GF and at the time i had a van for mountain biking. Since i was single, I didn't have any need for a van anymore, and seen this thing come up for sale for £800.
Before getting the car, i knew nothing about fixing and maintaining cars and had only done minor fixes on my van before hand, but I was/am keen to learn, so I like to get my hands dirty as much as I can. Every day is a school day!
101000miles on the clock, BMW service history up till 92000miles, nothing wrong with the engine, couple little bits of rust (rear arch... surprise surprise...) and abit of damage to the front from a small bump.

This is how she looked when picked up, not very loved if I'm honest. So she was given a good scrub and started to look good.


First thing was a good service, so the oil and fuel filters and the rocker cover gasket were changed and filled with castrol oil. I also started running her soley on Shell V-Power. After running 'normal' fuel, then trying bp ultimate, it idles and pulls away better. Although, this might just be a placebo effect... who knows!

Because i was still biking at this time, i found myself a removable OEM towbar and got about fitting.

Fitted and carrying my Jump bike.

Straight away i knew i needed to change the wheels. I wasn't a massive fan of the look and ride (they were 18s). I quickly found 4 black M-Sport rep wheels and an un-refurbed wheel for a bargain price, so had them.

The brake callipers were giving a quick brush to remove rust and painted black. It's the little things...

After going for a few 'fast/spirited drives' I knew keeping the car on the road only wasn't going to be enough to 'satisfy' me and I wanted to do it safer and legal. So track car was decided.
First was the suspension and brakes. I bought new OEM discs (sprayed with zinc 182 and high heat paint to stop them rusting) and some EBC red stuff pads.

I also bought a set of BC Racing RM series coilvers. Not the most expensive, but far from the cheapest. They give adjustable dampening, ride heigh and the fronts have adjustable camber top mounts.


The discs, pads and coils being fitted. I'm wanting to learn how to do everything, so luckily the lad that sold me the car is a mechanic and happy to help teach me.

Debaged and the 'motorsport' painted white.


Next up was a trip to 'BMW enthusiast' in peterborough to have an M50 manifold fitted, ASC TB delete and remap.

When I had the ASC TB body removed, the actual 'brain' was left. As if removed the ABS and ASC light would come on. As I wasn't sure if this would affect the ABS i left it for the time being.
While going out for a quick test drive, Lewis mentioned that he had the Z3 'short shift' in stock, so when we got back it was quickly finished swell.

On the way home, I seen a scorpion back box for sale on here, less than 2months old and cheap as chips! So picked that up and fitted that night.
I finally managed to find a front grill panel in 'arctic silver' so bought it and fitted that, along with Z3 top mount reinforcements front and rear.


I picked up some black grills at the same time.

The top mounts. (don't worry, they are on correctly, not in the place they are in the pic)
After doing some reading, I decided to remove the clutch fan. While at it, I thought it would be best to change the waterpump, belts and the 2 main radiator pipes. Stupidly I never bought an aluminium thermostat housing, so that will be changed at a later date.
New pump and belts fitted and fan removed!

I finally got round to completely removing the ASC and plugged a resistor into the ABS connector. This stops the ABS light coming on and the ABS still works normally.

The resistor.

Taped up and connected in. I also taped the actual connections, will probably solder it at some point.

And the ASC completely removed.
BMW Dynamics (also in Peterborough) have started doing CAIs, so I had myself one of those. Comes with everything bar the cone filter, all for £75! When fitting, i also gave the engine bay a quick scrub.

And then it really began, I was bored so the boot interior began coming out...

A few nights later, I had a little accident. I entered a corner, not fast as I had just came off a main road onto a B road. Started accelerating and didn't see a wet patch on the exit of the corner. Managed to stop the car spinning, but collected a small rock at the side of the road.

Luckily I had the spare wheel, so that was quickly refurbed and fitted. I've not replaced the side skirt yet as it's only bodywork and clipped back on! However, my rear camber arm took a knock and is no sitting at max camber, so that'll be getting replaced soon.
The days had been rather wet, so I hadn't been getting much done on the car, but sometimes being in the army has it's advantages... Found a hanger I can work in out of the rain and wind!

Started taking everything out of the back.


Also took the CD changer wiring out.

And pretty much everything I took out that day, including removing the towbar.

Couple days later, me and one of the lads were back at it. Everything that's not needed was coming out.

Everything on the left was staying, on the right was going.

All the wiring and carpet removed that day.

Clean!

Unfortunately, do to us doing it on a spur of the moment, I had to keep a section of carpet for the drivers footwell until my footplate arrived.

I then found someone on eBay selling BBTBs for £75 - http://www.ebay.co.uk/usr/sneakapeak99?_trksid=p20... - that's his user.
Fitted that, and along with the rest of the intake mods i've done, it really finished it off. The car revs much quicker and easier than it did before.

I then decided I needed to get on the track, so i booked a day at Castle Combe for the 5th of Sept. With that, I knew i needed to bleed the brakes. I had been finding I was getting brake fade towards the end of a hard drive (the black mountain pass in Swansea). The service history isn't the best and I have no idea when it was last done, so i bought some ATE Super R Blue fluid and also picked up some goodridge braided brake lines and braided clutch line to remove the CDV.
We got the car up on the ramps at work and set about fitting. However, upon raising the car, we realised that I had bought the wrong brake lines. I had picked up the 6-line set, when i need the 4-line set. This wasn't before we had tried to remove the rear line, found out it was completely seized and when trying to undo, twisted the copper pipe, splitting it.

My plan was to go to Merlin Motorsport to pick up a steering wheel/boss and a seat in the morning anyway. So with that and knowing we wouldn't be able to get the correct brakelines, i picked up a set of OEM brake pipes (better than the 18yr olds that were on there) and a flaring tool.
We checked all the brakelines and all bar the front offside were seized, so we decided to cut and replace all of the joints. We practiced flaring on abit of pipe that we cut for about an hour before hand, then set to flaring the pipes fitted to the car.

And one of the flared pipes.

Once fitted, we quickly found the front offside hadn't flared properly, so we sorted that. Apart from that, everything worked fine and I now have new brakelines (although only the standard pipes) and new fluid!
We also fitted my new Momo boss and model 78 wheel, sparco sprint seat (will become the passenger seat soon and i'll have a better one for the driver) and my seat mounts and foot plate from http://www.arperformance.co.uk/. I put some grip tape on top of the car footplate, as the car is still being used as my 'daily' car.


And that brings me to today.
I booked the car into http://www.aviaspeedshop.com to have the wheel alignment and corner weighting done.

Andy (the guy under the car) really knows his stuff with 30+ years or racing and car setup behind him. He explained everything to me in layman's terms so I knew what he was doing.
I was happy to know that the car (without driver and half a tank of fuel) weights 1240kg. So she's lost around 210kg and still has the OEM passenger seat!
After aligning the car, Andy took me for a quick drive to see how it feels. I've never been in a car with someone who car corner a car the way he did, which gave me even more confidence in the car and what he had done.
So my next thing is the trackday on friday, and i can not wait. I really can't.
So, yesterday (5th Sept) was my 1st ever track day and I was at Castle Combe. Short story; it was awesome.
Long Story;
I arrived just before 0730 and immediately felt abit out of place with all the properly prepped track cars, all the open tops and the Kumho Tyres BMW champs M3... But that I was wrong to feel that way as I was chatting away within a few minutes of being there!
After my 2nd session (my 1st was a novice only where myself and an ST left everyone else) I was being passed by some cars I wasn't expecting to be. But as the day went on, my confidence and driving ability grew.
It was an 'open pit' so I was doing 20min stints. After my 3rd session, I was getting some brake judder towards the end of the sessions. This turned out to be my front left brake pads pretty much disappearing in each session (by the end I just had enough to get home) and my tyres were scrubbing up nicely. I even got a few blisters on my front left (combe is 90% right handers) when I stayed out for abit too long.

I had 5 'moments' throughout the day, 3 of which were on the last corner. After the 3rd and biggest, I had a session with an instructor and he changed the track completely for me! After my session, i was carrying more speed out of majority of the corners and was no longer loosing my back end!
By the end of the day, I was keeping up with majority of people. It was only really the open top race cars and the M3 that I couldn't. I was still struggling to keep up with alot of the cars on the straights as some had 'longer legs' (bloody turbos!!!) but would reel them in on the corners!
The M3 passed me a few times, so i tried following him. My turn in points were the same as his, but he was using more of the road on the exit and was braking a hell of alot later than I was! This was defiantly to do with driving skill but also somewhat to do with car setup!
I managed to get a clip of him going for it at the end of the day!
[youtube]<iframe width="560" height="315" src="//www.youtube.com/embed/IUa-WL05fvg" frameborder="0" allowfullscreen></iframe>[/youtube]
The thing was on rails. Watching him go through the corners at the speed he was, was unreal. The car had no roll in it and was holding and going exactly where he wanted it.
Here's a couple pics from yesterday and a video of some of my 'moments' and a couple good laps!
[youtube]<iframe width="560" height="315" src="//www.youtube.com/embed/r3ahUX42CBc" frameborder="0" allowfullscreen></iframe>[/youtube]


So that's it so far. Got a few things i need to sort now tho;
Brake light switch (died towards end of day/on the way home)
New clutch (think mines is still the original and the bite point is very high) - any recommendations?
Sparco 2000 drivers seat
Strut and x brace
Polybush everything
M3 LSD
Cage!
So, I changed the pads back to the OEM ones that I still had and here are the EBC reds
The nearside ones -


And my offside for comparison -

Gave my calliper a good going over and the piston isn't sezied/sticking and the brake isn't dragging, so it must have been a bad pad...
While i had the car up on the jack, I gave the underneath another look. My PAS hose has a slight/slow leak (I have noticed this before) and my oil dipstick has a slight leak. Both are very minor and not leaking enough to affect levels, but I'll be sorting them as soon as I can.
Dipstick leak -

Looks like it has been going for a while, but the oil level has never dropped.

PAS leak. Again, this seems to be a common problem due to BMW using non-reusable clamps.
I then decided to tackle the sound deadening. I tried a CO2 fire extinguisher and plumper pipe freeze a couple weeks ago, but that was no use, so I got my heat gun back from my friend. Only done a couple hours tonight, but managed to remove everything in the rear. I even started removing the residue with white spirits, but it was making me high as a kite, so i stopped and had my dinner.


All the sound deadening that was removed today!

One thing that's on my mind, my coolant level has dropped a little bit, not much, only 2 fingers width under the 'cold level' line on the expansion tank. I last filled up about 4 weeks ago when i done my water pump. I have noticed some steam/water from my exhaust on startup. I've checked the oil filled cap and theres no white residue to say theres any coolant in the oil and can't see any oil in the coolant. Any ideas? worse case, I know it'll be my head gasket, but as far as I'm away, I can't see it being that. I'll pull my spark plugs off tomorrow and have a look to see if there is any oil/coolant in there...
So, I finally got the rough idle sorted out. When fitting my CAI, i accidentally crushed the ends of my MAF, so I bought an aftermarket one from ebay... So, i bought a 2nd hand OEM MAF and straight away the car was running like butter again.
I also finally got round the EBC yellowstuff pads and an oil service. Bosch filter and castrol oil, because I'm nice like that to her!

I'm currently in the Army and awaiting a medical discharge due to a back/leg injury. With this, a charity - Mission Motorsport - http://www.missionmotorsport.org - came to my attention. They help injured soldiers get someone fun/good back in their lives and can help get you into the motorsport industry when you are finally discharged. This year, along with all the other projects and days they do, they were running a MK1 MX5 in the MaX5 championship and also maintaining/supporting a MK3 in the same championship. However, the Mk1 driver, David Birrell - https://www.facebook.com/pages/David-Birrell-racin... - is a double below knee amputee. His car isn't modified to his disability in anyway. It's all standard controls and going into the last round he was sitting 4th... Ye.
So, I headed up to the workshop in Wantage to help out getting everything ready for the final race at Pembrey. Friday morning and we were at the track for a day of testing. DavieNoLegs (thats what he calls himself) had already spent sometime in the iZone simulator, so had a good idea of the track before hand.

The supported MK3 with Davies MK1 in the background.

Our pit setup. Thats Davies 14plate M135 next to my motor. On a random note, Davies car decided to die and had to be recovered by BMW... Think its been fixed now tho..
I was in luck tho, as that weekend also included the Kumho BMW championship! The M3s were incredible tho! The 2 top guys, all weekend were battling it out.

The M3s sounded incredible...

Winners of the biggest turbo/most torque...
Davie managed to pull 2nd in both races and fasted MK1 time of the weekend. With his he finished 3rd overall in his first year racing...
Over the last couple weeks, I also received the 2nd bucket seat, a set of bonnet catches, plastic door cards and an Xbrace.
First in was the 2nd bucket. Glad to have removed the OEM seat, as it weighed about 4 times (if not more) of the bucket.
I also removed the bottom of the centre console and the OBC. At the moment, the wiring is just tucked away as I need to get the dash out to remove the wiring from that and the interior lighting properly.

Finally got myself a dremel, because why not?

I fitted the door cards, using threaded rivets. I've got some black bolts coming just to make it abit more stealth.

One problem i do have, is closing the door as I have nothing to hold onto... So I have some door pulls on the way aswell.

She's staring to look like a real track car!

I set about removing the little bits of rust on the Xbrace and gave it a quick coat of paint.
I then tackled the bonnet catches. I partly got these due to my release catch starting to feel bait notchy while using and also #becasusetrackcar :wink:
However, I didnt realise until fitting that they were the underneath fitting, not the above fitting. But instead of sending them back, I fitted them anyway! I'm not afraid of people seeing my crap cutting skills!!


The latches had seen better days...

Finished!
I fitted the XBrace next. Alot of guides say you only need to use 4 nut sets to hold it in place, but to be safe i went with all 6 (there are 6 holes, so why not?)


Fitting the Xbrace literally took my 10mins to do, one of the easiest things I've done so far!
This week I finally have some Msport bumpers coming! So will be getting them and a couple other little bits fitted during the week.
One of the lads at work pointed out he couldn't really close the door... So I fitted a couple door pulls to make life easier!

Also picked up a replica (i think?) AC Schnitzner gear knob as mine was falling apart.

And so I don't need to hire, got myself a good fitting helmet from Merlin Motorport. I made a 140mile round trip, to get the helmet and size I thought I needed, just to be on the safe side with the fitting!

To finish the outside of the car (for the moment) I managed to pick up some M3 bumpers.

The bumper never came with cooling ducts and my original was missing a duct, so I used some duct tubing in place until I do the fog light duct to calliper cooling 'mod' to help.
The car was then ready for a 2nd track day. This time it was at a very local to me track, Llandow Circuit. It's not by any means a big track (averaged times of 50secs for myself) but it's still a track!

Chilling between sessions.


And a couple shots from the day.
I had the same tyres as i did for my 1st track day, a set of Nankang Ultrasport NS2s, with the rear being a new set since. However, on the day, they were crap. I'
After majority of sessions (between 15-20mins), my rear tyres were still cold. My fronts would have some heat, but not compared to the tyres of the cars around me. My back end was everywhere and i couldn't find any grip. I tried decreasing and increasing pressures, but nothing. My open diff also wasn't helping and I could feel my outside wheel spinning alot more than i did at Combe.
I also, was again let down by the EBC pads. As before, I never lost power or had any fade. But by the end of the day, I had no pads left. This time I know I wasn't dragging my brakes, as there was only 2 main braking points and 1 dab of brakes on the track. The 2 main were particularly heavy (105 to 30 in 100yards and 100 to 50 in 50 yards) and I did manage 8 sessions. But I was still surprised at how quick the pads wore down.

The pad fell off the backing when I removed it from the calliper. Speaking to Tommo on here in another thread, he reckons it's not having enough cooling going to the brake that's caused this, which I partially agree on. As I've already said, I know this is an area i need to address anyway.
I have another day at Brands Hatch on the 11th of Nov, with the possibility of doing Silverstone the day after. I don't really want to be going there wandering if my pads will last, or spending £120 (if i got yellowstuff again) in 2 days. I'm tempted to try the Pagid RS19 pads as they have great reviews.
So moving forward from the weekend. I've finally got a new clutch on the way. Lighweight flywheel and sachs clutch (from http://www.bigbavarianbeauties.com), Black powerflex LCA bushes and H&R anti roll bars arriving this week, so thats this weekends job sorted!
Also, having a harness bar fitted on friday, so i can finally get my harness in for my drivers seat. Also picking up a set of Team Dynamic wheels with Toyo R888s and an M3 3.0 LSD in the the next week aswell!
Last thing, not everything costs lots of money in this game! Managed to find some squares of wood at work and made myself some ramps to help lift the front end in 1 go!


it's the little things...
Well, as any good story starts, this one begins with a break-up. Broke up with my long term GF and at the time i had a van for mountain biking. Since i was single, I didn't have any need for a van anymore, and seen this thing come up for sale for £800.
Before getting the car, i knew nothing about fixing and maintaining cars and had only done minor fixes on my van before hand, but I was/am keen to learn, so I like to get my hands dirty as much as I can. Every day is a school day!
101000miles on the clock, BMW service history up till 92000miles, nothing wrong with the engine, couple little bits of rust (rear arch... surprise surprise...) and abit of damage to the front from a small bump.

This is how she looked when picked up, not very loved if I'm honest. So she was given a good scrub and started to look good.


First thing was a good service, so the oil and fuel filters and the rocker cover gasket were changed and filled with castrol oil. I also started running her soley on Shell V-Power. After running 'normal' fuel, then trying bp ultimate, it idles and pulls away better. Although, this might just be a placebo effect... who knows!

Because i was still biking at this time, i found myself a removable OEM towbar and got about fitting.

Fitted and carrying my Jump bike.

Straight away i knew i needed to change the wheels. I wasn't a massive fan of the look and ride (they were 18s). I quickly found 4 black M-Sport rep wheels and an un-refurbed wheel for a bargain price, so had them.

The brake callipers were giving a quick brush to remove rust and painted black. It's the little things...

After going for a few 'fast/spirited drives' I knew keeping the car on the road only wasn't going to be enough to 'satisfy' me and I wanted to do it safer and legal. So track car was decided.
First was the suspension and brakes. I bought new OEM discs (sprayed with zinc 182 and high heat paint to stop them rusting) and some EBC red stuff pads.

I also bought a set of BC Racing RM series coilvers. Not the most expensive, but far from the cheapest. They give adjustable dampening, ride heigh and the fronts have adjustable camber top mounts.


The discs, pads and coils being fitted. I'm wanting to learn how to do everything, so luckily the lad that sold me the car is a mechanic and happy to help teach me.

Debaged and the 'motorsport' painted white.


Next up was a trip to 'BMW enthusiast' in peterborough to have an M50 manifold fitted, ASC TB delete and remap.

When I had the ASC TB body removed, the actual 'brain' was left. As if removed the ABS and ASC light would come on. As I wasn't sure if this would affect the ABS i left it for the time being.
While going out for a quick test drive, Lewis mentioned that he had the Z3 'short shift' in stock, so when we got back it was quickly finished swell.

On the way home, I seen a scorpion back box for sale on here, less than 2months old and cheap as chips! So picked that up and fitted that night.
I finally managed to find a front grill panel in 'arctic silver' so bought it and fitted that, along with Z3 top mount reinforcements front and rear.


I picked up some black grills at the same time.

The top mounts. (don't worry, they are on correctly, not in the place they are in the pic)
After doing some reading, I decided to remove the clutch fan. While at it, I thought it would be best to change the waterpump, belts and the 2 main radiator pipes. Stupidly I never bought an aluminium thermostat housing, so that will be changed at a later date.
New pump and belts fitted and fan removed!

I finally got round to completely removing the ASC and plugged a resistor into the ABS connector. This stops the ABS light coming on and the ABS still works normally.

The resistor.

Taped up and connected in. I also taped the actual connections, will probably solder it at some point.

And the ASC completely removed.
BMW Dynamics (also in Peterborough) have started doing CAIs, so I had myself one of those. Comes with everything bar the cone filter, all for £75! When fitting, i also gave the engine bay a quick scrub.

And then it really began, I was bored so the boot interior began coming out...

A few nights later, I had a little accident. I entered a corner, not fast as I had just came off a main road onto a B road. Started accelerating and didn't see a wet patch on the exit of the corner. Managed to stop the car spinning, but collected a small rock at the side of the road.

Luckily I had the spare wheel, so that was quickly refurbed and fitted. I've not replaced the side skirt yet as it's only bodywork and clipped back on! However, my rear camber arm took a knock and is no sitting at max camber, so that'll be getting replaced soon.
The days had been rather wet, so I hadn't been getting much done on the car, but sometimes being in the army has it's advantages... Found a hanger I can work in out of the rain and wind!

Started taking everything out of the back.


Also took the CD changer wiring out.

And pretty much everything I took out that day, including removing the towbar.

Couple days later, me and one of the lads were back at it. Everything that's not needed was coming out.

Everything on the left was staying, on the right was going.

All the wiring and carpet removed that day.

Clean!

Unfortunately, do to us doing it on a spur of the moment, I had to keep a section of carpet for the drivers footwell until my footplate arrived.

I then found someone on eBay selling BBTBs for £75 - http://www.ebay.co.uk/usr/sneakapeak99?_trksid=p20... - that's his user.
Fitted that, and along with the rest of the intake mods i've done, it really finished it off. The car revs much quicker and easier than it did before.

I then decided I needed to get on the track, so i booked a day at Castle Combe for the 5th of Sept. With that, I knew i needed to bleed the brakes. I had been finding I was getting brake fade towards the end of a hard drive (the black mountain pass in Swansea). The service history isn't the best and I have no idea when it was last done, so i bought some ATE Super R Blue fluid and also picked up some goodridge braided brake lines and braided clutch line to remove the CDV.
We got the car up on the ramps at work and set about fitting. However, upon raising the car, we realised that I had bought the wrong brake lines. I had picked up the 6-line set, when i need the 4-line set. This wasn't before we had tried to remove the rear line, found out it was completely seized and when trying to undo, twisted the copper pipe, splitting it.

My plan was to go to Merlin Motorsport to pick up a steering wheel/boss and a seat in the morning anyway. So with that and knowing we wouldn't be able to get the correct brakelines, i picked up a set of OEM brake pipes (better than the 18yr olds that were on there) and a flaring tool.
We checked all the brakelines and all bar the front offside were seized, so we decided to cut and replace all of the joints. We practiced flaring on abit of pipe that we cut for about an hour before hand, then set to flaring the pipes fitted to the car.

And one of the flared pipes.

Once fitted, we quickly found the front offside hadn't flared properly, so we sorted that. Apart from that, everything worked fine and I now have new brakelines (although only the standard pipes) and new fluid!
We also fitted my new Momo boss and model 78 wheel, sparco sprint seat (will become the passenger seat soon and i'll have a better one for the driver) and my seat mounts and foot plate from http://www.arperformance.co.uk/. I put some grip tape on top of the car footplate, as the car is still being used as my 'daily' car.


And that brings me to today.
I booked the car into http://www.aviaspeedshop.com to have the wheel alignment and corner weighting done.

Andy (the guy under the car) really knows his stuff with 30+ years or racing and car setup behind him. He explained everything to me in layman's terms so I knew what he was doing.
I was happy to know that the car (without driver and half a tank of fuel) weights 1240kg. So she's lost around 210kg and still has the OEM passenger seat!
After aligning the car, Andy took me for a quick drive to see how it feels. I've never been in a car with someone who car corner a car the way he did, which gave me even more confidence in the car and what he had done.
So my next thing is the trackday on friday, and i can not wait. I really can't.
So, yesterday (5th Sept) was my 1st ever track day and I was at Castle Combe. Short story; it was awesome.
Long Story;
I arrived just before 0730 and immediately felt abit out of place with all the properly prepped track cars, all the open tops and the Kumho Tyres BMW champs M3... But that I was wrong to feel that way as I was chatting away within a few minutes of being there!
After my 2nd session (my 1st was a novice only where myself and an ST left everyone else) I was being passed by some cars I wasn't expecting to be. But as the day went on, my confidence and driving ability grew.
It was an 'open pit' so I was doing 20min stints. After my 3rd session, I was getting some brake judder towards the end of the sessions. This turned out to be my front left brake pads pretty much disappearing in each session (by the end I just had enough to get home) and my tyres were scrubbing up nicely. I even got a few blisters on my front left (combe is 90% right handers) when I stayed out for abit too long.

I had 5 'moments' throughout the day, 3 of which were on the last corner. After the 3rd and biggest, I had a session with an instructor and he changed the track completely for me! After my session, i was carrying more speed out of majority of the corners and was no longer loosing my back end!
By the end of the day, I was keeping up with majority of people. It was only really the open top race cars and the M3 that I couldn't. I was still struggling to keep up with alot of the cars on the straights as some had 'longer legs' (bloody turbos!!!) but would reel them in on the corners!
The M3 passed me a few times, so i tried following him. My turn in points were the same as his, but he was using more of the road on the exit and was braking a hell of alot later than I was! This was defiantly to do with driving skill but also somewhat to do with car setup!
I managed to get a clip of him going for it at the end of the day!
[youtube]<iframe width="560" height="315" src="//www.youtube.com/embed/IUa-WL05fvg" frameborder="0" allowfullscreen></iframe>[/youtube]
The thing was on rails. Watching him go through the corners at the speed he was, was unreal. The car had no roll in it and was holding and going exactly where he wanted it.
Here's a couple pics from yesterday and a video of some of my 'moments' and a couple good laps!
[youtube]<iframe width="560" height="315" src="//www.youtube.com/embed/r3ahUX42CBc" frameborder="0" allowfullscreen></iframe>[/youtube]


So that's it so far. Got a few things i need to sort now tho;
Brake light switch (died towards end of day/on the way home)
New clutch (think mines is still the original and the bite point is very high) - any recommendations?
Sparco 2000 drivers seat
Strut and x brace
Polybush everything
M3 LSD
Cage!
So, I changed the pads back to the OEM ones that I still had and here are the EBC reds
The nearside ones -


And my offside for comparison -

Gave my calliper a good going over and the piston isn't sezied/sticking and the brake isn't dragging, so it must have been a bad pad...
While i had the car up on the jack, I gave the underneath another look. My PAS hose has a slight/slow leak (I have noticed this before) and my oil dipstick has a slight leak. Both are very minor and not leaking enough to affect levels, but I'll be sorting them as soon as I can.
Dipstick leak -

Looks like it has been going for a while, but the oil level has never dropped.

PAS leak. Again, this seems to be a common problem due to BMW using non-reusable clamps.
I then decided to tackle the sound deadening. I tried a CO2 fire extinguisher and plumper pipe freeze a couple weeks ago, but that was no use, so I got my heat gun back from my friend. Only done a couple hours tonight, but managed to remove everything in the rear. I even started removing the residue with white spirits, but it was making me high as a kite, so i stopped and had my dinner.


All the sound deadening that was removed today!

One thing that's on my mind, my coolant level has dropped a little bit, not much, only 2 fingers width under the 'cold level' line on the expansion tank. I last filled up about 4 weeks ago when i done my water pump. I have noticed some steam/water from my exhaust on startup. I've checked the oil filled cap and theres no white residue to say theres any coolant in the oil and can't see any oil in the coolant. Any ideas? worse case, I know it'll be my head gasket, but as far as I'm away, I can't see it being that. I'll pull my spark plugs off tomorrow and have a look to see if there is any oil/coolant in there...
So, I finally got the rough idle sorted out. When fitting my CAI, i accidentally crushed the ends of my MAF, so I bought an aftermarket one from ebay... So, i bought a 2nd hand OEM MAF and straight away the car was running like butter again.
I also finally got round the EBC yellowstuff pads and an oil service. Bosch filter and castrol oil, because I'm nice like that to her!

I'm currently in the Army and awaiting a medical discharge due to a back/leg injury. With this, a charity - Mission Motorsport - http://www.missionmotorsport.org - came to my attention. They help injured soldiers get someone fun/good back in their lives and can help get you into the motorsport industry when you are finally discharged. This year, along with all the other projects and days they do, they were running a MK1 MX5 in the MaX5 championship and also maintaining/supporting a MK3 in the same championship. However, the Mk1 driver, David Birrell - https://www.facebook.com/pages/David-Birrell-racin... - is a double below knee amputee. His car isn't modified to his disability in anyway. It's all standard controls and going into the last round he was sitting 4th... Ye.
So, I headed up to the workshop in Wantage to help out getting everything ready for the final race at Pembrey. Friday morning and we were at the track for a day of testing. DavieNoLegs (thats what he calls himself) had already spent sometime in the iZone simulator, so had a good idea of the track before hand.

The supported MK3 with Davies MK1 in the background.

Our pit setup. Thats Davies 14plate M135 next to my motor. On a random note, Davies car decided to die and had to be recovered by BMW... Think its been fixed now tho..
I was in luck tho, as that weekend also included the Kumho BMW championship! The M3s were incredible tho! The 2 top guys, all weekend were battling it out.
The M3s sounded incredible...
Winners of the biggest turbo/most torque...
Davie managed to pull 2nd in both races and fasted MK1 time of the weekend. With his he finished 3rd overall in his first year racing...
Over the last couple weeks, I also received the 2nd bucket seat, a set of bonnet catches, plastic door cards and an Xbrace.
First in was the 2nd bucket. Glad to have removed the OEM seat, as it weighed about 4 times (if not more) of the bucket.
I also removed the bottom of the centre console and the OBC. At the moment, the wiring is just tucked away as I need to get the dash out to remove the wiring from that and the interior lighting properly.

Finally got myself a dremel, because why not?

I fitted the door cards, using threaded rivets. I've got some black bolts coming just to make it abit more stealth.

One problem i do have, is closing the door as I have nothing to hold onto... So I have some door pulls on the way aswell.

She's staring to look like a real track car!

I set about removing the little bits of rust on the Xbrace and gave it a quick coat of paint.
I then tackled the bonnet catches. I partly got these due to my release catch starting to feel bait notchy while using and also #becasusetrackcar :wink:
However, I didnt realise until fitting that they were the underneath fitting, not the above fitting. But instead of sending them back, I fitted them anyway! I'm not afraid of people seeing my crap cutting skills!!


The latches had seen better days...

Finished!
I fitted the XBrace next. Alot of guides say you only need to use 4 nut sets to hold it in place, but to be safe i went with all 6 (there are 6 holes, so why not?)


Fitting the Xbrace literally took my 10mins to do, one of the easiest things I've done so far!
This week I finally have some Msport bumpers coming! So will be getting them and a couple other little bits fitted during the week.
One of the lads at work pointed out he couldn't really close the door... So I fitted a couple door pulls to make life easier!

Also picked up a replica (i think?) AC Schnitzner gear knob as mine was falling apart.

And so I don't need to hire, got myself a good fitting helmet from Merlin Motorport. I made a 140mile round trip, to get the helmet and size I thought I needed, just to be on the safe side with the fitting!

To finish the outside of the car (for the moment) I managed to pick up some M3 bumpers.

The bumper never came with cooling ducts and my original was missing a duct, so I used some duct tubing in place until I do the fog light duct to calliper cooling 'mod' to help.
The car was then ready for a 2nd track day. This time it was at a very local to me track, Llandow Circuit. It's not by any means a big track (averaged times of 50secs for myself) but it's still a track!

Chilling between sessions.


And a couple shots from the day.
I had the same tyres as i did for my 1st track day, a set of Nankang Ultrasport NS2s, with the rear being a new set since. However, on the day, they were crap. I'
After majority of sessions (between 15-20mins), my rear tyres were still cold. My fronts would have some heat, but not compared to the tyres of the cars around me. My back end was everywhere and i couldn't find any grip. I tried decreasing and increasing pressures, but nothing. My open diff also wasn't helping and I could feel my outside wheel spinning alot more than i did at Combe.
I also, was again let down by the EBC pads. As before, I never lost power or had any fade. But by the end of the day, I had no pads left. This time I know I wasn't dragging my brakes, as there was only 2 main braking points and 1 dab of brakes on the track. The 2 main were particularly heavy (105 to 30 in 100yards and 100 to 50 in 50 yards) and I did manage 8 sessions. But I was still surprised at how quick the pads wore down.

The pad fell off the backing when I removed it from the calliper. Speaking to Tommo on here in another thread, he reckons it's not having enough cooling going to the brake that's caused this, which I partially agree on. As I've already said, I know this is an area i need to address anyway.
I have another day at Brands Hatch on the 11th of Nov, with the possibility of doing Silverstone the day after. I don't really want to be going there wandering if my pads will last, or spending £120 (if i got yellowstuff again) in 2 days. I'm tempted to try the Pagid RS19 pads as they have great reviews.
So moving forward from the weekend. I've finally got a new clutch on the way. Lighweight flywheel and sachs clutch (from http://www.bigbavarianbeauties.com), Black powerflex LCA bushes and H&R anti roll bars arriving this week, so thats this weekends job sorted!
Also, having a harness bar fitted on friday, so i can finally get my harness in for my drivers seat. Also picking up a set of Team Dynamic wheels with Toyo R888s and an M3 3.0 LSD in the the next week aswell!
Last thing, not everything costs lots of money in this game! Managed to find some squares of wood at work and made myself some ramps to help lift the front end in 1 go!


it's the little things...
Well it's been a while since I've updated and i've done a fair amount again!
Got myself back upto BMW Dynamics https://www.facebook.com/pages/Bmw-Dynamics/530063... and Sean made up and fitted a harness bar. This allowed me to finally get my harness installed. Got to give it to Sean, his welding is top notch! When i finally get a cage, I'll be getting him to fit it for me!
(pic to follow)
Also picked up a set of Team Dynamic 1.2 rims with a set of Toyo R888 second hand. These were owned by a couple of older gents who race an E36 M3 and my god, she was a beauty, gutted i never took a pic, but i was talking to one of the owners for so long it completely slipped my mind.
(pic to follow)
17x9j
I then got my self lots of shiny things to play with.

H&R anti-roll bars (28mm, 21mm), Sachs clutch, lightweight solid flywheel (5.5kg), flywheel bolts (http://www.bigbavarianbeauties.com), LCA black bushes, UUC clutch stop, shifter bushes, clutch pedal bushes, millers engine oil and Redline gear and diff oil.
First was the Anti-roll bars. The front came off and went on easily enough. I also changed the drop links from the anti-roll to the LCA, to the BC racing supplied Anti-roll to strut, to help stiffen the front end.
I then went to attack the rear, but found majority of the bolts and jackets were rusted beyond help, so choose to leave the OEM for the moment and ordered all new bolts and brackets from BMW. This also gave me time to order rear drop link black bushes.
So, I attacked the LCA and replaced the old bush.

Firstly cut the old bush out...

Nice and clean.
And since I don't have a vice readily available to use, my foot became the vice!


All fitted.
Also got amongst my brake cooling. I cut the fog light surround into the normal brake ducting and slotted in a couple ducts that I picked up from Merlin. I ran the duct against the anti-roll and zip tied the end to the top of the disk just in front of the calliper.


The arch is a little messy as I was playing around with ways to run the ducting. The way I have it now, the wheel doesn't touch tho.

sitting pretty.
I have bought foglight deletes that I'm going to cut to fill the rest of the hole, just need to get round to doing it!
My plan was to fit the new clutch and flywheel myself (on jackstands...). Got under the car and it started to dawn on me just how much of a job this was going to be... A quick message to Sean at BMW Dynamics again and he'd be able to fit it the following week for me, along as i got my hands dirty and helped out (which I don't mind doing, as it means i'm learning)
Also picked up an M3 3.0 LSD from drjhill on here, cheers lad.
Then I seen a z3 1.9 steering rack on eBay, so picked that up aswell. Also got some new track rods to go with it.

When the rack arrived, it had a fair amount of surface rust on it, so I got amongst removing the rust and gave it a quick coat of black spray paint. Nothing fancy.

New rack top, old rack bottom. While removing the old rack, I had abit of a brain fart and removed the cooling pipe aswell as i forgot that Id be swapping that onto my new rack. Which meant I had to cut the old 'life long' jubilee clip that BMW use. This worked in my favour tho, as the jubilee clip had started to leak. I replaced it with a new, normal jubilee clip and the leak stopped, so I was happy.
I tried to keep my track rods at the same spacing as the original ones I took off, but the alignment was slightly out. I was getting full alignment done along with my rear wheel bearings, but to get me through the weekend, I thought I'd give some string alignment ago. I've never been taught how to do it, but was hovering around while someone else was before, so i had a rough idea on what to do.

It wasn't perfect, but I wasn't far off. I was more than happy with what I managed on my first attempt. I just need to practice it more and start learning toe in/out adjustments with it aswell. I'll buy a camber tool so I can start playing with camber aswell.
I booked my car in for the following week to have the rear wheel bearings done aswell. A job, i knew i wouldn't be able to do myself easily. So, I finally ordered myself some new rear adjustable camber arms from Turner Motorsport. Also ordered a stud set and a couple tow straps, as trying to get proper screw in ones in the Uk is nails...

I had looked at the drift works camber arms, but the quality just didn't seem to be there in them. The turner ones, along with the bolt on the tow straps, are quality pieces. They are also very light. Also, posted for the USA on the wednesday, in my hands friday morning... can't complain with that!

Some how we were lucky and most bolts came off easily, only having to heat up the exhaust bolts that connect to the manifold. Only 1 bolt in the gearbox housing snapped aswell and it was one of the lower and smaller ones.

New fly and bolts

New clutch fitted. The old clutch was pretty knackered with cracks appearing an burn marks from being ragged! It done well tho.

Nice shiny new camber arms fitted aswell.

Sean cutting my cat covers off as they had become loose and were rattling around.
Driving home after was an experience. The car takes off much quicker now and revs up and down much quicker, making downshifts better! The car also feels much more planted while accelerating hard. Cornering was completely different aswell. I was still getting used to the quicker rack and with the rear wheels locking slightly under cornering, I kept turning into corners far to early!
Dropped the car off on the Monday morning for rear wheel bearings and full alignment. My rear anti-roll bolts and brackets finally arrived so I picked them up.
Picked my car up and so was happy that the whirling from the rear had gone. As far as I'm aware, the rear bearings had never been done, so 17years isn't to bad.
I cut my old brackets and bolts off to save time and got amongst removing the drop link bushes.


Fitted new black bushes and got the rear anti-roll bar on.

All fitted.
I also took an arch roller to the arches. I was taking my time at first, but got bored, so just went mad on them. Managed to get some good roll onto the arches, so now I have no issues with my wheels rubbing.

With my track wheels on. I am going to drop the rear slightly aswell.
With the new anit-rolls the car felt amazing. Really stiff, but lots of grip. With it still being a daily drive this, it has made missing pot holes an absolute must... But its worth it! It will be off the road in hopefully by march when i can afford a new daily car.
A couple nights later, I went out for a quick spin. I started doing some hard starts to see how the car was feeling. After a few I heard abit of a clunk from the rear end, then what sounded like bolts rubbing. I slowly took it back to camp and jacked it up. After making sure it wasn't my wheels rubbing, I checked the diff. I had snapped the front diff bolt.

I wasn't a happy chappy. I tried with what I had to get the rest of the bolt out of the casing, but there was no way. After a quick discussion with Sean (think I may aswell move into his unit permanently...) I got the drill out and with the help of ones of the lads at work, drilled it out with the aim of fitting a new casing a few days later. To temporally get me through, we used a nut and bolt to hold the diff in place. Unfortunately the only bolts we had we long enough, but not thick enough to fill the hole we drilled, but it done its job. The diff still knocked slightly if I ragged it, which meant a weekend of driving like a gran.
A quick oil change, using Millers 5-40W oil and filter change and I headed up to Peterborough.
While I was getting the diff casing replaced, I took the opportunely to replace the diff bushes with black bushes.

From here I went straight down to Brands Hatch for another track day on the tuesday.
Woke up tuesday morning (the 11th) to blue sky and dry ground, couldn't be happier!
Got to Brands and quickly got amongst swapping my wheels to my track wheels. I was happy with my and the cars performance. I was annoying a few M3s and happy passing a few more. I kept trying to jump onto the back of another Kumho M3, which helped with line and braking.
Having the 888s along with all the stiffening i had done, really helped the car. I was getting grip where I know i wouldn't have before and was alot more confident in the corners.
Around half way through the day, I did get fuel surge on the final corner. Speaking to a couple other E36s that were there, they were all getting the same in the same place, which put me at ease.
I only had 1 'moment' of the day and that was going through paddock hill bend (the 1st corner) but I managed to control the slide, kept it straight and kept it out the gravel.


Looking at the photos from outside, I'm happy with the way the car is sitting through the corners with only a little bit of lean to the front.
http://youtu.be/s8xYSeWfXZk - a couple clean laps at the end of the day. Most of the day I was averaging 58.5secs round the track, which I was happy with.
The brake ducts made a massive difference and I only used half of my pads (still using yellows) over 165miles of track time. Thank you Tommo for recommending sorting the cooling out.
After I finished Brands, I headed up to Silverstone for another track day the day after!
Woke up on the Wednesday morning and it was soaking and heavily overcast!
Rocking up to the track, it was completely different to the other days I've done. There where a few brit car teams, caterham, radicals and a few other teams... It was also ran by RMA who run their days slightly different with the regards of overtaking. With them, if you can get past you go (unless someone is turning in for their apex), no waiting around for invitations etc.

The 'paddock'.

Managed to get myself a garage to keep out the rain...

It was that wet...
A quick swap to brand new front pads (just to be safe) and i was ready.
Having never been on the track, things were going to be interesting. I had also booked 2 half hour tuition sessions. Luckily, my 1st session was straight away, so my first laps on track were with an instructor who showed me the wet lines and got me up to a decent pace.
Silverstone, when went, is horrible (in a good way). The back end was very very loose. It all lead to a slide off the track going through vale (which is notoriously slide when wet).
a quick video of my 'moments' from the day - http://youtu.be/fNRlAb9MbFA
The slide off at vale was completely my fault. As I started to try balance the throttle, for some reason i snapped off the accelerator, which span the car round. The 3rd, was because I tried to follow the Seat race car and he has far more downforce/grip than I do.
The result of my slide off at Vale.


I was sure I was going to have bent/broken something due sliding through the row of stones sideways, but luckily there was no damage, just lots of stones stuck in the tyre and under my car. I managed to get all the stones out and cleaned out all the stones and I was good to go after lunch again!
However, by the end of the day, I was getting more and more confident. I was slightly out braking alot of the catechism and lotus's that were there (even managed to out brake a clip cup car!).
heres a clean lap, that lotus couldn't pull anymore of a gap on me... - http://youtu.be/xRUrCPhxdTE
The car performed flawlessly on another 175miles of track time. Something is a little bit loose in the front end, but was good enough to drive home with.
From the 2 days, I'm a little bit worried about the oil temp getting up to high, so after ready Foxys journal and stealing some ideas, I'm in the process of gather the bits to fit an oil temp/pressure gauge, an oil cooler and a proper temperature gauge.
I'm down at Headley court for 3 weeks from the middle of this week, so I'm hoping to get a day at Brands and possibly Snetterton within the next few weeks!
I've also been considering upgrading the front brakes. I think I'm at the limit of where I can brake with them (still running OEM calipars, OEM discs, OEM hoses with ATF blue fluid and yellowstuff pads). I haven't had any fade, but I know I could be braking later with something with abit more power. I have been thinking of getting groved discs and braided lines, but also condsidering 330mm K Sport 8 pot brakes up front... decisions, decisions...
fter thinking about it, I went with my second decision of upgrading what I have. Going to order new discs and pagid pads this week, already got braided hoses on the way.
So, I finally 'finished' my brake ducts. Not the prettiest, but who cares? I bought foglight deletes and cut them of behind the ducts and simply bolted them in place.
I also added an extra duct running to below the air filter. I know it won't add masses of air, but extra cold air is better than nothing. Plus, it looks cool...


All fitted!
I then started gathering bits for my next venture with the car.
First, I picked up a new dashboard

It was tan colour and the lad looked at me with a funny look when I told him it was going in my car...
Well, I dropped it with The Flock Shop and collected it a week later (yesterday!)


Only cost me £90 to have done aswell...

Managed to pick this lot up for the low sum of £250... My plan was to fit new black bushes to the subframe, so finding this, I couldn't say no.
Thats a powder coated subframe, spring cups, callipers (new seals fitted aswell) with brackets and RTA brackets, new bushes in the spring cup/subframe joint and new bushes for my rear hubs. All brand new bolts, unused. I also got a spare set (although unpainted, which i will get done before fitting) RTA.
The lad did have polybushes already fitted to go onto his project car, but i'm going with power flex black where I can, so i have a set of them on the way.

Since I'm tracking, I want to keep my temps in check and after reading f0xys blog, I'm fitting an M3 oil filter housing so i can run a cooler. I have pretty much copied f0xys way of fitting as finding a better guide online is almost impossible. So in that collection i have an innovate gauge (I did look at the others, but as with f0xys, being able to set the temperature and also the way everything is displayed, i also prefer), a local 13row cooler and hose and fittings from Torques Uk. I have a filter housing on the way and I'm also looking at installing an aftermarket water gauge. But before i order anything, I've got a bit of reading to do to make sure I know where and how I'm going to fit that for best use.
I also picked up some solid rubber engine mounts and new exhaust mounts as mine were shot. I considered solid engine mounts, but with that, i know I'll need to get some strengthening done aswell, so the rubber will be more than good enough for the moment.
Because I'm at Headley Court on a 'spine rehab course' at the moment, I've only fitted the engine and exhaust mounts.

My old engine mounts compared to a new one.
However, the best thing I've bought and fitted to the car was this;


Makes life so much nicer and keeps my lap and legs bit dryer!

How it's looking now.
I was going to wait until the 27th Dec for my next track day (donnington) but I cannot wait that long! So, I'm currently in south wales to collect all my 'track equipment' so I can do a day at Snetterton next weekend.
Everything I've bought and waiting to arrive will be fitted my 1st week of xmas leave (from the 13th onwards).
The short list is as follows;
[list]fit new dash
cut down wiring loom
remove digital heating and fit manual heater box and controls
fit oil filter housing
fit oil cooler
fit oil sensors
swap rear subframe
and other bits and bobs[/list]
Going to be a busy week that one!
Ok here goes.
Alot of the information I've gained, is from f0xy - http://www.bmwowner.com/forum/viewtopic.php?f=26&a... However, I'm adding links to where I bought things from to help everyone.
Oil filter housing from an e36 M3
If you have an M52 engine, you will need spacers between the PAS pump and the filter housing. However, an M50 PAS pump (according to F0xy) is the same as an M3, or buy an M3 PAS pump so it's a straight bolt on.
If running OEM lines from the housing to the cooler, get them.
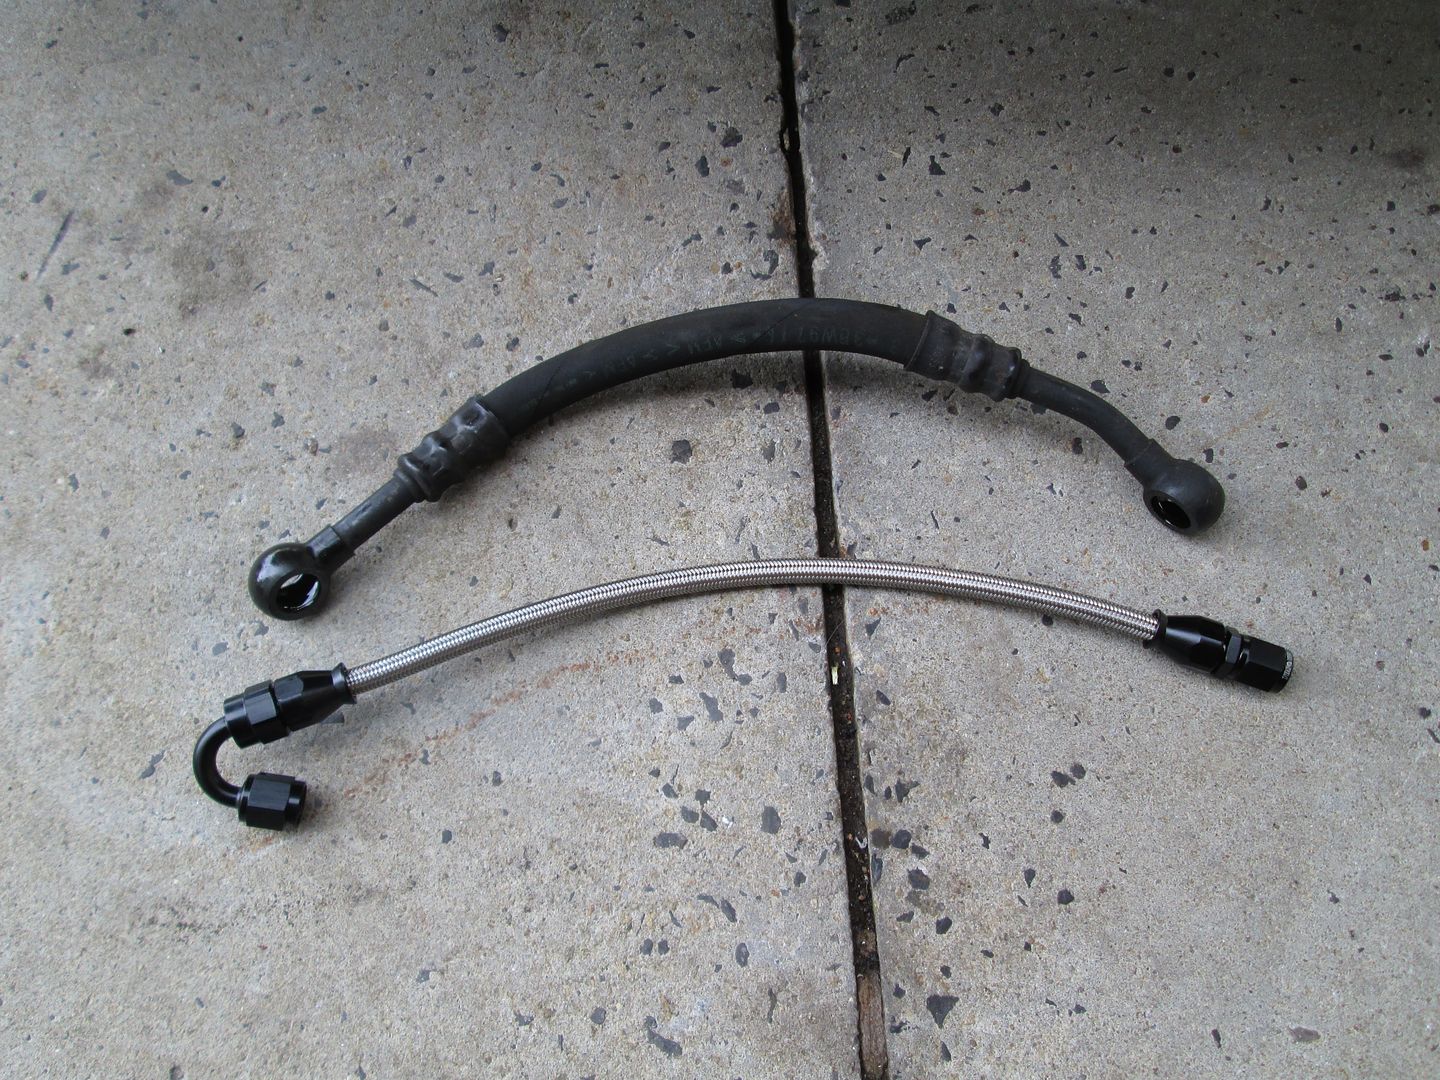
If you want to run braided, you need an AN10 adaptor - http://www.ebay.co.uk/itm/BMW-E36-Euro-E82-E9X-135...
30degree (f0xy showed why in his thread) AN10 connectors (attached to filter housing) -
Braided hose, an10 - http://www.ebay.co.uk/itm/10-AN10-Stainless-Braide...
AN10 connector for cooler (which ever degree you decide to mount the cooler etc) - http://stores.ebay.co.uk/Torques-U-K/AN-10-FastFlo...
Oil cooler - What ever you want really... I've went with a Mocal, 13row, 10 JIC (iirc) which takes the an10 connector.
So thats the cooler done.
For oil pressure/temp gauge.
Again, i've taken f0xys approach.
the innovate gauge - http://shop.grahamgoode.com/mtx-d-innovate-motorsp...
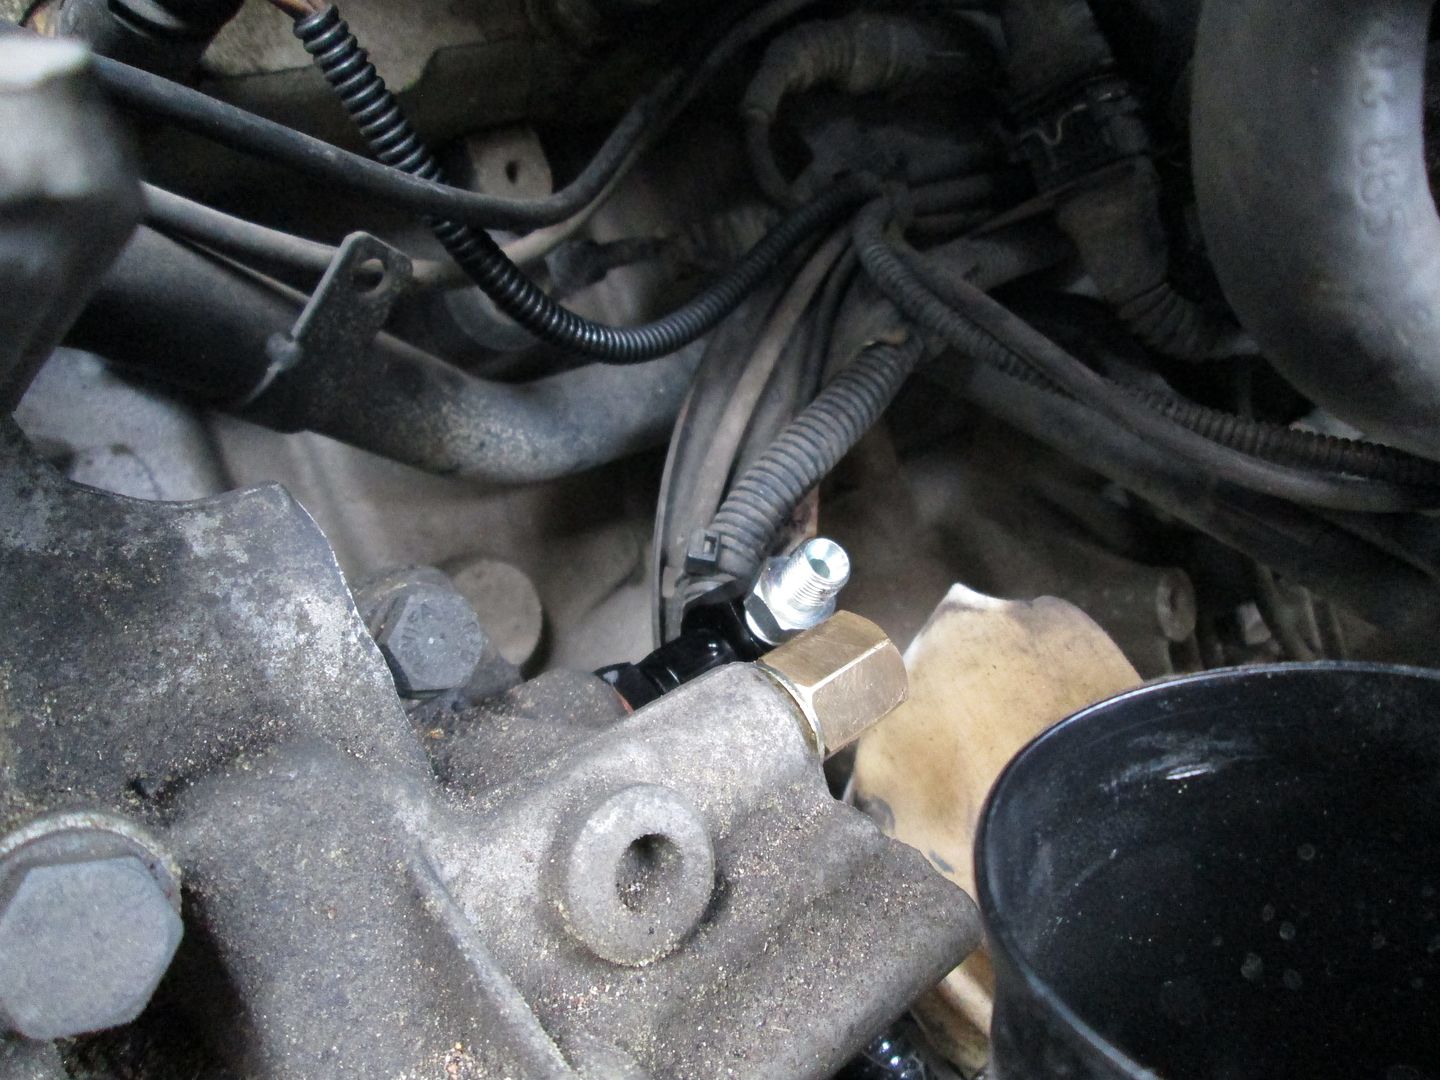
So, I am fitting the pressure gauge onto the vans line from the filter housing. So we need to replace the vanos line;
M12x1.5 to an4 adapter (m14 if you're using the standard filter housing)- http://www.ebay.co.uk/itm/4-AN4-4AN-M12x1-5-Metric...
An4 with 1/8NPT take off adapter - http://www.ebay.co.uk/itm/4-AN4-Male-Female-Union-...
An4 120 degree fitting - http://www.ebay.co.uk/itm/AN-4-AN4-BLACK-JIC-120-D...
braided hose an4 - http://www.ebay.co.uk/itm/AN-4-4AN-3-16-Stainless-...
AN4 - m14 banjo - http://www.ebay.co.uk/itm/4-AN4-04-14-5mm-Eye-Banj...
Now, you can screw the pressure sensor into the an4 - 1/8npt take off, or add a male 1/8npt - male AN4 adapter (http://www.ebay.co.uk/itm/4-AN4-04-1-8-NPT-Straight-Adapter-Stainless-Steel-/380654654824?pt=UK_CarsParts_Vehicles_CarParts_SM&hash=item58a0c91568), then using a AN4 straight connector (http://www.ebay.co.uk/itm/4-AN4-STRAIGHT-Stealth-Black-Teflon-Hose-Fitting-/160541138205?pt=UK_CarsParts_Vehicles_CarParts_SM&hash=item2560ff5d1d) - braided hose - an4 connector, you can remote the pressure gauge.
The temp sensor, you can either go with the same point as foxy (and where I'm going aswell) or into the sump. either way, both are the same thread.
For this, you need a M12x1.5 to 1/8npt adapter - http://automech-uk.com/index.php?page=shop.product...
For the temp sensor, i bought a few and used the smallest adapter so i can get the sensor properly into the oil stream without disturbing.
Some pics (thanks foxy ) to help;
The replacement vanos line.
In the background,
M12x1.5 to an4 adapter ---> An4 with 1/8NPT take off adapter (with 1/8npt to an4 adapter fitted)
m12x1.5 adapter at front.
When I do mine in next weekend, I'll take pics and number them to help with identifying.
So, in the run up to Snetteron, I tried to get my brakes sorted. No-where had any paid RS29s instock, so I'm on back order for them. To do me tho, I ordered new front discs, EBC ultimax groved discs and a set of EBC blues (needed a set to do the day anyway...)

So, Snetterton happened. My girlfriend also came along (was her first ever track day) and she even drove!
The day started off rather frosty and slidey in most places but as the day went on, it started to dry out and alot more grip appeared. The Mrs managed 2 sessions and I 6.
Now, before we got there, i bedded the brakes in (high speed hard stops, cool off, few times etc) but I'm not convinced by the pads. Even with lots of heat in them, they always felt as if the ABS was fighting and I wasn't slowing quick enough... In my opinion the yellows were much better than the blues... Can't wait for the Pagids now!
As the day was going on, I started having some steering issues. Going thro 2 fast left handers, my steering was feeling as if it was locking up. I checked what I thought was all the usual things (pump, rack, wheels for rubbing) and couldn't find anything wrong. However, 2 days later when I had time, i quickly checked under the bonnet and noticed this.

So new mounts were ordered. I also ordered new poly transmission mounts while I was at it.
Also, at Snetterton, mid right hand corner, this happened.

So Autoglass are coming out to replace it this weekend.
So, new mounts arrived, I jacked the car up, propped the engine and popped the offending mount out.

Well then, that certainly is interesting isn't it...
And the new transmission mounts, from here - http://www.ebay.co.uk/itm/191391698749

The mounts changed the feel of the car. There is alot more vibration in 1st and 2nd gear, but when travelling at speed, the car feels and changes gear alot smoother than it did before. It might be in my head, but it defiantly feels as if the power is being put down alot firmer aswell.
So, thats it for the moment. I've also booked the car in for the 2nd week of January to have a full custom cage installed and uprated front subframe bar fitted!
Got myself back upto BMW Dynamics https://www.facebook.com/pages/Bmw-Dynamics/530063... and Sean made up and fitted a harness bar. This allowed me to finally get my harness installed. Got to give it to Sean, his welding is top notch! When i finally get a cage, I'll be getting him to fit it for me!
(pic to follow)
Also picked up a set of Team Dynamic 1.2 rims with a set of Toyo R888 second hand. These were owned by a couple of older gents who race an E36 M3 and my god, she was a beauty, gutted i never took a pic, but i was talking to one of the owners for so long it completely slipped my mind.
(pic to follow)
17x9j
I then got my self lots of shiny things to play with.

H&R anti-roll bars (28mm, 21mm), Sachs clutch, lightweight solid flywheel (5.5kg), flywheel bolts (http://www.bigbavarianbeauties.com), LCA black bushes, UUC clutch stop, shifter bushes, clutch pedal bushes, millers engine oil and Redline gear and diff oil.
First was the Anti-roll bars. The front came off and went on easily enough. I also changed the drop links from the anti-roll to the LCA, to the BC racing supplied Anti-roll to strut, to help stiffen the front end.
I then went to attack the rear, but found majority of the bolts and jackets were rusted beyond help, so choose to leave the OEM for the moment and ordered all new bolts and brackets from BMW. This also gave me time to order rear drop link black bushes.
So, I attacked the LCA and replaced the old bush.

Firstly cut the old bush out...

Nice and clean.
And since I don't have a vice readily available to use, my foot became the vice!


All fitted.
Also got amongst my brake cooling. I cut the fog light surround into the normal brake ducting and slotted in a couple ducts that I picked up from Merlin. I ran the duct against the anti-roll and zip tied the end to the top of the disk just in front of the calliper.


The arch is a little messy as I was playing around with ways to run the ducting. The way I have it now, the wheel doesn't touch tho.

sitting pretty.
I have bought foglight deletes that I'm going to cut to fill the rest of the hole, just need to get round to doing it!
My plan was to fit the new clutch and flywheel myself (on jackstands...). Got under the car and it started to dawn on me just how much of a job this was going to be... A quick message to Sean at BMW Dynamics again and he'd be able to fit it the following week for me, along as i got my hands dirty and helped out (which I don't mind doing, as it means i'm learning)
Also picked up an M3 3.0 LSD from drjhill on here, cheers lad.
Then I seen a z3 1.9 steering rack on eBay, so picked that up aswell. Also got some new track rods to go with it.

When the rack arrived, it had a fair amount of surface rust on it, so I got amongst removing the rust and gave it a quick coat of black spray paint. Nothing fancy.

New rack top, old rack bottom. While removing the old rack, I had abit of a brain fart and removed the cooling pipe aswell as i forgot that Id be swapping that onto my new rack. Which meant I had to cut the old 'life long' jubilee clip that BMW use. This worked in my favour tho, as the jubilee clip had started to leak. I replaced it with a new, normal jubilee clip and the leak stopped, so I was happy.
I tried to keep my track rods at the same spacing as the original ones I took off, but the alignment was slightly out. I was getting full alignment done along with my rear wheel bearings, but to get me through the weekend, I thought I'd give some string alignment ago. I've never been taught how to do it, but was hovering around while someone else was before, so i had a rough idea on what to do.

It wasn't perfect, but I wasn't far off. I was more than happy with what I managed on my first attempt. I just need to practice it more and start learning toe in/out adjustments with it aswell. I'll buy a camber tool so I can start playing with camber aswell.
I booked my car in for the following week to have the rear wheel bearings done aswell. A job, i knew i wouldn't be able to do myself easily. So, I finally ordered myself some new rear adjustable camber arms from Turner Motorsport. Also ordered a stud set and a couple tow straps, as trying to get proper screw in ones in the Uk is nails...

I had looked at the drift works camber arms, but the quality just didn't seem to be there in them. The turner ones, along with the bolt on the tow straps, are quality pieces. They are also very light. Also, posted for the USA on the wednesday, in my hands friday morning... can't complain with that!

- becauseracecar
Some how we were lucky and most bolts came off easily, only having to heat up the exhaust bolts that connect to the manifold. Only 1 bolt in the gearbox housing snapped aswell and it was one of the lower and smaller ones.

New fly and bolts

New clutch fitted. The old clutch was pretty knackered with cracks appearing an burn marks from being ragged! It done well tho.

Nice shiny new camber arms fitted aswell.

Sean cutting my cat covers off as they had become loose and were rattling around.
Driving home after was an experience. The car takes off much quicker now and revs up and down much quicker, making downshifts better! The car also feels much more planted while accelerating hard. Cornering was completely different aswell. I was still getting used to the quicker rack and with the rear wheels locking slightly under cornering, I kept turning into corners far to early!
Dropped the car off on the Monday morning for rear wheel bearings and full alignment. My rear anti-roll bolts and brackets finally arrived so I picked them up.
Picked my car up and so was happy that the whirling from the rear had gone. As far as I'm aware, the rear bearings had never been done, so 17years isn't to bad.
I cut my old brackets and bolts off to save time and got amongst removing the drop link bushes.


Fitted new black bushes and got the rear anti-roll bar on.

All fitted.
I also took an arch roller to the arches. I was taking my time at first, but got bored, so just went mad on them. Managed to get some good roll onto the arches, so now I have no issues with my wheels rubbing.

With my track wheels on. I am going to drop the rear slightly aswell.
With the new anit-rolls the car felt amazing. Really stiff, but lots of grip. With it still being a daily drive this, it has made missing pot holes an absolute must... But its worth it! It will be off the road in hopefully by march when i can afford a new daily car.
A couple nights later, I went out for a quick spin. I started doing some hard starts to see how the car was feeling. After a few I heard abit of a clunk from the rear end, then what sounded like bolts rubbing. I slowly took it back to camp and jacked it up. After making sure it wasn't my wheels rubbing, I checked the diff. I had snapped the front diff bolt.

I wasn't a happy chappy. I tried with what I had to get the rest of the bolt out of the casing, but there was no way. After a quick discussion with Sean (think I may aswell move into his unit permanently...) I got the drill out and with the help of ones of the lads at work, drilled it out with the aim of fitting a new casing a few days later. To temporally get me through, we used a nut and bolt to hold the diff in place. Unfortunately the only bolts we had we long enough, but not thick enough to fill the hole we drilled, but it done its job. The diff still knocked slightly if I ragged it, which meant a weekend of driving like a gran.
A quick oil change, using Millers 5-40W oil and filter change and I headed up to Peterborough.
While I was getting the diff casing replaced, I took the opportunely to replace the diff bushes with black bushes.

From here I went straight down to Brands Hatch for another track day on the tuesday.
Woke up tuesday morning (the 11th) to blue sky and dry ground, couldn't be happier!
Got to Brands and quickly got amongst swapping my wheels to my track wheels. I was happy with my and the cars performance. I was annoying a few M3s and happy passing a few more. I kept trying to jump onto the back of another Kumho M3, which helped with line and braking.
Having the 888s along with all the stiffening i had done, really helped the car. I was getting grip where I know i wouldn't have before and was alot more confident in the corners.
Around half way through the day, I did get fuel surge on the final corner. Speaking to a couple other E36s that were there, they were all getting the same in the same place, which put me at ease.
I only had 1 'moment' of the day and that was going through paddock hill bend (the 1st corner) but I managed to control the slide, kept it straight and kept it out the gravel.


Looking at the photos from outside, I'm happy with the way the car is sitting through the corners with only a little bit of lean to the front.
http://youtu.be/s8xYSeWfXZk - a couple clean laps at the end of the day. Most of the day I was averaging 58.5secs round the track, which I was happy with.
The brake ducts made a massive difference and I only used half of my pads (still using yellows) over 165miles of track time. Thank you Tommo for recommending sorting the cooling out.
After I finished Brands, I headed up to Silverstone for another track day the day after!
Woke up on the Wednesday morning and it was soaking and heavily overcast!
Rocking up to the track, it was completely different to the other days I've done. There where a few brit car teams, caterham, radicals and a few other teams... It was also ran by RMA who run their days slightly different with the regards of overtaking. With them, if you can get past you go (unless someone is turning in for their apex), no waiting around for invitations etc.

The 'paddock'.

Managed to get myself a garage to keep out the rain...

It was that wet...
A quick swap to brand new front pads (just to be safe) and i was ready.
Having never been on the track, things were going to be interesting. I had also booked 2 half hour tuition sessions. Luckily, my 1st session was straight away, so my first laps on track were with an instructor who showed me the wet lines and got me up to a decent pace.
Silverstone, when went, is horrible (in a good way). The back end was very very loose. It all lead to a slide off the track going through vale (which is notoriously slide when wet).
a quick video of my 'moments' from the day - http://youtu.be/fNRlAb9MbFA
The slide off at vale was completely my fault. As I started to try balance the throttle, for some reason i snapped off the accelerator, which span the car round. The 3rd, was because I tried to follow the Seat race car and he has far more downforce/grip than I do.
The result of my slide off at Vale.


I was sure I was going to have bent/broken something due sliding through the row of stones sideways, but luckily there was no damage, just lots of stones stuck in the tyre and under my car. I managed to get all the stones out and cleaned out all the stones and I was good to go after lunch again!
However, by the end of the day, I was getting more and more confident. I was slightly out braking alot of the catechism and lotus's that were there (even managed to out brake a clip cup car!).
heres a clean lap, that lotus couldn't pull anymore of a gap on me... - http://youtu.be/xRUrCPhxdTE
The car performed flawlessly on another 175miles of track time. Something is a little bit loose in the front end, but was good enough to drive home with.
From the 2 days, I'm a little bit worried about the oil temp getting up to high, so after ready Foxys journal and stealing some ideas, I'm in the process of gather the bits to fit an oil temp/pressure gauge, an oil cooler and a proper temperature gauge.
I'm down at Headley court for 3 weeks from the middle of this week, so I'm hoping to get a day at Brands and possibly Snetterton within the next few weeks!
I've also been considering upgrading the front brakes. I think I'm at the limit of where I can brake with them (still running OEM calipars, OEM discs, OEM hoses with ATF blue fluid and yellowstuff pads). I haven't had any fade, but I know I could be braking later with something with abit more power. I have been thinking of getting groved discs and braided lines, but also condsidering 330mm K Sport 8 pot brakes up front... decisions, decisions...
fter thinking about it, I went with my second decision of upgrading what I have. Going to order new discs and pagid pads this week, already got braided hoses on the way.
So, I finally 'finished' my brake ducts. Not the prettiest, but who cares? I bought foglight deletes and cut them of behind the ducts and simply bolted them in place.
I also added an extra duct running to below the air filter. I know it won't add masses of air, but extra cold air is better than nothing. Plus, it looks cool...


All fitted!
I then started gathering bits for my next venture with the car.
First, I picked up a new dashboard

It was tan colour and the lad looked at me with a funny look when I told him it was going in my car...
Well, I dropped it with The Flock Shop and collected it a week later (yesterday!)


Only cost me £90 to have done aswell...

Managed to pick this lot up for the low sum of £250... My plan was to fit new black bushes to the subframe, so finding this, I couldn't say no.
Thats a powder coated subframe, spring cups, callipers (new seals fitted aswell) with brackets and RTA brackets, new bushes in the spring cup/subframe joint and new bushes for my rear hubs. All brand new bolts, unused. I also got a spare set (although unpainted, which i will get done before fitting) RTA.
The lad did have polybushes already fitted to go onto his project car, but i'm going with power flex black where I can, so i have a set of them on the way.

Since I'm tracking, I want to keep my temps in check and after reading f0xys blog, I'm fitting an M3 oil filter housing so i can run a cooler. I have pretty much copied f0xys way of fitting as finding a better guide online is almost impossible. So in that collection i have an innovate gauge (I did look at the others, but as with f0xys, being able to set the temperature and also the way everything is displayed, i also prefer), a local 13row cooler and hose and fittings from Torques Uk. I have a filter housing on the way and I'm also looking at installing an aftermarket water gauge. But before i order anything, I've got a bit of reading to do to make sure I know where and how I'm going to fit that for best use.
I also picked up some solid rubber engine mounts and new exhaust mounts as mine were shot. I considered solid engine mounts, but with that, i know I'll need to get some strengthening done aswell, so the rubber will be more than good enough for the moment.
Because I'm at Headley Court on a 'spine rehab course' at the moment, I've only fitted the engine and exhaust mounts.

My old engine mounts compared to a new one.
However, the best thing I've bought and fitted to the car was this;


Makes life so much nicer and keeps my lap and legs bit dryer!

How it's looking now.
I was going to wait until the 27th Dec for my next track day (donnington) but I cannot wait that long! So, I'm currently in south wales to collect all my 'track equipment' so I can do a day at Snetterton next weekend.
Everything I've bought and waiting to arrive will be fitted my 1st week of xmas leave (from the 13th onwards).
The short list is as follows;
[list]fit new dash
cut down wiring loom
remove digital heating and fit manual heater box and controls
fit oil filter housing
fit oil cooler
fit oil sensors
swap rear subframe
and other bits and bobs[/list]
Going to be a busy week that one!
Ok here goes.
Alot of the information I've gained, is from f0xy - http://www.bmwowner.com/forum/viewtopic.php?f=26&a... However, I'm adding links to where I bought things from to help everyone.
Oil filter housing from an e36 M3
If you have an M52 engine, you will need spacers between the PAS pump and the filter housing. However, an M50 PAS pump (according to F0xy) is the same as an M3, or buy an M3 PAS pump so it's a straight bolt on.
If running OEM lines from the housing to the cooler, get them.
If you want to run braided, you need an AN10 adaptor - http://www.ebay.co.uk/itm/BMW-E36-Euro-E82-E9X-135...
30degree (f0xy showed why in his thread) AN10 connectors (attached to filter housing) -
Braided hose, an10 - http://www.ebay.co.uk/itm/10-AN10-Stainless-Braide...
AN10 connector for cooler (which ever degree you decide to mount the cooler etc) - http://stores.ebay.co.uk/Torques-U-K/AN-10-FastFlo...
Oil cooler - What ever you want really... I've went with a Mocal, 13row, 10 JIC (iirc) which takes the an10 connector.
So thats the cooler done.
For oil pressure/temp gauge.
Again, i've taken f0xys approach.
the innovate gauge - http://shop.grahamgoode.com/mtx-d-innovate-motorsp...
So, I am fitting the pressure gauge onto the vans line from the filter housing. So we need to replace the vanos line;
M12x1.5 to an4 adapter (m14 if you're using the standard filter housing)- http://www.ebay.co.uk/itm/4-AN4-4AN-M12x1-5-Metric...
An4 with 1/8NPT take off adapter - http://www.ebay.co.uk/itm/4-AN4-Male-Female-Union-...
An4 120 degree fitting - http://www.ebay.co.uk/itm/AN-4-AN4-BLACK-JIC-120-D...
braided hose an4 - http://www.ebay.co.uk/itm/AN-4-4AN-3-16-Stainless-...
AN4 - m14 banjo - http://www.ebay.co.uk/itm/4-AN4-04-14-5mm-Eye-Banj...
Now, you can screw the pressure sensor into the an4 - 1/8npt take off, or add a male 1/8npt - male AN4 adapter (http://www.ebay.co.uk/itm/4-AN4-04-1-8-NPT-Straight-Adapter-Stainless-Steel-/380654654824?pt=UK_CarsParts_Vehicles_CarParts_SM&hash=item58a0c91568), then using a AN4 straight connector (http://www.ebay.co.uk/itm/4-AN4-STRAIGHT-Stealth-Black-Teflon-Hose-Fitting-/160541138205?pt=UK_CarsParts_Vehicles_CarParts_SM&hash=item2560ff5d1d) - braided hose - an4 connector, you can remote the pressure gauge.
The temp sensor, you can either go with the same point as foxy (and where I'm going aswell) or into the sump. either way, both are the same thread.
For this, you need a M12x1.5 to 1/8npt adapter - http://automech-uk.com/index.php?page=shop.product...
For the temp sensor, i bought a few and used the smallest adapter so i can get the sensor properly into the oil stream without disturbing.
Some pics (thanks foxy
) to help;The replacement vanos line.
In the background,
M12x1.5 to an4 adapter ---> An4 with 1/8NPT take off adapter (with 1/8npt to an4 adapter fitted)
m12x1.5 adapter at front.
When I do mine in next weekend, I'll take pics and number them to help with identifying.
So, in the run up to Snetteron, I tried to get my brakes sorted. No-where had any paid RS29s instock, so I'm on back order for them. To do me tho, I ordered new front discs, EBC ultimax groved discs and a set of EBC blues (needed a set to do the day anyway...)

So, Snetterton happened. My girlfriend also came along (was her first ever track day) and she even drove!
The day started off rather frosty and slidey in most places but as the day went on, it started to dry out and alot more grip appeared. The Mrs managed 2 sessions and I 6.
Now, before we got there, i bedded the brakes in (high speed hard stops, cool off, few times etc) but I'm not convinced by the pads. Even with lots of heat in them, they always felt as if the ABS was fighting and I wasn't slowing quick enough... In my opinion the yellows were much better than the blues... Can't wait for the Pagids now!
As the day was going on, I started having some steering issues. Going thro 2 fast left handers, my steering was feeling as if it was locking up. I checked what I thought was all the usual things (pump, rack, wheels for rubbing) and couldn't find anything wrong. However, 2 days later when I had time, i quickly checked under the bonnet and noticed this.

So new mounts were ordered. I also ordered new poly transmission mounts while I was at it.
Also, at Snetterton, mid right hand corner, this happened.

So Autoglass are coming out to replace it this weekend.
So, new mounts arrived, I jacked the car up, propped the engine and popped the offending mount out.

Well then, that certainly is interesting isn't it...
And the new transmission mounts, from here - http://www.ebay.co.uk/itm/191391698749

The mounts changed the feel of the car. There is alot more vibration in 1st and 2nd gear, but when travelling at speed, the car feels and changes gear alot smoother than it did before. It might be in my head, but it defiantly feels as if the power is being put down alot firmer aswell.
So, thats it for the moment. I've also booked the car in for the 2nd week of January to have a full custom cage installed and uprated front subframe bar fitted!
So, last Friday (12th dec), Mission Motorsport had abit of an Xmas present for us with a day at Donington Park. The day was predominately a day of being driven in and driving 'supercars' that they brought along (R8s, Porsche GT3 and a turbo, a Vantage, a Maserati, a Lambo, a couple caterhams and their own MX-5 race car). However, they were happy for us to use our own cars on track.
During the saftey brief, it came quickly obvious that I was the only one planning on really taking my car on the track... So I managed to use it as a normal track day for myself!
The morning started off very damp and most corners were outrageously slippy. Which did mean for some good fun sliding now that I'm used to the LSD. As the day went on, the 'race' line dryer out. I was catching alot of the cars, mainly due to most of the drivers having never been on a track before and they were driving a car that wasn't theirs.
One of the instructors did bring his 58plate, 420bhp M3 onto the track during my last session which gave a good little race. I managed to catch and pass him. After that, he was all over me on the straights (unsurprisingly) but going through the corners, his car just couldn't grip where mine was. His main point to me was going through Craner Curves. I was going 115mph+ with him following, as I turned for the left, i was powering, where he had to brake to keep on his line. As i was doing this, my front near side wheel was off the ground (in the video, its at 5min). All in, it was a awesome day and going through Craner Curves at full tilt is something else...
Video from the day - http://youtu.be/8ZTugse0mls?list=UUfVTdiJ14U7e_sMv...
So following on from that, I'm not on leave. My 1st week off was devoted to doing work on the car. The main thing was remove the AC, cut down the wiring loom as much as I could, at oil temp/pressure and water gauges, change oil filter housing and fit oil cooler. If I had time, I also wanted to change the rear subframe and fit the rear black bushes and also fit my braided brake lines.
1st thing I did was remove the AC. I was worried it was going to be a hard task, but was pleasantly surprised at how easy it was.

All that weight gone...
I removed the AC pump and the belt tensioner, but had to leave the last bracket on as both bolts are behind the crank. I'll get it another time.

Stupid bolts!
I had planned on running the Aux fan as stand-alone on a switch, but I hadn't considered it's size and with an Oil cooler, I wouldn't be able to fit the Aux fan and cooler. So a quick eBay buy with next day delivery and I had a 14" electric fan on it's way.
Next thing for me, was inside the car. I've already cut wiring out before, but never anything from behind the dashboard. I had thought about swapping the heater for a manual heater for 2 reasons. 1, getting rid of lots of wiring, 2, I've realized my heater matrix is leaking and thats where I'm loosing fluid. Quickly speaking to Sean at BMW Dynamics, when he's fitting my cage, he'll be removing the windscreen, so perfect time to fit a heater windscreen, so I'm having that done instead.

I removed the dash, then started getting into the wiring.

Most of the wiring I was removing was from the OBC, interior lights and other comforts I no-longer have. I didn't go as far as pulling anything out of the fusebox, just to the harnesses before you get to the fusebox.
As i've never done this before, I'm not going to lie, it was bloody stressful. I'm sure it could have been done alot quicker that I did, but it's all a learning process.
I broke the day up by removing my sunroof.


Again, all that weight...
So in it's place I had a fibreglass/carbon skin delete. I bought it from here - http://www.ebay.co.uk/itm/381073926502

It was a straight fit and fit in snug aswell. The holes were pre-drilled for the holes where the sunroof used to mount, so it only took 10mins to remove the old sunroof and fit the delete. I haven't used any sealeant yet, to make it easier for Sean when he is fitting the cage.


After that, I got back to the wiring loom. Once I had removed all the wiring I wanted/could, I got about fitting my gauges and the the wiring for it. I used the remote switch wire for the radio to power the gauges and the constant power wire for my fan. So the fan is on it's own circuit with a fuse in the fusebox.
Finally I finished and tidied up the wiring and fitted my dash back in.

My new and old dashes.

ooooo, flocked...

All the wiring I removed from behind the dash.
My fan arrived so I got that fitted. My plan was to run to metal strips across the front of my radiator and fit the fan to that, buuuuuuut my grinder died before I could get the strips finished. With no-way to get anywhere to get strips or a new grinder (as i think, i may be the only person camp...), I choose to mount the fan in a slighly crap way. I want to change the radiator for an alloy one in a few months away, so I got about sticking some cable-ties through the radiator...


I know, it's horrible, but it's only for a couple months.
Because I still have my heating, I only have a radio blanking plate to mount my hazard light switch, electric window switches, fan switch and gauges. Because of this, I got some small toggle switches from maplin and swapped the hazard and window switches over.

My 'control panel'.
Day 3 and I finally got back under the bonnet. I set about removing the manifold, alternator and oil filter housing.


M3 filter housing (thermostat removed so it's 'open' all the time. New bolts, gasket and filter.

All fitted. My plan was to fit an M50 PAS pump to avoid having to space the PAS pump out, but the one I bought uses 2 hard lines, where as the one on my car had 1 hard, 1 flex hose. So with no-way to connect the new PAS pump to the reservoir (the seller of the pump had cut the pipe), I used a 15mm spacer to keep the pulleys all in-line.
My water temp gauge, I decided to fit it straight in the head of the engine. The throttle body coolant pipes use an M12x1.5 thread, so with an adaptor in place to 1/8NPT, i had a mounting point.

The TB coolant pipe take off.

My water temp sensor fitted (middle) and oil temp sensor fitted (lower left).
The other side of the TB coolant pipes is a flexi pipe in to a small hard pipe. I cut the flexi back as far as I could, then screwed in an old sump plug (just bigger than the pipes inner width) coated in silicone gasket and tightened a jubilee clip around it.

Nice and tight and doesn't leak!
Next was the oil cooler. I sorted out the hose lengths and figured out the routing of the hoses. Straight away the alternator cooling duct and the heat shield was going to be in the way, so I cut a nice hole in the bottom of the heat shield to feed the hoses through and cut the top of the alternator cooling duct back.


I mounted the oil cooler to slam panel. I will get a couple brackets for the bottom, but it's not moving or going anywhere with the 2 bolts holding it on at the moment.

With everything mounted, I put everything else back together and started the car up. Quickly realised i hadn't tightened the oil cooler pipes on the cooler end and my pressure sensor was leaking. Tightened the cooler pipes and went to tighten the pressure sensor. It was then obvious that the connector had stripped it's threads. I then took the decision and mounted the pressure sensor on the take off adaptor on the oil filter housing.

Once everything was tight and secure, I ran the engine up to running temp, gave it some big revs then checked everything over. I was happy to see that NOTHING was leaking, happy days!

Everything I removed from the car. All that weight...
I finally removed the last of the sound deadening aswell from the drivers side of the car.


Although I've still got to remove the residue.
And how it looked all finished on the inside

I never got round to doing the rear bushes or the brake lines, so they will be done next week hopefully.

Thanks lads! It's good to know I'm not just talking to blank wall
Humour, funnily, it was after reading your thread, that made me decide to bring mine here aswell...
Ye, the BBK was an option, but as you pointed out, the bias would be off which was off putting. I also did have a few people say to me how good the OEM system is with a few choice changes and the fact that I havn't had any issues with them, there was no-need for a BBk yet...
Regarding the ABS, I've never really felt it kick-in on track and as you'll read in this update, it's probably coming out soon anyway.
I really like the look of them solid sliders. I'm going to give the front brakes a rebuild within the next month (since I've just fitted a recently rebuilt rear set) and I'll probably get the sliders at the same time (I'm going to order a fuel starvation kit from BW aswell, as I keep getting fuel starvation on fast right handers on track).
As a car in general, I love it. It handles so well and gives me so much confidence when pushing on track. The handful of spins I've had, have all been my fault (well, I am the driver) but i know why i spun. It's never been something the car has done, just been down to my lack of practice/skill. But with each spin, I learn what the car can/can't/won't do for me. Marjoity of my 'changes' have been to help with the handling. The fact that I managed to go through craners curves at Doninington (check my last update for the video) at over 115mph, with a passenger, and pull away from a 58plate m3...
I'll be heading over to Bedford at some point, so I'm sure I'll see you around!
Anyway...
Well, I bought myself an Xmas gift in the form of an OMP front strut brace.
Since I'm getting the cage fitted and already have the X-Brace, I felt it was a good investment to help stop any flex.

After Xmas day, I headed back to camp for a few days to get some more stuff down to the car. The aim was swap the subframe and fit my braided brake lines.
I set about doing the subframe swap first. The few days before, I read as many DIYs as I could to make sure I was happy. The main problem I was having, was majority of DIYs go on about dropping the RTAs aswell, but since I still need to get my spare set powder coated, I wasn't dropping mine.
So, I jacked the car as high as I could to give myself some space and set about undoing what I needed to under the car.


I was surprised/relieved to find that it was alot simpler than I thought it would be. Majority if the bolts came out easily, with only the OS spring cup - RTA being a arse to remove, but I eventually got it off by hammering a 17mm socket (it started life as a 18mm nut and bolt).

New subframe top, with Powerflex Black bushes, and all new bolts! The only old bolts I hard to reuse where for the Lower control arms/camber arms since they are aftermarket (but they are rather new anyway).

And to give an idea of the condition of the old subframe bushes, but they are 17years old...

Going back in... I've got to say, it was a proper pain to get the driveshafts between the lower and upper camber arms, I can see why people just remove the full thing...


All back on and torqued up properly!
The RTA will be replaced by mid-january. Hopefully getting them to the powdercoaters next week.

Yep, defo need to replace those bushes aswell...
Also quickly removed my instrument cluster and took out all but a few bulbs.

Although, just released I never took the dummy oil pressure bulb out...
I then set about fitting my braided hoses and powder coated rear pads.
The rear brakelines came off easily, so i fitted my new ones and the new callipers that I had.
I then went to do the fronts and the only one that hadn't seized when i replaced the hoses back in August, has seized. I couldn't be bothered cutting and flaring my brake line today, so I stopped there. I bled the rears, gave them a good squeeze and went for a blast.
Even tho I havn't done the RTAs yet, the car feels much stiffer and more responsive already (could be a placebo effect...). Even with my really crap road tyres on, it feels like the rear end is trying to come underneath the car when I floor it...
Next major thing is the cage. One problem Sean has pointed out, is the brake booster being in the way (as the cage is going all the way to the front struts). We had discussed a smaller booster, but I had already talked about getting a pedal box, as left foot braking is a killer with the positioning of the OEM pedals.
This would also mean removing the ABS, but from reading alot of peoples opinions, the E36 ABS isn't the best on the track. I'm going to drive around the next few days with the ABS relay removed to see how I get along (I know it's not track, but I don't have that option before she goes in for the cage...)
So, it's looking like the ABS will also be coming out, along with the fitting of a pedal box...
AM7 - thank you!
I have no noise or chatter from the flywheel/clutch. I do have some, that i assume, is gearbox noise from a bearing going. I've had no vibration either. Even with my AC going, I had no problems.
I had looked at getting the E20 flywheel, but getting it skimmed, changing the started etc etc, I didn't see a point. Plus that fly that i got form bigbavarianbeauties was lighter!
Evo - thank you aswell, words like that are appreciated. I have had a few people say/ask/tell me that I should have just bought a fully prept track/race car, but I wouldn't have learnt how to change/maintain the car myself.
Although I'm not a mechanic, I'm brave enough to get my hands dirty. I've been lucky to have good mates who had been happy to help and teach me. Youtube and finding good DIYs online have also been a great help. The sense of pride from doing it myself then noticing the improvements on track make it all worth while.
lloyd - not a problem lad!
BGarside - the induction kit gives a lovely noise, properly barks at the top of the rev range!
The BBT, there was a definite improvement in how quickly the car revs up. I havn't had it remapped since fitting, so it just has the 'M50 manifold map'. I want to take the car to a proper dyno and have it mapped properly once I've finished all my little bits and bobs.
The X-brace, again i noticed an improvement with the stiffness in the front end. Where it felt before that, especially on bumpy roads, that each side of the front end moved separately, it feels like the front end moves 'as one' now, if that makes sense. Did it make a massive improvement on track? Id say so, but wether or not thats a placebo effect or not is another question...
SebringMan - The lower arms I fitted with the car in the air, but everything was still in place. All we did was push the bottom of the wheel away from the car, given us enough room to get the arm on.
Funnily, I have a set of Pagid RS29s sat waiting to get fitted. Im going to put them on before my next day (looking like the 12th of Feb atm). They were alot more expensive (for fronts, ebc yellows £65, Pagid Rs29 £215 :| ), but they should last longer and give me better braking, so hopefully they'll be worth it!
Humour - Ye, I'll be fitting the RTAs hopefully as soon as i pick it back up from getting the cage fitted in a couple weeks. Hopefully get them off to the powdercoaters next week all going well!
F0xy is the one whose been given me lot of the ideas (look at his thread and you'll see why!). The only time the oil has went into the yellow on my gauge (so above 100degrees) was sat in traffic for ages and not moving...
My oil filter has the thermostat removed so the oil flows through the cooler constantly.
Well I want to get to Bedford soon, failing that, I can take the all the bits with me to swindon if you're close by and you can have it for peanuts!
After most track days, I was changing my oil, as it smelt, well rather burnt if Im honest. So I'm hoping the cooler will stop that!
Ferosferio - cheers lad! appreciated!
Anyway, it's been another busy week for the car... (surprise surprise)
Since the car is going in on sunday to get it's cage fitted, I decided to remove the heating now to get it out of the way.
Firstly, I removed the manifold and quickly figured out how I wanted to loop the coolant hoses that go thro the bulkhead. I nipped to pirtek and grab a foot of ¾ hose and a ¾ brass bard. Disconnected the pipes leading into the heater valve (I didn't drain the coolant before hand so I had to make sure the hoses constantly pointed upwards!!) and cut and shutted the hoses together.

Before

After
Because the pipes you want to connect to run in parallel, you need 180degree, which is bloody hard with pipes that aren't preformed in such a tight space. As you can see, it has caused abit kinking. Straight away I wasn't happy. Although this won't affect the coolant, as when the heater is off, no coolant flows this way, having free flowing pipes can only be better than not. So I was back on eBay and i've purchased 2x 90degree silicone pipes and a alloy connector. I havn't went with a 180 degree pipe as trying to find one that was wide enough to get to both connections was like rocking horses t.
t.
After that, I removed the heater valve and the pipes going into the bulkhead.
Everytime I've taken the manifold off, I've always noticed it had a slight coating of oil on the inside. Until now, i always thought this was normal... After doing abit of research, I know it really shouldn't... I know if I replaced and repositioned the CCV (the m50 conversion kit leaves it hanging around), it would probably sit it, but thats boring! So i've got a catch can on the way...
I also removed the charcoal canistor while I had everything off. The manifold connection had already broken (for the 2nd time), so I plugged it off on the manifold itself.

Airtight!
I still need to re-route the fuel tank vent away from the engine bay, but it's not causing any issues. I know some people leave the purge valve solenoid connected when doing this delete, but I've taken mine off and the car hasn't given me any issues (haven't plugged it in yet to see if there are any codes tho...)

So, with the heating disconnected, I removed the dash, again. Removing the matrix was a pain in the ass, because i didn't bloody disconnect the aircon pipe thats in the bulkhead itself. Not going to lie, took my about 30mins to realise!

All that weight saving...
The one problem with removing the heating, is the big old hole that gets left in the bulkhead!

So something had to be done.
After my grinder died trying to make the radiator mounts, I bought myself a jigsaw and straight away I wish i had done so sooner!

I quickly got the rough shape then painted it black. Using the the heater matrix mounts and a bead of sealant around the edges, I got it fitted.


All that space underneath the dash now.
I knew I was going to have to buy a plate to fit in the dash to cover the holes and also for fitting my switches...
After thinking and speaking to Sean (BMW dynamics) he reassured me I there was no-reason I couldn't make my own, and if it went pear shaped, I could buy one from him! (think he was trying to keep the list of things he has to do to my car as short as he can...)

Template was made!

And cut out in the 2mm alloy sheet I had! It's not a perfect fit, but I made it, and I'm proud that I done it. The fact that I done it with a jigsaw and a dremel, on a normal table, can't be put down!
To hold it on place, I've screwed 2 brackets into the inside of the dash and fitted them with 2 threaded rivets. I had considered having the brackets tabbed onto the plate, but that would make removing it a ballache, and with this way, it's easy to get to the back and sort any problems.

Holes drilled and painted black! Now to start fitting my guages/switches...

Started fitting. Its bit rough not, but once I've fitted all the swtichies, I'll dismantle it again and properly paint it.
The oil temp guide, I've got the gauge set up so it stays green until 100deg, yellow to 120deg and then red...
This weekend is the big one, car is going in for a full custom cage!
The BBT, there was a definite improvement in how quickly the car revs up. I havn't had it remapped since fitting, so it just has the 'M50 manifold map'. I want to take the car to a proper dyno and have it mapped properly once I've finished all my little bits and bobs.
The X-brace, again i noticed an improvement with the stiffness in the front end. Where it felt before that, especially on bumpy roads, that each side of the front end moved separately, it feels like the front end moves 'as one' now, if that makes sense. Did it make a massive improvement on track? Id say so, but wether or not thats a placebo effect or not is another question...
SebringMan - The lower arms I fitted with the car in the air, but everything was still in place. All we did was push the bottom of the wheel away from the car, given us enough room to get the arm on.
Funnily, I have a set of Pagid RS29s sat waiting to get fitted. Im going to put them on before my next day (looking like the 12th of Feb atm). They were alot more expensive (for fronts, ebc yellows £65, Pagid Rs29 £215 :| ), but they should last longer and give me better braking, so hopefully they'll be worth it!
Humour - Ye, I'll be fitting the RTAs hopefully as soon as i pick it back up from getting the cage fitted in a couple weeks. Hopefully get them off to the powdercoaters next week all going well!
F0xy is the one whose been given me lot of the ideas (look at his thread and you'll see why!). The only time the oil has went into the yellow on my gauge (so above 100degrees) was sat in traffic for ages and not moving...
My oil filter has the thermostat removed so the oil flows through the cooler constantly.
Well I want to get to Bedford soon, failing that, I can take the all the bits with me to swindon if you're close by and you can have it for peanuts!
After most track days, I was changing my oil, as it smelt, well rather burnt if Im honest. So I'm hoping the cooler will stop that!
Ferosferio - cheers lad! appreciated!
Anyway, it's been another busy week for the car... (surprise surprise)
Since the car is going in on sunday to get it's cage fitted, I decided to remove the heating now to get it out of the way.
Firstly, I removed the manifold and quickly figured out how I wanted to loop the coolant hoses that go thro the bulkhead. I nipped to pirtek and grab a foot of ¾ hose and a ¾ brass bard. Disconnected the pipes leading into the heater valve (I didn't drain the coolant before hand so I had to make sure the hoses constantly pointed upwards!!) and cut and shutted the hoses together.

Before

After
Because the pipes you want to connect to run in parallel, you need 180degree, which is bloody hard with pipes that aren't preformed in such a tight space. As you can see, it has caused abit kinking. Straight away I wasn't happy. Although this won't affect the coolant, as when the heater is off, no coolant flows this way, having free flowing pipes can only be better than not. So I was back on eBay and i've purchased 2x 90degree silicone pipes and a alloy connector. I havn't went with a 180 degree pipe as trying to find one that was wide enough to get to both connections was like rocking horses
t.After that, I removed the heater valve and the pipes going into the bulkhead.
Everytime I've taken the manifold off, I've always noticed it had a slight coating of oil on the inside. Until now, i always thought this was normal... After doing abit of research, I know it really shouldn't... I know if I replaced and repositioned the CCV (the m50 conversion kit leaves it hanging around), it would probably sit it, but thats boring! So i've got a catch can on the way...
I also removed the charcoal canistor while I had everything off. The manifold connection had already broken (for the 2nd time), so I plugged it off on the manifold itself.

Airtight!
I still need to re-route the fuel tank vent away from the engine bay, but it's not causing any issues. I know some people leave the purge valve solenoid connected when doing this delete, but I've taken mine off and the car hasn't given me any issues (haven't plugged it in yet to see if there are any codes tho...)

So, with the heating disconnected, I removed the dash, again. Removing the matrix was a pain in the ass, because i didn't bloody disconnect the aircon pipe thats in the bulkhead itself. Not going to lie, took my about 30mins to realise!

All that weight saving...
The one problem with removing the heating, is the big old hole that gets left in the bulkhead!

So something had to be done.
After my grinder died trying to make the radiator mounts, I bought myself a jigsaw and straight away I wish i had done so sooner!

I quickly got the rough shape then painted it black. Using the the heater matrix mounts and a bead of sealant around the edges, I got it fitted.


All that space underneath the dash now.
I knew I was going to have to buy a plate to fit in the dash to cover the holes and also for fitting my switches...
After thinking and speaking to Sean (BMW dynamics) he reassured me I there was no-reason I couldn't make my own, and if it went pear shaped, I could buy one from him! (think he was trying to keep the list of things he has to do to my car as short as he can...)

Template was made!

And cut out in the 2mm alloy sheet I had! It's not a perfect fit, but I made it, and I'm proud that I done it. The fact that I done it with a jigsaw and a dremel, on a normal table, can't be put down!
To hold it on place, I've screwed 2 brackets into the inside of the dash and fitted them with 2 threaded rivets. I had considered having the brackets tabbed onto the plate, but that would make removing it a ballache, and with this way, it's easy to get to the back and sort any problems.

Holes drilled and painted black! Now to start fitting my guages/switches...

Started fitting. Its bit rough not, but once I've fitted all the swtichies, I'll dismantle it again and properly paint it.
The oil temp guide, I've got the gauge set up so it stays green until 100deg, yellow to 120deg and then red...
This weekend is the big one, car is going in for a full custom cage!
Edited by brian394 on Friday 9th January 01:22
Cheers lads!
Humour - What you're saying shouldn't happen. Once the coolant has been through the heater matrix it goes back to the radiator, not back into the head. I looked through lots of different builds and spoke to as many people as I could and it was between the block off option or the loop way. I spoke to a few of the kumho bmw championship drivers (including one at autosport yesterday) and the ones I have spoke to have looped the system and not had any problems with overheating.
The oil changing, I know the oil could have lasted longer, but the amount of crap that was coming out the first few times after being driven hard, made sense to change. Now that everything is better/cleaner/cooler, I'm going to be changing a lot less now. I was using castrol and now millers, always been 5/40wt. Next change, which will probably be in the middle of the year, I'll go 10/50.
Sebring - being a military person, I've always been taught, there's no such thing as bad wether, just bad clothing choice ?? and I'm fitting a heated screen so I won't have to worry about the windscreen steaming up, and I'll treat the other windows with de-fog to help stop them fogging up.
Well, I dropped the car off with Sean today. To help get him started we stripped out what he needed gone from the interior (so everything) and the braking system from inside the engine bay (brake servo and and system).
This is how she looked when we left;

He's got her for 2 weeks and the an is;
Full custom cage from front struts to diff carrier.
Strengthened front and rear subframes.
Pedal box and some lines re done.
Heated front screen!
cannot wait to get it back...
Edited by brian394 on Thursday 15th January 21:39
Humour - Ye, I'm happy. If the kumho guys can get away with it... Majority of things I've done to the car, I've sat up until stupid o'clock in the morning searching and asking to make sure what I was doing was the correct thing.
Regarding the cage, they are always fitted for 2 reasons. 1)saving you're ass in an impact, 2) stiffening the car up more than you'll ever want! I can't wait to go back to the tracks I've already been on and see how quick I can push it now...
As for Sean, his current Facebook page is - https://www.facebook.com/pages/Bmw-Dynamics/530063... personal - https://www.facebook.com/sean.chapman.5496?fref=ts... I'm posting pics of his work in this post. His welding skills alone are top notch and how tight he's managed to make the cage in the car is not to be overlooked... This cage, and pedal box fitted, is costing around £1800...
I'll send you a message.
BG - I'm unsure of the m50 TB is bigger than the M52. Obviously if it is, it'll have less of a change than if it's the same. But the noise from the CAI is lovely, especially with the scorpion box...
As for weight, the car comes off the line, with a tank of fuel around 1450kg. When i had it weighed when getting the alignment done originally, it was done at 1240kg (with a full tank). That was still with the OEM passenger seat and ALOT more interior than I have now. I recon it's around the 1100kgish mark as it sits, if not abit lighter. Put it this way, when I fill the tank I can REALLY feel the difference...
Well, while I'm here, I thought I'd give you all an update on how the car is going with Sean.
So, after I helped him strip the car down, he got amongst prepping for the install, deciding how to mount and where to run everything.

Front legs

Rather clean welding...

Mounting box in place in the back

Rear subframe reinforments arrived. Sean had already built me up a front reinforced subframe, which he fitted (never got any pics tho...). Upon removing the front subframe, he did find the beginnings of cracks, so I'm happy he's done that.

Mounts and boxes ready to fit


All done. Happily, the rear wasn't cracked and had no signs of it beginning to go either.

Doors off...

As the tubing arrives.

Main hoop and door


Tight like a tiger...

Top cross and dash bar


Where he's fitting the harness bar for me.
Edited by brian394 on Thursday 15th January 22:16
So, a little bit more of Seans work so far.
One thing about me, is I'm in the Army. There was an accident a few years back which left me with a shattered femur. This left my femur 1.5inches shorter than it was (yes, most people have different sized legs, but to suddenly loose it when you're 21...). I went back to afghan in 2012, and with the limp/hips not level, my back gave up and the discs have started going. This has left me with back pain majority of the time. I'm currently waiting on a medical discharge as i can no longer run without the pain becoming unbearable...
With this in mind, and me not even thinking to ask him to do it, Sean has fitted my door bars slightly lower than usual to allow me getting in and out of the car a hell of a lot easier for me!

As Sean said to me "business can be personal".

Some rather neat welding. Sean is waiting on gussets to arrive for the door bars that he's going to weld on aswell.


Dash cut and back in.

Cage dropped back down so he could weld the top after making sure everything fits.

How he's going through the bulkhead and onto the front struts.

How she's looking ATM.
One thing that I've been thinking, is my OWN personal safety. After seeing videos and the fact the FIA are going to make Hans devices mandatory in all sanctioned races, I picked one up at the autosport show last week.

I never bought one of the fancy carbon ones, just the basic one. Safely wise, exactly the same as the ones over a grand, just abit heavier.
I also have a new Schroth Profi-2 6 point harness on the way. My old one will go onto the passenger as this one has thinner straps for the hans device.
Getting excited....
Edited by brian394 on Sunday 18th January 22:35
So, as the cage progressed Sean kept sending me pics, teasing me...

He was planning to go to the front and rear diff mounts for the pickup points, but was finding getting to the front tricky and with it being his first full cage, I was happy for him to only do the rears.


Got to love the attention to detail he has gone into for the gusseting, why? because why not...
Car was then pushed round the corner to his local 'painter'.

Sean has used him in the past and he's been painting for years, but he must have been having an off night as the paint job was rather crap! Now, it wasn't an expensive job, but it's not the point. He's missed parts of the cage, painted bits of the shell that were masked off before hand and pritty much covered the entire car in lacquer over spray. Now, it's not the end of the world for me, as looks aren't the most important bit, but still wasn't ideal.

Now that was masked off around the foot plate before painting...
Anyway, the car was picked back up and Sean got amongst re-doing my brake lines and fitting the pedal box.
Ideally, i wanted the pedal box against the transmission tunnel, but that wasn't going to work as the pedal box would have ended up sitting under the steering wheel, which I would have then needed to extend the steering column...

So the pedal box was fitted and the accelerator ended up in pretty much the same place.

My reservoirs were fitted in the same place as the old brake booster to make bleeding access easy.
He ran the rear brake lines along the inside of the car and also the clutch line across the top of the tunnel.


We bled the clutch and brakes with ATE racing fluid and the feel is brilliant! Nice and solid with no air! Getting the brake bias setup is being a pain tho. I've got the rear MC wound pretty much all the way in and the fronts all the way out. But, my rears are still locking just before the fronts (think the rear might be to light...)
And how she looked as we left. Since i've taken my heating and box out, de-misting my window would be a ballache, so i bought a heated screen from http://www.heatedwindscreen.com. Wiring it up is simple, if you order the correct relays. I stupidly ordered 'normally closed', so it would be in constant power, when you need 'normally open', so atm it wasn't compeltey wired in, so a quick coating of anti-fog in the mean time!


There was only a couple small problems to come from all this, is my speedo no-longer works. We have ran a wire from the clocks to the ECU to give the impression that the ABS speed sensor is still there, but still nothing. The next, one of my RTA bolts on my N/S has snapped (looking at it, it's not a new break, so i know Sean didn't do it) and on the O/S someone has previously snapped a bolt, drilled into the snapped bolt and tapped a thread into it.
Next night, I took the manifold off (again) to replace the coolant re-direct pipes i had previously fitted. When i fitted them, they had a slight kink, but the heat as helped and they weren't as kinked now.

I still replaced them as the barb was leaking slightly from the OEM pipe (the left hand side) being slightly to0 big to get a good fitment.

Not the best pic, but it's alot smoother, so shouldn't restrict any water flow and doesn't leak!
At this point, i also removed my CCV. I gave my ICV a quick clean and re routed the hoses for that. The ICV is now on it's own, coming from under the manifold and back onto the throttle body boot. I ran a length of oil hose from the crank case to a catch can fitted on the old charcoal canister mount. The CCV ran a closed system, so the old, hot air from the CC went back into the air intake and the oil back into the dipstick.
That no-longer happens, the catch can, does as it says, and catches the oil (although I need to add some filter on the inside to help catch more oil) and the air vents to atmosphere. I also sealed off the dipstick inlet.


After fitting everything back on, i realised the filter on top was in the way of the MAF, so it was promptly cut off. I do need to run a length of piping under the car as the all the fumes are being pushed into the cab while driving.
I then took her in for her MOT.


Now, the MOTer was on the friendly side, apart from one bolt being broken on the RTA, he couldn't pick anything up. Everything works, no rust holes etc etc... Every other comment was along the lines of 'wow, this has had so much work done to it', especially when he was under the car doing his checks. Needless to say, it passed with no advisories.
She's booked in for this week to Avia Autos -https://www.facebook.com/aviaautos?ref=ts&fref=ts - to have the bolts properly extracted and he's going to fit my new RTA bushes while he's there, and full wheel alignment and corner weighting.
Next track day should be the 12th of Feb at Silverstone and the 14th of Feb at Oulton Park....
And a few pics outside to show the cage and cars current state better.


Edited by brian394 on Sunday 1st February 19:00
Edited by brian394 on Monday 2nd February 10:41
Humour - The pedal box is different, but i've quickly adapted to it. The having no ABS or brake booster was 'different' but again, I'm used to it because I still use it as a daily (I know...). The same goes for the no heating thing. I've got the heated windscreen, so i don't have to worry about that misting up and if i'm cold, i just put on another layer!.
Also, got this little lot waiting for you now. Will need to arrange a weekend soon for you to come and get it all!

So, the 1st thing I did this week was drop the car of at Avia to have the RTA bolts sorted and bushes replaced. Immediately, they decided it would be easier to completely cut the top hats out and weld in a new set.
Speaking to the lad who owned the car before me, he had taken it to Imperial Tyres in Swindon for tyres and alignment. After getting it back, he heard a knocking, had a look and noticed a snapped bolt on the O/S RTA. He took it back and told them to fix it. What he didn't know, was they had snapped a bolt on the O/S and the N/S. Instead of extracting the broken bolts, they drilled into the snapped bolts and tapped a thread. 'Professional'.
Since then, the N/S bolt had snapped off and it's obvious why, it wasn't straight in the slightest!

So, Avia machined up new topmast and welded them in. They also fitted my black RTA bushes and poly bushes onto the hub. The car also had full wheel alignment again and feels so good now.
Also had a nice parcel containing Polycarb windows arrive from http://www.templarperformance.co.uk and bought window struts from http://www.amspeed.co.uk.


So, I got into the door, cut out the window motors and crash bars, removed the glass and slid the Poly window in. I drilled holes in the same mounting points in the same place that the glass has and fitted it back onto the old rail. I drilled a hole in the rail and fitted a nut and bolt to stop the window dropping down. Using the window struts is enough to keep the window in place and also pull them against the seal, so they don't flap around.

I did tidy the metal up, then re-fitted my door cards along with the door handles.
pic -


Each window weighs less than half of the original glass ones (as far as i can workout by holding them, didn't have a scale to hand). I didn't do the rear as I didn't have any wire or the tools to cut the bond, but I've found someone in Bridgend who'll do it cheap for me.
I then moved onto the brakes. I was finding my rear end locking up, so I bought a bigger bore'd master cylinder to take some pressure off. This was fitted and the rear brakes bled.
While I was doing the rears, I finally fitted my pagid RS29s (fitted the fronts aswell). I also cut the dust shields off the rear brakes to help aid cooling.


Next on the list was finally getting my alloy thermostat housing fitted. I've been running the plastic one and although it isn't leaking, I know it's a known weakspot.
So the coolant was drained.

New and old thermostat housings.

I've used around 75% coolant and 25% water, instead of the usual 50/50 to try help pull some heat away when on track. But I still used BMWs own coolant.
Since removing the heating, i've been meaning to cut the wiring back. What started off as a 'i'll just tidy the wiring up', turned into a 'how much do i actually need'.

This is how much wiring I had as i started (this is the 4th time i've cut the wiring back).

Another few KGs of weight lost.
I also, gained some confidence and got amongst the fuse box, removing relays and wiring from inside the box that I no longer need. I'm sure i can remove a few more, which i will at some point.

The 2 relays outside of the box (bottom of the pic) are for the windscreen.
And how it looks under the glove box.

The white 'module' is for the window washers and i still need to figure out what else is connected to the relay before removing it.
Because my rear window was bonded, as i said before, I opted to not remove it myself. Luckily, there's a company nearby in bridgend who were willing to do it for £40 cash...
So early monday morning, I headed over. Watching a fully grown welsh man squeeze into the back of my car was amusing, but once in, he had the screen out in less than 5mins!

The new screen was then bonded in and left to set.


I then removed this 'spring', which was my steering lock. I know its a very very very small chance of happening, but at least this elimtates the chance of my steering lock kicking in. Plus, I want to get rid of the ignition barrel when I move my fuse box and re-do my wiring next month, so I won't need the key at all.
Finally got round to re-routing the catch can vent hose. Since I had it venting into the engine bay, all the fumes were being pushed into the car and making for a sometimes unpleasant ride. I bought an oil hose and routed it under the car. simple.


Also, since I use a bluetooth speaker for when I'm driving, i bought/made and phone mount to hold the phone during driving, and can also be used for 'lap times' when needed.
I copied Tommos idea, with an exhaust hanger, piece of alloy and an iPhone holder.

Perfectly placed if I need to see, but also in line to see on my gopro. Even if its just showing my speed, I can tell if I'm going too fast/slow.
Then just finished giving her a quick wash before heading to Silverstone in the morning!

Also, got this little lot waiting for you now. Will need to arrange a weekend soon for you to come and get it all!

So, the 1st thing I did this week was drop the car of at Avia to have the RTA bolts sorted and bushes replaced. Immediately, they decided it would be easier to completely cut the top hats out and weld in a new set.
Speaking to the lad who owned the car before me, he had taken it to Imperial Tyres in Swindon for tyres and alignment. After getting it back, he heard a knocking, had a look and noticed a snapped bolt on the O/S RTA. He took it back and told them to fix it. What he didn't know, was they had snapped a bolt on the O/S and the N/S. Instead of extracting the broken bolts, they drilled into the snapped bolts and tapped a thread. 'Professional'.
Since then, the N/S bolt had snapped off and it's obvious why, it wasn't straight in the slightest!

So, Avia machined up new topmast and welded them in. They also fitted my black RTA bushes and poly bushes onto the hub. The car also had full wheel alignment again and feels so good now.
Also had a nice parcel containing Polycarb windows arrive from http://www.templarperformance.co.uk and bought window struts from http://www.amspeed.co.uk.


So, I got into the door, cut out the window motors and crash bars, removed the glass and slid the Poly window in. I drilled holes in the same mounting points in the same place that the glass has and fitted it back onto the old rail. I drilled a hole in the rail and fitted a nut and bolt to stop the window dropping down. Using the window struts is enough to keep the window in place and also pull them against the seal, so they don't flap around.

I did tidy the metal up, then re-fitted my door cards along with the door handles.
pic -

- racecar

Each window weighs less than half of the original glass ones (as far as i can workout by holding them, didn't have a scale to hand). I didn't do the rear as I didn't have any wire or the tools to cut the bond, but I've found someone in Bridgend who'll do it cheap for me.
I then moved onto the brakes. I was finding my rear end locking up, so I bought a bigger bore'd master cylinder to take some pressure off. This was fitted and the rear brakes bled.
While I was doing the rears, I finally fitted my pagid RS29s (fitted the fronts aswell). I also cut the dust shields off the rear brakes to help aid cooling.


Next on the list was finally getting my alloy thermostat housing fitted. I've been running the plastic one and although it isn't leaking, I know it's a known weakspot.
So the coolant was drained.

New and old thermostat housings.

I've used around 75% coolant and 25% water, instead of the usual 50/50 to try help pull some heat away when on track. But I still used BMWs own coolant.
Since removing the heating, i've been meaning to cut the wiring back. What started off as a 'i'll just tidy the wiring up', turned into a 'how much do i actually need'.

This is how much wiring I had as i started (this is the 4th time i've cut the wiring back).

Another few KGs of weight lost.
I also, gained some confidence and got amongst the fuse box, removing relays and wiring from inside the box that I no longer need. I'm sure i can remove a few more, which i will at some point.

The 2 relays outside of the box (bottom of the pic) are for the windscreen.
And how it looks under the glove box.

The white 'module' is for the window washers and i still need to figure out what else is connected to the relay before removing it.
Because my rear window was bonded, as i said before, I opted to not remove it myself. Luckily, there's a company nearby in bridgend who were willing to do it for £40 cash...
So early monday morning, I headed over. Watching a fully grown welsh man squeeze into the back of my car was amusing, but once in, he had the screen out in less than 5mins!

The new screen was then bonded in and left to set.


I then removed this 'spring', which was my steering lock. I know its a very very very small chance of happening, but at least this elimtates the chance of my steering lock kicking in. Plus, I want to get rid of the ignition barrel when I move my fuse box and re-do my wiring next month, so I won't need the key at all.
Finally got round to re-routing the catch can vent hose. Since I had it venting into the engine bay, all the fumes were being pushed into the car and making for a sometimes unpleasant ride. I bought an oil hose and routed it under the car. simple.


Also, since I use a bluetooth speaker for when I'm driving, i bought/made and phone mount to hold the phone during driving, and can also be used for 'lap times' when needed.
I copied Tommos idea, with an exhaust hanger, piece of alloy and an iPhone holder.

Perfectly placed if I need to see, but also in line to see on my gopro. Even if its just showing my speed, I can tell if I'm going too fast/slow.
Then just finished giving her a quick wash before heading to Silverstone in the morning!

Hum, I'll email you back in the morning!
Well, Silverstone didn't really happen...
I got there, done a couple laps to warm up, came back in, one of the lads jumped in, and within 3 laps, my rocket gasket decided to st itself and piss oil everywhere. Great.
We got the car into the garage and set about taking the rocker cover off, with the view of using some 'instant gasket'. Once it was off however, the gasket was fine. No rips, tears, cracks or any deformation at all. When looking at the gasket, it appeared as if it had popped out. Upon further investigation, both corner studs on the middle of the engine side (if that makes sense).
We cleaned the oil up, put the gasket back into place and I headed up to Total Dynamic Motorsport (Seans new 'official' name') as he was only 40mins away. Since Silverstone was a 'free' day from mission motorsport, I was happy to leave as Oulton was a day I'd booked myself, so wanted the car ready for then.
I took it easy driving to Sean's as there was oil bubbling from the 2 missing bolts. When I got to Sean's, I whipped the rocker cover off again, replaced the studs and re-fitted. There is still a slight leak coming from the middle gasket bolt hole closest to the bulkhead, but nothing to make me worry just yet.
I didn't take any pictures as I was in too much of a flat spin trying to make sure everything was working for Saturday.
The only thing we can thing, is the vent off the top of my catch can wasn't large enough to release the pressure quick enough, the crank case pressured, blowing the seal. So, i removed the blanked off bolt on the side of the catch can, which is the same size as the hose coming from the CC, to allow the pressure to escape quicker.
I ordered a new gasket and rubber o-rings for the bolts from BMW to be safe and took them along to Oulton just incase.
Saturday was a dry day. The track was a little wet to begin with, but quickly dryed up.
Before even getting onto track, I noticed my rear camber was out. I'm putting this down to poly bushes on my hubs settling in as I was told to expect to have to re-align the rear end soon. Luckily, I sorted this before my 1st session.
I used my first session as a shakedown, revving high and long to check for oil leaks and also to get used to track driving without ABS. Had a couple of moments of lock-up through out the day as the track conditions changed, but I do much prefer the feel without the ABS and the pedal box. However, catching expensive cars, in the wet, without ABS, who brake far to early, and far earlier than you'd expect is a 50p-5p moment.
I had a 20min instruction session with Mike from drivertution.com. Out of all the lessons I've had so far, he was by far the best. His tution was alot more race/track focused compared to the others who were almost going through the motions of just showing me lines. His tuition was alot more focused on what I was doing with the car, the way I was pedalling and all the other bits and bobs. He does full day tuitions, which I'll defiantly be taking advantage of in the future.
After my lesson, I went back out and started putting my lesson to use, i.e, i started racing everyone and had a hard session. As I pulled into my garage, my mrs noticed my nearside front wheel had oil on it. I quickly popped the bonnet to find my catch can had filled and decided to coat the engine bay and under the car with oil. Speaking to some of the kumho lads, they had mentioned that the cars breath heavy during race conditions and can usually half fill catch cans in 20mins. I hadn't emptied the can since i fitted it a couple weeks ago, and had had a few sessions already that day. So, I spent the lunch cleaning the engine bay and underside of the car.

That's the oil collected, from the day, bar the very last session. So I would have probably filled both bottles.
I was emptying my can after every other session in the afternoon. I was getting around a ¼ of a bottle of coke for around 20mins hard work. So, I'm going to move my catch can to the O/S of my engine bay to make it easier for emptying.

A clip after the 1st corner that my Mrs got for me.
All day, the car was driving perfect for me. I know I was surprising a fair few people with how it was handling, braking and driving in general, as over lunch and whenever I was in the garage, I was getting nothing but good comments.


And here's a couple good/clean laps!
https://www.youtube.com/embed/oCe9wGFbU2w
(really need to figure out how to get the videos to embed!)
One thing, after watching the videos, at the end of the day, I should have been shifting down into 2nd for the exits of Brittens and Hislops (the 2 back straight chicanes) and probably the Shell Oils hairpin. Whilst driving, I could feel the car was sluggish, but was happy with the way I was learning and driving. I know for next time tho!
I don't have any track days planned just yet, but I'll probably head to Donnington again next month, and money depending, do it with a full day tuition...
Well, Silverstone didn't really happen...
I got there, done a couple laps to warm up, came back in, one of the lads jumped in, and within 3 laps, my rocket gasket decided to s
t itself and piss oil everywhere. Great.We got the car into the garage and set about taking the rocker cover off, with the view of using some 'instant gasket'. Once it was off however, the gasket was fine. No rips, tears, cracks or any deformation at all. When looking at the gasket, it appeared as if it had popped out. Upon further investigation, both corner studs on the middle of the engine side (if that makes sense).
We cleaned the oil up, put the gasket back into place and I headed up to Total Dynamic Motorsport (Seans new 'official' name') as he was only 40mins away. Since Silverstone was a 'free' day from mission motorsport, I was happy to leave as Oulton was a day I'd booked myself, so wanted the car ready for then.
I took it easy driving to Sean's as there was oil bubbling from the 2 missing bolts. When I got to Sean's, I whipped the rocker cover off again, replaced the studs and re-fitted. There is still a slight leak coming from the middle gasket bolt hole closest to the bulkhead, but nothing to make me worry just yet.
I didn't take any pictures as I was in too much of a flat spin trying to make sure everything was working for Saturday.
The only thing we can thing, is the vent off the top of my catch can wasn't large enough to release the pressure quick enough, the crank case pressured, blowing the seal. So, i removed the blanked off bolt on the side of the catch can, which is the same size as the hose coming from the CC, to allow the pressure to escape quicker.
I ordered a new gasket and rubber o-rings for the bolts from BMW to be safe and took them along to Oulton just incase.
Saturday was a dry day. The track was a little wet to begin with, but quickly dryed up.
Before even getting onto track, I noticed my rear camber was out. I'm putting this down to poly bushes on my hubs settling in as I was told to expect to have to re-align the rear end soon. Luckily, I sorted this before my 1st session.
I used my first session as a shakedown, revving high and long to check for oil leaks and also to get used to track driving without ABS. Had a couple of moments of lock-up through out the day as the track conditions changed, but I do much prefer the feel without the ABS and the pedal box. However, catching expensive cars, in the wet, without ABS, who brake far to early, and far earlier than you'd expect is a 50p-5p moment.
I had a 20min instruction session with Mike from drivertution.com. Out of all the lessons I've had so far, he was by far the best. His tution was alot more race/track focused compared to the others who were almost going through the motions of just showing me lines. His tuition was alot more focused on what I was doing with the car, the way I was pedalling and all the other bits and bobs. He does full day tuitions, which I'll defiantly be taking advantage of in the future.
After my lesson, I went back out and started putting my lesson to use, i.e, i started racing everyone and had a hard session. As I pulled into my garage, my mrs noticed my nearside front wheel had oil on it. I quickly popped the bonnet to find my catch can had filled and decided to coat the engine bay and under the car with oil. Speaking to some of the kumho lads, they had mentioned that the cars breath heavy during race conditions and can usually half fill catch cans in 20mins. I hadn't emptied the can since i fitted it a couple weeks ago, and had had a few sessions already that day. So, I spent the lunch cleaning the engine bay and underside of the car.

That's the oil collected, from the day, bar the very last session. So I would have probably filled both bottles.
I was emptying my can after every other session in the afternoon. I was getting around a ¼ of a bottle of coke for around 20mins hard work. So, I'm going to move my catch can to the O/S of my engine bay to make it easier for emptying.
A clip after the 1st corner that my Mrs got for me.
All day, the car was driving perfect for me. I know I was surprising a fair few people with how it was handling, braking and driving in general, as over lunch and whenever I was in the garage, I was getting nothing but good comments.


And here's a couple good/clean laps!
https://www.youtube.com/embed/oCe9wGFbU2w
(really need to figure out how to get the videos to embed!)
One thing, after watching the videos, at the end of the day, I should have been shifting down into 2nd for the exits of Brittens and Hislops (the 2 back straight chicanes) and probably the Shell Oils hairpin. Whilst driving, I could feel the car was sluggish, but was happy with the way I was learning and driving. I know for next time tho!
I don't have any track days planned just yet, but I'll probably head to Donnington again next month, and money depending, do it with a full day tuition...
That leak you speak of is a common one. If you haven't replaced the gasket, its worth doing. Mine was leaking when i first got it, and when i replaced it, I don't think the gasket had ever been changed.
My catch can setup is a 20mm I/D hose running from the CC to the catch can thought a 19mm barb, then was venting out the top though a 7mm I/D hose. So, it may have been restricting it, or I may have just been unlucky.
Even with the few lock-ups, I was still pushing. Once I got used to how much pressure I could use before initiating the lock-up, I was happy.
Yep, first time with the cage. The response from the car is amazing. When you turn and ask it to go somewhere, it's already there. It's very 'positive'. I didn't find much oversteer throughout the day, as I can feel exactly what the car is doing, so its possible to counter-act any unwanted oversteer as-soon as it begins.
Pressures, you're correct. It idles at 19/20psi when up to temp, which as far as I'm aware, is normal, then gets to around 60psi at full chat. Again, as far as I'm aware, this is normal, and reading what F0xy has written about PSIs, mine seems to pretty much match what his is doing.
And yes, thats my water temp in C. I'm a little unhappy with just how hot it's getting, but I'm putting it down to an original radiator and no cowling. My plan is to get some ABS plastic sheets and make an undertray and new cowlings so that the air has nowhere to go but through the radiator and over the top of the engine (so should help cooling and also give a little bit of downforce (although the vents on the bonnet will limit the flow).
also, finally emailed you back hum!
McSam, ye, i really need to get it re-weighed now. Would be interesting just to see where it's at now...
So, payday means 1 thing, car parts!
The main thing on my list this month is sorting my temperatures on track. The only thing I haven't replaced in the cooling system is the radiator. I picked up a Nissens rad from GSF (cheaper than going to BMW and after reading and googling, they are recommended). I did contemplate going to an M3 rad, but couldn't justify it knowing what racers run... (majority run standard rads). I also picked up a new 80C thermostat incase mine was faulty and not allowing good flow. Better safe than sorry.
While I was looking, I also purchased a steering wheel spacer. I wasn't sure how much closer I wanted the wheel, so i bought an adjustable 40-70mm off eBay. After putting it on at around the 40mm, I tried a few different lengths. Eventually I settled at it at the 70mm position. While driving fast, I feel much more relaxed and more in control of the wheel. Where before my arms where stretched, my elbows are now down pointing towards my legs. Gives me more 'power' from my arms to control the wheel (it feels anyway) and also allows me to react better.

Now I know the length, I will probably end up getting a solid version in time.
Then it was onto fitting the rad.
Popped the front up, drained the coolant and quickly removed the rad and thermostat. Upon removing the thermost housing, i found the seal had pretty much melted flat. I know the car was getting hot, and with the metal housing, but I wasn't expecting that! I haven't had any leaks, but i replaced with a new seal anyway.

Nice new radiator.
I also move the electric fan to the rear of the rad to allow the air to flow through better. So the fan will now pull air instead of pushing and getting in the way. One of the lads (whose building a mk1 clio track car) who has helped me through-out the build, cut some brackets for the radiator while I fitted everything else.


Not ideal, but I've zip-tied my oil cooler to grills atm. I will make some brackets and mount it properly. Closer to the grill, should help the cooling.
After I had bled the system, I went for a drive. Immediately the car is sitting at a lower temp, but at 96/97 when i wanted 92/93, and does have it's moments where it rises up abit.
After speaking to someone on e36coupe, i drained the coolant and filled with distilled water (i thought coolant was a better at dissipating heat aswell as lower the freezing and raising the boiling point). I left some coolant in there, so it's about 90/10 mixture. Immediately the temperatures were at 92/93, both idling and driving on the road.
One thing I don't have is any fan/radiator cowling or even any underpanels. I've been looking, reading and asking questions and it's more than obvious that this won't be helping. Air, like water, will take the path of least resistance.
So, I've making my own cowling for the radiator, making all the air from the top grills, and half the air (i'll explain later) from the bottom to go through the radiator. I've cut 2 side panels and a bottom panel from 1mm alloy. This will give the air no-where to go, but through the radiator when it goes into this area.


The panels.

Assembled.


Fitted.
For the lower grill, I've left the bottom half open, so some air can flow under the engine. Now, I know air going under the car will create a small amount of 'lift', but the benefits of having cold air moving under the engine, cooling the PAS and the sump, outweighs the downforce I'll lose.
I do want to remake the cowling now with a softer material, so probably some sort of hard foam. That way incase of a bumper, the foam will bend/break and not push through my radiator like the current cowling will...
At the moment I don't have any under panels, but i've been eyeing up a fibreglass front splitter and undertray. Once I get this, the air entering the bottom grill will either go through the rad or will go along the top of the underpanel and over the PAS and sump.
I finally got round to de-skining the bonnet aswell.


Every penny makes a pound...
I then managed to get a last minute spot on the Llandow track day this past weekend. I was properly happy with how the car was feeling. The water temperature never went about 95c whilst on track. My oil temps were sitting around 110c towards the end of my 15/20minute session, but that's low enough for me not to worry. Once I get an undertray, the air flowing past the sump should bring that down a bit more.
The more i drive the car, the more confident I'm getting with it. It's so predictable now. With every track day aswell, my skill is also coming along. I'm alot happier now when the back end steps out, where I'm not panicking and snapping off the throttle, but also not holding the throttle at the same point, which ends up spinning the tyres more.
My toyos are well and trully done now tho, so they will have to be replaced at the end of the month. Apart from that, I had no issues with the car.
so, heres a few cleanish laps - https://www.youtube.com/watch?v=Syn6TJqGMvE
Some pictures courtesy of https://www.facebook.com/oversteerphotography?fref...


I'm now really happy with the way the car sits through the corners.
And now for something abit different!

Got to say, I'm happy with taking my rear anti-roll off, otherwise both wheels would be off the ground! Might soften my front tho...
Well, i've been busy for the last couple months, but the car is getting into shape again.
First thing, it's finally off the road and will be trailered now.

Managed to pick up the L200 at a decent price, it's auto aswell to make towing and driving less of a chore. Plus the Mrs likes driving it.
After that, I started collecting more parts to fit.
First big box was from ABS - http://absmotorsport.co.uk

Inside was a fibreglass bonnet and super tourer bumper/splitter/undertray combo.

Figuring out where I would need to cut my old bumper to attach the fibreglass bumper.

and both bonnet and bumper off.

The bonnet fitted. I will have 6 pins fitted (2 more at the front closer to the arches) when I'm finished to stop any flapping when driving.
While I was doing this, I started to remove the loom completely from the car. My intention was to tidy it aswell as i could and put the ignition on a toggle and the starter on a button.
After i removed it from the car.
I did eventually get it all laid out, nice and neat. But I just didn't feel completely confident with it. I know, deep down, that if I took my time, I'm sure I could achieve what I wanted. However, there was that nagging feeling of 'if I do something wrong, i can screw the ecu or set everything on fire...'

Ye, it was abit of a mess when I removed it...
So, I got back in touch with Chris at CR M-Tech - https://www.facebook.com/pages/CR-M-Tech-BMW-Spare... - and soon had the loom sent off for them to work their magic.
While that was away, I contact Martin at RaceParts - http://raceparts.biz - and placed an order for a fibreglass boot, with spoiler supports, and a supertourer LTW rear wing.

and fitted.
 .
.
Then, another box arrived, this time from America. Now I know some people are going to 'opinions' on what i've bought, but I'm happy and content, so thats all that matters.
From Bimmerworld, I got a Vac Motorsport sump baffle, fuel starvation kit (2 brand new m50 fuel pumps), brake hub ducts and solid brake guides.

At brands and donington, I had fuel surge. This was before I had a cage, so I expect it'll happen more often now. The train of thought on that, is, if my fuel is surging, whats my oil doing. Thus, the sump baffle.
The brake ducts make sense. I was running ducting from the bumper to 'near' the caliper, however, these ducts force the air into the centre of the disk and then out through the rotor and the solid guides will firm the brake feel up more.
Chris got back in contact when the loom was ready to return. It was less than a 5day turn around.

4.17kg, including that box, and including fuse box. Thats ridiculous.

All tidy and ready to fit.
While Chris had it, he tidied the loom up, made a few small repairs, put the ignition onto a toggle and the stater on a push button. He also extended the headlight wiring loom so I could mount the fuse box under the glove box. He also cut the fuse box, as its tiny now.

That is the fuse box. I need to add the couple relays for my windscreen and thats the box complete.
After checking the wiring loom was all good and everything was working as it should, I moved onto my front bumper.
I quickly cut my normal bumper in half, got the tiger bond out and started attaching. I also riveted the bumpers together.

Not sure what had more tiger bond on it, the bit between the 2 bumpers, the lower bumper where it wasn't needed, or me...

I cut the end of the undertray to fit around the x-brace and used 2 of the x-brace mounting bolts to hold it up.
And last thing before I finished for the evening, I got both my foglights to light up.

With the e36, only the O/S fog lights. For MSA requirements, you need either 2 fogs in place or a centre rain light.
I'm hoping to get my fuel pumps fitted tomorrow, but if not, it'll be in a few weeks time as I'm off on holiday then straight back to Mallory before the BTCC at Oulton...
Next on the list, rattle can the fibreglass bits (a top notch paint scheme doesn't make a car fast...), new tyres and it'll be ready to go!
and fitted.
First thing, it's finally off the road and will be trailered now.

Managed to pick up the L200 at a decent price, it's auto aswell to make towing and driving less of a chore. Plus the Mrs likes driving it.
After that, I started collecting more parts to fit.
First big box was from ABS - http://absmotorsport.co.uk

Inside was a fibreglass bonnet and super tourer bumper/splitter/undertray combo.

Figuring out where I would need to cut my old bumper to attach the fibreglass bumper.

and both bonnet and bumper off.

The bonnet fitted. I will have 6 pins fitted (2 more at the front closer to the arches) when I'm finished to stop any flapping when driving.
While I was doing this, I started to remove the loom completely from the car. My intention was to tidy it aswell as i could and put the ignition on a toggle and the starter on a button.
After i removed it from the car.
I did eventually get it all laid out, nice and neat. But I just didn't feel completely confident with it. I know, deep down, that if I took my time, I'm sure I could achieve what I wanted. However, there was that nagging feeling of 'if I do something wrong, i can screw the ecu or set everything on fire...'

Ye, it was abit of a mess when I removed it...
So, I got back in touch with Chris at CR M-Tech - https://www.facebook.com/pages/CR-M-Tech-BMW-Spare... - and soon had the loom sent off for them to work their magic.
While that was away, I contact Martin at RaceParts - http://raceparts.biz - and placed an order for a fibreglass boot, with spoiler supports, and a supertourer LTW rear wing.

and fitted.
 .
.Then, another box arrived, this time from America. Now I know some people are going to 'opinions' on what i've bought, but I'm happy and content, so thats all that matters.
From Bimmerworld, I got a Vac Motorsport sump baffle, fuel starvation kit (2 brand new m50 fuel pumps), brake hub ducts and solid brake guides.

At brands and donington, I had fuel surge. This was before I had a cage, so I expect it'll happen more often now. The train of thought on that, is, if my fuel is surging, whats my oil doing. Thus, the sump baffle.
The brake ducts make sense. I was running ducting from the bumper to 'near' the caliper, however, these ducts force the air into the centre of the disk and then out through the rotor and the solid guides will firm the brake feel up more.
Chris got back in contact when the loom was ready to return. It was less than a 5day turn around.

4.17kg, including that box, and including fuse box. Thats ridiculous.

All tidy and ready to fit.
While Chris had it, he tidied the loom up, made a few small repairs, put the ignition onto a toggle and the stater on a push button. He also extended the headlight wiring loom so I could mount the fuse box under the glove box. He also cut the fuse box, as its tiny now.

That is the fuse box. I need to add the couple relays for my windscreen and thats the box complete.
After checking the wiring loom was all good and everything was working as it should, I moved onto my front bumper.
I quickly cut my normal bumper in half, got the tiger bond out and started attaching. I also riveted the bumpers together.

Not sure what had more tiger bond on it, the bit between the 2 bumpers, the lower bumper where it wasn't needed, or me...

I cut the end of the undertray to fit around the x-brace and used 2 of the x-brace mounting bolts to hold it up.
And last thing before I finished for the evening, I got both my foglights to light up.

With the e36, only the O/S fog lights. For MSA requirements, you need either 2 fogs in place or a centre rain light.
I'm hoping to get my fuel pumps fitted tomorrow, but if not, it'll be in a few weeks time as I'm off on holiday then straight back to Mallory before the BTCC at Oulton...
Next on the list, rattle can the fibreglass bits (a top notch paint scheme doesn't make a car fast...), new tyres and it'll be ready to go!
and fitted.
VF - thank you.
TS - just had a read thro your thread. Can see you are struggling with almost the idea of just having a 'track car'. I was like that at first, wanted to keep the car completely mint, but the more track days I done and more time i spent around track and race cars, you realise that the shells and body aren't mint. Spend your time and money on things that will have an impact on track and you'll have a fantastic handling car. The amount of 'bigger' cars that can't stay with mine going round track would make you laugh...
And ye, Chris at CR M-Tech was a life saver. He did say they prefer 'unmolested' wiring looms, for obvious reasons, but they can work their magic on everything.
I did forget to say, I connected the loom up and the car started straight away, not a thing wrong with it. They do bench test the looms before sending them back out aswell.
Joe - Ye, they were over half the weight of the original parts. My aim is get into the kumho cup, so I can't really go up in power as that would move me up in class, so I'm going down to the minimum weight instead.
Hum,
That's good to hear. With how I was running it before, the air was just going everywhere, but that did make a difference already, so this should be even better (as you've found). I also got the solid guides after speaking to you about them.
Well, the regs for kumho say I'm not allowed to run a rear diffuser, so that's out. However, I'm not expecting a massive improvement on downforce or aero upgrade, but hoping I'll gain more air moving across my sump instead of down onto the ground. So hopefully it'll help keep my oil temps lower.
Yer, I can't fault Chris either. If I had had the time, I'd have went up aswell. However, the same thing for me, but over Facebook, he was more than happy to answer daft questions. He really knows his stuff. Have you gitted and lightened fly yet?
Worth the sump, I had thought about an m3 Evo pump and oil pickup, but the cost was so high I couldn't justify it. What other methods are you talking about?
And the fogs, nothing special really. The N/S light doesn't have a power feed for the fog light, even tho it and the bulb are already there (saving money when converting from left to right hand drive?) so I just joined into the O/S fog light feed. As I said, it's either that or buying a rain light for the middle of the window...
Brian
Ts, with the standard brakes and disc sizes, it's got to be the most efficient way to Coll the discs.
With normal ducting pointing towards the brake, it only cools 1 spot. But with the ducts, the air has to come out through the discs, this cooling them all over. The best thing you can do without the ducts, is have the ducting pointing towards the hub/centre of the disc to try make the air go through the disc.
With normal ducting pointing towards the brake, it only cools 1 spot. But with the ducts, the air has to come out through the discs, this cooling them all over. The best thing you can do without the ducts, is have the ducting pointing towards the hub/centre of the disc to try make the air go through the disc.
Well, i havnt updated in a while, but i have been progressing with the car. Quick shortlist of what has happened;

How she looks like inside.

Not to shabby.

Vents.
I've also now passed my ARDs test, just awaiting on my licence to come back (sent it off, but they wanted more information on an injury i sustained a few years back).
I also managed a full day at Doningon on the GP circuit, and the car worked flawlessly (apart from a few niggles that didnt really slow me).
https://youtu.be/pk3_6FrocDI - a few good laps from the day.
On the day, i realised my rev limit wasn't hitting the 7200, then remembered i hadn't connected my clocks to my ECU, so my ECU wasn't getting a speed signal (usually gets a signal from the ABS, which i no-longer have). My oil and water temps where a little high (they would settle at water - 110, oil 120). We were putting this down to me not having my cowling fitted (i've fitted a new one now before my next track day). I'm also now running just water and water wetter, so hopefully that should help.
So, my next day is this saturday at Castle Combe. Can't wait to test the new diff...
- dual fuel pumps installed - 2 x m50 pumps fitted. passenger side pumps into drivers side to stop fuel surge (kit from bimmerworld)
- sump baffle fitted - probably will never know if it works!
- hard motorsport console delete fitted
- starter button and ignition toggle fitted
- battery cut off fitted (moved jump point junction to under the dash and used that. all cables were long enough, had to shorten main cable)
- oil thermostat oil diverter valve so 100% of oil goes through cooler
- fire extinguisher fitted and plumbed in
- external cut offs fitted and plumbed in
- camber shims fitted to front wheels to give more camber
- brake ducts and ducting fitted (didn't have a single bit of fade on a full day on Donington GP)
- team dynamics powder coated black
- kumho Ecstas fitted (awesome tyre!)
- vibra tech competition engine mounts fitted
- decated
- naca duct un rear passenger window with ducting, providing air into the car. Pop vent also fitted to drivers finder.
- CAE shifter and shifter rod fitted (can't begin to describe how good it is...)
- 3.91 diff (not used yet)
- re-made radiator cowling as temps were a little high (i damaged and didnt refit my last one) (again, not used yet)

How she looks like inside.

Not to shabby.

Vents.
I've also now passed my ARDs test, just awaiting on my licence to come back (sent it off, but they wanted more information on an injury i sustained a few years back).
I also managed a full day at Doningon on the GP circuit, and the car worked flawlessly (apart from a few niggles that didnt really slow me).
https://youtu.be/pk3_6FrocDI - a few good laps from the day.
On the day, i realised my rev limit wasn't hitting the 7200, then remembered i hadn't connected my clocks to my ECU, so my ECU wasn't getting a speed signal (usually gets a signal from the ABS, which i no-longer have). My oil and water temps where a little high (they would settle at water - 110, oil 120). We were putting this down to me not having my cowling fitted (i've fitted a new one now before my next track day). I'm also now running just water and water wetter, so hopefully that should help.
So, my next day is this saturday at Castle Combe. Can't wait to test the new diff...
Gassing Station | Readers' Cars | Top of Page | What's New | My Stuff