Alfa GTA Sportwagon
Discussion


I think we’re all experienced car buying adults on this board. We know how it should be done.
1) You choose the chariot you want to buy, carefully evaluating criteria such as practicality, fuel economy and propensity to fall apart.
2) With this choice in mind you scour the market, carefully noting down the prices and condition of what is on sale.
3) You create a short list to view, and go and look at them. You are prepared to walk away until you find precisely the right car.
We know what you should not do is:
1) Read a post on Alfaowner.com with a title along the lines of “this car is so knackered I am thinking of scrapping it” and without even knowing what the car is, open the post with great interest. Not that you need a car, you have several already.
2) See a link to an ad on Pistonheads for a GTA Sportwagon that is firstly clearly sheddy, and secondly has accident damage.
3) Realise that the car is in the vague vicinity of where you will be working next week
4) Agree with the seller a price (having not seen the car)
5) Meet said seller in a shopping centre car park, in the dark, in Warrington
6) Neglect to even start the car before the seller has the money in his hands and is halfway across the car park.
No, of course none of us would buy this in such a manner. There is the “good” side:
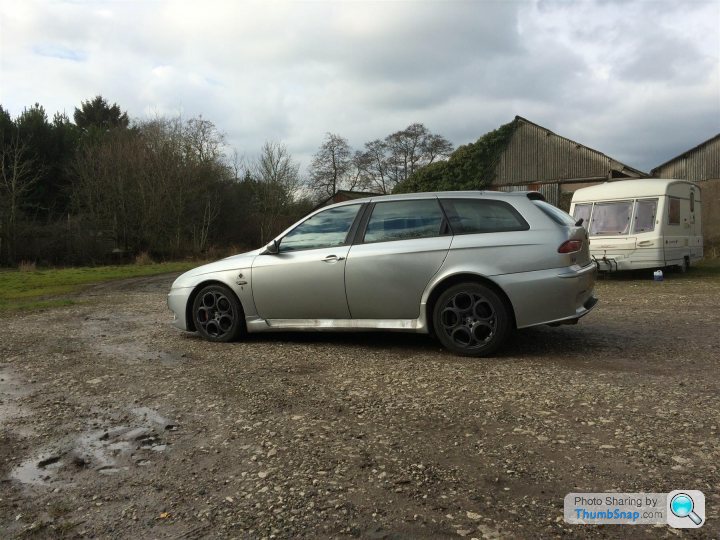
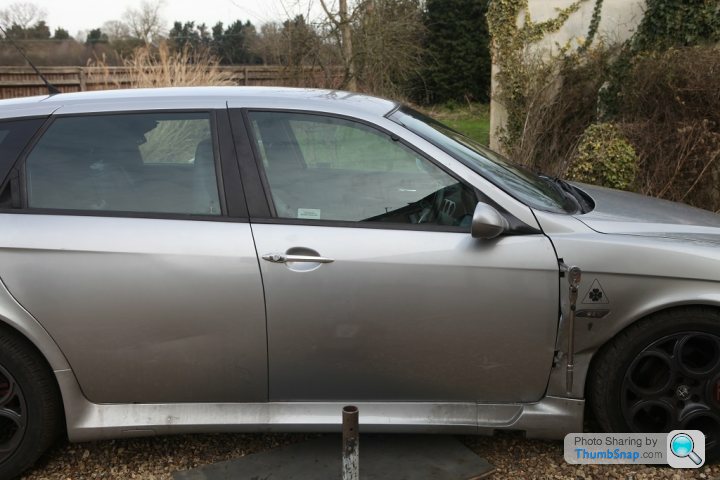
And the less good side.

The car is a Cat C as a result of the accident because GTA wings cost about eleventy billion pounds from Alfa, if you can get them. The only mitigation to the whole story is that I know the seller, and he had to drive it 100 miles to Warrington. Surely it can’t be that bad? Can it?
So I settled myself into the driver’s seat for the first time. Seemed comfortable enough, I didn’t get a wet bottom and it didn’t smell. Score. The instruments can only be described as “faded” with several bulbs out. At least the speedo was illuminated. I dared to shut the smashed door, and it latched reasonably well. OK, time to start it …. and it burst into life with a noise reminiscent of a badly shot up Spitfire coming into land. I had been warned of a “blow” in the downpipes, on hearing it, I wondered if the downpipes had been included in the sale. A cautious 10 mile drive to my hotel followed. First impressions were that the engine worked well, the handling was good, but the various noises were pretty awful. Time for bed.
A little work on eBay had revealed a replacement door (standard 156 item) for sale in Wigan, 15 miles up the road, so I got up early, and went to fetch it before work. Apologies to all in the hotel who were woken up by the unsilenced Busso chorus. It was about -5 that morning, and the tyres immediately went on the fix list – they had all the traction of ice skates.
Picking up the door in Wigan:

At the end of the week I was faced with a 250 mile journey down south. Would the GTA make it? Well, yes it did, and with no problems at all, indeed it went like the clappers, handling nice and predictably at respectable speeds on motorways and A roads. The engine management light was coming on with increasing regularity, and eventually stayed on, but performance was unaffected. In fact performance was blistering, and other than the howling gale coming through the gaps in the driver’s door, it all seemed pretty good, though that may have been deafness caused by the exhaust.
Once home, I stashed it with the rest of the fleet in an attempt to hide it from the missus, a ruse which lasted all of, er, 2 hours. Ho hum.
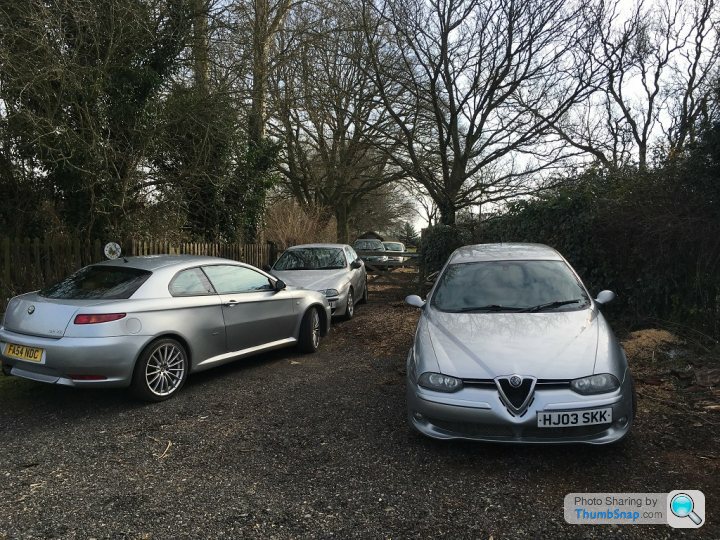
At this point you will see that I am a serial Alfa offender:
On the left is a GT 3.2 that I got for £900 with an engine that was mostly in the boot, in pieces.
Behind that is a 156 V6 that I use for general commuting duties
Behind that is my brother in laws car that is, er, resting with us.
Behind that is a parts car, an incredibly valuable asset which literally combines the properties of a shed (you can store things in it) and a parts store (you just unscrew things when you need them)
Those of you on Alfaowner will recognise the story here, it is in the image lounge, but you can't access that without being a member, so I thought I'd post it here as well given the love this board seems to have for shed-tastic activities.
1) You choose the chariot you want to buy, carefully evaluating criteria such as practicality, fuel economy and propensity to fall apart.
2) With this choice in mind you scour the market, carefully noting down the prices and condition of what is on sale.
3) You create a short list to view, and go and look at them. You are prepared to walk away until you find precisely the right car.
We know what you should not do is:
1) Read a post on Alfaowner.com with a title along the lines of “this car is so knackered I am thinking of scrapping it” and without even knowing what the car is, open the post with great interest. Not that you need a car, you have several already.
2) See a link to an ad on Pistonheads for a GTA Sportwagon that is firstly clearly sheddy, and secondly has accident damage.
3) Realise that the car is in the vague vicinity of where you will be working next week
4) Agree with the seller a price (having not seen the car)
5) Meet said seller in a shopping centre car park, in the dark, in Warrington
6) Neglect to even start the car before the seller has the money in his hands and is halfway across the car park.
No, of course none of us would buy this in such a manner. There is the “good” side:
And the less good side.
The car is a Cat C as a result of the accident because GTA wings cost about eleventy billion pounds from Alfa, if you can get them. The only mitigation to the whole story is that I know the seller, and he had to drive it 100 miles to Warrington. Surely it can’t be that bad? Can it?
So I settled myself into the driver’s seat for the first time. Seemed comfortable enough, I didn’t get a wet bottom and it didn’t smell. Score. The instruments can only be described as “faded” with several bulbs out. At least the speedo was illuminated. I dared to shut the smashed door, and it latched reasonably well. OK, time to start it …. and it burst into life with a noise reminiscent of a badly shot up Spitfire coming into land. I had been warned of a “blow” in the downpipes, on hearing it, I wondered if the downpipes had been included in the sale. A cautious 10 mile drive to my hotel followed. First impressions were that the engine worked well, the handling was good, but the various noises were pretty awful. Time for bed.
A little work on eBay had revealed a replacement door (standard 156 item) for sale in Wigan, 15 miles up the road, so I got up early, and went to fetch it before work. Apologies to all in the hotel who were woken up by the unsilenced Busso chorus. It was about -5 that morning, and the tyres immediately went on the fix list – they had all the traction of ice skates.
Picking up the door in Wigan:
At the end of the week I was faced with a 250 mile journey down south. Would the GTA make it? Well, yes it did, and with no problems at all, indeed it went like the clappers, handling nice and predictably at respectable speeds on motorways and A roads. The engine management light was coming on with increasing regularity, and eventually stayed on, but performance was unaffected. In fact performance was blistering, and other than the howling gale coming through the gaps in the driver’s door, it all seemed pretty good, though that may have been deafness caused by the exhaust.
Once home, I stashed it with the rest of the fleet in an attempt to hide it from the missus, a ruse which lasted all of, er, 2 hours. Ho hum.
At this point you will see that I am a serial Alfa offender:
On the left is a GT 3.2 that I got for £900 with an engine that was mostly in the boot, in pieces.
Behind that is a 156 V6 that I use for general commuting duties
Behind that is my brother in laws car that is, er, resting with us.
Behind that is a parts car, an incredibly valuable asset which literally combines the properties of a shed (you can store things in it) and a parts store (you just unscrew things when you need them)
Those of you on Alfaowner will recognise the story here, it is in the image lounge, but you can't access that without being a member, so I thought I'd post it here as well given the love this board seems to have for shed-tastic activities.
They're worth about £2500 as parts, I paid close to three. Good ones seem to be making about £10K - the days of bargain working GTAs for a few grand are behind us. The sale did include a second hand (but undamaged) wing, and 1/2 a tank of petrol, so I was happy.
3.2 GTs are cheaper, you can get a perfectly good one for about 4 or 5 grand. They also have the advantage of sharing the bodywork with the cooking models, so bumpers etc are easily and cheaply available. GTA bumpers are like hen's teeth second hand, and EUR 900 for a new one.
3.2 GTs are cheaper, you can get a perfectly good one for about 4 or 5 grand. They also have the advantage of sharing the bodywork with the cooking models, so bumpers etc are easily and cheaply available. GTA bumpers are like hen's teeth second hand, and EUR 900 for a new one.
Edited by rxe on Thursday 7th April 17:04
Adding more, or you'll be trying to solve my engine management light problem, which has been fixed by now.
First thing, the door. Fixing the door would make the police less likely to stop me, and free up loads of space on the back seat. Doors are really very large and heavy.
Firstly, remove the remains of the old door by undoing four bolts and disconnecting some wiring. Off it comes:

Then hang the new door. The wing needs to come off to access the upper hinge bolts, but this wing is scrap anyway, so I just cut slots in it to access the bolts:
 |http://thumbsnap.com/TDuV2IPR[/url]
Bring all the gubbins from the old door onto the new door. Fiddly, but pretty simple.
 |http://thumbsnap.com/3OMEdfkU[/url]
Job done.
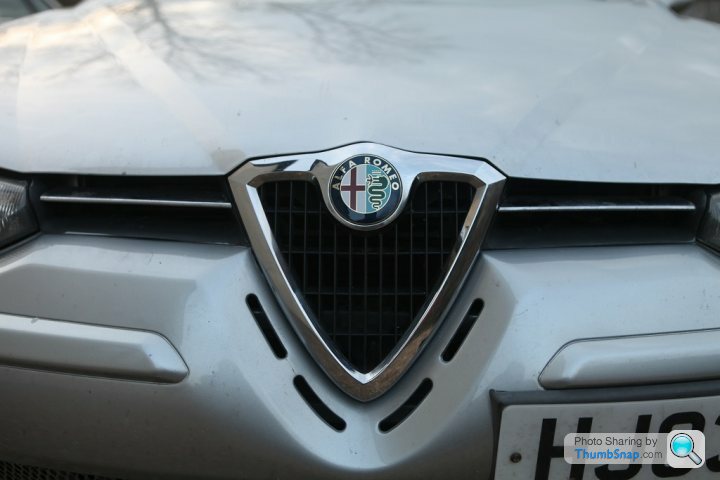
Next, replace this:
 |http://thumbsnap.com/FjzDqsIF[/url]
with the one from the parts car, and a spare badge I had in the garage:
Finally the most worrying problem of all - the EML, or "Motor Control System Failure" in Alfa speak. Once of the best bits about spannering these cars is that you can get diagnostic software for free, and the cables are a tenner. OK, you need to pay for the diagnostics if you want to do complex stuff, but it is only EUR 50, and worth every bit of it.
The errors pointed to a rear bank misfire across all three cylinders. The rear bank being the one that is buried under the intake plenum and the one that has the lambda sensor that is pretty much an engine out job. Removing the plenum looks awful, but is actually pretty easy once you have the right tools for the intake clips. Did a visual inspection of the coil packs and plugs, swapped coil packs between front and back, and....no change. Hmm. Time to get a bit more serious.
General folklore on Alfaowner is that misfire at idle is caused by four things:
- Air leaks
- Knackered coil packs or plugs (already checked)
- Compression. Bad.
- Cam timing on the rear bank exhaust cam. Fixable, if you have the cam locks (I do)
Checking for air leaks, I found this whopper in the intake manifold:

Great, easy fix, out with the duct tape and .... no difference. Damn. Still ordered a new section (£80 ....)
The quick an dirty approach to compression testing is to stick a current clamp on the battery and crank it, with the fuel injection relay removed. Low compression cylinders show up as a drop in current because they are easy to compress:
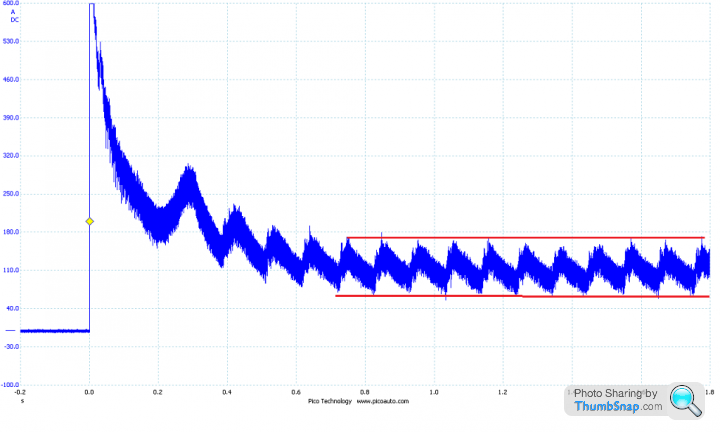
Mine was fine. Phew - that would be expensive.
Must be the lambdas? I put the diagnostics on, and got the following:
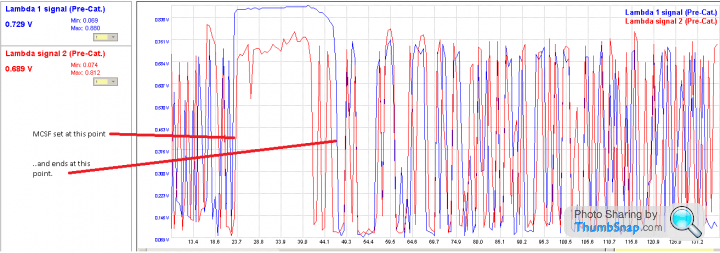
and

So its not the lambdas - they are flipping quickly between high and low volts as you would expect. But there is very strange data in there - sometimes one bank going rich, sometimes lean, then the other bank. A consultation with the Alfaowner hive mind, as well as the local specialist pointed to cam timing. OK, time to get in there.
You have to remove the plenum, the cam covers, and expose the cam-belt pulleys. Then you have to find TDC by putting a dial gauge in cylinder 1. Once you have the engine perfectly in position, you stick the cam locks on (3.2 specific), and check it is all lined up.
Midway through surgery:
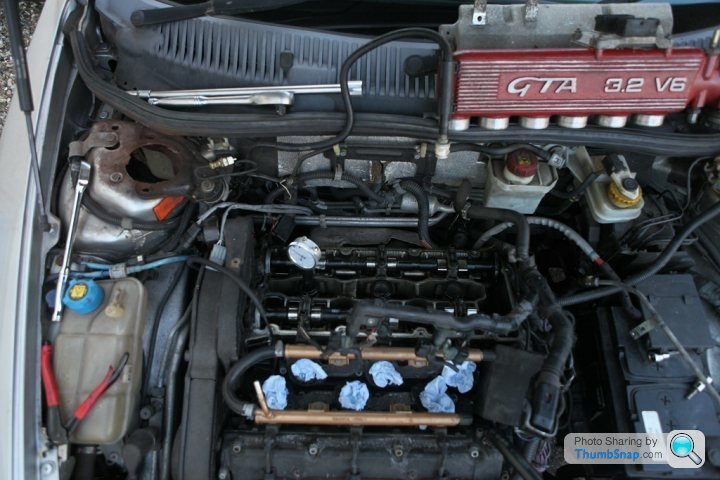
And a close up of the rear exhaust cam lock, which should be sitting flush on the head, but has a gap you could get a small bus through.

Resetting the cams is a procedure that is an extraordinary combination of violence (getting the pulleys off) and precision (getting it all in exactly the right place). You then have the moment where you are bricking it when you turn the key. And - result, idled as smoothly as anything, cleared the errors and they haven't come back.
First thing, the door. Fixing the door would make the police less likely to stop me, and free up loads of space on the back seat. Doors are really very large and heavy.
Firstly, remove the remains of the old door by undoing four bolts and disconnecting some wiring. Off it comes:
Then hang the new door. The wing needs to come off to access the upper hinge bolts, but this wing is scrap anyway, so I just cut slots in it to access the bolts:
|http://thumbsnap.com/TDuV2IPR[/url]Bring all the gubbins from the old door onto the new door. Fiddly, but pretty simple.
|http://thumbsnap.com/3OMEdfkU[/url]Job done.
Next, replace this:
|http://thumbsnap.com/FjzDqsIF[/url]with the one from the parts car, and a spare badge I had in the garage:
Finally the most worrying problem of all - the EML, or "Motor Control System Failure" in Alfa speak. Once of the best bits about spannering these cars is that you can get diagnostic software for free, and the cables are a tenner. OK, you need to pay for the diagnostics if you want to do complex stuff, but it is only EUR 50, and worth every bit of it.
The errors pointed to a rear bank misfire across all three cylinders. The rear bank being the one that is buried under the intake plenum and the one that has the lambda sensor that is pretty much an engine out job. Removing the plenum looks awful, but is actually pretty easy once you have the right tools for the intake clips. Did a visual inspection of the coil packs and plugs, swapped coil packs between front and back, and....no change. Hmm. Time to get a bit more serious.
General folklore on Alfaowner is that misfire at idle is caused by four things:
- Air leaks
- Knackered coil packs or plugs (already checked)
- Compression. Bad.
- Cam timing on the rear bank exhaust cam. Fixable, if you have the cam locks (I do)
Checking for air leaks, I found this whopper in the intake manifold:
Great, easy fix, out with the duct tape and .... no difference. Damn. Still ordered a new section (£80 ....)
The quick an dirty approach to compression testing is to stick a current clamp on the battery and crank it, with the fuel injection relay removed. Low compression cylinders show up as a drop in current because they are easy to compress:
Mine was fine. Phew - that would be expensive.
Must be the lambdas? I put the diagnostics on, and got the following:
and
So its not the lambdas - they are flipping quickly between high and low volts as you would expect. But there is very strange data in there - sometimes one bank going rich, sometimes lean, then the other bank. A consultation with the Alfaowner hive mind, as well as the local specialist pointed to cam timing. OK, time to get in there.
You have to remove the plenum, the cam covers, and expose the cam-belt pulleys. Then you have to find TDC by putting a dial gauge in cylinder 1. Once you have the engine perfectly in position, you stick the cam locks on (3.2 specific), and check it is all lined up.
Midway through surgery:
And a close up of the rear exhaust cam lock, which should be sitting flush on the head, but has a gap you could get a small bus through.
Resetting the cams is a procedure that is an extraordinary combination of violence (getting the pulleys off) and precision (getting it all in exactly the right place). You then have the moment where you are bricking it when you turn the key. And - result, idled as smoothly as anything, cleared the errors and they haven't come back.
My problem is that I rescue them and can't sell them. Some sort of emotional attachment starts once you've spent a few hours underneath them. Bringing this fully up to date....
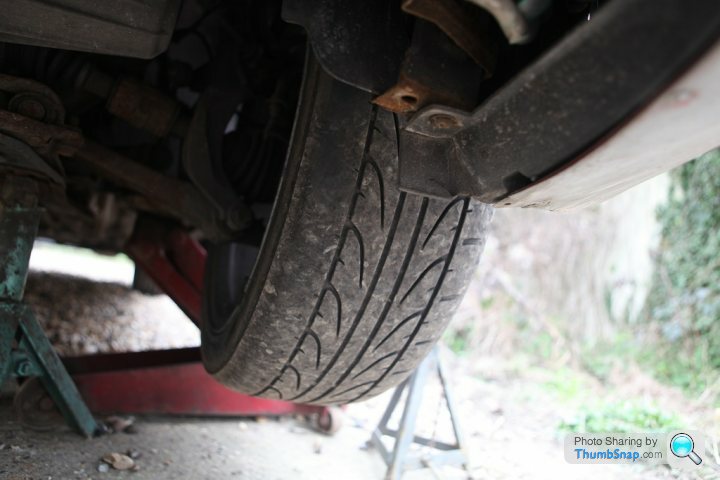
The car was "nervous" in the steering department, once it was set up in a corner is was fine, but a bit twitchy going in. Felt like tracking and initial checks confirmed my suspicion. Both front tyres were "unevenly worn" in MOT parlance, or "knackered" as the rest of us would say:
Two front tyres ordered, and it was booked into the local specialist for tracking. They promptly turned round and said it was not possible to set it up, the lower wishbones were utterly knackered. I have to admit I was surprised, because it handled pretty well, but they know what they are doing, so it came home with its tail between its legs.
On the good side, I have all the spares, they are common across GTAs, 156s, 147s and GT. So not a disaster. Two weekends ago, I set about the car with a clearly defined plan:
1) Get up early
2) Whip the lower wishbones off
3) Replace with new parts
4) Get it tracked
5) Have fun.
So we got to (2), and then suddenly the wheel arch looked like this:
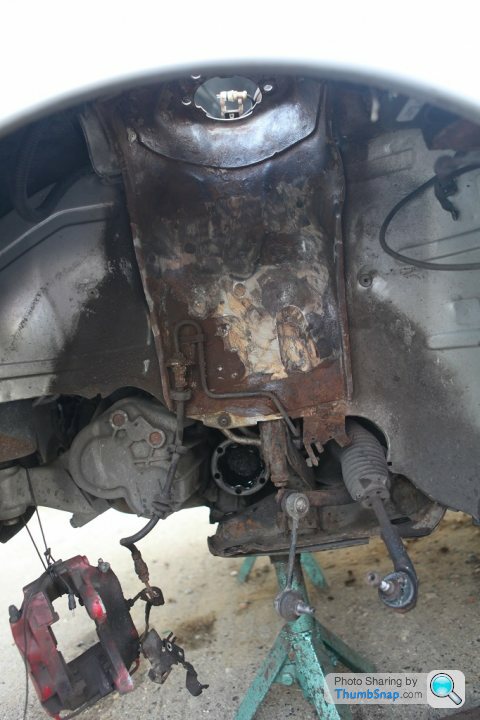
I had started with the best of intentions, but the driveshaft boots were in trouble, the track rod end boots were shot, the shocks were knackered and there was lots of surface rust in the shock turret - this can get very bad on 156s, so I bit the bullet and emptied out the wheelarches. Oh, I forgot, the brakes were well under the limit for the discs, so they went in the bin. The lower 'bones were indeed knackered - the rear bush literally fell off as I removed the bolts.
The rest of the w/e was devoted to cleaning up the wheelarches and sorting the rust.
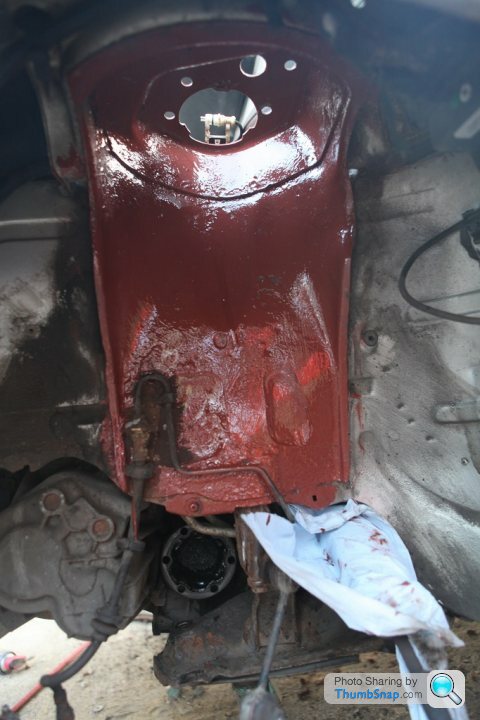
Wirebrushed and primed. The observant will be wondering why I did not finish it properly and move the brake pipe - the answer is that this is very high risk, and replacing the brake pipes at the front is an engine out job. To be avoided unless you really have to.
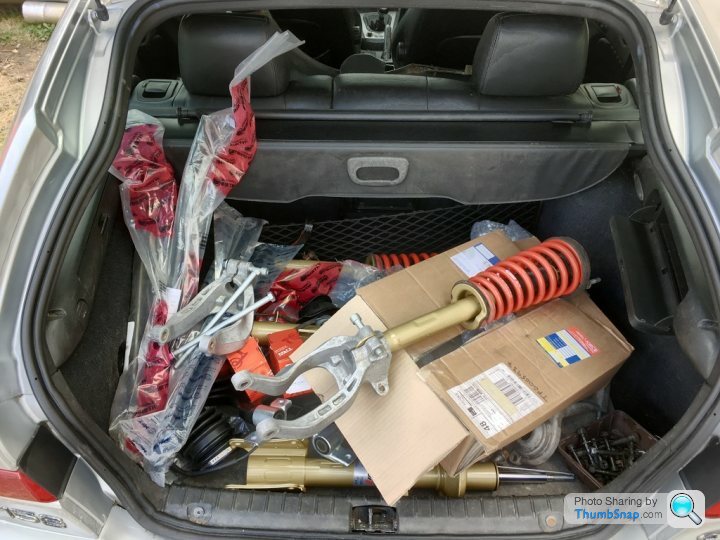
Two weekends later, the boot looked like this - about a grands worth of parts in there:
Starting to rebuild the front suspension. New lower wishbone, upper, painted the upright, new CV boots, new track rod end, springs and shocks:

Job jobbed, now for the other side:
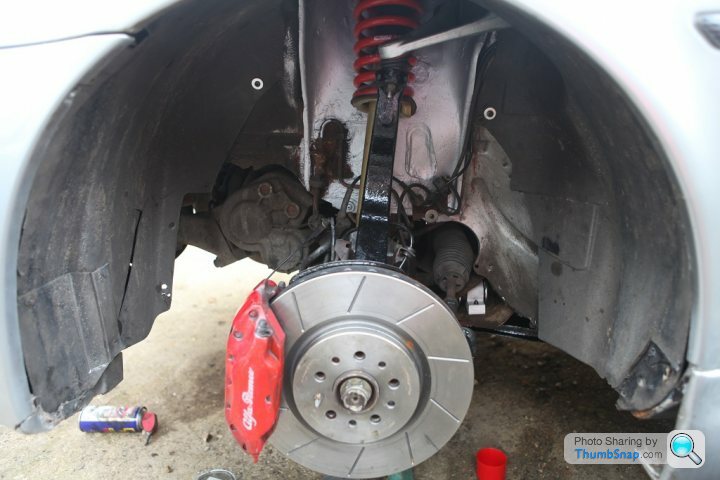
I know I need a new hub nut - I don't want to put this on until both sides have the brakes working - you get your assistant to stand on the brakes while you tighten them with an impact gun turned up to 11.
The car was "nervous" in the steering department, once it was set up in a corner is was fine, but a bit twitchy going in. Felt like tracking and initial checks confirmed my suspicion. Both front tyres were "unevenly worn" in MOT parlance, or "knackered" as the rest of us would say:
Two front tyres ordered, and it was booked into the local specialist for tracking. They promptly turned round and said it was not possible to set it up, the lower wishbones were utterly knackered. I have to admit I was surprised, because it handled pretty well, but they know what they are doing, so it came home with its tail between its legs.
On the good side, I have all the spares, they are common across GTAs, 156s, 147s and GT. So not a disaster. Two weekends ago, I set about the car with a clearly defined plan:
1) Get up early
2) Whip the lower wishbones off
3) Replace with new parts
4) Get it tracked
5) Have fun.
So we got to (2), and then suddenly the wheel arch looked like this:
I had started with the best of intentions, but the driveshaft boots were in trouble, the track rod end boots were shot, the shocks were knackered and there was lots of surface rust in the shock turret - this can get very bad on 156s, so I bit the bullet and emptied out the wheelarches. Oh, I forgot, the brakes were well under the limit for the discs, so they went in the bin. The lower 'bones were indeed knackered - the rear bush literally fell off as I removed the bolts.
The rest of the w/e was devoted to cleaning up the wheelarches and sorting the rust.
Wirebrushed and primed. The observant will be wondering why I did not finish it properly and move the brake pipe - the answer is that this is very high risk, and replacing the brake pipes at the front is an engine out job. To be avoided unless you really have to.
Two weekends later, the boot looked like this - about a grands worth of parts in there:
Starting to rebuild the front suspension. New lower wishbone, upper, painted the upright, new CV boots, new track rod end, springs and shocks:
Job jobbed, now for the other side:
I know I need a new hub nut - I don't want to put this on until both sides have the brakes working - you get your assistant to stand on the brakes while you tighten them with an impact gun turned up to 11.
MDMA . said:
Went north of Aberdeen from Wigan last year to buy a "mint - owners description " late model 156 GTA saloon in red. Was a rotten shed. Shame as really wanted one.
Promised myself never to go to Scotland and look at a car again. Have all been rust buckets.
This one was also from Scotland, but started its life in the less salty south. I think I've caught the rust in time, we'll see.Promised myself never to go to Scotland and look at a car again. Have all been rust buckets.
Edited by rxe on Thursday 7th April 21:13
Edited by rxe on Thursday 7th April 21:16
A couple of small updates. Front suspension is all done, I've totally renewed all of the moving parts and anything made of the chocolate rubber that Alfa used in the bushes. I should only need to visit the front wheel arches for brake pads in the next three years.
Took the car out for a quick test drive: not a fast one, because the tracking is pretty much done "by eye" and is almost certainly wrong. The Koni FSDs are a nice set of shocks, very similar to OE, but the hard bumps are smoothed out. It is very hard to draw any conclusions as the back end is still in a state.
Moody (i.e. dark) shot in the lane home, just to prove that the car actually works:

Started on the rear suspension, which is meant to be easier than the front. As expected, the wheel arches are covered in scabiness inside. I'm not sure if this is just because this car has suffered salted roads in Scotland, or they are all like this, but anyone with a 156 needs to be checking underneath. I've got this in time, it is just surface rust, but if I had waited for a few years, I'd be getting the MIG out.

This bit is important - it is the spring cup on the rear shock - and badly corroded. When it goes, the spring collapses and the bits end up shredding the tyre. Not good if it happens at speed. New one on the right:

Wheel arch after much wire brushing and now in primer:

Took the car out for a quick test drive: not a fast one, because the tracking is pretty much done "by eye" and is almost certainly wrong. The Koni FSDs are a nice set of shocks, very similar to OE, but the hard bumps are smoothed out. It is very hard to draw any conclusions as the back end is still in a state.
Moody (i.e. dark) shot in the lane home, just to prove that the car actually works:
Started on the rear suspension, which is meant to be easier than the front. As expected, the wheel arches are covered in scabiness inside. I'm not sure if this is just because this car has suffered salted roads in Scotland, or they are all like this, but anyone with a 156 needs to be checking underneath. I've got this in time, it is just surface rust, but if I had waited for a few years, I'd be getting the MIG out.
This bit is important - it is the spring cup on the rear shock - and badly corroded. When it goes, the spring collapses and the bits end up shredding the tyre. Not good if it happens at speed. New one on the right:
Wheel arch after much wire brushing and now in primer:
C70R said:
Absolute credit to you for rescuing such a rare and characterful car. But I find it petrifying that the front end could have been in such a horrendous state without you noticing (particularly having driven a long distance and at speed).
Surely there's no way a car with all of the faults below (particularly rust there, which doesn't appear overnight) could have passed an MOT recently???
I was amazed how well it handled. I've driven my fair share of sheddy Alfas, and they are all vague on the turn in, and clattery from the wishbones and droplinks. This one was neither - turned sharply (bit nervously but sharp all the same) and was very stable. The only fault I've found that would affect the handing is the lower wishbone, which is pretty hard to detect with it installed unless you really know where to pry. Surely there's no way a car with all of the faults below (particularly rust there, which doesn't appear overnight) could have passed an MOT recently???
rxe said:
Both front tyres were "unevenly worn" in MOT parlance, or "knackered" as the rest of us would say...
the lower wishbones were utterly knackered...
he driveshaft boots were in trouble, the track rod end boots were shot, the shocks were knackered and there was lots of surface rust in the shock turret...
the brakes were well under the limit for the discs...
the lower 'bones were indeed knackered - the rear bush literally fell off as I removed the bolts.
The MOT man did list the tyres as an advisory 2000 miles ago - but I think they are still technically legal - 1.6 mm over 75% of the width I think.
None of the rust has needed welding - this is all preventative. It would be an MOT fail in 2 years if left untreated.
The brakes worked - but I would not have liked to work them too hard.
I assume that the downpipes fell apart after the MOT - the tester would have to be blind and deaf to have missed that.
Thanks for the positive vibes from everyone - reassures me that these are really worth saving!
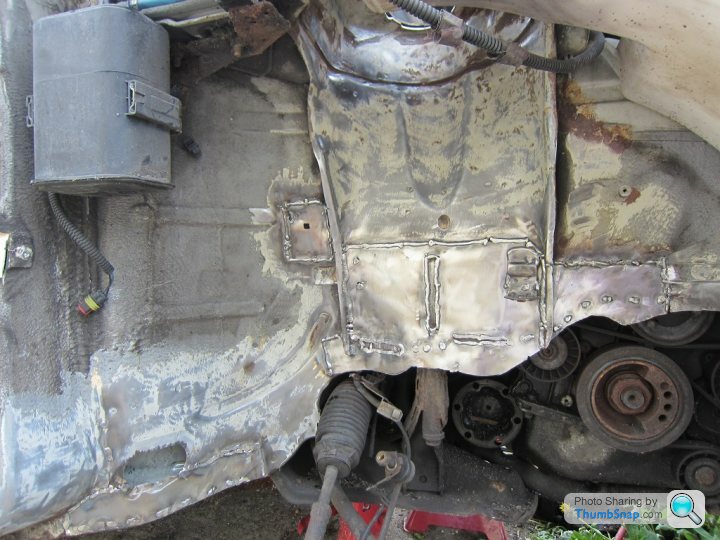
If you want to see rust, here are some pictures from another project - this one is an S-Reg 2.5.
Post welding on the driver's wheel arch - there's a lot of new metal in there:
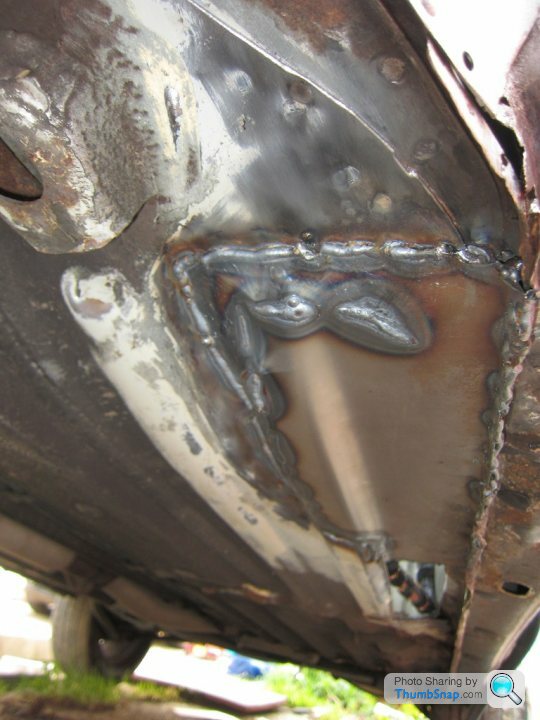
Floorpan fixing on the same car, looking from the passenger wheel to the back:
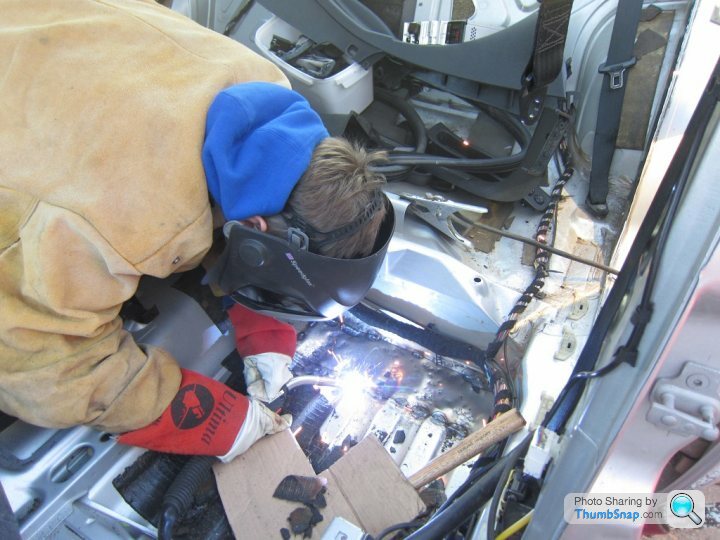
Action shot welding up the rear footwells, another common rot point. My 13 year old wielding the MIG (got to learn at some stage if the family drives Alfas):
Post welding on the driver's wheel arch - there's a lot of new metal in there:
Floorpan fixing on the same car, looking from the passenger wheel to the back:
Action shot welding up the rear footwells, another common rot point. My 13 year old wielding the MIG (got to learn at some stage if the family drives Alfas):
5ohmustang said:
Such a great looking wagon, aren't these the ones with the plastix impeller in the water pump?
Why do they rust so bad, it is not thay old.
Yes, the impeller was originally plastic on these engines, it used to crack, and the engine would overheat. Classic symptom is an engine that idles fine in traffic, and then overheats when it is moving at 70. Most of these are fixed now.Why do they rust so bad, it is not thay old.
Rust - QC at the factory was very patchy. My 51 plate 156 V6 is fine. My 04 GT is fine. This GTA is an 03 plate, and I've just managed to catch the corrosion in time, before it got serious. My S-Reg 156 V6 had the structural integrity of a colander before we got the MIG out.
Spinakerr said:
Any chance you two might be available to help weld my 164 rear crossmember smile?
Where are you? :-)strangehighways said:
I absolutely love the 156 GTA, especially the Sportwagon. The thing is, I have to drive 18k a year and I just know I would want to keep the car in very good order, which would probably bankrupt me. I always seem to be reading people spending thousands a year just to keep their GTAs running.
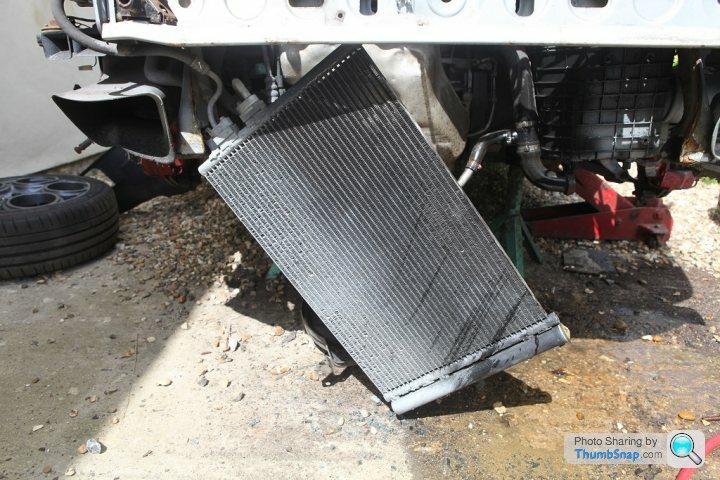
I would not go near one of these if I was not capable of wielding the spanners myself. The work done so far is about £1000 in parts and about £2000 in labour - thankfully I'm only paying the parts bill. As we all know, Sunday is a day for being on one's knees, so I decided to grovel in front of the GTA and fix most of the remaining mechanical issues. When I bought it, the radiator was a known problem. This is very common on 156s, the radiator corrodes quickly, all the little fins fall out and the car starts overheating in the summer. In addition to the radiator, i knew the oil cooler was leaking, which can fail catastrophically and wreck the engine, so needed to be done urgently.
Unfortunately, this sort of fixing involves removing the front bumper, which is fine when you've done it before and greased all the fastners, but on a new (to me) car, I knew it would be fun. Tally as follows:
4 torx bolts in the upper wings: 3 drilled out, one undid
3 torx bolts at the bottom front: missing
2 torx bolts at the bottom chassis legs: one drilled out, one undid
4 torx bolts across the front top - all undid.
That lot took 3 hours to do, and retap the holes. Everything has been replaced with stainless steel, greased to within an inch of its life. With the bumper off, drop the front cross member, which disintegrated in my hands, and the radiator lands on your head. Thankfully I have a spare cross member from another project available.
Old rad, looking a little tired:
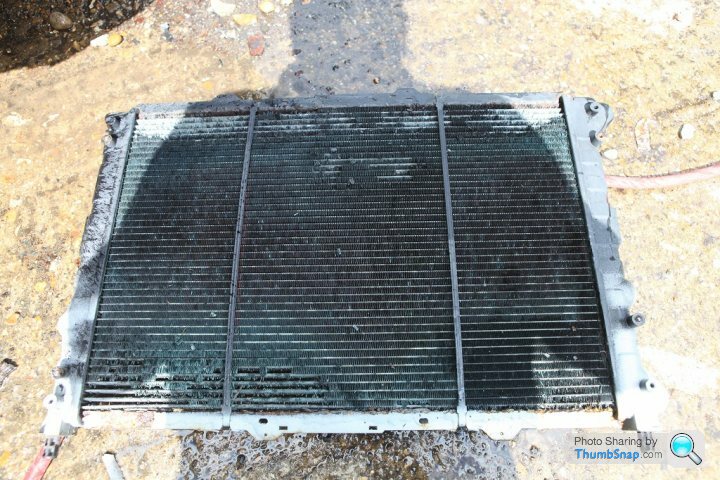
You can't see it in the pictures, but the antifreeze was that special stuff that looks just like plain water, oh wait, it was plain water. Chalk another one up to the people who installed the engine - not content with driving an exhaust flange bolt into a catalyst, they didn't bother with antifreeze. I'd better change the oil, they probably used a load of 3 in 1 that they had kicking around.
Amazingly the hoses were in reasonable condition, which is more than can be said for the air-con rad, which has a hole in it. I knew the car had needed front end work in the past, I wonder if the overspray camo job on the air con rad was extra.
Actually, there is overspray pretty much everywhere at the front, a proper kwality job. I've got a new air-con rad on order, I can stick that in pretty easily, the bumper will take about 20 minutes to remove next time.
Old oil cooler which was not doing much cooling, instead it was doing rather a lot of leaking:
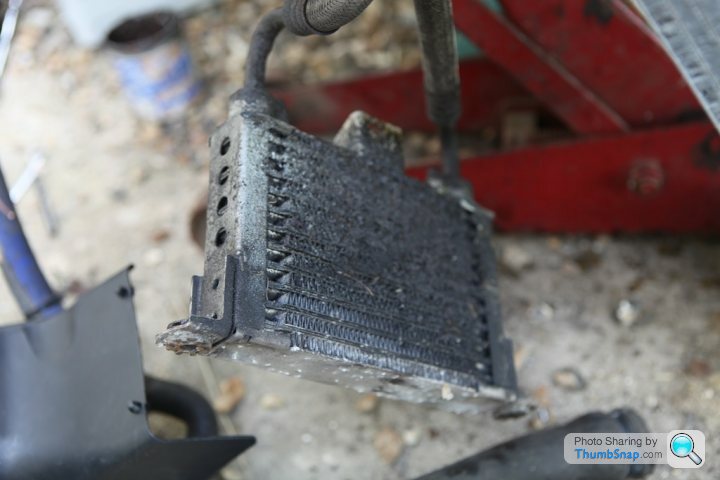
New oil cooler and new ducting. The old one failed because whoever fixed the front last time didn't bother to secure the ducting. This flaps against the cooler, eventually knocking holes in it.
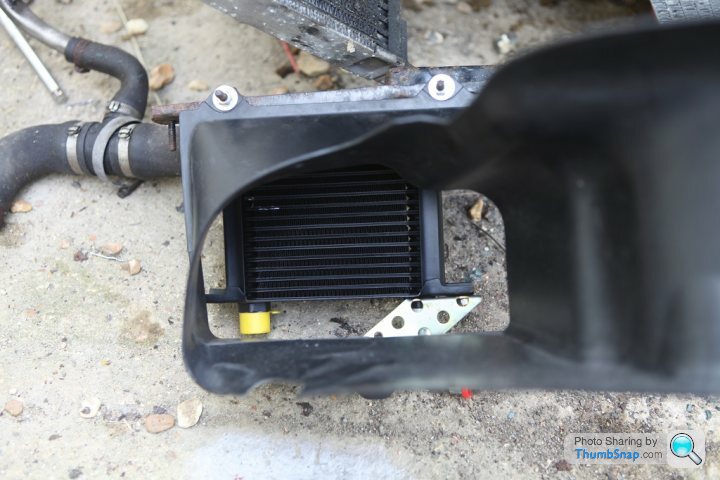
Reassembly is the reverse of removal, but this time with vast amounts of grease slathered over pretty much everything. I also replaced the gearbox side engine mount which was a bit tired.
With it all back together, it was time for a road test. This is the first time since the work started that I've properly been able to thrash it - I've either been worried about overheating or the oil cooler failing. The handling is pin sharp, without the harshness from over stiffening. The stiffened rear ARB has dialled out a lot of the natural understeer, and winding the engine up beyond 4K delivers the goods in style. It really is improbably quick for a very pedestrian (these days) 250 HP.
Remaining mechanical jobs:
- Handbrake. Works but needs too many clicks, it will probably need new cables
- Rather crusty brake pipes need replacing in places.
- Wire brush the underneath to make sure there is no corrosion, then underseal properly.
- Fix the air con, probably just needs a new rad, but I'll fit that and see if it holds vacuum before regassing.
Then off to the bodyshop for the winter....
Unfortunately, this sort of fixing involves removing the front bumper, which is fine when you've done it before and greased all the fastners, but on a new (to me) car, I knew it would be fun. Tally as follows:
4 torx bolts in the upper wings: 3 drilled out, one undid
3 torx bolts at the bottom front: missing
2 torx bolts at the bottom chassis legs: one drilled out, one undid
4 torx bolts across the front top - all undid.
That lot took 3 hours to do, and retap the holes. Everything has been replaced with stainless steel, greased to within an inch of its life. With the bumper off, drop the front cross member, which disintegrated in my hands, and the radiator lands on your head. Thankfully I have a spare cross member from another project available.
Old rad, looking a little tired:
You can't see it in the pictures, but the antifreeze was that special stuff that looks just like plain water, oh wait, it was plain water. Chalk another one up to the people who installed the engine - not content with driving an exhaust flange bolt into a catalyst, they didn't bother with antifreeze. I'd better change the oil, they probably used a load of 3 in 1 that they had kicking around.
Amazingly the hoses were in reasonable condition, which is more than can be said for the air-con rad, which has a hole in it. I knew the car had needed front end work in the past, I wonder if the overspray camo job on the air con rad was extra.
Actually, there is overspray pretty much everywhere at the front, a proper kwality job. I've got a new air-con rad on order, I can stick that in pretty easily, the bumper will take about 20 minutes to remove next time.
Old oil cooler which was not doing much cooling, instead it was doing rather a lot of leaking:
New oil cooler and new ducting. The old one failed because whoever fixed the front last time didn't bother to secure the ducting. This flaps against the cooler, eventually knocking holes in it.
Reassembly is the reverse of removal, but this time with vast amounts of grease slathered over pretty much everything. I also replaced the gearbox side engine mount which was a bit tired.
With it all back together, it was time for a road test. This is the first time since the work started that I've properly been able to thrash it - I've either been worried about overheating or the oil cooler failing. The handling is pin sharp, without the harshness from over stiffening. The stiffened rear ARB has dialled out a lot of the natural understeer, and winding the engine up beyond 4K delivers the goods in style. It really is improbably quick for a very pedestrian (these days) 250 HP.
Remaining mechanical jobs:
- Handbrake. Works but needs too many clicks, it will probably need new cables
- Rather crusty brake pipes need replacing in places.
- Wire brush the underneath to make sure there is no corrosion, then underseal properly.
- Fix the air con, probably just needs a new rad, but I'll fit that and see if it holds vacuum before regassing.
Then off to the bodyshop for the winter....
Edited by rxe on Monday 4th July 14:11
Edited by rxe on Monday 4th July 14:14
No, I haven't fixed the wing.
The plan has changed a bit. The original plan was to stick a door on (done) and then stick the spare wing that came with the car on as cheaply as possible and drive it for a while. The new plan is to do it properly, get a good set of s/h side skirts, front bumper and rear bumper, get them sprayed properly, get the remainder of the car sprayed properly and make it spot on. So rather than a £300 temporary botch job, we're looking at about 10x that to do it well.
So I'll be driving around with a chewed up wing while I assemble the parts, then bite the bullet and get it all done in one go. I can spray paint, but it usually looks cack, and I'll give it to someone who knows what they are doing.
Edited by rxe on Monday 4th July 18:46
Right, this is going to be a fairly nerdy post about fixing air conditioning on a 156 GTA. The general principles will apply to most air con installations, but the specifics will be different.
When i got the car, I didn't try the aircon, as it was about -3 outside, and I was simply grateful that the heater worked. Inevitably the air con didn't work, and when I was changing the radiator, I found a big hole in the aircon rad, which would explain why. So after spending £80 on a new radiator, and popping it in, I set about getting the air con going.
The principles of air con are reasonably simple, and the same as a domestic fridge. You have a "working gas", it gets compressed which raises the temperature, the hot gas gets cooled in the radiator (or "condenser" which I just replaced), and then this cooled gas is allowed to expand rapidly in the "evaporator". The evaporator gets cold as a result, and the air is blown over the cold evaporator and cools you down.
So first thing is to ensure that your system is gas tight. There are a whole load of joints and seals that could leak, and if there is no gas, then you have no air con. The other problem is water, or humidity. Any water in the system will destroy it in short order, causing corrosion and ice blockages.
Thankfully there is a simple procedure that allows you to be reasonably certain that the system is gas tight, and to remove all the water - a vacuum test. You connect the system to a vacuum pump for several hours, which boils off any water in the pipework. You then leave the system under vacuum overnight, and if it is still under vacuum, then there are no discernable leaks.

The first tool you need is a manifold and hoses. Blue is "low side" - this is the feed into the compressor. Red is "high" side, the output from the compressor. Yellow is the hose used for vacuum sucking, or adding gas if you are a professional air-con bloke. I'm not a professional, I do it the way, see later.
Inevitably, the gauges read zero pressure at this stage - I'd just replaced the condenser. So connect up the vacuum pump to the yellow hose, open the red and blue valves, and let it run. About 40 seconds later, the gauges looked like this:

Yay, vacuum. If it goes to vacuum instantly, you probably haven't opened the valves properly, it should take a while to hoover out the whole system. If it doesn't go to vacuum, then you've still got a big hole in the system, listen for hissing noises. I left it like this for 5 hours which makes absolutely sure that any water in there is boiled off. This is much better than most garages can afford to do, if you get 20 minutes of vacuum, you'll be lucky.
After 5 hours of the pump chugging away, I closed the manifold valves, switched the pump off, left the gauges connected, and went to bed. Next morning - vacuum was still there. So good news - there are no material leaks in the system. There may be very subtle leaks that can be found with a pressure test, but this has a 99% chance of being good.
With a cleaned out and leak proof system time to give it some gas. The STP cannisters in Halfords have a bad rap, but if you've done the tests above, then they have a good chance of working. Fortunately for me, the amount of gas in a can is pretty much exactly what the system needs. I wouldn't advise just adding gas to a system using these cans - air con systems need a specific weight of gas, and unless you know how much you are shoving in, then you have the potential break something.
So, connect up your cannister using the cheapo attachment, and pull the trigger, with the engine running and the aircon switched to full demand:

What should happen is that the compressor should kick in, and draw the gas through the system. Unfortunately, it didn't. The pressure in the low side went to 60 psi at the first pull of the trigger, and that was it.
Hmmm. The compressor is protected by an electric clutch, which engages with an audible "clunk" when you switch the air con on. You can clearly hear this from the driver's seat, and it is the basic test of an air con system - no clunk, no aircon.
There are a number of things that can stop the clutch working:
- it can be knackered. Easy to test, there is only one wire on the compressor, and if you give it 12v, then the clutch should click in. Mine did, so it was working.
- there is a pressure switch that will stop the compressor kicking in if the low side has no pressure (all the gas leaked out) or the high side is over pressure (blockage). Do not bypass this pressure switch, it is there to protect the system.
- there could be electrical b0rkage somewhere in the circuit that is stopping it from working. Anything is possible on a 15 year old car.
To get the gas done, I just connected the clutch to 12v and let it run - I had gauges on the system, so it was safe. The gas flowed in, pressure on the high side built up, and lovely cold air poured from the dash. All good. With the can emptied, the mechanical side was done - 500 grams of gas in, all working.
So now it is time to work out why the compressor is not kicking in. You might be tempted to hard wire the compressor into 12v in the summer, or connect it straight to the demand switch on the dashboard - this would be a mistake as there the pressure sensor is there to protect it. If something goes wrong and the clutch doesn't disengage, it can shred the aux belt, which can then throw the cambelt off and it gets expensive very fast.
The pressure sensor is here:

There's not much you can do to test it, but the wires all looked intact and the connector was plugged in. If the sensor gives the OK and the ECU gives the OK, then these fire a relay that then switches on the compressor. The relays are in front of the battery:

Being an Italian car, the relay marked "Air Con" on the box was in fact powering the fuel injection, and removing that killed the engine. The one next to it (circled) was allegedly running the cooling fans, but was in fact the air con. Your mileage may vary. if I wiggled this relay out, I could feel it unlatching as it disconnected, and latching again as it reconnected. This was good - it meant that the ECU and pressure switch were fine - air con demand was there, but the signal was not reaching the compressor clutch.
Flipping the relay over and poking around with a multimeter revealed the following:
There was a 12v supply at the relay, so looking good so far. Following the brown wire, the next stop is a big multi plug in front of the relays:

All fine here, keep looking. Round the back of the engine is the next plug:

Here the brown wire (on the left), turns into a green and red wire (on the right), which is the same as the wire going to the compressor, so we're getting close. Again everything was fine here. According to the continuity tester, I had perfect wiring from relay to compressor. But continuity does not mean an ability to carry current - so measuring voltage showed that I had power all the way to the compressor plug. A quick wiggle of the plug (fairly fraught with the engine running and a hot catalyst about 3 mm from the back of your hand), showed that the plug itself was knackered - the compressor kicked in when the plug was pushed, and died when it was was released.
The parts car yielded a new plug, and this was soldered on with heat shrink to protect the joint:

With that fixed, it was all working - the compressor engaged with air con demand, the little light came on, and cold air was plentiful. Beers all found and felt extremely chuffed.
When i got the car, I didn't try the aircon, as it was about -3 outside, and I was simply grateful that the heater worked. Inevitably the air con didn't work, and when I was changing the radiator, I found a big hole in the aircon rad, which would explain why. So after spending £80 on a new radiator, and popping it in, I set about getting the air con going.
The principles of air con are reasonably simple, and the same as a domestic fridge. You have a "working gas", it gets compressed which raises the temperature, the hot gas gets cooled in the radiator (or "condenser" which I just replaced), and then this cooled gas is allowed to expand rapidly in the "evaporator". The evaporator gets cold as a result, and the air is blown over the cold evaporator and cools you down.
So first thing is to ensure that your system is gas tight. There are a whole load of joints and seals that could leak, and if there is no gas, then you have no air con. The other problem is water, or humidity. Any water in the system will destroy it in short order, causing corrosion and ice blockages.
Thankfully there is a simple procedure that allows you to be reasonably certain that the system is gas tight, and to remove all the water - a vacuum test. You connect the system to a vacuum pump for several hours, which boils off any water in the pipework. You then leave the system under vacuum overnight, and if it is still under vacuum, then there are no discernable leaks.
The first tool you need is a manifold and hoses. Blue is "low side" - this is the feed into the compressor. Red is "high" side, the output from the compressor. Yellow is the hose used for vacuum sucking, or adding gas if you are a professional air-con bloke. I'm not a professional, I do it the
way, see later. Inevitably, the gauges read zero pressure at this stage - I'd just replaced the condenser. So connect up the vacuum pump to the yellow hose, open the red and blue valves, and let it run. About 40 seconds later, the gauges looked like this:
Yay, vacuum. If it goes to vacuum instantly, you probably haven't opened the valves properly, it should take a while to hoover out the whole system. If it doesn't go to vacuum, then you've still got a big hole in the system, listen for hissing noises. I left it like this for 5 hours which makes absolutely sure that any water in there is boiled off. This is much better than most garages can afford to do, if you get 20 minutes of vacuum, you'll be lucky.
After 5 hours of the pump chugging away, I closed the manifold valves, switched the pump off, left the gauges connected, and went to bed. Next morning - vacuum was still there. So good news - there are no material leaks in the system. There may be very subtle leaks that can be found with a pressure test, but this has a 99% chance of being good.
With a cleaned out and leak proof system time to give it some gas. The STP cannisters in Halfords have a bad rap, but if you've done the tests above, then they have a good chance of working. Fortunately for me, the amount of gas in a can is pretty much exactly what the system needs. I wouldn't advise just adding gas to a system using these cans - air con systems need a specific weight of gas, and unless you know how much you are shoving in, then you have the potential break something.
So, connect up your cannister using the cheapo attachment, and pull the trigger, with the engine running and the aircon switched to full demand:
What should happen is that the compressor should kick in, and draw the gas through the system. Unfortunately, it didn't. The pressure in the low side went to 60 psi at the first pull of the trigger, and that was it.
Hmmm. The compressor is protected by an electric clutch, which engages with an audible "clunk" when you switch the air con on. You can clearly hear this from the driver's seat, and it is the basic test of an air con system - no clunk, no aircon.
There are a number of things that can stop the clutch working:
- it can be knackered. Easy to test, there is only one wire on the compressor, and if you give it 12v, then the clutch should click in. Mine did, so it was working.
- there is a pressure switch that will stop the compressor kicking in if the low side has no pressure (all the gas leaked out) or the high side is over pressure (blockage). Do not bypass this pressure switch, it is there to protect the system.
- there could be electrical b0rkage somewhere in the circuit that is stopping it from working. Anything is possible on a 15 year old car.
To get the gas done, I just connected the clutch to 12v and let it run - I had gauges on the system, so it was safe. The gas flowed in, pressure on the high side built up, and lovely cold air poured from the dash. All good. With the can emptied, the mechanical side was done - 500 grams of gas in, all working.
So now it is time to work out why the compressor is not kicking in. You might be tempted to hard wire the compressor into 12v in the summer, or connect it straight to the demand switch on the dashboard - this would be a mistake as there the pressure sensor is there to protect it. If something goes wrong and the clutch doesn't disengage, it can shred the aux belt, which can then throw the cambelt off and it gets expensive very fast.
The pressure sensor is here:
There's not much you can do to test it, but the wires all looked intact and the connector was plugged in. If the sensor gives the OK and the ECU gives the OK, then these fire a relay that then switches on the compressor. The relays are in front of the battery:
Being an Italian car, the relay marked "Air Con" on the box was in fact powering the fuel injection, and removing that killed the engine. The one next to it (circled) was allegedly running the cooling fans, but was in fact the air con. Your mileage may vary. if I wiggled this relay out, I could feel it unlatching as it disconnected, and latching again as it reconnected. This was good - it meant that the ECU and pressure switch were fine - air con demand was there, but the signal was not reaching the compressor clutch.
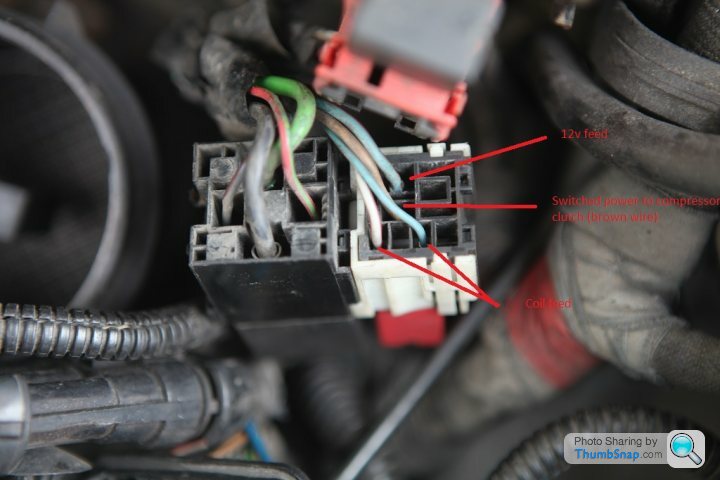
Flipping the relay over and poking around with a multimeter revealed the following:
There was a 12v supply at the relay, so looking good so far. Following the brown wire, the next stop is a big multi plug in front of the relays:
All fine here, keep looking. Round the back of the engine is the next plug:
Here the brown wire (on the left), turns into a green and red wire (on the right), which is the same as the wire going to the compressor, so we're getting close. Again everything was fine here. According to the continuity tester, I had perfect wiring from relay to compressor. But continuity does not mean an ability to carry current - so measuring voltage showed that I had power all the way to the compressor plug. A quick wiggle of the plug (fairly fraught with the engine running and a hot catalyst about 3 mm from the back of your hand), showed that the plug itself was knackered - the compressor kicked in when the plug was pushed, and died when it was was released.
The parts car yielded a new plug, and this was soldered on with heat shrink to protect the joint:
With that fixed, it was all working - the compressor engaged with air con demand, the little light came on, and cold air was plentiful. Beers all found and felt extremely chuffed.
Edited by rxe on Monday 11th July 20:43
Gassing Station | Readers' Cars | Top of Page | What's New | My Stuff