My Suzuki RG125F Project
Discussion


I thought it was time to post some pics of progress (little as it is) on my 1992 RG125F project.
This will be my first bike. I bought it on Ebay sight unseen (I know, I know...):
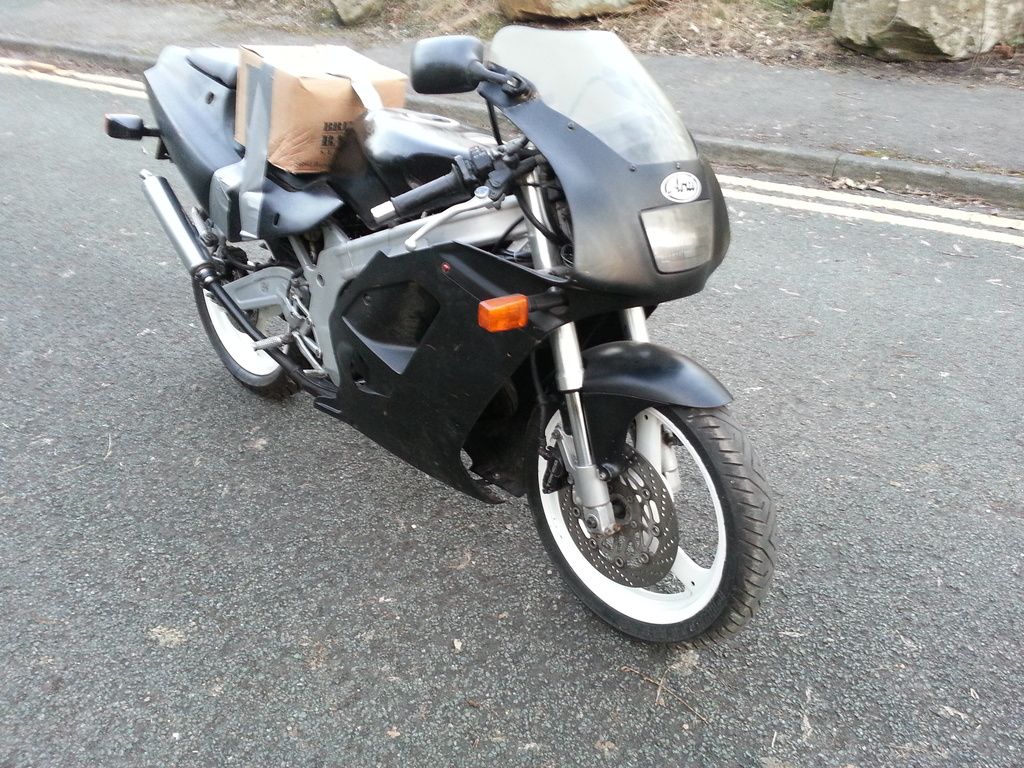
I wanted a 125 sportsbike that I could do some work on, because buying one that already runs is no fun at all, is it? The seller described it as having 'dodgy wiring', which didn't really cover half of it, but meant I got a decent price. Once I started pulling it apart, it was actually in good nick for a 23 year old bike. No signs of a serious crash or corrosion, overall quite clean for it's age and seemed to have been cared for for the most part, prime material for a rebuild.
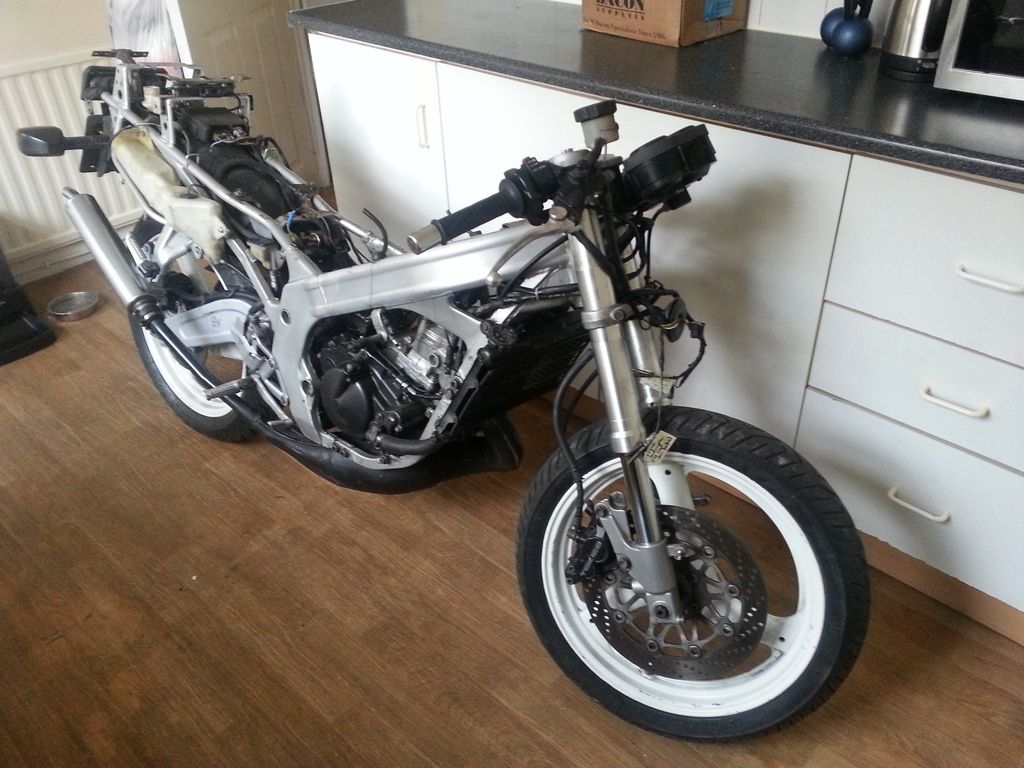
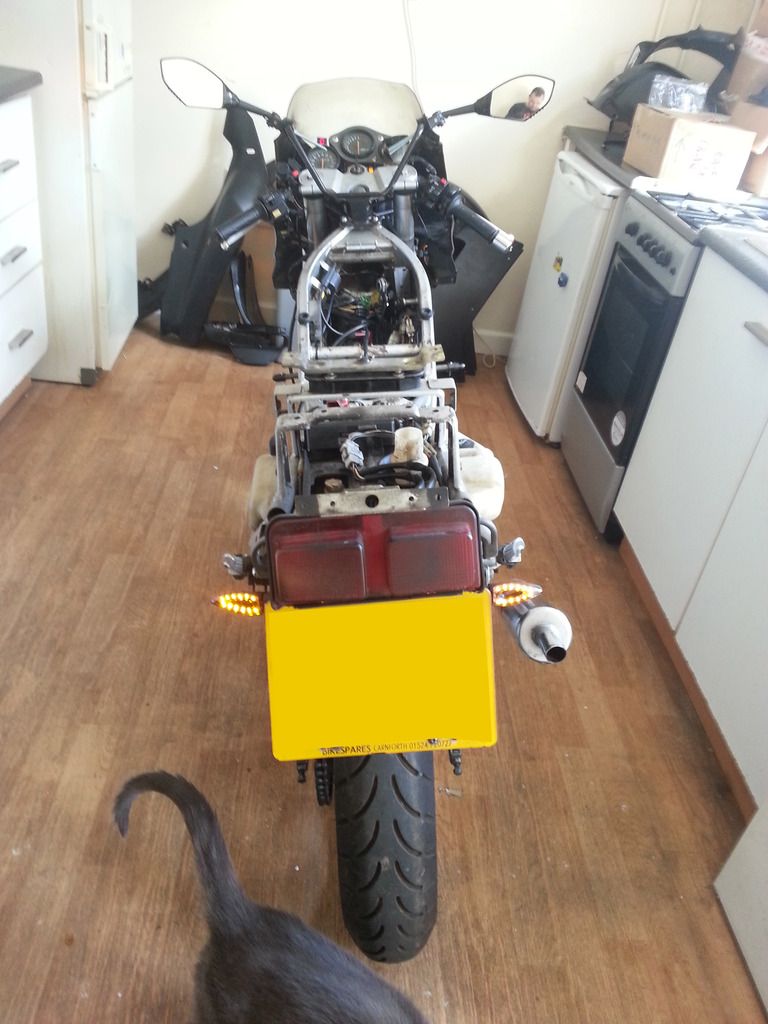
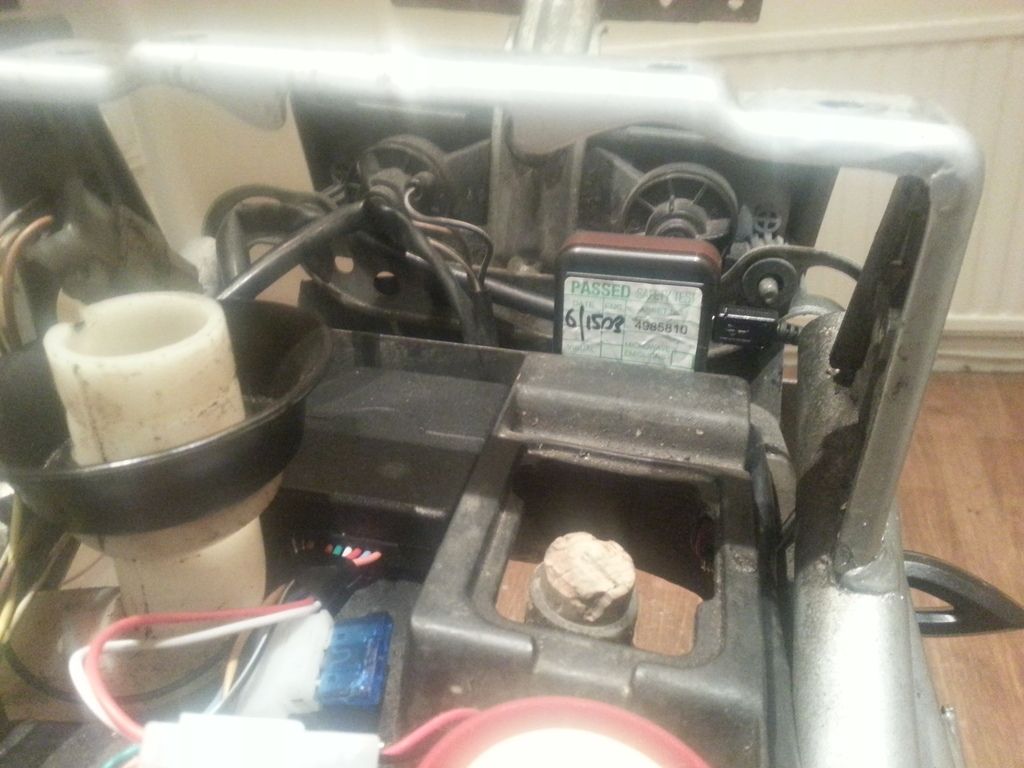
(Yes, that is my kitchen. I live in Manchester, it's cold.)
Most of the work so far has centred around sorting the wiring out. This meant fitting a new loom and ignition switch (the old ones were too butchered to use) and making a new neutral switch wire to replace the missing one. I managed to find a loom that didn't have the electronic restrictor wire cut, probably the only one left where that hasn't been done. I have since started wiring in a few add-ons.
I started by wiring in a hazard light switch (the RG doesn't have one from the factory) and added a charging point. This was very easy to install, just one wire attached to the frame as a ground, and another to a switched power point; I chose the horn as it was nearby and I could hook the wire on without cutting anything.
Next I wanted some diddy LED indicators to replace the standard ones. Just a bit smaller then.
And some for the rear too. Both flashing, you'll notice, to prove the hazards work.
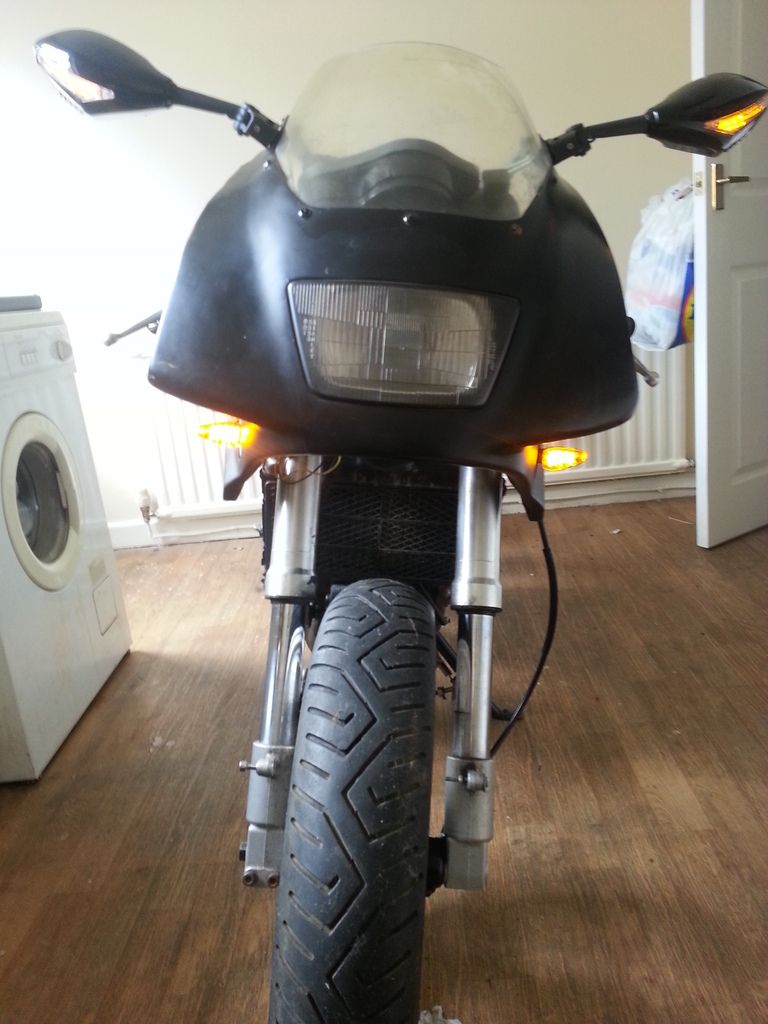
I decided the front blinkers, while pretty, weren't going to signal my intent to turn as much as I would like, so I got some mirrors with integrated flashers and wired them in.
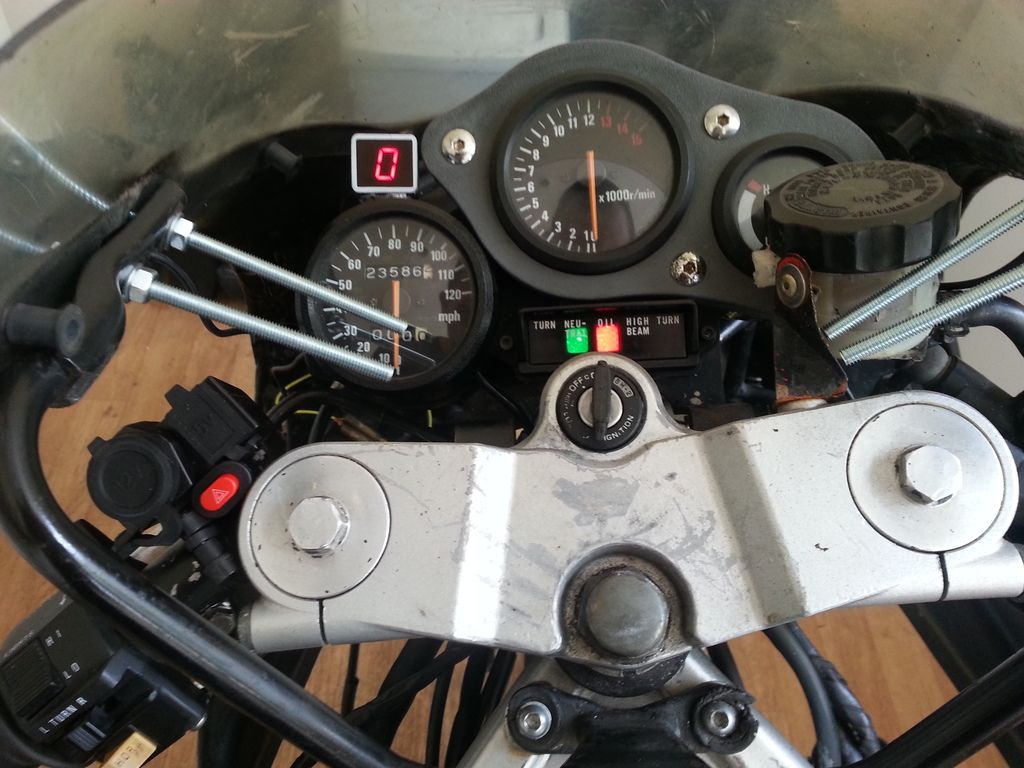
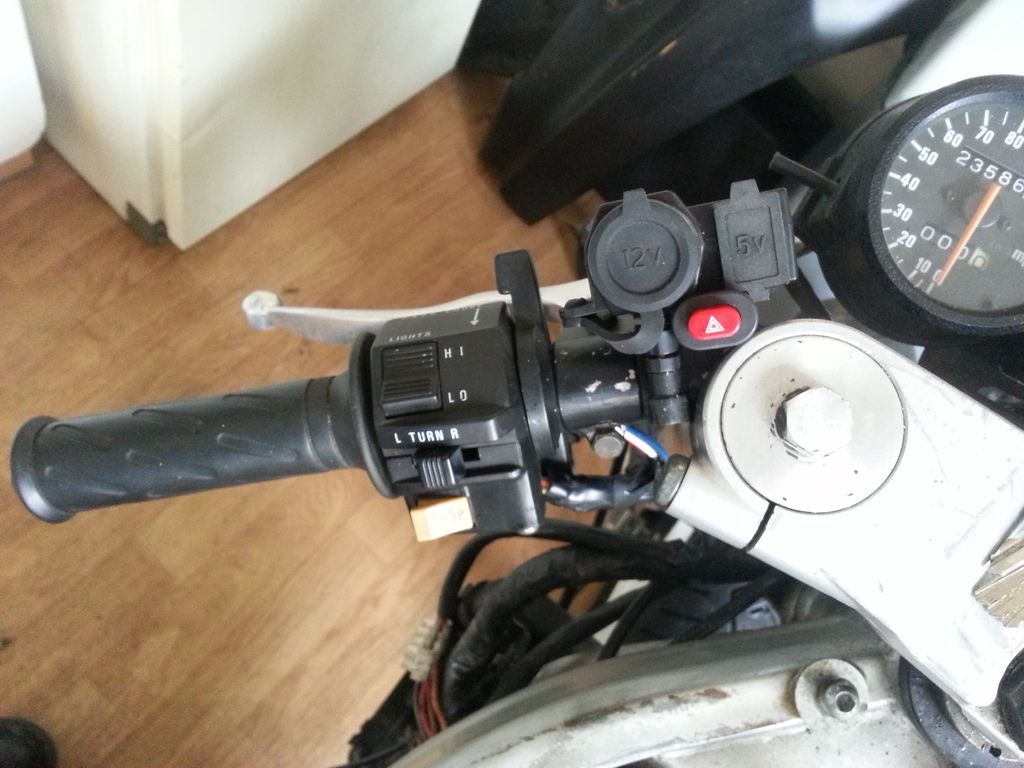
Finally I wanted to add a gear indicator. Putting it on top of the speedo was a ballache: I had to disassemble the instruments, drill a couple of holes in the housing for the wiring to pass through, and get it all to fit back together around the wire, not an easy task. I'm very happy with where it is and how neat it looks, but I don't think I would do it again! Ignore the bolts that are holding the mirrors on, they are all I had lying around to mock it up and will be replaced shortly.
I'm trying to take it step by step, so I'm working exclusively on the wiring, then will move to another part and will work exclusively on that. I'm going to look at adding some illumination for the instruments as what it has now isn't great, fit some kind of anti-theft device and then I shall declare the wiring done. Next will be the engine and gearbox, probably followed by the brakes and suspension, then the bodywork.
This will be my first bike. I bought it on Ebay sight unseen (I know, I know...):

I wanted a 125 sportsbike that I could do some work on, because buying one that already runs is no fun at all, is it?
The seller described it as having 'dodgy wiring', which didn't really cover half of it, but meant I got a decent price. Once I started pulling it apart, it was actually in good nick for a 23 year old bike. No signs of a serious crash or corrosion, overall quite clean for it's age and seemed to have been cared for for the most part, prime material for a rebuild.
(Yes, that is my kitchen. I live in Manchester, it's cold.)
Most of the work so far has centred around sorting the wiring out. This meant fitting a new loom and ignition switch (the old ones were too butchered to use) and making a new neutral switch wire to replace the missing one. I managed to find a loom that didn't have the electronic restrictor wire cut, probably the only one left where that hasn't been done.
I have since started wiring in a few add-ons. I started by wiring in a hazard light switch (the RG doesn't have one from the factory) and added a charging point. This was very easy to install, just one wire attached to the frame as a ground, and another to a switched power point; I chose the horn as it was nearby and I could hook the wire on without cutting anything.

Next I wanted some diddy LED indicators to replace the standard ones. Just a bit smaller then.


And some for the rear too. Both flashing, you'll notice, to prove the hazards work.

I decided the front blinkers, while pretty, weren't going to signal my intent to turn as much as I would like, so I got some mirrors with integrated flashers and wired them in.

Finally I wanted to add a gear indicator. Putting it on top of the speedo was a ballache: I had to disassemble the instruments, drill a couple of holes in the housing for the wiring to pass through, and get it all to fit back together around the wire, not an easy task. I'm very happy with where it is and how neat it looks, but I don't think I would do it again! Ignore the bolts that are holding the mirrors on, they are all I had lying around to mock it up and will be replaced shortly.
I'm trying to take it step by step, so I'm working exclusively on the wiring, then will move to another part and will work exclusively on that. I'm going to look at adding some illumination for the instruments as what it has now isn't great, fit some kind of anti-theft device and then I shall declare the wiring done. Next will be the engine and gearbox, probably followed by the brakes and suspension, then the bodywork.
podman said:
You may find the 2 stroke forum useful for reference, I dare say one or to people will have one tucked anyway.
http://the2strokeforum.proboards.com/
Cheers for that, I'll check it out. http://the2strokeforum.proboards.com/


Just a few bits to update with:
I installed an alarm, fitted neatly into the tail unit and works fine. Wiring it up to the lights proved a pain, I couldn't connect it to the indicators without making them all flash whenever I selected a left or right flasher. So I wired it to the brake light instead.

I also bought a basic GPS tracker. Put simply, you install a SIM card, call the number, and it texts you back with a Google Maps link to its co-ordinates. I've tested it out over the last few days and it seems pretty accurate. It has an 'SOS' button which if pressed, makes it text you every 10 minutes or so with its location. I'm tempted to try connecting this to a vibration switch, essentially making it a pager alarm:
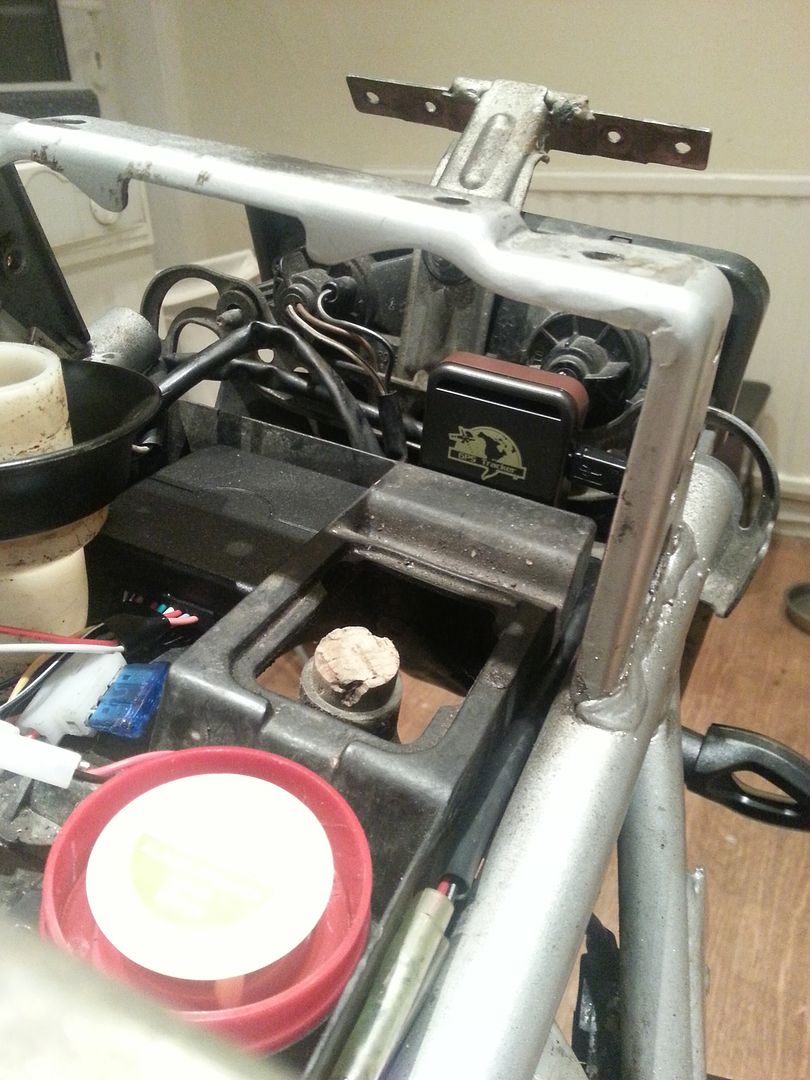
I thought 'GPS TRACKER' in big letters would give the game away to thieves once they started pulling her apart. I found a PAT testing sticker on the way to work that was still sticky, so I put it on to make it look a little more innocuous, The charger cable is to be wired into the bike's electrics so the unit gets charged whenever the ignition is turned on, at the moment the battery life is pretty poor:
I installed an alarm, fitted neatly into the tail unit and works fine. Wiring it up to the lights proved a pain, I couldn't connect it to the indicators without making them all flash whenever I selected a left or right flasher. So I wired it to the brake light instead.

I also bought a basic GPS tracker. Put simply, you install a SIM card, call the number, and it texts you back with a Google Maps link to its co-ordinates. I've tested it out over the last few days and it seems pretty accurate. It has an 'SOS' button which if pressed, makes it text you every 10 minutes or so with its location. I'm tempted to try connecting this to a vibration switch, essentially making it a pager alarm:

I thought 'GPS TRACKER' in big letters would give the game away to thieves once they started pulling her apart. I found a PAT testing sticker on the way to work that was still sticky, so I put it on to make it look a little more innocuous,
The charger cable is to be wired into the bike's electrics so the unit gets charged whenever the ignition is turned on, at the moment the battery life is pretty poor:
Edited by D-Angle on Saturday 1st August 11:26
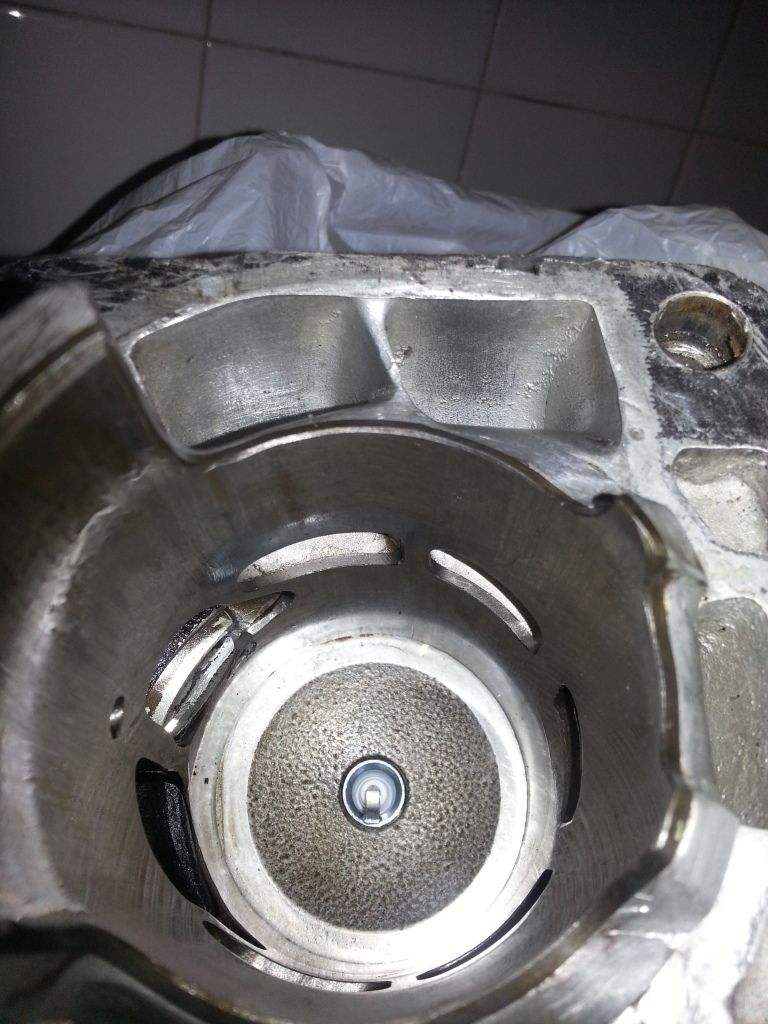
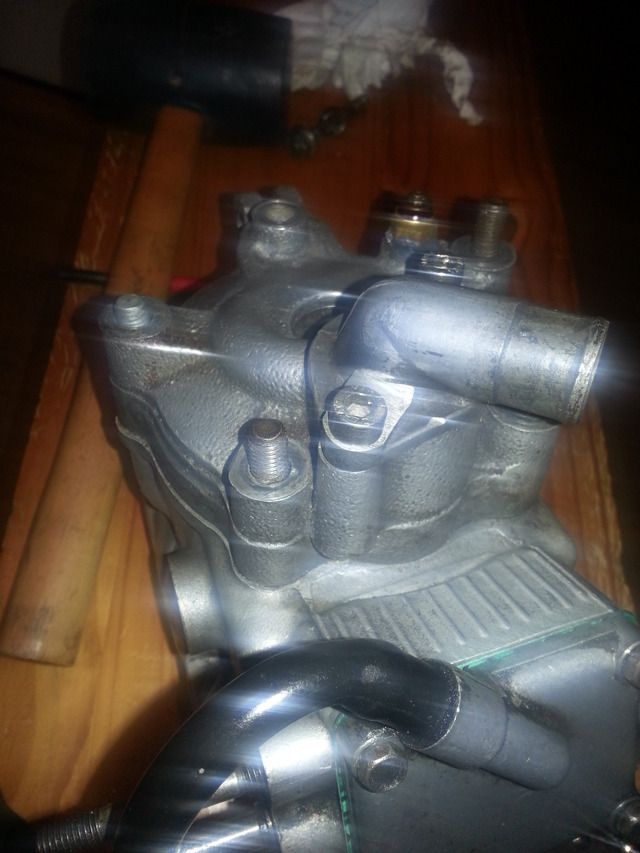
I popped the cylinder head off, turns out it has already had a new bigger piston:
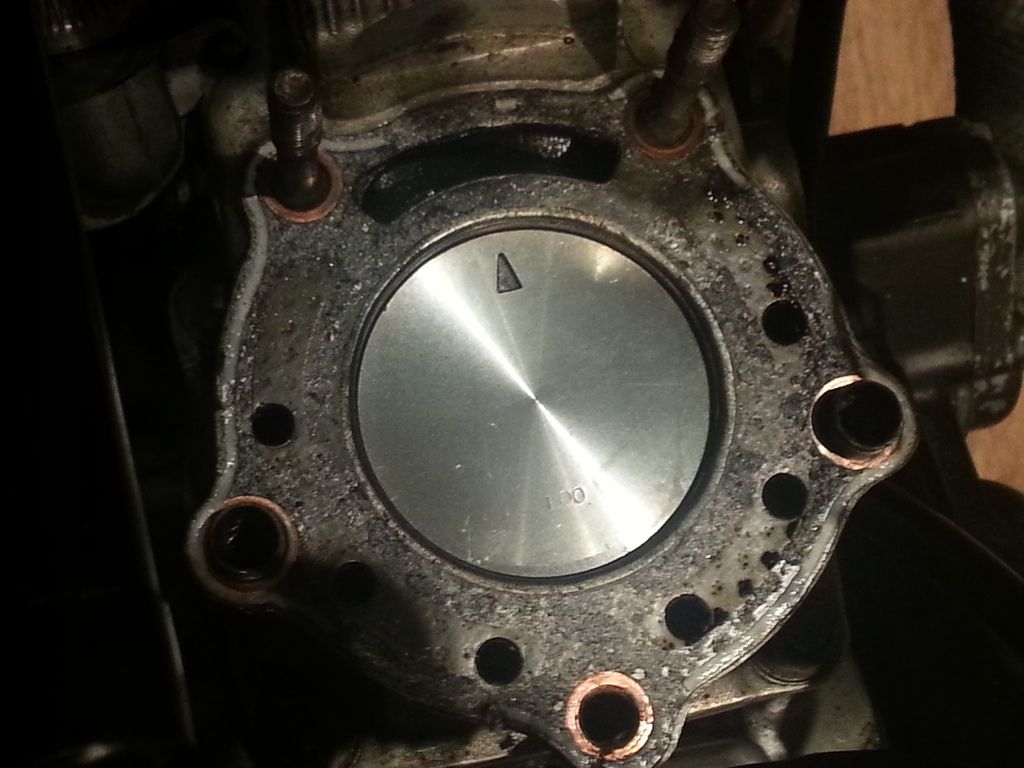
(In case you're wondering, the '1.00' on the top of the piston means that it's .040" over standard size)
Opinions of those who know engines better than I do appreciated. Here's the bore, how's it look condition wise?
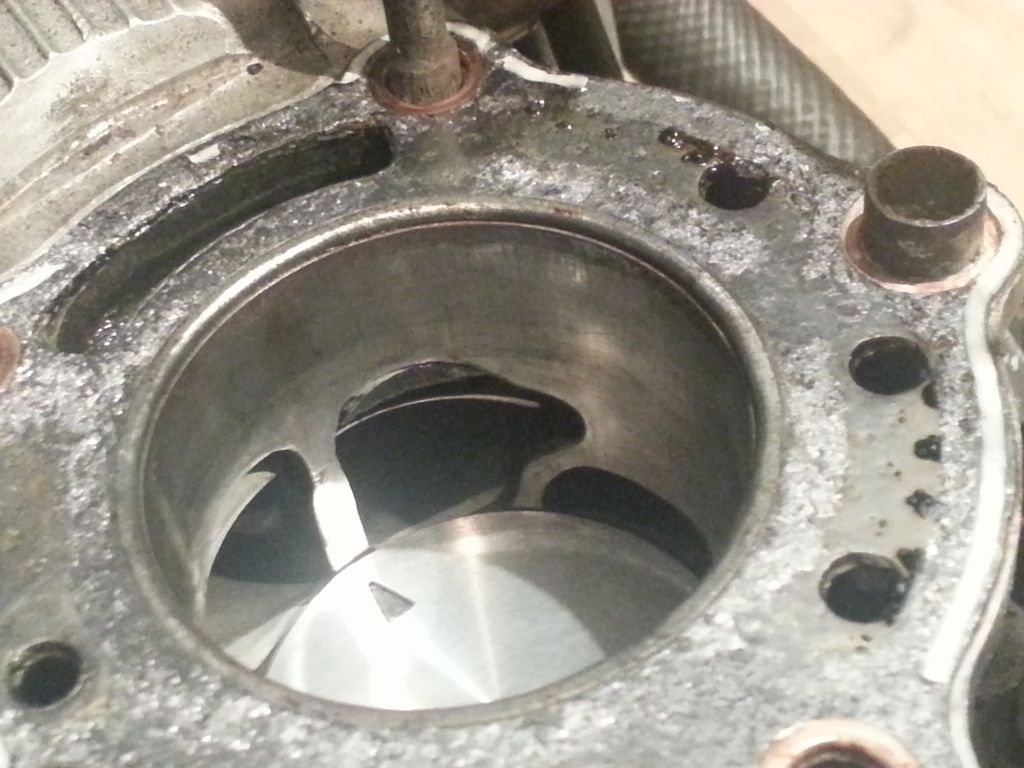
Also the piston has some play in the bore.This picture shows the front of the piston pressed up against the front of the barrel:
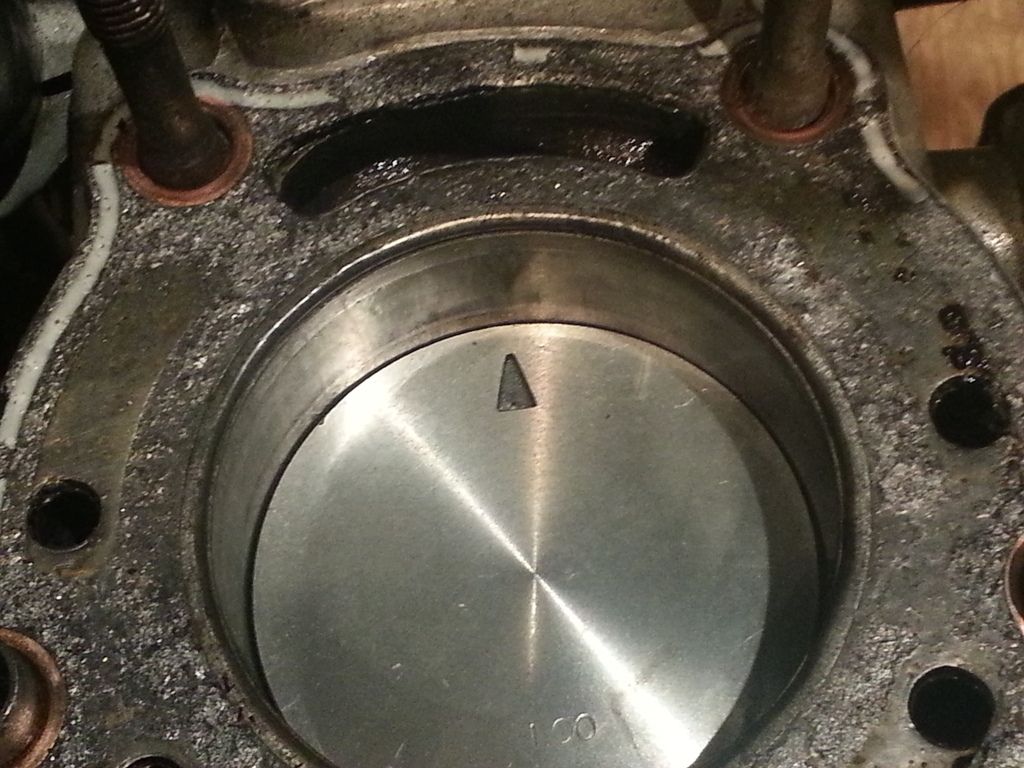
And here is is moved away from the front of the barrel:
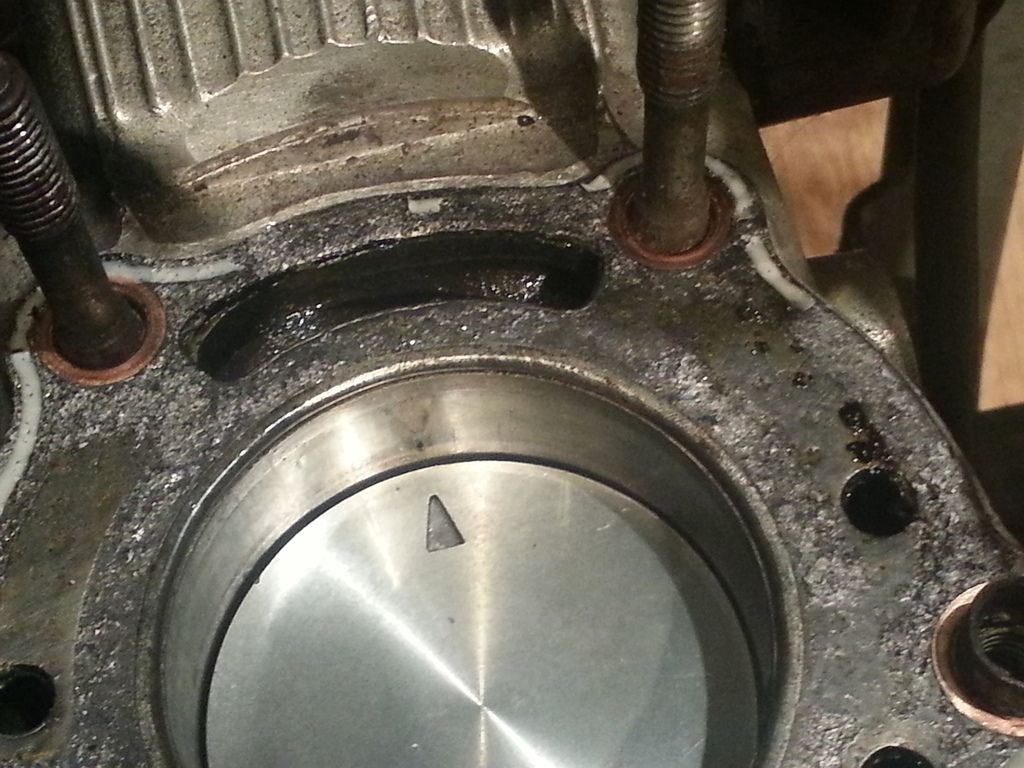
Thoughts? Is this acceptable? I haven't had a chance to look at the rings yet, I'm going to take the barrel off at a later date. There's no obvious ridge at the top of the bore that I can find.
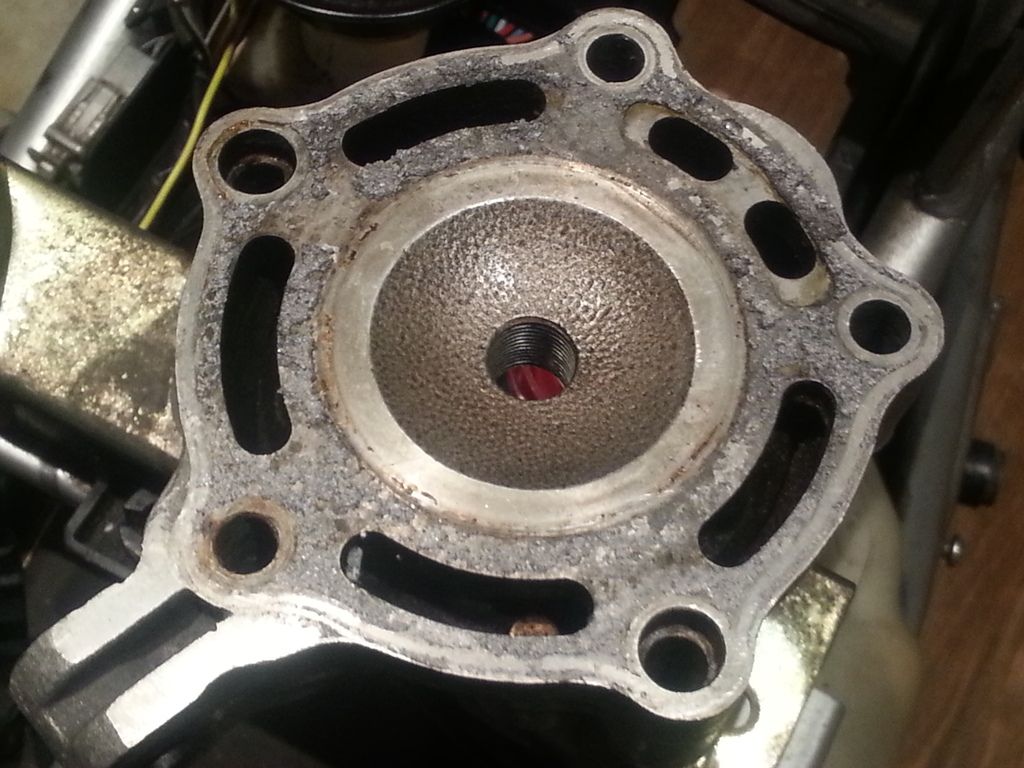
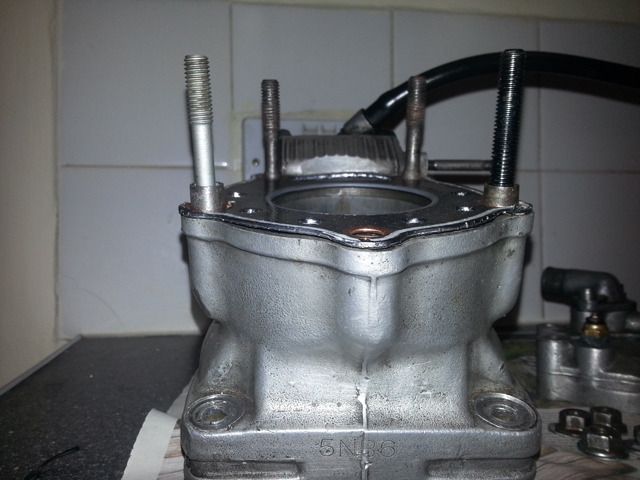
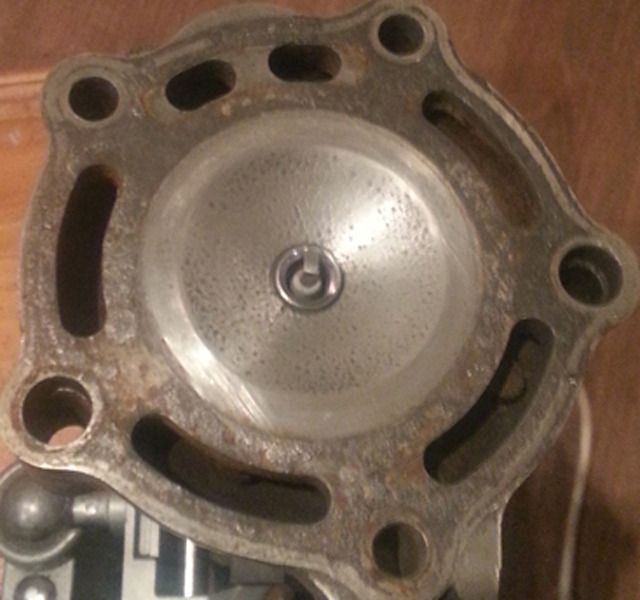
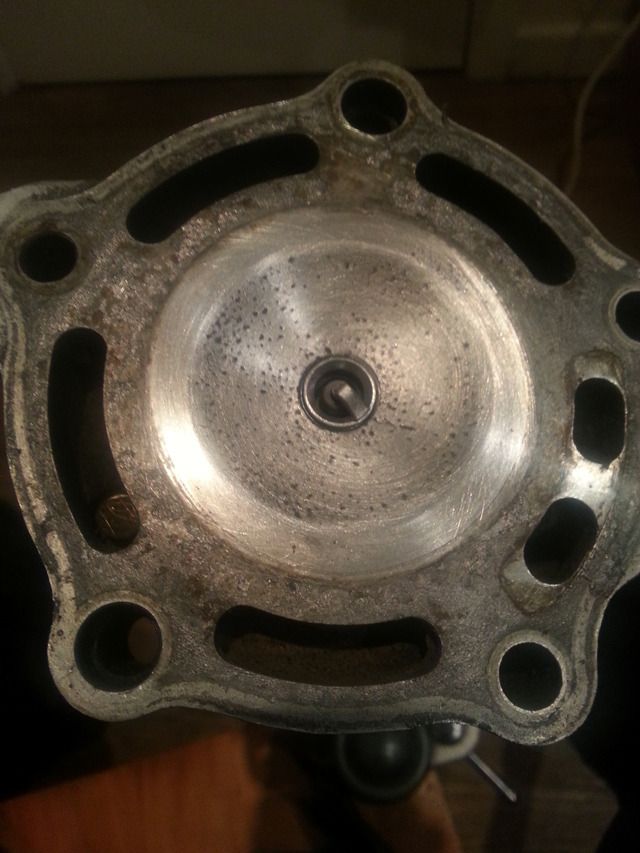
And finally the cylinder head, which looks hunky dory to me:

(In case you're wondering, the '1.00' on the top of the piston means that it's .040" over standard size)
Opinions of those who know engines better than I do appreciated. Here's the bore, how's it look condition wise?

Also the piston has some play in the bore.This picture shows the front of the piston pressed up against the front of the barrel:

And here is is moved away from the front of the barrel:

Thoughts? Is this acceptable? I haven't had a chance to look at the rings yet, I'm going to take the barrel off at a later date. There's no obvious ridge at the top of the bore that I can find.
And finally the cylinder head, which looks hunky dory to me:

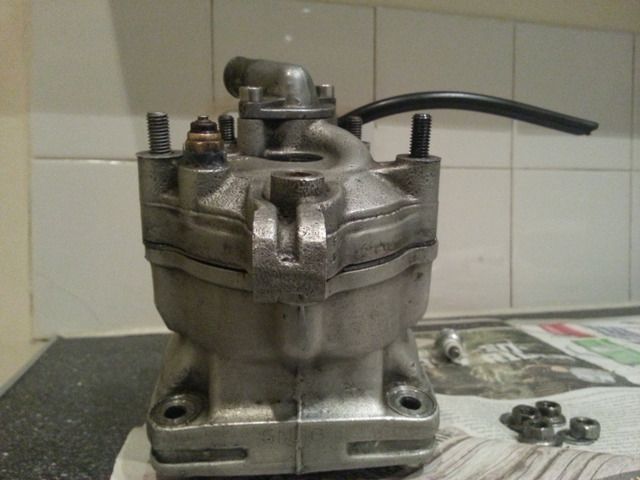
I took the engine out. No turning back now I guess. Wierdly it looks much cleaner than when it was in the bike...
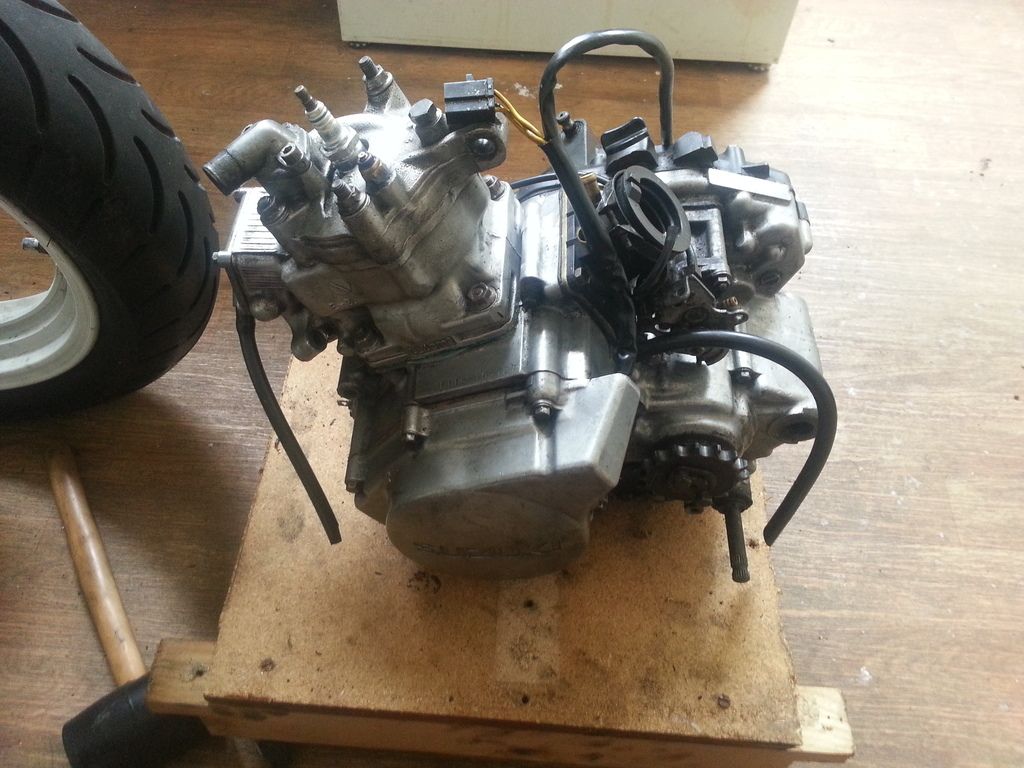
It feels like a proper project now. With spanners and grease and rebuilds and things. And I'm acutely aware that if I ever want my kitchen back and to eat anything besides a takeaway again, I'd best get a wiggle on...
Wierdly it looks much cleaner than when it was in the bike...
It feels like a proper project now. With spanners and grease and rebuilds and things. And I'm acutely aware that if I ever want my kitchen back and to eat anything besides a takeaway again, I'd best get a wiggle on...
Took the cylinder off and could do with some opinions...
A couple of better pictures of the cylinder bore. It feels smooth, no ridge at the top that I can feel. I'm told the cross hatching pattern is a good thing.
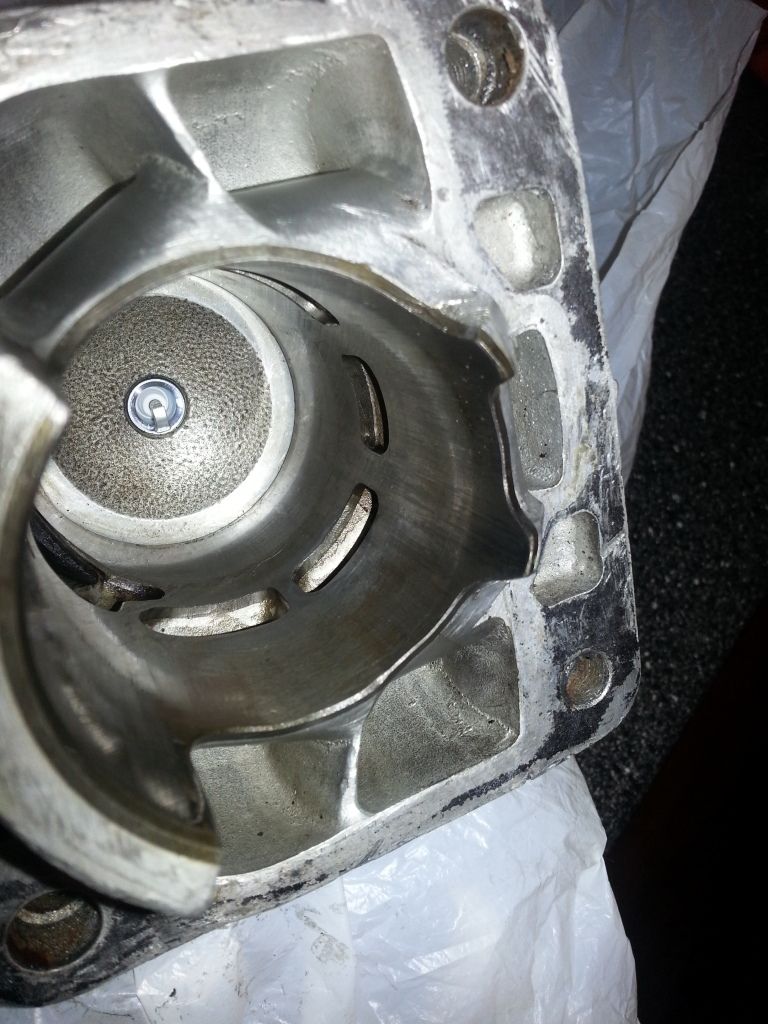
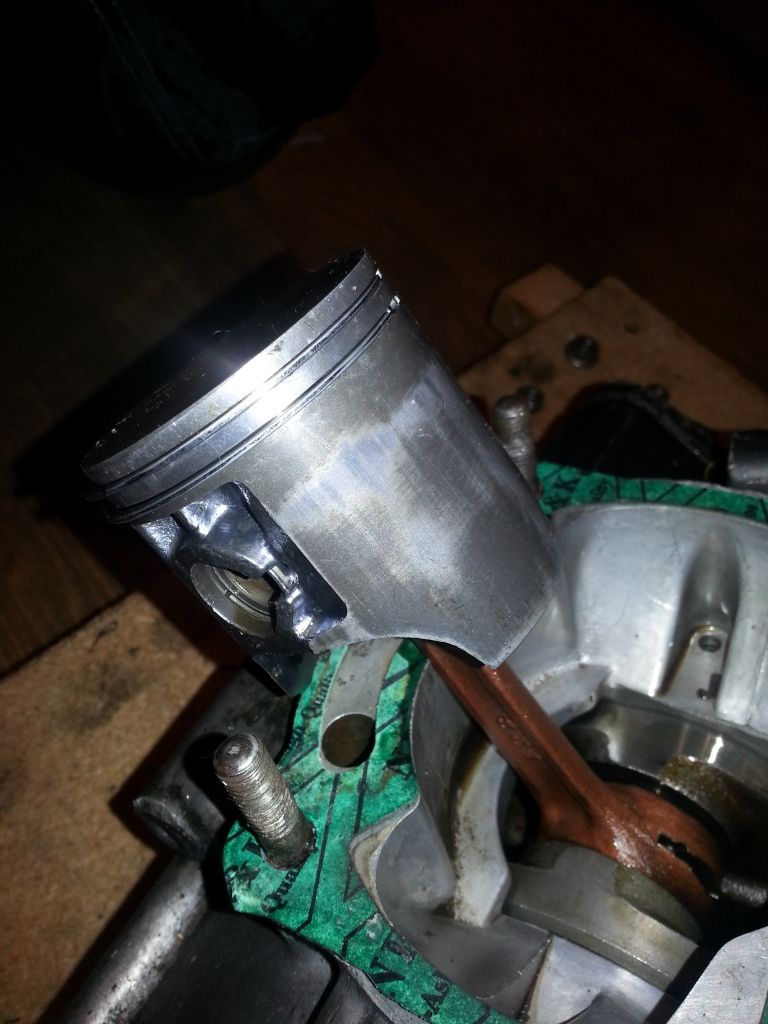
The piston: looks like it has seen very little use at all to me:
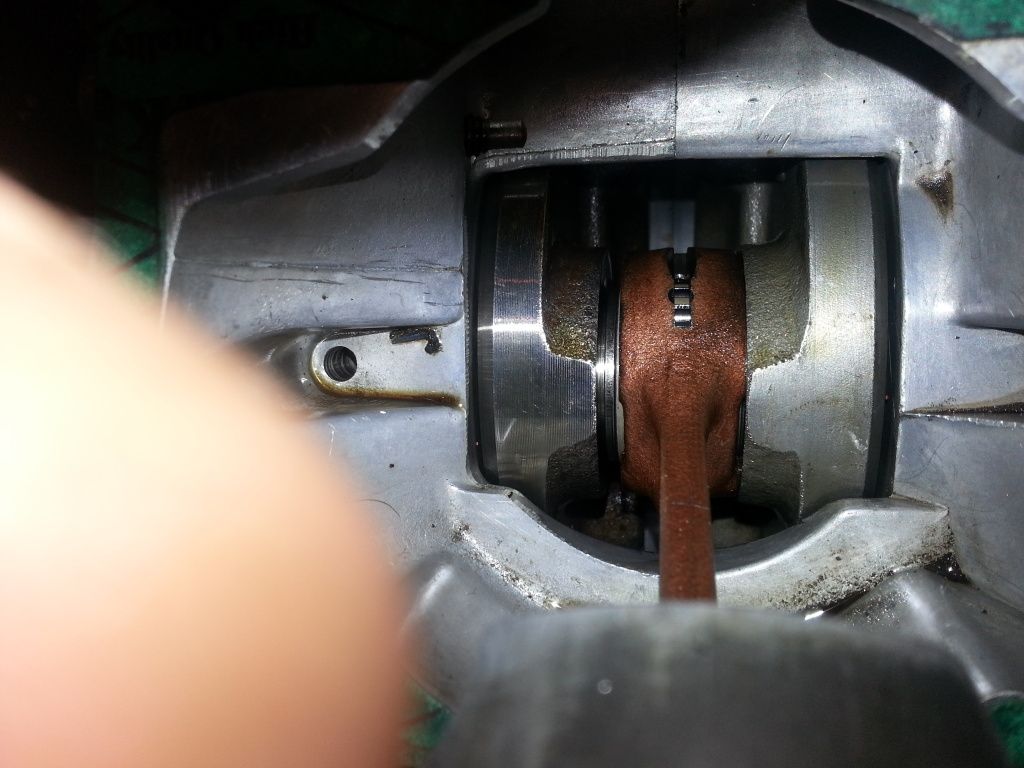
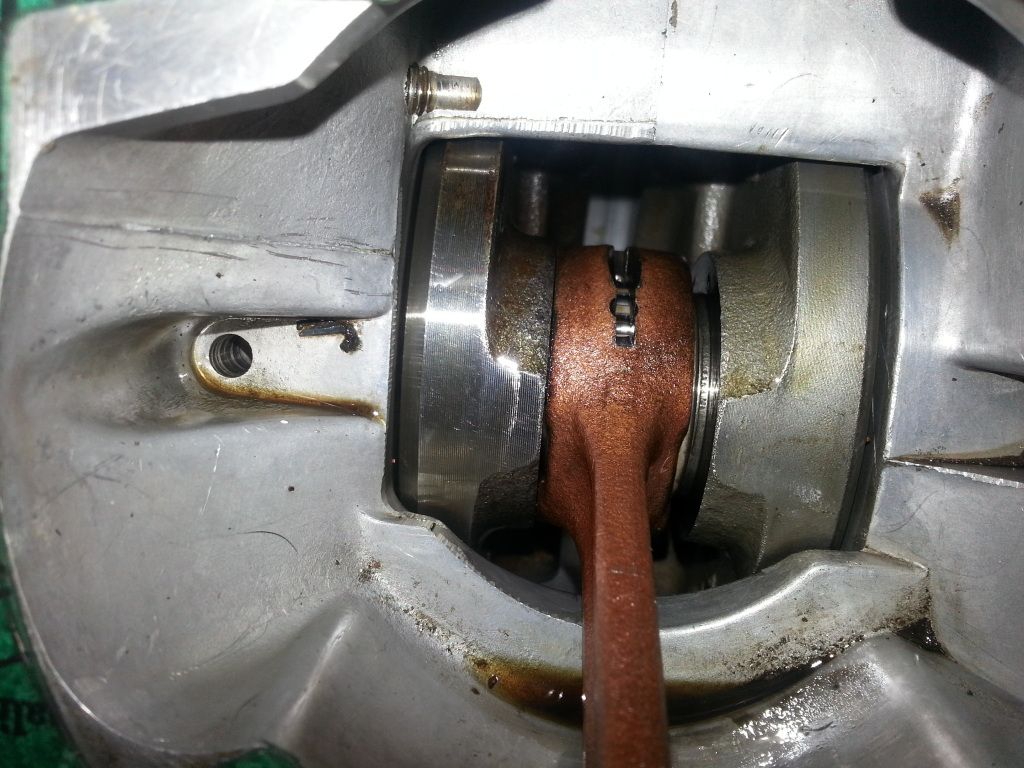
Now here's the main thing that has me worried: the big end doesn't have any up-down movement, but I can slide it from side to side quite a bit, as can be seen in the photos below. Given the aforementioned space the piston has in the cylinder, an I looking at almighty piston slap with the current setup? Or do I need a bigger piston or (God forbid) a bottom end rebuild?
A couple of better pictures of the cylinder bore. It feels smooth, no ridge at the top that I can feel. I'm told the cross hatching pattern is a good thing.


The piston: looks like it has seen very little use at all to me:

Now here's the main thing that has me worried: the big end doesn't have any up-down movement, but I can slide it from side to side quite a bit, as can be seen in the photos below. Given the aforementioned space the piston has in the cylinder, an I looking at almighty piston slap with the current setup? Or do I need a bigger piston or (God forbid) a bottom end rebuild?


cirian75 said:
is that a big chuck of the big end part of the con-rod missing ?
no wait
it seems to me normal
http://images.wemoto.com/full/CON_ROD_KIT/10052717...
I had the same thought when I took the barrel off, but no it's supposed to look like that.no wait
it seems to me normal
http://images.wemoto.com/full/CON_ROD_KIT/10052717...
bass gt3 said:
Regarding the big end side to side movement, it's likely that it's a small end centred rod. So while you won't have any thrust washers on the big end, make sure that the small end is snug and the piston can't slide side to side on the gudgeon pin. However, check the big end by measuring the conrod deflection from vertical. If is rocks side to side (not slides) then excessive amount will indicate a worn big end.
If you can, consider changing the crank seals while you're there, worth it in the long run.
As for the piston, if it's a size up from standard, then the barrel will have to have been adjusted to fit. Nikasil can't be rebored so it's possible the barrel has been bored and re-plated to suit the bigger piston. As for the play in the piston, the only way to tell is to a cold and hot compression test. It's possible it's a forged piston that will expand when hot and tighten up in the bore. Also make sure the ring gaps are opposite each other to maximise cylinder sealing. DON'T have them on top of eachother!
The piston looks brand new however, was this motor running??? Seems to show no signs of any combustion??
Check the exhaust port side of the piston for signs of scraping or seizure. Also check the piston for dark spots around the ring lands. This will indicated blow by of the rings. Obviously these aren't good...
Next up replace the reed valves. They might look fine but the slightest leak or gap will affect performance.
As for the exhaust port bridge, I wouldn't worry too much. It looks like it has been relieved to give room for the power valves..
Talking of which, if they are multi blade valves, check the centre pin. If it beaks, the valve will drop into the cylinder and that's the top end wrecked!
Another way to check the cylinder bore is to take one of the piston rings and place it into the bore. Then measure the ring gap. Move the ring down 5mm in the bore by pushing with the piston to keep it level and measure again. Repeat this until you get to the bottom of the stroke and you'll see if the bore is true or not. use feeler gauges to measure...
When you reassemble, make sure you use the correct base gasket(s). If you are using the standard head gasket I think they're a one shot item, so you can't keep taking the head off to measure the squish. Changing the base gasket thickness from standard will affect the port timing which can ruin the way the engine runs unless you make accompanying changes. Don't do this unless you're 100% on what to do or how to measure it all up....It can even result in the piston hitting the head if you go under the 0.8mm squish band.
Give the carb a thorough clean and check the jetting against the manual.
Very important to make sure the power valve is properly set up as well.
Finally give to pipe a thorough cleaning to get any coke out or replace with an after market item and jet accordingly.
Lots of great advice there, thank you. If you can, consider changing the crank seals while you're there, worth it in the long run.
As for the piston, if it's a size up from standard, then the barrel will have to have been adjusted to fit. Nikasil can't be rebored so it's possible the barrel has been bored and re-plated to suit the bigger piston. As for the play in the piston, the only way to tell is to a cold and hot compression test. It's possible it's a forged piston that will expand when hot and tighten up in the bore. Also make sure the ring gaps are opposite each other to maximise cylinder sealing. DON'T have them on top of eachother!
The piston looks brand new however, was this motor running??? Seems to show no signs of any combustion??
Check the exhaust port side of the piston for signs of scraping or seizure. Also check the piston for dark spots around the ring lands. This will indicated blow by of the rings. Obviously these aren't good...
Next up replace the reed valves. They might look fine but the slightest leak or gap will affect performance.
As for the exhaust port bridge, I wouldn't worry too much. It looks like it has been relieved to give room for the power valves..
Talking of which, if they are multi blade valves, check the centre pin. If it beaks, the valve will drop into the cylinder and that's the top end wrecked!
Another way to check the cylinder bore is to take one of the piston rings and place it into the bore. Then measure the ring gap. Move the ring down 5mm in the bore by pushing with the piston to keep it level and measure again. Repeat this until you get to the bottom of the stroke and you'll see if the bore is true or not. use feeler gauges to measure...
When you reassemble, make sure you use the correct base gasket(s). If you are using the standard head gasket I think they're a one shot item, so you can't keep taking the head off to measure the squish. Changing the base gasket thickness from standard will affect the port timing which can ruin the way the engine runs unless you make accompanying changes. Don't do this unless you're 100% on what to do or how to measure it all up....It can even result in the piston hitting the head if you go under the 0.8mm squish band.
Give the carb a thorough clean and check the jetting against the manual.
Very important to make sure the power valve is properly set up as well.
Finally give to pipe a thorough cleaning to get any coke out or replace with an after market item and jet accordingly.
It was a non runner when I got it, turned over on the starter motor but the fuel tank was disconnected and there was no spark plug or lead. I think it had been off the road for at least a year. The piston is absolutely spotless, I had the same thought that it might not have been used in anger yet. I have since confirmed that the RG has the thrust washers on the small end so I'm going to take a look at those, also do a compression test and see what that tells me. So far the bottom end seems OK, replacing the crank seals means splitting the case which I'm trying to avoid but we'll see what I find.Yazza54 said:
Does the bike have an oil pump or is your intention to mix?
It has an oil pump, I'm not intending to pre-mix.ETA: I didn't realise you were in this neck of the woods, I've been following your Mito build and it looks bloody awesome!

Edited by D-Angle on Thursday 13th August 22:13
It's been a while.
Other time pressures have slowed progress, I'm still working on the engine and so far I have managed:
- new clutch and clutch basket
- new gaskets throughout
- rebuilt the powervalves
- pulled out the reeds, which look fine so keeping those
- about to helicoil 2 stripped threads on the crankcase, soon as the kit shows up
I have done most of what I want to, I just have a loose head bolt to sort out, and I am considering replacing the stator and could use some opinions. Observe:
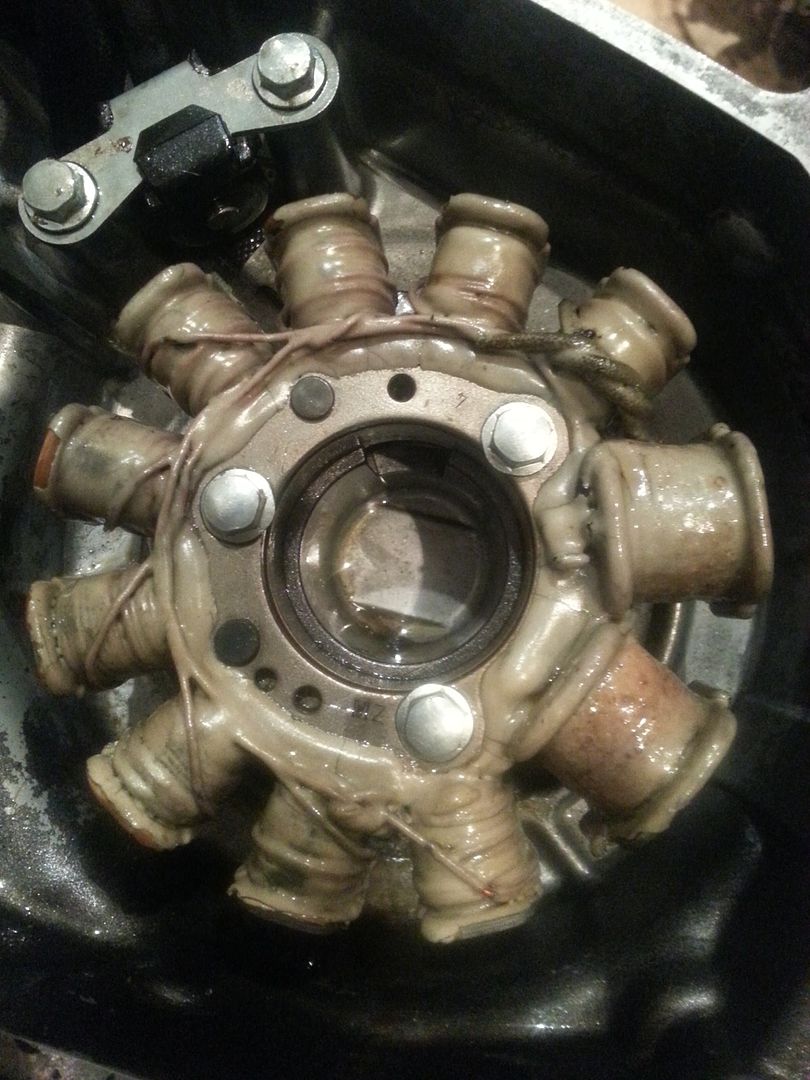
The insulating cover looks tatty as hell, I'm also not sure what this thing is sitting between 2 of the coils:
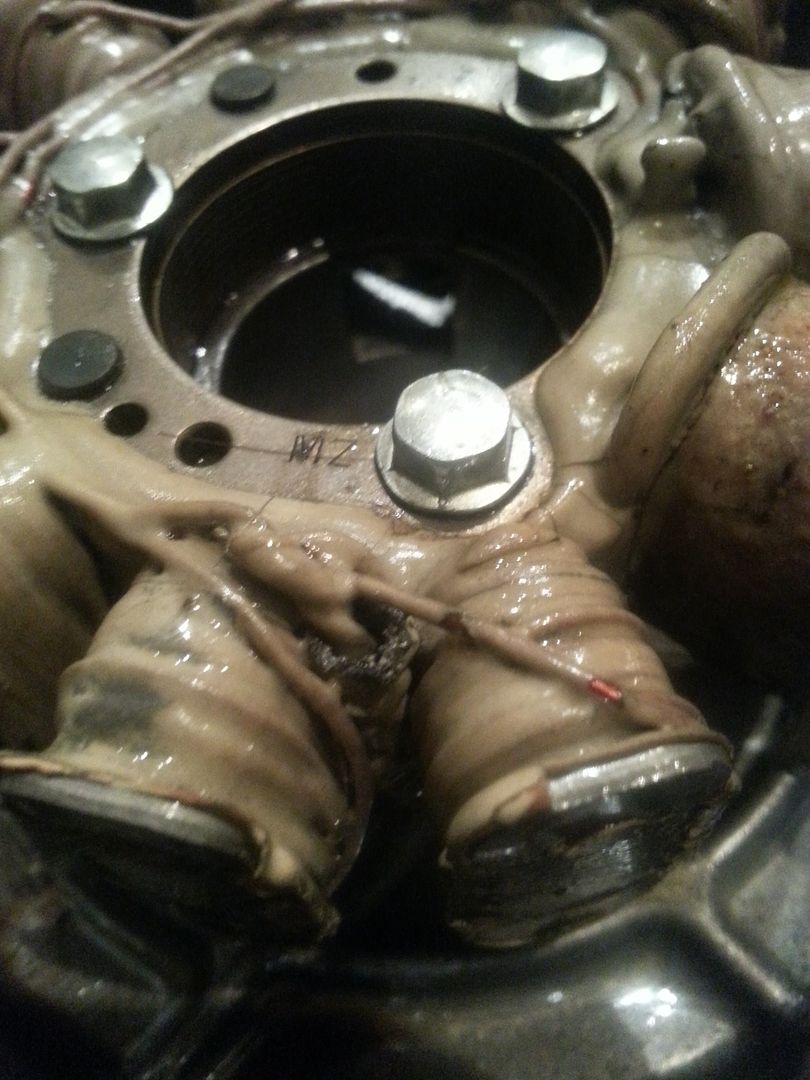
This wire looks a little dark, possibly shorted?
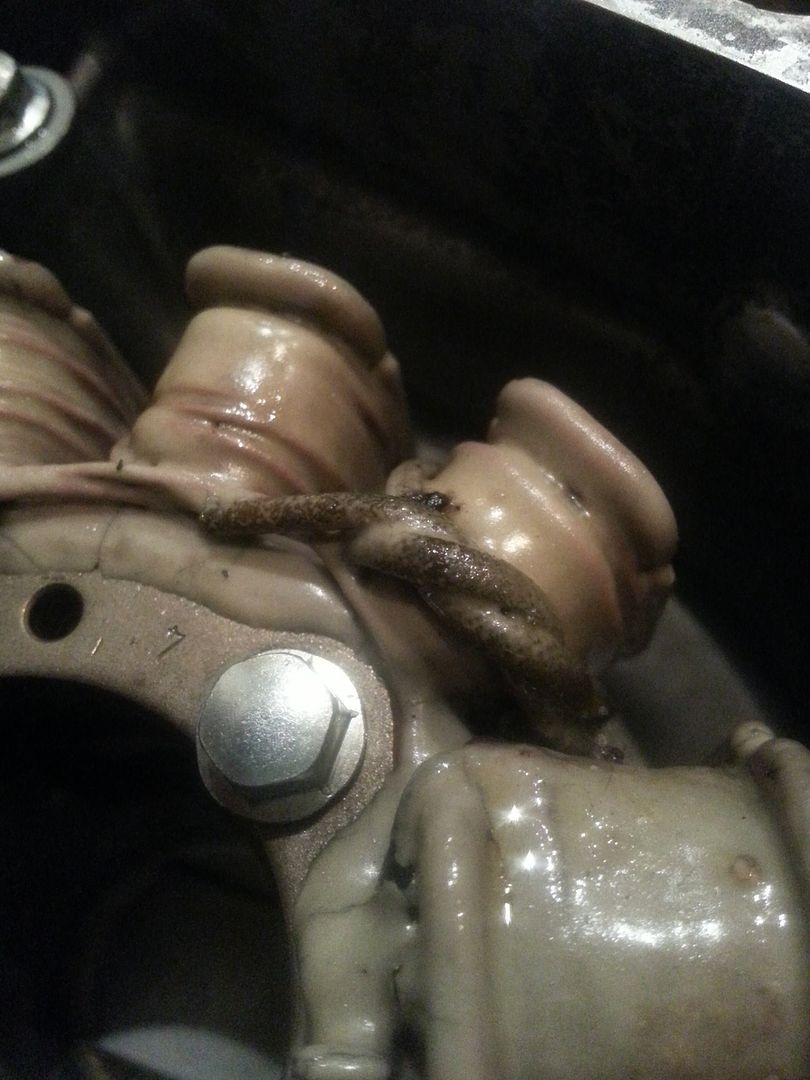
Any thoughts/suggestions appreciated.
Other time pressures have slowed progress, I'm still working on the engine and so far I have managed:
- new clutch and clutch basket
- new gaskets throughout
- rebuilt the powervalves
- pulled out the reeds, which look fine so keeping those
- about to helicoil 2 stripped threads on the crankcase, soon as the kit shows up
I have done most of what I want to, I just have a loose head bolt to sort out, and I am considering replacing the stator and could use some opinions. Observe:
The insulating cover looks tatty as hell, I'm also not sure what this thing is sitting between 2 of the coils:
This wire looks a little dark, possibly shorted?
Any thoughts/suggestions appreciated.
Oh bugger.
Tightening the cylinder head nuts today and one of the studs starts coming out of the cylinder as I turn, the required tightness being too much for the stud to stay in place.
I pop the head back off, and go to remove the stud to inspect it, only to find it is wobbling around in the hole while I do it. I get it out and this comes with it:
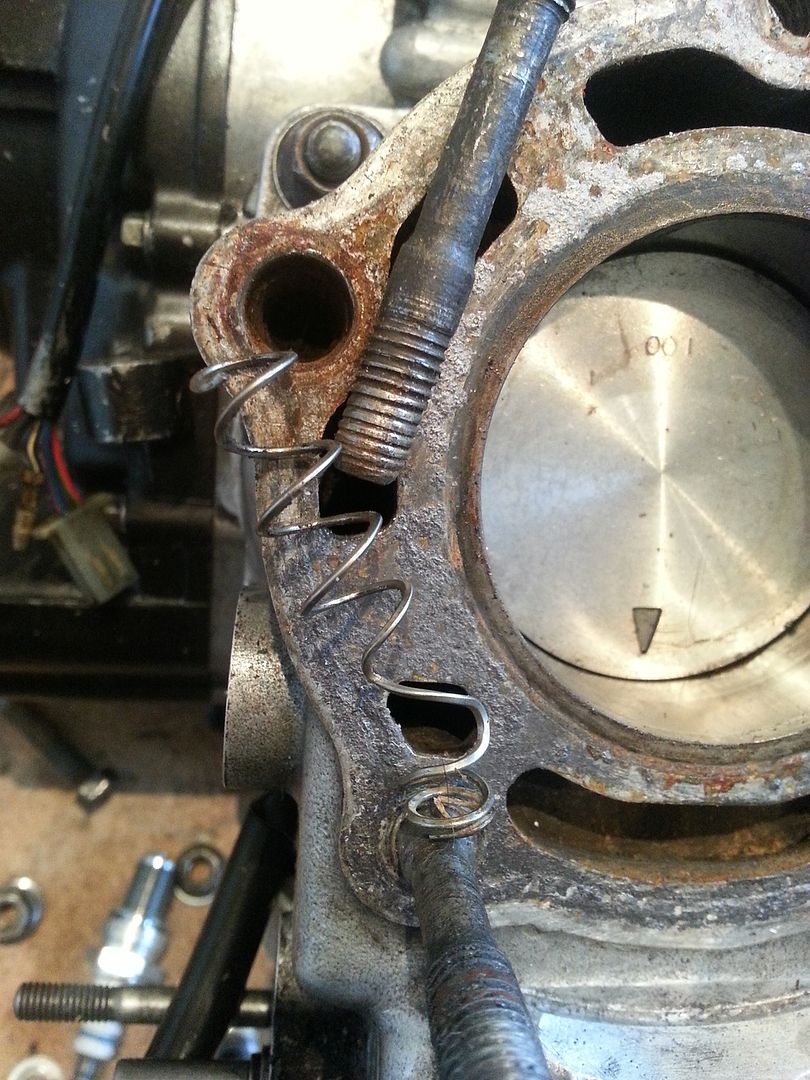
Holy Helicoil Batman!!
It looks like tightening up the head nut caused the helicoil to finally give up the ghost and come loose. There is some threading still in the hole but I'm not able to get the stud to catch onto it, so I'm guessing that's the thread for the helicoil.
So what are my options? Can I re-helicoil this? or is my cylinder screwed?
Tightening the cylinder head nuts today and one of the studs starts coming out of the cylinder as I turn, the required tightness being too much for the stud to stay in place.
I pop the head back off, and go to remove the stud to inspect it, only to find it is wobbling around in the hole while I do it. I get it out and this comes with it:
Holy Helicoil Batman!!
It looks like tightening up the head nut caused the helicoil to finally give up the ghost and come loose. There is some threading still in the hole but I'm not able to get the stud to catch onto it, so I'm guessing that's the thread for the helicoil.
So what are my options? Can I re-helicoil this? or is my cylinder screwed?
s3fella said:
Time for a Timesert? may be a squeeze, but should get one in.
Timeserts look good but expensive, I have ordered a helicoil kit and a new stud, I'll see how it looks once I have those to offer up to the hole and make a decision then.wc98 said:
your cylinder head looks as though there have been serious detonation issues to me,never seen a two stoke cylinder head that was anything but smooth,stand to be corrected though. all the high spots at the edge of those small depressions will heat up and cause pre ignition if run like that i would have thought.
I hadn't thought anything of the 'dappled' finish, I had assumed it was the natural finish from the casting process. I'm struggling to find a picture of another one for comparison but I'l look into it more, thanks for pointing that out. All the necessary bits arrived this morning, thanks to www.pjme.co.uk for getting it all out to me so quickly.
The drillbit that came with the helicoiliing kit goes most of the way into the hole. However the tap doesn't go in very far at all, suggesting there's enough material to cut a thread for the helicoil.
Old stud, meet new stud:
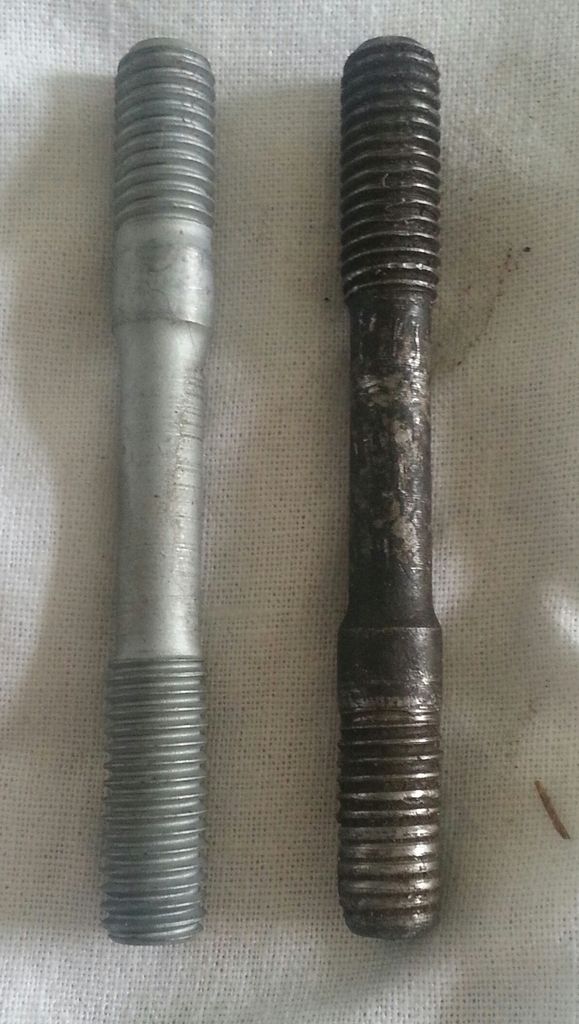
Yep, knackered.
The drillbit that came with the helicoiliing kit goes most of the way into the hole. However the tap doesn't go in very far at all, suggesting there's enough material to cut a thread for the helicoil.
Old stud, meet new stud:
Yep, knackered.
Well the helicoiling appears to have been successful, pending refitting of the cylinder. But like everything else, it wasn't that straightforward.
I rigged this up to make sure I drilled the hole as square and straight as possible:
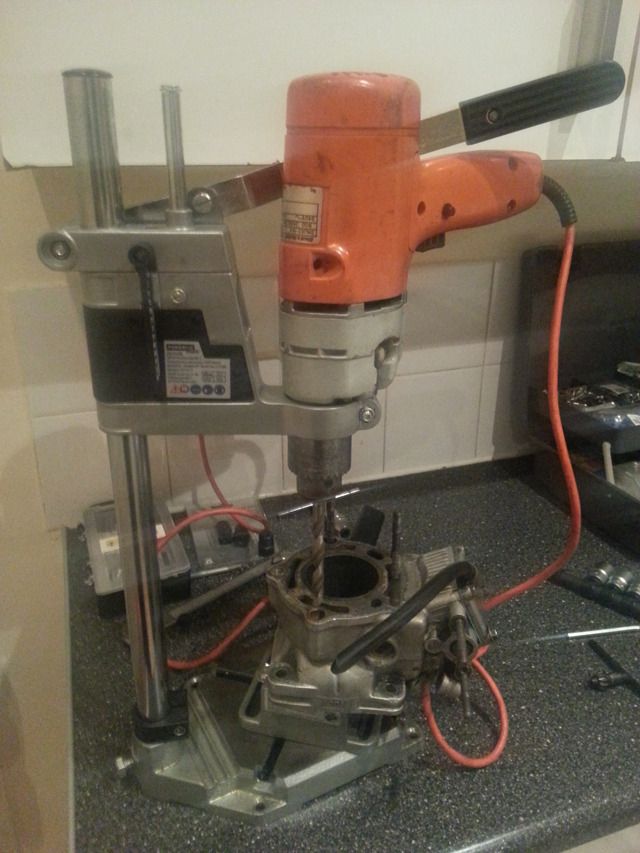
That drill stand by the way is £15 in Lidl and well worth getting, you'll never realise how much you wanted your own drill press.
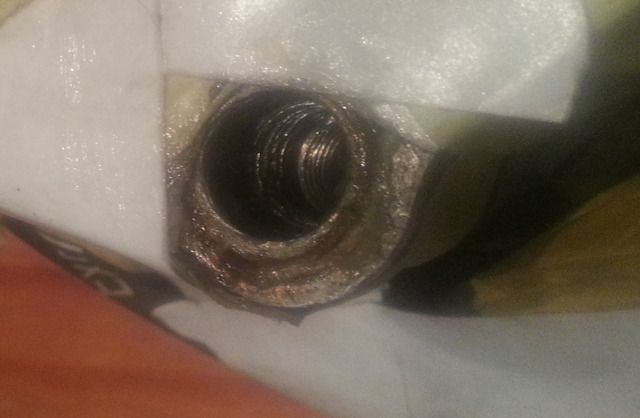
After the old helicoil came out I was able to find enough material to cut a thread for a new one, but it was further down in the hole compared with the old thread. You can see the remains of the old thread at the top, and the new helicoil below:
So, inevitably, the new stud sat much lower than originally intended (far left), with barely any visible thread once the head was installed:
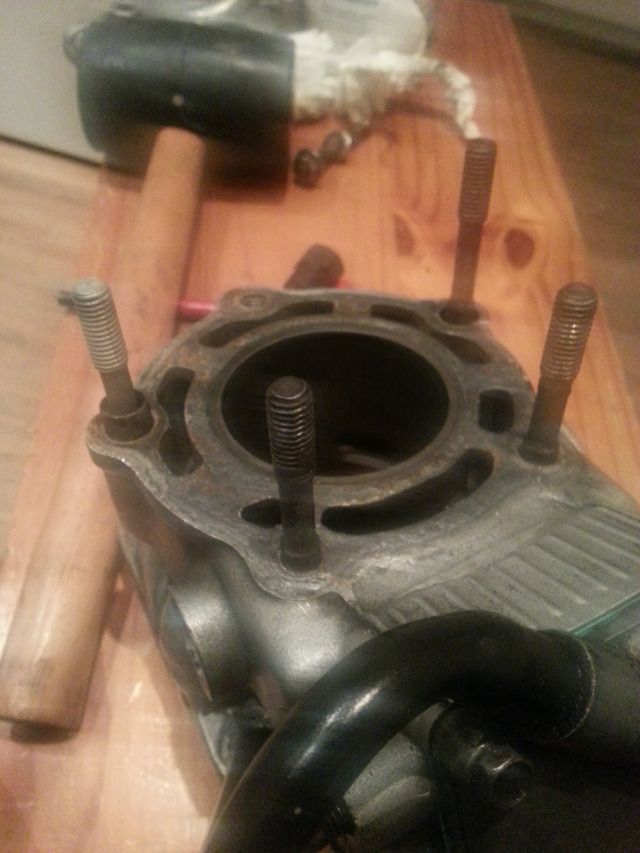
After much searching, and much ribbing from Mrs D-Angle about searching the internet for a long stud, I found a stud that would fit that was 12mm longer. This new stud is on the right in the photos, I decided to replace the stud on the other side with the standard stud that I had already bought. Waste not, want not. :
I still have to see if everything torques down, but it feels as secure as the rest of the studs so I'm quietly confident.
I also decided to revisit the combustion chamber as it was mentioned previously that it shouldn't have such a 'dimpled' finish. I needed something to move the head in a circular motion so I could smooth the chamber with increasingly fine pieces of abrasive paper. So I put this together:
That's an electric screwdriver, clamped to a bench, with a couple of adaptors to fit a sparkplug socket, which is holding the plug, to turn the head around the axis of the centre of the cylinder. I'm not proud of myself, but it seems to have worked.
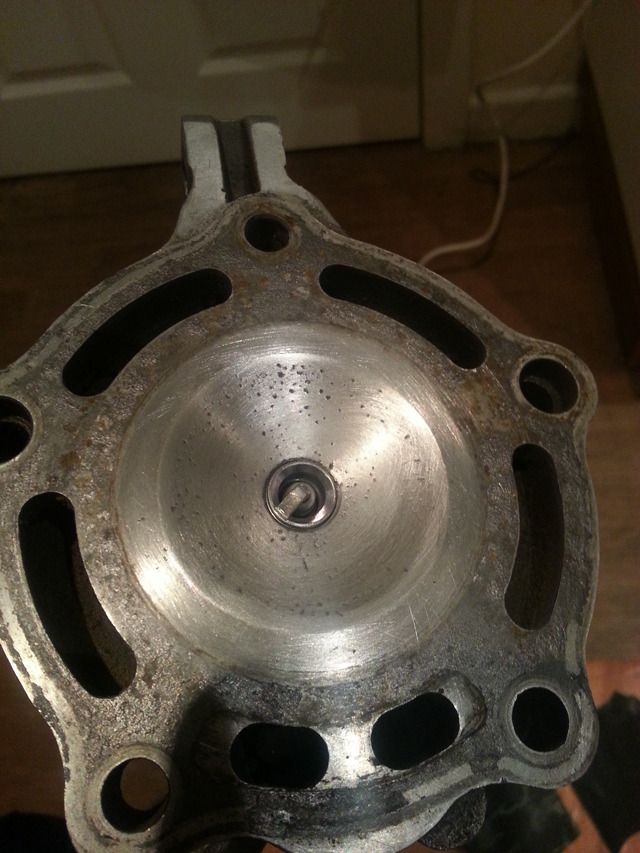
It's not perfect, but it's a damn sight better than it was.
I have some new reeds on the way,and once they're fitted the engine is going back in and we'll see if it will start. After that I will be looking at the suspension and brakes; I learned recently that a popular upgrade for the RG is to fit the rear shock from the SV650, which fits with minor modification. So that's a possibility. Engine first though!
I rigged this up to make sure I drilled the hole as square and straight as possible:
That drill stand by the way is £15 in Lidl and well worth getting, you'll never realise how much you wanted your own drill press.
After the old helicoil came out I was able to find enough material to cut a thread for a new one, but it was further down in the hole compared with the old thread. You can see the remains of the old thread at the top, and the new helicoil below:
So, inevitably, the new stud sat much lower than originally intended (far left), with barely any visible thread once the head was installed:
After much searching, and much ribbing from Mrs D-Angle about searching the internet for a long stud, I found a stud that would fit that was 12mm longer. This new stud is on the right in the photos, I decided to replace the stud on the other side with the standard stud that I had already bought. Waste not, want not.
:I still have to see if everything torques down, but it feels as secure as the rest of the studs so I'm quietly confident.
I also decided to revisit the combustion chamber as it was mentioned previously that it shouldn't have such a 'dimpled' finish. I needed something to move the head in a circular motion so I could smooth the chamber with increasingly fine pieces of abrasive paper. So I put this together:
That's an electric screwdriver, clamped to a bench, with a couple of adaptors to fit a sparkplug socket, which is holding the plug, to turn the head around the axis of the centre of the cylinder. I'm not proud of myself, but it seems to have worked.
It's not perfect, but it's a damn sight better than it was.
I have some new reeds on the way,and once they're fitted the engine is going back in and we'll see if it will start.
After that I will be looking at the suspension and brakes; I learned recently that a popular upgrade for the RG is to fit the rear shock from the SV650, which fits with minor modification. So that's a possibility. Engine first though!'Scuse me posting at such an ungodly hour, but I just finished reassembling the motor, everything torques down, and I'm very chuffed about that. 
I still have to put the motor back in in the frame and take a good long look at the carb and the ignition system, but there is definitely some progress made. I put some carbon reeds in:

And my SV650 shock arrived ready for the next stage once the motor is done.
I still have to put the motor back in in the frame and take a good long look at the carb and the ignition system, but there is definitely some progress made. I put some carbon reeds in:
And my SV650 shock arrived ready for the next stage once the motor is done.
cirian75 said:
MotorsportTom said:
Why not be proud of yourself for rigging up the screwdriver/head jig?
There is a fine line between genius and stupidity. If it worked it wasn't stupid...
Also looks like great progress thus far, keep it up! I'm looking forward to seeing the finished article
http://www.strategypage.com/humor/articles/military_humor_murphys_laws_of_combat.asp There is a fine line between genius and stupidity. If it worked it wasn't stupid...
Also looks like great progress thus far, keep it up! I'm looking forward to seeing the finished article
Rule 6
Since my last update Ihave pretty much spent all this time trying to get it to start, found that I have no spark and have been trying to isolate the problem. So far think it's not one thing but several.
First up, the ignition coil. Continuity test from the far side of the coil to the spark plug cap failed, so a new one is to be acquired. Secondly, a test of the CDI unit using the handy graph in my manual suggests that it is comprehensively shafted. Neither item is technically difficult to replace, it will just mean sourcing them and paying for them. Failing that I'm calling a witchdoctor...
First up, the ignition coil. Continuity test from the far side of the coil to the spark plug cap failed, so a new one is to be acquired. Secondly, a test of the CDI unit using the handy graph in my manual suggests that it is comprehensively shafted. Neither item is technically difficult to replace, it will just mean sourcing them and paying for them. Failing that I'm calling a witchdoctor...
Gassing Station | Biker Banter | Top of Page | What's New | My Stuff