Vacuum advance removal
Discussion


My vac advance doesn't work so I thought I would replace it, looks an easy enough job, I guess I should have known better, I can remove the screw that locates the slotted end of the unit to the dissy, the other end has a stud with a nut on it, but when I turn the nut the stud turns as well, is this normal?
I guess the only way to get it off is to remove the dissy cover, rotor arm and then the black plate that says "do not remove this cover", is there anything I need to look out for?
Thanks
Paul
I guess the only way to get it off is to remove the dissy cover, rotor arm and then the black plate that says "do not remove this cover", is there anything I need to look out for?
Thanks
Paul
Hi Sardonicus, from your message I assume that there should be 2 screws, so probably someone has stripped the thread in one, maybe I can re thread it the next size up.
Before removing the HT leads to let me get the dizzy cap out of the way I thought I would mark the positions, when I look in the bible I should have this
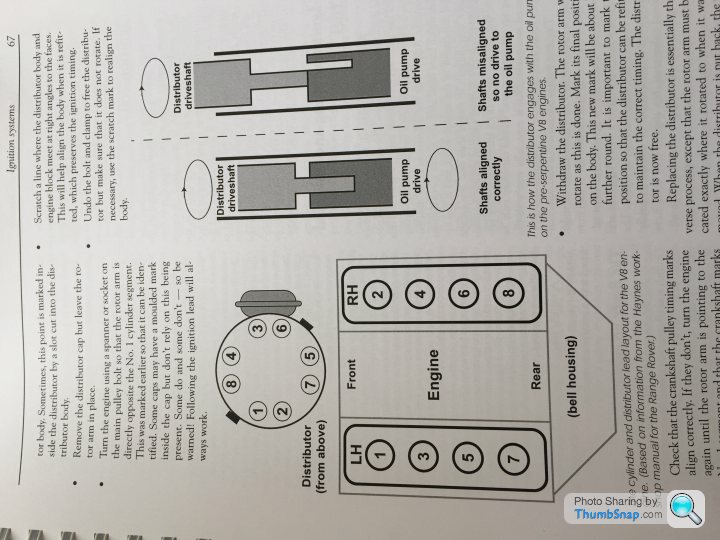
But when I look at my dizzy I have this

Have I just misinterpreted the bibles bit on the right as the vac advance unit and the locating springs or is it an different model to mine from 95?
Paul
Before removing the HT leads to let me get the dizzy cap out of the way I thought I would mark the positions, when I look in the bible I should have this
But when I look at my dizzy I have this
Have I just misinterpreted the bibles bit on the right as the vac advance unit and the locating springs or is it an different model to mine from 95?
Paul
Hi Steve, that's what I did, as it was running ok I just put them back as they were, just a bit confused as to the relationship to the vac advance and holding clips.
I tested mine by removing the vac pipe from the plenum, if you suck on it you should have a high resistance, if not the pipe or vac advance diaphragm has a leak, if you remove the dissy cap, rotor arm and cover below it you can then suck on the pipe and see the system rotating
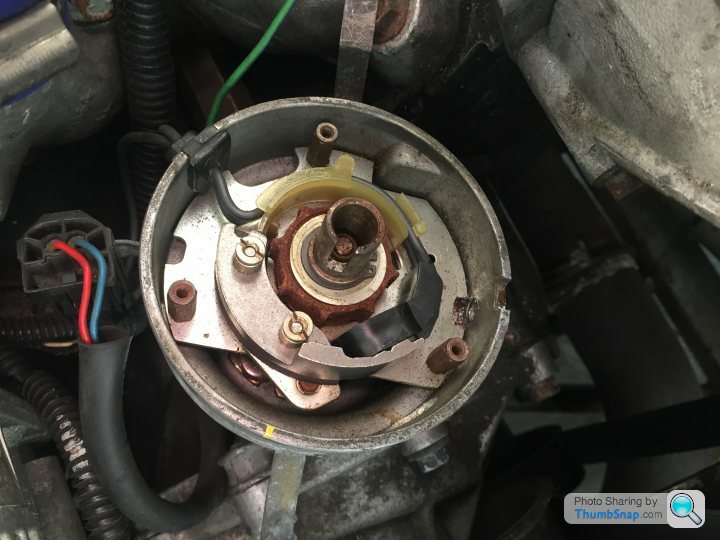
The vac advance has been removed on this picture, but it fits on the left and connect to the internal pin that's a just past the 9 o'clock position, this then rotates the central ring with the cam sensor on (outside the rather rusty looking 8 lobed cam).
I did take the car for a quick spin after and can't say I noticed much difference, but I knew it was faulty so needed to fix it anyway.
Paul
I tested mine by removing the vac pipe from the plenum, if you suck on it you should have a high resistance, if not the pipe or vac advance diaphragm has a leak, if you remove the dissy cap, rotor arm and cover below it you can then suck on the pipe and see the system rotating
The vac advance has been removed on this picture, but it fits on the left and connect to the internal pin that's a just past the 9 o'clock position, this then rotates the central ring with the cam sensor on (outside the rather rusty looking 8 lobed cam).
I did take the car for a quick spin after and can't say I noticed much difference, but I knew it was faulty so needed to fix it anyway.
Paul
Dave,
Thank you for the very detailed explanation, I'm glad I changed it now😀, I never intended to scare myself with measuring mpg on a TVR, but I couldn't resist after doing a long journey earlier this year to to Burghley meet, I got about 21.5 mpg which I thought was quite good for a 500, maybe I will try it again someday🙂
Colin - the actual sequence is the same, just looks like starting in a different place, but it seems to work ok
Paul
Gassing Station | Chimaera | Top of Page | What's New | My Stuff