New Dash Update….
Discussion


Hi all, at last my new dash update after a couple of months!!
As mentioned in a post a few weeks back, I have been developing a new dash concept to eliminate A) the crap way gauges and switches were fitted from new, B) the poorly design veneered piece of 1.5mm steel sheet, which flexed and twisted in use causing the veneer to crack regularly!
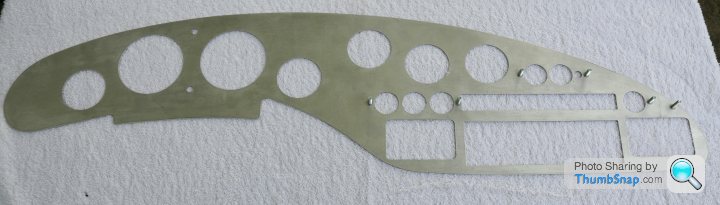
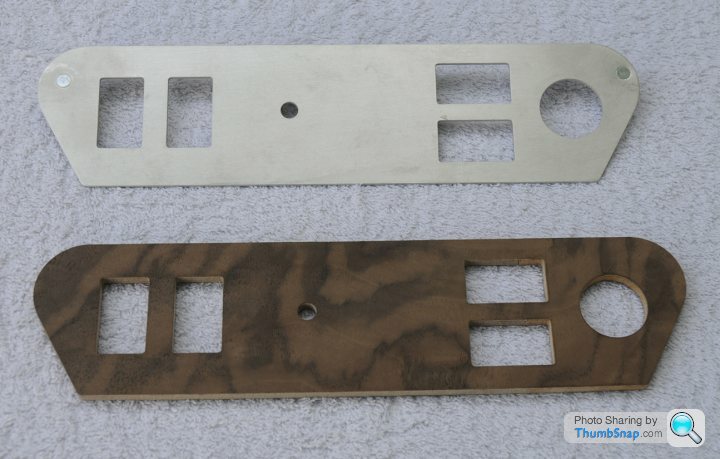
So, my design is a laminated dash concept; meaning that I have an aluminium backing of 1.5mm that holds all the gauges via bezel mount and has 'press studs' to provide fixing capability, then a front bonded layer of 4mm ply veneered with the wood of your choice (in my case burl walnut). This design produces a nice relatively flex free surface and allows all the switches and gauges to be properly mounted rather than using mastic or araldited little bracket!
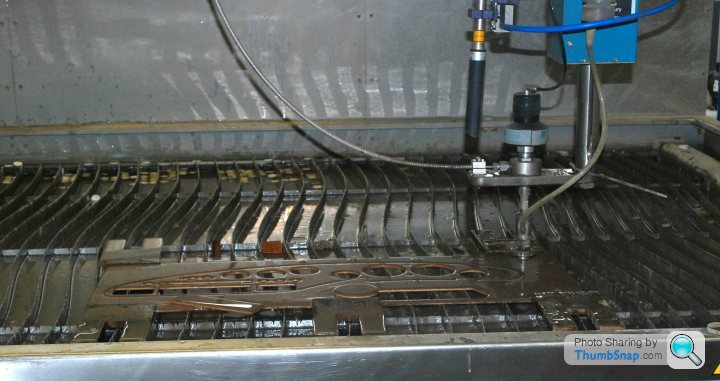
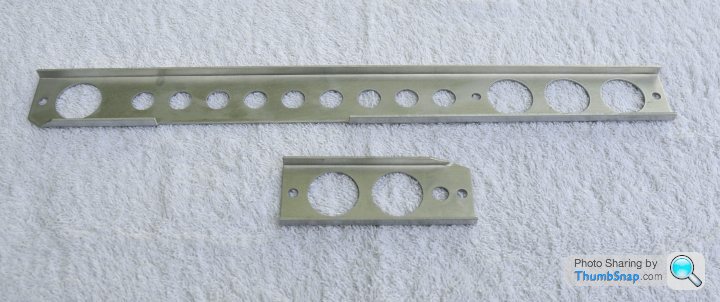
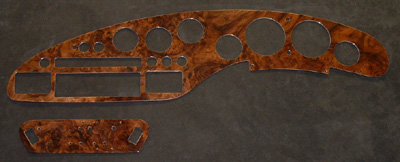
It all started with a digital CAD file of the dash outline (Dave - V8Griff, kindly supplied me with a file he produced a few years back), which I then produced a paper 1:1, then modified the file to follow as accurately my original profile. Then, I had produced two layers; 1 the aluminium with gauge holes the size of the case and 2 the wood with gauge holes a clearance fit for the bezel. I also designed switch and indicator lamp mounting brackets to all fit onto the aluminium layer. Finally I had both the wood and aluminium water jet cut from the CAD files, then the veneered wood layer was bonded to the aluminium. Lastly the veneer was coated with 7 coats of lacquer to give a deep shine.
The following are photographs showing the stages and finished items:
Water Jet Cutting 1:
The Cut Pieces:
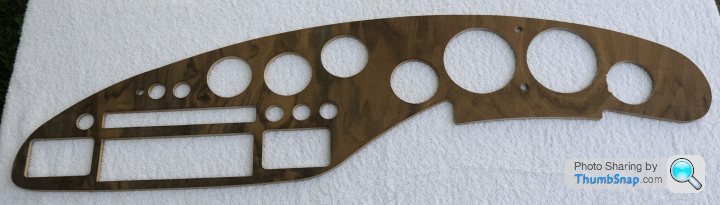
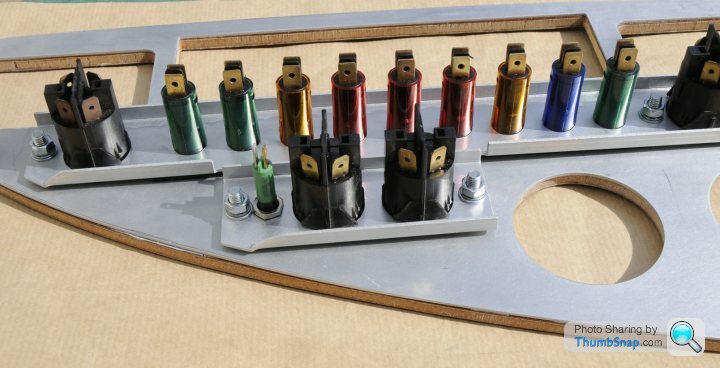
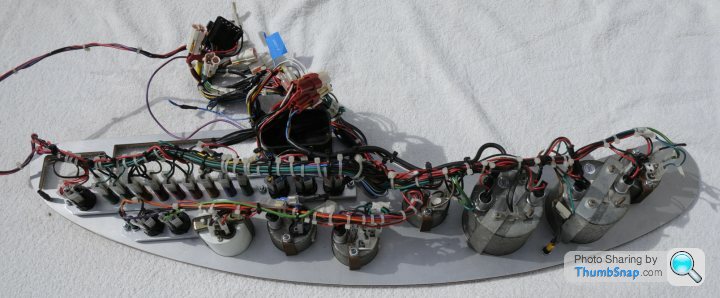
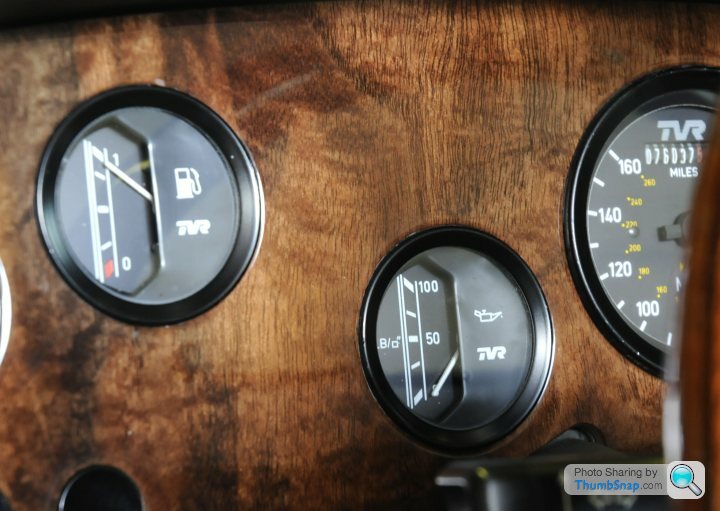
Assembly of finished dash:
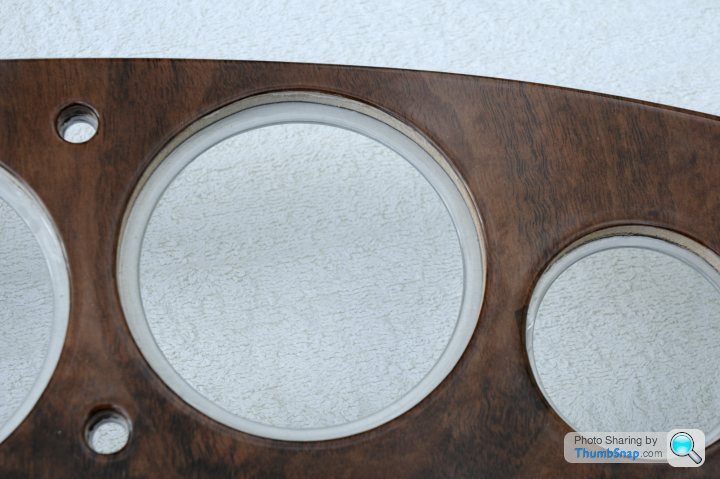
Fitted into car:
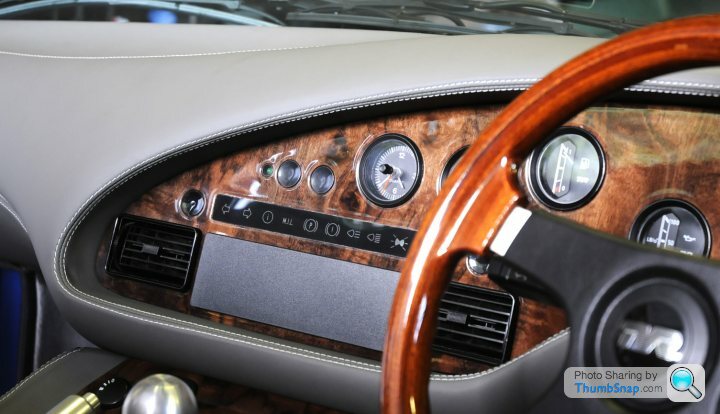
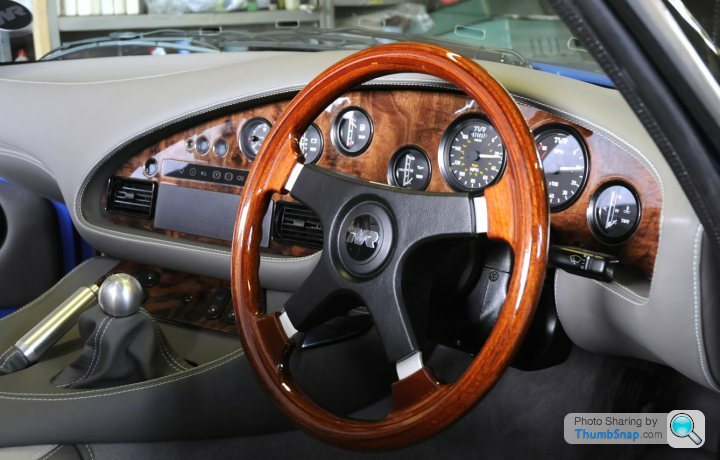
It may appear like marks on the finished dash but they are reflections.
Oh and by the way, my Griff came back from a complete interior retrim at the end of July, so the new dash finished it of very nicely!
Hope you liked my post, regards, Pete
As mentioned in a post a few weeks back, I have been developing a new dash concept to eliminate A) the crap way gauges and switches were fitted from new, B) the poorly design veneered piece of 1.5mm steel sheet, which flexed and twisted in use causing the veneer to crack regularly!
So, my design is a laminated dash concept; meaning that I have an aluminium backing of 1.5mm that holds all the gauges via bezel mount and has 'press studs' to provide fixing capability, then a front bonded layer of 4mm ply veneered with the wood of your choice (in my case burl walnut). This design produces a nice relatively flex free surface and allows all the switches and gauges to be properly mounted rather than using mastic or araldited little bracket!
It all started with a digital CAD file of the dash outline (Dave - V8Griff, kindly supplied me with a file he produced a few years back), which I then produced a paper 1:1, then modified the file to follow as accurately my original profile. Then, I had produced two layers; 1 the aluminium with gauge holes the size of the case and 2 the wood with gauge holes a clearance fit for the bezel. I also designed switch and indicator lamp mounting brackets to all fit onto the aluminium layer. Finally I had both the wood and aluminium water jet cut from the CAD files, then the veneered wood layer was bonded to the aluminium. Lastly the veneer was coated with 7 coats of lacquer to give a deep shine.
The following are photographs showing the stages and finished items:
Water Jet Cutting 1:
The Cut Pieces:
Assembly of finished dash:
Fitted into car:
It may appear like marks on the finished dash but they are reflections.
Oh and by the way, my Griff came back from a complete interior retrim at the end of July, so the new dash finished it of very nicely!
Hope you liked my post, regards, Pete
Hi Guys, many thanks for the comments. I have been to a local show today with the Mid Essex TVR Club. Had a lot of interest in the dash, from not only us pre-cat owners but you 500 boys as well. In answer to questions, yes it would be easy for me to produce a '500' variant as there is very little to change and it is as simple as modifying a CAD file. I would be prepared to look into producing kits, for home assembly and fitting! They would require carefully trimming to size as every Griff is slightly different, but this is only a careful use of a file, or if you live close enough I could do it for you. By the way I only made one fixing point in the centre of the bit that goes down in front of the steering column as opposed to the two originals, just having a central one means you cannot easily see it. The other fixing point is a 'press stud' in the top L/H corner as per original.
In answer to the question re water jet cutting - the process uses a high pressure water and fine abrasive jet at 27,000 bar! The machine that was used to cut my parts will cut through 200mm thick Titanium! Anyway, though the wooden parts do get wet it soon dries off and did not effect my panels at all, in fact this process is widely used to cut intricately shaped parts out of plywood and other sheet wood materials.
I am willing to discuss further if you PM me!
Oh, by the way, will make a post soon in respect of my new re-trimmed interior. Regards, Pete
Pete Mac said:
Pete, I think what you have done is amazing and combined with what dnb is doing there is real potential for turning out some fantastic dash boards. This is way beyond my capabilities I am afraid and I really don't have access to this level of engineering expertise. What a pity the market isn't larger for this sort of thing.
I am very interested in a couple of dash boards for my 500's. I am a wood veneer man rather than an aluminium or any other finish. In my 500 that I am renovating a have a carbon fibre finish dash, which I am happy to sacrifice for the good of producing new dash boards to your spec, if that is necessary.
As usual I am away in Kazakhstan right now, not to return to Blighty until 19th September at the earliest (got to pay for the Griffs somehow, plus two daughters at University of course).
I will PM you. Perhaps we can work out a way forward on this. I am not sure if anyone on this forum has a CAD drawing of a 500 dash board already. Pete
Hi Pete, if you could let me borrow a 500 dash it would be very easy to modify the 'precat' CAD file to suit, therefore enabling me to potentially be able to look at producing '500' dashes also! PM me some time, perhaps we can have a chat when you are next home? Regards, PeteI am very interested in a couple of dash boards for my 500's. I am a wood veneer man rather than an aluminium or any other finish. In my 500 that I am renovating a have a carbon fibre finish dash, which I am happy to sacrifice for the good of producing new dash boards to your spec, if that is necessary.
As usual I am away in Kazakhstan right now, not to return to Blighty until 19th September at the earliest (got to pay for the Griffs somehow, plus two daughters at University of course).
I will PM you. Perhaps we can work out a way forward on this. I am not sure if anyone on this forum has a CAD drawing of a 500 dash board already. Pete
Hedgehopper said:
That is a really fantastic result..absolutey stunning.
As your finished dash is 5.5mm thick how did you bend it to fit into place? I've always thought that the bending may have been one of the reasons that the factory dash veneers came loose, i.e. veneered flat then bent to fit afterwards.
Do you mind passing on details of where you bought your veneer and what lacquer did you use?
Hi HH, I was initially concerned regarding the bend or bow required in the Griff dashboards, but after making a thorough assessment I cam to the conclusion that it did not require to be bowed or bent that much! My new dash was processed completely flat, on fitting I gently pushed it into place forming a gently curve, it fitted well with only a 5mm gap in the middle when viewed through the radio opening. It is firmly fixed using an M5 stud on the top L/H side as per original, and one black panel screw with recessed cup washer in the section that goes down behind the steering column cover. I gently pushed the dash into teh recess when screwing it up an it then forms the gentle curve. Being a laminated concept and thicker it is really secure and firm to any pressure, so the truth is don't worry too much about the curve it can be made to fit nicely and firmlly, even though it is not curved as much as original.As your finished dash is 5.5mm thick how did you bend it to fit into place? I've always thought that the bending may have been one of the reasons that the factory dash veneers came loose, i.e. veneered flat then bent to fit afterwards.
Do you mind passing on details of where you bought your veneer and what lacquer did you use?
I obtained the veneer from a small internet company called 'The Vine Tree', they have a shop on eBay and I contacted them to discuss my requirement, they keep some stunning burl/figured walnut veneers like I used.
The main build lacquer is an industrial 2 pack product, finished off with a coat of UV resistant lacquer for the best durable finish. Unfortunately these products are not freely available to 'joe public' as they are a professional product. Sorry I cannot be more helpful. Best regards, Pete
MPoxon said:
I just had a proper look at those photos and I must say I am really impressed with that. These are the kind of modifications that I really like, something that looks original but is reengineered to provide a benefit. I bought a new dash for mine a couple of years ago, I am very pleased with it, the veneer was handpicked so was nice a dark with a really nice grain in it. Unfortunately it suffers from the same issues as my previous dash where it is bendy and the glue holding the buttons in fails in the height of summer and the buttons fall into the dash.
Myself like many others have looked at the dash and thought well that is a crap design. But kudos to you for having the same thought but then actually doing something about it. From what I can see on the pictures the new design looks absolutely quality. The veneer looks brilliant as well and I am very picky with that. I cannot wait to see it in the flesh and I would be very interested in a 500 version. I may still have my old dash in the loft if you need a template.
Is that a new interior I spy there Pete. From what little I can see that looks superb in the two tone grey.
With the new paint job, all the epic work you have done under the bonnet and now the interior and dash I reckon you have one of the best condition TVRs in the country.
Hi Matt, thank you for the comments and yes it is a newly retrimmed interior which was completed on 25th July. Your offer of a 500 dash to play around with is welcome, could you bring it along to one of the meets or if you wanted come over to mine for a mug of tea and a Griff tyre kicking session? Regards, PeteMyself like many others have looked at the dash and thought well that is a crap design. But kudos to you for having the same thought but then actually doing something about it. From what I can see on the pictures the new design looks absolutely quality. The veneer looks brilliant as well and I am very picky with that. I cannot wait to see it in the flesh and I would be very interested in a 500 version. I may still have my old dash in the loft if you need a template.
Is that a new interior I spy there Pete. From what little I can see that looks superb in the two tone grey.
With the new paint job, all the epic work you have done under the bonnet and now the interior and dash I reckon you have one of the best condition TVRs in the country.
EGB said:
Nice job Pete. Your dash lights panel is also nice. Was this your idea, the other guy, or mine? Mine is easy, 3 seconds to apply. See TVRCC forum.
Hi EGB, the dash light and switch mounting panel is my design done at the same time as the dash design. The front legend light display panel I bought from 'Jeboa' when he had a batch made last year. What was yours? please send me link as I am always interested in new designs. Many thanks, PeteGreen Meanie said:
MMm,that warning light symbol panel looks like one of Mine.
Looks good!
G.M
Yep DEFINATELY one of mine,must be quite a number of Griffs with them in now.
GM Yes it is one of yours, I got confused with Jeboa who supplied the carbon door reflectors! I saved it until I was able to do my new dash. Looks great mate and it fitted easily. All the best, PeteLooks good!
G.M
Yep DEFINATELY one of mine,must be quite a number of Griffs with them in now.
Edited by Green Meanie on Monday 1st September 20:04
Rosse said:
Verry nice job indeed. Could I order one for a LHD or convert the CAD file?
Hi Rosse, it should be any easy process of just flipping the CAD file. Please confirm via PM whether pre-cat or 500. Please note it will be a while as I am going to get a list going in the next month or so. Watch this space!Hi all, can I ask those that are seriously interested in a 'New Type' laminated dash to PM me please, as I have an opportunity to buy a consignment of great figured and burl walnut veneer! I would be willing to initially fund the veneer, but would then get a list going of those seriously interested, then get a deposit to proceed. I will need to create a '500' style dash CAD file (Matt your spare dash would be great if I could borrow it), but that should be straight forward. By the way it would not be too much trouble to 'flip' the design file to create a L/H drive version! I would warn you all in advance that the building of these dashboards is not a 5 minute job. Also, please note that there will be a little edge fettling required to fit perfectly as not all TVR dash surrounds are the same. Lastly, I would need from one of you '500' boys a list of the dimensions of the instrument/gauge bezel and case diameter, plus switches etc (or the loan of said parts for me to measure up - this is preferred).
I do have a duplicate set of parts I made at the same time that anyone can borrow as a sample to have a serious look at (unfortunately the veneer is only standard black grained walnut not figured/burl). Best regards, Pete
I do have a duplicate set of parts I made at the same time that anyone can borrow as a sample to have a serious look at (unfortunately the veneer is only standard black grained walnut not figured/burl). Best regards, Pete
prideaux said:
Well Done that looks fantastic
Classical Dash who did my 69 V8SE Dash do a replacment Griffith Dash to order there finish is fantastic if you dont feel you have the skills to do it yourself and they can use whatever thickness of alloy rear you wantif you are worried about cracking
http://www.classical-dash.co.uk/tvrgriffith.html
A
Many thanks Prideau. looking at the Classical Dash it is a fantastic finish! If I had used a tight burr veneer rather than the figured type I favoured I might have achieved a similar result. Only comment I would make is, you are still have to mount your switches somehow and if it is metal it will flex causing cracking eventually, finally on the pre-cats to retain originality you need to have the instrument bezels almost flush, hence the idea of a metal backing layer to mount to and a wooden ply veneered front layer to enable flush effect and the strength of lamination. Regards, PeteClassical Dash who did my 69 V8SE Dash do a replacment Griffith Dash to order there finish is fantastic if you dont feel you have the skills to do it yourself and they can use whatever thickness of alloy rear you wantif you are worried about cracking
http://www.classical-dash.co.uk/tvrgriffith.html
A
MPoxon said:
My dash is from Ian at Classical dash and I personally think the finish is stunning.

This however is what I am fed up with....

It is the third time this has happened and I am at my wits end as the whole dash needs to come out each time to fix it. Where my car lives outside during the summer the glue fails and the buttons disappear into the dashboard.
Pete I have sent you an email regarding the dash I have, intact I looked in the loft and I have two you can borrow, both from Griff 500s but both have different diameter cut outs for the small gauges. I assume one is early clocks and the other later clocks.
Hi Matthew, the switches need a proper mounting panel, also no matter how well the veneer is applied to a thin metal backing it will flex and it will crack. Got your message Matt an shave replied. All the best, PeteThis however is what I am fed up with....
It is the third time this has happened and I am at my wits end as the whole dash needs to come out each time to fix it. Where my car lives outside during the summer the glue fails and the buttons disappear into the dashboard.
Pete I have sent you an email regarding the dash I have, intact I looked in the loft and I have two you can borrow, both from Griff 500s but both have different diameter cut outs for the small gauges. I assume one is early clocks and the other later clocks.
GlynMo said:
Pete, I may be selling my Griff but, if not, I would be interested in one of your dashes. Presumably it could be supplied without a veneer so that I could use my existing s/s dash front?
Hi GlynMo, Yes I could provide just a plywood faced/aluminium backed laminated assembly, but I could not guarantee the alignment of holes and slots with your stainless steel front! Regards, PeteHi all, forgot to say in the first post that I managed to source a replacement set of the coloured 'indicator panel' lights! it is far easier to just push a new set into the 'new' bracket than try and get the old ones out and break them. They were only about £1.65 each so if anyone who is interested in a new dash wants a new light set I can source them! Also I identified the red, yellow and green LED indicator lights used on the precat (not sure of 500), so can get them also, they were £4.75 each and came as per original with the nut fixing body (I designed the aluminium backing layer to accept the threaded body only so as they could be fixed by nut rather than araldite). Finally, I made a useful tool to enable the easy removal of the pushbutton switches, I can provide details of how to make one. Regards, Pete
GlynMo said:
Hi Pete, do you have a reason to believe that the alignment might be out on a s/s dash, or is that just a cautionary note?
Glyn
Hi Glyn, just a cautionary note as I know how TVR parts can vary across similar models. What might be a good idea is if I get a paper 1:1 printout run off some time and send it to you, or if you can send me a tracing of your dash so as I can match it against mine? I did have a duplicate set of parts made at the same time so have an identical sample! Regards, PeteGlyn
Andy_J_G said:
The only thing is, if its the same as mine, the brackets for the bolts are glued to the dash and can fail, as mine just has. Attempting to fix with gorilla glue until my new dash comes.
Andy, you are correct, the fixing studs are on little plates glued to the back of the dash! Mine was exactly the same. The new dash design as you know 'does away with the glue'. I can always use glue for those wishing a little TVR nostalgia…...Hoover. said:
^^^^ should of bought a very early griff, mine is very much like the "new dash" with everything held in place by bolted brackets 

My 430 precat had bolted brackets, but the threaded studs holding the brackets were welded onto little plates which were 'glued' with araldite to the back of the dash panel. Though better than the later '500' griff dashes, the araldite could and does fail, meaning the brackets come loose when the buttons are pushed. Thats why I have used rivet or 'clinch' studs in the backing layer to hold the new mounting plates/brackets. TVR could have used the 'clinch' stud method easily into the steel dash, then veneer over the top. The precat early dashes also have the araldite/glued spacer clips for the gauges, which can come loose and make them fall into the back! The whole idea of veneering onto a thin flexible metal layer is poor practice anyway and leads to all the issues of cracking that are experienced. Regards, PeteHi Guys, I have had an extensive look at a couple of 500 dashes loaned to me by Matt Poxon. It appears that the external profile of the 500, though looking similar to the pre-cat's, is different! It's as if TVR made another dash surround mould for the 500 era. Also as known the gauges/instruments are in different places and are surface 'bezel' mounted rather than 'flush' mounted like the earlier pre-cat and the interim pre-serp 500.
So, I have decided to have the 500 (original TVR stainless) dash of Matthews laser scanned to acquire the exact shape of the profile and the position of the gauges etc. This process will give a 'DXF' CAD readable file which is good news, enabling easy tidying up within the CAD software. Good news as it will give as near an exact match as practically possible.
Also, my pal who is helping me with the CAD side (he has the expensive software) has produced for me a 'flipped' LHD pre-cat dash layout/file!
Regards, Pete
Pete Mac said:
Pete
Why does that not surprise me, we are talking TVR after all...?
Sounds like you are making great progress anyway - did you know what you were letting yourself in for when you started this?
Pete
Yes I did... After 4 years of enjoyable ownership everything I have looked at had odd quirks and differences, hence me trying to standardise and re-engineer accurately everything I do (where possible). By the way I am having drawn up my 'professional' front top wishbone heatshields and air splitter which I designed last year and have fitted to my Griff. Will now be able to have them laser cut and then formed quite economically! Watch the space......Why does that not surprise me, we are talking TVR after all...?
Sounds like you are making great progress anyway - did you know what you were letting yourself in for when you started this?
Pete
I produced last year for our Mid Essex TVRCC Griff (and Chim) guys a batch of stainless exhaust mounting trays. Had this CAD drawn a couple of years ago when I had all the exhaust off, made and fitted stainless tray when reassembled.
Pete
Pete Mac said:
Pete, I forgot to say that I might be interested in a couple of these if you were planning another run. I was going to have my tray galvanized but stainless steel sounds a good alternative. Pete
Hi Pete, go for stainless - fitted and forgotten. I am quite happy to start another list for a group purchase, so will kick it off with 2 for your good self. When I had a batch made before it was more cost effective to get 10 made so will aim for this! Regards, PeteGassing Station | Griffith | Top of Page | What's New | My Stuff