Citroen door mirror woe's
Discussion


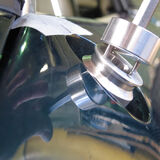
If you've ever had the misfortune to remove or repair the Citroen mirrors on your V8S-Griffith-Chimera, you will know what a pain it is to remove and then reset them accurately.
This I discovered when somebody hit my passenger side mirror and wrenched it out of the door. Thankfully the only damage was some light scratches where the mirror swung on the wires.

Separating the threaded door mounting piece from the mirror, I screwed it back into the door but was unable to tighten it sufficiently without a specific tool and then when the mount was in, I was not able to get to the grub screw to set the mirror correctly, even with an extremely cut down hex "Allen" key.
I found that I had to insert the mount into the mirror and tighten the screw on to it in the position I thought it should be, before winding the whole unit into the door trying not to cross thread the mount in the brass door fitting.
This proved to be more than frustrating because, as expected, the mirror ended up in the wrong position. Several attempts and a twisted wiring loom later, I got it right.
I measured the tread on the cast "Mazak" zinc alloy mount and found it to be well undersize, which is probably why it was pulled out of the door.
Engineering being my trade for the last 40 years, I decided to make new ones but with a difference.
First thing was to make the thread the correct size and secondly to make the mount longer so that the screw was easily accessible, enabling the mount to be fitted and tightened to the door securely before fitting and easily adjusting the mirror body.

Measuring the door my first attempt was 20mm longer. While this made the mirror very easy to fit I felt that this was a little excessive so the next pair I made 15mm long. This still gives easy access to the screw but doesn't look obviously different.
In fact when I've asked fellow owners if they could spot anything different about the car, specifically the doors, nobody immediately spotted them. Only when they saw the neoprene rubber I had used to fill in the gap between the mount and the door did they get a clue but still did not see what I had done.
When I came to screw in the new improved version into my Griff's doors, they wouldn't fit! Upon closer inspection I realised that the threads in the brass bushes in the door were part filled with paint possible thread lock and general, now how shall I put this? Detritus!!
I looked into buying the appropriate M24 x 1.5 tap to clear the thread and decided that as I needed it there and then and it was also little expensive for a one off use, I would spend ten minutes picking out the offending crud from the treads to allow me to fit the new mounts.
I've since made a mild steel thread clearing tool to clean out any residual crud from the door fitting without damaging the brass thread.

My attention then turned to tightening the mounts securely into the door and seeing that the original mount had six radial slots cast into the top, I drilled four 3.5mm holes in my mounts at the same Pitch Circle Diameter as the Citroen part.
This then needed a pin tool to screw them in, so I made one with two 3mm pins protruding from one side and a hexagonal hole the other so that this will not only drive in the new mount but can also be used to remove the old one should this be stuck in the door.
Since I've been able tighten the mount firmly into the door and attach the mirror securely to the mount the view from them has improved as the vibration I used to get in the mirrors has been greatly reduced.
Another bonus is that I can now fold the mirror in closer to the door or fold it out and clean/polish behind it.
Talking to other owners it became clear that it was something they would be interested in.
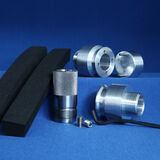
So, I've come up with a kit of parts consisting of two new longer mounts, two new stainless steel grub screws, a thread cleaning tool, a pin tool, a modified Allen key and a couple of strips of neoprene foam rubber to wrap around the mounts and fill the void in the recess. I had enough material to make eight sets.
I would be keen to know what people here think and if i got enough interest I can make more.
please let me know.
This I discovered when somebody hit my passenger side mirror and wrenched it out of the door. Thankfully the only damage was some light scratches where the mirror swung on the wires.
Separating the threaded door mounting piece from the mirror, I screwed it back into the door but was unable to tighten it sufficiently without a specific tool and then when the mount was in, I was not able to get to the grub screw to set the mirror correctly, even with an extremely cut down hex "Allen" key.
I found that I had to insert the mount into the mirror and tighten the screw on to it in the position I thought it should be, before winding the whole unit into the door trying not to cross thread the mount in the brass door fitting.
This proved to be more than frustrating because, as expected, the mirror ended up in the wrong position. Several attempts and a twisted wiring loom later, I got it right.
I measured the tread on the cast "Mazak" zinc alloy mount and found it to be well undersize, which is probably why it was pulled out of the door.
Engineering being my trade for the last 40 years, I decided to make new ones but with a difference.
First thing was to make the thread the correct size and secondly to make the mount longer so that the screw was easily accessible, enabling the mount to be fitted and tightened to the door securely before fitting and easily adjusting the mirror body.
Measuring the door my first attempt was 20mm longer. While this made the mirror very easy to fit I felt that this was a little excessive so the next pair I made 15mm long. This still gives easy access to the screw but doesn't look obviously different.
In fact when I've asked fellow owners if they could spot anything different about the car, specifically the doors, nobody immediately spotted them. Only when they saw the neoprene rubber I had used to fill in the gap between the mount and the door did they get a clue but still did not see what I had done.
When I came to screw in the new improved version into my Griff's doors, they wouldn't fit! Upon closer inspection I realised that the threads in the brass bushes in the door were part filled with paint possible thread lock and general, now how shall I put this? Detritus!!
I looked into buying the appropriate M24 x 1.5 tap to clear the thread and decided that as I needed it there and then and it was also little expensive for a one off use, I would spend ten minutes picking out the offending crud from the treads to allow me to fit the new mounts.
I've since made a mild steel thread clearing tool to clean out any residual crud from the door fitting without damaging the brass thread.
My attention then turned to tightening the mounts securely into the door and seeing that the original mount had six radial slots cast into the top, I drilled four 3.5mm holes in my mounts at the same Pitch Circle Diameter as the Citroen part.
This then needed a pin tool to screw them in, so I made one with two 3mm pins protruding from one side and a hexagonal hole the other so that this will not only drive in the new mount but can also be used to remove the old one should this be stuck in the door.
Since I've been able tighten the mount firmly into the door and attach the mirror securely to the mount the view from them has improved as the vibration I used to get in the mirrors has been greatly reduced.
Another bonus is that I can now fold the mirror in closer to the door or fold it out and clean/polish behind it.
Talking to other owners it became clear that it was something they would be interested in.
So, I've come up with a kit of parts consisting of two new longer mounts, two new stainless steel grub screws, a thread cleaning tool, a pin tool, a modified Allen key and a couple of strips of neoprene foam rubber to wrap around the mounts and fill the void in the recess. I had enough material to make eight sets.
I would be keen to know what people here think and if i got enough interest I can make more.
please let me know.
Edited by Griffo400 on Saturday 11th February 18:19
Well thank you for all your comments and interest. This is very encouraging and it looks like I'll have to go and buy more material, screws and keys.
Portzi, it's good to hear your comments, you obviously appreciate that this is not a quick "just knock a couple of these up for me in your teabreak mate" type of job. I'll bet you've had a few of those!!!
Thankfully, having spent my early career on manual lathes, Colchester's Harrison's etc then Ward and Herbert manual capstan lathes, I progressed onto these new fangled CNC machines. This means I can make them somewhat quicker.
So I'm going to offer them at an all in price of £50 including p&p.
Please P/M me your order and postal address and I'll let you know my bank details or you can send me a cheque if you wish, sorry, I don't take luncheon vouchers :-))
As I said in the description I've only got eight sets that I can send out straight away for those that might need them immediately.
So if you're not in any rush for a set and can wait, It will take me about four to six weeks to make some more, as I've got to buy some more aluminium and steel then fit them in on the machine when It's clear and I've a free weekend or two.
I'll thank you for your patience in advance.
I intend to be at BHP, the Growl and other events this year and I'll make sure I bring some along with me. You might also catch me at the Herts Beds and Bucks meet at Old Warden.
Once again thanks for your comments.
Brian.
Edited by Griffo400 on Tuesday 17th April 17:37
Edited by Griffo400 on Tuesday 17th April 17:38
Edited by Griffo400 on Wednesday 8th August 09:46
bomb said:
Does a purchase of £40 come with ALL of this ?? 
.....a kit of parts consisting of two new longer mounts, two new stainless steel grub screws, a thread cleaning tool, a pin tool, a modified Allen key and a couple of strips of neoprene foam rubber to wrap around the mounts and fill the void in the recess.
Yes bomb, .....a kit of parts consisting of two new longer mounts, two new stainless steel grub screws, a thread cleaning tool, a pin tool, a modified Allen key and a couple of strips of neoprene foam rubber to wrap around the mounts and fill the void in the recess.
I could have applied the TVR Tax like the big boys do but to be fair I havent the overheads that they do. I just think it's a fair price for my time and effort and I hope it something lots of people will want.
But if you want to pay me more I won't refuse........
Discopotatoes said:
You can disconnect the motor and mirror connections at the mirror end, they are tiny so no problem pokeing them through
The only other way is to cut the wires either inside the door or pull as much through as you can and don't let it slip while you working on it. Then use some form of connector to reconnect them. Mine has Bullet connectors which I think is the norm'.The original won't even go through the hole in the threaded part of the door.
I'm looking into a 5 way Plug/Socket from CPC Farnell that is small enough (18mm dia) to go through my new mount. Its waterproof but I'm not sure if it will handle the amps that the mirrors draw. Does anybody know what power these mirrors use.
I'll look out the info on the plugs and post it Monday and if any one who is working on their mirrors now wants to get a set, or I'll order and supply them at cost, for you to try them.
Its just something else to make this mirror arrangement more user friendly.
PeteGriff said:
I can vouch for the superb quality of these items as I was one of the first to have a set. Brian discussed this with me ages ago and I told him to go with it. I really liked the thread clearing tool. Buy the kit with confidence, its precision stuff. Brian has also developed other turned stuff also, ask him to PM you with details! All the best, Pete
Thank you for your commendation Pete, shall I send the cheque to the usual address ?? 
Hi All.
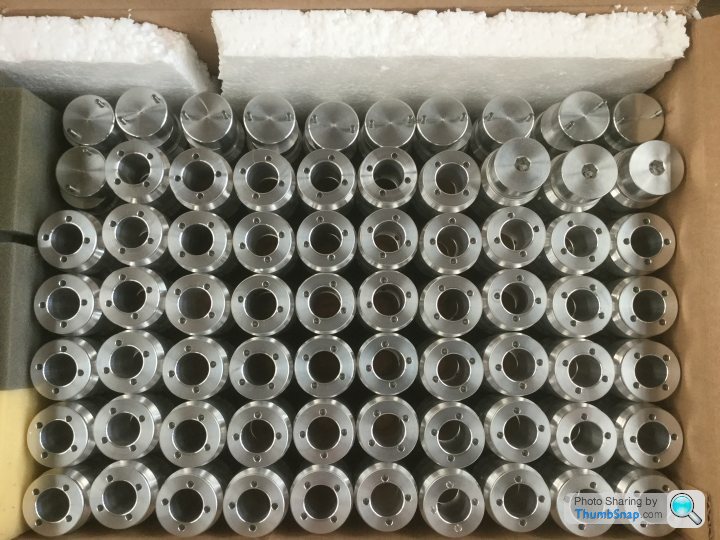
As it's been four weeks since I started this thread, I thought I would let those of you that are waiting for the next batch know that it's well underway.
I have completed the Mirror Mounts and the pin tools and should have the thread tool finished soon.
Then all I need is some more "Allen" hex keys and grub screws.
So just to keep you on the edge of your seat and to satisfy Oldred V8S's need for questionable photography!! I thought I would include this image. Enjoy!!

ChimpOnGas said:
Payment sent Brian and I've emailed you with my address.
We only live 30 miles apart so please feel free to save the postage and drop them off in Rickmansworth if you're over this way soon?
A couple of questions if I may.
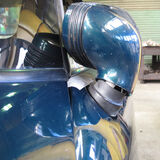
1. Does the mirror sit higher than the original position?
Just curious, but if the mirrors sit higher it could actually offer a rear visibility advantage as the standard position is quite low.
2. Did you have any luck finding a 5 way Plug/Socket?
Last time I fixed my mirrors I went with bullet connectors but I'd like to make a neater job of it this time.
Many thanks for creating such an excellent kit, Dave
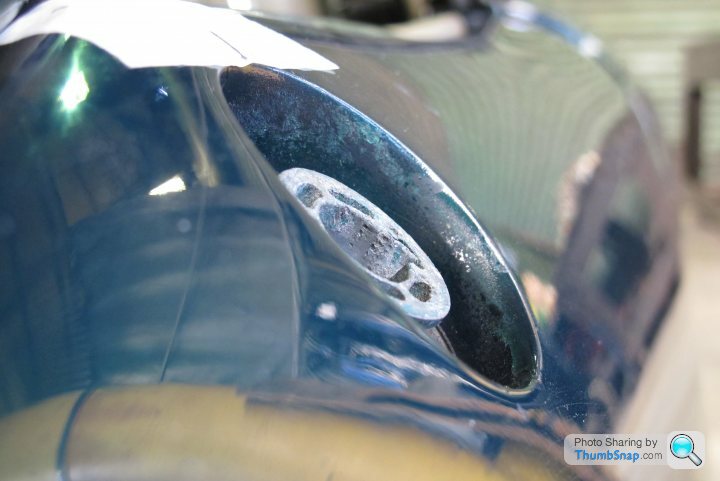
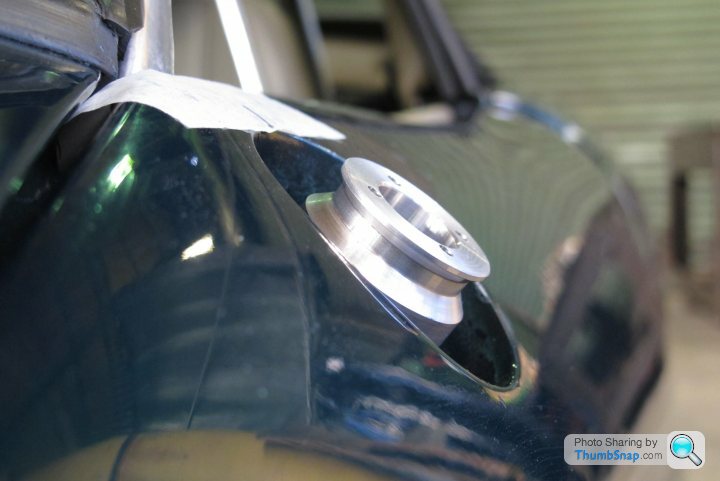
Re the height, here is a before and after shot.We only live 30 miles apart so please feel free to save the postage and drop them off in Rickmansworth if you're over this way soon?
A couple of questions if I may.
1. Does the mirror sit higher than the original position?
Just curious, but if the mirrors sit higher it could actually offer a rear visibility advantage as the standard position is quite low.
2. Did you have any luck finding a 5 way Plug/Socket?
Last time I fixed my mirrors I went with bullet connectors but I'd like to make a neater job of it this time.
Many thanks for creating such an excellent kit, Dave
The plug/socket I have bought myself cost £34 for both doors, they are well overspec'd but I think will work well.
To be honest, I've been more concerned with completing these orders than finding cheaper plugs but now the initial rush is over I will look into them again. So watch this space......
Oldred_V8S said:
The mirrors have been on all sorts of cars; the title of this subject says "Citroen" but I prefer to think of them as Aston Martin or Jaguar XJ220, both marques having used them too . I am sure none of the many companies that have fitted them have been stupid enough to mount them in a recess so that access to the fastening grub screw is nigh on impossible to adjust.
Brian should be nominated for man of the year for this little venture.
Thanks for all the comment guys. You may find this little snippet of interest.. I am sure none of the many companies that have fitted them have been stupid enough to mount them in a recess so that access to the fastening grub screw is nigh on impossible to adjust. Brian should be nominated for man of the year for this little venture.
http://definitelymotoring.blogspot.co.uk/2015/02/l...
And don't forget that Marcos used them too.
lancepar said:
On the subject of the door mirrors, can I ask why they were recessed in the first place? Were they recessed on the donor car?
The doors of my rebuild have had the brass mount and surrounded GRP removed leaving just a circular hole because the OE mirrors were broken and the PO was going to fit some other mirrors.
I have the original mirrors but have not examined them yet. If they are repairable and I can find or get some mounts, my thought would be to glass them in flush or just below the outer door surface. This would mean the mirrors would protrude further out but maybe the grub screw would be accessible.
What you think?
BTW, Tidy product Brian


With any luck the PO cut them out as one and all the bits are still attached to the mirror.
I found this "how too" description on a Marcos site very helpful......
http://marcossportscarenthusiasts.yuku.com/topic/5...
The Marcos is the total opposite to our cars as they put the mirror on a stalk!!!
simonwedge said:
Mine arrived as well today - totally agree with the above.
I take it the method of removing the mirrors is brute force and ignorance? Also, just want to check they both unscrew conventionally i.e. neither of them is right-hand threaded?
Simon, yes it takes a firm grip and steady pressure to unscrew the mirror and mount as one. Maybe apply some easing-penetrating oil a day or two before you try to undo them.I take it the method of removing the mirrors is brute force and ignorance? Also, just want to check they both unscrew conventionally i.e. neither of them is right-hand threaded?
I'll correct you with regard the thread.
They ARE right hand threaded not left, so as you stand looking down at the mirror you will need to turn them anti-clockwise.
That's for both sides.
Hope this all helps.
Brian.G
Fozzie73 said:
I agree fully with all the positive comments - really nicely made stuff. Top job Brian - thanks again.
I fitted my drivers side mirror today and have a question for those of you more electrically savvy than me (so pretty much anyone )
)
The mirror has clearly been floppy for a which as lots of marks where the grub screw has been tightened - and none of the wires were connected (cut and taped off). Whilst I'm not worried about a non-electric mirror will thus be OK? Wires are just individually taped up, would value any input.
Mirror now works a treat though!
Hi Fozzie.I fitted my drivers side mirror today and have a question for those of you more electrically savvy than me (so pretty much anyone
)The mirror has clearly been floppy for a which as lots of marks where the grub screw has been tightened - and none of the wires were connected (cut and taped off). Whilst I'm not worried about a non-electric mirror will thus be OK? Wires are just individually taped up, would value any input.
Mirror now works a treat though!
The wires from the mirror will obviously be dead but it's the wires that have been cut off and are now possibly floating around loose in the door that I would want to find.
If they have been taped up, no problem, if they haven't there is a risk that the wires to the heated mirror may short but unlikely.
I believe that the mirrors are heated permanently BUT there are differing stories about this and as my mirrors, like yours, have been cut I haven't really bothered to investigate this....has anyone????
For peace of mind I would remove the door speaker and with the window raised, fish around and try to find the loose end, it's probably still connected to the loom. If it's like my May 92 Griff the 5 way connector on the loom will be black and the mating part that should be wired to the mirror will be white.
I have removed the loom from my drivers door as there may have been a short to the ciggy lighter or it was overloaded as the wire had melted all the way back to the A post connector
along with the earth wire. Hence I know what the damn thing looks like as it's nailed to a board at the moment
I am near to finding an alternative connector for the mirrors, one that will fit through the mount so it can be pulled through and disconnected without taking the door card off.....just depends on the price. Watch this space.
Brian.
I intend to be at the Burghley meet this weekend so hope to see some of you there for a chat maybe.
I'll be bringing along some mounting kits (obviously) should anyone want to have look at them before they make their mind up and also some other bits and bobs for yo-all to peruse.
I will also take this opportunity to say thank you everyone for your kind comments about my work. It's not often us lowly machinists get a pat on the back so thanks very much.
Brian G.
Springbank said:
Great thread. I'm just in the process of taking off my wobbly drivers door mirror and yes everyone is correct it is a bugger getting to the infamous grub screw. Your solution looks great. I would like to order one if possible? What is the process of ordering? Cheers.
Pm sent.Springbank said:
I'm trying to remove the mirror pivot from the threaded boss - can anyone confirm if you remove it clockwise or anti-clockwise? Also what has anyone used to take it off? Difficult to get anything on it with enough purchase to move it! Thanks in anticipation.
All the threads are standard right hand springbank, so to undo this rotate it anti-clockwise.Wait till you get my kit and use the Pin tool to remove it. I've designed it to fit the original part.
Gassing Station | Griffith | Top of Page | What's New | My Stuff