Range Rover CSK
Discussion


This is a little late to post a project thread really as the car is pretty much completed but I will be doing further updates as I do further modification and changes. Thing are going to break at some point, it is a Range Rover, so I will post about fixing them.
I decided a while ago that I wanted a Range Rover again, after my 1991 classic met a less than dignified end on a country lane 3 years ago.
I'd been looking at Softdash classics and P38 models but I had also spotted a CSK on ebay, No.64. I'd always fancied a slightly more modern take on the 2 door but never considered that a CSK could be obtainable until now. I placed a bid, and for a long time was the highest bidder, but was outbid in the last few moments.
To be honest I was a little gutted about this, I now had my heart set on a CSK but figured the chance of finding two for sale in the space of time I was looking at would be unlikely. I joined the CSK forum and had a look about, noticed a post hiding away in the CSK-Exchange section advertising the sale of CSK 120. I jumped at this opportunity and started correspondence with the current owner through messages and email. I passed on my phone number and waited to hear from him, we had originally arranged to talk that afternoon. By 2pm I'd all but given up on this and was just loading the Series 3 for a trip into the hills when my phone rang!
The car was in Sussex (I live in Derbyshire) but David, the current owner, was willing to sell ASAP and I decided that there was no time like the present. A quick call to my brother and insurance and the transport was on the way and the CSK insured in my name!
We made good progress down the country and as we pushed around the M25 it began to get dark. It was about this time the "sensible voice" that had been dormant until now decided to pipe up. I hadn't seen any photos of this CSK, I didn't even know if there was a CSK or just an advert and here I was driving half way down the country in the dark on a Saturday night.
Finally we started to get close, the A road became a single track lane, which turned into a dirt track. We pulled onto the drive and there she was, a CSK!
Money exchanged, spare wheels were loaded into the back and coffee was provided! David and his wife turned out to be very decent folk. We then set off back up the motorway to Derbyshire. Considering I'd just bought this CSK unseen it drove OK, the clutch was more than a little ropey it seemed to miss at high revs and the ABS light was on, but it went quite well and got us home without issue.
So, if you've read this far then you're probably wondering when I'm going to mention the car itself.
CSK no.120 is a manual. It's had a new headlining, new bumpers and has been treated to a full S/S sports exhaust. It's rotten in all the usual places and is going to be subject to a total rebuild, which I will document here.
For those that don't know what the CSK is, allow me...
to mark the 20th anniversary of the Range Rover, Land Rover decided to build a run of 200 "special" 2 door models (2 door production had stopped about 4 years beforehand). These were all fitted with a full set of perforated leather seats in beige, matching leather door and cheek cards and beige carpets. The suspension was uprated with large ARB's front and rear.
They fitted the 3.9 EFi Rover V8 and an upgraded ECU, chrome bumpers and extra spot lamps on the bumper.
In essence is was a "GTi" version of the top of the range Vogue SE model in a 2 door body shell.
more info here http://www.rangerovercsk.com/technical.html
A few photos for you;


Whilst this may look OK from the outside I knew it was hiding some pretty epic rust, put it up on the ramps to have a look and found the following;
Front wings and mounts shot
A posts shot
Footwells shot
Inner and outer sills shot
Front body mounts gone
Boot floor shot
Rear x-member shot
That was expected, so a strip down began.
I decided a while ago that I wanted a Range Rover again, after my 1991 classic met a less than dignified end on a country lane 3 years ago.
I'd been looking at Softdash classics and P38 models but I had also spotted a CSK on ebay, No.64. I'd always fancied a slightly more modern take on the 2 door but never considered that a CSK could be obtainable until now. I placed a bid, and for a long time was the highest bidder, but was outbid in the last few moments.
To be honest I was a little gutted about this, I now had my heart set on a CSK but figured the chance of finding two for sale in the space of time I was looking at would be unlikely. I joined the CSK forum and had a look about, noticed a post hiding away in the CSK-Exchange section advertising the sale of CSK 120. I jumped at this opportunity and started correspondence with the current owner through messages and email. I passed on my phone number and waited to hear from him, we had originally arranged to talk that afternoon. By 2pm I'd all but given up on this and was just loading the Series 3 for a trip into the hills when my phone rang!
The car was in Sussex (I live in Derbyshire) but David, the current owner, was willing to sell ASAP and I decided that there was no time like the present. A quick call to my brother and insurance and the transport was on the way and the CSK insured in my name!
We made good progress down the country and as we pushed around the M25 it began to get dark. It was about this time the "sensible voice" that had been dormant until now decided to pipe up. I hadn't seen any photos of this CSK, I didn't even know if there was a CSK or just an advert and here I was driving half way down the country in the dark on a Saturday night.
Finally we started to get close, the A road became a single track lane, which turned into a dirt track. We pulled onto the drive and there she was, a CSK!
Money exchanged, spare wheels were loaded into the back and coffee was provided! David and his wife turned out to be very decent folk. We then set off back up the motorway to Derbyshire. Considering I'd just bought this CSK unseen it drove OK, the clutch was more than a little ropey it seemed to miss at high revs and the ABS light was on, but it went quite well and got us home without issue.
So, if you've read this far then you're probably wondering when I'm going to mention the car itself.
CSK no.120 is a manual. It's had a new headlining, new bumpers and has been treated to a full S/S sports exhaust. It's rotten in all the usual places and is going to be subject to a total rebuild, which I will document here.
For those that don't know what the CSK is, allow me...
to mark the 20th anniversary of the Range Rover, Land Rover decided to build a run of 200 "special" 2 door models (2 door production had stopped about 4 years beforehand). These were all fitted with a full set of perforated leather seats in beige, matching leather door and cheek cards and beige carpets. The suspension was uprated with large ARB's front and rear.
They fitted the 3.9 EFi Rover V8 and an upgraded ECU, chrome bumpers and extra spot lamps on the bumper.
In essence is was a "GTi" version of the top of the range Vogue SE model in a 2 door body shell.
more info here http://www.rangerovercsk.com/technical.html
A few photos for you;
Whilst this may look OK from the outside I knew it was hiding some pretty epic rust, put it up on the ramps to have a look and found the following;
Front wings and mounts shot
A posts shot
Footwells shot
Inner and outer sills shot
Front body mounts gone
Boot floor shot
Rear x-member shot
That was expected, so a strip down began.
Started to strip the car apart, only to uncover more lovely rust;

I'm sure there should be a B-post here


N/S rear wing removed
rear bumper removed
headlining removed - this seems to be a GRP replacement but will need recovering as it's starting to come free in a few places
All ECUs removed
Tailgates removed
Rear windows removed
C-pillar trim removed
bottom of dash and TX tunnel sound proofing removed
gear stick and gaitors removed


Removed all the body mounts, radiator and various bits from the inner wings, disconnecting various wiring and cutting through flexible hoses till we got to the stage where we could do this;


Fuel tank is aluminium, I would guess the capacity is lower than the steel or plastic equivalent but since I'm fitting LPG this is no biggie to me, might help keep the weight down!
cleaning and painting the front axle and a few other bits and fitting polybushes to the parts that required them.

Front and rear axles were stripped, rebuilt, cleaned and painted. The remaining suspension parts were cleaned off and the axles were slowly assembled and mounted on the chassis.


I fitted the old front and rear hubs back on, some of the bits I ordered hadn't turned up (namely the S/S pistons for the brakes).
I then put some new rubbers onto the only 4 body mounts that hadn't rotted off entirely and dropped the body back onto the refreshed chassis.

stripped the rest of the stuff from the front wings and then cut one off
front headlamp sections were welded together;


Front wings removed, holes uncovered and cleaned up and patched. Body mounts were fabricated and welded on


Headlamp sections were bolted down, bonnet slam panel is bolted in position for the moment (I could leave this bolted or I can weld it back, currently undecided). One of the completed inner wings was offered into place and trimmed to fit before being welded in place;


I'm sure there should be a B-post here
N/S rear wing removed
rear bumper removed
headlining removed - this seems to be a GRP replacement but will need recovering as it's starting to come free in a few places
All ECUs removed
Tailgates removed
Rear windows removed
C-pillar trim removed
bottom of dash and TX tunnel sound proofing removed
gear stick and gaitors removed
Removed all the body mounts, radiator and various bits from the inner wings, disconnecting various wiring and cutting through flexible hoses till we got to the stage where we could do this;
Fuel tank is aluminium, I would guess the capacity is lower than the steel or plastic equivalent but since I'm fitting LPG this is no biggie to me, might help keep the weight down!
cleaning and painting the front axle and a few other bits and fitting polybushes to the parts that required them.
Front and rear axles were stripped, rebuilt, cleaned and painted. The remaining suspension parts were cleaned off and the axles were slowly assembled and mounted on the chassis.
I fitted the old front and rear hubs back on, some of the bits I ordered hadn't turned up (namely the S/S pistons for the brakes).
I then put some new rubbers onto the only 4 body mounts that hadn't rotted off entirely and dropped the body back onto the refreshed chassis.
stripped the rest of the stuff from the front wings and then cut one off
front headlamp sections were welded together;
Front wings removed, holes uncovered and cleaned up and patched. Body mounts were fabricated and welded on
Headlamp sections were bolted down, bonnet slam panel is bolted in position for the moment (I could leave this bolted or I can weld it back, currently undecided). One of the completed inner wings was offered into place and trimmed to fit before being welded in place;
Front wings were finished off and roughly painted in whatever I had laying about to keep the rain off them;


These are going to need sanding back before getting a proper coat of paint but the idea was to get a coat of something on them rather than to make them pretty
Attention then turned to what was left of the O/S sill section. The remaining metal work was removed at the sacrifice of several cutting discs and the new sections trial fitted;


These were then welded together in what I hope is the right shape and offered back up to the car, the floor was cut back till all the rot was gone. This was fairly easy to fit as both the A post and B post were pretty far gone so were removed with the sill allowing me to slide it into place and bolt it back down onto new mountings before being welded into place.
I had a 2-door repair panel for the A post so that eased the rebuild slightly but the B-post was a little more difficult, I had purchased some B-post repair panels but they were very wrong. Armed with some cardboard and a pencil I constructed something that I hope is correct;
purchased B-post repair;

what I hope it's supposed to look like;

the whole lot was dressed back with a sanding disk and grinder before being covered in red-oxide;


Attention was then turned to the sill on the other side, while the B-post on this side was mostly still there the A post had vanished further up the bulkhead so reconstruction was going to be a PITA. The supplied A-post panels only provided the outer-skin and not the internal hinge mounts, tubes etc.
Sill was ripped out and damage surveyed;

Replacement sill was welded up and wrestled into place, B post welded on and A-post repairs were started. The parts of the footwell that could be repaired were done so, once all the rot has been removed from the top the body is coming back off and being turned onto it's side so welding repairs can be completed underneath and it can all be cleaned up.
once again the whole lot was covered in red-oxide;


Moving back from the B posts it was time to look at the side panels, wheel arches, rear X-member and rear floor.
Before I started they looked like this;


I was unable to find the repair sections for the back end so set about cutting out the rot and letting new metal in. The replacement steel is a lot thicker so should add some more strength. It's not the prettiest looking job but at the end of the day it's hidden. The panels I got from YRM were cut and shaped. I had to fashion a flange for the end closest to the tailgate in the style of the old floor.


The new rear X member means that every body mounting is now new
The Discovery rear floor is shorter than the Range Rover one, I could have bought an ally one but am fairly sure I can make this fit with the addition of some strapping across the rear of the floor. I got 4x crossmembers with the new floor but am convinced I only need 3, the two angled ones that sit on the chassis stand-offs and one more towards the back, the Disco ones seem to have bolts welded to them though?

Anyway, here's the floor rested in place so you get an idea of how it all looks

These are going to need sanding back before getting a proper coat of paint but the idea was to get a coat of something on them rather than to make them pretty
Attention then turned to what was left of the O/S sill section. The remaining metal work was removed at the sacrifice of several cutting discs and the new sections trial fitted;
These were then welded together in what I hope is the right shape and offered back up to the car, the floor was cut back till all the rot was gone. This was fairly easy to fit as both the A post and B post were pretty far gone so were removed with the sill allowing me to slide it into place and bolt it back down onto new mountings before being welded into place.
I had a 2-door repair panel for the A post so that eased the rebuild slightly but the B-post was a little more difficult, I had purchased some B-post repair panels but they were very wrong. Armed with some cardboard and a pencil I constructed something that I hope is correct;
purchased B-post repair;
what I hope it's supposed to look like;
the whole lot was dressed back with a sanding disk and grinder before being covered in red-oxide;
Attention was then turned to the sill on the other side, while the B-post on this side was mostly still there the A post had vanished further up the bulkhead so reconstruction was going to be a PITA. The supplied A-post panels only provided the outer-skin and not the internal hinge mounts, tubes etc.
Sill was ripped out and damage surveyed;
Replacement sill was welded up and wrestled into place, B post welded on and A-post repairs were started. The parts of the footwell that could be repaired were done so, once all the rot has been removed from the top the body is coming back off and being turned onto it's side so welding repairs can be completed underneath and it can all be cleaned up.
once again the whole lot was covered in red-oxide;
Moving back from the B posts it was time to look at the side panels, wheel arches, rear X-member and rear floor.
Before I started they looked like this;
I was unable to find the repair sections for the back end so set about cutting out the rot and letting new metal in. The replacement steel is a lot thicker so should add some more strength. It's not the prettiest looking job but at the end of the day it's hidden. The panels I got from YRM were cut and shaped. I had to fashion a flange for the end closest to the tailgate in the style of the old floor.
The new rear X member means that every body mounting is now new
The Discovery rear floor is shorter than the Range Rover one, I could have bought an ally one but am fairly sure I can make this fit with the addition of some strapping across the rear of the floor. I got 4x crossmembers with the new floor but am convinced I only need 3, the two angled ones that sit on the chassis stand-offs and one more towards the back, the Disco ones seem to have bolts welded to them though?
Anyway, here's the floor rested in place so you get an idea of how it all looks
Rear floor is in, underneath all tidied up / seam-sealed and undersealed.

Made a wheel-well for the spare

The finished the underseal;

Whilst I a wheel laying about from the wheel-well I thought I'd take a stupid photo;

Lasty the chassis has been built, good diff in the rear. Front ARB fitted. Hubs rebuilt and brake discs fitted. Also dropped the fuel tank in.

The engine was rebuilt with new shells/cam/followers/timing chain/seals/water pump/head gaskets (inc bolts) and pieced back together. Flywheel and spigot bush added. (I had ordered a spigot bush earlier in the week but, despite ordering a LOT of rover v8 parts the supplier decided to send a bush for a 200/300/TD5?!). A trip to paddocks sorted that out.

The gearbox (LT77S) was given a wash down and the new clutch components fitted. I drove the car about 150 miles before strip down and the gearbox itself was spot on so didn't feel the need to do anything with this, it's an easy thing to drop out if needs be at a later date. This was dropped in to the chassis and the engine followed suit.


Props/steering box/exhaust/fuel lines and then a heavy coat of waxoyl followed. Axle/t-box/g-box fluids were all refreshed and then the body was dropped back for what I hope to be the last time.

I attacked the back of the S/S exhaust with the make-shiney attachment in the drill, went from this;

to this;

Finished the welding on the windscreen surround and A-posts and put the tubes in for the door hinges;

replaced the hinges on the doors and hung them, they fit! I was a little worried after replacing the sills and the
A/B posts there would be issues, they fit like a glove though


the inner wings front and rear were painted with underseal to try and stave off madam rust, the whole lot is going to
be smothered in waxoyl once the painting has been completed too.

Brakes plumbed and wired, apart from the ABS Stop Light Switch. The dog knocked the pedal box over in the garage and snapped it off already ordered a new one from Land Rover. Tried a pattern part one years ago and it was useless.
Fitted the rest of the exhaust pipe, now all shiny


The clutch was plumbed with a new flexi and AP/Lockheed master cylinder.
A-posts were painted and the windscreen fitted.
Roof painted and fitted along with replacement rear wiper motor.
New heater resistor pack fitted.
Doors painted and fitted.
Bottom tailgate painted and fitted.
Top tailgate fitted loosely to keep weather out. I have a alluminium one and a genuine one, both could be made to very good condition with a little work but I'm undecided on which to fit. I'm probably going to fit the genuine one once I have made it work with central locking unless anyone can think of a good reason why not?
The rear of the car inside has been painted and the rear windows were fitted.


I also fitted the inlet manifold that came with the AG SGi LPG kit I bought, it wasn't till I'd torqued down the last bolt when the realisation that the inlet was for a multi-belt engine and not a serpentine as I fitted. That was a little annoying. I now need to find a tap and tapping drill for the LPG injectors, once I work out what the thread actually is.
Made a wheel-well for the spare
The finished the underseal;
Whilst I a wheel laying about from the wheel-well I thought I'd take a stupid photo;
Lasty the chassis has been built, good diff in the rear. Front ARB fitted. Hubs rebuilt and brake discs fitted. Also dropped the fuel tank in.
The engine was rebuilt with new shells/cam/followers/timing chain/seals/water pump/head gaskets (inc bolts) and pieced back together. Flywheel and spigot bush added. (I had ordered a spigot bush earlier in the week but, despite ordering a LOT of rover v8 parts the supplier decided to send a bush for a 200/300/TD5?!). A trip to paddocks sorted that out.
The gearbox (LT77S) was given a wash down and the new clutch components fitted. I drove the car about 150 miles before strip down and the gearbox itself was spot on so didn't feel the need to do anything with this, it's an easy thing to drop out if needs be at a later date. This was dropped in to the chassis and the engine followed suit.
Props/steering box/exhaust/fuel lines and then a heavy coat of waxoyl followed. Axle/t-box/g-box fluids were all refreshed and then the body was dropped back for what I hope to be the last time.
I attacked the back of the S/S exhaust with the make-shiney attachment in the drill, went from this;
to this;
Finished the welding on the windscreen surround and A-posts and put the tubes in for the door hinges;
replaced the hinges on the doors and hung them, they fit! I was a little worried after replacing the sills and the
A/B posts there would be issues, they fit like a glove though
the inner wings front and rear were painted with underseal to try and stave off madam rust, the whole lot is going to
be smothered in waxoyl once the painting has been completed too.
Brakes plumbed and wired, apart from the ABS Stop Light Switch. The dog knocked the pedal box over in the garage and snapped it off already ordered a new one from Land Rover. Tried a pattern part one years ago and it was useless.
Fitted the rest of the exhaust pipe, now all shiny
The clutch was plumbed with a new flexi and AP/Lockheed master cylinder.
A-posts were painted and the windscreen fitted.
Roof painted and fitted along with replacement rear wiper motor.
New heater resistor pack fitted.
Doors painted and fitted.
Bottom tailgate painted and fitted.
Top tailgate fitted loosely to keep weather out. I have a alluminium one and a genuine one, both could be made to very good condition with a little work but I'm undecided on which to fit. I'm probably going to fit the genuine one once I have made it work with central locking unless anyone can think of a good reason why not?
The rear of the car inside has been painted and the rear windows were fitted.
I also fitted the inlet manifold that came with the AG SGi LPG kit I bought, it wasn't till I'd torqued down the last bolt when the realisation that the inlet was for a multi-belt engine and not a serpentine as I fitted. That was a little annoying. I now need to find a tap and tapping drill for the LPG injectors, once I work out what the thread actually is.
I've avoided buying new panels for the time being and tried to repair what I had. There aren't many "before" photos, I forgot :/
The rear wings were welded by a friend with a fancy TIG
The rear quarter panels had patches welded in and bashed back into shape.
Front wings were cleaned up and had glass-fibre matting put behind any hole to strengthen it
All sections had acid-etch sprayed on, copious amounts of filler thrown at them before a few layers of high-build. They were all then sprayed with the Beluga Black celly top coat.
The photos;


And finally

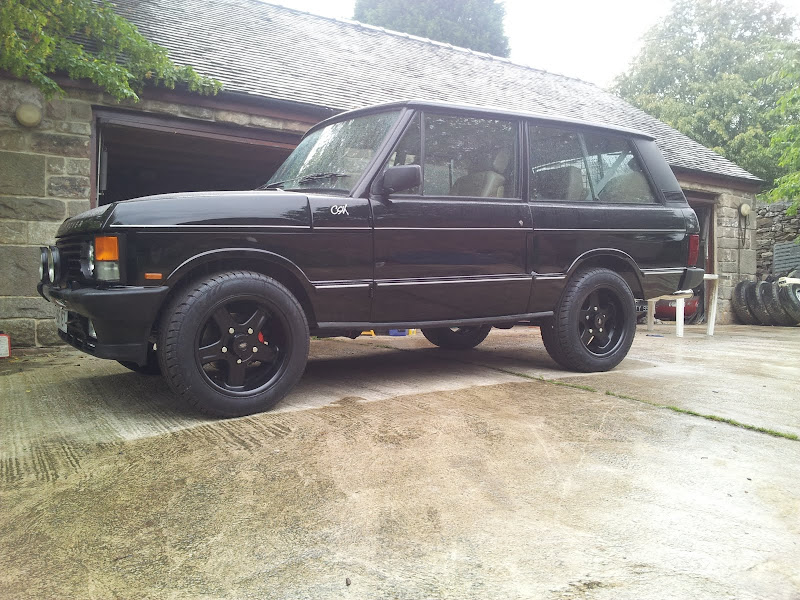
Also my new wheels arrived;

Fired the engine up, starts and runs fine. Bled the clutch this morning and drove it up and onto the ramps! Felt good to have her move under her own steam.
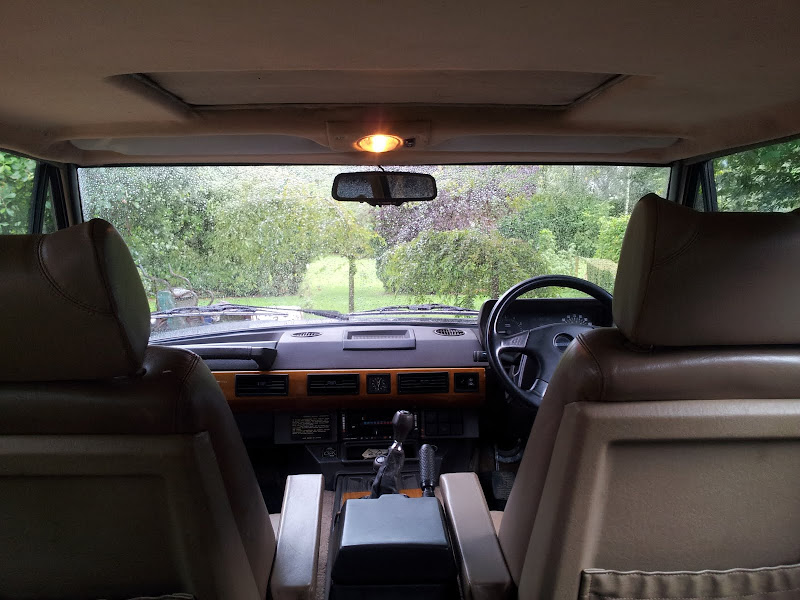
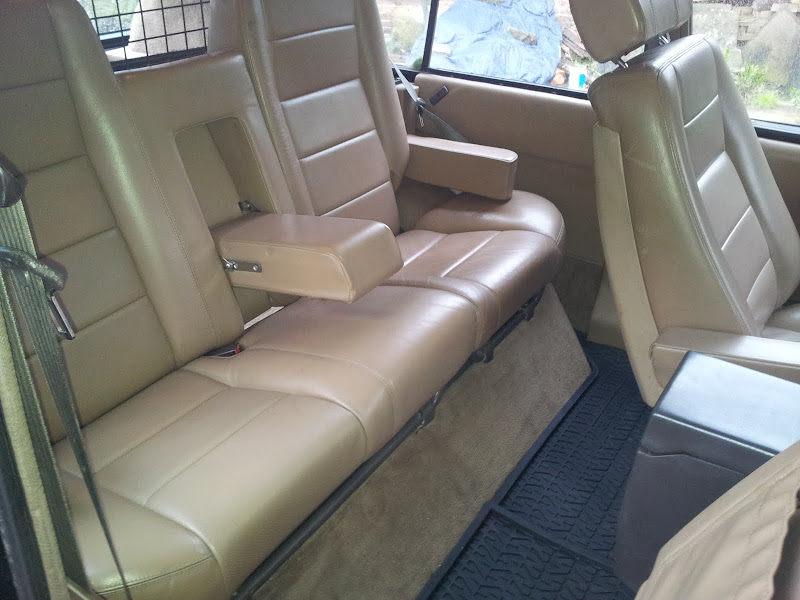
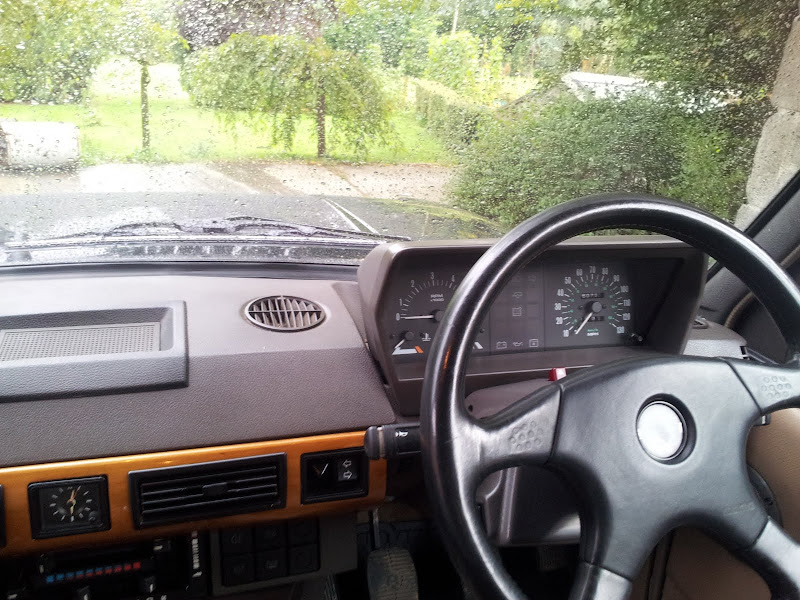
Fitted centre console, handbrake, rebuilt most of the dashboard and put in the drivers seat..
Bled the brakes, they're a PITA on these. Had to swap out the pressure pump as it seems the one I fitted was faulty :/
Side skirts are on and I've been creating the ties to keep the wings in place. Hope to finish off underneath tomorrow and get the new wheels fitted (looking forward to that bit).

bought some wood to remake the bottom doorcards and need to adjust the top ones so they sit flush on the doors properly. Whilst they're apart I'm going to fit speakers and do the rest of the audio kit.
Have also been bust cutting/polishing/waxing the panels. Started with the rear tailgate, I think it's come out ok...
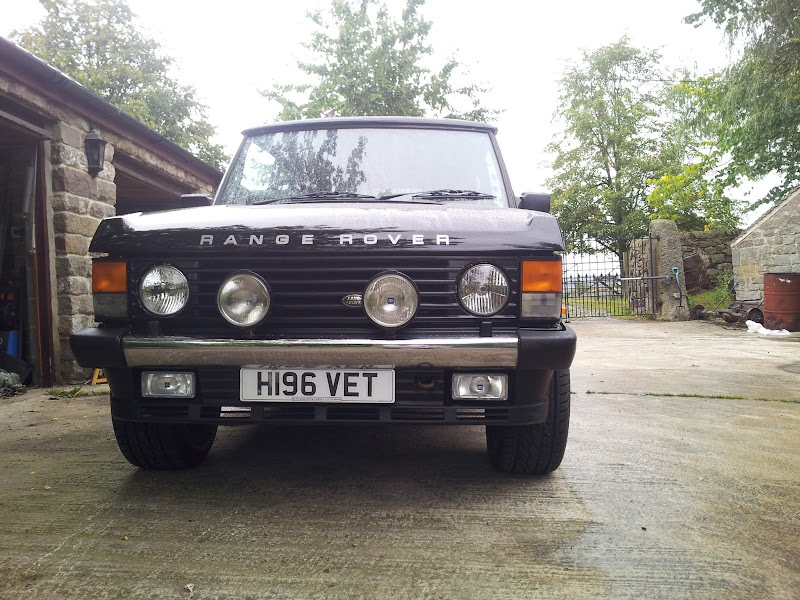
Also fitted the CSK and Range Rover decals, makes a big difference. Might have to get a set of mudflaps though.

MOT passed, road tax applied for. Finished the cutting and polishing and applied coach lines;

The inside is very nearly finished, just the audio gear left to fit really

I've been driving it about for a week now and whilst there seem to be a few teething issues it's a lot of fun
Hope this hasn't proved to be a fruitless post and someone enjoys reading it.
The rear wings were welded by a friend with a fancy TIG
The rear quarter panels had patches welded in and bashed back into shape.
Front wings were cleaned up and had glass-fibre matting put behind any hole to strengthen it
All sections had acid-etch sprayed on, copious amounts of filler thrown at them before a few layers of high-build. They were all then sprayed with the Beluga Black celly top coat.
The photos;
And finally
Also my new wheels arrived;
Fired the engine up, starts and runs fine. Bled the clutch this morning and drove it up and onto the ramps! Felt good to have her move under her own steam.
Fitted centre console, handbrake, rebuilt most of the dashboard and put in the drivers seat..
Bled the brakes, they're a PITA on these. Had to swap out the pressure pump as it seems the one I fitted was faulty :/
Side skirts are on and I've been creating the ties to keep the wings in place. Hope to finish off underneath tomorrow and get the new wheels fitted (looking forward to that bit).
bought some wood to remake the bottom doorcards and need to adjust the top ones so they sit flush on the doors properly. Whilst they're apart I'm going to fit speakers and do the rest of the audio kit.
Have also been bust cutting/polishing/waxing the panels. Started with the rear tailgate, I think it's come out ok...
Also fitted the CSK and Range Rover decals, makes a big difference. Might have to get a set of mudflaps though.
MOT passed, road tax applied for. Finished the cutting and polishing and applied coach lines;
The inside is very nearly finished, just the audio gear left to fit really
I've been driving it about for a week now and whilst there seem to be a few teething issues it's a lot of fun
Hope this hasn't proved to be a fruitless post and someone enjoys reading it.
Blimey - you made all that seem easy!?
I really must learn to weld, as if you can do that (And I should be able to, as my dad can and has the gear, Mig and Gas) then the worlds your oyster regards fixer-uppers.
Looks brilliant, I'd never heard of that model before.
Parked up next to a blinged up RRS with massive shiny wheels, this would look effortlessly cool.

 Well done that man!
Cheers for the kind words.
The wheels contribute to a better driving experience by providing a lower profile tyre and a better offset without the use of wheel spacers or hub adaptors, neither of which I am a fan of.
I still have the original CSK wheels which I will be cleaning up and putting tyres on to use on occasion.
The wheels contribute to a better driving experience by providing a lower profile tyre and a better offset without the use of wheel spacers or hub adaptors, neither of which I am a fan of.
I still have the original CSK wheels which I will be cleaning up and putting tyres on to use on occasion.
stuttgartmetal said:
A hideous question by all accounts, but how much does it owe you?
A good question, I haven't sat down and totted the whole thing up but as a rough figure probably around 5 or 6K.bob1179 said:
Absolutely fantastic job! How long in total did it take you to complete the work?
I would love a classic Range Rover but the potential rust frightens me! I just don't have the sort of skills required to carry out the sort of work you've done.
I would love to see more pictures!
I would say it took me around 700 hours of holiday and weekends, not including time spent searching for parts and countless evenings doing the odd bit after work.I would love a classic Range Rover but the potential rust frightens me! I just don't have the sort of skills required to carry out the sort of work you've done.
I would love to see more pictures!
I'll try and find more photos, finished ones or build pics?

Gassing Station | Readers' Cars | Top of Page | What's New | My Stuff